2008 MERCEDES-BENZ GLK SUV parking brake
[x] Cancel search: parking brakePage 108 of 261
submenu is only reset if the vehicle is sta-
tionary.
X Press the =or; button to select the
Settings menu.
X Press the :or9 button to select the
Factory setting submenu.
X Press the abutton to confirm.
The Reset all settings? message is
shown.
X Press the :or9 button to select
Yes orNo.
X Press the abutton to confirm the selec-
tion.
If you have selected Yes, the multi-function
display shows a confirmation message. Off-road driving
Overview of off-road driving systems
The systems which are relevant for off-road
driving are explained on the following pages:
R 4MATIC (permanent four-wheel drive), for
optimum traction
R DSR (Downhill Speed Regulation)* (vehi-
cles with Off-Road Pro engineering pack-
age*), which assists you when driving
downhill
R Off-road driving program* (vehicles with
Off-road Pro engineering package*), which
assists you when driving off-road
You will find further information about driving
off-road in the "Operation" section
(Y page 158). 4MATIC* (permanent four-wheel
drive)
4MATIC ensures that all four wheels are per-
manently driven. Together with ESP ®
and
ETS, it improves the traction of your vehicle
whenever a drive wheel spins due to insuffi-
cient grip. G
Risk of accident
4MATIC cannot reduce the risk of an accident
if you drive too fast.
If a drive wheel spins due to insufficient grip:
R only depress the accelerator pedal as far as
necessary when pulling away.
R accelerate less when driving.
R adapt your driving style to suit road and
traffic conditions.
i In wintry driving conditions, the maximum
effect of 4MATIC can only be achieved if
you use winter tyres (M+S tyres), with snow
chains if necessary.
! When testing the parking brake, operate
the vehicle only briefly (for a maximum of
ten seconds) on a brake test dynamometer.
When doing this, turn the key to position
0 or 1in the ignition. Failure to do this can
cause damage to the drive train or the
brake system.
! A function or performance test should
only be carried out on a twin-axle dyna-
mometer. If you wish to operate the vehicle
on such a dynamometer, please consult a
Mercedes-Benz Service Centre in advance.
You could otherwise damage the drive train
or the brake system. DSR (Downhill Speed Regulation)*
(vehicles with the off-road engineer-
ing package*)
You will find information about driving off-
road in the "Operation" section
(Y page 158).
DSR is an aid to assist you when driving down-
hill. It keeps the speed of travel at the speed
selected on the on-board computer. The
steeper the downhill gradient, the greater the
DSR braking effect on the vehicle. When driv-
ing on flat stretches of road or on an uphill Off-road driving
105Controls
* optional
X204_AKB; 1; 5, en-GB
wobuchh,
Version: 2.11.4 2008-10-15T13:20:56+02:00 - Seite 105 ZDateiname: 6515_0671_02_buchblock.pdf; preflight
Page 111 of 261
Driving systems
Overview of driving systems
The vehicle's driving systems are described
on the following pages:
R cruise control* and Speedtronic*, which
are used to control the speed of the vehicle
R Parktronic*, which assists you in parking
and manoeuvring
R reversing camera*, which assists you when
parking and manoeuvring
The ABS, BAS, adaptive brake lights, ESP ®
and EBV (electronic brake-power distribution)
driving safety systems are described in the
"Driving safety systems" section
(Y page 51). Cruise control*
Cruise control maintains a constant road
speed for you. It brakes automatically in order
to avoid exceeding the set speed. On long and
steep downhill gradients, especially if the
vehicle is laden or towing a trailer, you must
select shift range 1,2or3 in good time. By
doing so, you will make use of the braking
effect of the engine, which relieves the load
on the brake system and prevents the brakes
from overheating and wearing too quickly. G
Risk of accident
Do not change down for additional engine
braking on a slippery road surface. This could
cause the drive wheels to lose their grip and
the vehicle could skid.
Use cruise control only if road and traffic con-
ditions make it appropriate to maintain a
steady speed for a prolonged period. You can
store any road speed above 30 km/h. G
Risk of accident
Cruise control cannot take account of road
and traffic conditions. Always pay attention to traffic conditions
even when cruise control is activated.
Cruise control is only an aid designed to assist
driving. You are responsible for the vehicle's
speed and for braking in good time. G
Risk of accident
Do not use cruise control:
R in road and traffic conditions which do not
allow you to maintain a constant speed (e.g.
heavy traffic or winding roads). You could
otherwise cause an accident.
R on slippery roads. Braking or accelerating
could cause the drive wheels to lose trac-
tion and the vehicle could then skid.
R when there is poor visibility, e.g. due to fog,
heavy rain or snow
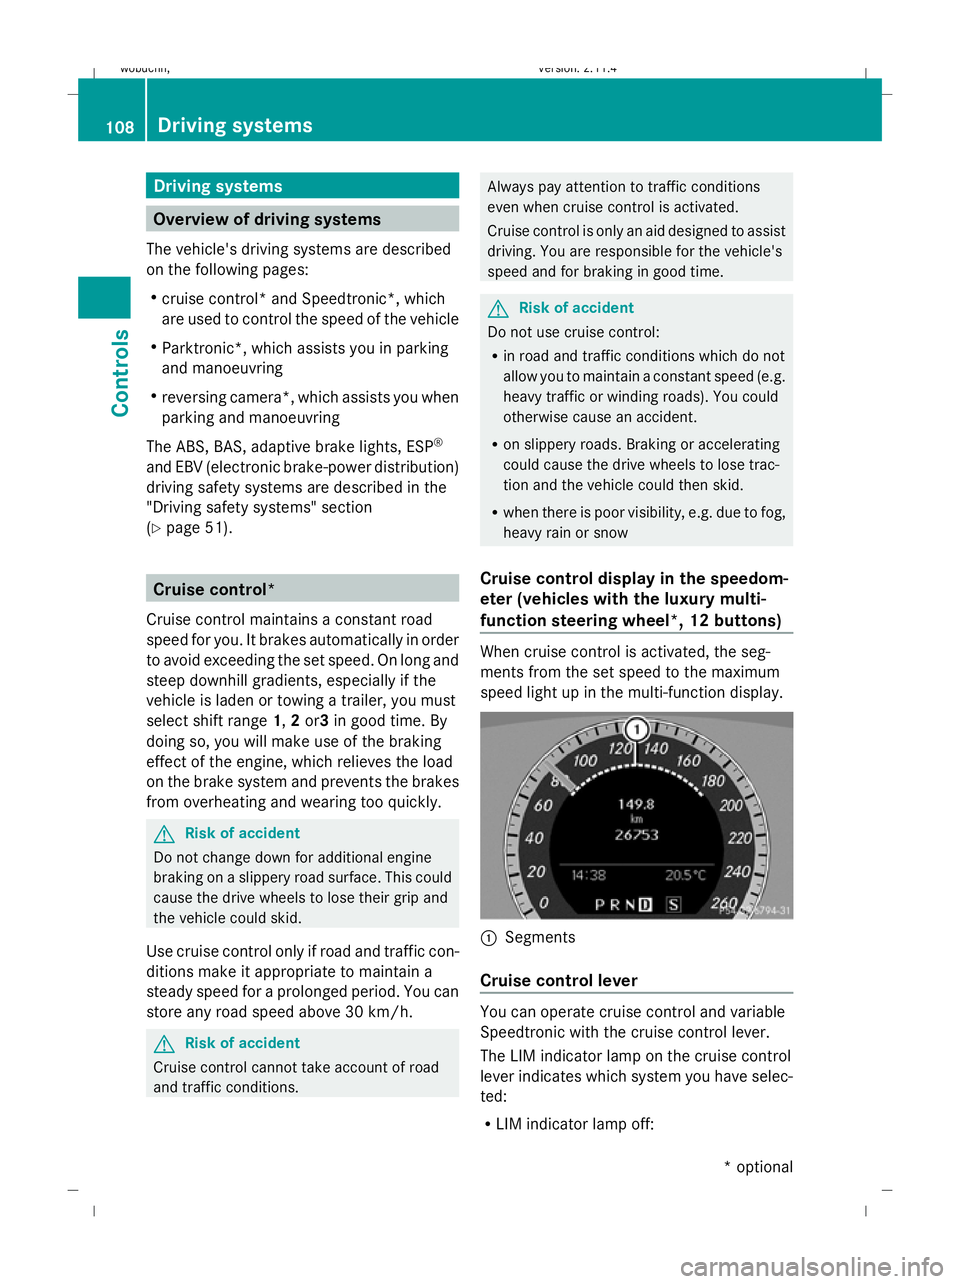
Cruise control display in the speedom-
eter (vehicles with the luxury multi-
function steering wheel *,12 buttons) When cruise control is activated, the seg-
ments from the set speed to the maximum
speed light up in the multi-function display.
:
Segments
Cruise control lever You can operate cruise control and variable
Speedtronic with the cruise control lever.
The LIM indicator lamp on the cruise control
lever indicates which system you have selec-
ted:
R
LIM indicator lamp off: 108 Driving systemsControls
* optional
X204_AKB; 1; 5, en-GB
wobuchh,
Version: 2.11.4 2008-10-15T13:20:56+02:00 - Seite 108Dateiname: 6515_0671_02_buchblock.pdf; preflight
Page 113 of 261
cruise control adjusts the vehicle's speed
to the last speed stored after you have fin-
ished overtaking.
i Deceleration of the vehicle by means of
the cruise control lever is assisted by auto-
matic application of the brakes.
On long downhill gradients, the automatic
transmission also shifts down.
Making adjustments in 1 km/hincre-
ments X
Briefly press the cruise control lever to the
pressure point, up :for a higher speed or
down ?for a lower speed.
The last speed stored is increased or
reduced.
Making adjustments in 10 km/hincre-
ments X
Briefly press the cruise control lever
beyond the pressure point up :for a
higher speed or down ?for a lower speed.
The last speed stored is increased or
reduced.
Deactivating cruise control There are several ways to deactivate cruise
control:
X
Briefly press the cruise control lever for-
wards B.
or
X Brake.
or
X Briefly press the cruise control lever in the
direction of arrow A.
Variable Speedtronic is selected. LIM indi-
cator lamp ;in the cruise control lever
lights up.
Cruise control is automatically deactivated if:
R you depress the parking brake
R you drive at less than 30 km/h R
ESP ®
intervenes or you deactivate ESP ®
R you move the selector lever to Nwhile driv-
ing
If cruise control is deactivated, you will hear
a warning tone. You see the Cruise control
off message in the multi-function display for
approximately five seconds.
i The last speed stored is cleared when you
switch off the engine. Speedtronic*
Speedtronic brakes automatically so that you
do not exceed the set speed. On long and
steep downhill gradients, especially if the
vehicle is laden or towing a trailer, you must
select shift range 1,2or3 in good time. By
doing so, you will make use of the braking
effect of the engine, which relieves the load
on the brake system and prevents the brakes
from overheating and wearing too quickly. If
you need additional braking, depress the
brake pedal repeatedly rather than continu-
ously. G
Risk of accident
Never depress the brake pedal continuously
while the vehicle is in motion, e.g. never cause
the brakes to rub by applying constant slight
pedal pressure. This causes the brake system
to overheat, increases the braking distance
and can lead to the brakes failing completely. G
Risk of accident
Do not change down for additional engine
braking on a slippery road surface. This could
cause the drive wheels to lose their grip and
the vehicle could skid. 110 Driving systemsControls
* optional
X204_AKB; 1; 5, en-GB
wobuchh,
Version: 2.11.4 2008-10-15T13:20:56+02:00 - Seite 110Dateiname: 6515_0671_02_buchblock.pdf; preflight
Page 116 of 261
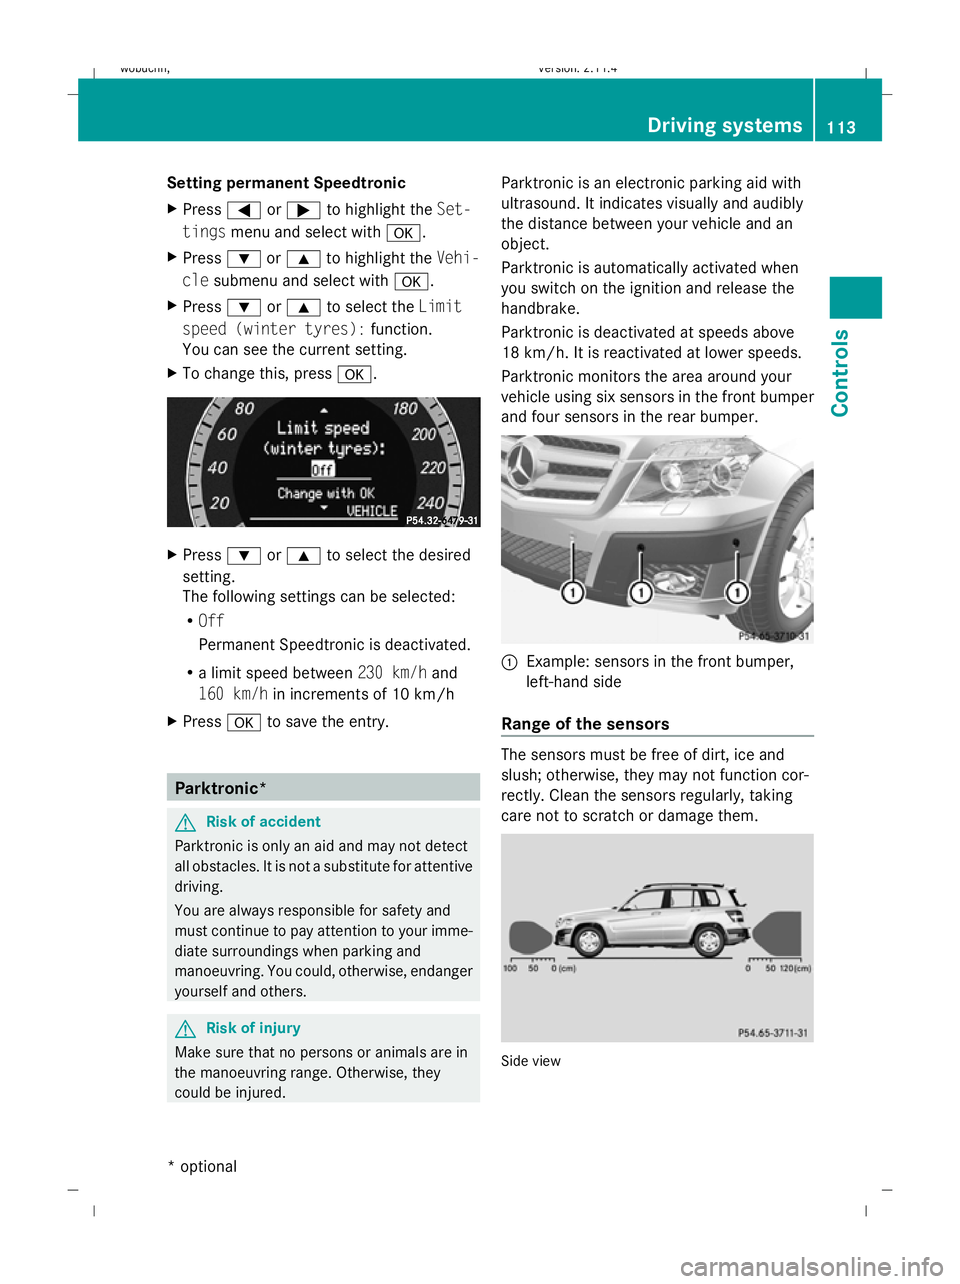
Setting permanent Speedtronic
X
Press =or; to highlight the Set-
tings menu and select with a.
X Press :or9 to highlight the Vehi-
cle submenu and select with a.
X Press :or9 to select the Limit
speed (winter tyres): function.
You can see the current setting.
X To change this, press a. X
Press :or9 to select the desired
setting.
The following settings can be selected:
R Off
Permanent Speedtronic is deactivated.
R a limit speed between 230 km/hand
160 km/h in increments of 10 km/h
X Press ato save the entry. Parktronic*
G
Risk of accident
Parktronic is only an aid and may not detect
all obstacles. It is not a substitute for attentive
driving.
You are always responsible for safety and
must continue to pay attention to your imme-
diate surroundings when parking and
manoeuvring. You could, otherwise, endanger
yourself and others. G
Risk of injury
Make sure that no persons or animals are in
the manoeuvring range. Otherwise, they
could be injured. Parktronic is an electronic parking aid with
ultrasound. It indicates visually and audibly
the distance between your vehicle and an
object.
Parktronic is automatically activated when
you switch on the ignition and release the
handbrake.
Parktronic is deactivated at speeds above
18 km/h. It is reactivated at lower speeds.
Parktronic monitors the area around your
vehicle using six sensors in the front bumper
and four sensors in the rear bumper.
:
Example: sensors in the front bumper,
left-hand side
Range of the sensors The sensors must be free of dirt, ice and
slush; otherwise, they may not function cor-
rectly. Clean the sensors regularly, taking
care not to scratch or damage them.
Side view Driving systems
113Controls
* optional
X204_AKB; 1; 5, en-GB
wobuchh,
Version: 2.11.4
2008-10-15T13:20:56+02:00 - Seite 113 ZDateiname: 6515_0671_02_buchblock.pdf; preflight
Page 117 of 261
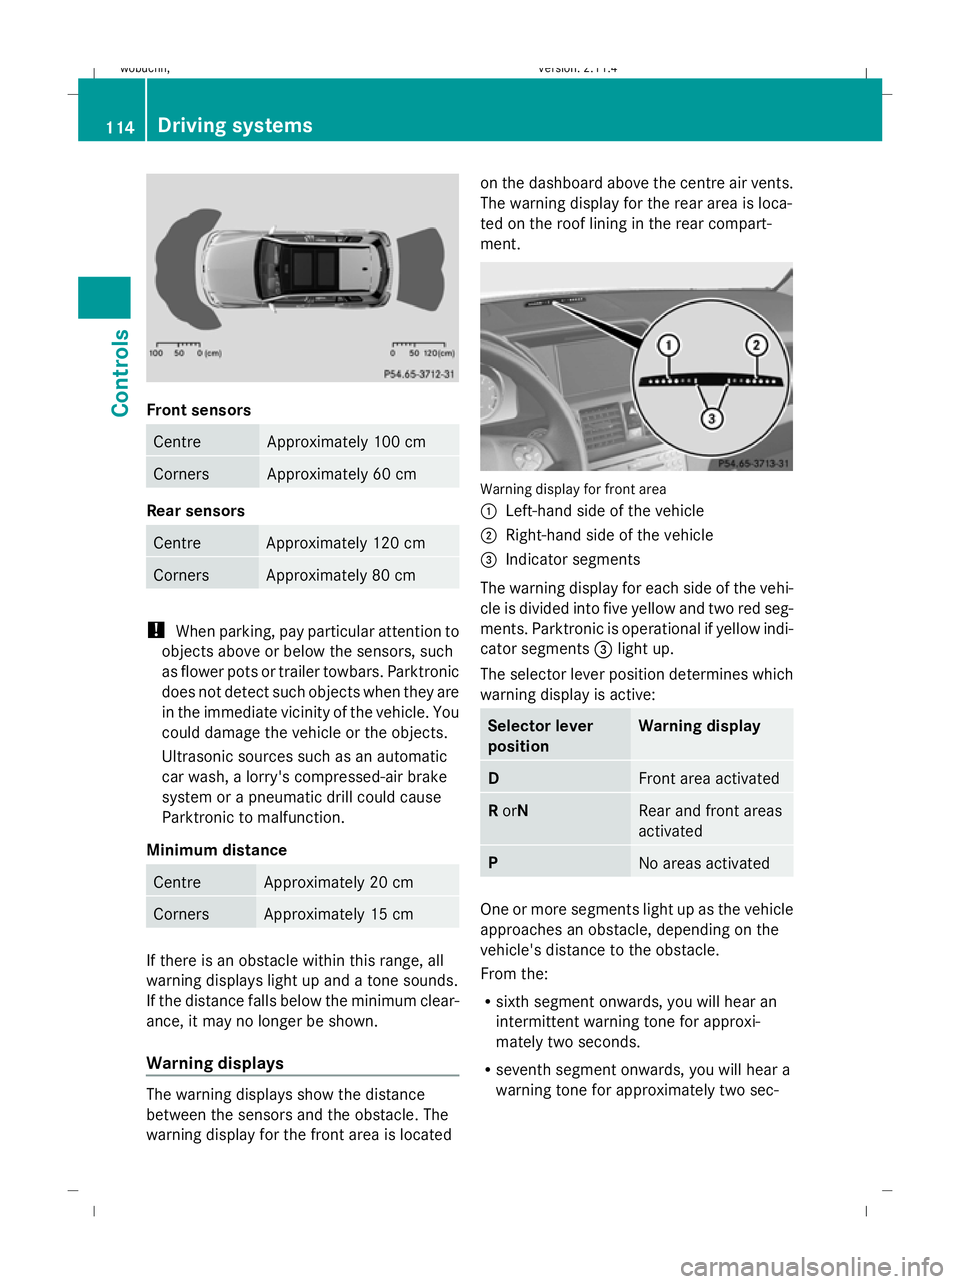
Front sensors
Centre Approximately 100 cm
Corners Approximately 60 cm
Rear sensors
Centre Approximately 120 cm
Corners Approximately 80 cm
!
When parking, pay particular attention to
objects above or below the sensors, such
as flower pots or trailer towbars. Parktronic
does not detect such objects when they are
in the immediate vicinity of the vehicle. You
could damage the vehicle or the objects.
Ultrasonic sources such as an automatic
car wash, a lorry's compressed-air brake
system or a pneumatic drill could cause
Parktronic to malfunction.
Minimum distance Centre Approximately 20 cm
Corners Approximately 15 cm
If there is an obstacle within this range, all
warning displays light up and a tone sounds.
If the distance falls below the minimum clear-
ance, it may no longer be shown.
Warning displays The warning displays show the distance
between the sensors and the obstacle. The
warning display for the front area is located on the dashboard above the centre air vents.
The warning display for the rear area is loca-
ted on the roof lining in the rear compart-
ment.
Warning display for front area
:
Left-hand side of the vehicle
; Right-hand side of the vehicle
= Indicator segments
The warning display for each side of the vehi-
cle is divided into five yellow and two red seg-
ments. Parktronic is operational if yellow indi-
cator segments =light up.
The selector lever position determines which
warning display is active: Selector lever
position Warning display
D
Front area activated
R
orN Rear and front areas
activated
P
No areas activated
One or more segments light up as the vehicle
approaches an obstacle, depending on the
vehicle's distance to the obstacle.
From the:
R
sixth segment onwards, you will hear an
intermittent warning tone for approxi-
mately two seconds.
R seventh segment onwards, you will hear a
warning tone for approximately two sec- 114 Driving systemsControls
X204_AKB; 1; 5, en-GB
wobuchh,
Version: 2.11.4 2008-10-15T13:20:56+02:00 - Seite 114Dateiname: 6515_0671_02_buchblock.pdf; preflight
Page 154 of 261

legal stipulations and factory recommenda-
tions at a Mercedes-Benz Service Centre.
Modification work on the brake system and
wheels is not permitted, nor is the use of
spacer plates or brake dust shields. This inva-
lidates the General Operating Permit for the
vehicle.
Notes on selecting, fitting and replacing
tyres R
Only fit tyres and wheels of the same type
and make.
R Only fit tyres of the correct size onto the
wheels.
R After fitting new tyres, run them in at mod-
erate speeds for the first 100 km as they
only reach their full performance after this
distance.
R Fit new tyres on the front wheels first if
tyres of the same size are required on the
front and rear wheels.
R Replace the tyres after six years at the lat-
est, regardless of wear. This also applies to
the spare wheel*.
R Do not drive with tyres which have too little
tread depth, as this significantly reduces
the traction on wet roads (aquaplaning).
! Store tyres that are not being used in a
cool, dry and preferably dark place. Protect
the tyres against oil, grease, petrol and die-
sel.
Notes on regularly inspecting wheels
and tyres R
Regularly check the wheels and tyres of
your vehicle for damage (e.g. cuts, punctu-
res, tears, bulges on tyres and deformation,
cracks or severe corrosion on wheels), at
least every 14 days, as well as after driving
off-road or on rough roads. Damaged
wheels could cause a loss of tyre pressure.
R Regularly check the tyre tread depth and
the condition of the tread across the whole width of the tyre (Y
page 152). If neces-
sary, turn the front wheels to full lock in
order to inspect the inner side of the tyre
surface.
R All wheels must have a valve cap to protect
the valve against dirt and moisture. Do not
fit anything onto the valve (such as tyre
pressure monitoring systems) other than
the standard valve cap or other valve caps
approved by Mercedes-Benz for your vehi-
cle.
R You should regularly check the pressure of
all the tyres, particularly prior to long trips,
and correct the pressure as necessary
(Y page 152).
Notes on driving R
While driving, pay attention to vibrations,
noises and unusual handling characteris-
tics, e.g. pulling to one side. This may indi-
cate that the wheels or tyres are damaged.
If you suspect that a tyre is defective,
reduce your speed and stop the vehicle as
soon as possible to check the wheels and
tyres for damage. Hidden tyre damage
could also be causing the unusual handling
characteristics. If you find no signs of dam-
age, have the wheels and tyres examined
at a specialist workshop, for example at a
Mercedes-Benz Service Centre.
R When parking your vehicle, make sure that
the tyres do not get deformed by the kerb
or other obstacles. If it is necessary to drive
over kerbs, speed humps or similar eleva-
tions, try to do so slowly and at an obtuse
angle. Otherwise, the tyres, particularly the
sidewalls, could get damaged. Tyres and wheels
151Operation
* optional
X204_AKB; 1; 5, en-GB
wobuchh,
Version: 2.11.4 2008-10-15T13:20:56+02:00 - Seite 151 ZDateiname: 6515_0671_02_buchblock.pdf; preflight
Page 188 of 261
Display messages
Possible causes/consequences and
X
X Solutions # a
with 4
buttons:
Check
brake wear
a with
12 buttons:
Check
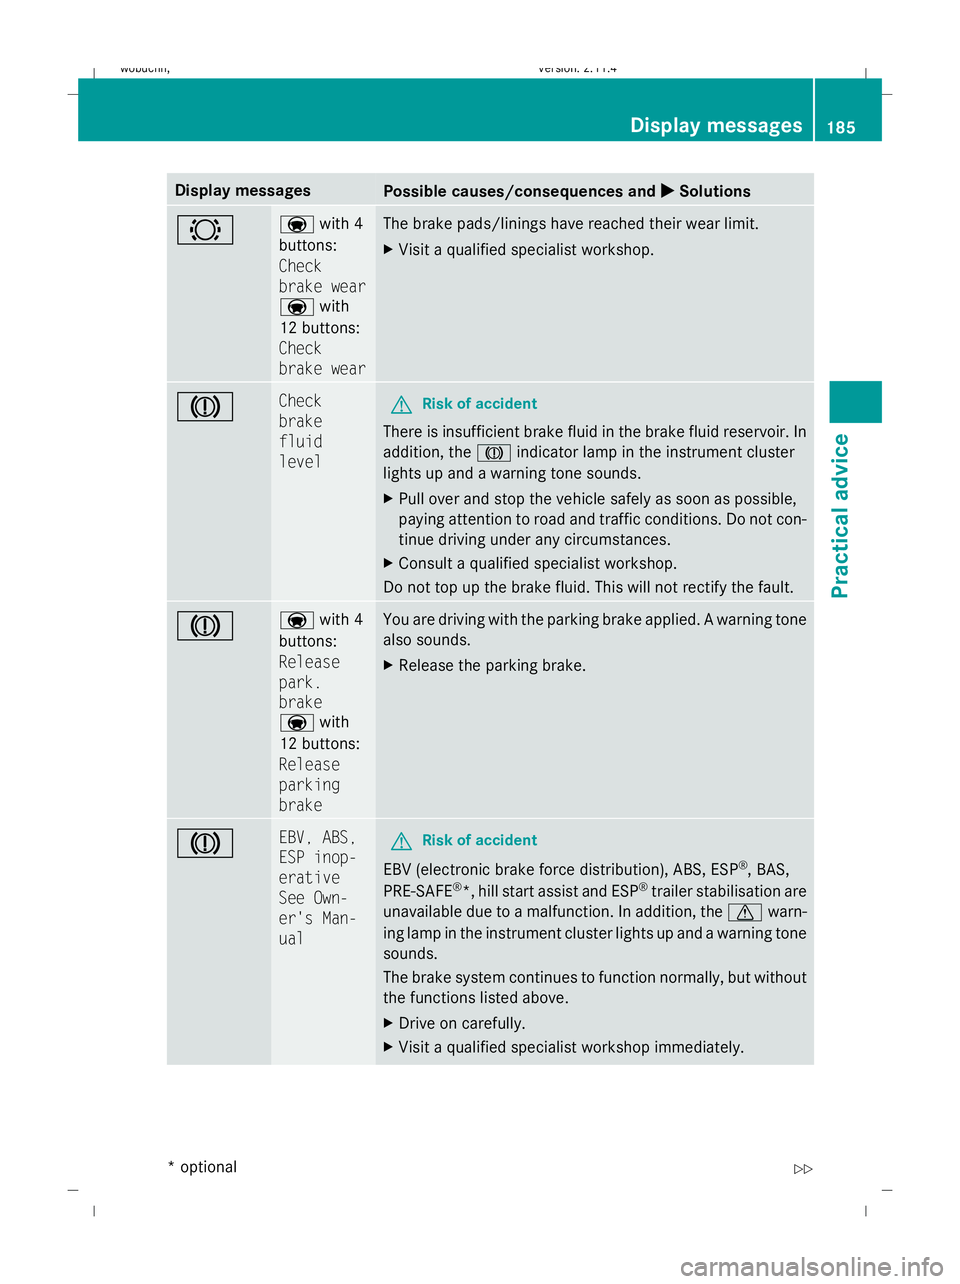
brake wear The brake pads/linings have reached their wear limit.
X
Visit a qualified specialist workshop. J Check
brake
fluid
level
G
Risk of accident
There is insufficient brake fluid in the brake fluid reservoir. In
addition, the Jindicator lamp in the instrument cluster
lights up and a warning tone sounds.
X Pull over and stop the vehicle safely as soon as possible,
paying attention to road and traffic conditions. Do not con-
tinue driving under any circumstances.
X Consult a qualified specialist workshop.
Do not top up the brake fluid. This will not rectify the fault. J a
with 4
buttons:
Release
park.
brake
a with
12 buttons:
Release
parking
brake You are driving with the parking brake applied. A warning tone
also sounds.
X
Release the parking brake. J EBV, ABS,
ESP inop-
erative
See Own-
er's Man-
ual
G
Risk of accident
EBV (electronic brake force distribution), ABS, ESP ®
, BAS,
PRE-SAFE ®
*, hill start assist and ESP ®
trailer stabilisation are
unavailable due to a malfunction. In addition, the dwarn-
ing lamp in the instrument cluster lights up and a warning tone
sounds.
The brake system continues to function normally, but without
the functions listed above.
X Drive on carefully.
X Visit a qualified specialist workshop immediately. Display
messages
185Practical advice
* optional
X204_AKB; 1; 5, en-GB
wobuchh
,V ersion: 2.11.4
2008-10-15T13:20:56+02:00 - Seite 185 ZDateiname: 6515_0671_02_buchblock.pdf; preflight
Page 205 of 261
Problem
Possible causes/consequences and
X XSolutions d
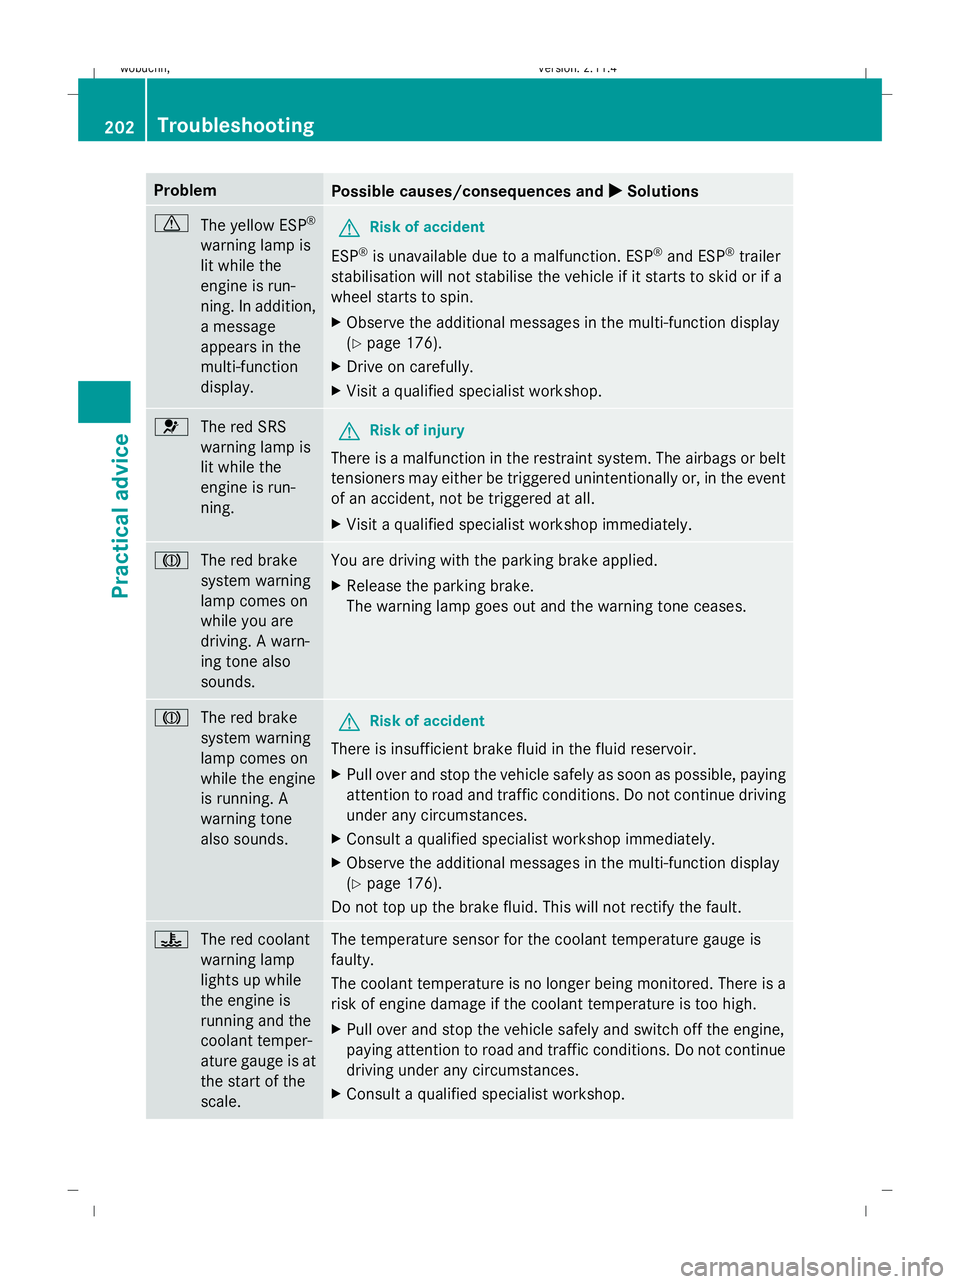
The yellow ESP ®
warning lamp is
lit while the
engine is run-
ning. In addition,
a message
appears in the
multi-function
display. G
Risk of accident
ESP ®
is unavailable due to a malfunction. ESP ®
and ESP ®
trailer
stabilisation will not stabilise the vehicle if it starts to skid or if a
wheel starts to spin.
X Observe the additional messages in the multi-function display
(Y page 176).
X Drive on carefully.
X Visit a qualified specialist workshop. 6
The red SRS
warning lamp is
lit while the
engine is run-
ning. G
Risk of injury
There is a malfunction in the restraint system. The airbags or belt
tensioners may either be triggered unintentionally or, in the event
of an accident, not be triggered at all.
X Visit a qualified specialist workshop immediately. J
The red brake
system warning
lamp comes on
while you are
driving. A warn-
ing tone also
sounds. You are driving with the parking brake applied.
X
Release the parking brake.
The warning lamp goes out and the warning tone ceases. J
The red brake
system warning
lamp comes on
while the engine
is running. A
warning tone
also sounds. G
Risk of accident
There is insufficient brake fluid in the fluid reservoir.
X Pull over and stop the vehicle safely as soon as possible, paying
attention to road and traffic conditions. Do not continue driving
under any circumstances.
X Consult a qualified specialist workshop immediately.
X Observe the additional messages in the multi-function display
(Y page 176).
Do not top up the brake fluid. This will not rectify the fault. ?
The red coolant
warning lamp
lights up while
the engine is
running and the
coolant temper-
ature gauge is at
the start of the
scale. The temperature sensor for the coolant temperature gauge is
faulty.
The coolant temperature is no longer being monitored. There is a
risk of engine damage if the coolant temperature is too high.
X
Pull over and stop the vehicle safely and switch off the engine,
paying attention to road and traffic conditions. Do not continue
driving under any circumstances.
X Consult a qualified specialist workshop. 202 TroubleshootingPractical advice
X204_AKB; 1; 5, en-GB
wobuchh,
Version: 2.11.4 2008-10-15T13:20:56+02:00 - Seite 202Dateiname: 6515_0671_02_buchblock.pdf; preflight