2008 MERCEDES-BENZ GLK SUV winter tyres
[x] Cancel search: winter tyresPage 19 of 261
Washer fluid reservoir...............
149, 249
Filling capacity. ............................... 249
Wearing seat belts............................... 70
Wheel bolts Tightening torque............................ 231
Wheel chock
Use. ................................................ 176
Wheels
General notes. ................................ 150
Interchanging.................................. 154
Technical data. ............................... 252
Windowbag........................................... 39
Windowbags Display message (luxury multi-
function steering wheel) .................198
Display message (multi-function
steering wheel). .............................. 182
Windows
Cleaning. ........................................ 169
Cleaning the windscreen ...............169
see Side windows
Windscreen washer fluid................... 249
Topping up. ..................................... 149
Windscreen washer system...... 149, 249
Windscreen wipers.............................. 79
Cleaning. ........................................ 169
Malfunction..................................... 210
Replacing the wiper blades .............220
Winter diesel...................................... 146
Winter driving............................. 155, 156
Winter tyres ........................................ 155
Limit speed (on-board computer,
luxury multi-function steering
wheel). ............................................ 113
Wooden trim
Cleaning. ........................................ 17116 Index
X204_AKB; 1; 5, en-GB
wobuchh,
Version: 2.11.4 2008-10-15T13:20:56+02:00 - Seite 16Dateiname: 6515_0671_02_buchblock.pdf; preflight
Page 107 of 261
Vehicle
Set permanent SPEEDTRONIC with
Limit
speed (winter tyres): (Ypage 113).
Activating/deactivating automatic door
locking
If you select the Automatic Door Locks:
function, the vehicle is centrally locked above
a speed of around 15 km/h.
For more information on automatic door lock-
ing, see (Y page 59).
X Press the =or; button to select the
Settings menu.
X Press the :or9 button to select the
Vehicle submenu.
X Press the abutton to confirm.
X Press the :or9 button to select the
Automatic door locks: function.
You will see the selected setting: Onor
Off .
X Press the abutton to save the setting.
Convenience Activating/deactivating the easy-entry/
exit feature*
You can use the Easy-Entry/Exit: function
to activate or deactivate the easy-entry/exit
feature (Y page 67). G
Risk of injury
The steering wheel moves when the EASY-
ENTRY/EXIT feature is active. There is a risk
of occupants becoming trapped. Before acti-
vating the EASY-ENTRY/EXIT feature, make
sure that nobody can become trapped.
Do not leave children unsupervised in the
vehicle, even if they are secured in a child
restraint system. The children could open the
driver's door and thereby unintentionally acti-
vate the EASY-ENTRY/EXIT feature and
become trapped. X
Press the =or; button to select the
Settings menu.
X Press the :or9 button to select the
Convenience submenu.
X Press the abutton to confirm.
X Press the :or9 button to select the
Easy Entry/Exit: function.
You will see the selected setting: Onor
Off .
X Press the abutton to save the setting.
Switching the fold in mirrors when lock-
ing*function on/off
If you switch on the Fold mirrors in when
locking: function, the exterior mirrors fold
in when you lock the vehicle. When you
unlock the vehicle and then open the driver's
or front-passenger door, the exterior mirrors
fold out again.
If you have switched the function on and you
fold the exterior mirrors in using the button
on the door (Y page 68), they will not fold out
automatically. The exterior mirrors can then
only be folded out using the button on the
door.
X Press the =or; button to select the
Settings menu.
X Press the :or9 button to select the
Convenience submenu.
X Press the abutton to confirm.
X Press the :or9 button to select the
Fold in mirrors when locking: func-
tion.
You will see the selected setting: Onor
Off .
X Press the abutton to save the setting.
Restoring the factory settings For safety reasons, not all functions are reset:
the
Limit Speed (winter tyres): func-
tion in permanent Speedtronic can only be set
in the Vehicle submenu. The Daytime
driving lights: function in theLights104
On-board computer (12-button multi-function steering wheel*)Controls
* optional
X204_AKB; 1; 5, en-GB
wobuchh,
Version: 2.11.4 2008-10-15T13:20:56+02:00 - Seite 104Dateiname: 6515_0671_02_buchblock.pdf; preflight
Page 108 of 261
submenu is only reset if the vehicle is sta-
tionary.
X Press the =or; button to select the
Settings menu.
X Press the :or9 button to select the
Factory setting submenu.
X Press the abutton to confirm.
The Reset all settings? message is
shown.
X Press the :or9 button to select
Yes orNo.
X Press the abutton to confirm the selec-
tion.
If you have selected Yes, the multi-function
display shows a confirmation message. Off-road driving
Overview of off-road driving systems
The systems which are relevant for off-road
driving are explained on the following pages:
R 4MATIC (permanent four-wheel drive), for
optimum traction
R DSR (Downhill Speed Regulation)* (vehi-
cles with Off-Road Pro engineering pack-
age*), which assists you when driving
downhill
R Off-road driving program* (vehicles with
Off-road Pro engineering package*), which
assists you when driving off-road
You will find further information about driving
off-road in the "Operation" section
(Y page 158). 4MATIC* (permanent four-wheel
drive)
4MATIC ensures that all four wheels are per-
manently driven. Together with ESP ®
and
ETS, it improves the traction of your vehicle
whenever a drive wheel spins due to insuffi-
cient grip. G
Risk of accident
4MATIC cannot reduce the risk of an accident
if you drive too fast.
If a drive wheel spins due to insufficient grip:
R only depress the accelerator pedal as far as
necessary when pulling away.
R accelerate less when driving.
R adapt your driving style to suit road and
traffic conditions.
i In wintry driving conditions, the maximum
effect of 4MATIC can only be achieved if
you use winter tyres (M+S tyres), with snow
chains if necessary.
! When testing the parking brake, operate
the vehicle only briefly (for a maximum of
ten seconds) on a brake test dynamometer.
When doing this, turn the key to position
0 or 1in the ignition. Failure to do this can
cause damage to the drive train or the
brake system.
! A function or performance test should
only be carried out on a twin-axle dyna-
mometer. If you wish to operate the vehicle
on such a dynamometer, please consult a
Mercedes-Benz Service Centre in advance.
You could otherwise damage the drive train
or the brake system. DSR (Downhill Speed Regulation)*
(vehicles with the off-road engineer-
ing package*)
You will find information about driving off-
road in the "Operation" section
(Y page 158).
DSR is an aid to assist you when driving down-
hill. It keeps the speed of travel at the speed
selected on the on-board computer. The
steeper the downhill gradient, the greater the
DSR braking effect on the vehicle. When driv-
ing on flat stretches of road or on an uphill Off-road driving
105Controls
* optional
X204_AKB; 1; 5, en-GB
wobuchh,
Version: 2.11.4 2008-10-15T13:20:56+02:00 - Seite 105 ZDateiname: 6515_0671_02_buchblock.pdf; preflight
Page 114 of 261
You can set a variable or permanent limit
speed:
R
variable for speed limits, e.g. in built-up
areas
R permanent for long-term speed restric-
tions, e.g. for driving on winter tyres
(Y page 112) G
Risk of accident
Speedtronic is only an aid designed to assist
driving. You are responsible for the vehicle's
speed and for braking in good time.
i The speed indicated in the speedometer
may differ slightly from the limit speed
stored.
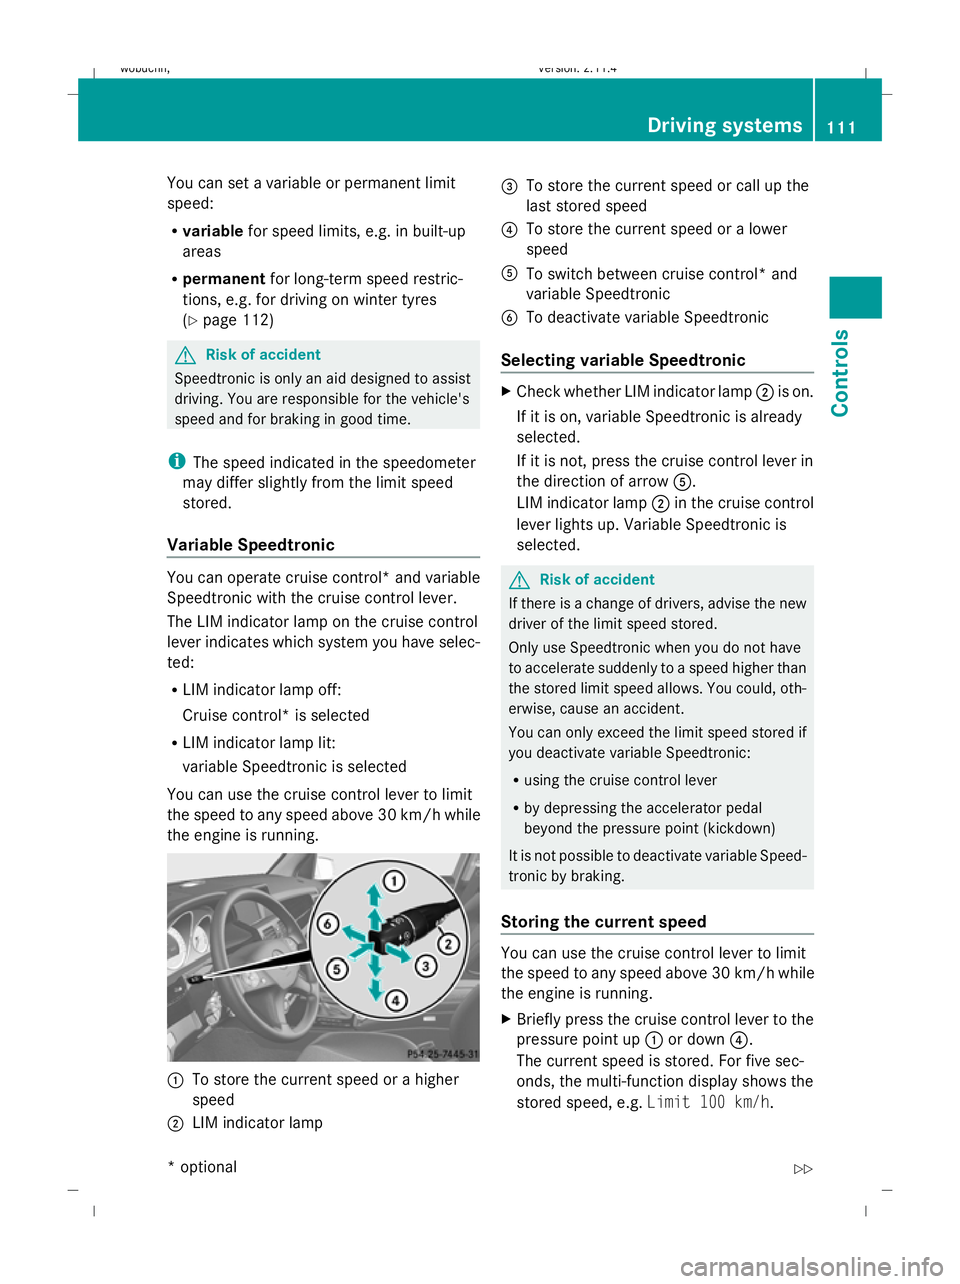
Variable Speedtronic You can operate cruise control* and variable
Speedtronic with the cruise control lever.
The LIM indicator lamp on the cruise control
lever indicates which system you have selec-
ted:
R LIM indicator lamp off:
Cruise control* is selected
R LIM indicator lamp lit:
variable Speedtronic is selected
You can use the cruise control lever to limit
the speed to any speed above 30 km/h while
the engine is running. :
To store the current speed or a higher
speed
; LIM indicator lamp =
To store the current speed or call up the
last stored speed
? To store the current speed or a lower
speed
A To switch between cruise control* and
variable Speedtronic
B To deactivate variable Speedtronic
Selecting variable Speedtronic X
Check whether LIM indicator lamp ;is on.
If it is on, variable Speedtronic is already
selected.
If it is not, press the cruise control lever in
the direction of arrow A.
LIM indicator lamp ;in the cruise control
lever lights up. Variable Speedtronic is
selected. G
Risk of accident
If there is a change of drivers, advise the new
driver of the limit speed stored.
Only use Speedtronic when you do not have
to accelerate suddenly to a speed higher than
the stored limit speed allows. You could, oth-
erwise, cause an accident.
You can only exceed the limit speed stored if
you deactivate variable Speedtronic:
R using the cruise control lever
R by depressing the accelerator pedal
beyond the pressure point (kickdown)
It is not possible to deactivate variable Speed-
tronic by braking.
Storing the current speed You can use the cruise control lever to limit
the speed to any speed above 30 km/h while
the engine is running.
X
Briefly press the cruise control lever to the
pressure point up :or down ?.
The current speed is stored. For five sec-
onds, the multi-function display shows the
stored speed, e.g. Limit 100 km/h. Driving systems
111Controls
* optional
X204_AKB; 1; 5, en-GB
wobuchh,
Version: 2.11.4 2008-10-15T13:20:56+02:00 - Seite 111 ZDateiname: 6515_0671_02_buchblock.pdf; preflight
Page 115 of 261
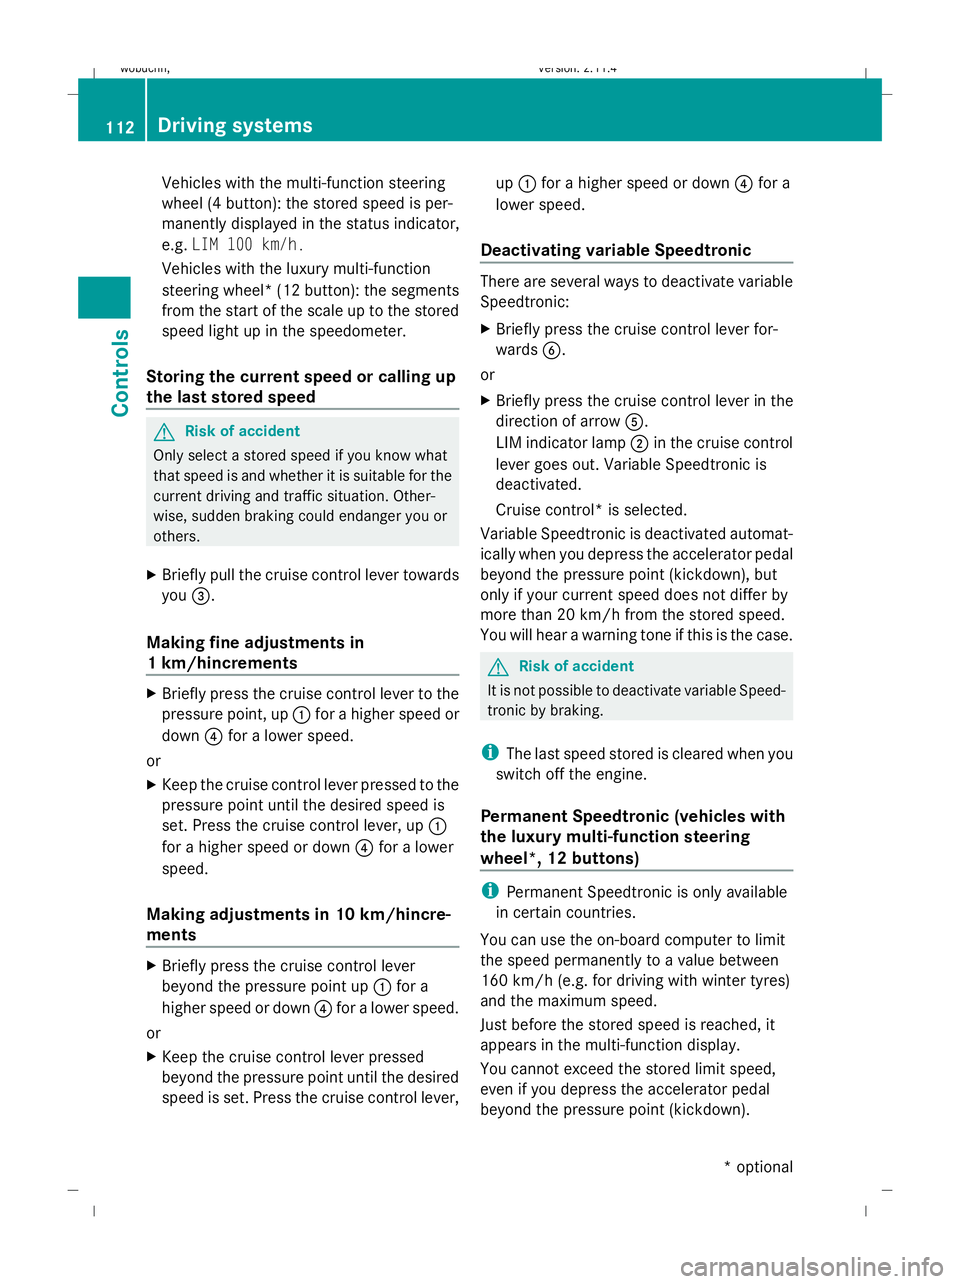
Vehicles with the multi-function steering
wheel (4 button): the stored speed is per-
manently displayed in the status indicator,
e.g. LIM 100 km/h.
Vehicles with the luxury multi-function
steering wheel*( 12 button): the segments
from the start of the scale up to the stored
speed light up in the speedometer.
Storing the current speed or calling up
the last stored speed G
Risk of accident
Only select a stored speed if you know what
that speed is and whether it is suitable for the
current driving and traffic situation. Other-
wise, sudden braking could endanger you or
others.
X Briefly pull the cruise control lever towards
you =.
Making fine adjustments in
1 km/hincrements X
Briefly press the cruise control lever to the
pressure point, up :for a higher speed or
down ?for a lower speed.
or
X Keep the cruise control lever pressed to the
pressure point until the desired speed is
set. Press the cruise control lever, up :
for a higher speed or down ?for a lower
speed.
Making adjustments in 10 km/hincre-
ments X
Briefly press the cruise control lever
beyond the pressure point up :for a
higher speed or down ?for a lower speed.
or
X Keep the cruise control lever pressed
beyond the pressure point until the desired
speed is set. Press the cruise control lever, up
: for a higher speed or down ?for a
lower speed.
Deactivating variable Speedtronic There are several ways to deactivate variable
Speedtronic:
X
Briefly press the cruise control lever for-
wards B.
or
X Briefly press the cruise control lever in the
direction of arrow A.
LIM indicator lamp ;in the cruise control
lever goes out. Variable Speedtronic is
deactivated.
Cruise control* is selected.
Variable Speedtronic is deactivated automat-
ically when you depress the accelerator pedal
beyond the pressure point (kickdown), but
only if your current speed does not differ by
more than 20 km/h from the stored speed.
You will hear a warning tone if this is the case. G
Risk of accident
It is not possible to deactivate variable Speed-
tronic by braking.
i The last speed stored is cleared when you
switch off the engine.
Permanent Speedtronic (vehicles with
the luxury multi-function steering
wheel*, 12 buttons) i
Permanent Speedtronic is only available
in certain countries.
You can use the on-board computer to limit
the speed permanently to a value between
160 km/h (e.g. for driving with winter tyres)
and the maximum speed.
Just before the stored speed is reached, it
appears in the multi-function display.
You cannot exceed the stored limit speed,
even if you depress the accelerator pedal
beyond the pressure point (kickdown). 112 Driving systemsControls
* optional
X204_AKB; 1; 5, en-GB
wobuchh,
Version: 2.11.4 2008-10-15T13:20:56+02:00 - Seite 112Dateiname: 6515_0671_02_buchblock.pdf; preflight
Page 116 of 261
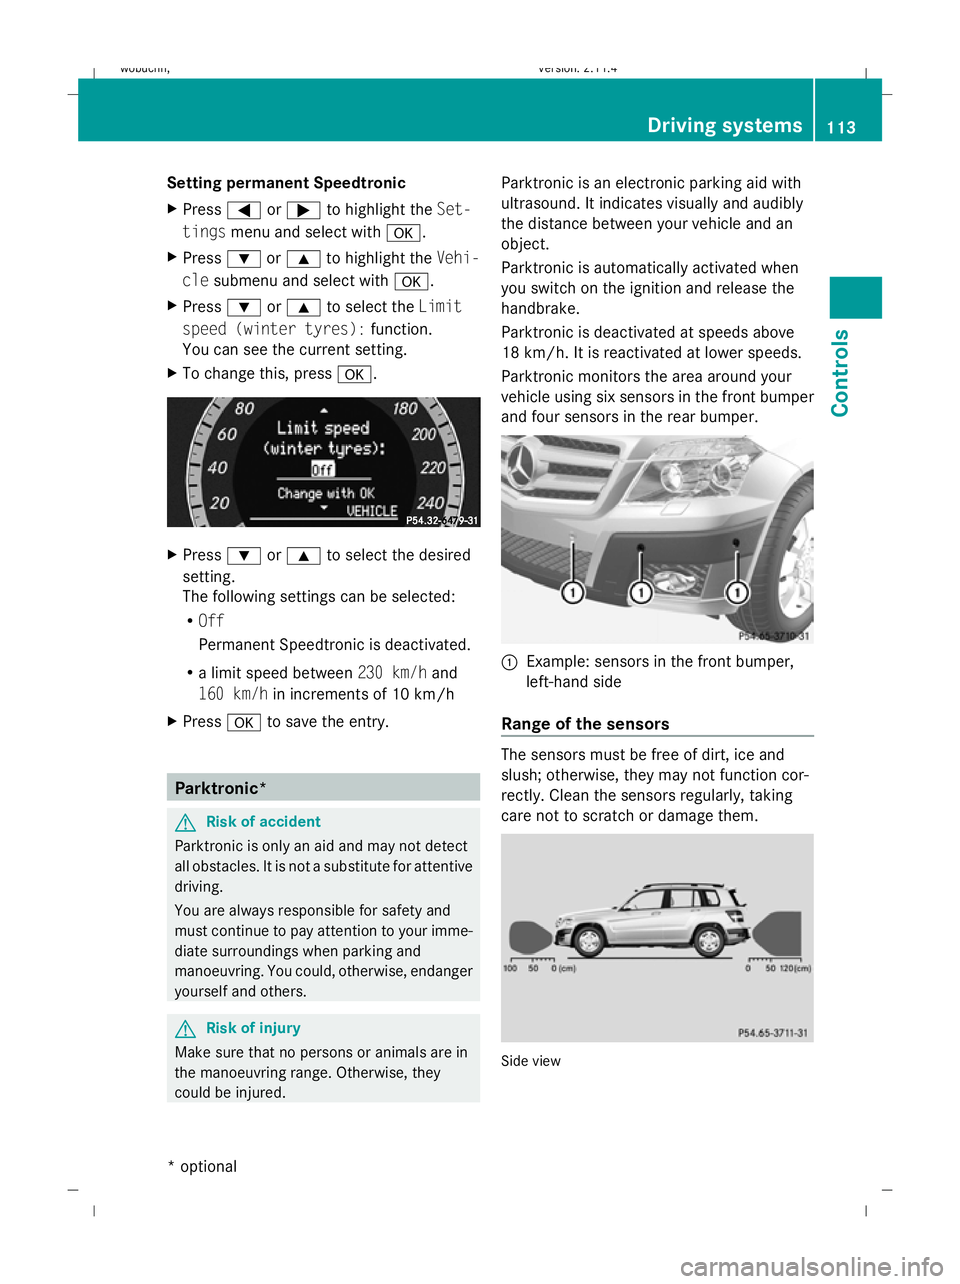
Setting permanent Speedtronic
X
Press =or; to highlight the Set-
tings menu and select with a.
X Press :or9 to highlight the Vehi-
cle submenu and select with a.
X Press :or9 to select the Limit
speed (winter tyres): function.
You can see the current setting.
X To change this, press a. X
Press :or9 to select the desired
setting.
The following settings can be selected:
R Off
Permanent Speedtronic is deactivated.
R a limit speed between 230 km/hand
160 km/h in increments of 10 km/h
X Press ato save the entry. Parktronic*
G
Risk of accident
Parktronic is only an aid and may not detect
all obstacles. It is not a substitute for attentive
driving.
You are always responsible for safety and
must continue to pay attention to your imme-
diate surroundings when parking and
manoeuvring. You could, otherwise, endanger
yourself and others. G
Risk of injury
Make sure that no persons or animals are in
the manoeuvring range. Otherwise, they
could be injured. Parktronic is an electronic parking aid with
ultrasound. It indicates visually and audibly
the distance between your vehicle and an
object.
Parktronic is automatically activated when
you switch on the ignition and release the
handbrake.
Parktronic is deactivated at speeds above
18 km/h. It is reactivated at lower speeds.
Parktronic monitors the area around your
vehicle using six sensors in the front bumper
and four sensors in the rear bumper.
:
Example: sensors in the front bumper,
left-hand side
Range of the sensors The sensors must be free of dirt, ice and
slush; otherwise, they may not function cor-
rectly. Clean the sensors regularly, taking
care not to scratch or damage them.
Side view Driving systems
113Controls
* optional
X204_AKB; 1; 5, en-GB
wobuchh,
Version: 2.11.4
2008-10-15T13:20:56+02:00 - Seite 113 ZDateiname: 6515_0671_02_buchblock.pdf; preflight
Page 146 of 261
Running-in notes............................... 144
Refuelling ........................................... 144
Engine compartment ........................146
Tyres and wheels .............................. 150
Winter driving ................................... 155
Driving tips ........................................ 156
Off-road driving ................................. 158
Driving abroad ................................... 162
Trailer towing* .................................. 162
Service ............................................... 167
Care .................................................... 167
143
Operation
X204_AKB; 1; 5, en-GB
wobuchh, Version: 2.11.4
2008-10-15T13:20:56+02:00 - Seite 143 Dateiname: 6515_0671_02_buchblock.pdf; preflight
Page 153 of 261

on the left-hand side when viewed in the
direction of travel. i
Add windscreen washer concentrate to
the washer fluid all year round. G
Risk of fire
Windscreen washer fluid is highly flammable.
Fire, naked flames and smoking are prohibi-
ted when handling washer fluid concentrate.
! Only use windscreen washer fluid which
is suitable for plastic lamp lenses. Unsuit-
able windscreen washer fluid could dam-
age the plastic lamp lenses of the head-
lamps.
X Mix the windscreen washer fluid in a con-
tainer beforehand.
X At temperatures below freezing:
Fill the washer fluid reservoir with a mix of
water and windscreen washer concentrate
(e.g. MB SummerFit).
X At temperatures below freezing:
Fill the washer fluid reservoir with a mix of
water, antifreeze additive and windscreen
washer concentrate (e.g. MB WinterFit).
Adapt the mixing ratio to the outside tem-
peratures.
X To open: pull cap:upwards by the tab.
X Top up with the premixed washer fluid.
X To close: press cap :onto the filler neck
until it clicks into place. Tyres and wheels
Points to remember
! For safety reasons, Mercedes-Benz rec-
ommends that you only use tyres and
wheels which have been approved by
Mercedes-Benz specifically for your vehi-
cle. These tyres have been specially adap-
ted for use with the control systems, such
as ABS or ESP ®
, and are marked as follows:
R MO = Mercedes-Benz Original
If you use other tyres and wheels,
Mercedes-Benz cannot accept any respon-
sibility for damage that may result from
this. Further information about tyres,
wheels and approved combinations can be
obtained from any Mercedes-Benz Service
Centre.
If you use tyres other than those tested and
recommended for Mercedes-Benz vehi-
cles, characteristics such as handling, vehi-
cle noise emissions and fuel consumption
may be adversely affected. In addition, the
wheels may come into contact with the
body or axle components when heavily loa-
ded or when driving with snow chains. This
could result in damage to the tyres or the
vehicle.
! Retreaded tyres are neither tested nor
recommended by Mercedes-Benz, since
previous damage cannot always be detec-
ted on retreaded tyres. As a result,
Mercedes-Benz cannot guarantee vehicle
safety if retreaded tyres are fitted. Do not
fit used tyres if you have no information
about their previous usage. G
Risk of accident
Tyres, wheels or accessories which have not
been approved by Mercedes-Benz for your
vehicle or are not used as they should be, can
impair driving safety. As a result, you could
cause an accident. Before purchasing and
using them, enquire about their suitability, 150 Tyres and wheelsOperation
X204_AKB; 1; 5, en-GB
wobuchh,
Version: 2.11.4 2008-10-15T13:20:56+02:00 - Seite 150Dateiname: 6515_0671_02_buchblock.pdf; preflight