2008 MERCEDES-BENZ GLK SUV parking brake
[x] Cancel search: parking brakePage 208 of 261
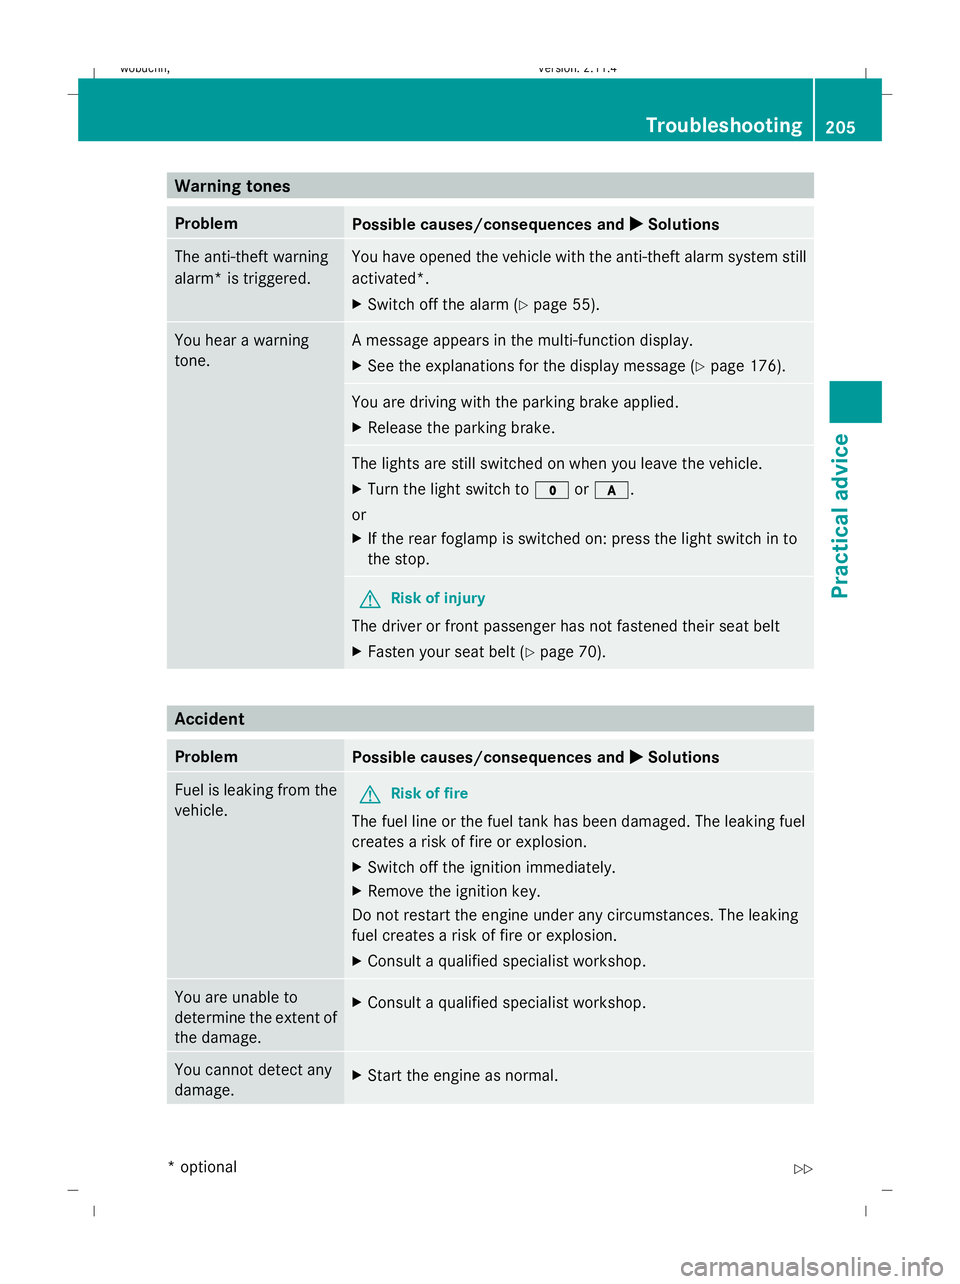
Warning tones
Problem
Possible causes/consequences and
X
X Solutions The anti-theft warning
alarm* is triggered. You have opened the vehicle with the anti-theft alarm system still
activated*.
X Switch off the alarm (Y page 55). You hear a warning
tone. A message appears in the multi-function display.
X
See the explanations for the display message (Y page 176). You are driving with the parking brake applied.
X
Release the parking brake. The lights are still switched on when you leave the vehicle.
X
Turn the light switch to $orc.
or
X If the rear foglamp is switched on: press the light switch in to
the stop. G
Risk of injury
The driver or front passenger has not fastened their seat belt
X Fasten your seat belt (Y page 70). Accident
Problem
Possible causes/consequences and
X
X Solutions Fuel is leaking from the
vehicle.
G
Risk of fire
The fuel line or the fuel tank has been damaged. The leaking fuel
creates a risk of fire or explosion.
X Switch off the ignition immediately.
X Remove the ignition key.
Do not restart the engine under any circumstances. The leaking
fuel creates a risk of fire or explosion.
X Consult a qualified specialist workshop. You are unable to
determine the extent of
the damage.
X
Consult a qualified specialist workshop. You cannot detect any
damage.
X
Start the engine as normal. Troubleshooting
205Practical advice
* optional
X204_AKB; 1; 5, en-GB
wobuchh,
Version: 2.11.4 2008-10-15T13:20:56+02:00 - Seite 205 ZDateiname: 6515_0671_02_buchblock.pdf; preflight
Page 218 of 261
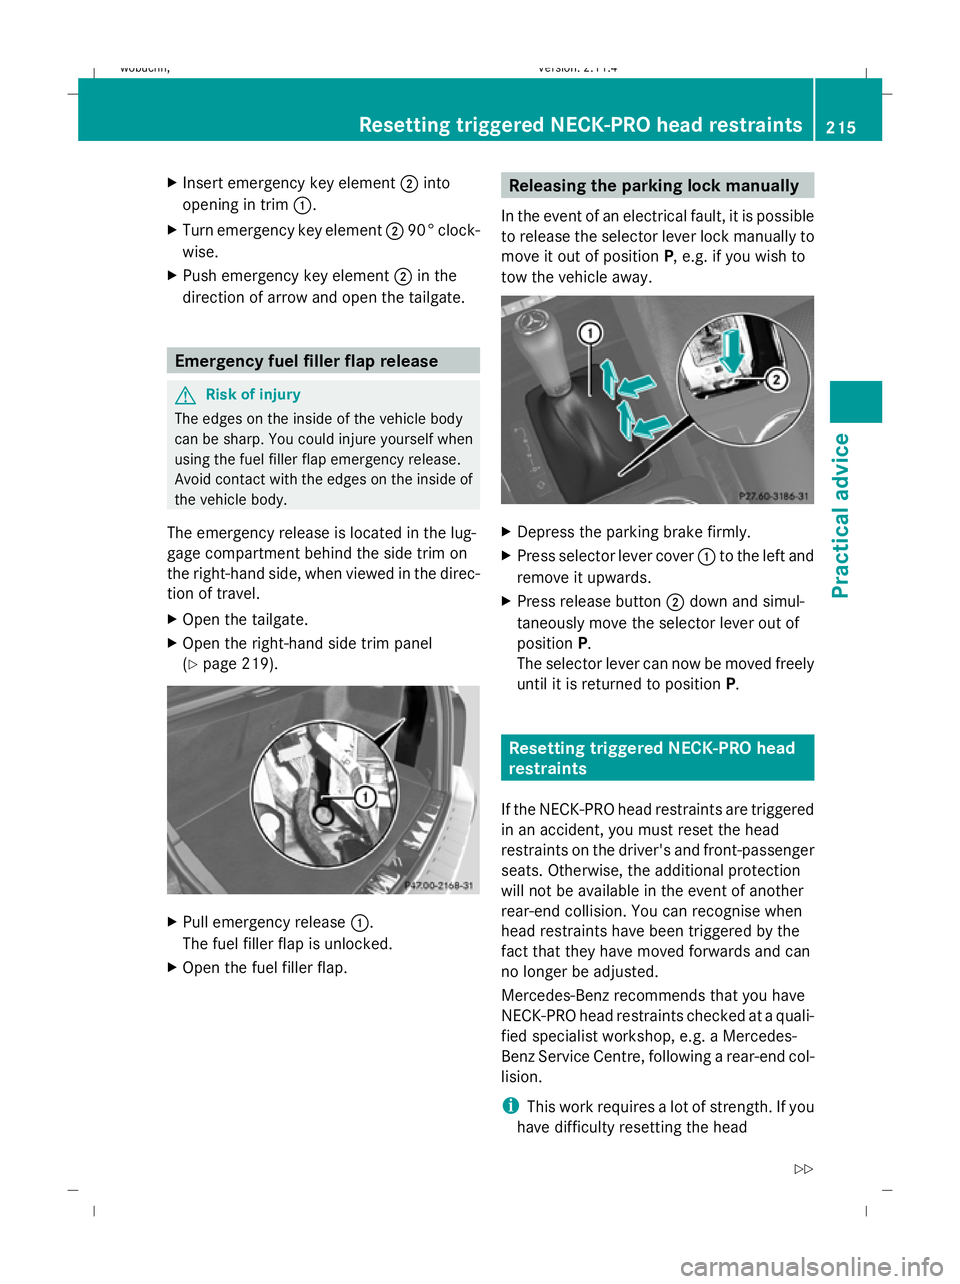
X
Insert emergency key element ;into
opening in trim :.
X Turn emergency key element ;90° clock-
wise.
X Push emergency key element ;in the
direction of arrow and open the tailgate. Emergency fuel filler flap release
G
Risk of injury
The edges on the inside of the vehicle body
can be sharp. You could injure yourself when
using the fuel filler flap emergency release.
Avoid contact with the edges on the inside of
the vehicle body.
The emergency release is located in the lug-
gage compartment behind the side trim on
the right-hand side, when viewed in the direc-
tion of travel.
X Open the tailgate.
X Open the right-hand side trim panel
(Y page 219). X
Pull emergency release :.
The fuel filler flap is unlocked.
X Open the fuel filler flap. Releasing the parking lock manually
In the event of an electrical fault, it is possible
to release the selector lever lock manually to
move it out of position P, e.g. if you wish to
tow the vehicle away. X
Depress the parking brake firmly.
X Press selector lever cover :to the left and
remove it upwards.
X Press release button ;down and simul-
taneously move the selector lever out of
position P.
The selector lever can now be moved freely
until it is returned to position P. Resetting triggered NECK-PRO head
restraints
If the NECK-PRO head restraints are triggered
in an accident, you must reset the head
restraints on the driver's and front-passenger
seats. Otherwise, the additional protection
will not be available in the event of another
rear-end collision. You can recognise when
head restraints have been triggered by the
fact that they have moved forwards and can
no longer be adjusted.
Mercedes-Benz recommends that you have
NECK-PRO head restraints checked at a quali-
fied specialist workshop, e.g. a Mercedes-
Benz Service Centre, following a rear-end col-
lision.
i This work requires a lot of strength. If you
have difficulty resetting the head Resetting triggered NECK-PRO head restraints
215Practical advice
X204_AKB; 1; 5, en-GB
wobuchh,Version: 2.11.4 2008-10-15T13:20:56+02:00 - Seite 215 ZDateiname: 6515_0671_02_buchblock.pdf; preflight
Page 225 of 261
X
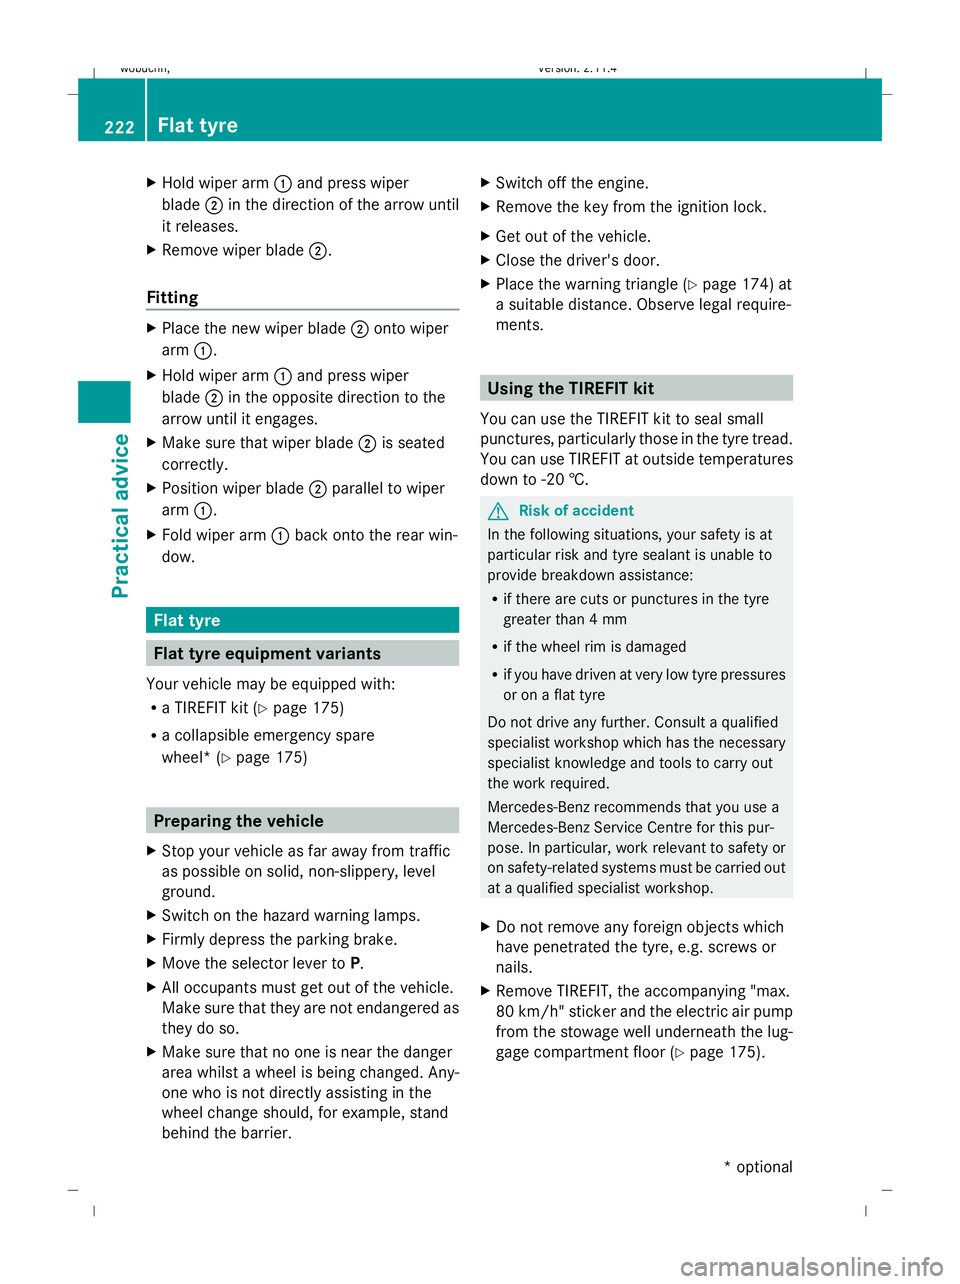
Hold wiper arm :and press wiper
blade ;in the direction of the arrow until
it releases.
X Remove wiper blade ;.
Fitting X
Place the new wiper blade ;onto wiper
arm :.
X Hold wiper arm :and press wiper
blade ;in the opposite direction to the
arrow until it engages.
X Make sure that wiper blade ;is seated
correctly.
X Position wiper blade ;parallel to wiper
arm :.
X Fold wiper arm :back onto the rear win-
dow. Flat tyre
Flat tyre equipment variants
Your vehicle may be equipped with:
R a TIREFIT kit (Y page 175)
R a collapsible emergency spare
wheel* (Y page 175) Preparing the vehicle
X Stop your vehicle as far away from traffic
as possible on solid, non-slippery, level
ground.
X Switch on the hazard warning lamps.
X Firmly depress the parking brake.
X Move the selector lever to P.
X All occupants must get out of the vehicle.
Make sure that they are not endangered as
they do so.
X Make sure that no one is near the danger
area whilst a wheel is being changed. Any-
one who is not directly assisting in the
wheel change should, for example, stand
behind the barrier. X
Switch off the engine.
X Remove the key from the ignition lock.
X Get out of the vehicle.
X Close the driver's door.
X Place the warning triangle (Y page 174) at
a suitable distance. Observe legal require-
ments. Using the TIREFIT kit
You can use the TIREFIT kit to seal small
punctures, particularly those in the tyre tread.
You can use TIREFIT at outside temperatures
down to -20 †. G
Risk of accident
In the following situations, your safety is at
particular risk and tyre sealant is unable to
provide breakdown assistance:
R if there are cuts or punctures in the tyre
greater than 4 mm
R if the wheel rim is damaged
R if you have driven at very low tyre pressures
or on a flat tyre
Do not drive any further. Consult a qualified
specialist workshop which has the necessary
specialist knowledge and tools to carry out
the work required.
Mercedes-Benz recommends that you use a
Mercedes-Benz Service Centre for this pur-
pose. In particular, work relevant to safety or
on safety-related systems must be carried out
at a qualified specialist workshop.
X Do not remove any foreign objects which
have penetrated the tyre, e.g. screws or
nails.
X Remove TIREFIT, the accompanying "max.
80 km/h" sticker and the electric air pump
from the stowage well underneath the lug-
gage compartment floor (Y page 175).222 Flat tyrePractical advice
* optional
X204_AKB; 1; 5, en-GB
wobuchh,
Version: 2.11.4 2008-10-15T13:20:56+02:00 - Seite 222Dateiname: 6515_0671_02_buchblock.pdf; preflight
Page 236 of 261
from the battery. Otherwise, you may
destroy electronic components, such as
the alternator.
i Mercedes-Benz recommends that you
have all work involving the battery, e.g.
removal, charging and replacement, car-
ried out at a qualified specialist workshop,
e.g. a Mercedes-Benz Service Centre.
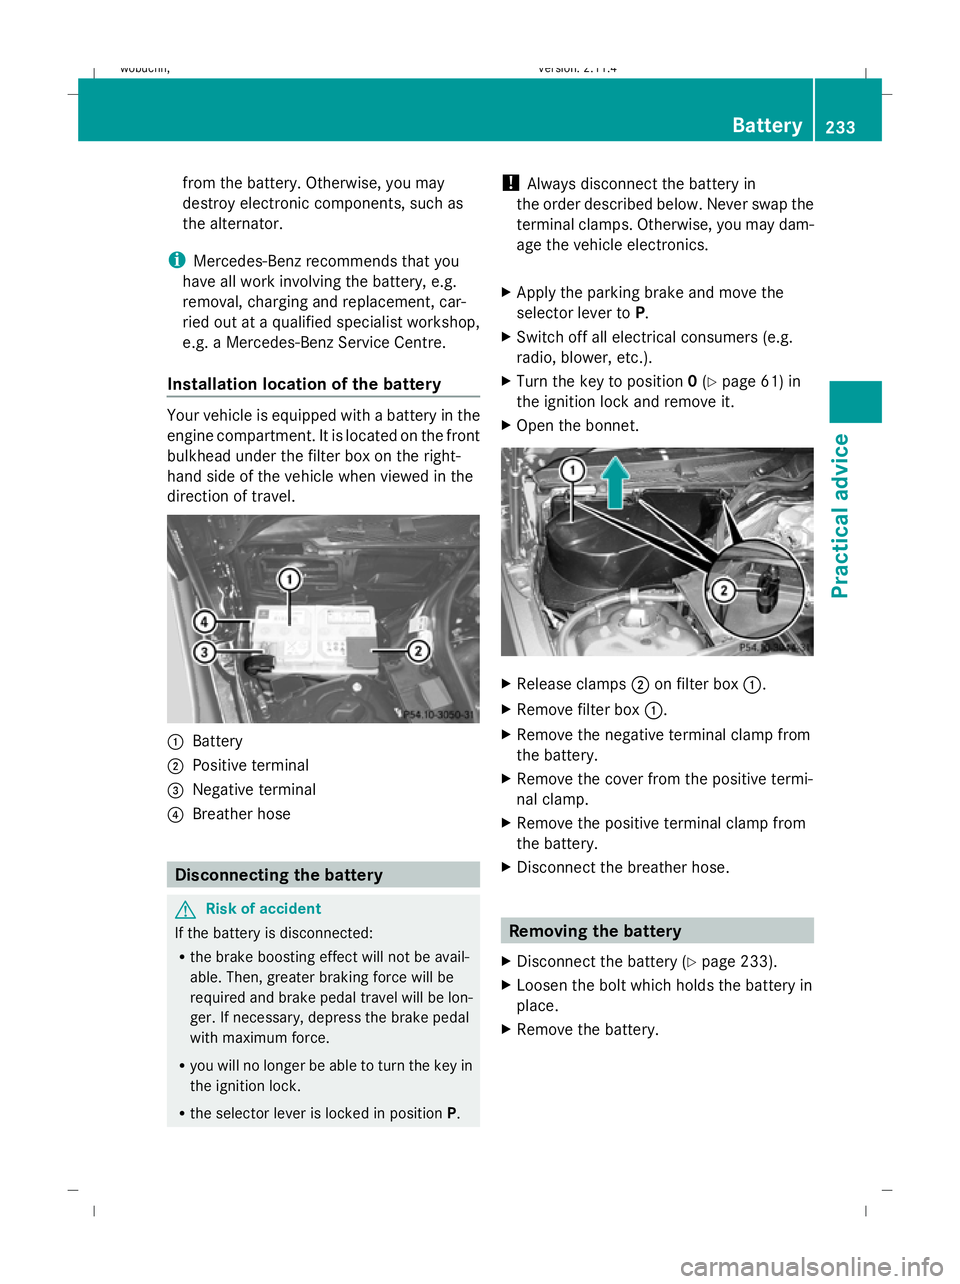
Installation location of the battery Your vehicle is equipped with a battery in the
engine compartment. It is located on the front
bulkhead under the filter box on the right-
hand side of the vehicle when viewed in the
direction of travel.
:
Battery
; Positive terminal
= Negative terminal
? Breather hose Disconnecting the battery
G
Risk of accident
If the battery is disconnected:
R the brake boosting effect will not be avail-
able. Then, greater braking force will be
required and brake pedal travel will be lon-
ger. If necessary, depress the brake pedal
with maximum force.
R you will no longer be able to turn the key in
the ignition lock.
R the selector lever is locked in position P.!
Always disconnect the battery in
the order described below. Never swap the
terminal clamps. Otherwise, you may dam-
age the vehicle electronics.
X Apply the parking brake and move the
selector lever to P.
X Switch off all electrical consumers (e.g.
radio, blower, etc.).
X Turn the key to position 0(Y page 61) in
the ignition lock and remove it.
X Open the bonnet. X
Release clamps ;on filter box :.
X Remove filter box :.
X Remove the negative terminal clamp from
the battery.
X Remove the cover from the positive termi-
nal clamp.
X Remove the positive terminal clamp from
the battery.
X Disconnect the breather hose. Removing the battery
X Disconnect the battery ( Ypage 233).
X Loosen the bolt which holds the battery in
place.
X Remove the battery. Battery
233Practical advice
X204_AKB; 1; 5, en-GB
wobuchh, Version: 2.11.4 2008-10-15T13:20:56+02:00 - Seite 233 ZDateiname: 6515_0671_02_buchblock.pdf; preflight
Page 238 of 261
i
Jump leads and further information about
jump-starting can be obtained from any
Mercedes-Benz Service Centre.
! Avoid repeated and lengthy starting
attempts.
Never start the vehicle using a rapid battery
charger. G
Risk of injury
There is a risk of acid burns when jump-start-
ing a vehicle due to the gases which escape
from the battery. Do not lean over the battery
while the engine is being jump-started. G
Risk of explosion
Gases escaping from the battery during jump-
starting may cause minor explosions. Avoid
creating sparks. Keep naked flames away
from the battery, and do not smoke.
Comply with safety precautions and take pro-
tective measures when handling batteries.
You will find these under "Battery" in the
index.
X Make sure that the two vehicles do not
touch.
X Depress the parking brake firmly.
X Move the selector lever to P.
X Switch off all electrical consumers (e.g.
radio, blower, etc.).
X Open the bonnet (Y page 146). Jump-starting
235Practical advice
X204_AKB; 1; 5, en-GB
wobuchh, Version: 2.11.4 2008-10-15T13:20:56+02:00 - Seite 235 ZDateiname: 6515_0671_02_buchblock.pdf; preflight