2008 MERCEDES-BENZ CLS COUPE window
[x] Cancel search: windowPage 168 of 329
Air conditioning
165
X
To deactivate: press the , button.
The indicator lamp in the , button goes
out.
i Air-recirculation mode switches off auto-
matically:
R after approximately five minutes at out-
side temperatures below approximately
5 †
R after
approximately five minutes if the air
dehumidification is deactivated
R after approximately 30 minutes at out-
side temperatures above approximately
5 †
Air-recirculation mode with the conve-
nience opening/closing feature G
Risk of injury
Make sure that nobody can become trap-
ped
between the side window and the door
frame as the side windows are opened and
closed. Do not place objects or lean against
the side window when it is being opened or
closed. You or the objects could be drawn
in or become trapped between the side
window and the door frame as the window moves. If there is a risk of entrapment,
press the , button again. If necessary,
press
the switch that stops, opens or closes
the side window in the opposite direction.
Make sure that nobody can become trap-
ped when you are opening or closing the
sliding/tilting sunroof*. If there is a risk of
entrapment, press the , button again.
If necessary, press the switch to stop, open
or close the sliding/tilting sunroof* in the
opposite direction.
X Convenience closing: press and hold
the ,
button until the side windows and
the sliding/tilting sunroof* have closed.
The indicator lamp in the , button
comes on. Air-recirculation mode is activa-
ted.
X Convenience opening: press and hold
the ,
button until the side windows and
the sliding/tilting sunroof* have reached
their original position.
The indicator lamp in the , button goes
out. Air-recirculation mode is deactivated.
i If you open the side windows or the slid-
ing/tilting sunroof* manually after closing
using the convenience closing feature, it will remain in this position when opened
using the convenience opening feature. Switching the residual heat/auxiliary
ventilation on/off
It
is possible to make use of the residual heat
of the engine to continue heating the station-
ary vehicle for up to 30 minutes after the
engine has been switched off. The heating
time depends on the set interior temperature.
i The blower will run at a low speed regard-
less of the airflow setting.
i If you activate the "residual heat" function
at high temperatures, only the ventilation
will be activated. The blower runs at
medium speed.
X Make sure that the key is in position 0 in
the ignition lock or that it has been
removed.
X To switch on: press the T button.
REST appears in the display.
X To deactivate: press the T button.
REST is no longer shown in the display. Controls
* optional
219_AKB; 2; 4, en-GB
mkalafa,
2007-11-13T09:28:36+01:00 - Seite 165
Page 172 of 329
Sliding sunroof
169The auxiliary ventilation
is switched on. The num-
ber in the remote control
display indicates the
remaining operating time
of the auxiliary ventila-
tion.
The auxiliary heating is
switched on. The number
in the remote control dis-
play indicates the
remaining operating time
of the auxiliary heating. Sliding sunroof
Sliding/tilting sunroof*
G
Risk of injury
Never leave children unsupervised in the
vehicle. They could operate the sliding/tilt-
ing sunroof and injure themselves. Always
take the key with you when leaving the
vehicle, even if you only leave it for a short
time. G
Risk of injury
Make sure that nobody can become trap-
ped when you are opening and closing the
sliding/tilting sunroof. If danger threatens,
release the switch and push it briefly in any
direction to stop the sliding/tilting sunroof. G
Risk of injury
The glass in the sliding/tilting sunroof
could break in an accident. If you are not
wearing a seat belt, there is a risk that you
could be thrown through the opening in the
event of the vehicle overturning. Therefore,
always wear a seat belt to reduce the risk
of injuries. !
Only open the sliding/tilting sunroof if it
is free of snow and ice. Otherwise, mal-
functions may occur.
Do not allow anything to protrude from the
sliding/tilting sunroof. The seals could oth-
erwise be damaged.
i Resonance noises can occur in addition
to the usual airflow noises when the slid-
ing/tilting sunroof is open. They are caused
by minor pressure fluctuations in the vehi-
cle interior.
Change the position of the sliding/tilting
sunroof or open a side window slightly to
reduce or eliminate these noises.
i It is also possible to open and close the
sliding/tilting sunroof from the outside
using the "Summer opening" ( Y page 100)
and "Convenience closing" ( Y page 100)
features respectively. Controls
* optional
219_AKB; 2; 4, en-GB
mkalafa,
2007-11-13T09:28:36+01:00 - Seite 169
Page 183 of 329
Features
180 Features
Sun visors
G
Risk of accident
Keep the mirrors in the sun visors covered
while driving. You could otherwise be daz-
zled by bright lights, impairing your view of
traffic conditions. As a result you could
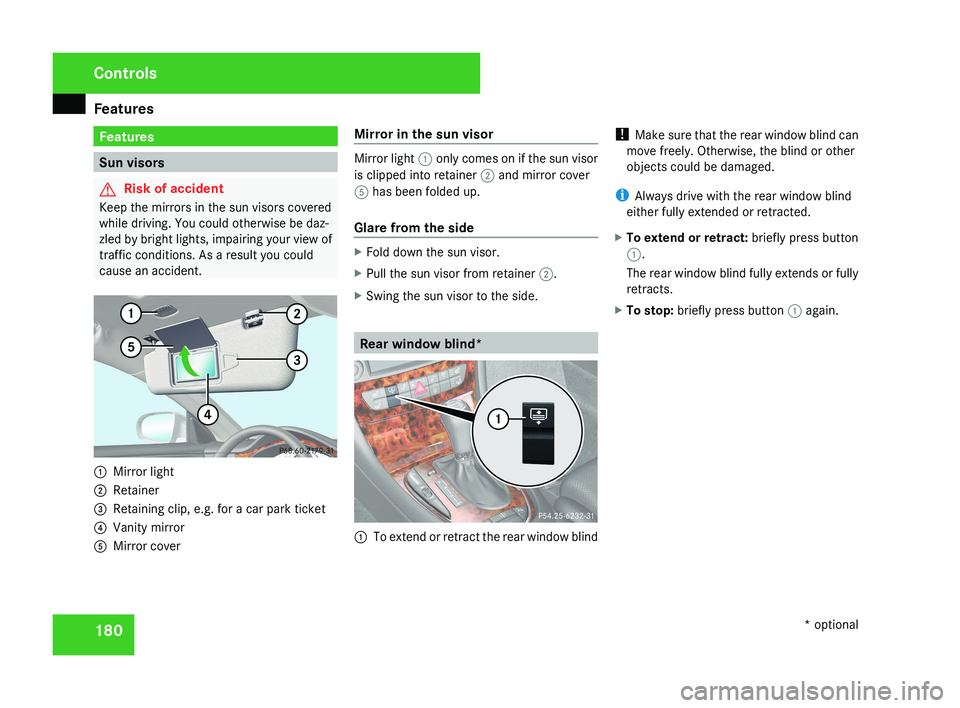
cause an accident.1 Mirror light
2 Retainer
3 Retaining clip, e.g. for a car park ticket
4 Vanity mirror
5 Mirror cover Mirror in the sun visor
Mirror light
1 only comes on if the sun visor
is clipped into retainer 2 and mirror cover
5 has been folded up.
Glare from the side
X Fold down the sun visor.
X Pull the sun visor from retainer 2.
X Swing the sun visor to the side.
Rear window blind*
1 To extend or retract the rear window blind !
Make sure that the rear window blind can
move freely. Otherwise, the blind or other
objects could be damaged.
i Always drive with the rear window blind
either fully extended or retracted.
X To extend or retract: briefly press button
1.
The rear window blind fully extends or fully
retracts.
X To stop: briefly press button 1 again.
Controls
* optional
219_AKB; 2; 4, en-GB
mkalafa,
2007-11-13T09:28:36+01:00 - Seite 180
Page 207 of 329
Winter driving
204
X
Press the reset button on the left of the
instrument cluster
(Y page 209).
The following message appears in the
multi-function display: Check current
tyre pressure?
X Press the æ button.
The following message appears in the
multi-function display:
Tyre pressure monitor restarted
The tyre pressure monitor has stored the
pressure of the tyres as a new reference
value.
If you wish to cancel the restart:
X Press the ç button. Winter driving
Have your vehicle winterproofed at a qualified
specialist workshop, e.g. at a Mercedes-Benz
Service Centre, at the onset of winter.
! Do not use a sharp object to remove snow
or ice from the trim on the B-pillar between
the side windows. Winter tyres
Use
winter tyres at temperatures below +7 °
C and on snow or ice-covered roads. Only
then can the effect of the ABS and ESP ®
driv-
ing systems be ensured in winter too.
Use winter tyres of the same make and tread
on all wheels to maintain safe handling char-
acteristics. G
Risk of accident
You must replace winter tyres with a tread
depth
of less than 4 mm immediately. They
are no longer suitable for winter use, in par-
ticular because they do not provide suffi-
cient grip. This could cause you to lose
control of your vehicle and cause an acci-
dent. Always observe the maximum permitted
speed
specified for the winter tyres you have
fitted. If you fit winter tyres which have a
lower maximum permitted speed than that of
the vehicle, affix an appropriate warning sign
in the driver's field of vision. This can be
obtained at a qualified specialist workshop,
e.g. from a Mercedes-Benz Service Centre.
In such circumstances, you should also
restrict the maximum speed of the vehicle
using permanent Speedtronic 26
to the maxi-
mum permissible speed for winter tyres
(Y page 144).
Once you have fitted the winter tyres:
X Restart the tyre pressure moni-
tor* (Y page 202). G
Risk of accident
If you fit the spare wheel* when driving with
winter tyres, bear in mind that driving sta-
bility will be impaired owing to unstable
cornering
characteristics caused by the dif-
ferent tyres. You should therefore adapt
your driving style and drive carefully.
Have the spare wheel* replaced at the
nearest qualified specialist workshop
which has the necessary specialist knowl-
edge and tools to carry out the work
26 Only available for certain countries. Operation
* optional
219_AKB; 2; 4, en-GB
mkalafa,
2007-11-13T09:28:36+01:00 - Seite 204
Page 214 of 329
Care
211
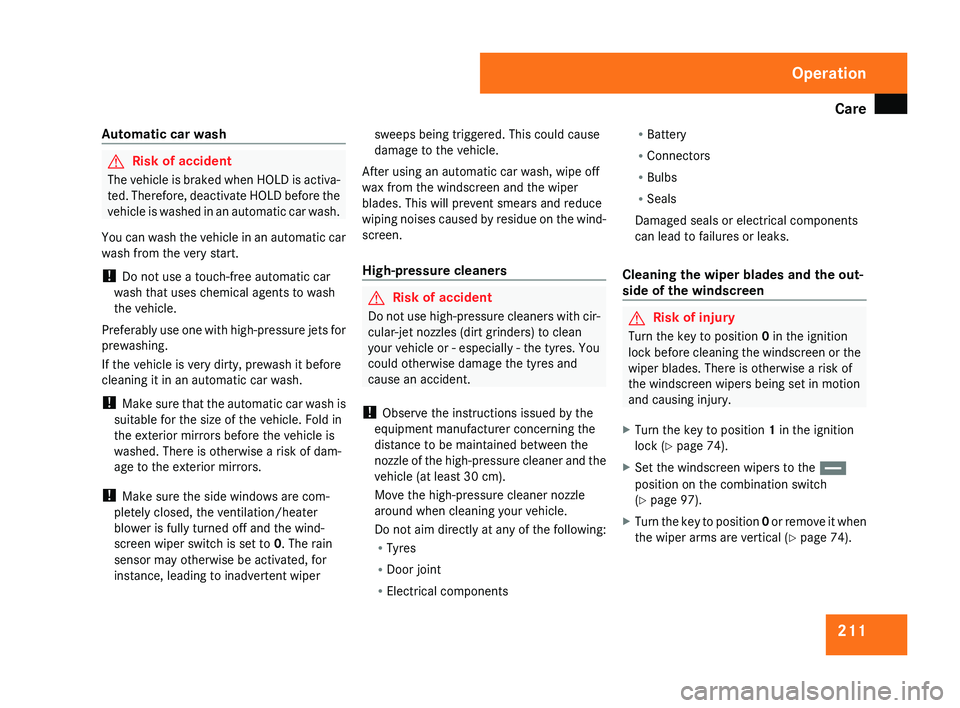
Automatic car wash G
Risk of accident
The vehicle is braked when HOLD is activa-
ted. Therefore, deactivate HOLD before the
vehicle is washed in an automatic car wash.
You can wash the vehicle in an automatic car
wash from the very start.
! Do not use a touch-free automatic car
wash that uses chemical agents to wash
the vehicle.
Preferably use one with high-pressure jets for
prewashing.
If the vehicle is very dirty, prewash it before
cleaning it in an automatic car wash.
! Make sure that the automatic car wash is
suitable for the size of the vehicle. Fold in
the exterior mirrors before the vehicle is
washed. There is otherwise a risk of dam-
age to the exterior mirrors.
! Make sure the side windows are com-
pletely closed, the ventilation/heater
blower is fully turned off and the wind-
screen wiper switch is set to 0. The rain
sensor may otherwise be activated, for
instance, leading to inadvertent wiper sweeps being triggered. This could cause
damage to the vehicle.
After using an automatic car wash, wipe off
wax from the windscreen and the wiper
blades. This will prevent smears and reduce
wiping
noises caused by residue on the wind-
screen.
High-pressure cleaners G
Risk of accident
Do not use high-pressure cleaners with cir-
cular-jet nozzles (dirt grinders) to clean
your vehicle or - especially - the tyres. You
could otherwise damage the tyres and
cause an accident.
! Observe the instructions issued by the
equipment manufacturer concerning the
distance to be maintained between the
nozzle
of the high-pressure cleaner and the
vehicle (at least 30 cm).
Move the high-pressure cleaner nozzle
around when cleaning your vehicle.
Do not aim directly at any of the following:
R Tyres
R Door joint
R Electrical components R
Battery
R Connectors
R Bulbs
R Seals
Damaged seals or electrical components
can lead to failures or leaks.
Cleaning the wiper blades and the out-
side of the windscreen G
Risk of injury
Turn the key to position 0 in the ignition
lock
before cleaning the windscreen or the
wiper blades. There is otherwise a risk of
the windscreen wipers being set in motion
and causing injury.
X Turn the key to position 1 in the ignition
lock (Y page 74).
X Set the windscreen wipers to the u
position on the combination switch
(Y page 97).
X Turn the key to position 0
or remove it when
the wiper arms are vertical ( Y page 74). Operation
219_AKB; 2; 4, en-GB
mkalafa,
2007-11-13T09:28:36+01:00 - Seite 211
Page 215 of 329
Care
212
!
Only fold the windscreen wipers away
from the windscreen when vertical, other-
wise you will damage the bonnet.
X Fold the wiper arms away from the wind-
screen until you feel them engage.
X Clean the windscreen and the wiper blades.
X Fold the windscreen wipers back again
before the ignition is switched on.
! Do not clean the wiper blades too often,
as otherwise the coating may come off.
This could cause wiper noise.
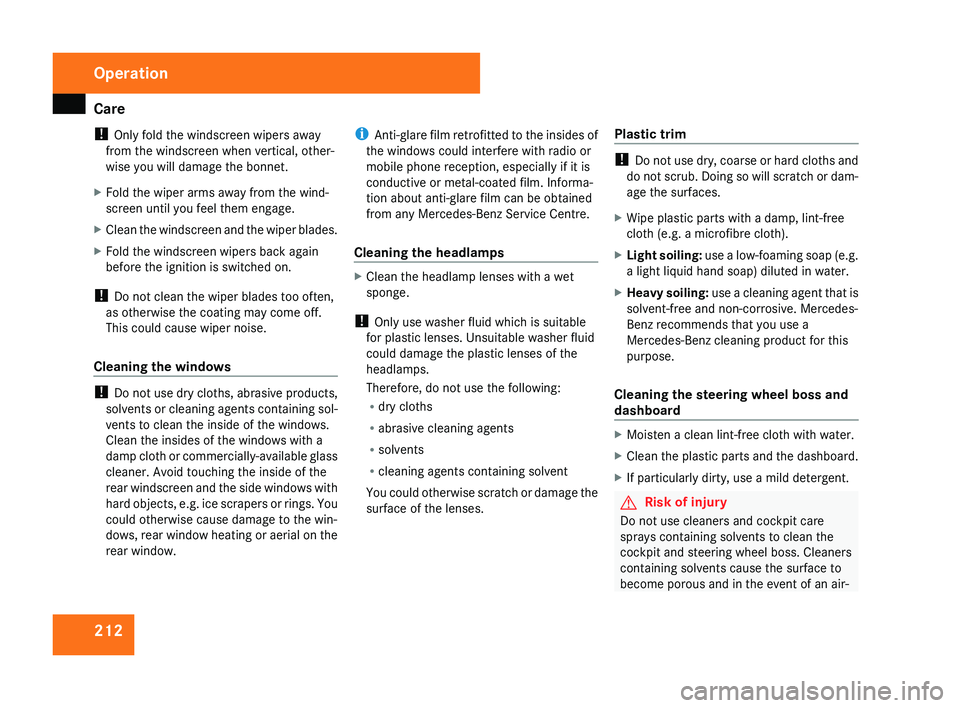
Cleaning the windows !
Do not use dry cloths, abrasive products,
solvents or cleaning agents containing sol-
vents to clean the inside of the windows.
Clean the insides of the windows with a
damp cloth or commercially-available glass
cleaner. Avoid touching the inside of the
rear windscreen and the side windows with
hard objects, e.g. ice scrapers or rings. You
could otherwise cause damage to the win-
dows, rear window heating or aerial on the
rear window. i
Anti-glare
film retrofitted to the insides of
the windows could interfere with radio or
mobile phone reception, especially if it is
conductive or metal-coated film. Informa-
tion about anti-glare film can be obtained
from any Mercedes-Benz Service Centre.
Cleaning the headlamps X
Clean the headlamp lenses with a wet
sponge.
! Only use washer fluid which is suitable
for plastic lenses. Unsuitable washer fluid
could damage the plastic lenses of the
headlamps.
Therefore, do not use the following:
R dry cloths
R abrasive cleaning agents
R solvents
R cleaning agents containing solvent
You
could otherwise scratch or damage the
surface of the lenses. Plastic trim !
Do
not use dry, coarse or hard cloths and
do not scrub. Doing so will scratch or dam-
age the surfaces.
X Wipe plastic parts with a damp, lint-free
cloth (e.g. a microfibre cloth).
X Light soiling:
use a low-foaming soap (e.g.
a light liquid hand soap) diluted in water.
X Heavy soiling:
use a cleaning agent that is
solvent-free and non-corrosive. Mercedes-
Benz recommends that you use a
Mercedes-Benz cleaning product for this
purpose.
Cleaning the steering wheel boss and
dashboard X
Moisten a clean lint-free cloth with water.
X Clean the plastic parts and the dashboard.
X If particularly dirty, use a mild detergent. G
Risk of injury
Do not use cleaners and cockpit care
sprays containing solvents to clean the
cockpit and steering wheel boss. Cleaners
containing solvents cause the surface to
become porous and in the event of an air- Operation
219_AKB; 2; 4, en-GB
mkalafa,
2007-11-13T09:28:36+01:00 - Seite 212
Page 245 of 329
Troubleshooting
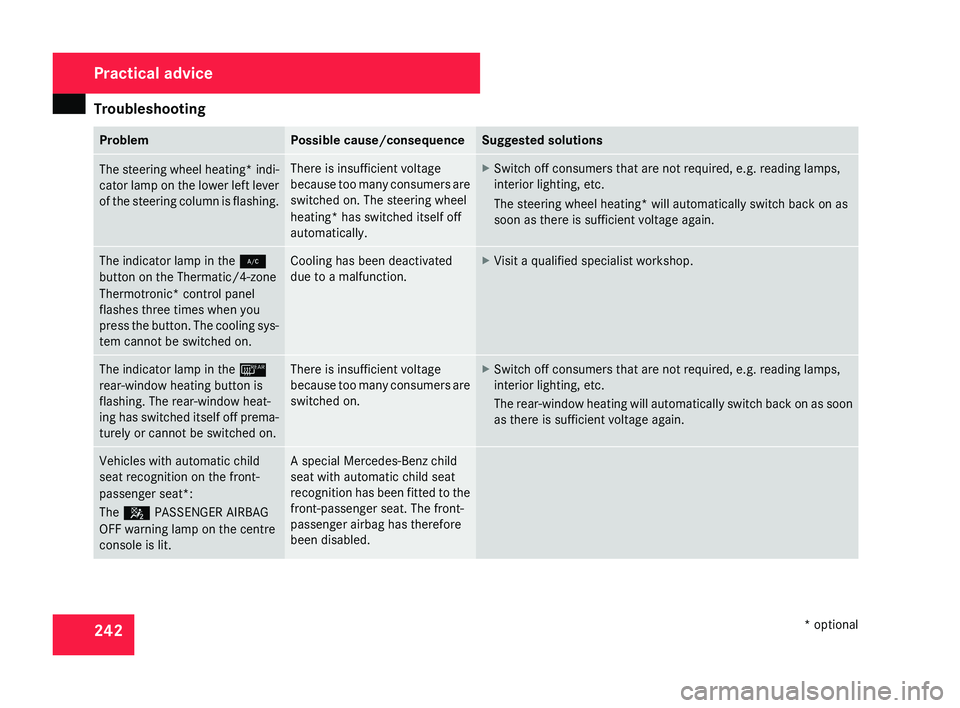
242 Problem Possible cause/consequence Suggested solutions
The steering wheel heating* indi-
cator
lamp on the lower left lever
of the steering column is flashing. There is insufficient voltage
because
too many consumers are
switched on. The steering wheel
heating* has switched itself off
automatically. X
Switch off consumers that are not required, e.g. reading lamps,
interior lighting, etc.
The steering wheel heating*
will automatically switch back on as
soon as there is sufficient voltage again. The indicator lamp in the
2
button on the Thermatic/4-zone
Thermotronic* control panel
flashes three times when you
press
the button. The cooling sys-
tem cannot be switched on. Cooling has been deactivated
due to a malfunction. X
Visit a qualified specialist workshop. The indicator lamp in the
¯
rear-window heating button is
flashing. The rear-window heat-
ing
has switched itself off prema-
turely or cannot be switched on. There is insufficient voltage
because
too many consumers are
switched on. X
Switch off consumers that are not required, e.g. reading lamps,
interior lighting, etc.
The
rear-window heating will automatically switch back on as soon
as there is sufficient voltage again. Vehicles with automatic child
seat recognition on the front-
passenger seat*:
The 5 PASSENGER AIRBAG
OFF warning lamp on the centre
console is lit. A special Mercedes-Benz child
seat with automatic child seat
recognition
has been fitted to the
front-passenger seat. The front-
passenger airbag has therefore
been disabled. Practical advice
* optional
219_AKB; 2; 4, en-GB
mkalafa,
2007-11-13T09:28:36+01:00 - Seite 242
Page 263 of 329
Troubleshooting
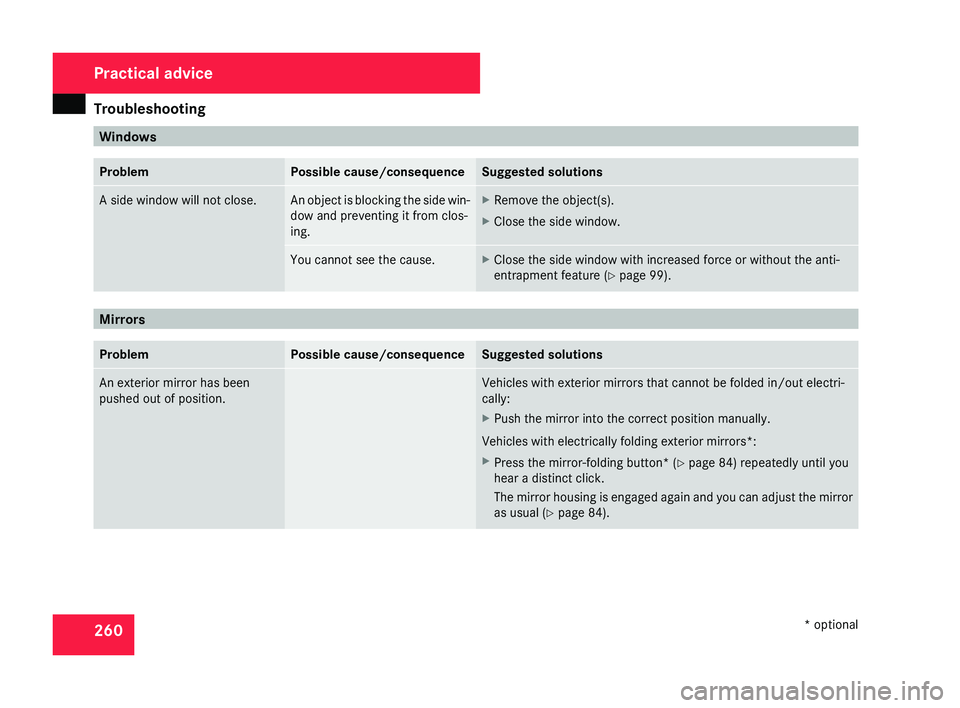
260 Windows
Problem Possible cause/consequence Suggested solutions
A side window will not close. An object is blocking the side win-
dow and preventing it from clos-
ing. X
Remove the object(s).
X Close the side window. You cannot see the cause. X
Close the side window with increased force or without the anti-
entrapment feature ( Y page 99).Mirrors
Problem Possible cause/consequence Suggested solutions
An exterior mirror has been
pushed out of position. Vehicles with exterior mirrors that cannot be folded in/out electri-
cally:
X
Push the mirror into the correct position manually.
Vehicles with electrically folding exterior mirrors*:
X Press the mirror-folding button* ( Y page 84) repeatedly until you
hear a distinct click.
The
mirror housing is engaged again and you can adjust the mirror
as usual (Y page 84). Practical advice
* optional
219_AKB; 2; 4, en-GB
mkalafa,
2007-11-13T09:28:36+01:00 - Seite 260