2008 MERCEDES-BENZ CLS COUPE reset
[x] Cancel search: resetPage 138 of 329
Driving systems
135
X
Briefly press the cruise control lever in the
direction of arrow 5.
Variable Speedtronic is selected. LIM indi-
cator lamp 2 in the cruise control lever
lights up.
Cruise control is automatically deactivated if,
for example:
R you depress the parking brake
R you are driving at less than
30 km/h
R ESP ®
(Y page 59) is intervening or you
deactivate ESP ®
R you move the selector lever to N while driv-
ing
If cruise control is deactivated, you will hear
a warning tone. You will see the Cruise con-
trol off message in the multi-function dis-
play for approximately five seconds.
i The last speed stored is cleared when you
switch off the engine. Distronic*
Distronic regulates the speed and automati-
cally maintains the distance to the vehicle in
front.
It brakes automatically in order to avoid
exceeding the set speed. On long and steep
downhill gradients, especially if the vehicle is
laden, you must select shift range 1, 2 or 3 in
good time. In this way you will make use of
the braking effect of the engine, which
relieves the load on the brake system and
prevents the brakes from overheating and
wearing too quickly. G
Risk of accident
Do not change down for additional engine
braking on a slippery road surface. This
could cause the drive wheels to lose their
grip and the vehicle could skid. G
Risk of accident
Distronic is only an aid designed to assist
driving.
The driver remains fully responsible
for the vehicle's distance from other vehi-
cles, the vehicle's speed and braking in
good time. Distronic does not react to: R
pedestrians
R stationary
obstacles on the road, e.g. sta-
tionary or parked vehicles
R oncoming and crossing traffic
Distronic may not detect narrow vehicles
driving in front, e.g. motorcycles, or vehi-
cles driving on a different line. Therefore,
always pay attention to traffic conditions
even when Distronic is activated. Other-
wise, you may fail to recognise dangers in
time, could cause an accident and injure
yourself and others.
If a slower-moving vehicle is detected in front,
Distronic causes your vehicle to brake and
maintain a preset distance to the vehicle in
front. G
Risk of accident
Distronic cannot take account of road and
traffic conditions. Deactivate, or do not
activate, Distronic in situations in which
Distronic maintains the speed or acceler-
ates
to the set speed because it has lost the
vehicle in front, in particular:
R before corners
R on filter lanes Controls
* optional
219_AKB; 2; 4, en-GB
mkalafa,
2007-11-13T09:28:36+01:00 - Seite 135 Z
Page 174 of 329

Sliding sunroof
171
Lowering and closing X
To lower manually: pull the switch in the
direction of arrow 2 and hold it until the
sliding/tilting
sunroof is in the desired posi-
tion.
X To lower fully: pull the switch briefly
beyond the pressure point in the direction
of arrow 2 and release it.
X To stop: push or pull the switch in any
direction.
Rain closing feature The sliding/tilting sunroof closes automati-
cally:
R
if it starts to rain
R at extreme outside temperatures
R after 12 hours
R if
there is a malfunction in the power supply
The rear of the sliding/tilting sunroof is then
raised in order to ventilate the interior of the
vehicle.
i The sliding/tilting sunroof is opened
slightly again if it is obstructed while being
closed by the rain closing feature. The rain
closing feature is then deactivated. i
The
sliding/tilting sunroof does not close
if:
R it is raised at the rear
R it is blocked
R no rain is falling on the windscreen (e.g.
because the vehicle is under a bridge or
in a carport)
Opening and closing the cover The cover functions as a sunblind. When you
open the sliding/tilting sunroof, the cover
moves back with it.
When the sliding/tilting sunroof is closed or
raised at the rear, you can open or close the
cover manually.
Resetting the sliding/tilting sunroof
Reset the sliding/tilting sunroof if it does not
move smoothly, or if the battery was discon-
nected or flat:
X
Remove the fuse for the sliding/tilting sun-
roof in the main fuse box (Y page 296).
X Reinsert the fuse.
X Make sure that the key is in position 2 in
the ignition lock. X
Press the switch in the direction of
arrow 3
and hold it until the sliding/tilting
sunroof is fully raised at the rear.
X Keep the switch pressed for an additional
second.
X Make sure that the sliding/tilting sunroof
can be opened or closed fully again
(Y page 170).
X If this is not the case, consult a qualified
specialist workshop. Controls
219_AKB; 2; 4, en-GB
mkalafa,
2007-11-13T09:28:36+01:00 - Seite 171
Page 205 of 329
Tyres and wheels
202tyres is set correctly for the operating con-
ditions concerned.
X Also observe the notes in the section on
tyre pressures ( Y page 200). G
Risk of accident
The tyre pressure loss warning system can
only give reliable warnings if you have set
the correct tyre pressure.
If an incorrect tyre pressure is set, these
incorrect values will be monitored.
A tyre with insufficient pressure results in
an instability of the vehicle when driving,
thus increasing the risk of an accident.
X Make sure that the key is in position 2 in
the ignition lock.
The standard display appears in the multi-
function display ( Y page 115).
X Press k or j to select the tyre pres-
sure function:
Run Flat Indicator active
Menu: R-Button æ
X Press the reset button on the left of the
instrument cluster.
The following message appears in the
multi-function display:
Restart Run Flat Indicator? Yes Cancel
If you wish to confirm the restart:
X Press the æ button.
The following message appears in the
multi-function display:
Run Flat Indicator restarted
After a teach-in period, the tyre pressure
loss warning system will monitor the set
tyre pressures of all four tyres.
If you wish to cancel the restart:
X Press the ç button.
or
X Wait until the message
Restart Run Flat Indicator?
Yes Cancel disappears.
The tyre pressure values stored at the last
restart will continue to be monitored. Checking the tyre pressure electroni-
cally*
The tyre pressure monitor only functions if
the correct wheel electronics are fitted to all
wheels.
These monitor the pressure in all four
tyres, which you have set when restarting the
tyre pressure monitor. The monitor warns you
when the pressure drops in one or more of
the tyres. G
Risk of accident
The tyre pressure monitor does not warn
you
of an incorrectly set tyre pressure. The
table on the inside of the fuel filler flap will
help you decide whether the tyre pressures
should be corrected.
The tyre pressure monitor is not able to
warn you of a sudden loss of pressure, e.g.
if the tyre is penetrated by a foreign object.
In the event of a sudden loss of pressure,
bring the vehicle to a halt by braking care-
fully. Do not make any sudden steering
movements when doing so.
i The operation of the tyre pressure moni-
tor can be affected by interference from
radio transmitting equipment (e.g. radio
headphones, two-way radios) that may be
being operated in or near the vehicle. Operation
* optional
219_AKB; 2; 4, en-GB
mkalafa,
2007-11-13T09:28:36+01:00 - Seite 202
Page 207 of 329
Winter driving
204
X
Press the reset button on the left of the
instrument cluster
(Y page 209).
The following message appears in the
multi-function display: Check current
tyre pressure?
X Press the æ button.
The following message appears in the
multi-function display:
Tyre pressure monitor restarted
The tyre pressure monitor has stored the
pressure of the tyres as a new reference
value.
If you wish to cancel the restart:
X Press the ç button. Winter driving
Have your vehicle winterproofed at a qualified
specialist workshop, e.g. at a Mercedes-Benz
Service Centre, at the onset of winter.
! Do not use a sharp object to remove snow
or ice from the trim on the B-pillar between
the side windows. Winter tyres
Use
winter tyres at temperatures below +7 °
C and on snow or ice-covered roads. Only
then can the effect of the ABS and ESP ®
driv-
ing systems be ensured in winter too.
Use winter tyres of the same make and tread
on all wheels to maintain safe handling char-
acteristics. G
Risk of accident
You must replace winter tyres with a tread
depth
of less than 4 mm immediately. They
are no longer suitable for winter use, in par-
ticular because they do not provide suffi-
cient grip. This could cause you to lose
control of your vehicle and cause an acci-
dent. Always observe the maximum permitted
speed
specified for the winter tyres you have
fitted. If you fit winter tyres which have a
lower maximum permitted speed than that of
the vehicle, affix an appropriate warning sign
in the driver's field of vision. This can be
obtained at a qualified specialist workshop,
e.g. from a Mercedes-Benz Service Centre.
In such circumstances, you should also
restrict the maximum speed of the vehicle
using permanent Speedtronic 26
to the maxi-
mum permissible speed for winter tyres
(Y page 144).
Once you have fitted the winter tyres:
X Restart the tyre pressure moni-
tor* (Y page 202). G
Risk of accident
If you fit the spare wheel* when driving with
winter tyres, bear in mind that driving sta-
bility will be impaired owing to unstable
cornering
characteristics caused by the dif-
ferent tyres. You should therefore adapt
your driving style and drive carefully.
Have the spare wheel* replaced at the
nearest qualified specialist workshop
which has the necessary specialist knowl-
edge and tools to carry out the work
26 Only available for certain countries. Operation
* optional
219_AKB; 2; 4, en-GB
mkalafa,
2007-11-13T09:28:36+01:00 - Seite 204
Page 212 of 329
Service
209Service
Active Service System PLUS
ASSYST PLUS, the Active Service System,
tells you when the next service is due. When-
ever a service is due, this is shown in the
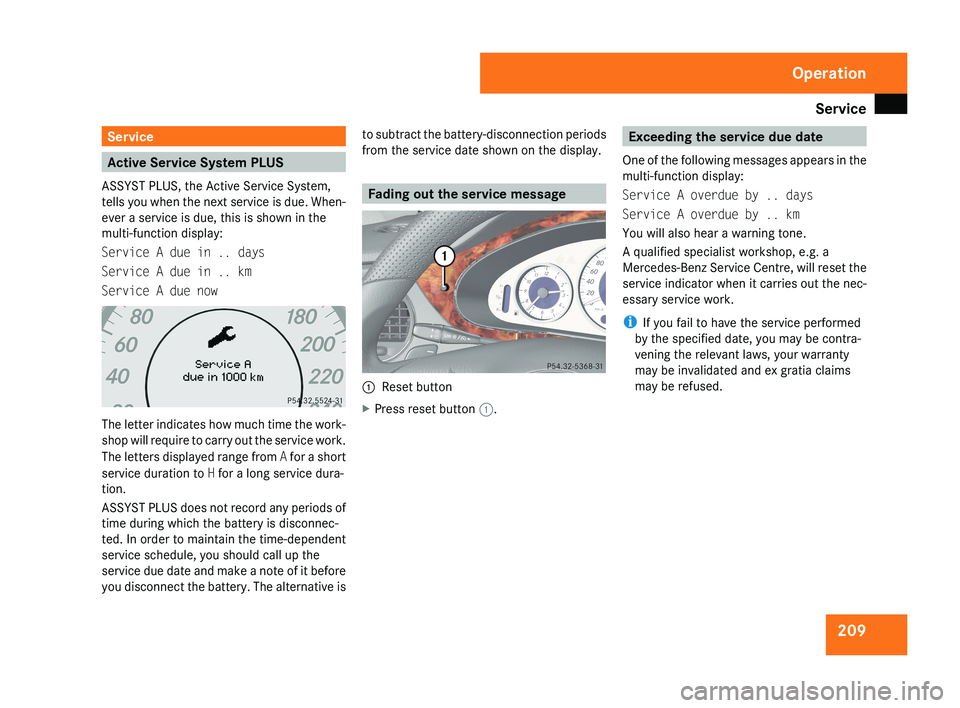
multi-function display:
Service A due in .. days
Service A due in .. km
Service A due nowThe letter indicates how much time the work-
shop will require to carry out the service work.
The letters displayed range from A for a short
service duration to H for a long service dura-
tion.
ASSYST PLUS does not record any periods of
time during which the battery is disconnec-
ted. In order to maintain the time-dependent
service schedule, you should call up the
service due date and make a note of it before
you disconnect the battery. The alternative is to subtract the battery-disconnection periods
from the service date shown on the display.
Fading out the service message
1
Reset button
X Press reset button 1.
Exceeding the service due date
One of the following messages appears in the
multi-function display:
Service A overdue by .. days
Service A overdue by .. km
You will also hear a warning tone.
A qualified specialist workshop, e.g. a
Mercedes-Benz Service Centre, will reset the
service indicator when it carries out the nec-
essary service work.
i If you fail to have the service performed
by the specified date, you may be contra-
vening the relevant laws, your warranty
may be invalidated and ex gratia claims
may be refused.
Operation
219_AKB; 2; 4, en-GB
mkalafa,
2007-11-13T09:28:36+01:00 - Seite 209
Page 218 of 329
215
Where will I find...? ...........................
216
Display messages ............................. 219
Troubleshooting ................................ 241
Locking/unlocking in an emer-
gency ................................................. 266
Resetting triggered NECK-PRO
head restraints .................................. 269
Changing the batteries .....................269
Changing the bulbs ...........................271
Replacing the wiper blades ..............275
Flat tyre ............................................. 276
Battery ............................................... 288
Jump-starting .................................... 291
Towing and tow-starting .................. 293
Fuses .................................................. 295
Practical advice
219_AKB; 2; 4, en-GB
mkalafa,
2007-11-13T09:28:36+01:00 - Seite 215
Page 255 of 329
Troubleshooting
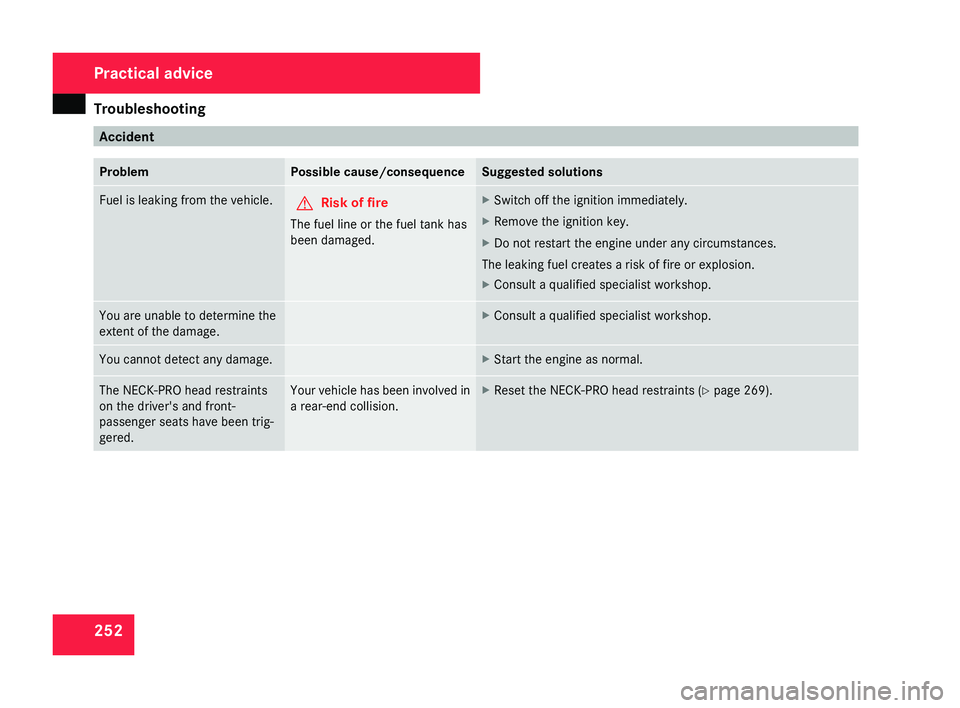
252 Accident
Problem Possible cause/consequence Suggested solutions
Fuel is leaking from the vehicle.
G
Risk of fire
The fuel line or the fuel tank has
been damaged. X
Switch off the ignition immediately.
X Remove the ignition key.
X Do not restart the engine under any circumstances.
The leaking fuel creates a risk of fire or explosion.
X Consult a qualified specialist workshop. You are unable to determine the
extent of the damage. X
Consult a qualified specialist workshop. You cannot detect any damage. X
Start the engine as normal. The NECK-PRO head restraints
on the driver's and front-
passenger seats have been trig-
gered. Your vehicle has been involved in
a rear-end collision. X
Reset the NECK-PRO head restraints (Y page 269). Practical advice
219_AKB; 2; 4, en-GB
mkalafa,
2007-11-13T09:28:36+01:00 - Seite 252
Page 272 of 329
Changing the batteries
269Resetting triggered NECK-PRO head
restraints
If the NECK-PRO head restraints are triggered
in an accident, you must reset the head
restraints on the driver's and front-passenger
seats. Otherwise, the additional protection
will not be available in the event of another
rear-end collision. You can recognise when
head restraints have been triggered by the
fact that they have been moved forwards and
can no longer be adjusted.
Mercedes-Benz recommends that you have
NECK-PRO head restraints checked at a quali-
fied specialist workshop, e.g. a Mercedes-
Benz Service Centre, following a rear-end
collision.
i If you have problems resetting the head
restraints, have this work carried out at a
qualified specialist workshop, e.g. a
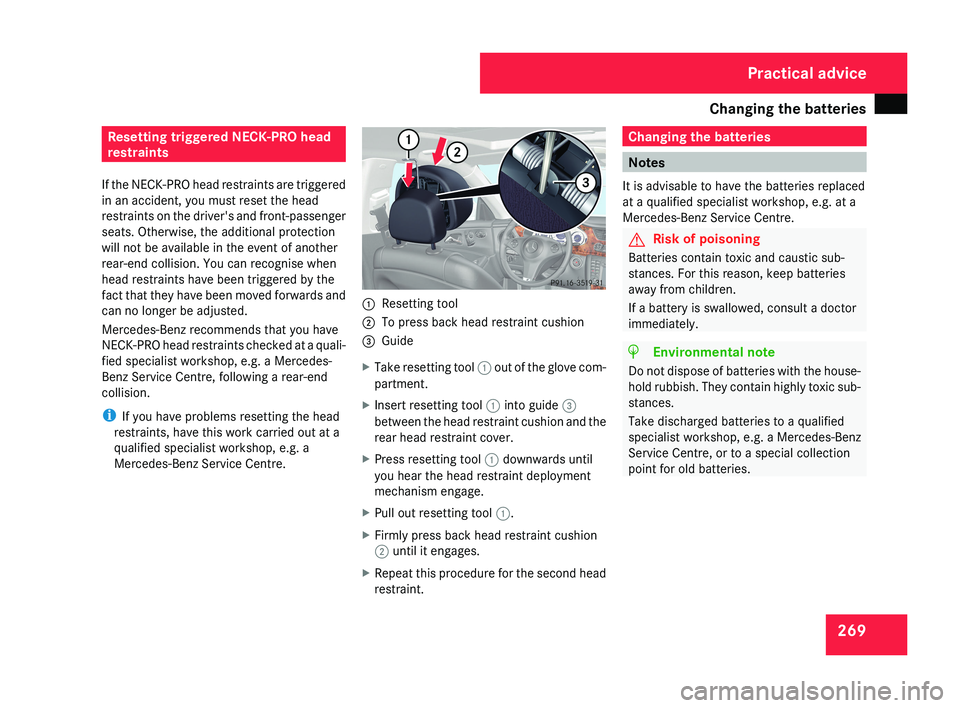
Mercedes-Benz Service Centre.1 Resetting tool
2 To press back head restraint cushion
3 Guide
X Take resetting tool 1 out of the glove com-
partment.
X Insert resetting tool 1 into guide 3
between the head restraint cushion and the
rear head restraint cover.
X Press resetting tool 1 downwards until
you hear the head restraint deployment
mechanism engage.
X Pull out resetting tool 1.
X Firmly press back head restraint cushion
2 until it engages.
X Repeat this procedure for the second head
restraint.
Changing the batteries
Notes
It is advisable to have the batteries replaced
at a qualified specialist workshop, e.g. at a
Mercedes-Benz Service Centre.
G Risk of poisoning
Batteries contain toxic and caustic sub-
stances. For this reason, keep batteries
away from children.
If a battery is swallowed, consult a doctor
immediately.
H Environmental note
Do not dispose of batteries with the house-
hold rubbish. They contain highly toxic sub-
stances.
Take discharged batteries to a qualified
specialist workshop, e.g. a Mercedes-Benz
Service Centre, or to a special collection
point for old batteries.
Practical advice
219_AKB; 2; 4, en-GB
mkalafa,
2007-11-13T09:28:36+01:00 - Seite 269