2008 MERCEDES-BENZ CLS COUPE remote start
[x] Cancel search: remote startPage 69 of 329

Opening and closing
66 Opening and closing
Key
The vehicle's equipment includes two keys
with remote control. Each key contains an
emergency key element.
The key is configured at the factory to cen-
trally lock and unlock the following:
R the doors
R the boot lid
R the fuel filler flap G
Risk of accident
Never leave children unsupervised in the
vehicle. They could open a door from the
inside, even if it has been locked, or start
the vehicle if the key is left in it. They could
endanger themselves and others. You
should therefore take the key with you
when leaving the vehicle, even if you are
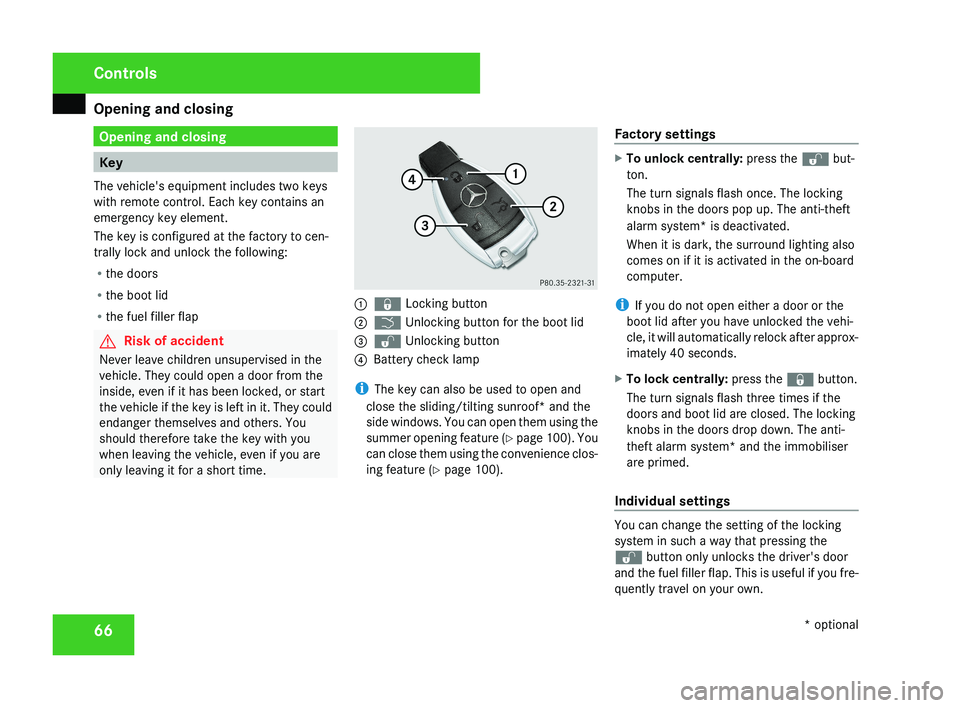
only leaving it for a short time.1 j Locking button
2 i Unlocking button for the boot lid
3 k Unlocking button
4 Battery check lamp
i The key can also be used to open and
close the sliding/tilting sunroof* and the
side windows. You can open them using the
summer opening feature (Y page 100). You
can close them using the convenience clos-
ing feature ( Y page 100). Factory settings
X
To unlock centrally: press the k but-
ton.
The turn signals flash once. The locking
knobs in the doors pop up. The anti-theft
alarm system* is deactivated.
When it is dark, the surround lighting also
comes on if it is activated in the on-board
computer.
i If you do not open either a door or the
boot lid after you have unlocked the vehi-
cle, it will automatically relock after approx-
imately 40 seconds.
X To lock centrally: press the j button.
The turn signals flash three times if the
doors and boot lid are closed. The locking
knobs in the doors drop down. The anti-
theft alarm system* and the immobiliser
are primed.
Individual settings
You can change the setting of the locking
system in such a way that pressing the
k button only unlocks the driver's door
and the fuel filler flap. This is useful if you fre-
quently travel on your own.
Controls
* optional
219_AKB; 2; 4, en-GB
mkalafa,
2007-11-13T09:28:36+01:00 - Seite 66
Page 70 of 329

Opening and closing
67
X
To change the setting: press the k
and j buttons simultaneously for
approximately six seconds until the battery
check lamp flashes twice.
The key now functions as follows:
X To unlock the driver's door: press the
k button once.
X To unlock centrally: press the k but-
ton twice.
X To lock centrally: press the j button.
Restoring the factory settings X
Press the k and j buttons simulta-
neously for approximately six seconds until
the battery check lamp flashes twice. KEYLESS GO*
If you are carrying the KEYLESS GO key on
your person, you can use the KEYLESS GO
functions of your vehicle. The KEYLESS GO
key should not be more than one metre away
from the vehicle. However, you can also use
the KEYLESS GO key like a normal key with
remote control.
When you pull the door handle, the following
unlock centrally if the factory settings have
not been changed:
R the doors
R the boot lid
R the fuel filler flap G
Risk of accident
Never leave children unsupervised in the
vehicle. They could open a door from the
inside at any time, even if it has been
locked. Or they could start the vehicle if a
valid KEYLESS GO key is in the vehicle and
they press the KEYLESS GO button on the
gear selector lever. They could endanger
themselves and others. Switch off the
engine and take the KEYLESS GO key with
you, even if you are only leaving the vehicle
for a short time. 1
j Locking button
2 i Unlocking button for the boot lid
3 k Unlocking button
4 Battery check lamp
i You can also use the KEYLESS GO key to
open and close the side windows and slid-
ing/tilting sunroof* . You can open them
using the summer opening feature
(Y page 100). You can close them using
the convenience closing feature
(Y page 100).
i If the vehicle has been parked for a long
time, you must pull the door handle to acti-
vate the KEYLESS GO functions. Controls
* optional
219_AKB; 2; 4, en-GB
mkalafa,
2007-11-13T09:28:36+01:00 - Seite 67
Page 189 of 329

Features
186 Garage door opener*
The remote control integrated in the rear-view
mirror allows you to operate up to three dif-
ferent door and gate systems.
i The garage door opener is only available
for certain countries. Observe the legal
requirements in all countries concerned.
The HomeLink ®
garage door opener is
compatible with most European garage and
gate opener drives. More information on
HomeLink ®
and/or compatible products is
available from:
R any Mercedes-Benz Service Centre
R the HomeLink ®
hotline
(0) 08000 466 354 65 (free of charge) or
+49 (0) 6839 907-277 (at a charge)
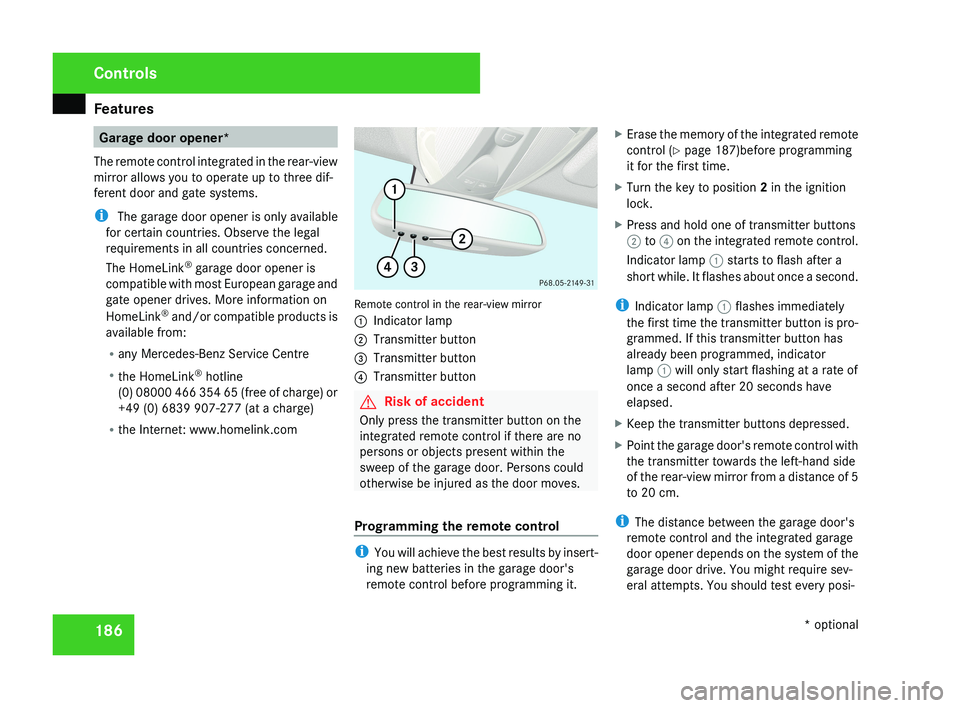
R the Internet: www.homelink.comRemote control in the rear-view mirror
1 Indicator lamp
2 Transmitter button
3 Transmitter button
4 Transmitter button
G Risk of accident
Only press the transmitter button on the
integrated remote control if there are no
persons or objects present within the
sweep of the garage door. Persons could
otherwise be injured as the door moves.
Programming the remote control
i You will achieve the best results by insert-
ing new batteries in the garage door's
remote control before programming it. X
Erase the memory of the integrated remote
control ( Y page 187)before programming
it for the first time.
X Turn the key to position 2 in the ignition
lock.
X Press and hold one of transmitter buttons
2 to 4 on the integrated remote control.
Indicator lamp 1 starts to flash after a
short while. It flashes about once a second.
i Indicator lamp 1 flashes immediately
the first time the transmitter button is pro-
grammed. If this transmitter button has
already been programmed, indicator
lamp 1 will only start flashing at a rate of
once a second after 20 seconds have
elapsed.
X Keep the transmitter buttons depressed.
X Point the garage door's remote control with
the transmitter towards the left-hand side
of the rear-view mirror from a distance of 5
to 20 cm.
i The distance between the garage door's
remote control and the integrated garage
door opener depends on the system of the
garage door drive. You might require sev-
eral attempts. You should test every posi-
Controls
* optional
219_AKB; 2; 4, en-GB
mkalafa,
2007-11-13T09:28:36+01:00 - Seite 186
Page 190 of 329

Features
187
tion for at least 20 seconds before trying
another position.
X Keep the transmitter button on the garage
door's
remote control depressed until indi-
cator lamp 1 starts to flash rapidly.
The programming was successful if indica-
tor lamp 1 flashes rapidly.
X Release the transmitter buttons on the
garage
door's remote control and the inte-
grated remote control.
If indicator lamp 1 goes out after approxi-
mately 20 seconds and did not flash rapidly
before this:
X Release the transmitter buttons on the
integrated and portable remote controls.
X Repeat the programming procedure. At the
same time change the distance between
the garage door's remote control and the
transmitter
buttons in the rear-view mirror.
i If the garage door system works with a
rolling code, after programming you must
synchronise the remote control integrated
in
the rear-view mirror with the garage door
system receiver.
You will find further information in the
garage door opening system's operating instructions, e.g. the sections on “Synchro-
nising the transmitter” or “Registering a
new
transmitter”. You can also call the hot-
line mentioned above.
Opening or closing the garage door Once programmed, the integrated remote
control
will assume the function of the garage
door system's remote control. Please read
the operating instructions for the garage door
system.
X Turn the key to position 2 in the ignition
lock.
X Press the transmitter button on the rear-
view mirror that you have programmed to
operate the garage door.
Garage door system with fixed code: indi-
cator lamp 1 lights up continuously.
Garage
door system with rolling code: indi-
cator lamp 1 flashes briefly and then lights
up for approximately two seconds. This is
repeated for up to 20 seconds.
i The transmitter will transmit a signal for
as long as the transmitter button is being
pressed. The transmission will be halted
after a maximum of 20 seconds and indi- cator lamp 1 will flash. Press the trans-
mitter button again if necessary.
Clearing the remote control memory X
Turn the key to position 2 in the ignition
lock.
X Press and hold transmitter buttons 2 and
4
for approximately 20 seconds until indi-
cator lamp 1 flashes rapidly.
The memory is cleared.
i You
should clear the remote control mem-
ory before selling the vehicle. Floormat* on the driver's side
G
Risk of accident
Make sure that there is sufficient clearance
around the pedals when floormats are
used, and that the floormats are properly
secured.
The
floormats must be secured at all times
using retainers and studs.
Before you drive off, make sure that the
floormats are secure and rectify if neces-
sary. A floormat which is not properly Controls
* optional
219_AKB; 2; 4, en-GB
mkalafa,
2007-11-13T09:28:36+01:00 - Seite 187 Z