Page 190 of 329

Features
187
tion for at least 20 seconds before trying
another position.
X Keep the transmitter button on the garage
door's
remote control depressed until indi-
cator lamp 1 starts to flash rapidly.
The programming was successful if indica-
tor lamp 1 flashes rapidly.
X Release the transmitter buttons on the
garage
door's remote control and the inte-
grated remote control.
If indicator lamp 1 goes out after approxi-
mately 20 seconds and did not flash rapidly
before this:
X Release the transmitter buttons on the
integrated and portable remote controls.
X Repeat the programming procedure. At the
same time change the distance between
the garage door's remote control and the
transmitter
buttons in the rear-view mirror.
i If the garage door system works with a
rolling code, after programming you must
synchronise the remote control integrated
in
the rear-view mirror with the garage door
system receiver.
You will find further information in the
garage door opening system's operating instructions, e.g. the sections on “Synchro-
nising the transmitter” or “Registering a
new
transmitter”. You can also call the hot-
line mentioned above.
Opening or closing the garage door Once programmed, the integrated remote
control
will assume the function of the garage
door system's remote control. Please read
the operating instructions for the garage door
system.
X Turn the key to position 2 in the ignition
lock.
X Press the transmitter button on the rear-
view mirror that you have programmed to
operate the garage door.
Garage door system with fixed code: indi-
cator lamp 1 lights up continuously.
Garage
door system with rolling code: indi-
cator lamp 1 flashes briefly and then lights
up for approximately two seconds. This is
repeated for up to 20 seconds.
i The transmitter will transmit a signal for
as long as the transmitter button is being
pressed. The transmission will be halted
after a maximum of 20 seconds and indi- cator lamp 1 will flash. Press the trans-
mitter button again if necessary.
Clearing the remote control memory X
Turn the key to position 2 in the ignition
lock.
X Press and hold transmitter buttons 2 and
4
for approximately 20 seconds until indi-
cator lamp 1 flashes rapidly.
The memory is cleared.
i You
should clear the remote control mem-
ory before selling the vehicle. Floormat* on the driver's side
G
Risk of accident
Make sure that there is sufficient clearance
around the pedals when floormats are
used, and that the floormats are properly
secured.
The
floormats must be secured at all times
using retainers and studs.
Before you drive off, make sure that the
floormats are secure and rectify if neces-
sary. A floormat which is not properly Controls
* optional
219_AKB; 2; 4, en-GB
mkalafa,
2007-11-13T09:28:36+01:00 - Seite 187 Z
Page 266 of 329

Troubleshooting
263KEYLESS GO*
Problem Possible cause/consequence Suggested solutions
You cannot lock or unlock the
vehicle using the KEYLESS GO
key. The KEYLESS GO key batteries
are discharged or nearly dis-
charged. X
Lock or unlock the vehicle using the remote control function of the
key.
Point the tip of the key at the driver's door handle from close
range and try to open the vehicle again.
If this does not work:
X Lock or unlock the vehicle using the emergency key element
(Y page 266).
X Check the KEYLESS GO key batteries (Y page 270) and replace
them if necessary (Y page 270). There is a fault with KEYLESS GO. X
Lock or unlock the vehicle using the remote control function of the
key.
To do this, point the tip of the key at the driver's door handle
from close range and try to open the vehicle again.
X Have the KEYLESS GO key checked at a qualified specialist work-
shop. There is interference from a pow-
erful source of radio waves. X
Lock or unlock the vehicle using the emergency key element
(Y page 266). The battery check lamp in the
KEYLESS GO key does not light
up when tested. The KEYLESS GO key batteries
are discharged. X
Change the batteries ( Y page 270). Practical advice
* optional
219_AKB; 2; 4, en-GB
mkalafa,
2007-11-13T09:28:36+01:00 - Seite 263 Z
Page 268 of 329

Troubleshooting
265Problem Possible cause/consequence Suggested solutions
The auxiliary heating cannot be
switched on or off using the
remote control. The remote control display shows
FAIL and the
¢ symbol.
The signal transmission between
the remote control and the vehi-
cle is faulty. X
Change your position in relation to the vehicle, moving closer if
necessary.
X Make another attempt to switch the auxiliary heating on or off using
the remote control. The remote control display shows
FAIL and the
¡ symbol.
There is not enough fuel in the
tank, or the auxiliary heating is
faulty. X
Refuel at the nearest filling station.
X Have the auxiliary heating checked at a qualified specialist work-
shop. Parking up the vehicle
Problem Possible cause/consequence Suggested solutions
The vehicle is to be left parked up
for longer than six weeks. X
Visit a qualified specialist workshop and seek advice.
X Disconnect the battery ( Y page 290). Practical advice
219_AKB; 2; 4, en-GB
mkalafa,
2007-11-13T09:28:36+01:00 - Seite 265
Page 273 of 329

Changing the batteries
270 Key or KEYLESS GO key*
Checking the batteries X
Press the j or k button.
The batteries are in order if the battery
charge indicator lamp lights up briefly.
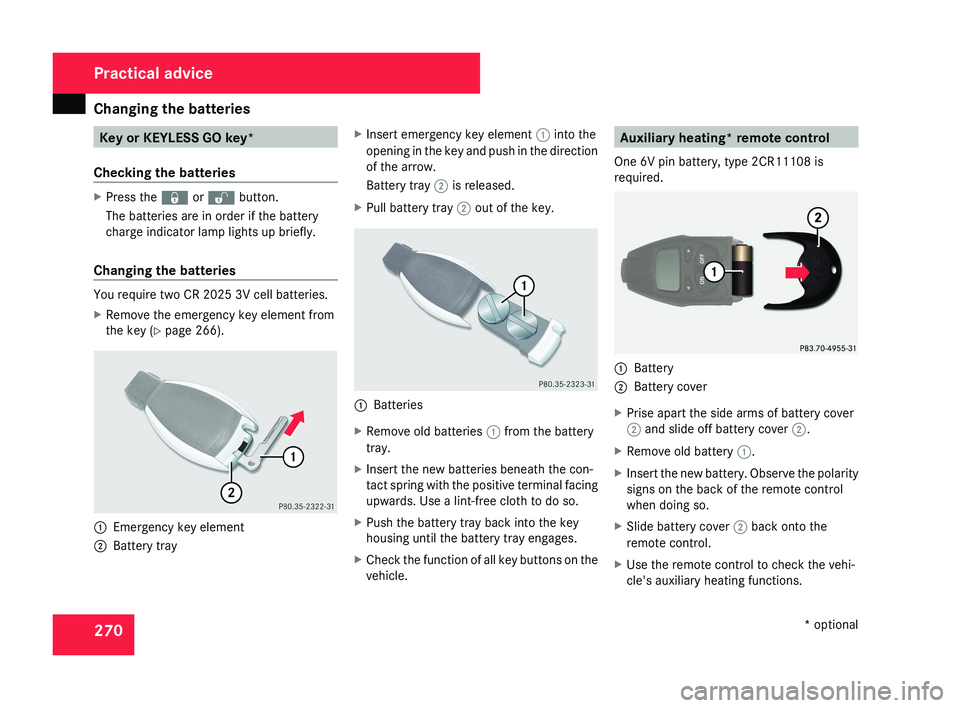
Changing the batteries You require two CR 2025 3V cell batteries.
X
Remove the emergency key element from
the key (Y page 266). 1
Emergency key element
2 Battery tray X
Insert emergency key element 1 into the
opening in the key and push in the direction
of the arrow.
Battery tray 2 is released.
X Pull battery tray 2 out of the key. 1
Batteries
X Remove old batteries 1 from the battery
tray.
X Insert the new batteries beneath the con-
tact spring with the positive terminal facing
upwards. Use a lint-free cloth to do so.
X Push the battery tray back into the key
housing until the battery tray engages.
X Check the function of all key buttons on the
vehicle. Auxiliary heating* remote control
One 6V pin battery, type 2CR11108 is
required. 1
Battery
2 Battery cover
X Prise apart the side arms of battery cover
2 and slide off battery cover 2.
X Remove old battery 1.
X Insert the new battery. Observe the polarity
signs on the back of the remote control
when doing so.
X Slide battery cover 2 back onto the
remote control.
X Use the remote control to check the vehi-
cle's auxiliary heating functions. Practical advice
* optional
219_AKB; 2; 4, en-GB
mkalafa,
2007-11-13T09:28:36+01:00 - Seite 270
Page:
< prev 1-8 9-16 17-24