2008 MERCEDES-BENZ CLS COUPE remote control
[x] Cancel search: remote controlPage 74 of 329
Opening and closing
71
i
Do not leave the key in the boot. You
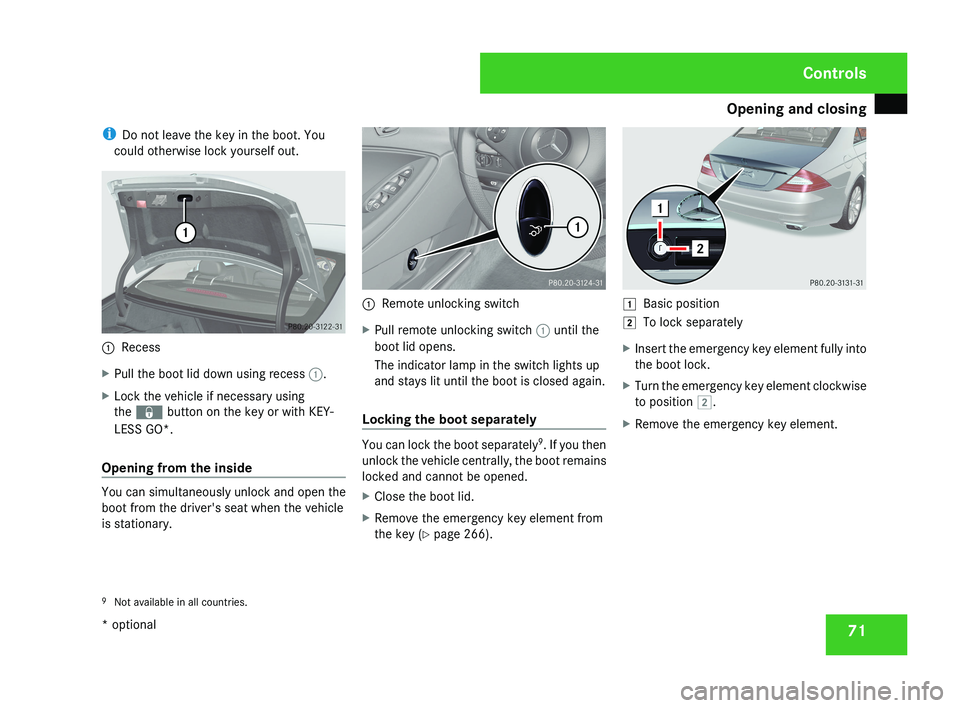
could otherwise lock yourself out.1 Recess
X Pull the boot lid down using recess 1.
X Lock the vehicle if necessary using
the j button on the key or with KEY-
LESS GO*.
Opening from the inside
You can simultaneously unlock and open the
boot from the driver's seat when the vehicle
is stationary.
1 Remote unlocking switch
X Pull remote unlocking switch 1 until the
boot lid opens.
The indicator lamp in the switch lights up
and stays lit until the boot is closed again.
Locking the boot separately
You can lock the boot separately 9
. If you then
unlock the vehicle centrally, the boot remains
locked and cannot be opened.
X Close the boot lid.
X Remove the emergency key element from
the key (Y page 266).
$ Basic position
% To lock separately
X Insert the emergency key element fully into
the boot lock.
X Turn the emergency key element clockwise
to position %.
X Remove the emergency key element.
9 Not available in all countries.
Controls
* optional
219_AKB; 2; 4, en-GB
mkalafa,
2007-11-13T09:28:36+01:00 - Seite 71
Page 75 of 329
Opening and closing
72 Boot (vehicles with remote boot lid
closing feature*)
The remote boot lid closing feature* opens
and closes the boot lid automatically. You can
stop the automatic opening and closing pro-
cedure at any time:
R by pulling or pressing the remote operating
switch at the driver's seat
R by pressing the i button on the key
R by pulling the handle on the boot lid
R by pressing the closing button in the boot
lid G
Risk of poisoning
Exhaust fumes could enter the vehicle inte-
rior if the engine is running and the boot lid
is open. This could poison you. Therefore,
you should make sure that the boot lid is
always closed when the engine is running.
! The boot lid swings upwards when
opened. Therefore, make sure that there is
enough space above the boot lid.
Opening from the outside You can only open the boot lid after unlocking
it first. X
To unlock centrally: press the k but-
ton on the key. 1
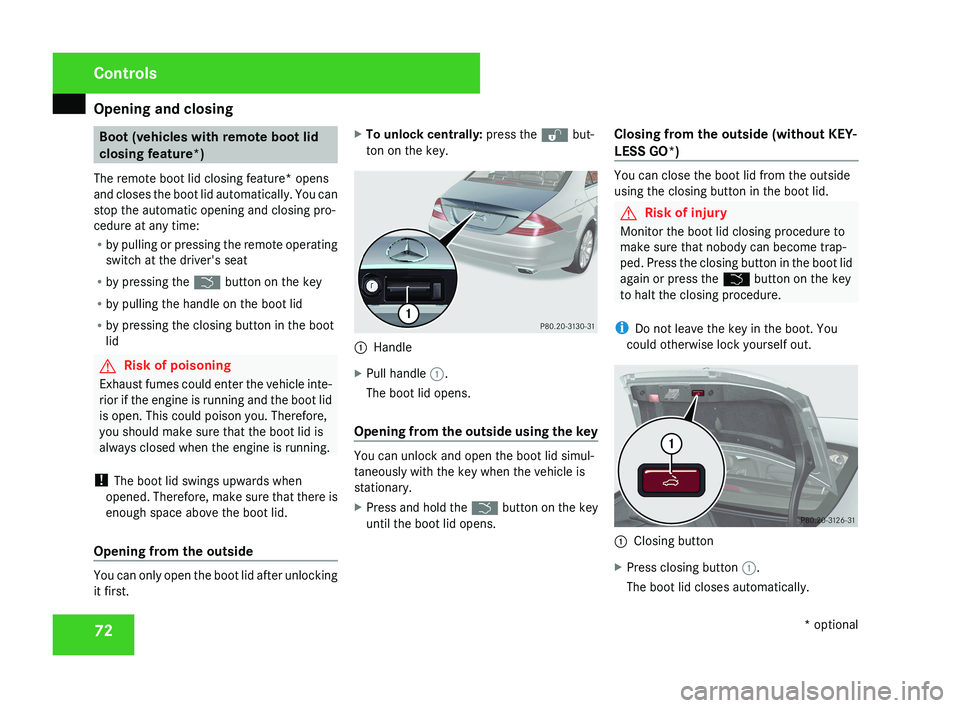
Handle
X Pull handle 1.
The boot lid opens.
Opening from the outside using the key You can unlock and open the boot lid simul-
taneously with the key when the vehicle is
stationary.
X
Press and hold the i button on the key
until the boot lid opens. Closing from the outside (without KEY-
LESS GO*) You can close the boot lid from the outside
using the closing button in the boot lid.
G
Risk of injury
Monitor the boot lid closing procedure to
make sure that nobody can become trap-
ped. Press the closing button in the boot lid
again or press the i button on the key
to halt the closing procedure.
i Do not leave the key in the boot. You
could otherwise lock yourself out. 1
Closing button
X Press closing button 1.
The boot lid closes automatically. Controls
* optional
219_AKB; 2; 4, en-GB
mkalafa,
2007-11-13T09:28:36+01:00 - Seite 72
Page 76 of 329
Opening and closing
73
Closing from the outside and locking
centrally (using KEYLESS GO*) You can close the boot lid from the outside
using the closing button in the boot lid, or you
can close and centrally lock the vehicle simul-
taneously with the KEYLESS GO button*.
G
Risk of injury
Monitor the boot lid closing procedure to
make sure that nobody can become trap-
ped. Press the closing button in the boot lid
again or press the i button on the key
to halt the closing procedure.
i Do not leave the key in the boot. You
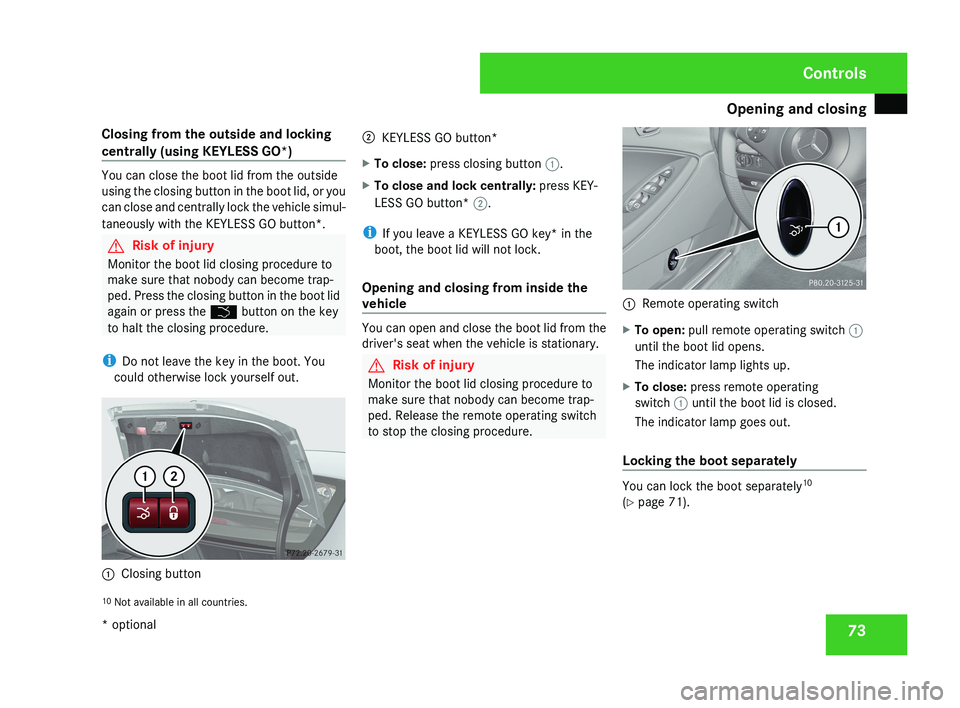
could otherwise lock yourself out. 1
Closing button 2
KEYLESS GO button*
X To close: press closing button 1.
X To close and lock centrally: press KEY-
LESS GO button* 2.
i If you leave a KEYLESS GO key* in the
boot, the boot lid will not lock.
Opening and closing from inside the
vehicle You can open and close the boot lid from the
driver's seat when the vehicle is stationary.
G
Risk of injury
Monitor the boot lid closing procedure to
make sure that nobody can become trap-
ped. Release the remote operating switch
to stop the closing procedure. 1
Remote operating switch
X To open: pull remote operating switch 1
until the boot lid opens.
The indicator lamp lights up.
X To close: press remote operating
switch 1 until the boot lid is closed.
The indicator lamp goes out.
Locking the boot separately You can lock the boot separately
10
(Y page 71).
10 Not available in all countries. Controls
* optional
219_AKB; 2; 4, en-GB
mkalafa,
2007-11-13T09:28:36+01:00 - Seite 73
Page 130 of 329
On-board computer
127
X
Press the æ or ç button to select the
Lighting submenu.
X Press the j button to select Interior
lighting delayed switch-off.
X Press the æ or ç button to activate
or deactivate the Interior lighting
delayed switch-off feature.
X Press the j, è or ÿ button to
select a different display.
Activating/deactivating the automatic
door locking feature The Automatic door locking feature
allows you to set whether your vehicle will
lock centrally from a speed of about
15 km/h
upwards.
i For more information on the automatic
locking feature, see ( Y page 69).
X Press the è
or · button to select the
Settings... menu.
X Press the j
button to call up the selec-
tion of submenus.
X Press the æ
or ç button to select the
Vehicle submenu. X
Press the j
button to select Automatic
door locking.
X Press the æ or ç button to switch
the Automatic door locking feature on
or off.
X Press the j, è or ÿ button to
select a different display.
Selecting the switch-on time for the
auxiliary heating* This function is only available if the vehicle
has an auxiliary heating system.
The
Auxiliary
heat. function allows you to
select three switch-on times. You can set the
exact switch-on time using the other func-
tions in the Heater submenu.
The auxiliary heating adopts the Thermatic or
4-zone Thermotronic* temperature setting.
The minimum and maximum temperature set-
tings for the auxiliary heating are 20 † and
24 † respectively.
You can switch off the auxiliary heating by
using the remote control or the auxiliary heat-
ing button on the centre console.
The auxiliary heating is switched off automat-
ically after 50 minutes. This time can be
changed. To do this, visit a qualified specialist workshop, e.g. a Mercedes-Benz Service
Centre. G
Risk of fire and poisoning
The operation of the auxiliary heating pro-
duces hot, toxic exhaust fumes. The fuel
vapours produced during refuelling could
ignite on the hot exhaust system.
Do not switch on the auxiliary heating at
filling stations or in enclosed spaces, for
instance,
a garage, if there is no air extrac-
tion system.
You could otherwise endanger yourself and
others.
The Auxiliary heat. function can be called
up directly.
X Turn the key to position 1
or 2 in the ignition
lock.
X Press the button for the auxiliary heating on
the centre console
(Y page 166).
or
X Press the è
or · button to select the
Settings... menu.
X Press the j
button to call up the selec-
tion of submenus.
X Press the æ
or ç button to select the
Heater submenu. Controls
* optional
219_AKB; 2; 4, en-GB
mkalafa,
2007-11-13T09:28:36+01:00 - Seite 127 Z
Page 169 of 329
Air conditioning
166
i
The auxiliary heating/ventilation is auto-
matically deactivated after about 30
minutes, or when:
R the ignition is switched on
R the battery voltage drops Auxiliary heating/ventilation*
G
Risk of poisoning
Exhaust fumes are produced when the aux-
iliary heating is in operation. Inhaling these
exhaust fumes can be poisonous. You
should therefore switch off the auxiliary
heating in confined spaces without an
extraction system, e.g. a garage. G
Risk of fire
When operating the auxiliary heating, parts
of the vehicle may become very hot, and
highly inflammable material such as fuels
could be ignited. Operating the auxiliary
heating is thus prohibited at filling stations
or when your vehicle is being refuelled. You
must therefore switch off the auxiliary heat-
ing at filling stations.
The auxiliary heating heats the air in the vehi-
cle interior to a temperature between 20 °C and 24 °C without using the heat of the run-
ning engine. The auxiliary heating is operated
using fuel directly from the vehicle's fuel tank.
For this reason, the tank content must be at
least at reserve fuel level to ensure that the
auxiliary heating functions.
The auxiliary heating/ventilation automati-
cally adjusts to changes in temperature and
weather conditions. For this reason, the aux-
iliary heating could automatically switch over
from ventilation mode to heating mode or
from heating mode to ventilation mode.
You cannot use the auxiliary ventilation to
cool the vehicle interior to a temperature
lower than the outside temperature.
Before activating
X
Set the temperature to a value between
20 † and 24 †.
The auxiliary heating/ventilation can be acti-
vated even when the air conditioning is being
controlled manually. Optimum comfort can
be attained when the system is set to auto-
matic mode. Set the desired temperature
within this range. If a higher temperature is
set, the vehicle is heated to 24 †. If a lower
temperature is set, the vehicle is heated to
20 †. Activating or deactivating the auxiliary
heating/ventilation The auxiliary heating/ventilation can be acti-
vated or deactivated via the remote control
or the button on the centre console.
The on-board computer can be used to spec-
ify up to three departure times, one of which
may be preselected (
Y page 128).
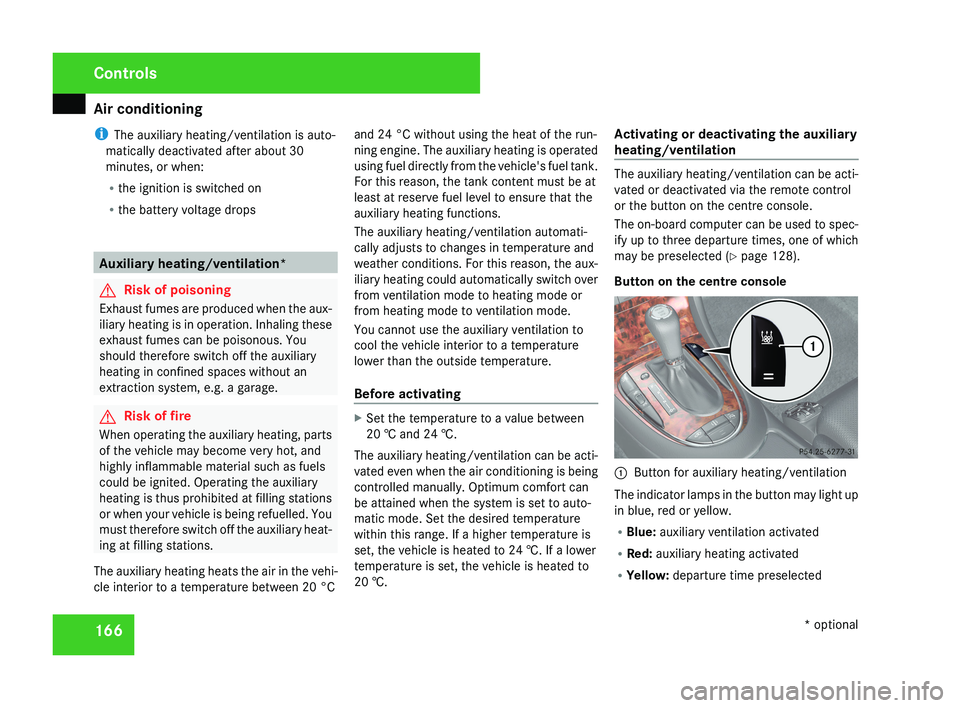
Button on the centre console 1
Button for auxiliary heating/ventilation
The indicator lamps in the button may light up
in blue, red or yellow.
R Blue: auxiliary ventilation activated
R Red: auxiliary heating activated
R Yellow: departure time preselected Controls
* optional
219_AKB; 2; 4, en-GB
mkalafa,
2007-11-13T09:28:36+01:00 - Seite 166
Page 170 of 329
Air conditioning
167
Activating the auxiliary heating/ventila-
tion
If the key is in position 1 or 2:
X
Press and hold button 1 for at least two
seconds.
The red or blue indicator lamp in the button
lights up.
If the key is removed or in position 0:
X Briefly press button 1.
The red or blue indicator lamp in the button
lights up.
Deactivating the auxiliary heating/venti-
lation
X Briefly press button 1.
The red or blue indicator lamp in the button
goes out.
Remote control
Your vehicle comes with one remote control.
You may use two additional remote controls
for your vehicle. For further information, con-
sult a qualified specialist workshop, e.g. a
Mercedes-Benz Service Centre. The remote control has a maximum range of
approximately 300 metres. This range may be
reduced by:
R
sources of radio interference
R solid objects between the remote control
and the vehicle
R the remote control being in an unfavoura-
ble position in relation to the vehicle
R transmitting from an enclosed space
i The optimum range can be achieved if you
hold the remote control vertically, pointing
upwards when you press one of the but-
tons.
i A battery symbol appears in the display
when the batteries in the remote control
are low. Replace the remote control bat-
teries (Y page 270).
i More information about the auxiliary
heating can be found in the "Practical
advice" section ( Y page 264).1
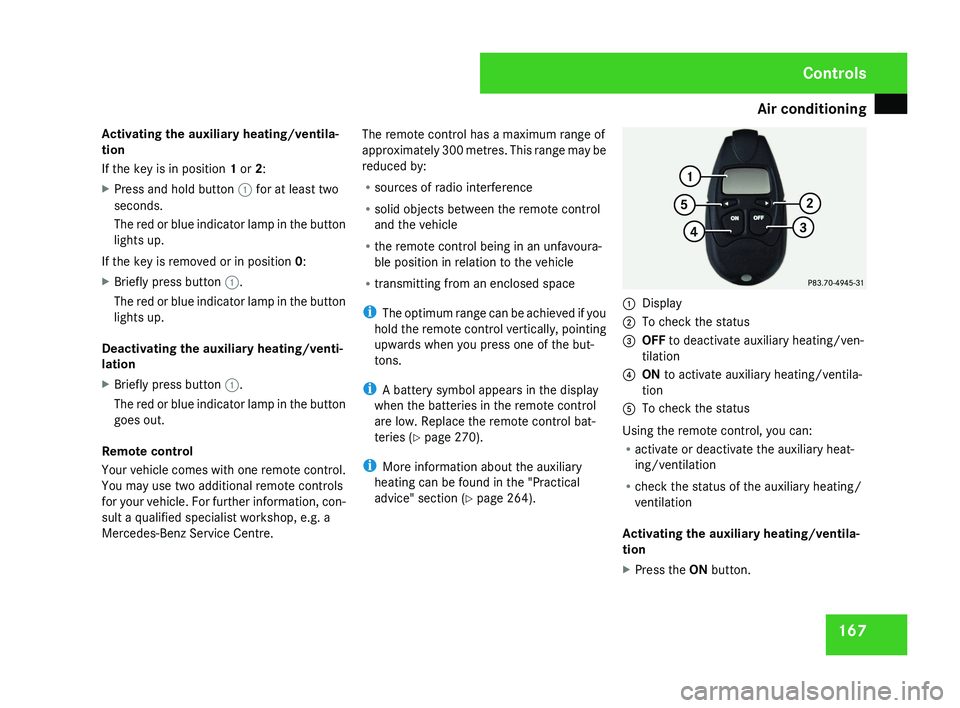
Display
2 To check the status
3 OFF to deactivate auxiliary heating/ven-
tilation
4 ON to activate auxiliary heating/ventila-
tion
5 To check the status
Using the remote control, you can:
R activate or deactivate the auxiliary heat-
ing/ventilation
R check the status of the auxiliary heating/
ventilation
Activating the auxiliary heating/ventila-
tion
X Press the ON button.
Controls
219_AKB; 2; 4, en-GB
mkalafa,
2007-11-13T09:28:36+01:00 - Seite 167
Page 172 of 329
Sliding sunroof
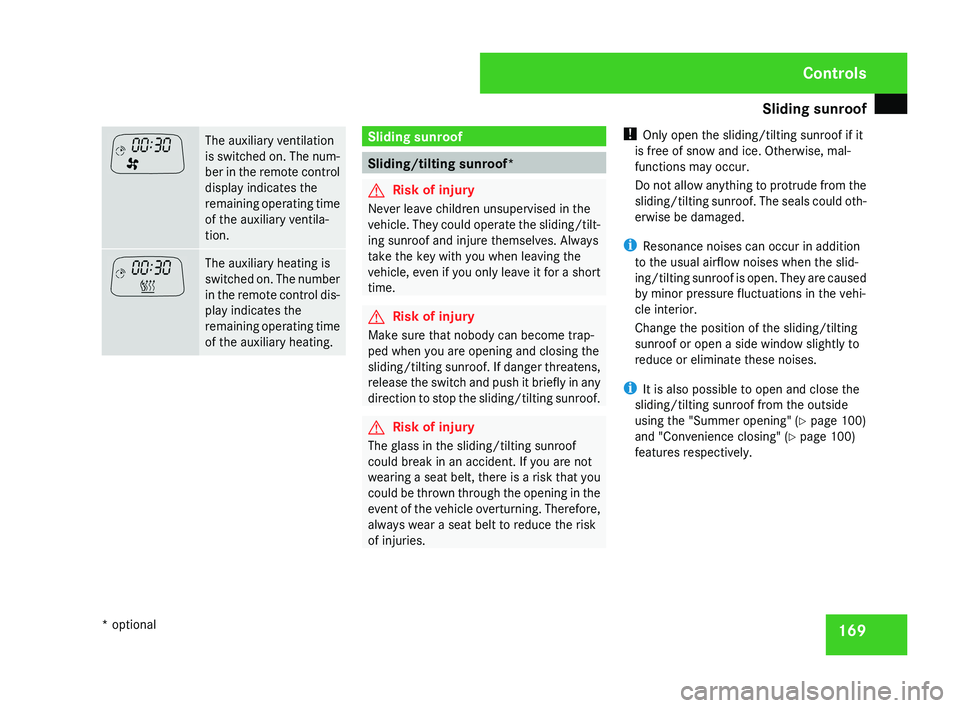
169The auxiliary ventilation
is switched on. The num-
ber in the remote control
display indicates the
remaining operating time
of the auxiliary ventila-
tion.
The auxiliary heating is
switched on. The number
in the remote control dis-
play indicates the
remaining operating time
of the auxiliary heating. Sliding sunroof
Sliding/tilting sunroof*
G
Risk of injury
Never leave children unsupervised in the
vehicle. They could operate the sliding/tilt-
ing sunroof and injure themselves. Always
take the key with you when leaving the
vehicle, even if you only leave it for a short
time. G
Risk of injury
Make sure that nobody can become trap-
ped when you are opening and closing the
sliding/tilting sunroof. If danger threatens,
release the switch and push it briefly in any
direction to stop the sliding/tilting sunroof. G
Risk of injury
The glass in the sliding/tilting sunroof
could break in an accident. If you are not
wearing a seat belt, there is a risk that you
could be thrown through the opening in the
event of the vehicle overturning. Therefore,
always wear a seat belt to reduce the risk
of injuries. !
Only open the sliding/tilting sunroof if it
is free of snow and ice. Otherwise, mal-
functions may occur.
Do not allow anything to protrude from the
sliding/tilting sunroof. The seals could oth-
erwise be damaged.
i Resonance noises can occur in addition
to the usual airflow noises when the slid-
ing/tilting sunroof is open. They are caused
by minor pressure fluctuations in the vehi-
cle interior.
Change the position of the sliding/tilting
sunroof or open a side window slightly to
reduce or eliminate these noises.
i It is also possible to open and close the
sliding/tilting sunroof from the outside
using the "Summer opening" ( Y page 100)
and "Convenience closing" ( Y page 100)
features respectively. Controls
* optional
219_AKB; 2; 4, en-GB
mkalafa,
2007-11-13T09:28:36+01:00 - Seite 169
Page 189 of 329
Features
186 Garage door opener*
The remote control integrated in the rear-view
mirror allows you to operate up to three dif-
ferent door and gate systems.
i The garage door opener is only available
for certain countries. Observe the legal
requirements in all countries concerned.
The HomeLink ®
garage door opener is
compatible with most European garage and
gate opener drives. More information on
HomeLink ®
and/or compatible products is
available from:
R any Mercedes-Benz Service Centre
R the HomeLink ®
hotline
(0) 08000 466 354 65 (free of charge) or
+49 (0) 6839 907-277 (at a charge)
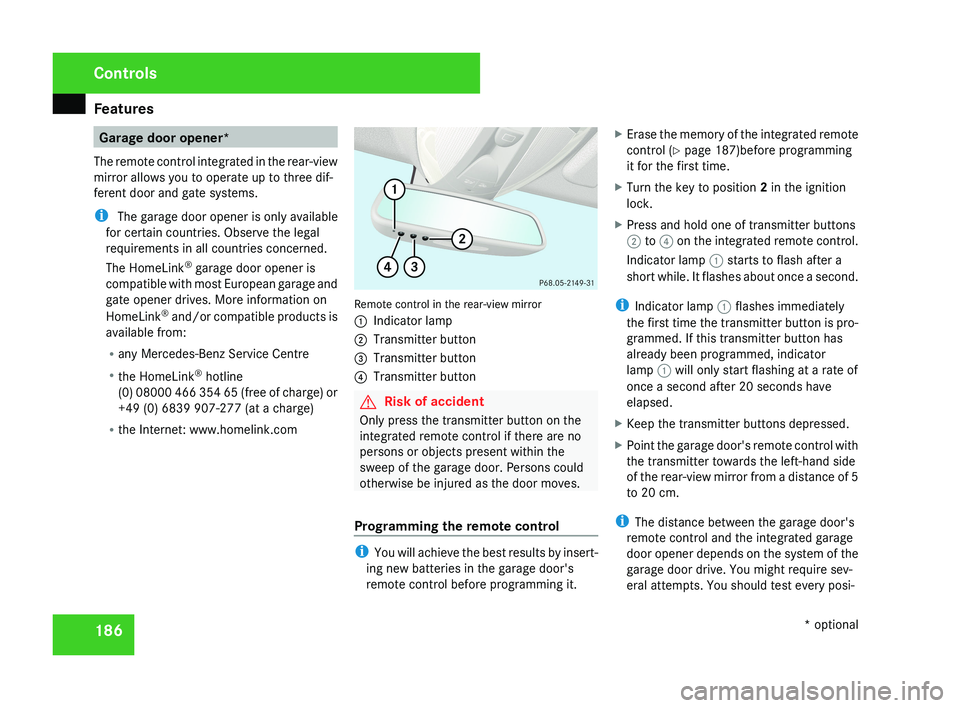
R the Internet: www.homelink.comRemote control in the rear-view mirror
1 Indicator lamp
2 Transmitter button
3 Transmitter button
4 Transmitter button
G Risk of accident
Only press the transmitter button on the
integrated remote control if there are no
persons or objects present within the
sweep of the garage door. Persons could
otherwise be injured as the door moves.
Programming the remote control
i You will achieve the best results by insert-
ing new batteries in the garage door's
remote control before programming it. X
Erase the memory of the integrated remote
control ( Y page 187)before programming
it for the first time.
X Turn the key to position 2 in the ignition
lock.
X Press and hold one of transmitter buttons
2 to 4 on the integrated remote control.
Indicator lamp 1 starts to flash after a
short while. It flashes about once a second.
i Indicator lamp 1 flashes immediately
the first time the transmitter button is pro-
grammed. If this transmitter button has
already been programmed, indicator
lamp 1 will only start flashing at a rate of
once a second after 20 seconds have
elapsed.
X Keep the transmitter buttons depressed.
X Point the garage door's remote control with
the transmitter towards the left-hand side
of the rear-view mirror from a distance of 5
to 20 cm.
i The distance between the garage door's
remote control and the integrated garage
door opener depends on the system of the
garage door drive. You might require sev-
eral attempts. You should test every posi-
Controls
* optional
219_AKB; 2; 4, en-GB
mkalafa,
2007-11-13T09:28:36+01:00 - Seite 186