2008 INFINITI QX56 turn signal
[x] Cancel search: turn signalPage 3337 of 4083
SN-12
< FUNCTION DIAGNOSIS >
FRONT AND REAR SONAR SYSTEM
Component Description
INFOID:0000000001754064
CONSULT-III Function (SONAR)INFOID:0000000001754065
SELF DIAGNOSTIC PROCEDURE
CONSULT-III can be used to read and clear DTCs. Refer to GI-46, "Description".
SELF DIAGNOSTIC RESULTS
Refer to SN-44, "DTC Index".
Component Function
Sonar control unit Controls sonar system and provides self-diagnosis
Back-up lamp relay Provides reverse signal for sonar control unit
A/T assembly Controls back-up lamp relay
Front sonar buzzer Sounds a signal when objects are detected in the front of the vehicle
Rear sonar buzzer Sounds a signal when objects are detected in the rear of the vehicle
Sonar system OFF switch Enables the driver to turn the system off and signals a system malfunction
Front sonar sensors Senses objects in the front of the vehicle
Rear sonar sensors Senses objects in the rear of the vehicle
Combination meter Provides Park and vehicle speed signals for sonar control unit
Diagnosis mode Description
SELF-DIAG RESULTS Displays sonar control unit self-diagnosis results.
Revision: March 2010 2008 QX56
Page 3340 of 4083
SN
SONAR SENSOR CIRCUIT INSPECTIONSN-15
< COMPONENT DIAGNOSIS >
C
DE
F
G H
I
J
K L
M B A
O P
SONAR SENSOR CIRCUIT INSPECTION
DescriptionINFOID:0000000004832343
With power and ground supplied to the sonar sensors, the sonar sensors transmit an ultrasonic signal. This
signal is reflected back to the sensor by objec ts large enough and close enough to be detected. The sonar
sensors measure the time from the transmitted signal to the time the signal is reflected back and send this
information to the sonar control unit.
Diagnosis Procedure (With Rear Sonar System)INFOID:0000000004832344
1.CHECK REAR SONAR SENSOR CIRCUITS
1. Turn ignition switch OFF.
2. Disconnect sonar control unit connector and rear sonar sensor connectors.
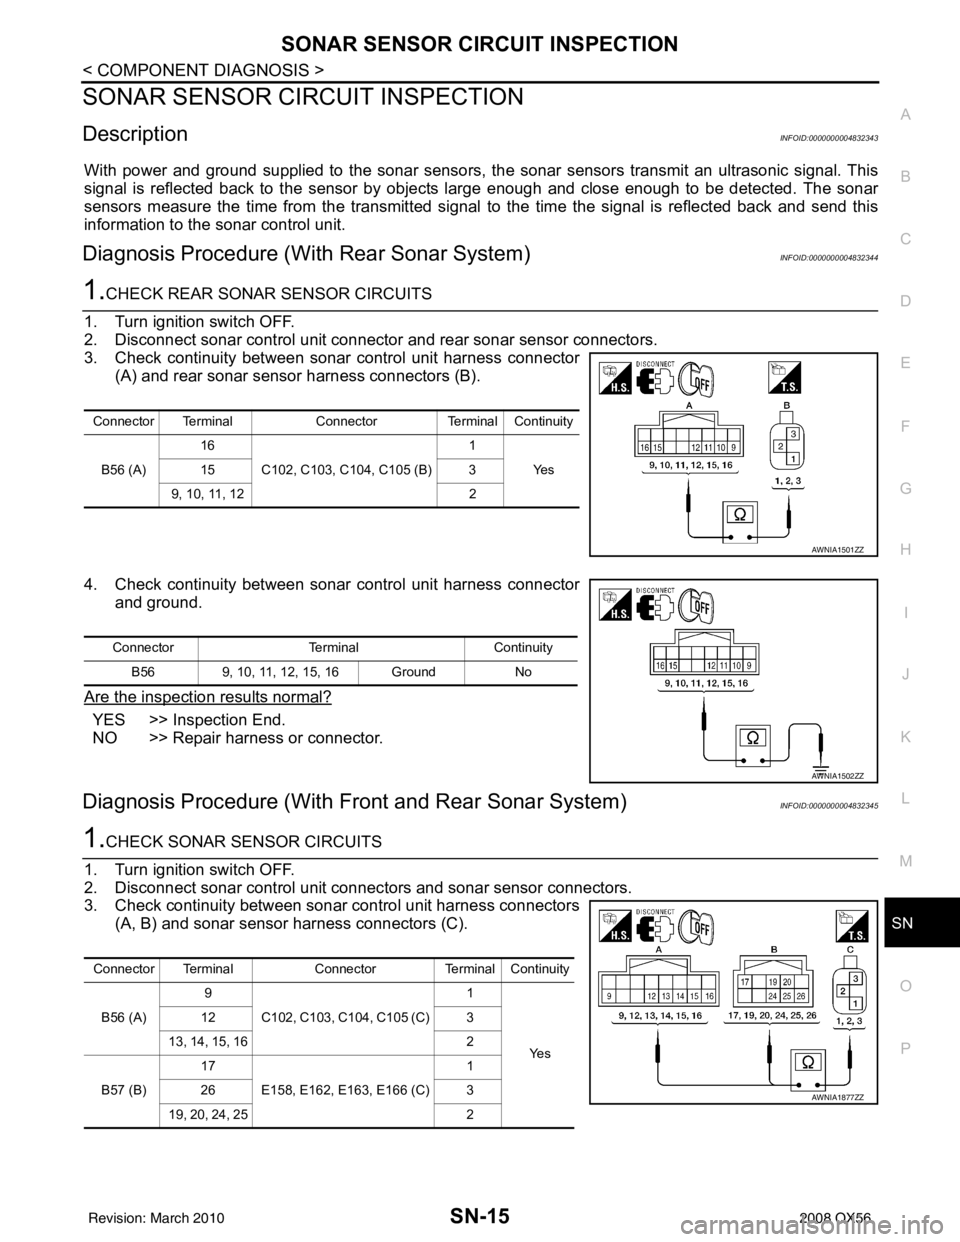
3. Check continuity between sonar control unit harness connector (A) and rear sonar sensor harness connectors (B).
4. Check continuity between sonar control unit harness connector and ground.
Are the inspection results normal?
YES >> Inspection End.
NO >> Repair harness or connector.
Diagnosis Procedure (With Front and Rear Sonar System)INFOID:0000000004832345
1.CHECK SONAR SENSOR CIRCUITS
1. Turn ignition switch OFF.
2. Disconnect sonar control unit connec tors and sonar sensor connectors.
3. Check continuity between sonar control unit harness connectors (A, B) and sonar sensor harness connectors (C).
Connector Terminal ConnectorTerminal Continuity
B56 (A) 16
C102, C103, C104, C105 (B) 1
Ye s
15 3
9, 10, 11, 12 2
AWNIA1501ZZ
ConnectorTerminalContinuity
B56 9, 10, 11, 12, 15, 16 Ground No
AWNIA1502ZZ
Connector TerminalConnectorTerminal Continuity
B56 (A) 9
C102, C103, C104, C105 (C) 1
Ye s
12
3
13, 14, 15, 16 2
B57 (B) 17
E158, E162, E1 63, E166 (C) 1
26 3
19, 20, 24, 25 2
AWNIA1877ZZ
Revision: March 2010 2008 QX56
Page 3346 of 4083
SN
SONAR CONTROL UNIT FOR REAR SONAR SYSTEMSN-21
< ECU DIAGNOSIS >
C
DE
F
G H
I
J
K L
M B A
O P
ECU DIAGNOSIS
SONAR CONTROL UNIT FO R REAR SONAR SYSTEM
Reference ValueINFOID:0000000001754070
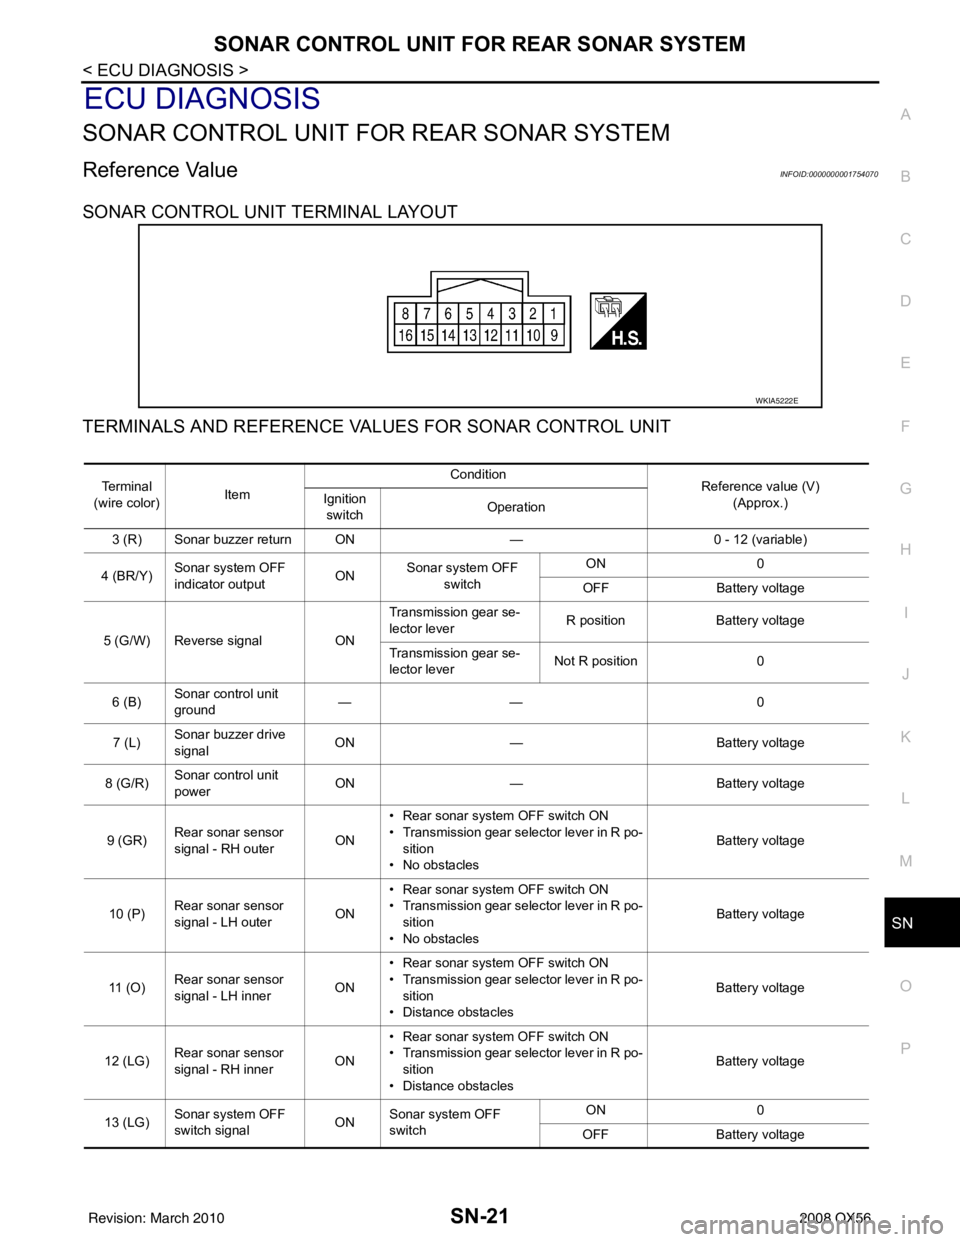
SONAR CONTROL UNIT TERMINAL LAYOUT
TERMINALS AND REFERENCE VA LUES FOR SONAR CONTROL UNIT
WKIA5222E
Te r m i n a l
(wire color) Item Condition
Reference value (V)
(Approx.)
Ignition
switch Operation
3 (R) Sonar buzzer return ON —0 - 12 (variable)
4 (BR/Y) Sonar system OFF
indicator output ON
Sonar system OFF
switch ON
0
OFF Battery voltage
5 (G/W) Reverse signal ONTransmission gear se-
lector lever
R position
Battery voltage
Transmission gear se-
lector lever Not R position
0
6 (B) Sonar control unit
ground ——
0
7 (L) Sonar buzzer drive
signal
ON
— Battery voltage
8 (G/R) Sonar control unit
power ON
— Battery voltage
9 (GR) Rear sonar sensor
signal - RH outer
ON• Rear sonar system OFF switch ON
• Transmission gear selector lever in R po-
sition
• No obstacles Battery voltage
10 (P) Rear sonar sensor
signal - LH outer
ON• Rear sonar system OFF switch ON
• Transmission gear selector lever in R po-
sition
• No obstacles Battery voltage
11 ( O ) Rear sonar sensor
signal - LH inner
ON• Rear sonar system OFF switch ON
• Transmission gear selector lever in R po-
sition
• Distance obstacles Battery voltage
12 (LG) Rear sonar sensor
signal - RH inner
ON• Rear sonar system OFF switch ON
• Transmission gear selector lever in R po-
sition
• Distance obstacles Battery voltage
13 (LG) Sonar system OFF
switch signal
ONSonar system OFF
switch ON
0
OFF Battery voltage
Revision: March 2010 2008 QX56
Page 3356 of 4083
SN
SONAR CONTROL UNIT FOR FRONT AND REAR SONAR SYSTEMSN-31
< ECU DIAGNOSIS >
C
DE
F
G H
I
J
K L
M B A
O P
SONAR CONTROL UNIT FOR FR ONT AND REAR SONAR SYSTEM
Reference ValueINFOID:0000000001754073
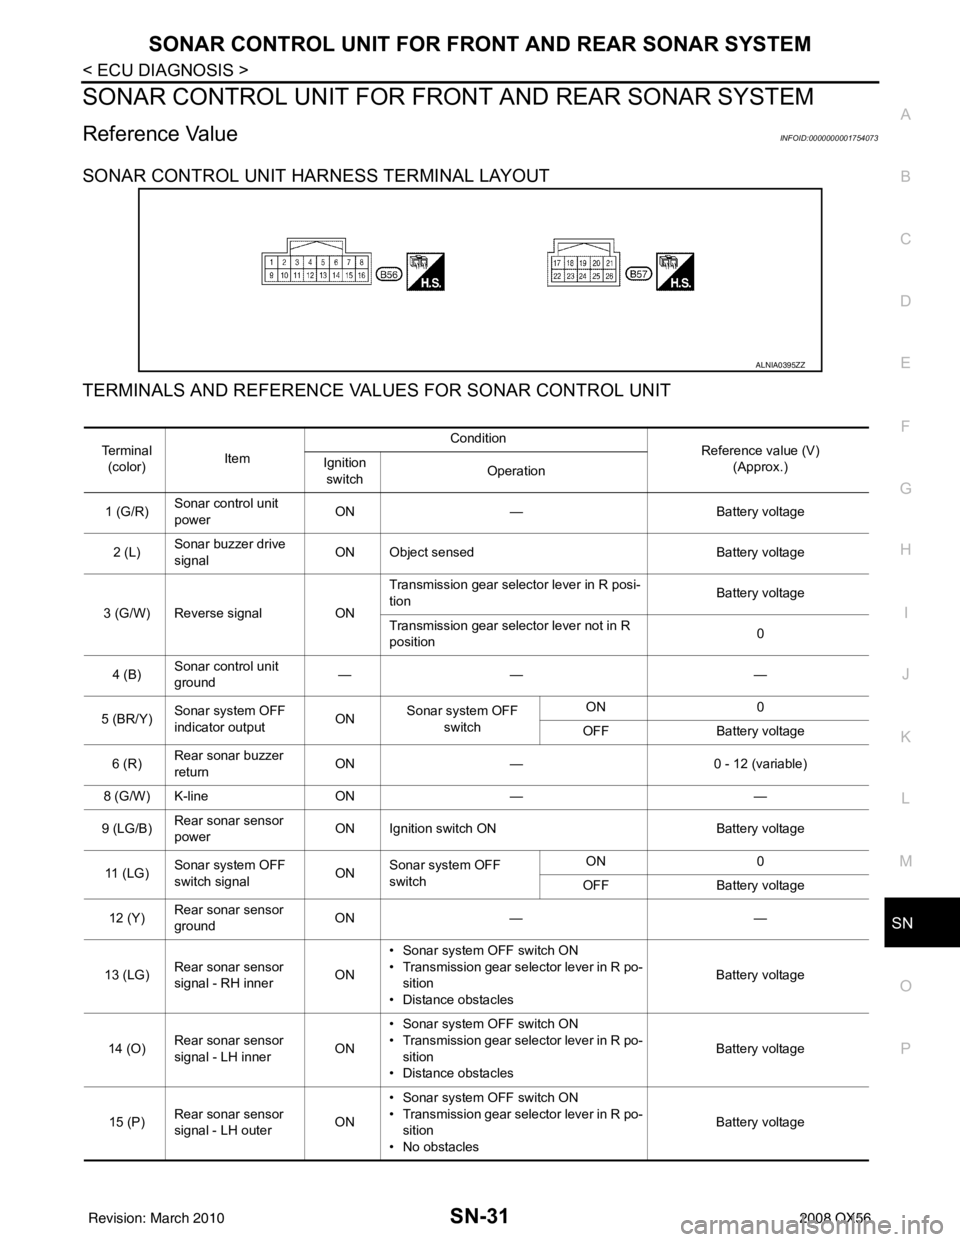
SONAR CONTROL UNIT HARNESS TERMINAL LAYOUT
TERMINALS AND REFERENCE VA LUES FOR SONAR CONTROL UNIT
ALNIA0395ZZ
Te r m i n a l
(color) Item Condition
Reference value (V)
(Approx.)
Ignition
switch Operation
1 (G/R) Sonar control unit
power ON
— Battery voltage
2 (L) Sonar buzzer drive
signal
ON Object sensed
Battery voltage
3 (G/W) Reverse signal ONTransmission gear selector lever in R posi-
tion
Battery voltage
Transmission gear selector lever not in R
position 0
4 (B) Sonar control unit
ground ——
—
5 (BR/Y) Sonar system OFF
indicator output ON
Sonar system OFF
switch ON
0
OFF Battery voltage
6 (R) Rear sonar buzzer
return
ON
— 0 - 12 (variable)
8 (G/W) K-line ON— —
9 (LG/B) Rear sonar sensor
power ON Ignition switch ON
Battery voltage
11 ( L G ) Sonar system OFF
switch signal
ONSonar system OFF
switch ON
0
OFF Battery voltage
12 (Y) Rear sonar sensor
ground ON
— —
13 (LG) Rear sonar sensor
signal - RH inner ON• Sonar system OFF switch ON
• Transmission gear selector lever in R po-
sition
• Distance obstacles Battery voltage
14 (O) Rear sonar sensor
signal - LH inner ON• Sonar system OFF switch ON
• Transmission gear selector lever in R po-
sition
• Distance obstacles Battery voltage
15 (P) Rear sonar sensor
signal - LH outer ON• Sonar system OFF switch ON
• Transmission gear selector lever in R po-
sition
• No obstacles Battery voltage
Revision: March 2010
2008 QX56
Page 3357 of 4083
SN-32
< ECU DIAGNOSIS >
SONAR CONTROL UNIT FOR FRONT AND REAR SONAR SYSTEM
16 (GR)Rear sonar sensor
signal - RH outer ON• Sonar system OFF switch ON
• Transmission gear selector lever in R po-
sition
• No obstacles Battery voltage
17 (LG/B) Front sonar sensor
power
ON Ignition switch ON
Battery voltage
18 (GR/R) Park position signal ON Vehicle in PARK 12
19 (GR) Front sonar sensor
signal - RH outer ON• Sonar system OFF switch ON
• Transmission gear selector lever in a for-
ward drive gear
• Distance obstacles Battery voltage
20 (LG) Front sonar sensor
signal - RH inner ON• Sonar system OFF switch ON
• Transmission gear selector lever in re-
verse or a forward drive gear
• No obstacles Battery voltage
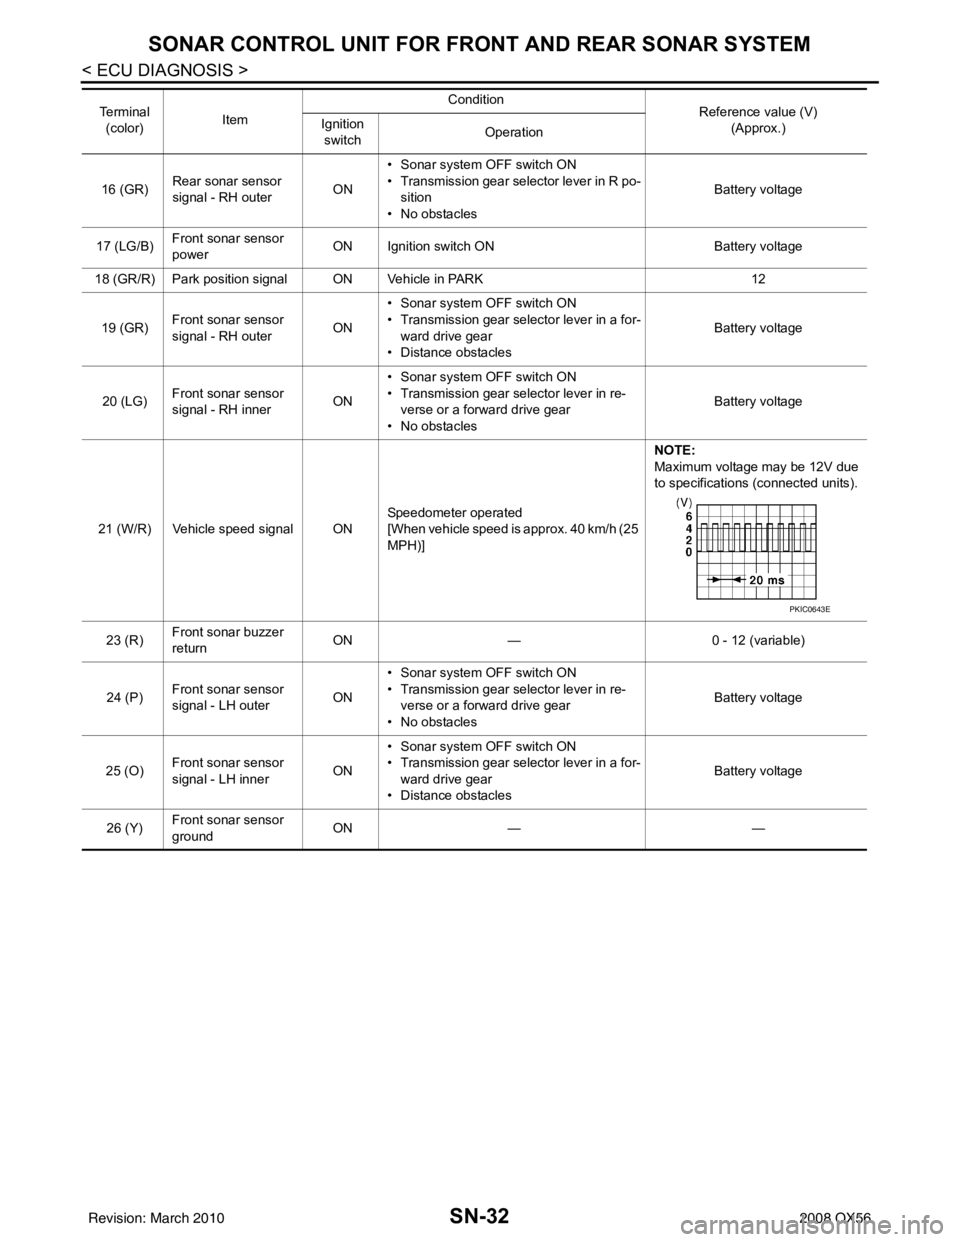
21 (W/R) Vehicle speed signal ON Speedometer operated
[When vehicle speed is approx. 40 km/h (25
MPH)]NOTE:
Maximum voltage may be 12V due
to specifications (connected units).
23 (R) Front sonar buzzer
return ON
— 0 - 12 (variable)
24 (P) Front sonar sensor
signal - LH outer
ON• Sonar system OFF switch ON
• Transmission gear selector lever in re-
verse or a forward drive gear
• No obstacles Battery voltage
25 (O) Front sonar sensor
signal - LH inner
ON• Sonar system OFF switch ON
• Transmission gear selector lever in a for-
ward drive gear
• Distance obstacles Battery voltage
26 (Y) Front sonar sensor
ground ON
— —
Te r m i n a l
(color) Item Condition
Reference value (V)
(Approx.)
Ignition
switch Operation
PKIC0643E
Revision: March 2010
2008 QX56
Page 3383 of 4083
SPIRAL CABLESR-7
< ON-VEHICLE REPAIR >
C
DE
F
G
I
J
K L
M A
B
SR
N
O P
SPIRAL CABLE
Removal and InstallationINFOID:0000000004894348
REMOVAL
CAUTION:
• Before servicing the SRS, turn ignition switch OFF, disconnect both battery cables and wait at least 3 minutes.
• When servicing the SRS, do not work from directly in front of air bag module.
1. Remove the steering wheel. Refer to ST-18, "
Removal and Installation".
2. Remove the column cover upper and lower.
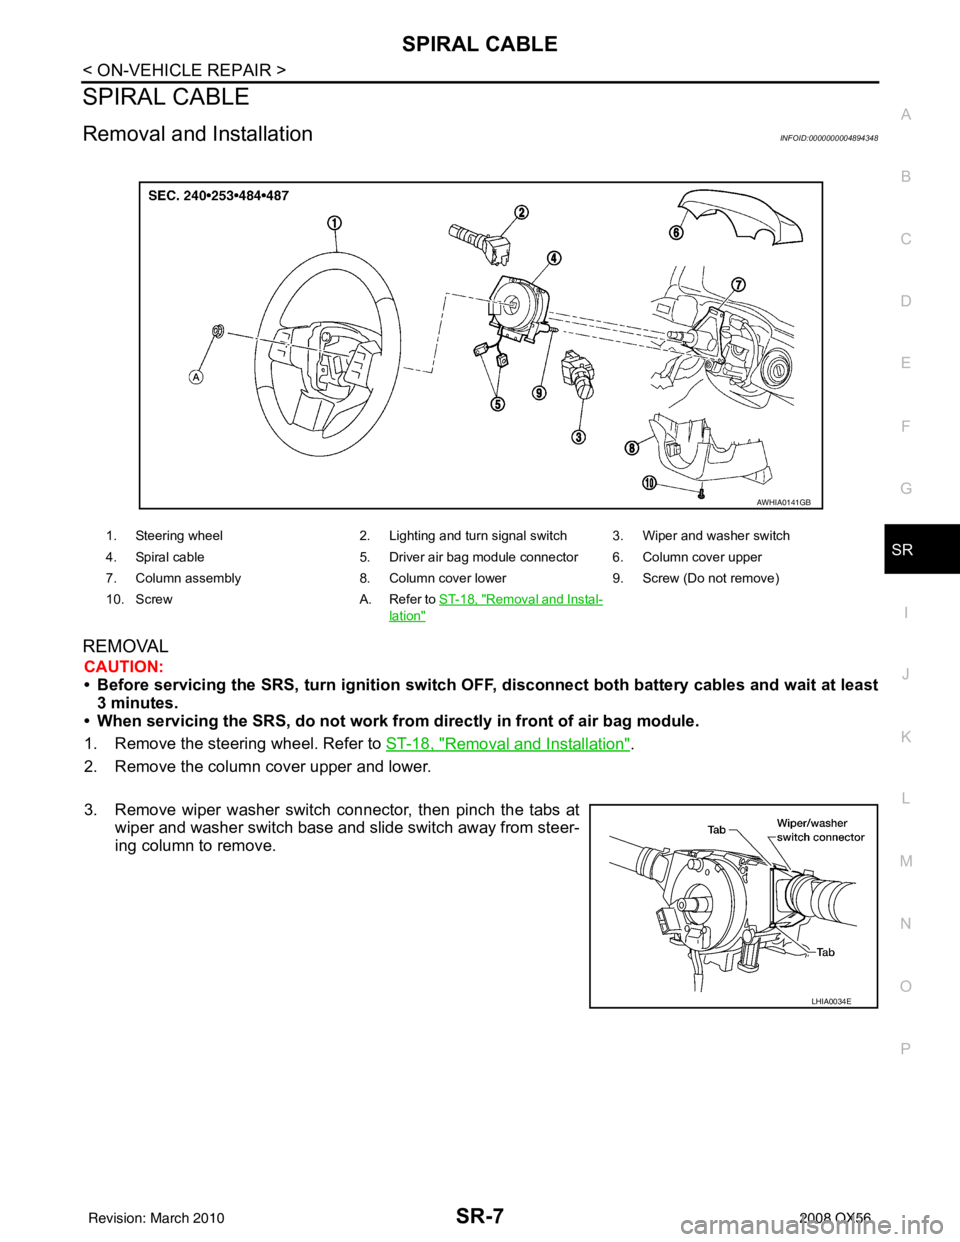
3. Remove wiper washer switch connector, then pinch the tabs at wiper and washer switch base and slide switch away from steer-
ing column to remove.
1. Steering wheel 2. Lighting and turn signal switch 3. Wiper and washer switch
4. Spiral cable 5. Driver air bag module connector 6. Column cover upper
7. Column assembly 8. Column cover lower9. Screw (Do not remove)
10. Screw A. Refer to ST-18, "
Removal and Instal-
lation"
AWHIA0141GB
LHIA0034E
Revision: March 2010 2008 QX56
Page 3384 of 4083
SR-8
< ON-VEHICLE REPAIR >
SPIRAL CABLE
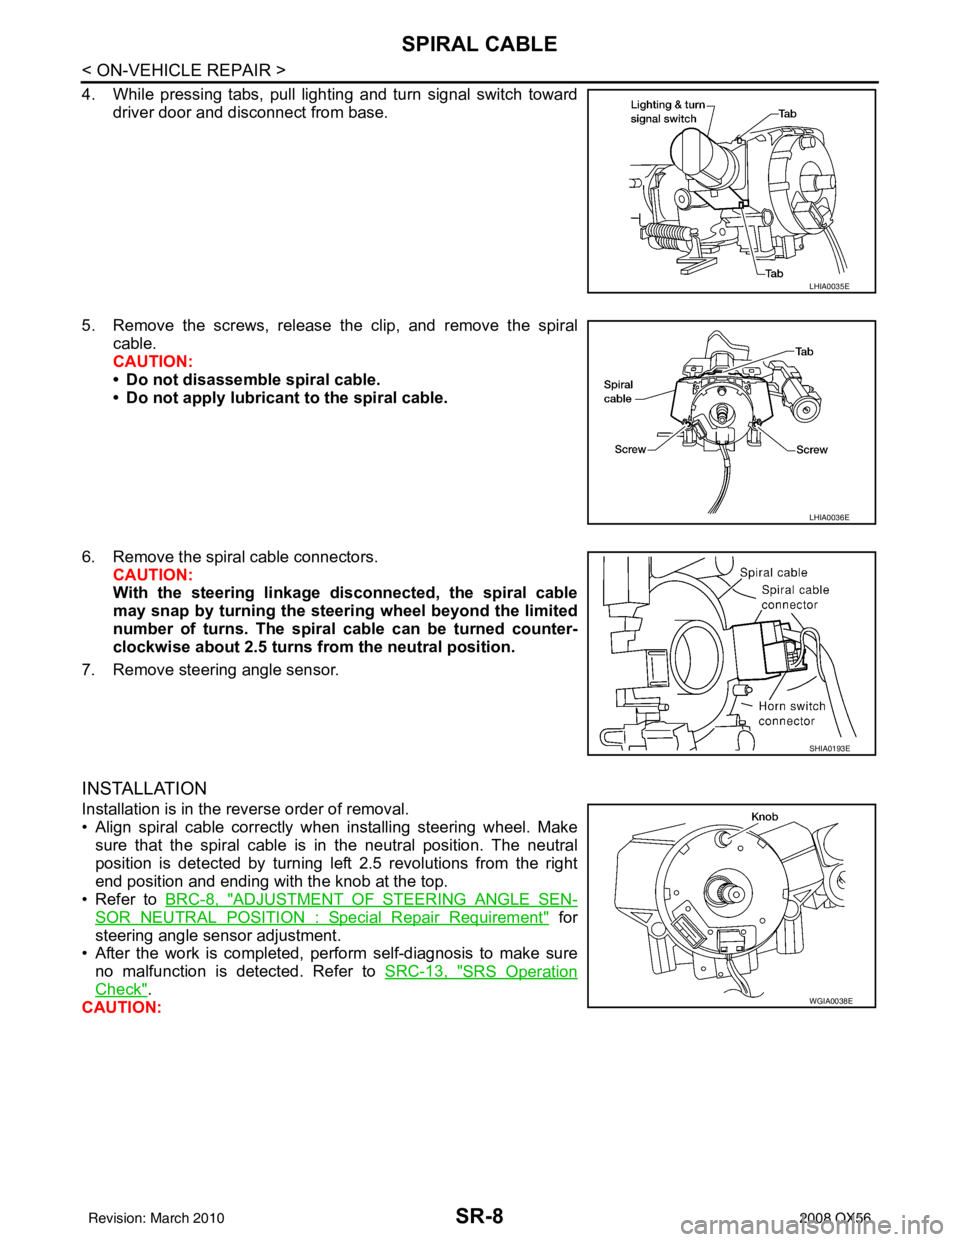
4. While pressing tabs, pull lighting and turn signal switch towarddriver door and disconnect from base.
5. Remove the screws, release the clip, and remove the spiral cable.
CAUTION:
• Do not disassemble spiral cable.
• Do not apply lubricant to the spiral cable.
6. Remove the spiral cable connectors. CAUTION:
With the steering linkage di sconnected, the spiral cable
may snap by turning the steer ing wheel beyond the limited
number of turns. The spiral cable can be turned counter-
clockwise about 2.5 turns fr om the neutral position.
7. Remove steering angle sensor.
INSTALLATION
Installation is in the reverse order of removal.
• Align spiral cable correctly when installing steering wheel. Make sure that the spiral cable is in the neutral position. The neutral
position is detected by turning left 2.5 revolutions from the right
end position and ending with the knob at the top.
• Refer to BRC-8, "
ADJUSTMENT OF STEERING ANGLE SEN-
SOR NEUTRAL POSITION : Special Repair Requirement" for
steering angle sensor adjustment.
• After the work is completed, perform self-diagnosis to make sure no malfunction is detected. Refer to SRC-13, "
SRS Operation
Check".
CAUTION:
LHIA0035E
LHIA0036E
SHIA0193E
WGIA0038E
Revision: March 2010 2008 QX56
Page 3413 of 4083
ON BOARD DIAGNOSTIC (OBD) SYSTEMSRC-15
< FUNCTION DIAGNOSIS >
C
DE
F
G
I
J
K L
M A
B
SRC
N
O P
Trouble Diagnosis without CONSULT-IIIINFOID:0000000001735300
DIAGNOSTIC PROCEDURE 6
Inspect SRS Malfunction Using "AIR BAG" Warning Lamp—Diagnosis Mode
NOTE:
SRS will not enter Diagnosis mode if no malfunction is detected in User mode.
1. Turn ignition switch ON.
2. After “AIR BAG” warning lamp lights for 7 seconds, turn ignition switch OFF within 1 second.
3. Wait more than 3 seconds.
4. Repeat steps 1 to 3 two more times (3 times total).
5. Turn ignition switch ON.
SRS is now in Diagnosis mode. Refer to SRC-85, "
Trouble Diagnosis without CONSULT-III".
CONSULT-III Function (AIR BAG)INFOID:0000000001735301
CONSULT-III can display each diagnostic item using the diagnostic test modes shown following.
Self-Diagnosis Function (Without CONSULT-III)INFOID:0000000001735302
• The reading of these results is accomplished using one of two modes — “User mode” and “Diagnosis
mode”.
• After a malfunction is repaired, turn the ignition s witch OFF for at least one second, then back ON. Diagnosis
mode returns to the User mode. At that time, the self-diagnostic result is cleared.
AIR BAG diagnostic mode Description
SELF-DIAG [CURRENT] A current Self-diagnosis result (also indicated by the number of warning lamp flashes in the Diagnosis
mode) is displayed on the CONSULT-III screen in real
time. This refers to a malfunctioning part requir-
ing repairs.
SELF-DIAG [PAST] Diagnosis results previously stored in the memo
ry are displayed on the CONSULT-III screen. The
stored results will remain until memory erasing is executed.
TROUBLE DIAG RECORD With TROUBLE DIAG RECORD, diagnosis results previously erased by a reset operation can be dis-
played on the CONSULT-III screen.
ECU DISCRIMINATED NO. Air bag diagnosis sensor unit ECU discriminated number (identification number) is displayed. Air bag
diagnosis sensor unit has individual ECU discriminated number (identification number) based on model
and equipment.
PASSENGER AIR BAG The STATUS (readiness) of the front passenger air bag module is displayed. The STATUS displayed
(ON/OFF) depends on the signals supplied to the occupant classification system control module and
air bag diagnosis sensor unit. Refer to
SRC-10, "
Occupant Classification System (OCS)" for more in-
formation.
Revision: March 2010 2008 QX56