2008 INFINITI FX35 installation
[x] Cancel search: installationPage 3452 of 3924
PR-10
< SERVICE INFORMATION >
REAR PROPELLER SHAFT
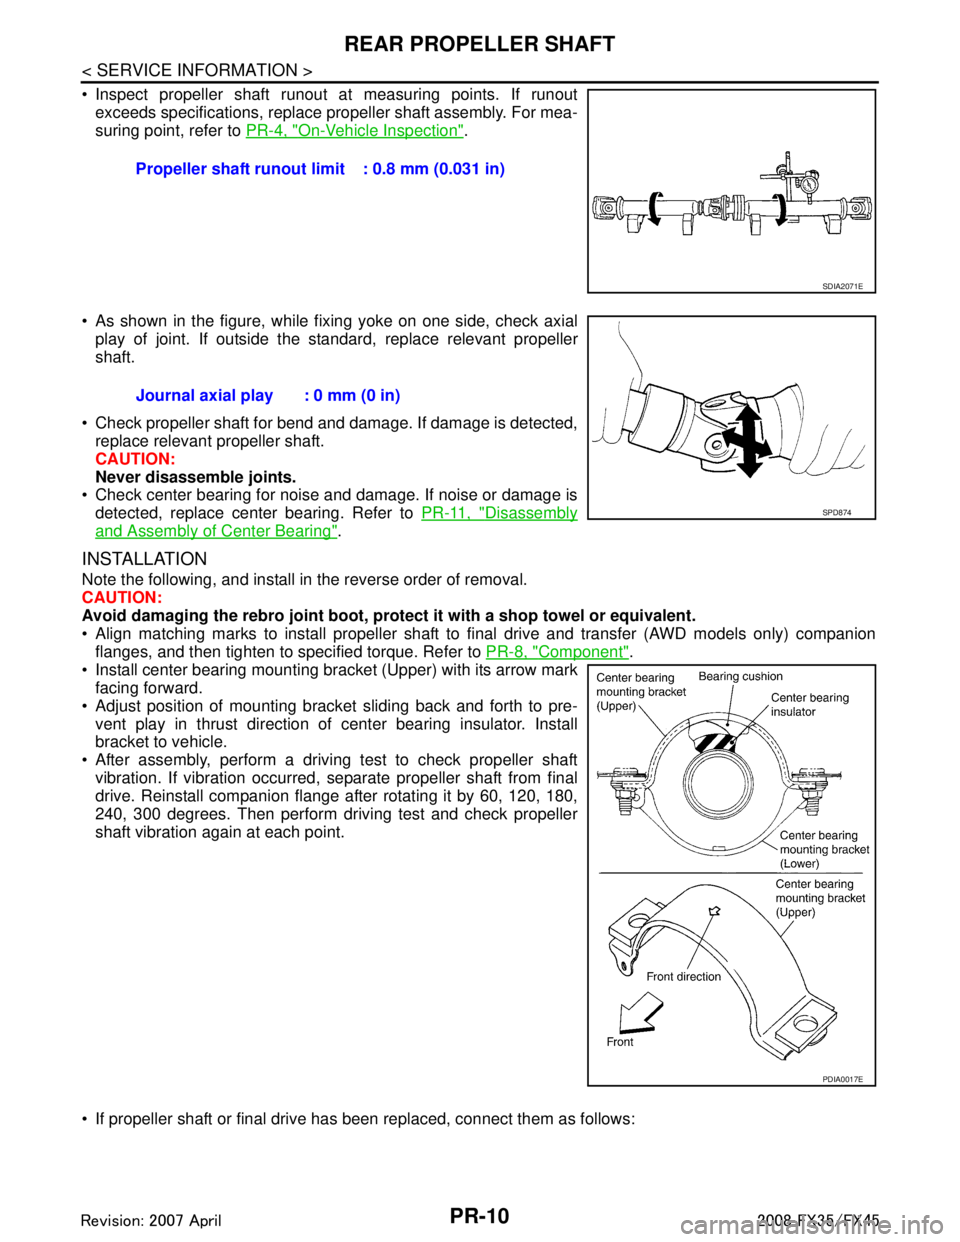
Inspect propeller shaft runout at measuring points. If runoutexceeds specifications, replace propeller shaft assembly. For mea-
suring point, refer to PR-4, "
On-Vehicle Inspection".
As shown in the figure, while fixing yoke on one side, check axial play of joint. If outside the standard, replace relevant propeller
shaft.
Check propeller shaft for bend and damage. If damage is detected, replace relevant propeller shaft.
CAUTION:
Never disassemble joints.
Check center bearing for noise and damage. If noise or damage is
detected, replace center bearing. Refer to PR-11, "
Disassembly
and Assembly of Center Bearing".
INSTALLATION
Note the following, and install in the reverse order of removal.
CAUTION:
Avoid damaging the rebro joint boot, protect it with a shop towel or equivalent.
Align matching marks to install propeller shaft to final drive and transfer (AWD models only) companion
flanges, and then tighten to specified torque. Refer to PR-8, "
Component".
Install center bearing mounting bracket (Upper) with its arrow mark
facing forward.
Adjust position of mounting bracket sliding back and forth to pre- vent play in thrust direction of center bearing insulator. Install
bracket to vehicle.
After assembly, perform a driving test to check propeller shaft vibration. If vibration occurred, separate propeller shaft from final
drive. Reinstall companion flange after rotating it by 60, 120, 180,
240, 300 degrees. Then perform driving test and check propeller
shaft vibration again at each point.
If propeller shaft or final drive has been replaced, connect them as follows: Propeller shaft runout limit : 0.8 mm (0.031 in)
SDIA2071E
Journal axial play : 0 mm (0 in)
SPD874
PDIA0017E
3AA93ABC3ACD3AC03ACA3AC03AC63AC53A913A773A893A873A873A8E3A773A983AC73AC93AC03AC3
3A893A873A873A8F3A773A9D3AAF3A8A3A8C3A863A9D3AAF3A8B3A8C
Page 3456 of 3924

PS-1
STEERING
C
DE
F
H I
J
K L
M
SECTION PS
A
B
PS
N
O P
CONTENTS
POWER STEERING SYSTEM
SERVICE INFORMATION .. ..........................2
PRECAUTIONS .............................................. .....2
Precaution for Supplemental Restraint System
(SRS) "AIR BAG" and "SEAT BELT PRE-TEN-
SIONER" ............................................................. ......
2
Precaution Necessary for Steering Wheel Rota-
tion After Battery Disconnect .....................................
2
Precaution for Steering System ................................2
PREPARATION ...................................................4
Special Service Tool ........................................... ......4
Commercial Service Tool ..........................................5
NOISE, VIBRATION AND HARSHNESS
(NVH) TROUBLESHOOTING .............................
6
NVH Troubleshooting Chart ................................ ......6
POWER STEERING FLUID ................................7
Checking Fluid Level ........................................... ......7
Checking Fluid Leakage ............................................7
Air Bleeding Hydraulic System ..................................7
STEERING WHEEL .............................................9
On-Vehicle Inspection and Service ..................... ......9
Removal and Installation .........................................10
STEERING COLUMN .........................................12
Removal and Installation ..................................... ....12
Disassembly and Assembly .....................................14
POWER STEERING GEAR AND LINKAGE ....17
Removal and Installation .........................................17
Disassembly and Assembly .....................................19
POWER STEERING OIL PUMP .......................27
On-Vehicle Inspection and Service .........................27
Removal and Installation (VQ35DE Models) ...........28
Removal and Installation (VK45DE Models) ...........29
Disassembly and Assembly (VQ35DE Models) ......29
Disassembly and Assembly (VK45DE Models) .......32
HYDRAULIC LINE ............................................37
Component ..............................................................37
Removal and Installation .........................................39
SERVICE DATA AND SPECIFICATIONS
(SDS) .................................................................
41
Steering Wheel ........................................................41
Steering Angle .........................................................41
Steering Column ......................................................41
Steering Outer Socket and Inner Socket .................41
Steering Gear ..........................................................42
Oil Pump ..................................................................43
Steering Fluid ..........................................................43
3AA93ABC3ACD3AC03ACA3AC03AC63AC53A913A773A893A873A873A8E3A773A983AC73AC93AC03AC3
3A893A873A873A8F3A773A9D3AAF3A8A3A8C3A863A9D3AAF3A8B3A8C
Page 3457 of 3924
PS-2
< SERVICE INFORMATION >
PRECAUTIONS
SERVICE INFORMATION
PRECAUTIONS
Precaution for Supplemental Restraint System (SRS) "AIR BAG" and "SEAT BELT
PRE-TENSIONER"
INFOID:0000000001612911
The Supplemental Restraint System such as “A IR BAG” and “SEAT BELT PRE-TENSIONER”, used along
with a front seat belt, helps to reduce the risk or severi ty of injury to the driver and front passenger for certain
types of collision. This system includes seat belt switch inputs and dual stage front air bag modules. The SRS
system uses the seat belt switches to determine the front air bag deployment, and may only deploy one front
air bag, depending on the severity of a collision and w hether the front occupants are belted or unbelted.
Information necessary to service the system safely is included in the “SUPPLEMENTAL RESTRAINT SYS-
TEM” and “SEAT BELTS” of this Service Manual.
WARNING:
• To avoid rendering the SRS inopera tive, which could increase the risk of personal injury or death in
the event of a collision which would result in air bag inflation, all maintenance must be performed by
an authorized NISS AN/INFINITI dealer.
Improper maintenance, including in correct removal and installation of the SRS, can lead to personal
injury caused by unintent ional activation of the system. For re moval of Spiral Cable and Air Bag
Module, see the “SUPPLEMEN TAL RESTRAINT SYSTEM”.
Do not use electrical test equipmen t on any circuit related to the SRS unless instructed to in this
Service Manual. SRS wiring harnesses can be identi fied by yellow and/or orange harnesses or har-
ness connectors.
Precaution Necessary for Steering W heel Rotation After Battery Disconnect
INFOID:0000000001612914
NOTE:
This Procedure is applied only to models with In telligent Key system and NVIS/IVIS (NISSAN/INFINITI
VEHICLE IMMOBILIZER SYSTEM - NATS).
Remove and install all control units after disconnecting both battery cables with the ignition knob in the ″LOCK ″ position.
Always use CONSULT-III to perform self-diagnosis as a part of each function inspection after finishing work.
If DTC is detected, perform trouble diagnosis according to self-diagnostic results.
For models equipped with the Intelligent Key system and NVIS /IVIS, an electrically controlled steering lock
mechanism is adopted on the key cylinder.
For this reason, if the battery is disconnected or if the battery is discharged, the steering wheel will lock and
steering wheel rotation will become impossible.
If steering wheel rotation is required when battery pow er is interrupted, follow the procedure below before
starting the repair operation.
OPERATION PROCEDURE
1. Connect both battery cables. NOTE:
Supply power using jumper cables if battery is discharged.
2. Use the Intelligent Key or mechanical key to turn the ignition switch to the ″ACC ″ position. At this time, the
steering lock will be released.
3. Disconnect both battery cables. The steering lock will remain released and the steering wheel can be
rotated.
4. Perform the necessary repair operation.
5. When the repair work is completed, return the ignition switch to the ″LOCK ″ position before connecting
the battery cables. (At this time, the steering lock mechanism will engage.)
6. Perform a self-diagnosis check of all control units using CONSULT-III.
Precaution for Steering SystemINFOID:0000000001327705
In case of removing steering gear assembly, make the final tightening with grounded and unloaded vehicle
condition, and then check wheel alignment.
Observe the following precautions when disassembling.
3AA93ABC3ACD3AC03ACA3AC03AC63AC53A913A773A893A873A873A8E3A773A983AC73AC93AC03AC3
3A893A873A873A8F3A773A9D3AAF3A8A3A8C3A863A9D3AAF3A8B3A8C
Page 3461 of 3924
PS-6
< SERVICE INFORMATION >
NOISE, VIBRATION AND HARSHNESS (NVH) TROUBLESHOOTING
NOISE, VIBRATION AND HARSHNESS (NVH) TROUBLESHOOTING
NVH Troubleshooting ChartINFOID:0000000001327708
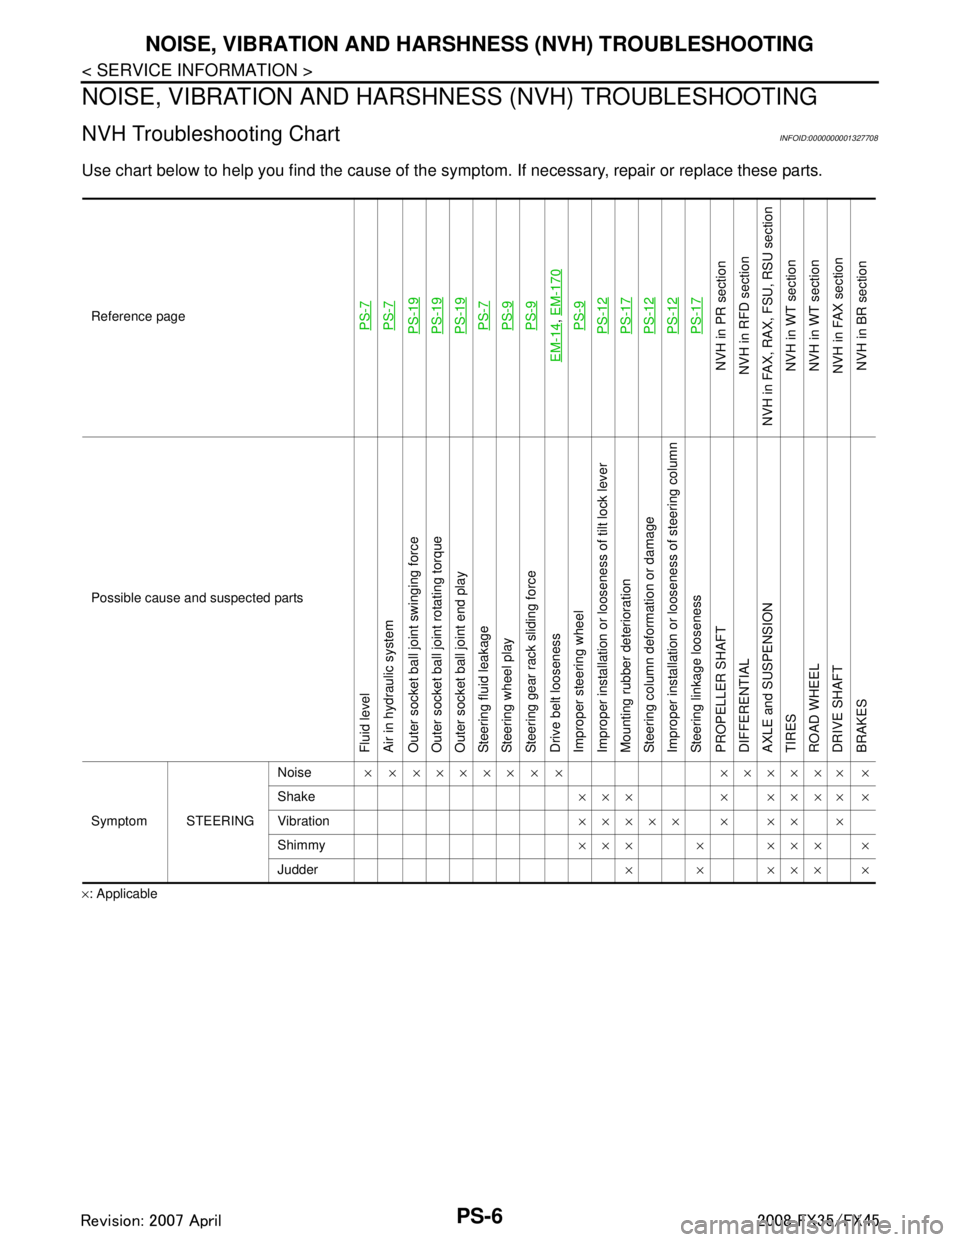
Use chart below to help you find the cause of the symp tom. If necessary, repair or replace these parts.
×: ApplicableReference page
PS-7PS-7PS-19PS-19PS-19PS-7PS-9PS-9
EM-14
,
EM-170PS-9PS-12PS-17PS-12PS-12PS-17
NVH in PR section
NVH in RFD section
NVH in FAX, RAX, FSU, RSU section NVH in WT section
NVH in WT section
NVH in FAX section
NVH in BR section
Possible cause and suspected parts
Fluid level
Air in hydraulic system
Outer socket ball joint swinging force
Outer socket ball joint rotating torque
Outer socket ball joint end play
Steering fluid leakage
Steering wheel play
Steering gear rack sliding force
Drive belt looseness
Improper steering wheel
Improper installation or looseness of tilt lock lever
Mounting rubber deterioration
Steering column deformation or damage
Improper installation or looseness of steering column
Steering linkage looseness
PROPELLER SHAFT
DIFFERENTIAL
AXLE and SUSPENSION
TIRES
ROAD WHEEL
DRIVE SHAFT
BRAKES
Symptom STEERING Noise
× × ××××× × × ×××××× ×
Shake ××× × ×××× ×
Vibration ××××× × ×× ×
Shimmy ××× × ××× ×
Judder ××××××
3AA93ABC3ACD3AC03ACA3AC03AC63AC53A913A773A893A873A873A8E3A773A983AC73AC93AC03AC3
3A893A873A873A8F3A773A9D3AAF3A8A3A8C3A863A9D3AAF3A8B3A8C
Page 3464 of 3924
STEERING WHEELPS-9
< SERVICE INFORMATION >
C
DE
F
H I
J
K L
M A
B
PS
N
O P
STEERING WHEEL
On-Vehicle Inspection and ServiceINFOID:0000000001327712
CHECKING CONDITION OF INSTALLATION
Check installation condition of steering gear assemb ly, front suspension, axle and steering column.
Check if movement exists when steering wheel is mo ved up and down, to the left and right and to the axial
direction.
Check if the mounting bolts for steering gear assembly are loose or not. Refer to PS-17
.
CHECKING STEERING WHEEL PLAY
1. Set tires to the straight ahead, start engine, then turn steering wheel to the left and right lightly, and mea-
sure steering wheel movement on the outer circumfe rence when steering wheel is turned up to the point
where tires start moving.
CHECKING NEUTRAL POSITION ON STEERING WHEEL
Check neutral position on steering wheel after confirming that front wheel alignment is correct. Refer to FSU-5,
"Wheel Alignment Inspection".
1. Set vehicle to the straight direction, chec k if steering wheel is in the neutral position.
2. If it is not in the neutral position, remo ve steering wheel and reinstall it correctly.
3. If the neutral position cannot adjust in the two teeth of steering gear assembly, loosen outer socket lock
nuts of steering outer sockets, then adjust outer so cket by the same amount in the opposite direction.
CHECKING STEERING WHEEL TURNING FORCE
1. Park vehicle on a level and dry surface, set parking brake.
2. Start engine.
3. Bring power steering fluid up to adequate operating te mperature. [Make sure temperature of fluid is
approximately 50 to 80 °C (122 to 176 °F).]
NOTE:
Tires need to be inflated normal pressure.
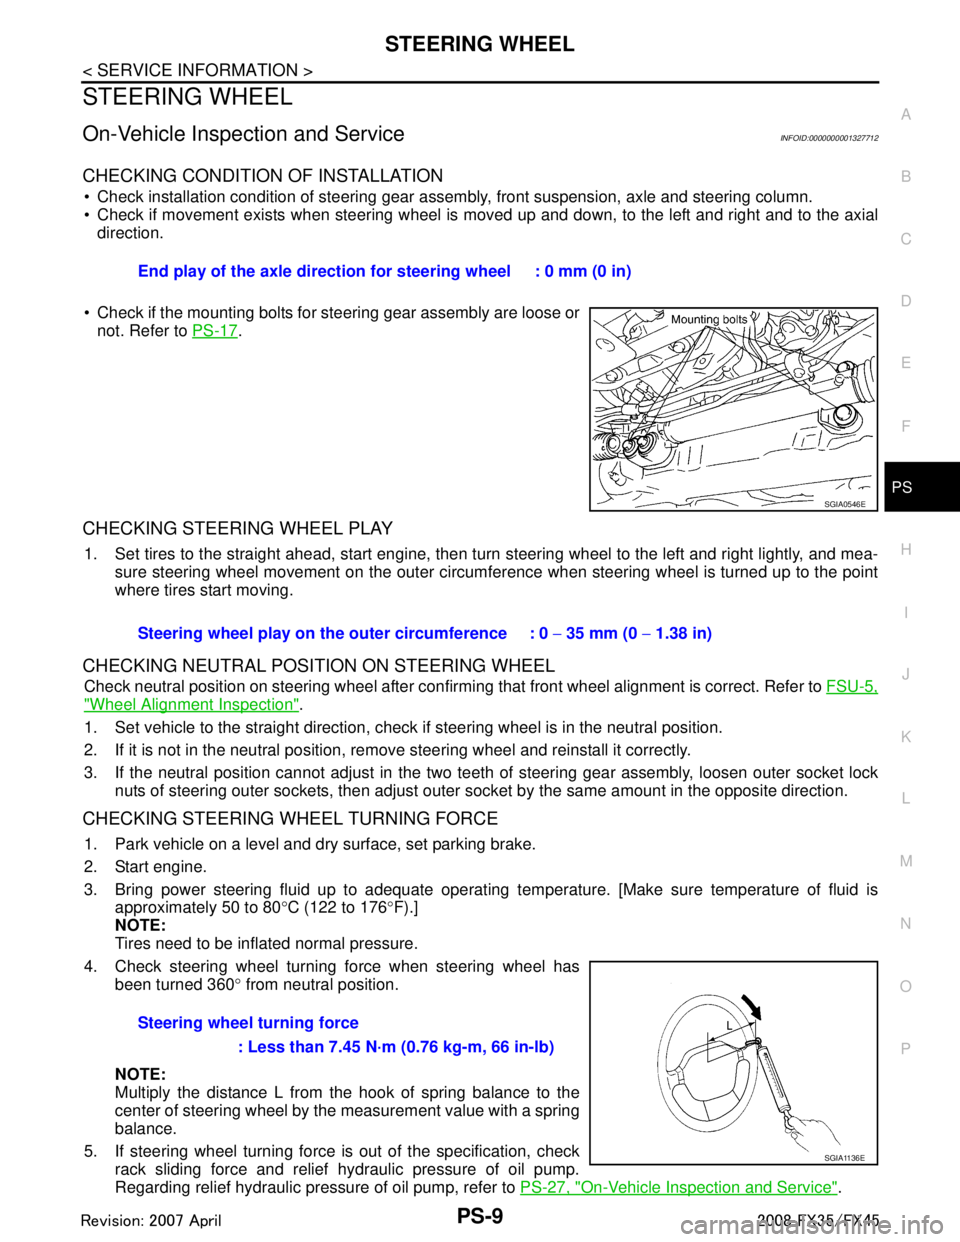
4. Check steering wheel turning force when steering wheel has been turned 360 ° from neutral position.
NOTE:
Multiply the distance L from the hook of spring balance to the
center of steering wheel by the measurement value with a spring
balance.
5. If steering wheel turning force is out of the specification, check
rack sliding force and relief hydraulic pressure of oil pump.
Regarding relief hydraulic pressure of oil pump, refer to PS-27, "
On-Vehicle Inspection and Service".
End play of the axle direction for steering wheel : 0 mm (0 in)
SGIA0546E
Steering wheel play on the
outer circumference : 0 − 35 mm (0 − 1.38 in)
Steering wheel turning force : Less than 7.45 N·m (0.76 kg-m, 66 in-lb)
SGIA1136E
3AA93ABC3ACD3AC03ACA3AC03AC63AC53A913A773A893A873A873A8E3A773A983AC73AC93AC03AC3
3A893A873A873A8F3A773A9D3AAF3A8A3A8C3A863A9D3AAF3A8B3A8C
Page 3465 of 3924
PS-10
< SERVICE INFORMATION >
STEERING WHEEL
a. Disconnect lower joint and steering knuckle from steering gear assembly. Refer to PS-12, "Removal and
Installation", FA X - 4 , "Removal and Installation", FAX-11, "Removal and Installation".
b. Start and run engine at idle to make sure steer ing fluid has reached normal operating temperature.
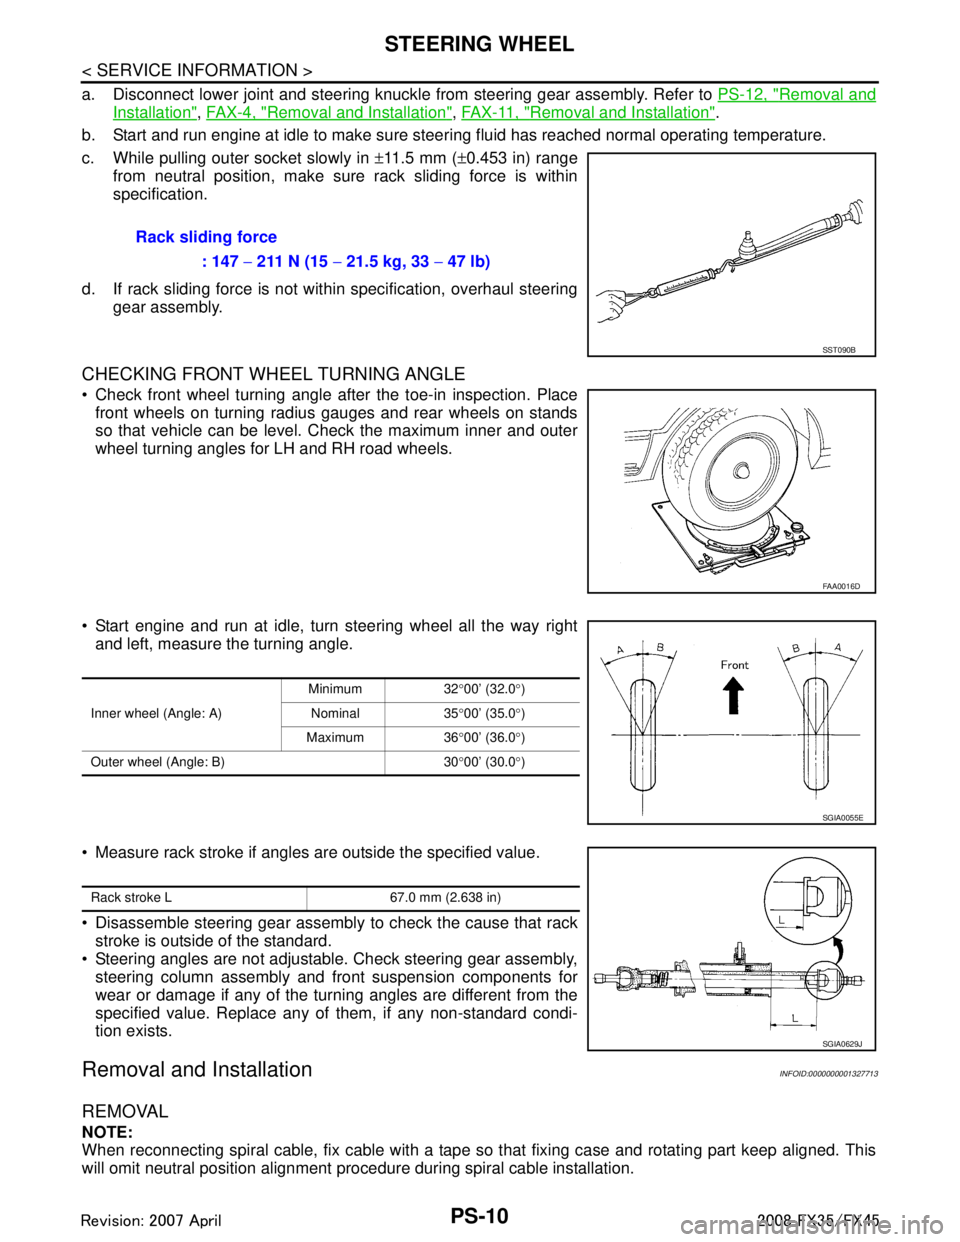
c. While pulling outer socket slowly in ±11.5 mm ( ±0.453 in) range
from neutral position, make sure rack sliding force is within
specification.
d. If rack sliding force is not within specification, overhaul steering gear assembly.
CHECKING FRONT WHEEL TURNING ANGLE
Check front wheel turning angle after the toe-in inspection. Placefront wheels on turning radius gauges and rear wheels on stands
so that vehicle can be level. Check the maximum inner and outer
wheel turning angles for LH and RH road wheels.
Start engine and run at idle, turn steering wheel all the way right and left, measure the turning angle.
Measure rack stroke if angles are outside the specified value.
Disassemble steering gear assembly to check the cause that rack
stroke is outside of the standard.
Steering angles are not adjustable. Check steering gear assembly, steering column assembly and front suspension components for
wear or damage if any of the turning angles are different from the
specified value. Replace any of them, if any non-standard condi-
tion exists.
Removal and InstallationINFOID:0000000001327713
REMOVAL
NOTE:
When reconnecting spiral cable, fix cable with a tape so that fixing case and rotating part keep aligned. This
will omit neutral position alignment procedure during spiral cable installation. Rack sliding force
: 147 − 211 N (15 − 21.5 kg, 33 − 47 lb)
SST090B
FAA0016D
Inner wheel (Angle: A) Minimum 32
°00’ (32.0 °)
Nominal 35 °00’ (35.0 °)
Maximum 36 °00’ (36.0 °)
Outer wheel (Angle: B) 30 °00’ (30.0 °)
SGIA0055E
Rack stroke L 67.0 mm (2.638 in)
SGIA0629J
3AA93ABC3ACD3AC03ACA3AC03AC63AC53A913A773A893A873A873A8E3A773A983AC73AC93AC03AC3
3A893A873A873A8F3A773A9D3AAF3A8A3A8C3A863A9D3AAF3A8B3A8C
Page 3466 of 3924
STEERING WHEELPS-11
< SERVICE INFORMATION >
C
DE
F
H I
J
K L
M A
B
PS
N
O P
1. Set vehicle to the straight-ahead direction.
2. Remove driver air bag module. Refer to SRS-34, "
Removal and Installation".
3. Remove steering wheel lock nut after steering is locked.
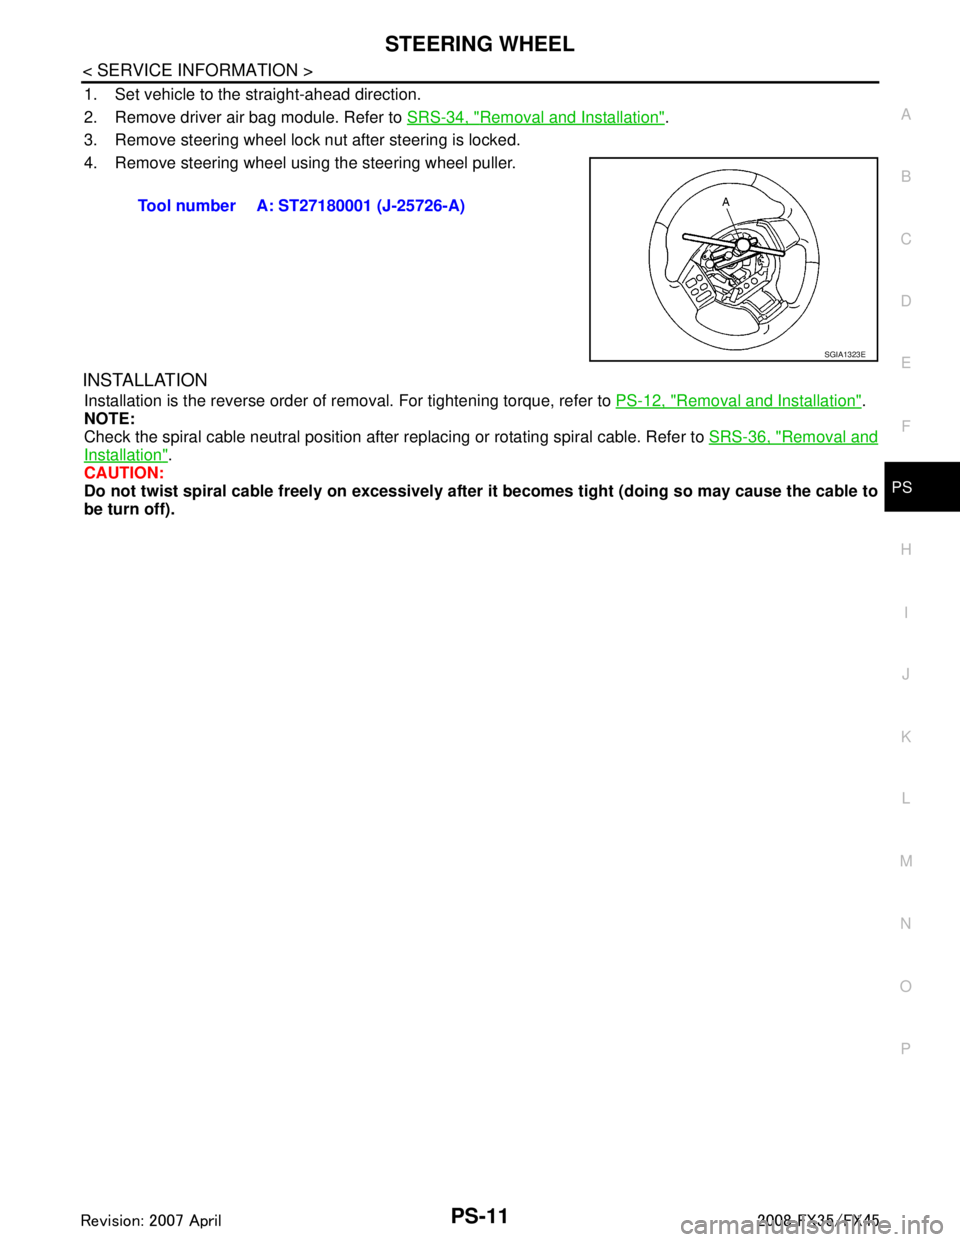
4. Remove steering wheel using the steering wheel puller.
INSTALLATION
Installation is the reverse order of removal. For tightening torque, refer to PS-12, "Removal and Installation".
NOTE:
Check the spiral cable neutral position after r eplacing or rotating spiral cable. Refer to SRS-36, "
Removal and
Installation".
CAUTION:
Do not twist spiral cable freely on excessively after it becomes tight (doing so may cause the cable to
be turn off). Tool number A: ST27180001 (J-25726-A)
SGIA1323E
3AA93ABC3ACD3AC03ACA3AC03AC63AC53A913A773A893A873A873A8E3A773A983AC73AC93AC03AC3
3A893A873A873A8F3A773A9D3AAF3A8A3A8C3A863A9D3AAF3A8B3A8C
Page 3467 of 3924
PS-12
< SERVICE INFORMATION >
STEERING COLUMN
STEERING COLUMN
Removal and InstallationINFOID:0000000001327714
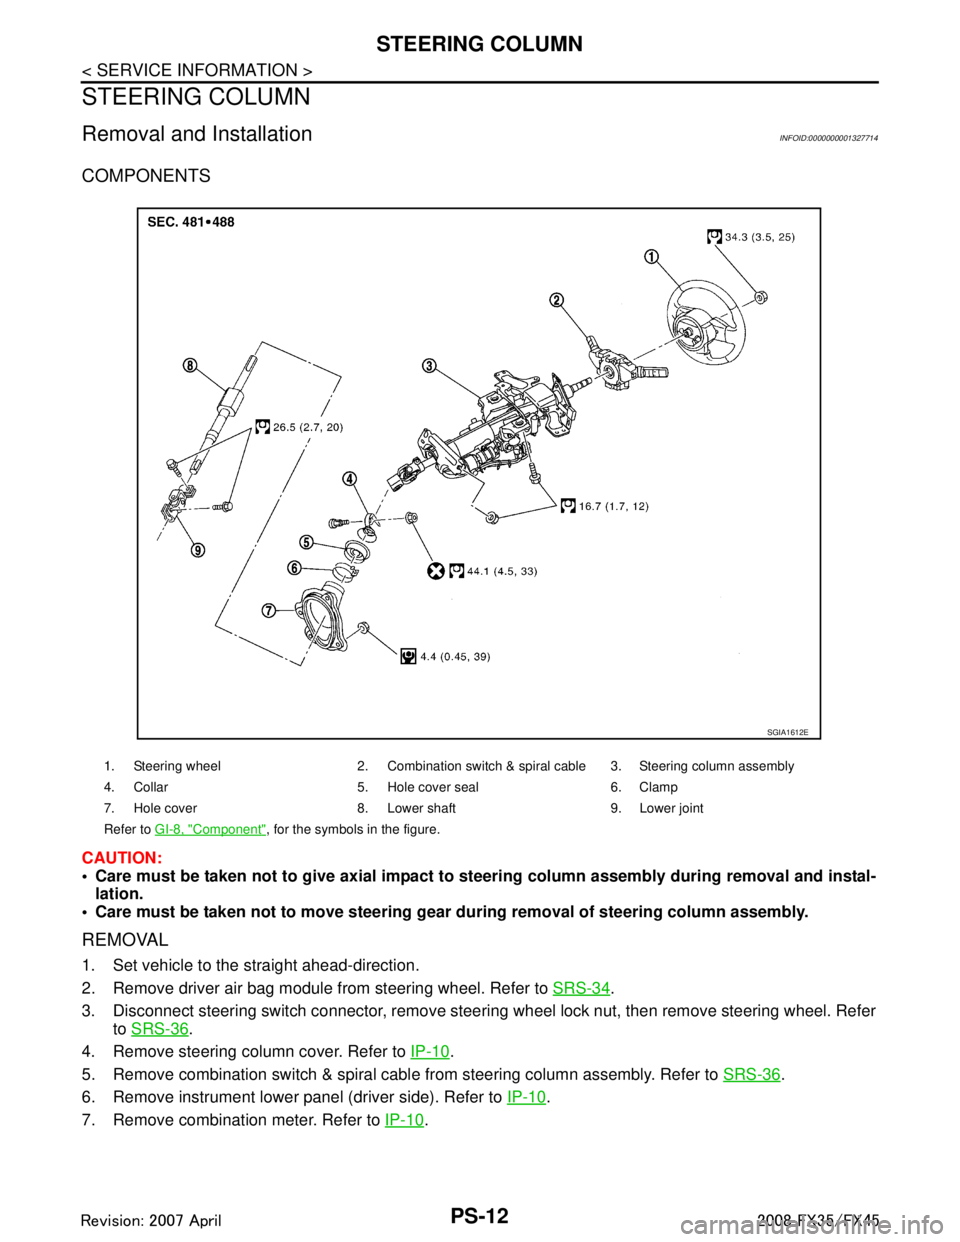
COMPONENTS
CAUTION:
Care must be taken not to give axial impact to steering column assembly during removal and instal-
lation.
Care must be taken not to move steering gear during removal of steering column assembly.
REMOVAL
1. Set vehicle to the straight ahead-direction.
2. Remove driver air bag module from steering wheel. Refer to SRS-34
.
3. Disconnect steering switch connector, remove steering wheel lock nut, then remove steering wheel. Refer to SRS-36
.
4. Remove steering column cover. Refer to IP-10
.
5. Remove combination switch & spiral cabl e from steering column assembly. Refer to SRS-36
.
6. Remove instrument lower panel (driver side). Refer to IP-10
.
7. Remove combination meter. Refer to IP-10
.
1. Steering wheel 2. Combination switch & spiral cable 3. Steering column assembly
4. Collar 5. Hole cover seal 6. Clamp
7. Hole cover 8. Lower shaft 9. Lower joint
Refer to GI-8, "
Component", for the symbols in the figure.
SGIA1612E
3AA93ABC3ACD3AC03ACA3AC03AC63AC53A913A773A893A873A873A8E3A773A983AC73AC93AC03AC3
3A893A873A873A8F3A773A9D3AAF3A8A3A8C3A863A9D3AAF3A8B3A8C