2008 INFINITI FX35 boot
[x] Cancel search: bootPage 3512 of 3924
RAX-14
< SERVICE INFORMATION >
REAR DRIVE SHAFT
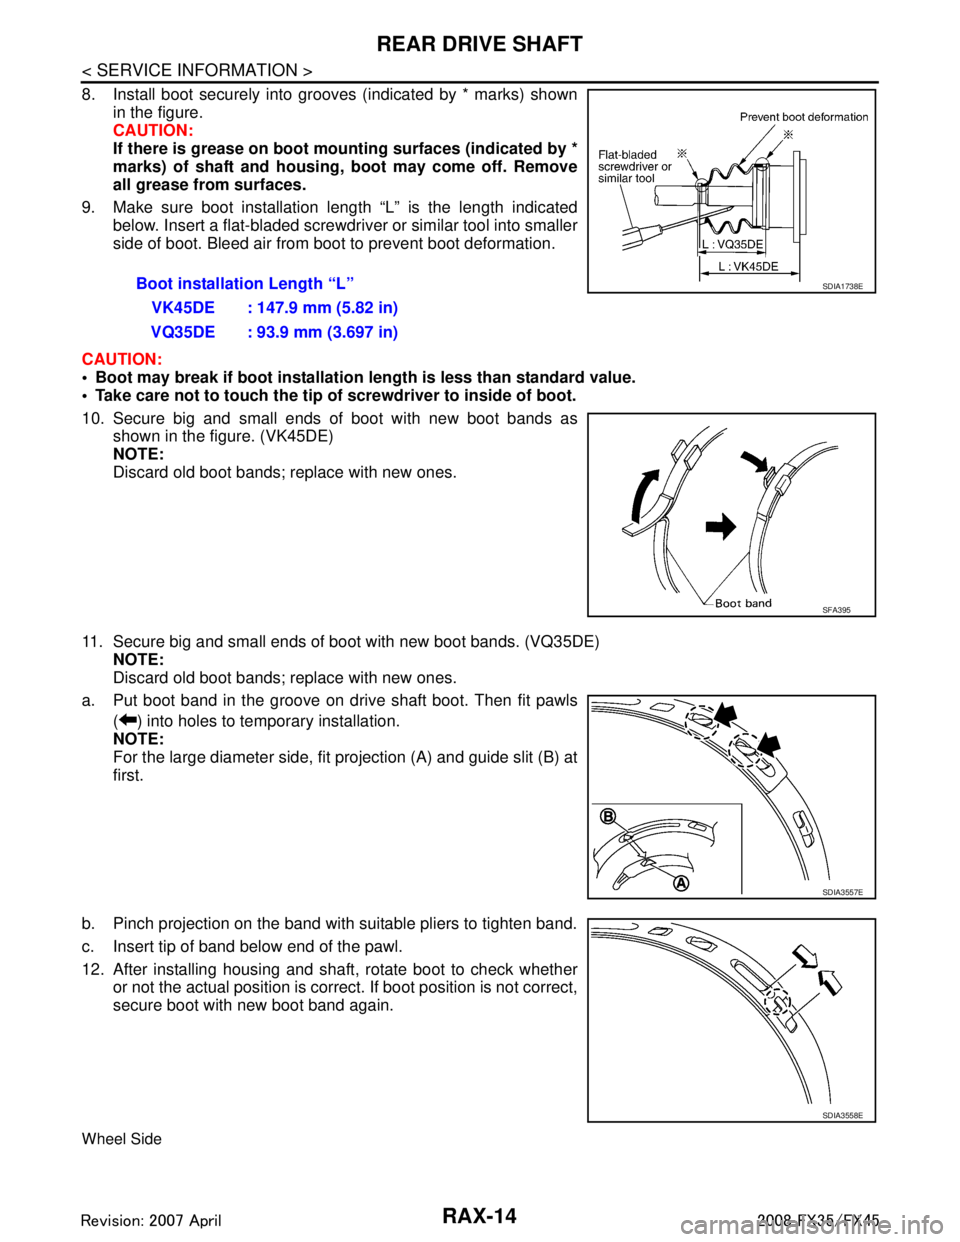
8. Install boot securely into grooves (indicated by * marks) shownin the figure.
CAUTION:
If there is grease on boot mounting surfaces (indicated by *
marks) of shaft and housing, boot may come off. Remove
all grease from surfaces.
9. Make sure boot installation length “L” is the length indicated below. Insert a flat-bladed screwdriver or similar tool into smaller
side of boot. Bleed air from boot to prevent boot deformation.
CAUTION:
Boot may break if boot installation length is less than standard value.
Take care not to touch the tip of screwdriver to inside of boot.
10. Secure big and small ends of boot with new boot bands as
shown in the figure. (VK45DE)
NOTE:
Discard old boot bands; replace with new ones.
11. Secure big and small ends of boot with new boot bands. (VQ35DE) NOTE:
Discard old boot bands; replace with new ones.
a. Put boot band in the groove on drive shaft boot. Then fit pawls ( ) into holes to temporary installation.
NOTE:
For the large diameter side, fit projection (A) and guide slit (B) at
first.
b. Pinch projection on the band with suitable pliers to tighten band.
c. Insert tip of band below end of the pawl.
12. After installing housing and shaft, rotate boot to check whether or not the actual position is corre ct. If boot position is not correct,
secure boot with new boot band again.
Wheel Side
Boot installation Length “L”
VK45DE : 147.9 mm (5.82 in)
VQ35DE : 93.9 mm (3.697 in)SDIA1738E
SFA395
SDIA3557E
SDIA3558E
3AA93ABC3ACD3AC03ACA3AC03AC63AC53A913A773A893A873A873A8E3A773A983AC73AC93AC03AC3
3A893A873A873A8F3A773A9D3AAF3A8A3A8C3A863A9D3AAF3A8B3A8C
Page 3513 of 3924
REAR DRIVE SHAFTRAX-15
< SERVICE INFORMATION >
CEF
G H
I
J
K L
M A
B
RAX
N
O P
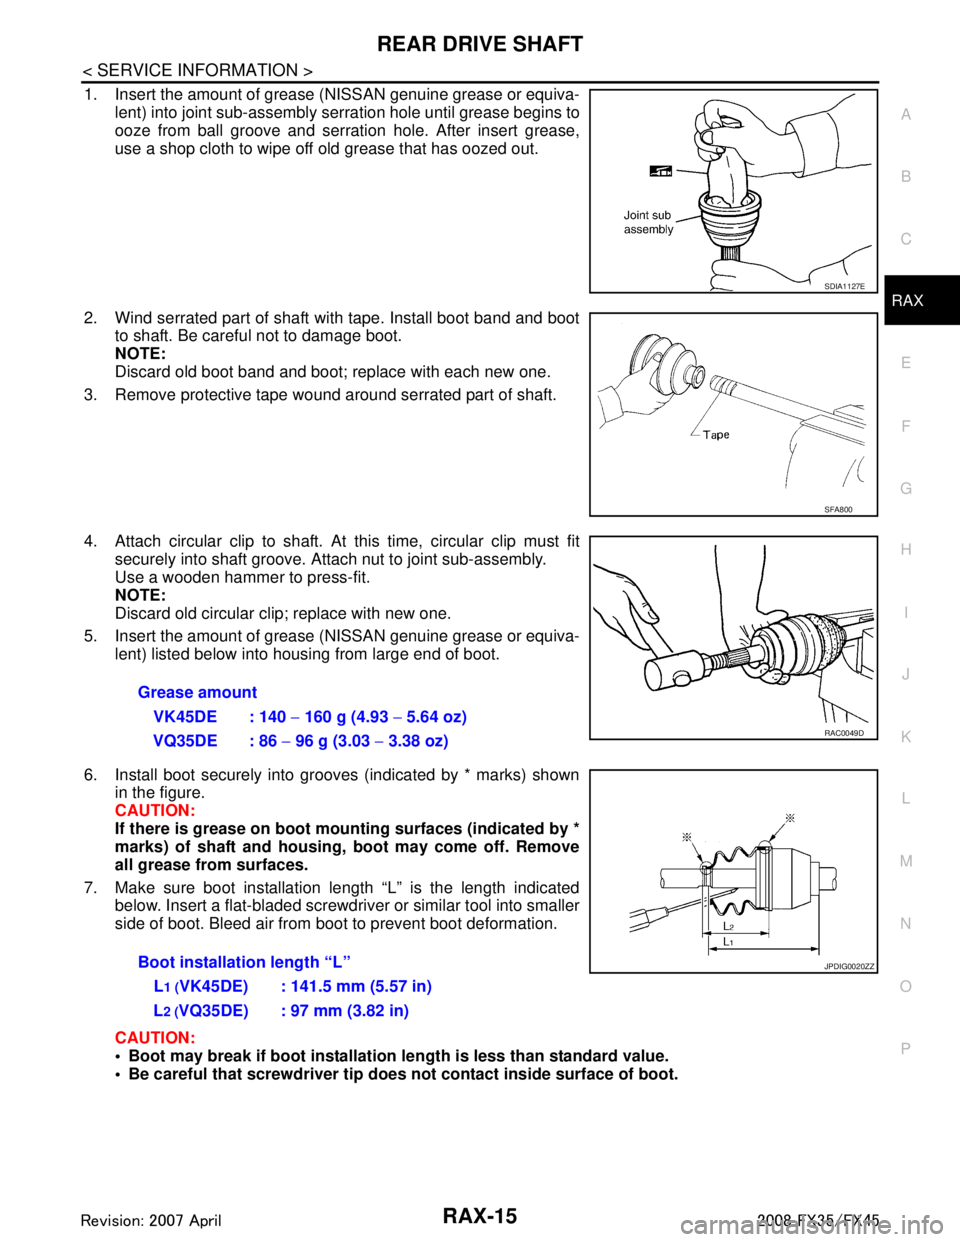
1. Insert the amount of grease (NISSAN genuine grease or equiva-
lent) into joint sub-assembly serration hole until grease begins to
ooze from ball groove and serration hole. After insert grease,
use a shop cloth to wipe off old grease that has oozed out.
2. Wind serrated part of shaft with tape. Install boot band and boot to shaft. Be careful not to damage boot.
NOTE:
Discard old boot band and boot; replace with each new one.
3. Remove protective tape wound around serrated part of shaft.
4. Attach circular clip to shaft. At this time, circular clip must fit securely into shaft groove. Attach nut to joint sub-assembly.
Use a wooden hammer to press-fit.
NOTE:
Discard old circular clip; replace with new one.
5. Insert the amount of grease (NISSAN genuine grease or equiva-
lent) listed below into housing from large end of boot.
6. Install boot securely into grooves (indicated by * marks) shown in the figure.
CAUTION:
If there is grease on boot mo unting surfaces (indicated by *
marks) of shaft and housing, boot may come off. Remove
all grease from surfaces.
7. Make sure boot installation length “L” is the length indicated below. Insert a flat-bladed screwdriver or similar tool into smaller
side of boot. Bleed air from boot to prevent boot deformation.
CAUTION:
Boot may break if boot installation le ngth is less than standard value.
Be careful that screwdriver tip does not contact inside surface of boot.
SDIA1127E
SFA800
Grease amount
VK45DE : 140 − 160 g (4.93 − 5.64 oz)
VQ35DE : 86 − 96 g (3.03 − 3.38 oz)
RAC0049D
Boot installation length “L”
L
1 (VK45DE) : 141.5 mm (5.57 in)
L
2 (VQ35DE) : 97 mm (3.82 in)
JPDIG0020ZZ
3AA93ABC3ACD3AC03ACA3AC03AC63AC53A913A773A893A873A873A8E3A773A983AC73AC93AC03AC3
3A893A873A873A8F3A773A9D3AAF3A8A3A8C3A863A9D3AAF3A8B3A8C
Page 3514 of 3924
RAX-16
< SERVICE INFORMATION >
REAR DRIVE SHAFT
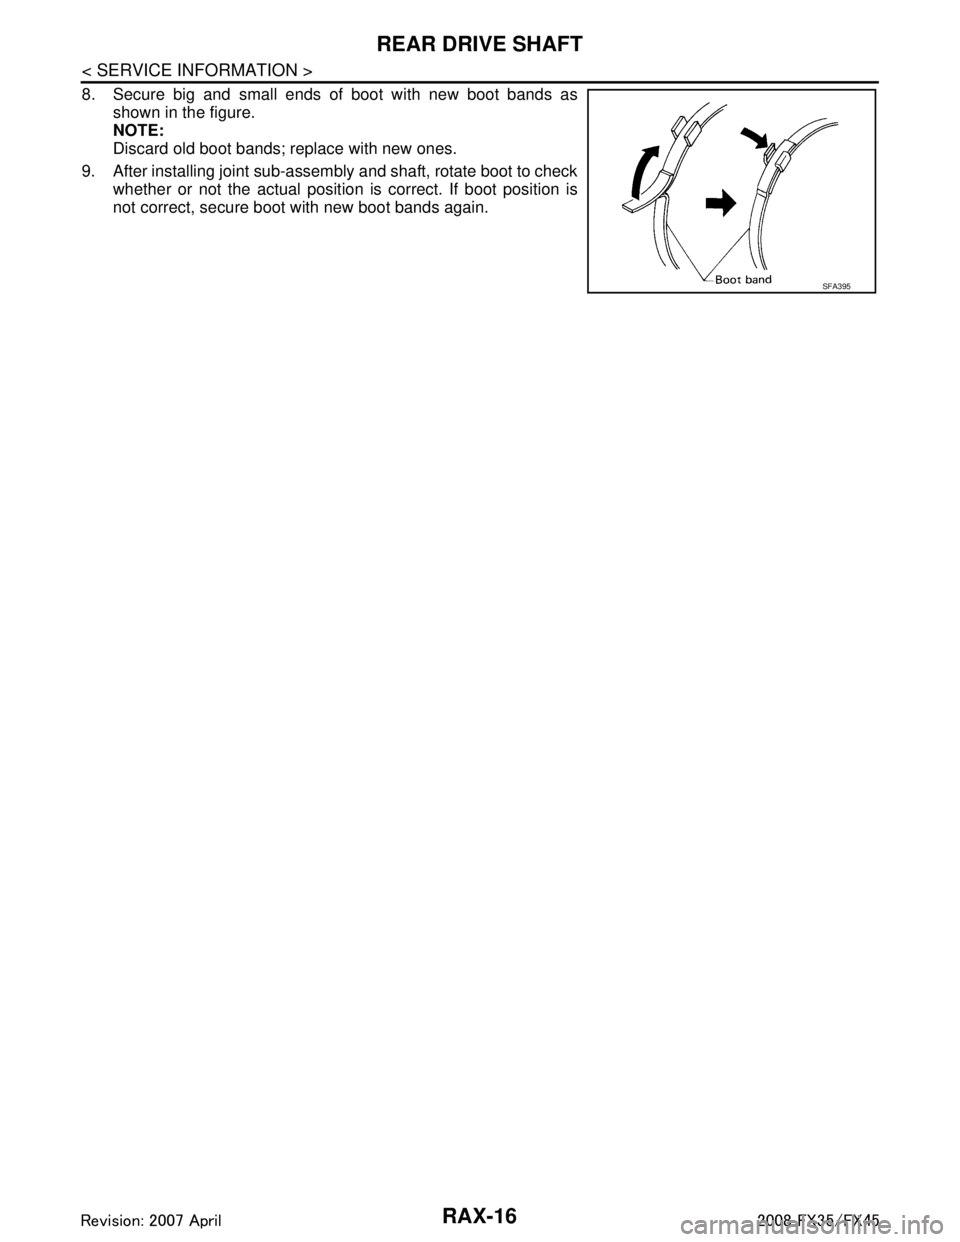
8. Secure big and small ends of boot with new boot bands asshown in the figure.
NOTE:
Discard old boot bands; replace with new ones.
9. After installing joint sub-assembly and shaft, rotate boot to check whether or not the actual positi on is correct. If boot position is
not correct, secure boot with new boot bands again.
SFA395
3AA93ABC3ACD3AC03ACA3AC03AC63AC53A913A773A893A873A873A8E3A773A983AC73AC93AC03AC3
3A893A873A873A8F3A773A9D3AAF3A8A3A8C3A863A9D3AAF3A8B3A8C
Page 3515 of 3924
SERVICE DATA AND SPECIFICATIONS (SDS)
RAX-17
< SERVICE INFORMATION >
C EF
G H
I
J
K L
M A
B
RAX
N
O P
SERVICE DATA AND SPECIFICATIONS (SDS)
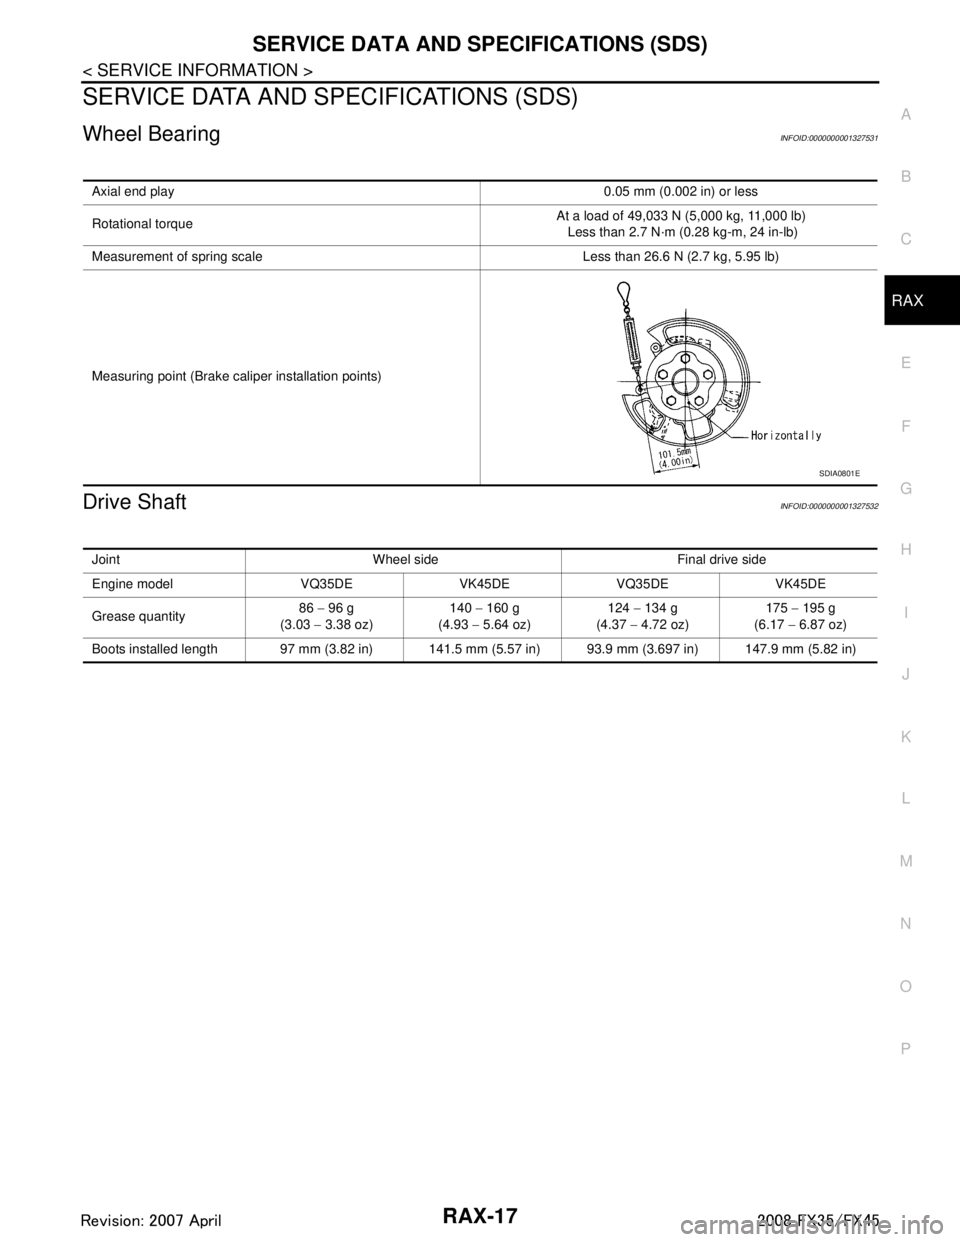
Wheel BearingINFOID:0000000001327531
Drive ShaftINFOID:0000000001327532
Axial end play 0.05 mm (0.002 in) or less
Rotational torque At a load of 49,033 N (5,000 kg, 11,000 lb)
Less than 2.7 N·m (0.28 kg-m, 24 in-lb)
Measurement of spring scale Less than 26.6 N (2.7 kg, 5.95 lb)
Measuring point (Brake caliper installation points)
SDIA0801E
Joint Wheel side Final drive side
Engine model VQ35DE VK45DE VQ35DE VK45DE
Grease quantity 86
− 96 g
(3.03 − 3.38 oz) 140
− 160 g
(4.93 − 5.64 oz) 124
− 134 g
(4.37 − 4.72 oz) 175
− 195 g
(6.17 − 6.87 oz)
Boots installed length 97 mm (3.82 in) 141.5 mm (5.57 in) 93.9 mm (3.697 in) 147.9 mm (5.82 in)
3AA93ABC3ACD3AC03ACA3AC03AC63AC53A913A773A893A873A873A8E3A773A983AC73AC93AC03AC3
3A893A873A873A8F3A773A9D3AAF3A8A3A8C3A863A9D3AAF3A8B3A8C
Page 3586 of 3924
REAR SUSPENSION ASSEMBLYRSU-5
< SERVICE INFORMATION >
C
DF
G H
I
J
K L
M A
B
RSU
N
O P
REAR SUSPENSION ASSEMBLY
On-Vehicle Inspection and ServiceINFOID:0000000001327552
Make sure the mounting conditions (looseness, ba ck lash) of each component and component status (wear,
damage) are normal.
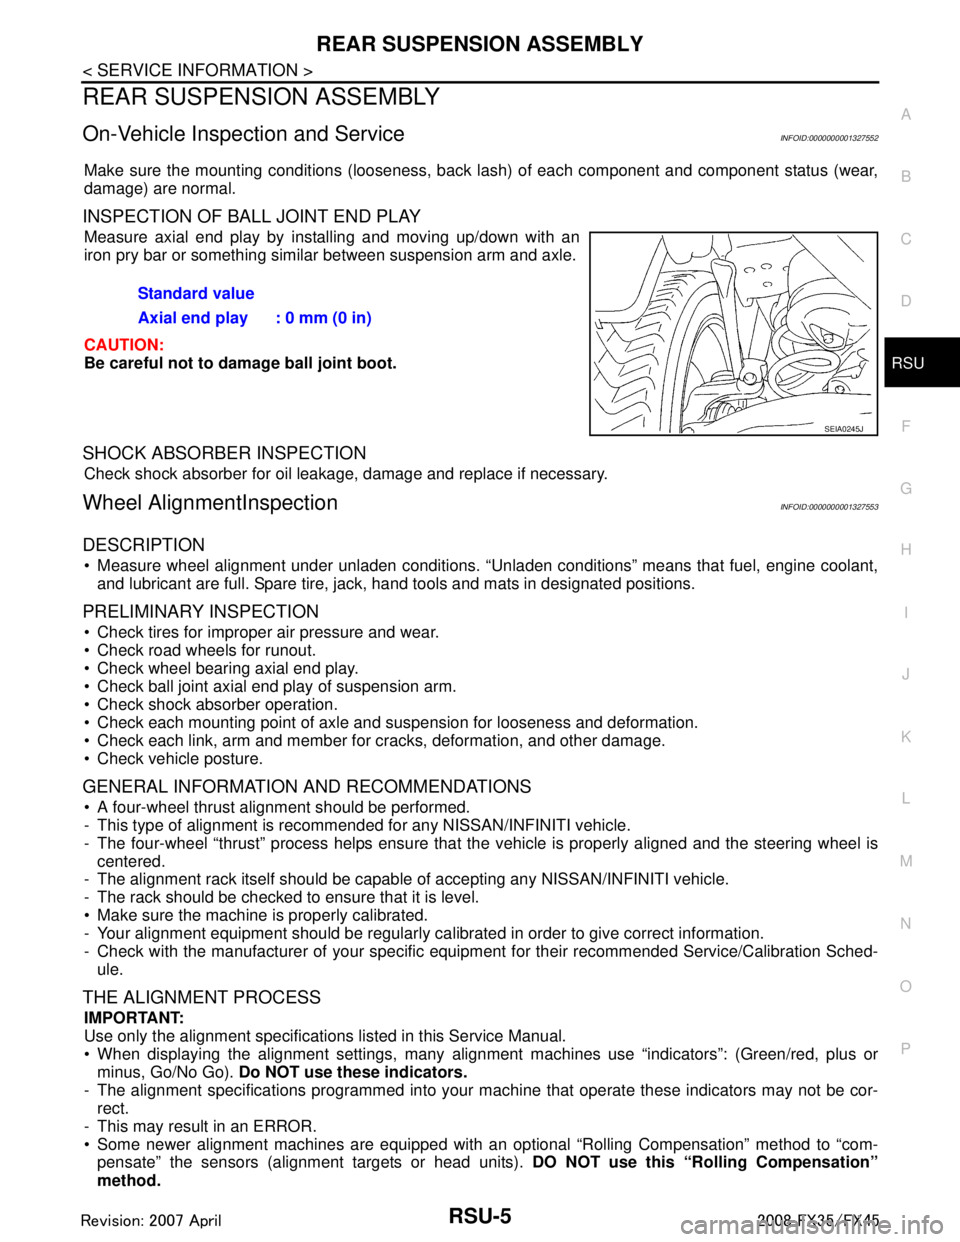
INSPECTION OF BALL JOINT END PLAY
Measure axial end play by installing and moving up/down with an
iron pry bar or something similar between suspension arm and axle.
CAUTION:
Be careful not to damage ball joint boot.
SHOCK ABSORBER INSPECTION
Check shock absorber for oil leakage, damage and replace if necessary.
Wheel AlignmentInspectionINFOID:0000000001327553
DESCRIPTION
Measure wheel alignment under unladen conditions. “U nladen conditions” means that fuel, engine coolant,
and lubricant are full. Spare tire, jack, hand tools and mats in designated positions.
PRELIMINARY INSPECTION
Check tires for improper air pressure and wear.
Check road wheels for runout.
Check wheel bearing axial end play.
Check ball joint axial end play of suspension arm.
Check shock absorber operation.
Check each mounting point of axle and suspension for looseness and deformation.
Check each link, arm and member for cracks, deformation, and other damage.
Check vehicle posture.
GENERAL INFORMATION AND RECOMMENDATIONS
A four-wheel thrust alignment should be performed.
- This type of alignment is recomm ended for any NISSAN/INFINITI vehicle.
- The four-wheel “thrust” process helps ensure that t he vehicle is properly aligned and the steering wheel is
centered.
- The alignment rack itself should be capable of accepting any NISSAN/INFINITI vehicle.
- The rack should be checked to ensure that it is level.
Make sure the machine is properly calibrated.
- Your alignment equipment should be regularly ca librated in order to give correct information.
- Check with the manufacturer of your specific equi pment for their recommended Service/Calibration Sched-
ule.
THE ALIGNMENT PROCESS
IMPORTANT:
Use only the alignment specificati ons listed in this Service Manual.
When displaying the alignment settings, many alignment machines use “indicators”: (Green/red, plus or
minus, Go/No Go). Do NOT use these indicators.
- The alignment specifications programmed into your machine that operate these indicators may not be cor-
rect.
- This may result in an ERROR.
Some newer alignment machines are equipped with an optional “Rolling Compensation” method to “com-
pensate” the sensors (alignment targets or head units). DO NOT use this “Rolling Compensation”
method. Standard value
Axial end play : 0 mm (0 in)
SEIA0245J
3AA93ABC3ACD3AC03ACA3AC03AC63AC53A913A773A893A873A873A8E3A773A983AC73AC93AC03AC3
3A893A873A873A8F3A773A9D3AAF3A8A3A8C3A863A9D3AAF3A8B3A8C
Page 3592 of 3924
SUSPENSION ARMRSU-11
< SERVICE INFORMATION >
C
DF
G H
I
J
K L
M A
B
RSU
N
O P
SUSPENSION ARM
Removal and InstallationINFOID:0000000001327557
REMOVAL
1. Remove tires from vehicle with power tool.
2. Remove stabilizer connecting rod mounting br acket from suspension arm with power tool.
3. Remove drive shaft from vehicle. (VK45DE models) Refer to RAX-10, "
Removal and Installation".
4. Remove cotter pin of suspension arm ball joint, and loosen nut.
5. Use a ball joint remover (suitable tool) to remove suspension arm from axle assembly. Be careful not to damage ball joint boot.
CAUTION:
Tighten temporarily mounting nu t to prevent damage to threads and to prevent ball joint remover
(suitable tool) from coming off.
6. Remove fixing nuts and bolts between suspension arm and rear suspension member with power tool.
7. Remove suspension arm from vehicle.
INSPECTION AFTER REMOVAL
Visual Inspection
Check suspension arm and bushing for deformation, cracks, or damage. If any non-standard condition is
found, replace it.
Check boot of ball joint for cracks, or damage, and also for grease leakage.
Ball Joint Inspection
Manually move ball stud to confirm it moves smoothly with no binding.
Swing Torque Inspection
NOTE:
Before measuring, move ball joint at least ten times by hand to check for smooth movement.
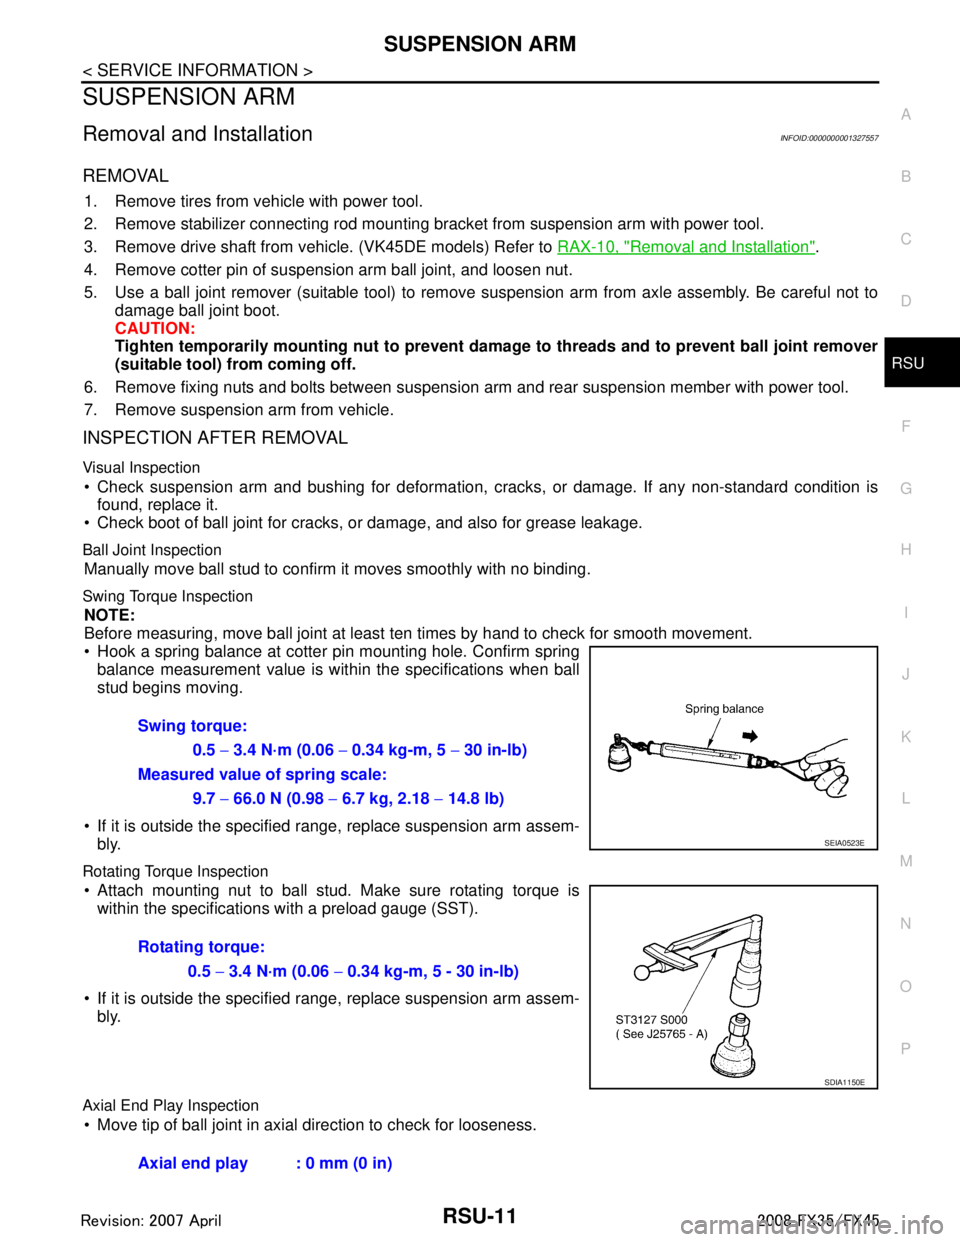
Hook a spring balance at cotter pin mounting hole. Confirm spring balance measurement value is withi n the specifications when ball
stud begins moving.
If it is outside the specified r ange, replace suspension arm assem-
bly.
Rotating Torque Inspection
Attach mounting nut to ball stud. Make sure rotating torque is within the specifications with a preload gauge (SST).
If it is outside the specified r ange, replace suspension arm assem-
bly.
Axial End Play Inspection
Move tip of ball joint in axial direction to check for looseness. Swing torque:
0.5
− 3.4 N·m (0.06 − 0.34 kg-m, 5 − 30 in-lb)
Measured value of spring scale:
9.7 − 66.0 N (0.98 − 6.7 kg, 2.18 − 14.8 lb)
SEIA0523E
Rotating torque:
0.5 − 3.4 N·m (0.06 − 0.34 kg-m, 5 - 30 in-lb)
SDIA1150E
Axial end play : 0 mm (0 in)
3AA93ABC3ACD3AC03ACA3AC03AC63AC53A913A773A893A873A873A8E3A773A983AC73AC93AC03AC3
3A893A873A873A8F3A773A9D3AAF3A8A3A8C3A863A9D3AAF3A8B3A8C