Page 3466 of 3924
STEERING WHEELPS-11
< SERVICE INFORMATION >
C
DE
F
H I
J
K L
M A
B
PS
N
O P
1. Set vehicle to the straight-ahead direction.
2. Remove driver air bag module. Refer to SRS-34, "
Removal and Installation".
3. Remove steering wheel lock nut after steering is locked.
4. Remove steering wheel using the steering wheel puller.
INSTALLATION
Installation is the reverse order of removal. For tightening torque, refer to PS-12, "Removal and Installation".
NOTE:
Check the spiral cable neutral position after r eplacing or rotating spiral cable. Refer to SRS-36, "
Removal and
Installation".
CAUTION:
Do not twist spiral cable freely on excessively after it becomes tight (doing so may cause the cable to
be turn off). Tool number A: ST27180001 (J-25726-A)
SGIA1323E
3AA93ABC3ACD3AC03ACA3AC03AC63AC53A913A773A893A873A873A8E3A773A983AC73AC93AC03AC3
3A893A873A873A8F3A773A9D3AAF3A8A3A8C3A863A9D3AAF3A8B3A8C
Page 3469 of 3924
PS-14
< SERVICE INFORMATION >
STEERING COLUMN
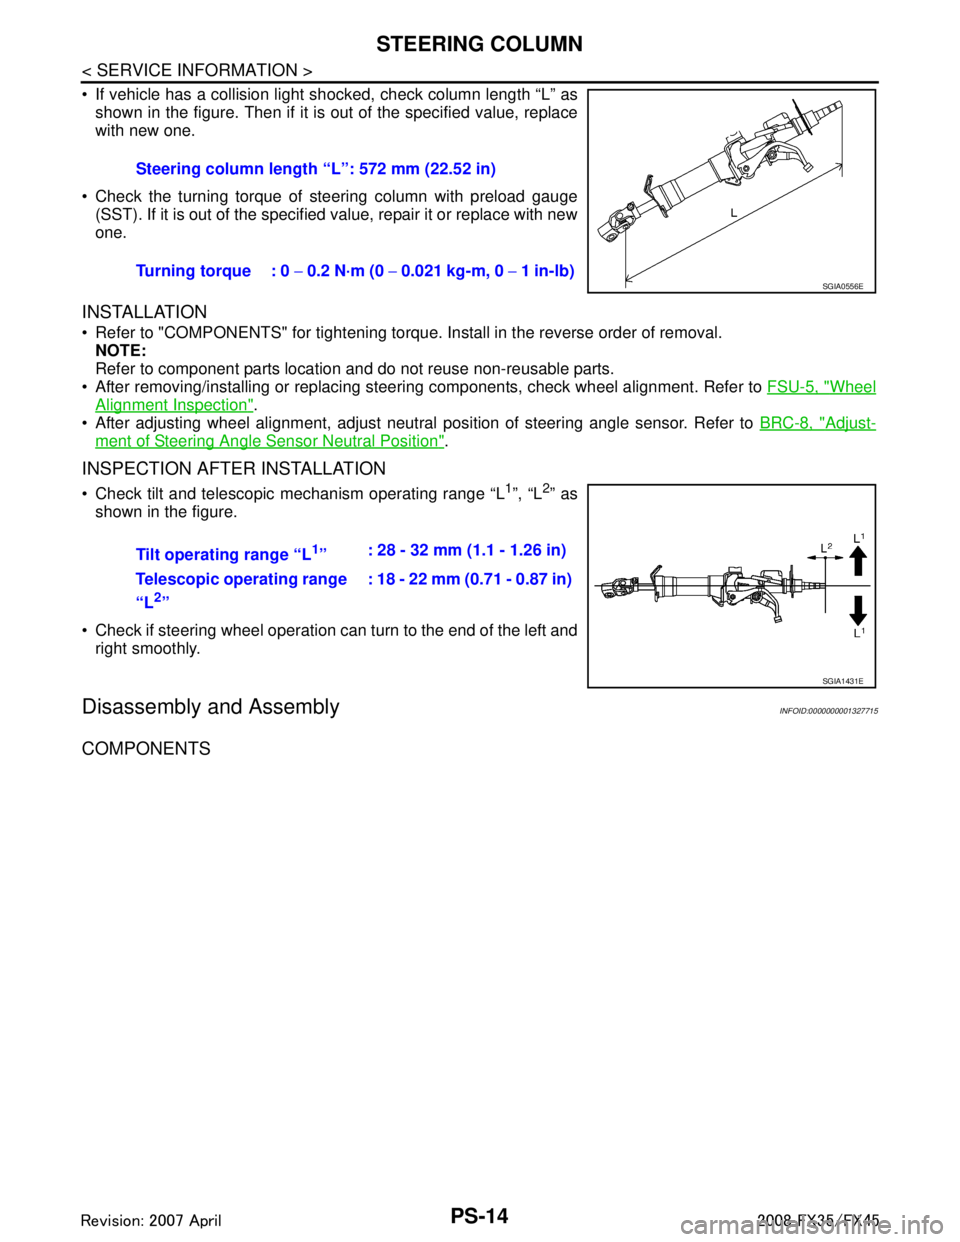
If vehicle has a collision light shocked, check column length “L” as
shown in the figure. Then if it is out of the specified value, replace
with new one.
Check the turning torque of steering column with preload gauge (SST). If it is out of the specified value, repair it or replace with new
one.
INSTALLATION
Refer to "COMPONENTS" for tightening torque. Install in the reverse order of removal.NOTE:
Refer to component parts location and do not reuse non-reusable parts.
After removing/installing or replacing steering components, check wheel alignment. Refer to FSU-5, "
Wheel
Alignment Inspection".
After adjusting wheel alignment, adjust neutral position of steering angle sensor. Refer to BRC-8, "
Adjust-
ment of Steering Angle Sensor Neutral Position".
INSPECTION AFTER INSTALLATION
Check tilt and telescopic mechanism operating range “L1”, “L2” as
shown in the figure.
Check if steering wheel operation can turn to the end of the left and right smoothly.
Disassembly and AssemblyINFOID:0000000001327715
COMPONENTS
Steering column length “L”: 572 mm (22.52 in)
Turning torque : 0 − 0.2 N·m (0 − 0.021 kg-m, 0 − 1 in-lb)
SGIA0556E
Tilt operating range “L1” : 28 - 32 mm (1.1 - 1.26 in)
Telescopic operating range
“L
2” : 18 - 22 mm (0.71 - 0.87 in)
SGIA1431E
3AA93ABC3ACD3AC03ACA3AC03AC63AC53A913A773A893A873A873A8E3A773A983AC73AC93AC03AC3
3A893A873A873A8F3A773A9D3AAF3A8A3A8C3A863A9D3AAF3A8B3A8C
Page 3471 of 3924
PS-16
< SERVICE INFORMATION >
STEERING COLUMN
DISASSEMBLY
Disassemble the parts from jacket tube. The parts to be disassembled are shown in the figure.
ASSEMBLY
Refer to "COMPONENTS" for tightening torque. Install in the reverse order of disassembly.
3AA93ABC3ACD3AC03ACA3AC03AC63AC53A913A773A893A873A873A8E3A773A983AC73AC93AC03AC3
3A893A873A873A8F3A773A9D3AAF3A8A3A8C3A863A9D3AAF3A8B3A8C
Page 3473 of 3924
PS-18
< SERVICE INFORMATION >
POWER STEERING GEAR AND LINKAGE
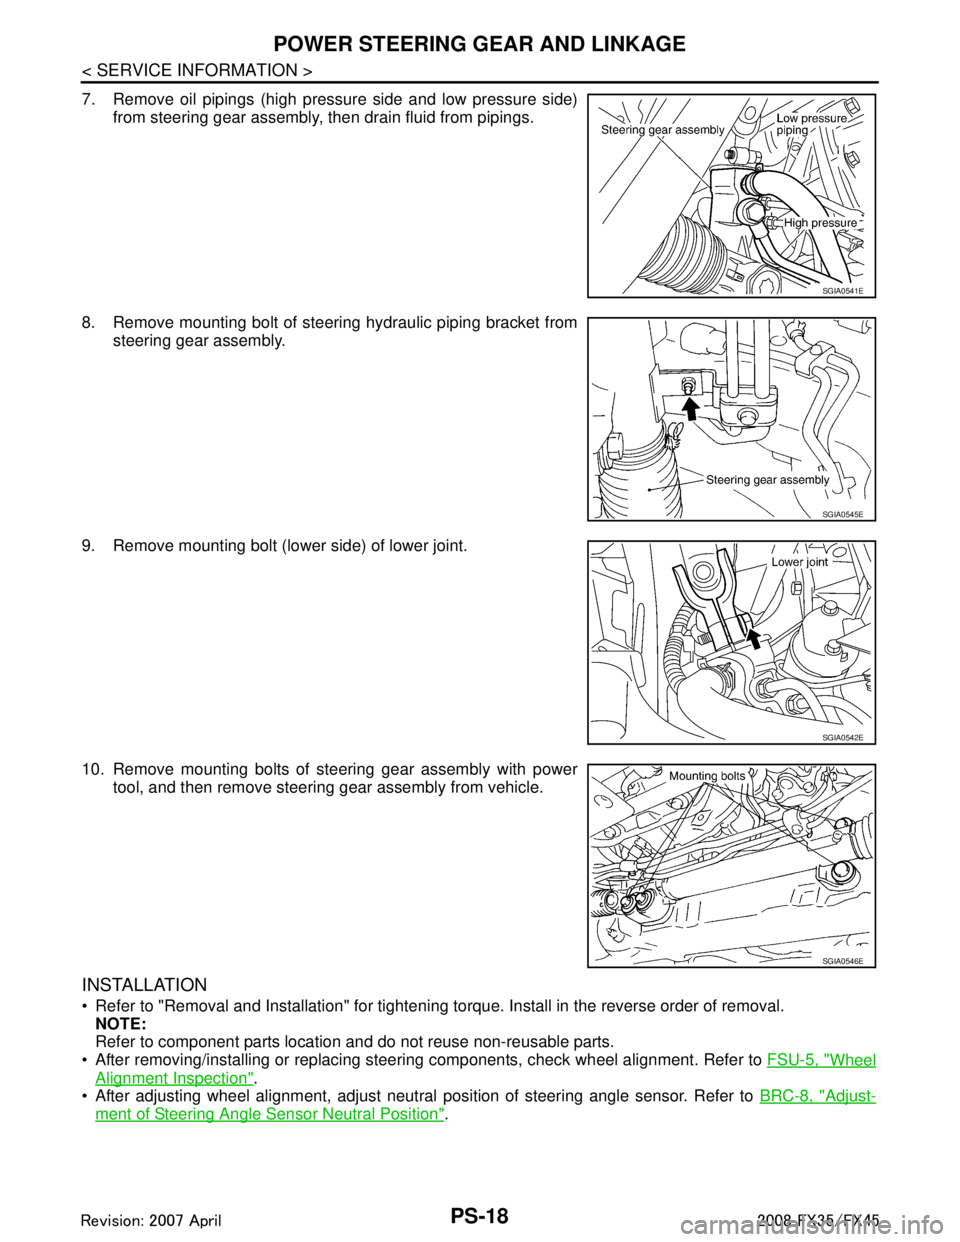
7. Remove oil pipings (high pressure side and low pressure side)from steering gear assembly, then drain fluid from pipings.
8. Remove mounting bolt of steering hydraulic piping bracket from steering gear assembly.
9. Remove mounting bolt (lower side) of lower joint.
10. Remove mounting bolts of steering gear assembly with power tool, and then remove steering gear assembly from vehicle.
INSTALLATION
Refer to "Removal and Installation" for tightening torque. Install in the reverse order of removal.
NOTE:
Refer to component parts location and do not reuse non-reusable parts.
After removing/installing or replacing steering components, check wheel alignment. Refer to FSU-5, "
Wheel
Alignment Inspection".
After adjusting wheel alignment, adjust neutral position of steering angle sensor. Refer to BRC-8, "
Adjust-
ment of Steering Angle Sensor Neutral Position".
SGIA0541E
SGIA0545E
SGIA0542E
SGIA0546E
3AA93ABC3ACD3AC03ACA3AC03AC63AC53A913A773A893A873A873A8E3A773A983AC73AC93AC03AC3
3A893A873A873A8F3A773A9D3AAF3A8A3A8C3A863A9D3AAF3A8B3A8C
Page 3477 of 3924
PS-22
< SERVICE INFORMATION >
POWER STEERING GEAR AND LINKAGE
Gear Housing Assembly
Check gear housing assembly for damage and scratches (inner wall). Replace it, if necessary.
Outer Socket and Inner Socket
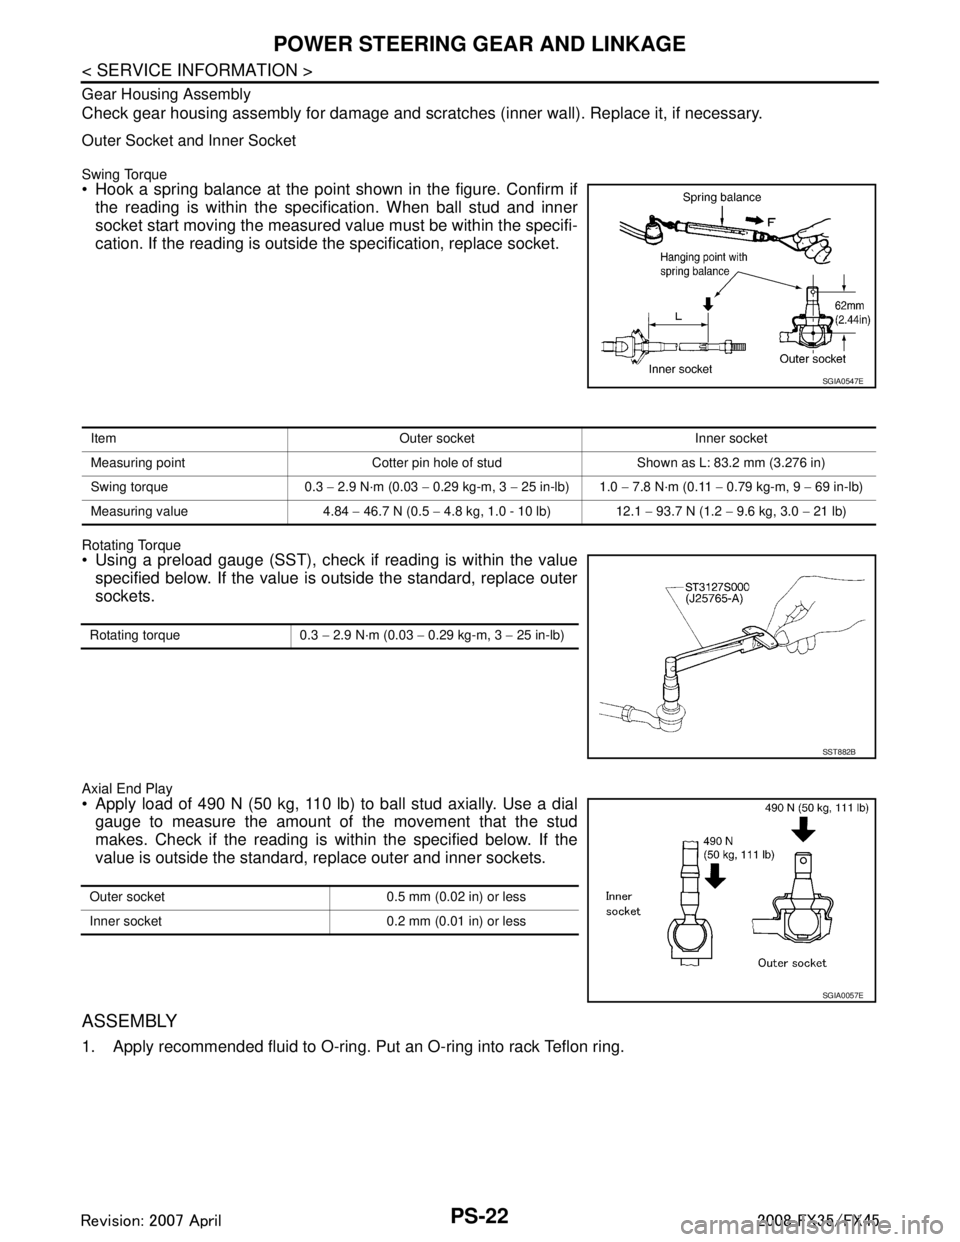
Swing Torque Hook a spring balance at the point shown in the figure. Confirm ifthe reading is within the specification. When ball stud and inner
socket start moving the measured value must be within the specifi-
cation. If the reading is outside the specification, replace socket.
Rotating Torque Using a preload gauge (SST), check if reading is within the valuespecified below. If the value is outside the standard, replace outer
sockets.
Axial End Play Apply load of 490 N (50 kg, 110 lb) to ball stud axially. Use a dialgauge to measure the amount of the movement that the stud
makes. Check if the reading is within the specified below. If the
value is outside the standard, replace outer and inner sockets.
ASSEMBLY
1. Apply recommended fluid to O-ring. Put an O-ring into rack Teflon ring.
SGIA0547E
Item Outer socket Inner socket
Measuring point Cotter pin hole of stud Shown as L: 83.2 mm (3.276 in)
Swing torque 0.3 − 2.9 N·m (0.03 − 0.29 kg-m, 3 − 25 in-lb) 1.0 − 7.8 N·m (0.11 − 0.79 kg-m, 9 − 69 in-lb)
Measuring value 4.84 − 46.7 N (0.5 − 4.8 kg, 1.0 - 10 lb) 12.1 − 93.7 N (1.2 − 9.6 kg, 3.0 − 21 lb)
Rotating torque 0.3 − 2.9 N·m (0.03 − 0.29 kg-m, 3 − 25 in-lb)
SST882B
Outer socket 0.5 mm (0.02 in) or less
Inner socket 0.2 mm (0.01 in) or less
SGIA0057E
3AA93ABC3ACD3AC03ACA3AC03AC63AC53A913A773A893A873A873A8E3A773A983AC73AC93AC03AC3
3A893A873A873A8F3A773A9D3AAF3A8A3A8C3A863A9D3AAF3A8B3A8C
Page 3479 of 3924
![INFINITI FX35 2008 Service Manual
PS-24
< SERVICE INFORMATION >
POWER STEERING GEAR AND LINKAGE
c. When installing outer rack oil seal, cover the end of rack with anOHP sheet [70 mm (2.76 in) × 100 mm (3.94 in)]. It will avoid
dama INFINITI FX35 2008 Service Manual
PS-24
< SERVICE INFORMATION >
POWER STEERING GEAR AND LINKAGE
c. When installing outer rack oil seal, cover the end of rack with anOHP sheet [70 mm (2.76 in) × 100 mm (3.94 in)]. It will avoid
dama](/manual-img/42/57017/w960_57017-3478.png)
PS-24
< SERVICE INFORMATION >
POWER STEERING GEAR AND LINKAGE
c. When installing outer rack oil seal, cover the end of rack with anOHP sheet [70 mm (2.76 in) × 100 mm (3.94 in)]. It will avoid
damaging rack oil seal. Then place oil seal on sheet. Pull rack oil
seal along with OHP sheet until they pass rack end. Then
remove OHP sheet.
d. Install end cover assembly to rack, move it to gear housing assembly.
5. Using a 45 mm (1.77 in) open head (suitable tool), tighten end cover assembly at the specified torque.
CAUTION:
Do not damage rack surface. If it is damaged, it may cause
oil leaks. Replace rack assembly.
6. After tightening end cover assembly, caulk cylinder at one point as shown in the figure using a punch. This will prevent end cover
from getting loose.
7. Install pinion assembly to gear housing assembly. CAUTION:
In order to protect oil seal from any damage, insert pinion
assembly out straightly.
8. Apply recommended fluid to O-ring. Install O-ring to rear cover.
9. Use a rear cover wrench (SST), install rear cover to gear hous- ing assembly.
10. Confirm projection on rear cover cap nearly fit with marking posi- tion on gear housing assembly.
11. Apply recommended thread locking sealant to the thread (2 turns thread), and then screw in the adjusting screw until it
reaches height “H” from gear housing assembly measured
before disassembling.
12. Rotate pinion ten times whole range of rack so that parts get to fit with each other.
SGIA0157E
SST081B
SGIA0158E
SGIA0568E
3AA93ABC3ACD3AC03ACA3AC03AC63AC53A913A773A893A873A873A8E3A773A983AC73AC93AC03AC3
3A893A873A873A8F3A773A9D3AAF3A8A3A8C3A863A9D3AAF3A8B3A8C
Page 3480 of 3924
POWER STEERING GEAR AND LINKAGEPS-25
< SERVICE INFORMATION >
C
DE
F
H I
J
K L
M A
B
PS
N
O P
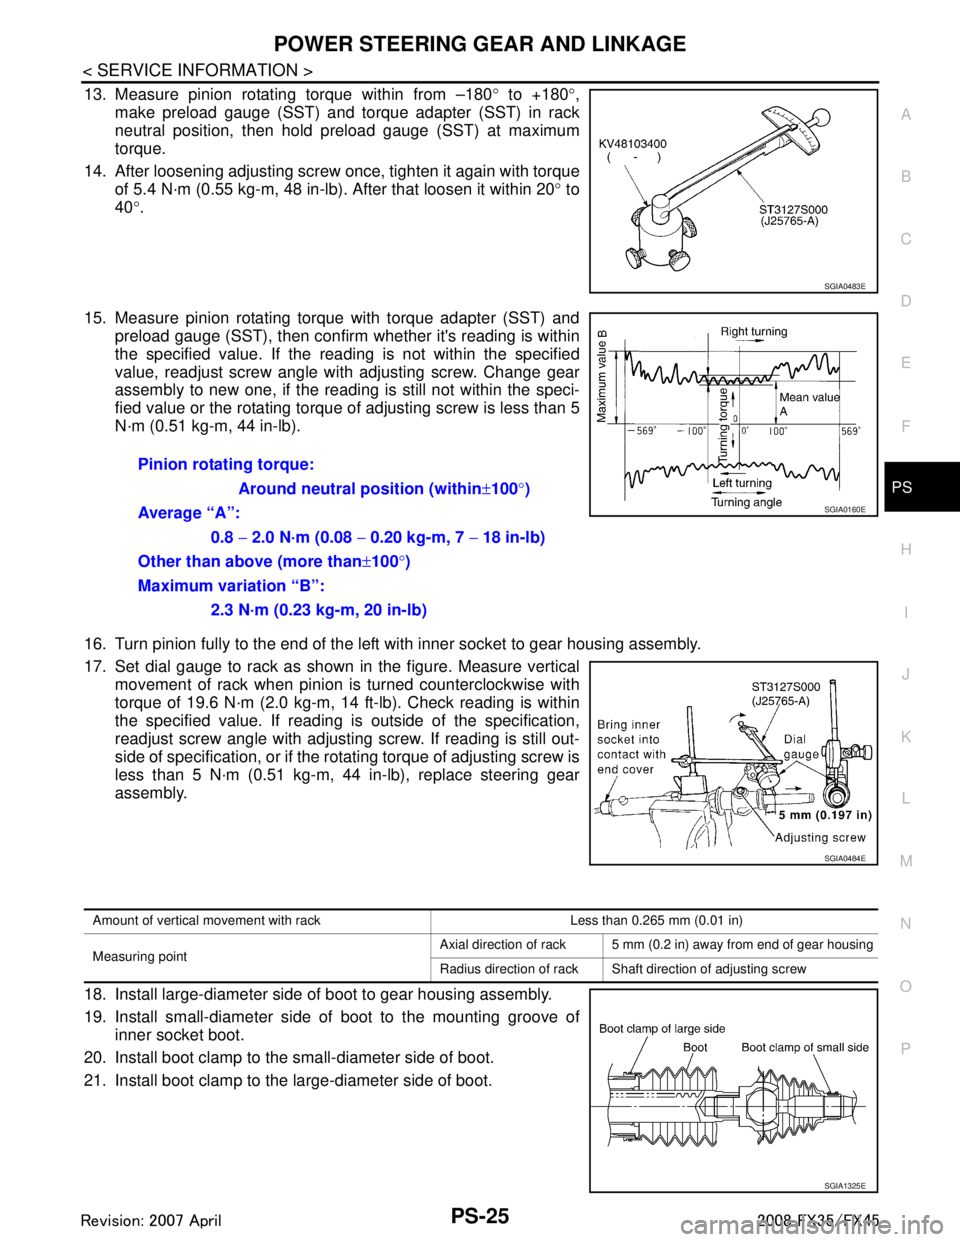
13. Measure pinion rotating torque within from –180 ° to +180 °,
make preload gauge (SST) and torque adapter (SST) in rack
neutral position, then hold preload gauge (SST) at maximum
torque.
14. After loosening adjusting screw once, tighten it again with torque of 5.4 N·m (0.55 kg-m, 48 in-lb). After that loosen it within 20 ° to
40 °.
15. Measure pinion rotating torque with torque adapter (SST) and preload gauge (SST), then confirm w hether it's reading is within
the specified value. If the r eading is not within the specified
value, readjust screw angle with adjusting screw. Change gear
assembly to new one, if the readi ng is still not within the speci-
fied value or the rotating torque of adjusting screw is less than 5
N·m (0.51 kg-m, 44 in-lb).
16. Turn pinion fully to the end of the left with inner socket to gear housing assembly.
17. Set dial gauge to rack as shown in the figure. Measure vertical movement of rack when pinion is turned counterclockwise with
torque of 19.6 N·m (2.0 kg-m, 14 ft-lb). Check reading is within
the specified value. If reading is outside of the specification,
readjust screw angle with adjusting screw. If reading is still out-
side of specification, or if the rotating torque of adjusting screw is
less than 5 N·m (0.51 kg-m, 44 in-lb), replace steering gear
assembly.
18. Install large-diameter side of boot to gear housing assembly.
19. Install small-diameter side of boot to the mounting groove of inner socket boot.
20. Install boot clamp to the small-diameter side of boot.
21. Install boot clamp to the large-diameter side of boot.
SGIA0483E
Pinion rotating torque:
Around neutral position (within ±100 °)
Average “A”:
0.8 − 2.0 N·m (0.08 − 0.20 kg-m, 7 − 18 in-lb)
Other than above (more than ±100 °)
Maximum variation “B”:
2.3 N·m (0.23 kg-m, 20 in-lb)
SGIA0160E
SGIA0484E
Amount of vertical movement with rack Less than 0.265 mm (0.01 in)
Measuring point Axial direction of rack 5 mm (0.2 in) away from end of gear housing
Radius direction of rack Shaft direction of adjusting screw
SGIA1325E
3AA93ABC3ACD3AC03ACA3AC03AC63AC53A913A773A893A873A873A8E3A773A983AC73AC93AC03AC3
3A893A873A873A8F3A773A9D3AAF3A8A3A8C3A863A9D3AAF3A8B3A8C
Page 3481 of 3924
PS-26
< SERVICE INFORMATION >
POWER STEERING GEAR AND LINKAGE
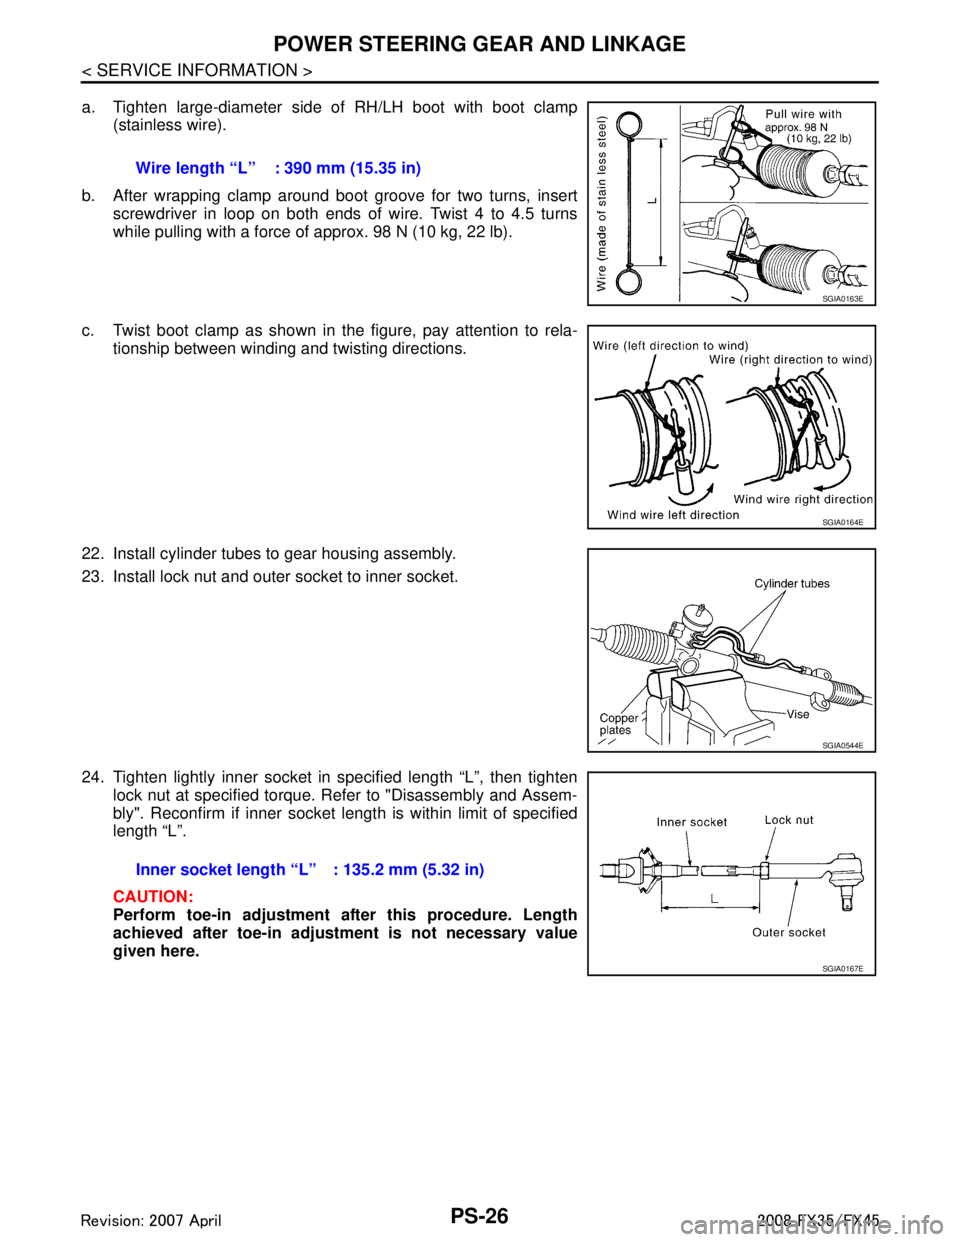
a. Tighten large-diameter side of RH/LH boot with boot clamp(stainless wire).
b. After wrapping clamp around boot groove for two turns, insert screwdriver in loop on both ends of wire. Twist 4 to 4.5 turns
while pulling with a force of approx. 98 N (10 kg, 22 lb).
c. Twist boot clamp as shown in the figure, pay attention to rela- tionship between winding and twisting directions.
22. Install cylinder tubes to gear housing assembly.
23. Install lock nut and outer socket to inner socket.
24. Tighten lightly inner socket in specified length “L”, then tighten lock nut at specified torque. Refer to "Disassembly and Assem-
bly". Reconfirm if inner socket length is within limit of specified
length “L”.
CAUTION:
Perform toe-in adjustment after this procedure. Length
achieved after toe-in adjustment is not necessary value
given here.Wire length “L” : 390 mm (15.35 in)
SGIA0163E
SGIA0164E
SGIA0544E
Inner socket length “L” : 135.2 mm (5.32 in)
SGIA0167E
3AA93ABC3ACD3AC03ACA3AC03AC63AC53A913A773A893A873A873A8E3A773A983AC73AC93AC03AC3
3A893A873A873A8F3A773A9D3AAF3A8A3A8C3A863A9D3AAF3A8B3A8C