2008 INFINITI FX35 service
[x] Cancel search: servicePage 1205 of 3924
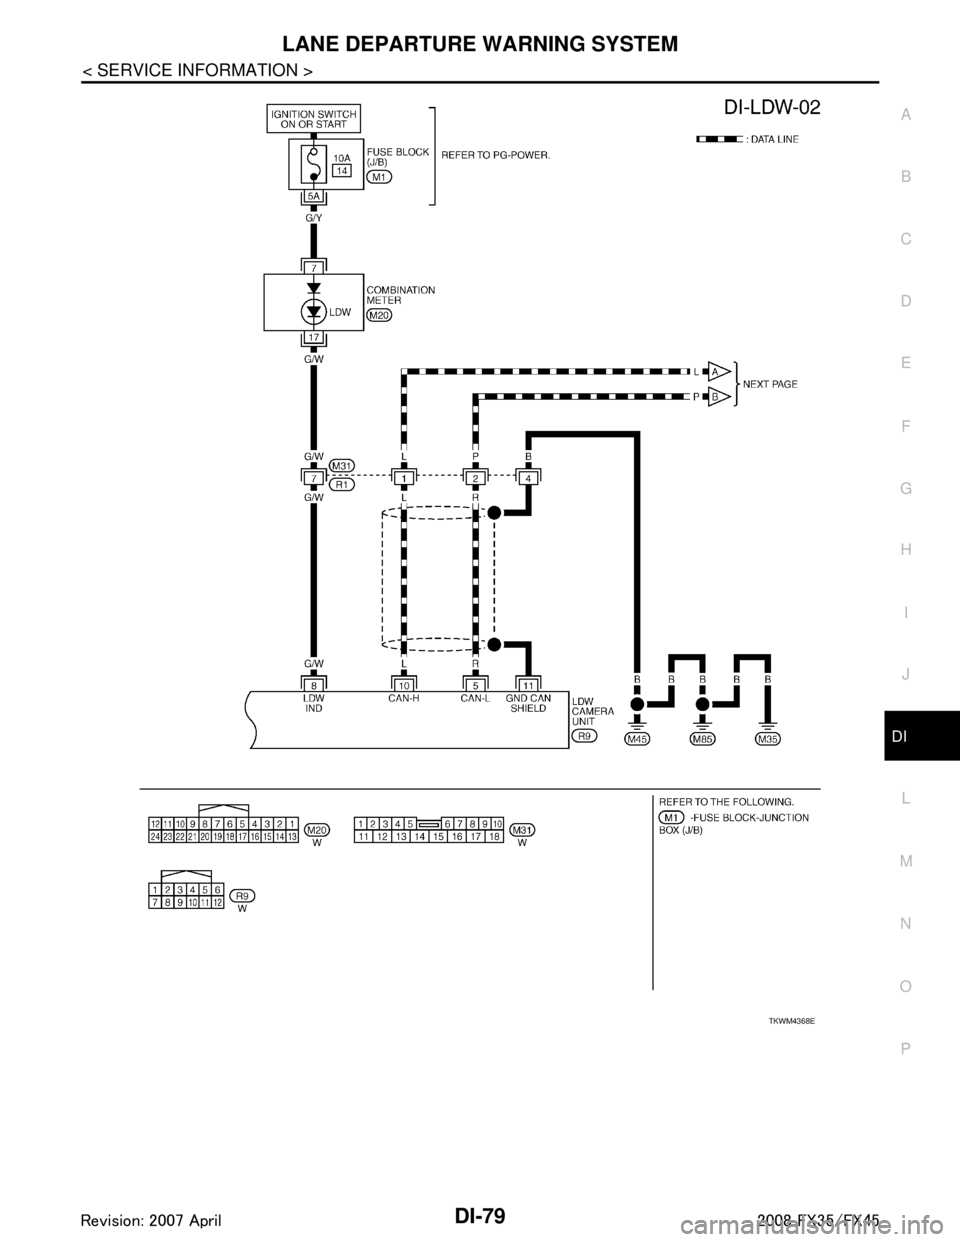
LANE DEPARTURE WARNING SYSTEMDI-79
< SERVICE INFORMATION >
C
DE
F
G H
I
J
L
M A
B
DI
N
O P
TKWM4368E
3AA93ABC3ACD3AC03ACA3AC03AC63AC53A913A773A893A873A873A8E3A773A983AC73AC93AC03AC3
3A893A873A873A8F3A773A9D3AAF3A8A3A8C3A863A9D3AAF3A8B3A8C
Page 1206 of 3924

DI-80
< SERVICE INFORMATION >
LANE DEPARTURE WARNING SYSTEM
TKWM4369E
3AA93ABC3ACD3AC03ACA3AC03AC63AC53A913A773A893A873A873A8E3A773A983AC73AC93AC03AC3
3A893A873A873A8F3A773A9D3AAF3A8A3A8C3A863A9D3AAF3A8B3A8C
Page 1207 of 3924
LANE DEPARTURE WARNING SYSTEMDI-81
< SERVICE INFORMATION >
C
DE
F
G H
I
J
L
M A
B
DI
N
O P
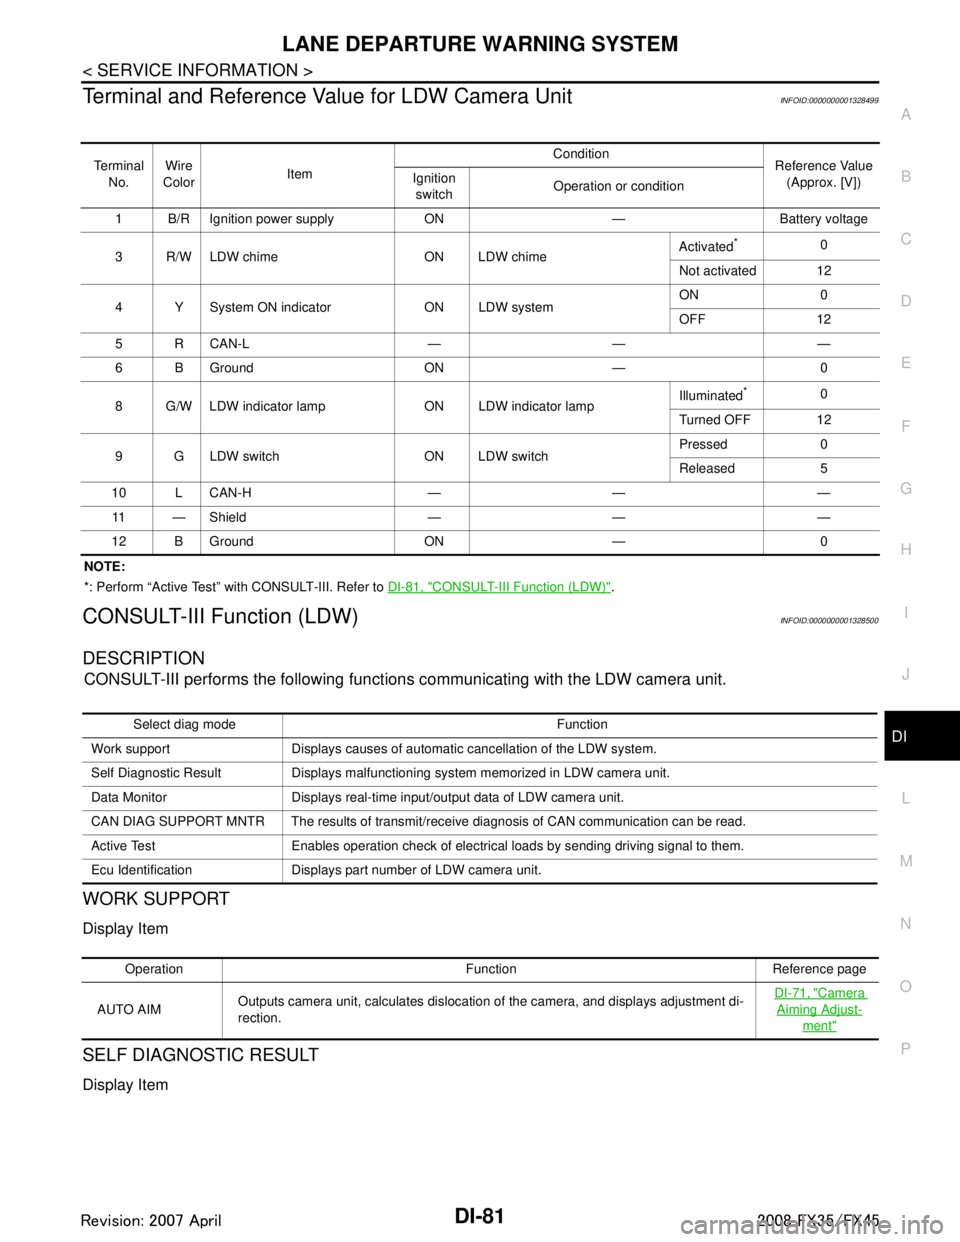
Terminal and Reference Va lue for LDW Camera UnitINFOID:0000000001328499
NOTE:
*: Perform “Active Test” with CONSULT-III. Refer to DI-81, "
CONSULT-III Function (LDW)".
CONSULT-III Function (LDW)INFOID:0000000001328500
DESCRIPTION
CONSULT-III performs the following functions communicating with the LDW camera unit.
WORK SUPPORT
Display Item
SELF DIAGNOSTIC RESULT
Display Item
Te r m i n a l
No. Wire
Color Item Condition
Reference Value
(Approx. [V])
Ignition
switch Operation or condition
1 B/R Ignition power supply ON — Battery voltage
3 R/W LDW chime ON LDW chime Activated
*0
Not activated 12
4 Y System ON indicator ON LDW system ON 0
OFF 12
5 R CAN-L — — —
6 B Ground ON — 0
8 G/W LDW indicator lamp ON LDW indicator lamp Illuminated
*0
Turned OFF 12
9 G LDW switch ON LDW switch Pressed 0
Released 5
10 L CAN-H — — — 11 — Shield — — —
12 B Ground ON — 0
Select diag mode Function
Work support Displays causes of automatic cancellation of the LDW system.
Self Diagnostic Result Displays malfunctioning system memorized in LDW camera unit.
Data Monitor Displays real-time input/output data of LDW camera unit.
CAN DIAG SUPPORT MNTR The results of transmit/receive diagnosis of CAN communication can be read.
Active Test Enables operation check of electrical loads by sending driving signal to them.
Ecu Identification Displays part number of LDW camera unit.
Operation Function Reference page
AUTO AIM Outputs camera unit, calculates dislocation of the camera, and displays adjustment di-
rection.
DI-71, "
Camera
Aiming Adjust-
ment"
3AA93ABC3ACD3AC03ACA3AC03AC63AC53A913A773A893A873A873A8E3A773A983AC73AC93AC03AC3
3A893A873A873A8F3A773A9D3AAF3A8A3A8C3A863A9D3AAF3A8B3A8C
Page 1208 of 3924
![INFINITI FX35 2008 Service Manual
DI-82
< SERVICE INFORMATION >
LANE DEPARTURE WARNING SYSTEM
NOTE:
When a DTC is detected, the LDW system dose not operate.
When the DTC except “ABNRML TEMP DETECT [C1B03] ” is detected, the INFINITI FX35 2008 Service Manual
DI-82
< SERVICE INFORMATION >
LANE DEPARTURE WARNING SYSTEM
NOTE:
When a DTC is detected, the LDW system dose not operate.
When the DTC except “ABNRML TEMP DETECT [C1B03] ” is detected, the](/manual-img/42/57017/w960_57017-1207.png)
DI-82
< SERVICE INFORMATION >
LANE DEPARTURE WARNING SYSTEM
NOTE:
When a DTC is detected, the LDW system dose not operate.
When the DTC except “ABNRML TEMP DETECT [C1B03] ” is detected, the LDW indicator lamp turns ON.
When the DTC “ABNRML TEMP DETECT [C1B03] ” is detected, the LDW system ON indicator lamp blinks.
DATA MONITOR
Display Item
ACTIVE TEST
CAUTION:
Never perform the active test while driving.
Active test cannot be started while LDW indicator lamp is illuminated.
Display item [Code] Malfunctions detected where... Reference
page
CAMERA UNIT MALF [C1B00] LDW camera unit internal malfunction DI-85
CAM AIMING INCMP [C1B01] LDW camera aiming is not adjusted. DI-85
VHCL SPD DATA MALF [C1B02]LDW camera unit detected different vehicle speed signal from TCM and ABS ac-
tuator and electric unit (control unit). DI-85
ABNRML TEMP DETECT [C1B03] Temperature around LDW camera unit is excessively high.
DI-86
CAN COMM CIRCUIT [U1000] LDW camera unit detected CAN communication malfunction. DI-86
CONTROL UNIT (CAN) [U1010] LDW camera unit detected internal CAN communication circuit malfunction. DI-86
Monitored Item [unit] Description
VHCL SPD SE [km/h] or [mph] Displays vehicle speed calculated by LDW camera unit through CAN communication [ABS
actuator and electric unit (control unit) transmits wheel sensor signal through CAN communi-
cation].
VHCL SPD AT [km/h] or [mph] Displays vehicle speed calculated from A/T vehicle speed sensor by LDW camera unit
through CAN communication (TCM transmits A/T vehicle speed sensor signal through CAN
communication).
FCTRY AIM YAW [deg] Displays camera unit installation condition.
FCTRY AIM ROL [deg] Displays camera unit installation condition.
FCTRY AIM PIT [deg] Displays camera unit installation condition.
XOFFSET [pixel] Displays camera unit installation condition.
MAIN SW [On/Off] Displays [On/Off] status as judged from LDW switch signal.
SW ON LAMP [On/Off] Displays [On/Off] status of LDW system ON indicator signal output.
INDICATE LAMP [On/Off] Displays [On/Off] status of LDW indicator signal output.
BUZZER OUTPUT [On/Off] Displays [On/Off] status of LDW chime operation signal output.
LDW INACCURAT [On/Off] Displays LDW camera unit status.
TURN SIGNAL [Off/LH/RH] Displays “Tur n signal” status, determined from BCM thro ugh CAN communication.
LANE DETCT LH [On/Off] Displays left lane marker is detected.
LANE DETCT RH [On/Off] Displays right lane marker is detected.
CROSS LANE LH [On/Off] Displays vehicle is crossing left lane.
CROSS LANE RH [On/Off] Displays vehicle is crossing right lane.
WARN LANE LH [On/Off] Displays warning for left lane.
WARN LANE RH [On/Off] Displays warning for right lane.
VALID POS LH [VLD/INVLD] Displays lateral position for left lane marker is valid.
VALID POS RH [VLD/INVLD] Displays lateral position for right lane marker is valid.
AIMING DONE [OK/NG] Displa ys camera aiming done.
AIMING RESULT [OK/NOK] Disp lays camera aiming result.
3AA93ABC3ACD3AC03ACA3AC03AC63AC53A913A773A893A873A873A8E3A773A983AC73AC93AC03AC3
3A893A873A873A8F3A773A9D3AAF3A8A3A8C3A863A9D3AAF3A8B3A8C
Page 1209 of 3924
LANE DEPARTURE WARNING SYSTEMDI-83
< SERVICE INFORMATION >
C
DE
F
G H
I
J
L
M A
B
DI
N
O P
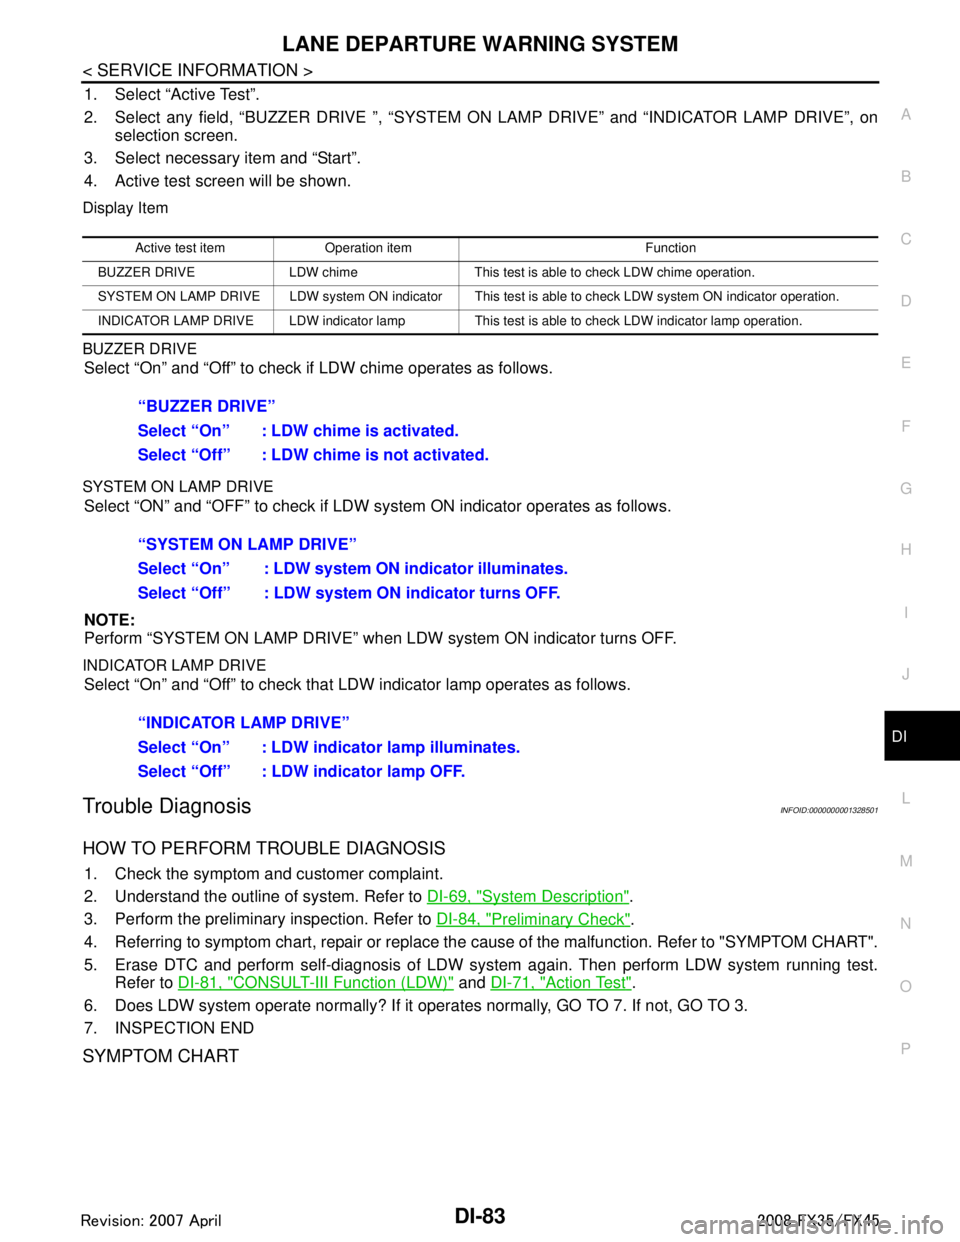
1. Select “Active Test”.
2. Select any field, “BUZZER DRIVE ”, “SYSTEM ON LAMP DRIVE” and “INDICATOR LAMP DRIVE”, on
selection screen.
3. Select necessary item and “Start”.
4. Active test screen will be shown.
Display Item
BUZZER DRIVE
Select “On” and “Off” to check if LDW chime operates as follows.
SYSTEM ON LAMP DRIVE
Select “ON” and “OFF” to check if LDW s ystem ON indicator operates as follows.
NOTE:
Perform “SYSTEM ON LAMP DRIVE” when LDW system ON indicator turns OFF.
INDICATOR LAMP DRIVE
Select “On” and “Off” to check that LDW indicator lamp operates as follows.
Trouble DiagnosisINFOID:0000000001328501
HOW TO PERFORM TROUBLE DIAGNOSIS
1. Check the symptom and customer complaint.
2. Understand the outline of system. Refer to DI-69, "
System Description".
3. Perform the preliminary inspection. Refer to DI-84, "
Preliminary Check".
4. Referring to symptom chart, repair or replace the cause of the malfunction. Refer to "SYMPTOM CHART".
5. Erase DTC and perform self-diagnosis of LDW sys tem again. Then perform LDW system running test.
Refer to DI-81, "
CONSULT-III Function (LDW)" and DI-71, "Action Test".
6. Does LDW system operate normally? If it oper ates normally, GO TO 7. If not, GO TO 3.
7. INSPECTION END
SYMPTOM CHART
Active test item Operation item Function
BUZZER DRIVE LDW chime This test is able to check LDW chime operation.
SYSTEM ON LAMP DRIVE LDW system ON indicator This test is able to check LDW system ON indicator operation.
INDICATOR LAMP DRIVE LDW indicator lamp This test is able to check LDW indicator lamp operation.
“BUZZER DRIVE”
Select “On” : LDW chime is activated.
Select “Off” : LDW chime is not activated.
“SYSTEM ON LAMP DRIVE”
Select “On” : LDW system ON indicator illuminates.
Select “Off” : LDW system ON indicator turns OFF.
“INDICATOR LAMP DRIVE”
Select “On” : LDW indicator lamp illuminates.
Select “Off” : LDW indicator lamp OFF.
3AA93ABC3ACD3AC03ACA3AC03AC63AC53A913A773A893A873A873A8E3A773A983AC73AC93AC03AC3
3A893A873A873A8F3A773A9D3AAF3A8A3A8C3A863A9D3AAF3A8B3A8C
Page 1210 of 3924
DI-84
< SERVICE INFORMATION >
LANE DEPARTURE WARNING SYSTEM
Preliminary Check
INFOID:0000000001328502
1.CHECK CAMERA LENS AND WINDSHIELD
Are camera lens and windshield contaminated with foreign materials?
YES >> Clean camera lens and windshield.
NO >> GO TO 2.
2.CHECK CAMERA UNIT IN STALLATION CONDITION
Check camera unit installation condition (installat ion position, properly tightened, a bent bracket).
OK or NG
OK >> GO TO 3.
NG >> Install camera unit properly, and adjust camera aiming. Refer to DI-71, "
Camera Aiming Adjust-
ment".
3.CHECK VEHICLE HEIGHT
Check vehicle height. Refer to GI-47, "
Dimensions".
Is vehicle height appropriate?
OK >> GO TO 4.
NG >> Repair vehicle to appropriate height.
4.CHECK LDW CAMERA UNIT (CONSULT-III)
Perform self-diagnosis of LDW camera unit. Refer to DI-81, "
CONSULT-III Function (LDW)".
Self
-diagnosis results
No malfunction detected >> GO TO 5.
Malfunction detected >> Check applicable parts, and repair or replace corresponding parts.
5.CHECK COMBINATION METER
Check combination meter function.
Do speedometer and turn signal indicator normal function?
YES >> INSPECTION END
NO >> Check combination meter. Refer to DI-15, "
Trouble Diagnosis".
Power Supply and Ground Circuit InspectionINFOID:0000000001328503
1.CHECK FUSE
Check for blown LDW camera unit fuse.
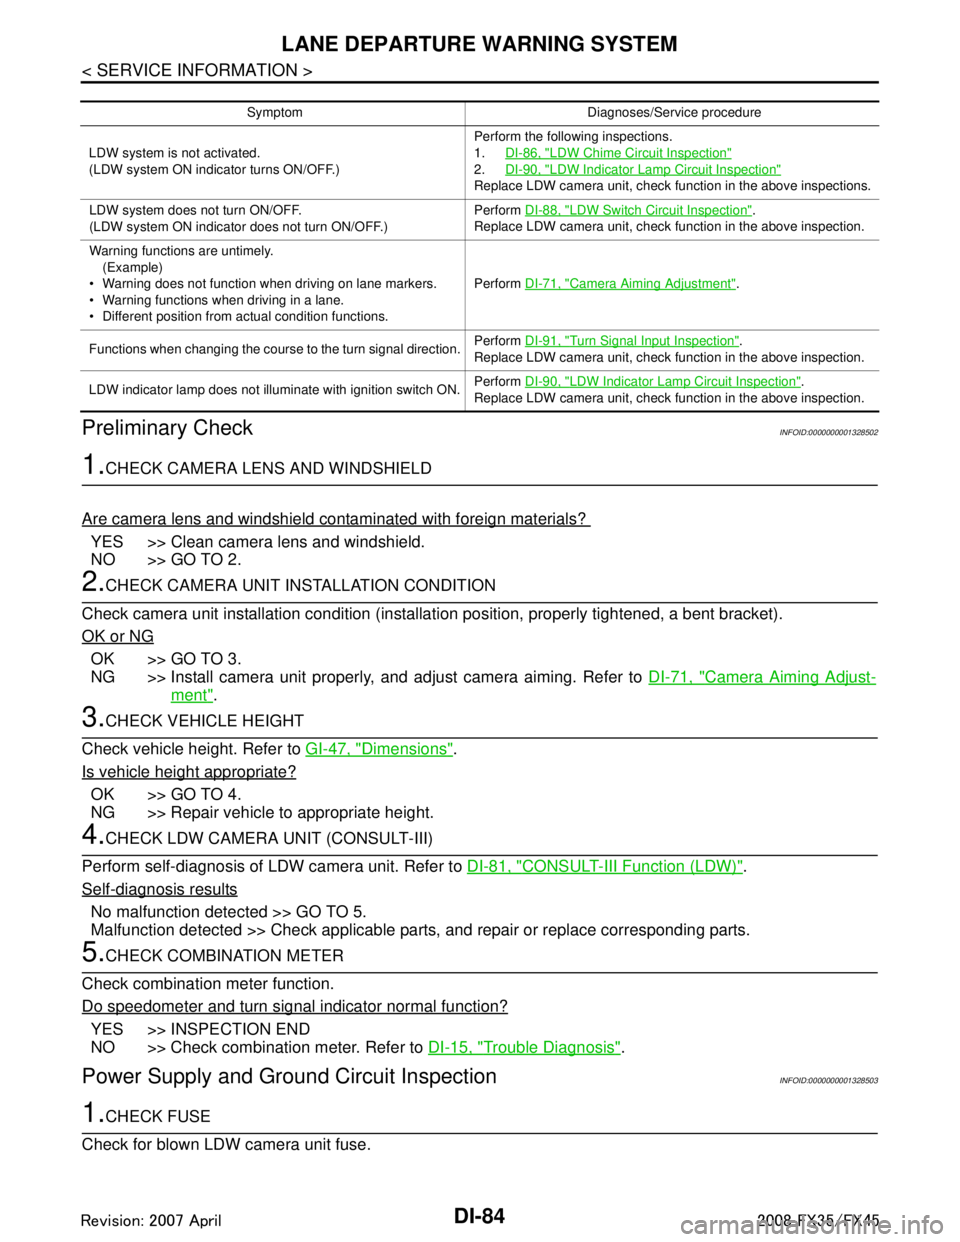
Symptom Diagnoses/Service procedure
LDW system is not activated.
(LDW system ON indicator turns ON/OFF.) Perform the following inspections.
1.
DI-86, "
LDW Chime Circuit Inspection"
2.DI-90, "LDW Indicator Lamp Circuit Inspection"
Replace LDW camera unit, check function in the above inspections.
LDW system does not turn ON/OFF.
(LDW system ON indicator does not turn ON/OFF.) Perform
DI-88, "
LDW Switch Circuit Inspection".
Replace LDW camera unit, check function in the above inspection.
Warning functions are untimely. (Example)
Warning does not function when driving on lane markers.
Warning functions when driving in a lane.
Different position from actual condition functions. Perform
DI-71, "
Camera Aiming Adjustment".
Functions when changing the course to the turn signal direction. Perform
DI-91, "
Turn Signal Input Inspection".
Replace LDW camera unit, check function in the above inspection.
LDW indicator lamp does not illuminate with ignition switch ON. Perform
DI-90, "
LDW Indicator Lamp Circuit Inspection".
Replace LDW camera unit, check function in the above inspection.
3AA93ABC3ACD3AC03ACA3AC03AC63AC53A913A773A893A873A873A8E3A773A983AC73AC93AC03AC3
3A893A873A873A8F3A773A9D3AAF3A8A3A8C3A863A9D3AAF3A8B3A8C
Page 1211 of 3924
LANE DEPARTURE WARNING SYSTEMDI-85
< SERVICE INFORMATION >
C
DE
F
G H
I
J
L
M A
B
DI
N
O P
OK or NG
OK >> GO TO 2.
NG >> Be sure to eliminate cause of malfunction before installing new fuse. Refer to PG-77, "
Terminal
Arrangement".
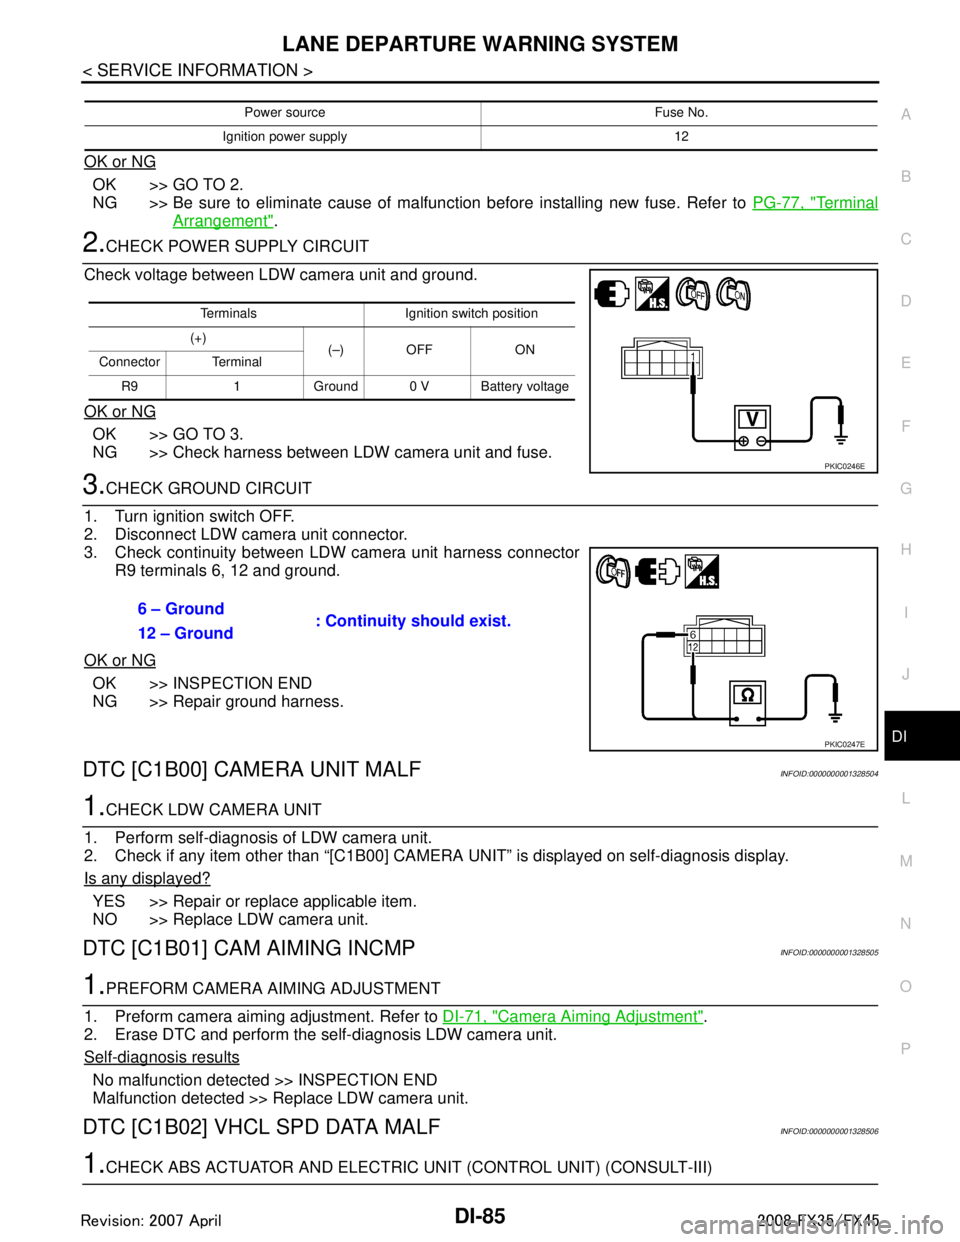
2.CHECK POWER SUPPLY CIRCUIT
Check voltage between LDW camera unit and ground.
OK or NG
OK >> GO TO 3.
NG >> Check harness between LDW camera unit and fuse.
3.CHECK GROUND CIRCUIT
1. Turn ignition switch OFF.
2. Disconnect LDW camera unit connector.
3. Check continuity between LDW camera unit harness connector R9 terminals 6, 12 and ground.
OK or NG
OK >> INSPECTION END
NG >> Repair ground harness.
DTC [C1B00] CAMERA UNIT MALFINFOID:0000000001328504
1.CHECK LDW CAMERA UNIT
1. Perform self-diagnosis of LDW camera unit.
2. Check if any item other than “[C1B00] CAMERA UNIT” is displayed on self-diagnosis display.
Is any displayed?
YES >> Repair or replace applicable item.
NO >> Replace LDW camera unit.
DTC [C1B01] CAM AIMING INCMPINFOID:0000000001328505
1.PREFORM CAMERA AIMING ADJUSTMENT
1. Preform camera aiming adjustment. Refer to DI-71, "
Camera Aiming Adjustment".
2. Erase DTC and perform the self-diagnosis LDW camera unit.
Self
-diagnosis results
No malfunction detected >> INSPECTION END
Malfunction detected >> Replace LDW camera unit.
DTC [C1B02] VHCL SPD DATA MALFINFOID:0000000001328506
1.CHECK ABS ACTUATOR AND ELECTRIC UNIT (CONTROL UNIT) (CONSULT-III)
Power source Fuse No.
Ignition power supply 12
Terminals Ignition switch position
(+) (–) OFF ON
Connector Terminal
R9 1 Ground 0 V Battery voltage
PKIC0246E
6 – Ground : Continuity should exist.
12 – Ground
PKIC0247E
3AA93ABC3ACD3AC03ACA3AC03AC63AC53A913A773A893A873A873A8E3A773A983AC73AC93AC03AC3
3A893A873A873A8F3A773A9D3AAF3A8A3A8C3A863A9D3AAF3A8B3A8C
Page 1212 of 3924
DI-86
< SERVICE INFORMATION >
LANE DEPARTURE WARNING SYSTEM
Perform self-diagnosis of ABS actuator and electric unit (control unit). Refer to \
BRC-26, "CONSULT-III Func-
tions (ABS)".
Self
-diagnosis results
No malfunction detected >> GO TO 2.
Malfunction detected >> Check applicable parts, and repair or replace corresponding parts.
2.CHECK TCM (CONSULT-III)
Perform self-diagnosis of TCM. Refer to AT-84, "
CONSULT-III Function (TRANSMISSION)".
Self
-diagnosis results
No malfunction detected >> Replace LDW camera unit.
Malfunction detected >> Check applicable parts, and repair or replace corresponding parts.
DTC [C1B03] ABNRML TEMP DETECTINFOID:0000000001328507
1.COOLING CAMERA UNIT
1. Cooling camera unit.
2. Erase DTC and perform self-diagnosis the LDW camera unit.
Self
-diagnosis results
No malfunction detected >> INSPECTION END
Malfunction detected >> Replace LDW camera unit.
DTC [U1000] CAN COMM CIRCUITINFOID:0000000001328508
1.CHECK CAN COMMUNICATION
1. Turn ignition switch ON and wait for 2 seconds or more.
2. Check “Self Diagnostic Result” of “LDW”.
>> Go to “LAN SYSTEM”. Refer to LAN-43, "
CAN System Specification Chart".
DTC [U1010] CONTROL UNIT (CAN)INFOID:0000000001328509
Replace LDW camera unit, when “[U1010] CONTROL UNI T (CAN)” is displayed on self-diagnosis display.
LDW Chime Circuit InspectionINFOID:0000000001328510
1.CHECK LDW CHIME OPERATION
Check LDW chime operation “BUZZER DRIVE” in “Active Test” mode with CONSULT-III.
OK or NG
OK >> INSPECTION END
NG >> GO TO 2.
2.CHECK LDW CHIME POWER SUPPLY CIRCUIT
1. Turn ignition switch OFF.
2. Disconnect LDW chime connector.
3. Turn ignition switch ON. “BUZZER DRIVE”
Select “On” : LDW chime is activated.
Select “Off” : LDW chime is not activated.
3AA93ABC3ACD3AC03ACA3AC03AC63AC53A913A773A893A873A873A8E3A773A983AC73AC93AC03AC3
3A893A873A873A8F3A773A9D3AAF3A8A3A8C3A863A9D3AAF3A8B3A8C