2008 INFINITI FX35 turn signal
[x] Cancel search: turn signalPage 664 of 3924

NAVIGATION SYSTEMAV-117
< SERVICE INFORMATION >
C
DE
F
G H
I
J
L
M A
B
AV
N
O P
Self-Diagnosis Mode (NAVI)INFOID:0000000001328754
OPERATION PROCEDURE
1. Start the engine.
2. Turn the audio system OFF.
3. While pressing the “4” button, turn the volume control dial clock- wise or counterclockwise for 30 clicks or more. (When the self-
diagnosis mode is started, a short beep will be heard.)
Shifting from current screen to previous screen is performedby pressing “BACK” button.
4. The initial trouble diagnosis screen will be shown, and items “Self Diagnosis (DCU)”, “Self Diagnosis (NAVI)”, “Confirmation/
Adjustment” and “CAN DIAG SUPPORT MONITOR” will
become selective.
NOTE:
Select “Self Diagnosis (DCU)” when “Self Diagnosis (NAVI)” is
not available. Repair malfunctioning part.
4 NAVI control unit power supply and ground circuit mal-
function is detected.
Malfunction is detected on communication signal be-
tween display control unit and NAVI control unit. 1. Check NAVI control unit power supply and ground cir-
cuit.
2. Check communication circuit between display control unit and NAVI control unit.
3. If the results from the above checkup show no mal- function, replace either display control unit or NAVI
control unit, and then start self-diagnosis.
4. If self-diagnosis results still show any malfunction, re- place the other unit.
5 GPS antenna connection malfunction is detected. 1. Check if GPS antenna feeder line is snapped or
pinched.
2. If the results from the above checkup show no mal- function, replace GPS antenna, and then restart self-
diagnosis.
3. If self-diagnosis results still show any malfunction, re- place NAVI control unit.
6 Satellite radio tuner power supply and ground circuit mal-
function is detected.
Malfunction is detected on communication signal be-
tween audio unit and satellite radio tuner. 1. Check satellite radio tuner power supply and ground
circuit.
2. Check communication circuit between audio unit and satellite radio tuner.
3. Check communication signal between audio unit and
satellite radio tuner.
4. If the results from the above checkup show no mal- function, replace either audio unit or satellite radio tun-
er, and then start self-diagnosis.
5. If self-diagnosis results still show any malfunction, re- place the other unit.
Diagnosis
No. Possible cause Action to take
SKIB8642E
SKIB7874E
3AA93ABC3ACD3AC03ACA3AC03AC63AC53A913A773A893A873A873A8E3A773A983AC73AC93AC03AC3
3A893A873A873A8F3A773A9D3AAF3A8A3A8C3A863A9D3AAF3A8B3A8C
Page 667 of 3924

AV-120
< SERVICE INFORMATION >
NAVIGATION SYSTEM
3. While pressing the “4” button, turn the volume control dial clock-wise or counterclockwise for 30 clicks or more. (When the self-
diagnosis mode is started, a short beep will be heard.)
Shifting from current screen to previous screen is performed
by pressing “BACK” button.
4. The initial trouble diagnosis screen will be shown, and items “Self Diagnosis (DCU)”, “Self Diagnosis (NAVI)”, “Confirmation/
Adjustment” and “CAN DIAG SUPPORT MONITOR” will
become selective.
5. Select “Confirmation/Adjustment”.
6. Each diagnosis is shown by selecting each screen switch on Confirmation/Adjustment screen.
DISPLAY DIAGNOSIS
Color tone and shading of the display control unit-generat ed image can be checked by the display of a color
bar and a gray scale.
If RGB signal is malfunctioning, the tint of the color bar display is as follows.
SKIB8642E
SKIB7874E
SKIA4220E
SKIB7777E
3AA93ABC3ACD3AC03ACA3AC03AC63AC53A913A773A893A873A873A8E3A773A983AC73AC93AC03AC3
3A893A873A873A8F3A773A9D3AAF3A8A3A8C3A863A9D3AAF3A8B3A8C
Page 676 of 3924

NAVIGATION SYSTEMAV-129
< SERVICE INFORMATION >
C
DE
F
G H
I
J
L
M A
B
AV
N
O P
3. Check continuity between display harness connector M63 termi- nal 1 and ground.
OK or NG
OK >> GO TO 3.
NG >> Repair harness or connector.
3.CHECK HARNESS
1. Disconnect display control unit connector.
2. Check continuity between display control unit harness connector (A) M75 terminals 2, 4, 5, 7 and display harness connector (B)
M63 terminals 2, 3, 13, 14.
3. Check continuity between display control unit harness connector (A) M75 terminals 2, 4 and ground.
OK or NG
OK >> GO TO 4.
NG >> Repair harness or connector.
4. CHECK DISPLAY POWER SUPPLY AND GROUND CIRCUIT (INVERTER AND SIGNAL)
1. Connect display control unit and display connectors.
2. Turn ignition switch ON.
3. Check voltage between display control unit harness connector M75 terminals 2 and 5.
4. Check voltage between display control unit harness connector M75 terminals 4 and 7.
OK or NG
OK >> Replace display.
NG >> Replace display control unit. 1 – Ground : Continuity should exist.
SKIB7839E
2 – 2 : Continuity should exist.
4 – 3 : Continuity should exist.
5 – 13 : Continuity should exist.
7 – 14 : Continuity should exist.
2, 4 – Ground : Continuity should not exist.
SKIB7840E
2 – 5 : Approx. 9 V
SKIB7841E
4 – 7 : Approx. 9 V
SKIB7842E
3AA93ABC3ACD3AC03ACA3AC03AC63AC53A913A773A893A873A873A8E3A773A983AC73AC93AC03AC3
3A893A873A873A8F3A773A9D3AAF3A8A3A8C3A863A9D3AAF3A8B3A8C
Page 677 of 3924

AV-130
< SERVICE INFORMATION >
NAVIGATION SYSTEM
5.CHECK DISPLAY CONTROL UNIT POWER SUPPLY AND GROUND CIRCUIT
1. Check voltage between display control unit harness connector terminals and ground.
2. Turn ignition switch OFF.
3. Disconnect display control unit connector.
4. Check continuity between display control unit harness connector M75 terminal 3 and ground.
OK or NG
OK >> Replace display control unit.
NG >> Repair harness or connector.
Status Screen for Audio and A/C Is Not Displayed When Showing Map Screen
INFOID:0000000001328761
Symptom: Status screen is not displayed in the lower portion of map screen when operating audio system and
A/C system.
1.CHECK HARNESS
1. Turn ignition switch OFF.
2. Disconnect display control unit and display connectors.
3. Check continuity between display control unit harness connector (A) M76 terminals 53, 55 and display harness connector (B)
M63 terminals 20, 8.
4. Check continuity between display control unit harness connector (A) M76 terminals 53, 55 and ground.
OK or NG
OK >> GO TO 2.
NG >> Repair harness or connector.
2.CHECK VERTICAL SYNCHRONIZING (VP) SIGNAL
1. Connect display control unit and display connectors.
2. Turn ignition switch ON.
Te r m i n a l s
OFF ACC ON
(+)
(–)
Connector Terminal
M75 1
Ground Battery
voltage Battery
voltage Battery
voltage
10 0 V Battery
voltage Battery
voltage
3 – Ground : Continuity should exist.
SKIB7843E
SKIB7844E
53 – 20 : Continuity should exist.
55 – 8 : Continuity should exist.
53, 55 – Ground : Continuity should not exist.
SKIB7850E
3AA93ABC3ACD3AC03ACA3AC03AC63AC53A913A773A893A873A873A8E3A773A983AC73AC93AC03AC3
3A893A873A873A8F3A773A9D3AAF3A8A3A8C3A863A9D3AAF3A8B3A8C
Page 679 of 3924

AV-132
< SERVICE INFORMATION >
NAVIGATION SYSTEM
Check NAVI control unit reverse signal circuit, and repair malfunctioning part.
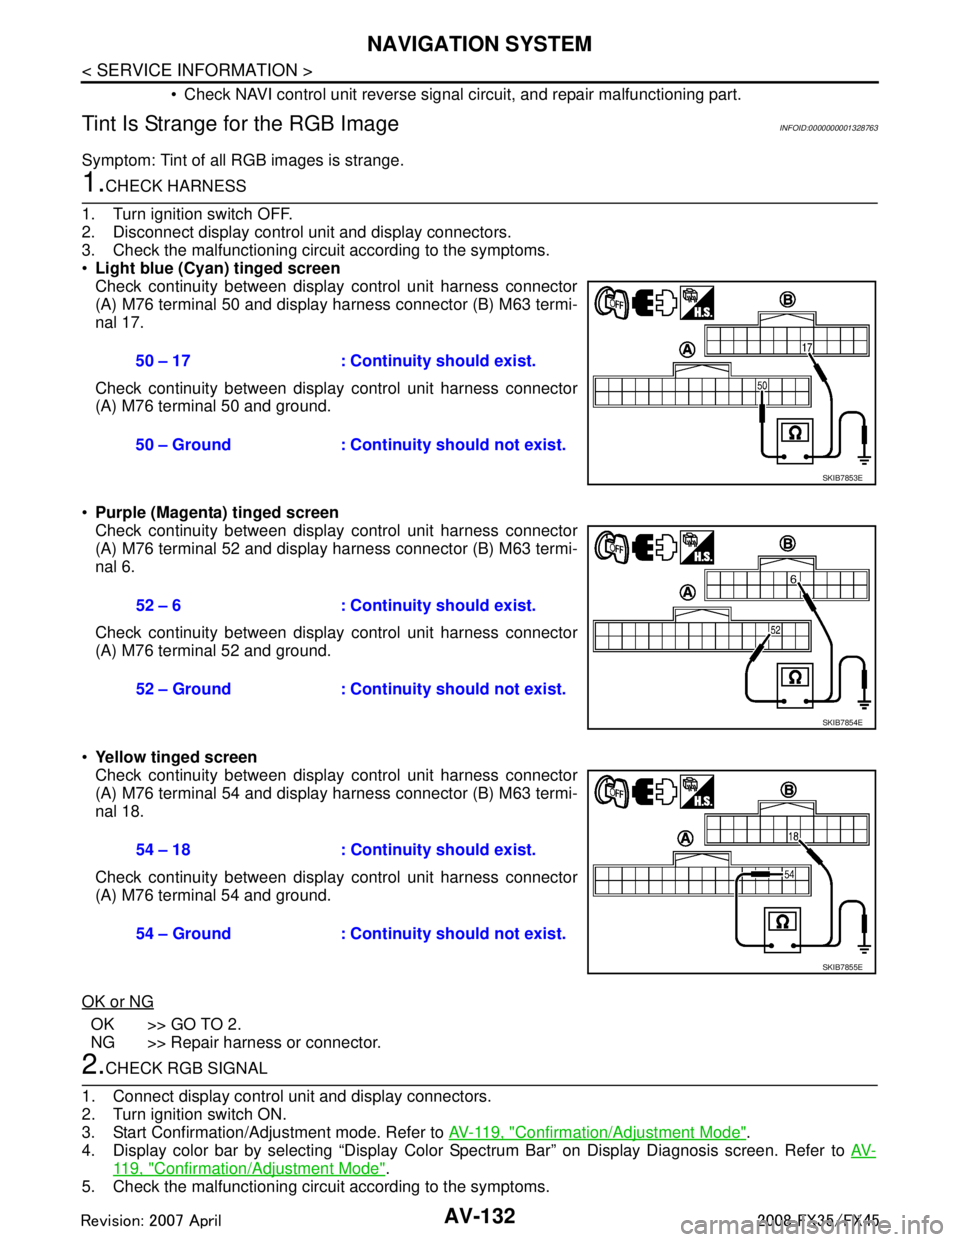
Tint Is Strange for the RGB ImageINFOID:0000000001328763
Symptom: Tint of all RGB images is strange.
1.CHECK HARNESS
1. Turn ignition switch OFF.
2. Disconnect display control unit and display connectors.
3. Check the malfunctioning circuit according to the symptoms.
Light blue (Cyan) tinged screen
Check continuity between display control unit harness connector
(A) M76 terminal 50 and display harness connector (B) M63 termi-
nal 17.
Check continuity between display control unit harness connector
(A) M76 terminal 50 and ground.
Purple (Magenta) tinged screen
Check continuity between display control unit harness connector
(A) M76 terminal 52 and display harness connector (B) M63 termi-
nal 6.
Check continuity between display control unit harness connector
(A) M76 terminal 52 and ground.
Yellow tinged screen
Check continuity between display control unit harness connector
(A) M76 terminal 54 and display harness connector (B) M63 termi-
nal 18.
Check continuity between display control unit harness connector
(A) M76 terminal 54 and ground.
OK or NG
OK >> GO TO 2.
NG >> Repair harness or connector.
2.CHECK RGB SIGNAL
1. Connect display control unit and display connectors.
2. Turn ignition switch ON.
3. Start Confirmation/Adjustment mode. Refer to AV-119, "
Confirmation/Adjustment Mode".
4. Display color bar by selecting “Display Color Spectrum Bar” on Display Diagnosis screen. Refer to AV-
119, "Confirmation/Adjustment Mode".
5. Check the malfunctioning circuit according to the symptoms. 50 – 17 : Continuity should exist.
50 – Ground : Continuity should not exist.
SKIB7853E
52 – 6 : Continuity should exist.
52 – Ground : Continuity should not exist.
SKIB7854E
54 – 18 : Continuity should exist.
54 – Ground : Continuity should not exist.
SKIB7855E
3AA93ABC3ACD3AC03ACA3AC03AC63AC53A913A773A893A873A873A8E3A773A983AC73AC93AC03AC3
3A893A873A873A8F3A773A9D3AAF3A8A3A8C3A863A9D3AAF3A8B3A8C
Page 681 of 3924

AV-134
< SERVICE INFORMATION >
NAVIGATION SYSTEM
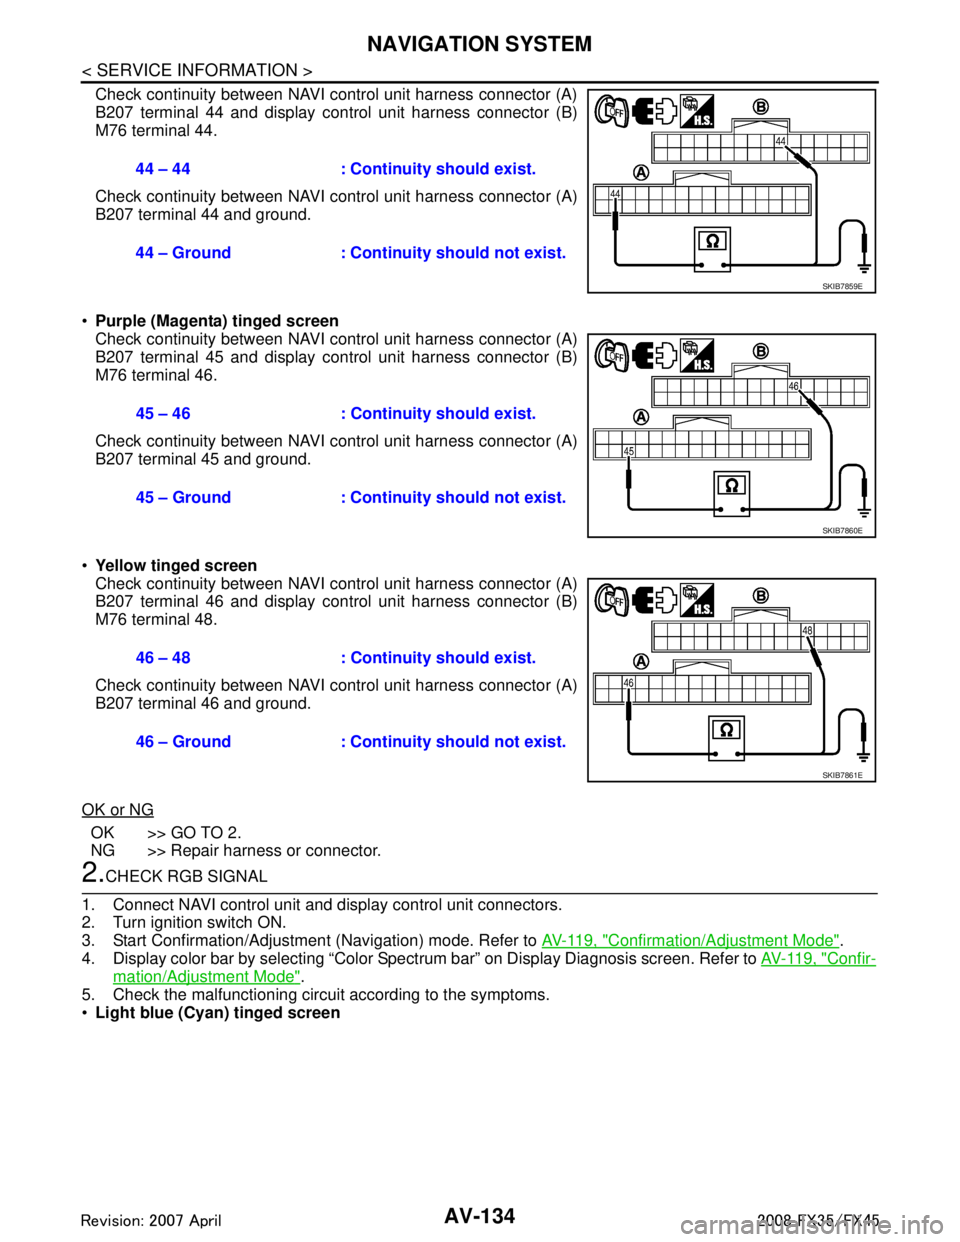
Check continuity between NAVI control unit harness connector (A)
B207 terminal 44 and display control unit harness connector (B)
M76 terminal 44.
Check continuity between NAVI control unit harness connector (A)
B207 terminal 44 and ground.
Purple (Magenta) tinged screen
Check continuity between NAVI control unit harness connector (A)
B207 terminal 45 and display control unit harness connector (B)
M76 terminal 46.
Check continuity between NAVI control unit harness connector (A)
B207 terminal 45 and ground.
Yellow tinged screen
Check continuity between NAVI control unit harness connector (A)
B207 terminal 46 and display control unit harness connector (B)
M76 terminal 48.
Check continuity between NAVI control unit harness connector (A)
B207 terminal 46 and ground.
OK or NG
OK >> GO TO 2.
NG >> Repair harness or connector.
2.CHECK RGB SIGNAL
1. Connect NAVI control unit and display control unit connectors.
2. Turn ignition switch ON.
3. Start Confirmation/Adjustment (Navigation) mode. Refer to AV-119, "
Confirmation/Adjustment Mode".
4. Display color bar by selecting “Color Spectrum bar” on Display Diagnosis screen. Refer to AV-119, "
Confir-
mation/Adjustment Mode".
5. Check the malfunctioning circuit according to the symptoms.
Light blue (Cyan) tinged screen 44 – 44 : Continuity should exist.
44 – Ground : Continuity should not exist.
SKIB7859E
45 – 46 : Continuity should exist.
45 – Ground : Continuity should not exist.
SKIB7860E
46 – 48 : Continuity should exist.
46 – Ground : Continuity should not exist.
SKIB7861E
3AA93ABC3ACD3AC03ACA3AC03AC63AC53A913A773A893A873A873A8E3A773A983AC73AC93AC03AC3
3A893A873A873A8F3A773A9D3AAF3A8A3A8C3A863A9D3AAF3A8B3A8C
Page 683 of 3924

AV-136
< SERVICE INFORMATION >
NAVIGATION SYSTEM
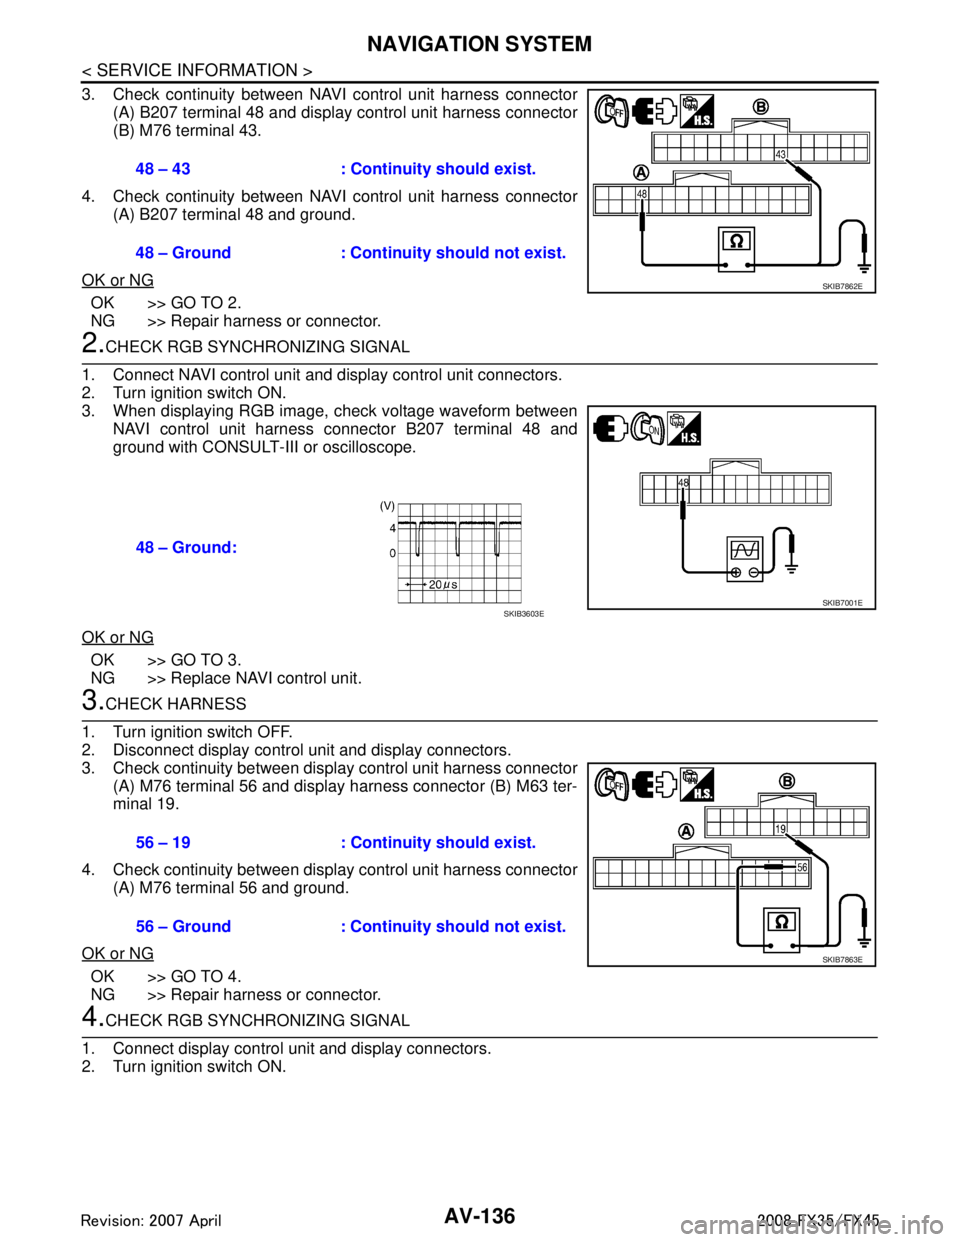
3. Check continuity between NAVI control unit harness connector(A) B207 terminal 48 and display control unit harness connector
(B) M76 terminal 43.
4. Check continuity between NAVI control unit harness connector (A) B207 terminal 48 and ground.
OK or NG
OK >> GO TO 2.
NG >> Repair harness or connector.
2.CHECK RGB SYNCHRONIZING SIGNAL
1. Connect NAVI control unit and display control unit connectors.
2. Turn ignition switch ON.
3. When displaying RGB image, check voltage waveform between NAVI control unit harness connector B207 terminal 48 and
ground with CONSULT-III or oscilloscope.
OK or NG
OK >> GO TO 3.
NG >> Replace NAVI control unit.
3.CHECK HARNESS
1. Turn ignition switch OFF.
2. Disconnect display control unit and display connectors.
3. Check continuity between display control unit harness connector (A) M76 terminal 56 and display harness connector (B) M63 ter-
minal 19.
4. Check continuity between display control unit harness connector (A) M76 terminal 56 and ground.
OK or NG
OK >> GO TO 4.
NG >> Repair harness or connector.
4.CHECK RGB SYNCHRONIZING SIGNAL
1. Connect display control unit and display connectors.
2. Turn ignition switch ON. 48 – 43 : Continuity should exist.
48 – Ground : Continuity should not exist.
SKIB7862E
48 – Ground:
SKIB7001ESKIB3603E
56 – 19 : Continuity should exist.
56 – Ground : Continuity should not exist.
SKIB7863E
3AA93ABC3ACD3AC03ACA3AC03AC63AC53A913A773A893A873A873A8E3A773A983AC73AC93AC03AC3
3A893A873A873A8F3A773A9D3AAF3A8A3A8C3A863A9D3AAF3A8B3A8C
Page 685 of 3924

AV-138
< SERVICE INFORMATION >
NAVIGATION SYSTEM
Voice Guidance Is Not Heard
INFOID:0000000001328769
Symptom: Voice guidance does not sound at route guidance.
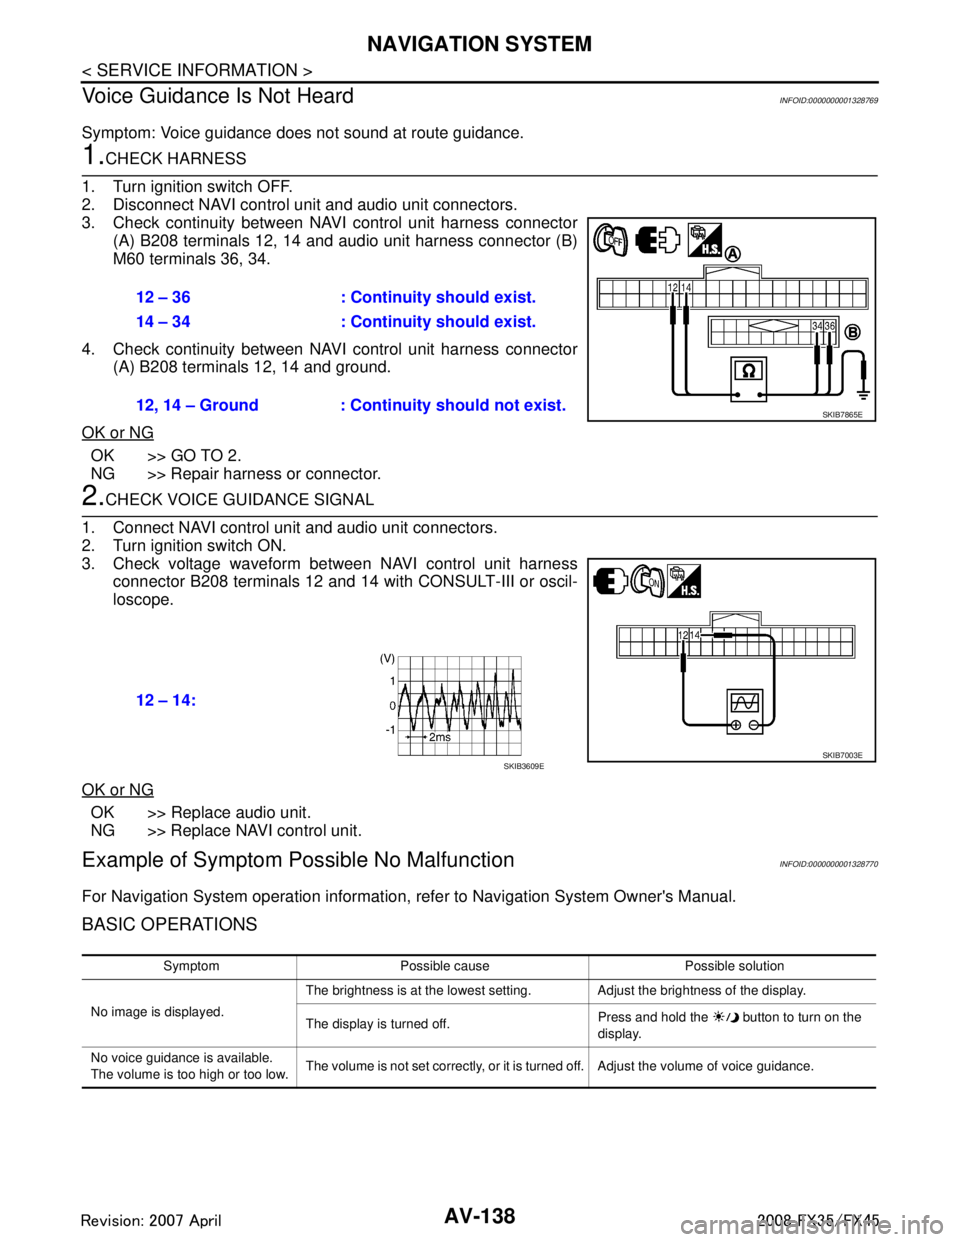
1.CHECK HARNESS
1. Turn ignition switch OFF.
2. Disconnect NAVI control unit and audio unit connectors.
3. Check continuity between NAVI control unit harness connector (A) B208 terminals 12, 14 and audio unit harness connector (B)
M60 terminals 36, 34.
4. Check continuity between NAVI control unit harness connector (A) B208 terminals 12, 14 and ground.
OK or NG
OK >> GO TO 2.
NG >> Repair harness or connector.
2.CHECK VOICE GUIDANCE SIGNAL
1. Connect NAVI control unit and audio unit connectors.
2. Turn ignition switch ON.
3. Check voltage waveform between NAVI control unit harness connector B208 terminals 12 and 14 with CONSULT-III or oscil-
loscope.
OK or NG
OK >> Replace audio unit.
NG >> Replace NAVI control unit.
Example of Symptom Poss ible No MalfunctionINFOID:0000000001328770
For Navigation System operation information, refer to Navigation System Owner's Manual.
BASIC OPERATIONS
12 – 36 : Continuity should exist.
14 – 34 : Continuity should exist.
12, 14 – Ground : Continuity should not exist.
SKIB7865E
12 – 14:
SKIB7003ESKIB3609E
Symptom Possible cause Possible solution
No image is displayed. The brightness is at the lowest setting. Adjust the brightness of the display.
The display is turned off.
Press and hold the button to turn on the
display.
No voice guidance is available.
The volume is too high or too low. The volume is not set correctly, or it is turned off. Adjust the volume of voice guidance.
3AA93ABC3ACD3AC03ACA3AC03AC63AC53A913A773A893A873A873A8E3A773A983AC73AC93AC03AC3
3A893A873A873A8F3A773A9D3AAF3A8A3A8C3A863A9D3AAF3A8B3A8C