2008 GREAT WALL FLORID lock
[x] Cancel search: lockPage 104 of 281

Downloaded from www.Manualslib.com manuals search engine 97Brake System
(e) Make sure not to let the system valves block the air bleeding.
(f) When the brake fluid that flows out of the hose or connector has no bubbles, it means that the air
in the system has been exhausted. There is still air inside the system if the hose inserted into the
brake fluid is still bubbling when pressing down the pedal.
(g) Keep the free end of the hose immerged in the brake fluid to avoid air from flowing into the
system while opening the screw.
(h) While air bleeding, hammer the casting part of the vibrating brake device with a rubber hammer.
This is helpful for removing bubbles deep in the brake fluid.
(i) If air in the master cylinder is suspected, then perform air bleeding on the master cylinder first,
then the wheel cylinder or brake caliper.
(j) When releasing air from the tires, generally make sure to release air out of all the tires.
(k) To avoid the possibility of air reversely entering into the system, a bleeder hose that has a check
valve could be used.
(2) Pressure blow-off
Under the proper conditions, a pressure blow-off device can be used to release the air inside the brake system.
3. Air releasing sequence
(1) Master cylinder air bleeding
If the master cylinder does not have air bleed screws, perform the follo\
wing steps:
(a) Check the brake fluid level inside the master cylinder’s reservoir and add to it if necessary.
(b) Slowly take off the front brake pipe connector until the brake fluid flows out from the end.
(c) Reconnect the brake pipe, but do not tighten it.
(d) Slowly step down and press on the brake pedal, check if the brake fluid flowing out of the connector
contains bubbles.
(e) Tighten the pipe fitting.
(f) Have the assistant loosen the pedal, wait for 15 s.
(g) Repeat the above steps until all the air is released.
(h) Take off the rear brake pipe connector, repeat the above steps.
(2) Wheel brake air releasing
(a) Check the brake fluid level inside the master cylinder’s reservoir and add to it if necessary. During the
entire air releasing period, check repeatedly and add promptly.
(b) Connect one end of the bleeder hose with the bleed screw and the other end immerged in the brake fluid.
(c) Have the assistant step on the pedal several times, raise the pedal gradually until it cannot be stepped on
any more, then forcibly press on the pedal once more.
(d) Loosen the bleed screw, check if there are any bubbles in the brake fluid flowing out. Meanwhile, slowly
lower the pedal.
(e) When the brake pedal is close to the stroke end or the out flowing brake fluid does not have any bubbles,
tighten the bleed screw.
(f) Have the assistant release the pedal and wait for 15 s.
(g) Repeat the above steps until there are no bubbles in the flowing brake fluid when the screw is loosened.
(h) Release the air for all the wheels in turn using the same method.
(i) After releasing the air from the entire system, switch the ignition to the on position.
(j) Inspect the stroke of the brake pedal and its reaction.
(k) Inspect the lighting condition of the brake warning lamp, and repeatedly perform maintenance or air
bleeding if necessary.
( l ) Add brake fluid to the reservoir until the specified fluid level, air bleeding is complete.
Page 106 of 281

Downloaded from www.Manualslib.com manuals search engine 99Brake System
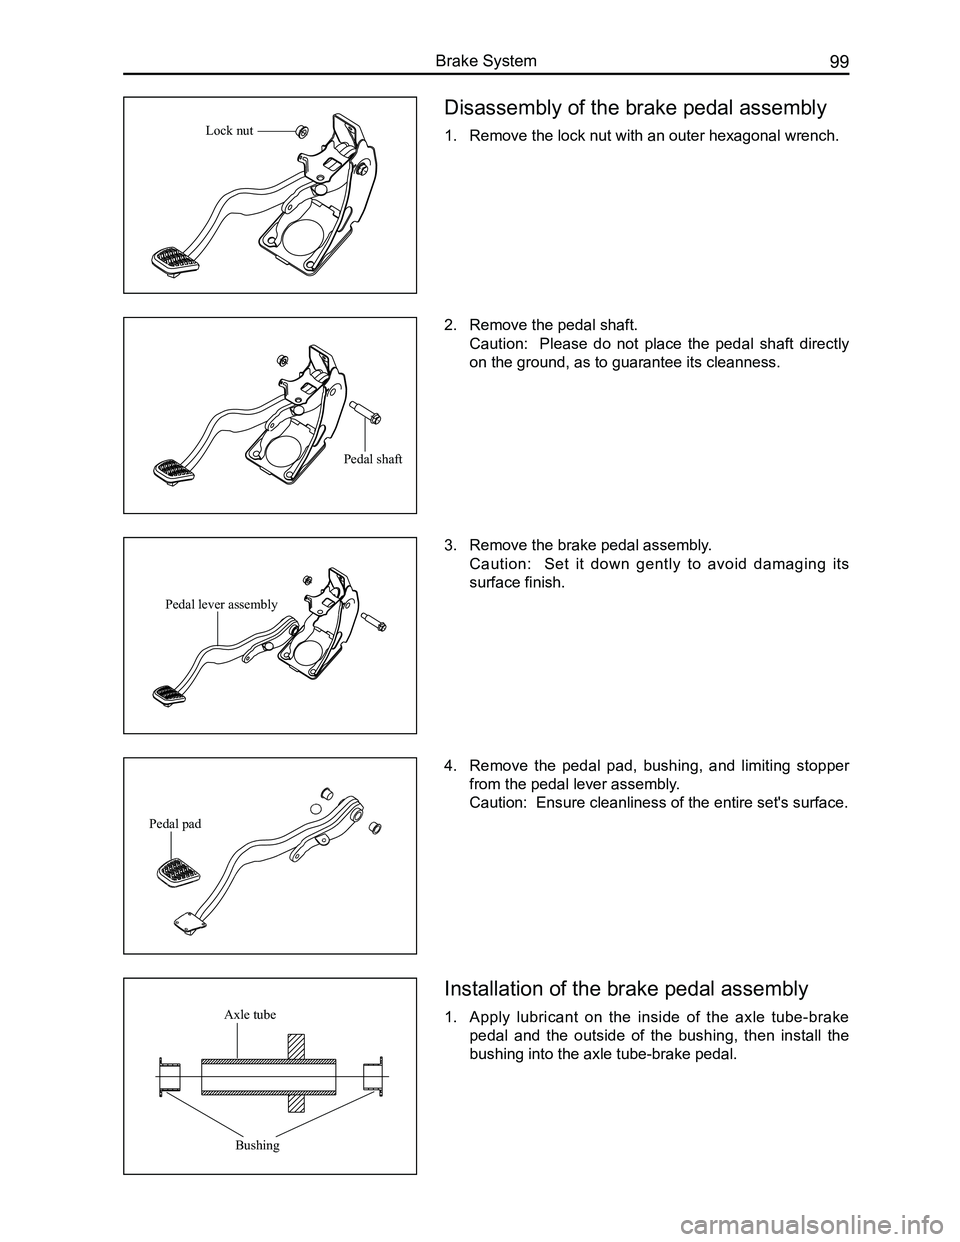
Disassembly of the brake pedal assembly
1. Remove the lock nut with an outer hexagonal wrench.
2. Remove the pedal shaft.
Caution: Please do not place the pedal shaft directly
on the ground, as to guarantee its cleanness.
3. Remove the brake pedal assembly.
Caution: Set it down gently to avoid damaging its
surface finish.
4. Remove the pedal pad, bushing, and limiting stopper
from the pedal lever assembly.
Caution: Ensure cleanliness of the entire set's surface.
Installation of the brake pedal assembly
1. Apply lubricant on the inside of the axle tube-brake
pedal and the outside of the bushing, then install the
bushing into the axle tube-brake pedal.
Lock nut
Pedal shaft
Pedal lever assembly
Pedal pad
Axle tube
Bushing
Page 107 of 281

Downloaded from www.Manualslib.com manuals search engine GWFLORID Maintenance Manual100
2. Install the pedal pad and limiting stopper to the pedal
lever.
3. Apply lubricant on the inner bushing and the outer
pedal shaft. Install the pedal lever assembly, pedal
shaft, and brake pedal bracket welding assembly.
4. Put on a nut, and tighten the nut and spring washer
using a 30 N·m torque.
Brake pedal examination and adjustment
1. Check if the pedal height is correct.
Height between pedal and the lower cowl panel: 109 mm
Pedal push rod's working empty stroke: 2 mm
2. Adjust pedal height if necessary.
(a) Disconnect the brake lamp's switch wire connector,
loosen the lock nuts, rotate the brake switch and
unscrew it until no contact with the brake pedal's
limiting stopper.
(b) Loosen the control rod lock nut and use combination
pliers to rotate the control rod and adjust the brake
pedal height to its standard value. After arriving at the
standard value, tighten the lock nut, and make sure the
working empty stroke of the pedal push rod is 2 mm.
(c) Rotate the brake lamp's switch and push it in until it
barely contacts with the brake pedal limiting stopper,
continue rotating 1/2-1 circle, then tighten the lock nut.
(d) Connect the brake lamp's switch wire connector.
(e) When the brake pedal is loose, the brake lamp should
be off.
Pedal height
Pedal padLimiting stopper
Page 109 of 281

Downloaded from www.Manualslib.com manuals search engine GWFLORID Maintenance Manual102
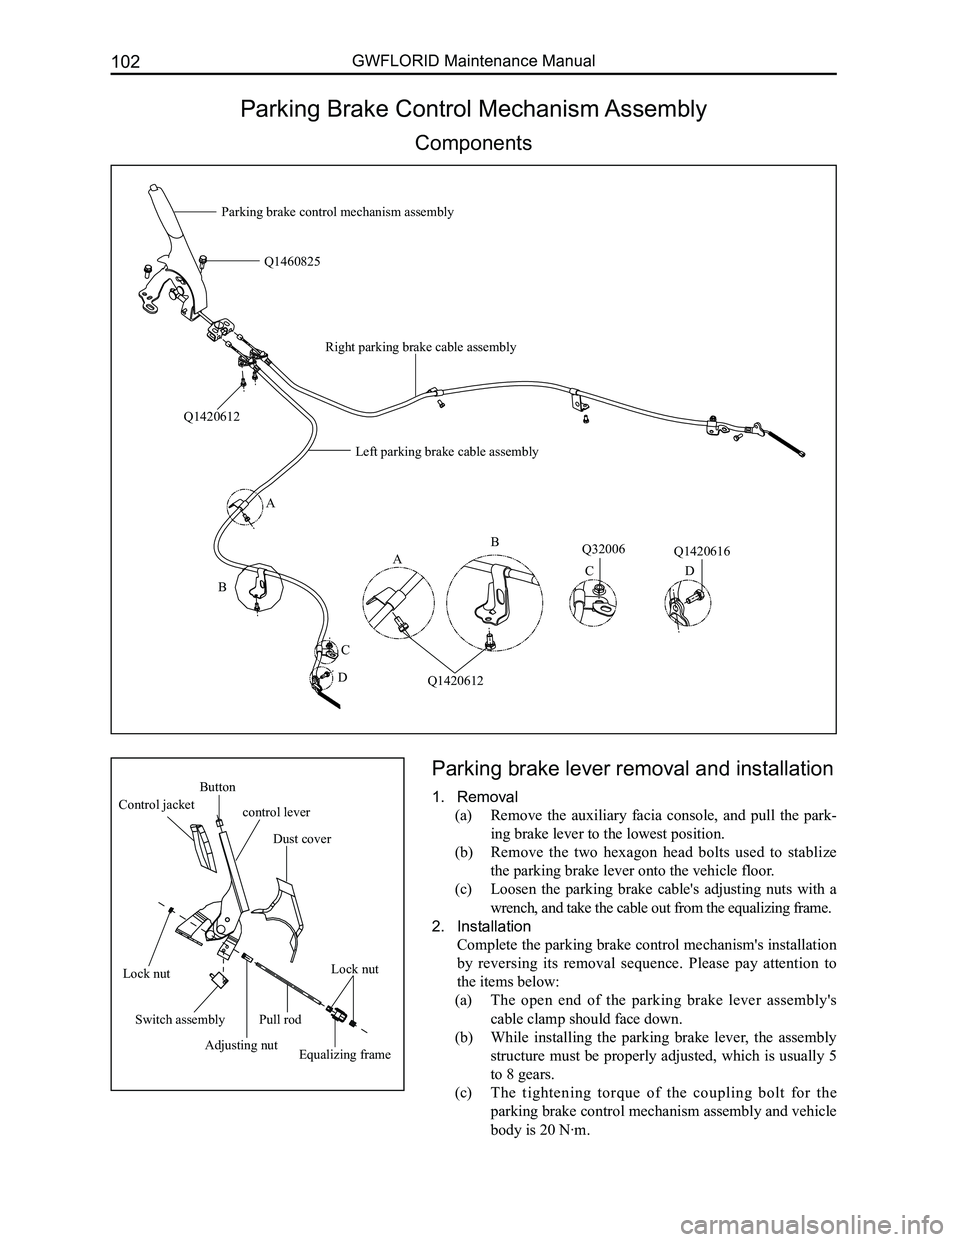
Parking Brake Control Mechanism Assembly
Components
Parking brake lever removal and installation
1. Removal
(a) Remove the auxiliary facia console, and pull the park-
ing brake lever to the lowest position.
(b) Remove the two hexagon head bolts used to stablize
the parking brake lever onto the vehicle floor.
(c) Loosen the parking brake cable's adjusting nuts with a
wrench, and take the cable out from the equalizing frame.
2. Installation
Complete the parking brake control mechanism's installation
by reversing its removal sequence. Please pay attention to
the items below:
(a) The open end of the parking brake lever assembly's
cable clamp should face down.
(b) While installing the parking brake lever, the assembly
structure must be properly adjusted, which is usually 5
to 8 gears.
(c) The tightening torque of the coupling bolt for the
parking brake control mechanism assembly and vehicle
body is 20 N·m.
A
B
C
D
Q1420612
Q1460825
Q32006Q1420616
Parking brake control mechanism assembly
Q1420612
A
B
CD
Left parking brake cable assembly
Right parking brake cable assembly
Button
control lever Control jacket
Dust cover
Lock nutLock nut
Switch assembly
Adjusting nutEqualizing frame
Pull rod
Page 110 of 281

Downloaded from www.Manualslib.com manuals search engine 103Brake System
Vacuum Booster with Brake Cylinder Assembly
Components
Areas of Importance
1. The vacuum booster with brake cylinder assembly is tightly connected with the brake pedal assembly on
the cowl panel using four nuts. It is also connected with the brake pedal push rod via an center pin and
lock pin. Thus before removal of the assembly, first loosen the rigid pipe fitting with an open-end wrench,
disconnect the lock pin and center pin using pliers, loosen the four nuts, and then proceed with the booster.
2. Tighten the lock nuts on brake master cylinder and vacuum booster according to the specified torque,
and coat with signal paint.
3. Dimensions between the rear housing head face and the adjusting fork hole center is adjusted to
standard before it leaves factory. Please do not adjust it again.
4. The vacuum booster valve rod on the vehicle must be in a free state.
5. The brake master cylinder's working agent is DOT4 brake fluid. It must not be mixed with any other
brake fluid.
Problems and symptomsCausesEliminating methods
M a s t e r c y l i n d e r ' s o i l r e s e r v o i r i s severely leakingThe master cylinder, slave cylinder, or hydraulic line is leaking.Eliminate the areas with leaks (in general, it may be that the pipe fitting's tightening torque is not enough, check one by one and tighten as necessary)
1. Vacuum booster not sufficient2. No boost when the engine is off3. May lead to unsteady engine idling when severe
1. Under non-operating conditions, the vacuum booster leaks air.2. Front and rear housing connection are not sealed.3. Booster's front and rear gas seal sealing failure.4. Vacuum check valve leaks.
1. Replace the front and back gas seal and control valve assembly.2. Replace the vacuum booster.3. Replace the vacuum check valve assembly.
Brake pedal is heavy with no boost effect1. Under non-operating conditions, the vacuum booster leaks air.2. Booster diaphragm worn and damaged.3. Control valve ring cup worn and damaged.
1. Replace the front, back gas seal and booster diaphragm.2. Replace the vacuum booster.3. Replace the control valve assembly.
Spongy pedal when braking1. There is air in the brake fluid.2. Cylinder or slave cylinder leaks oil.3. There is brake line seepage.
1. Eliminate the air in the system.2. Inspect the cylinder and sub-pump cup and replace with new parts.3. Inspect the pipeline and eliminate the seepage.
When continuously step on the brake pedal, the pedal will gradually change and expand till the highest extend.
Pump valve opening blockage.Brake fluid cleanliness is insufficient, please replace the brake fluid.
Troubleshooting
Oil cup cover
Oil cup body
Check valve
Check valve seat
Vacuum booster
Pad
Lock nut
Rod clevisCoupling nut
Rectangular sealing ringCylinder body
Fluid supply sealing ring
Page 111 of 281

Downloaded from www.Manualslib.com manuals search engine GWFLORID Maintenance Manual104
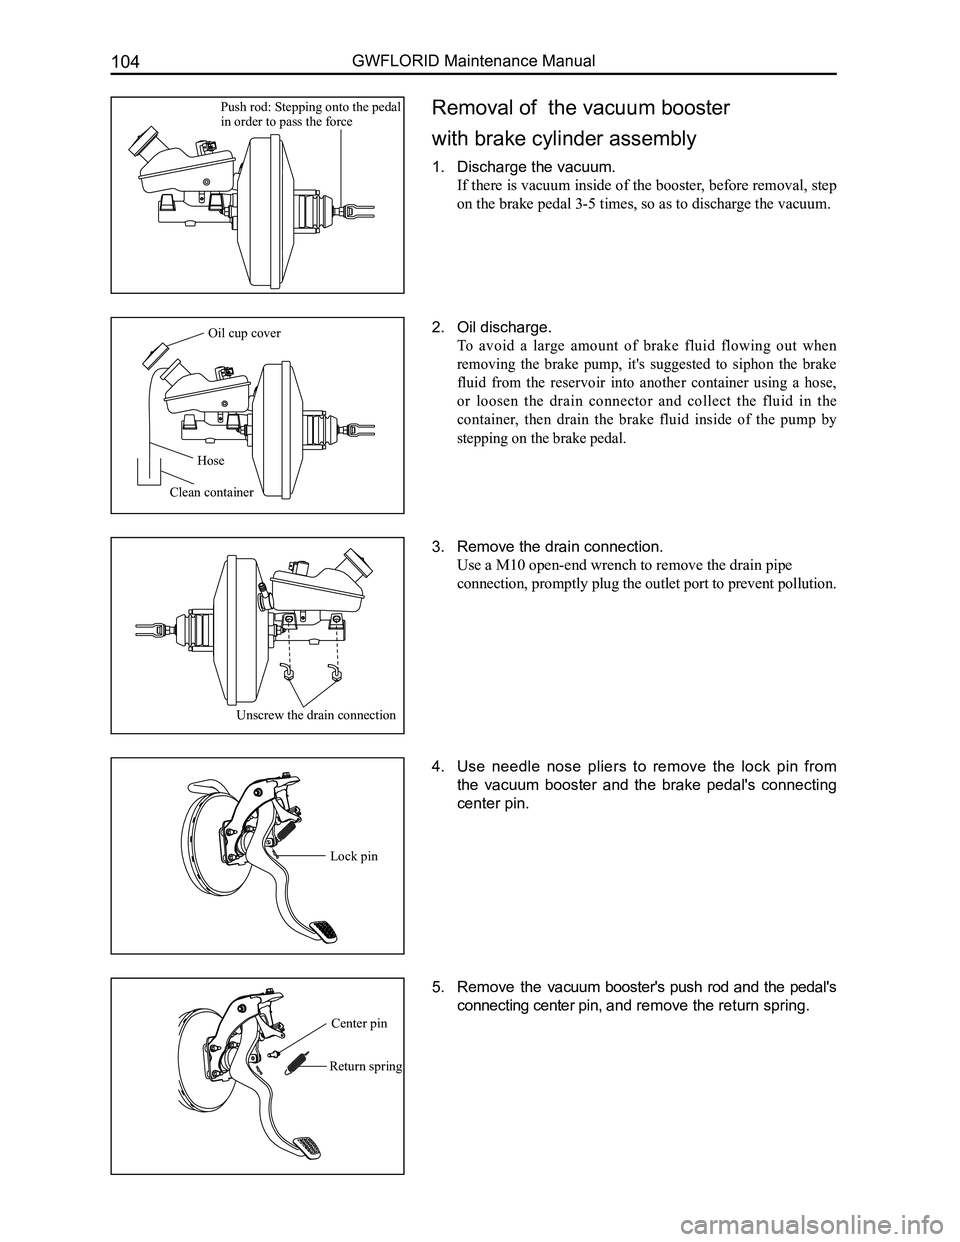
Removal of the vacuum booster
with brake cylinder assembly
1. Discharge the vacuum.
If there is vacuum inside of the booster, before removal, step
on the brake pedal 3-5 times, so as to discharge the vacuum.
2. Oil discharge.
To avoid a large amount of brake fluid flowing out when
removing the brake pump, it's suggested to siphon the brake
fluid from the reservoir into another container using a hose,
or loosen the drain connector and collect the fluid in the
container, then drain the brake fluid inside of the pump by
stepping on the brake pedal.
3. Remove the drain connection.
Use a M10 open-end wrench to remove the drain pipe
connection, promptly plug the outlet port to prevent pollution.
4. Use needle nose pliers to remove the lock pin from
the vacuum booster and the brake pedal's connecting
center pin.
5. Remove the vacuum booster's push rod and the pedal's
connecting center pin, and remove the return spring.
Push rod: Stepping onto the pedal in order to pass the force
Oil cup cover
Hose
Clean container
Unscrew the drain connection
Lock pin
Return spring
Center pin
Page 112 of 281

Downloaded from www.Manualslib.com manuals search engine 105Brake System
3. Remove the check valve assembly.
Pull out the check valve and valve seat from the vacuum
booster's front case as shown on the left.
Disassembling the vacuum booster with
brake cylinder assembly
1. Brake master pump removal.
Take down the lock nuts between the fixed brake master
pump and front case with a M13 sleeve, and then forcibly
pull out the brake master pump.
Caution: Do not lose the rectangular sealing ring.
2. Remove the brake reservoir assembly.
Push out the elastic cylindrical pin from the hole of the oil
cup’s foot with a suitably sized screwdriver, and then pull
out the oil cup from the pump in the direction as shown on
the left. If necessary to take off the brake reservoir cover,
twist it off manually.
6. Screw off the coupling bolt between the vacuum booster
and the pedal bracket with a M13 sleeve.
7. Extract the vacuum booster with brake cylinder assem-
bly.
Removal of the vacuum booster with brake cylinder assembly
is now complete.
Check valveCheck valve seat
Lock nutRectangular sealing ring
Elastic cylindrical pin
Bolt
Page 113 of 281

Downloaded from www.Manualslib.com manuals search engine GWFLORID Maintenance Manual106
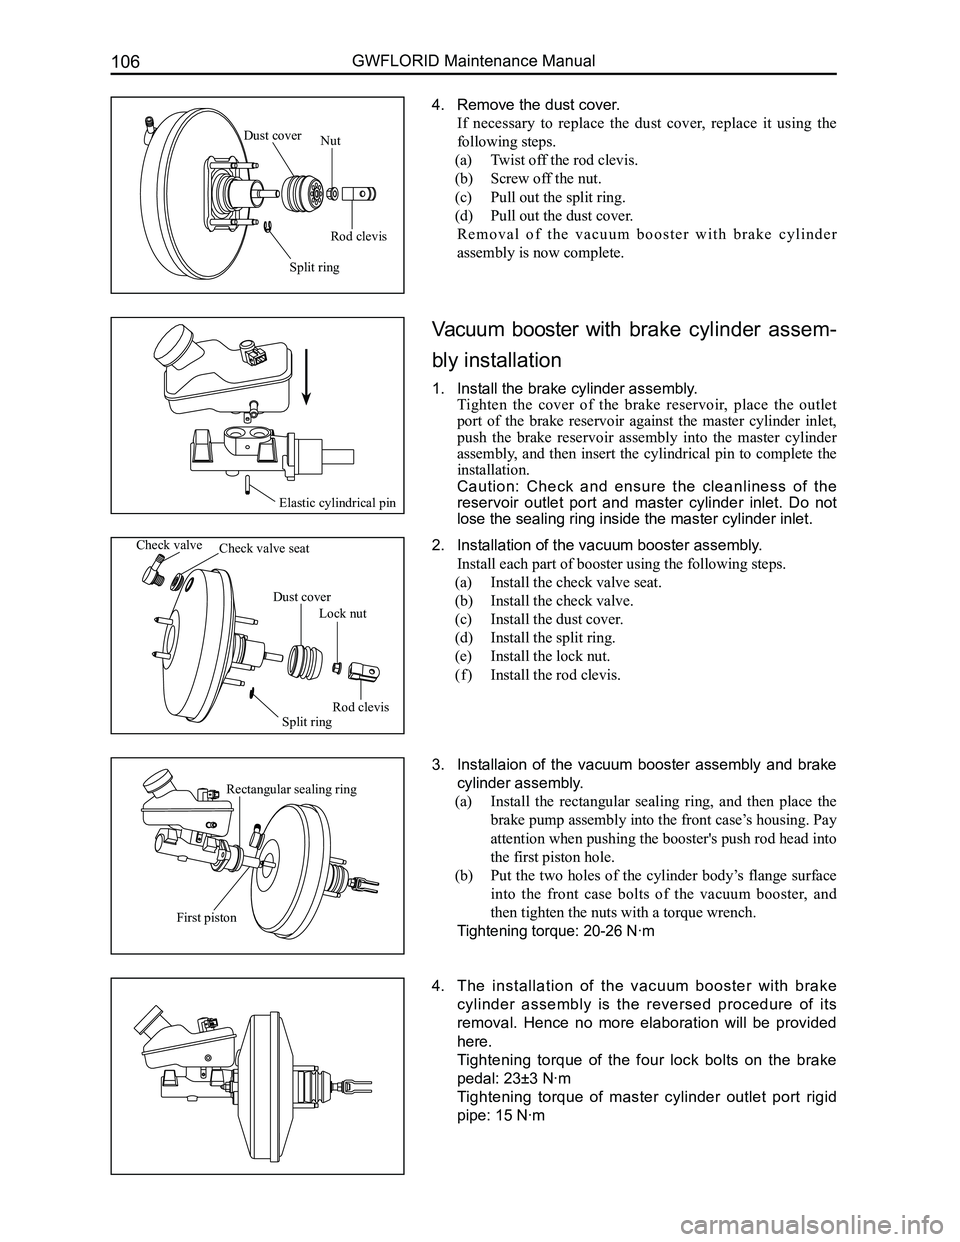
4. Remove the dust cover.
If necessary to replace the dust cover, replace it using the
following steps.
(a) Twist off the rod clevis.
(b) Screw off the nut.
(c) Pull out the split ring.
(d) Pull out the dust cover.
R e m o v a l o f t h e v a c u u m b o o s t e r w i t h b r a k e c y l i n d e r
assembly is now complete.
Vacuum booster with brake cylinder assem-
bly installation
1. Install the brake cylinder assembly.
Tighten the cover of the brake reservoir, place the outlet
port of the brake reservoir against the master cylinder inlet,
push the brake reservoir assembly into the master cylinder
assembly, and then insert the cylindrical pin to complete the
installation.
Caution: Check and ensure the cleanliness of the
reservoir outlet port and master cylinder inlet. Do not
lose the sealing ring inside the master cylinder inlet.
2. Installation of the vacuum booster assembly.
Install each part of booster using the following steps.
(a) Install the check valve seat.
(b) Install the check valve.
(c) Install the dust cover.
(d) Install the split ring.
(e) Install the lock nut.
( f ) Install the rod clevis.
3. Installaion of the vacuum booster assembly and brake
cylinder assembly.
(a) Install the rectangular sealing ring, and then place the
brake pump assembly into the front case’s housing. Pay
attention when pushing the booster's push rod head into
the first piston hole.
(b) Put the two holes of the cylinder body’s flange surface
into the front case bolts of the vacuum booster, and
then tighten the nuts with a torque wrench.
Tightening torque: 20-26 N·m
4. The installation of the vacuum booster with brake
cylinder assembly is the reversed procedure of its
removal. Hence no more elaboration will be provided
here.
Tightening torque of the four lock bolts on the brake
pedal: 23±3 N·m
Tightening torque of master cylinder outlet port rigid
pipe: 15 N·m
Rod clevis
Nut
Split ring
Dust cover
Elastic cylindrical pin
Check valveCheck valve seat
Lock nut
Rod clevis
Split ring
Dust cover
Rectangular sealing ring
First piston