2008 GREAT WALL FLORID relay
[x] Cancel search: relayPage 12 of 281

Downloaded from www.Manualslib.com manuals search engine 5Overview
The white side
The black side
7. Pay attention to the "Areas of Importance" below to
avoid damaging any part:
(a) Do not open the cover or case of the ECU (Electronic
Control Unit) unless it's absolutely necessary. (Touching
the pin of the IC (Integrated Circuit) may damage the
IC due to static electricity.)
(b) When unplugging the vacuum hose, make sure to pull
from the end of the hose but not the center.
IncorrectCorrect
(c) To make hose reassembly more convenient, label the
unplugged portions for easier recognition later. After
performing this task, check carefully to make sure the
hose is connected correctly.
(d) Be careful! Do not drop any electrical components (like
sensors or relay connectors). Replace them at once
if they have been dropped onto a hard surface. They
cannot be used for the second time.
(e) When cleaning the engine with a steam, make sure to
properly protect the ignition coil and air filter as to
prevent water from seeping in.
(f) D o n o t f o r c e f u l l y t r y t o c o n n e c t a h o s e i n t o a n
oversized tube while using a vacuum gauge. Instead,
use a stepped connector. If the hose is stretched, it may
lead to leaking.
8. All resistors must be measured at below 20oC room
temperature unless special situations arise. This is
because resistance value measured under higher
temperature may exceed standard requirements, espe-
cially if measured after driving the vehicle. All measures
should be taken after the engine has cooled down.
Circuit Maintenance Instructions
1. Rules to be obeyed before a circuit is repaired:
(a) Make sure to disconnect the negative (-) cable from the
battery before electrical maintenance is performed.
(b) W h e n i n s p e c t i o n a n d m a i n t e n a n c e w o r k r e q u i r e s
disconnecting the battery, make absolutely sure to
disconnect the negative (-) cable of the battery and that
it is connected to the vehicle body as grounding.
(c) To prevent damaging the wiring terminal of the battery,
loosen the cable's fixing nut and lift up the cable, but
do not forcefully twist or press the cable.
(d) When cleaning up the battery's and the cable's connecting
terminals, make sure to use a special rag, and do not use a
file or other rough material to wipe them.
(e) While connecting the connecting terminals of the cable
and battery, loosen the nuts first, then tighten them
after installation. Do not hammer the cable's connecting
terminals into the battery with a hammer.
(f) I f t h e b a t t e r y ' s g r o u n d c a b l e h a s n o t y e t b e e n
disconnected, please do not try to speed charge the
battery, as this could damage the alternator's diode.
(g) Should the battery's ground cable be disconnected,
please do not try to start the engine, as this could
seriously damage the wire.
(h) Make sure to properly cover the battery's positive (+)
end cover.
Page 118 of 281

Downloaded from www.Manualslib.com manuals search engine 111Brake System
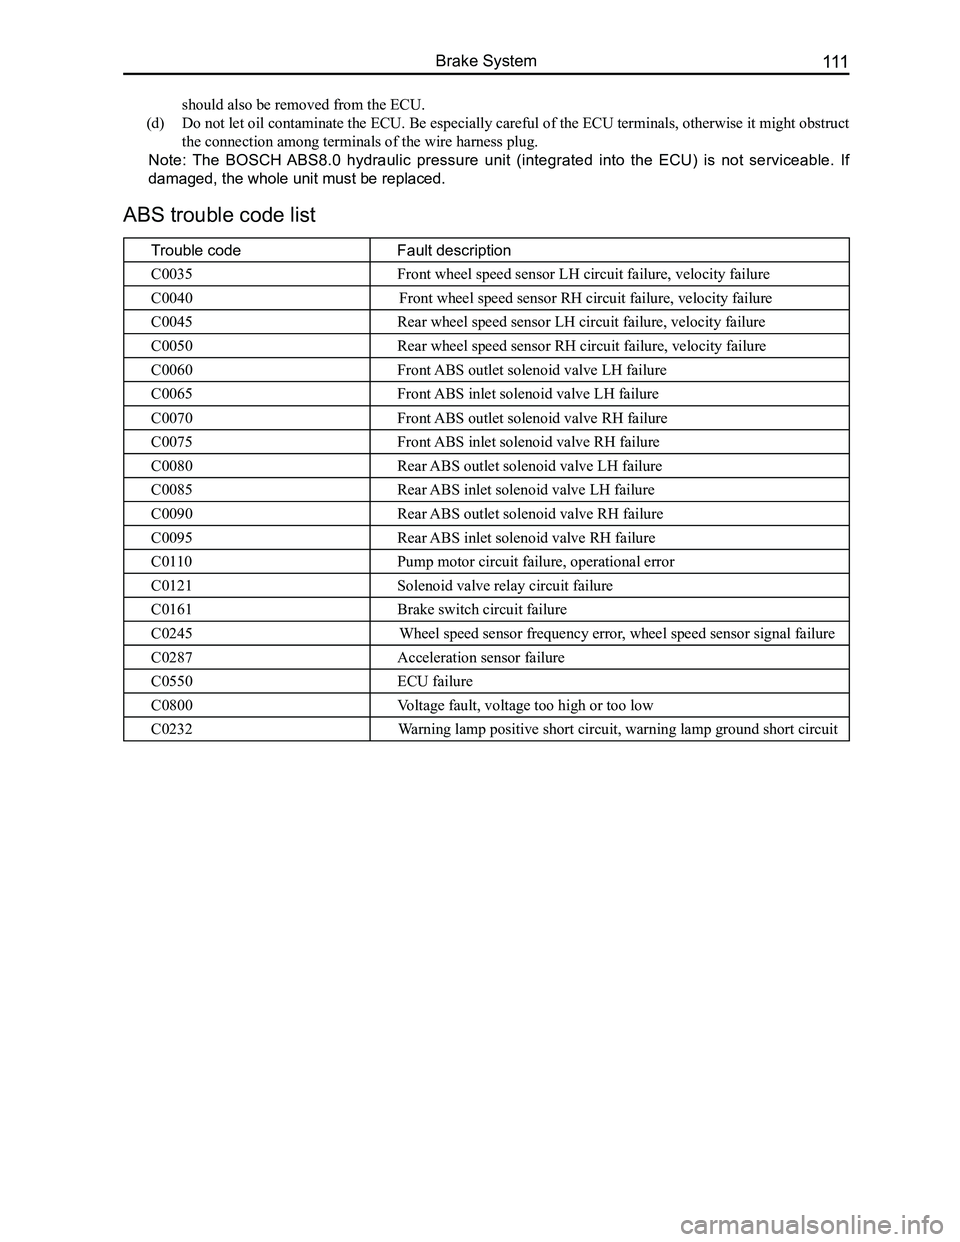
ABS trouble code list
Trouble codeFault description
C0035Front wheel speed sensor LH circuit failure, velocity failure
C0040Front wheel speed sensor RH circuit failure, velocity failure
C0045Rear wheel speed sensor LH circuit failure, velocity failure
C0050Rear wheel speed sensor RH circuit failure, velocity failure
C0060Front ABS outlet solenoid valve LH failure
C0065Front ABS inlet solenoid valve LH failure
C0070Front ABS outlet solenoid valve RH failure
C0075Front ABS inlet solenoid valve RH failure
C0080Rear ABS outlet solenoid valve LH failure
C0085Rear ABS inlet solenoid valve LH failure
C0090Rear ABS outlet solenoid valve RH failure
C0095Rear ABS inlet solenoid valve RH failure
C0110Pump motor circuit failure, operational error
C0121Solenoid valve relay circuit failure
C0161Brake switch circuit failure
C0245Wheel speed sensor frequency error, wheel speed sensor signal failure
C0287Acceleration sensor failure
C0550ECU failure
C0800Voltage fault, voltage too high or too low
C0232Warning lamp positive short circuit, warning lamp ground short circuit
should also be removed from the ECU.
(d) Do not let oil contaminate the ECU. Be especially careful of the ECU terminals, otherwise it might obstruct
the connection among terminals of the wire harness plug.
Note: The BOSCH ABS8.0 hydraulic pressure unit (integrated into the ECU) is not serviceable. If
damaged, the whole unit must be replaced.
Page 150 of 281

Downloaded from www.Manualslib.com manuals search engine 143Vehicle Body Electronic System
Basic Information on the Electrical System
Electrical system schematics reading instructions
1. Configuration introduction
The GWFLORID comes in three configurations: comfort, luxury and elite. The wire harness has two types of
configurations: One is a non jam protection comfort model, which is a combination of both comfort and luxury
type, the other type is called elite. These two configurations are universally used in most of this manual. The
parts that are only available for the non jam protection comfort type have been marked in this manual, please
pay attention to these sections while performing maintenance.
2. Fuse box and power supply introduction
The fuse box located inside the left side of the dashboard is No. 1 Fuse Box, the other one inside the left side of
the engine compartment is No. 2 Fuse Box.
• 30 represents a power cord for normal power, which is from the battery positive fuse box-60 A.
• 30a represents a power cord for normal power, which is from the battery positive fuse box-120 A.
• 30b represents a power cord for normal power, which is from the battery positive fuse box-120 A.
• 15 represents a power cord for small capacity electronics. When the ignition switch is at the "ON" position,
power is supplied by relay IG.
• 15a represents a power cord for small capacity electronics. When the ignition switch is at the "ON"
position, power is directly supplied by ignition switch IG1.
• 15b represents a power cord for small capacity electronics. When the ignition switch is at the "ON"
position, power is directly supplied by ignition switch IG2.
• X represents a power cord for small capacity electronics. When the ignition switch is at the "ACC"
position, power is supplied by relay ACC.
4. Wire's color and sectional area (mm2)
B-BlackW-WhiteR-RedBl-BlueBr-BrownY-Yellow
G-GreenP-PinkOr-OrangeV-VioletLg-Light greenGr-Gray
Mark the solid-colored wires with the letters in the above table. Double-colored wires' first letter is the primary
color, second letter is the secondary color.
For example:
Solid-colored wire: Red, marked as R.
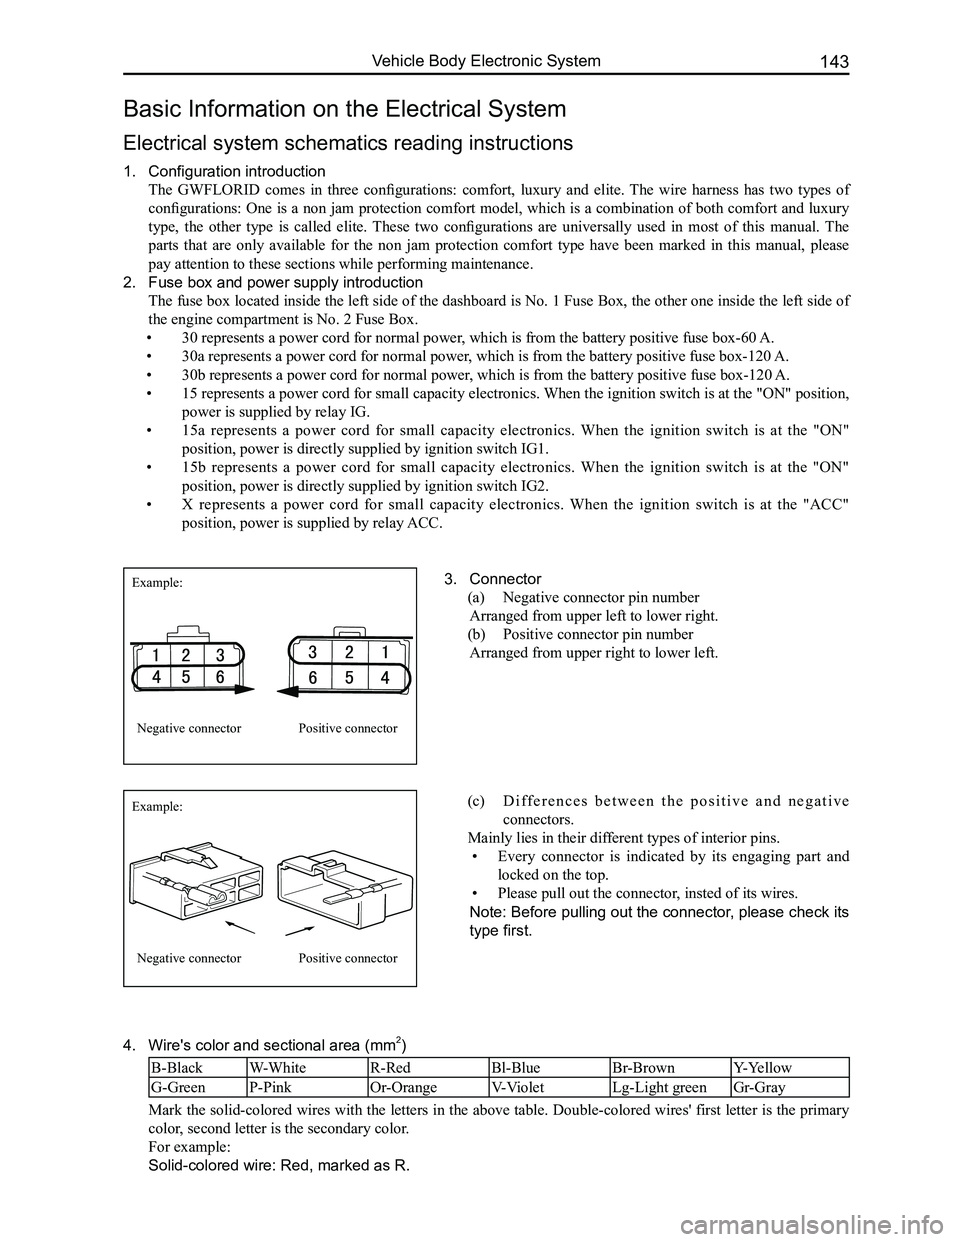
3. Connector
(a) Negative connector pin number
Arranged from upper left to lower right.
(b) Positive connector pin number
Arranged from upper right to lower left.
Example:
Example:
Negative connector
Negative connector
Positive connector
Positive connector
(c) D i f f e r e n c e s b e t w e e n t h e p o s i t i v e a n d n e g a t i v e
connectors.
Mainly lies in their different types of interior pins.
• Every connector is indicated by its engaging part and
locked on the top.
• Please pull out the connector, insted of its wires.
Note: Before pulling out the connector, please check its
type first.
Page 151 of 281

Downloaded from www.Manualslib.com manuals search engine GWFLORID Maintenance Manual144
Double-colored wire: Primary color is Red, secondary color is Blue, mark\
ed as RBl.
0.5BrGr means Brown wire with a Gray fine wire, and sectional area is 0.\
5 mm2.
Areas of importance in circuit maintenance
1. Before operating any electronic devices, and when tools or maintenance devices may easily make
contact with an uncovered electronic terminal, please make sure to turn the ignition switch to the LOCK
position, and then disconnect the battery's negative cable to avoid injury or vehicle damage. When the
ignition switch is on the ON position, please do not disconnect the battery's connecting wire or take out
the power's fuse, regardless if the engine is running or not.Otherwise it would seriously damage the
ECU and related microelectronic devices such as sensors.
2. When changing the fuse, please make sure that the new fuse possesses the proper current rating,
and is not above or below this rating.
3. When repairing the wire harnesses of the airbag and pretensioner, only specified contact points,
plugs, and wires are allowed to be used.
4. Before repairing the wire harness, make sure to eliminate any factor that might cause damage,
for example, the edge of a vehicle body part is too sharp, or the used electronics are damaged or
corroded.
5. Shielded wire should not be repaired, it must be replaced entirely once it is damaged.
6. Unless it is specified during the test, please do not use an analog multimeter to test the ECU and
sensor, instead use a high-impedance digital multimeter (internal resistance should be ≥10 kΩ) or a
vehicle multimeter for inspection.
7. When inspecting the connector with a digital multimeter, take the waterproof rubber cover off the
connector, and tightly insert the test pen along the connecting terminal. Don't use too much force, as
to avoid cracking the connector.
Circuit inspection steps
The principle of troubleshooting is to confirm the "possible cause". Once the possible cause is confirmed, the
components that need to be inspected are limited to the components that are related to the possible cause. The
confirmed possible cause should be based on theory and be supported by facts, but not just by intuition. If
one tries to solve the problem but does not adopt the proper troubleshooting steps, it may make the problem
worse. Then the possible cause not only can't be confirmed, but also maintenance can't be performed properly.
Troubleshooting should adhere to the four steps below:
1. Observe the symptoms carefully, inspect if there is anything else abnormal, and record it.
2. While confirming the possible causes, study the circuit diagram carefully, and regard it as a whole
system in order to understand the circuit. Thorough knowledge of switches, relays, and other
electronic components is obligatory for proper analysis.
3. Inspect and eliminate the problems one by one until the cause is found.
4. After the malfunction is fixed, make sure to check if the inspected system is working properly, and also
check if the maintenance may have caused any new problems.
Compres-
sor relay
Reserve
Sunroof (Elite) Lamplet
Reserve
Reserve
Reserve
Reserve Door and window Reserve Blower
Lamplet
relay Flasher relay Blower high
speed relay (Elite) Door and
window relay (Comfort, Luxury) Blower relay
Reserve
Front fog lamp
Combination
meter
Interior
lighting
central
door lock
brake lamp
CD player
Reserve
Reserve
Reserve
Cigarette
lighter
Rearview
mirror
Front wiper
Charge
Airbag
Reserve
Reverse lamp Rear fog lamp
Rear wiper
Defroster Compressor
ACC relay
IG relayRear wiper
relay Defroster
relay
Front fog
lamp relay Rear fog
lamp relay
Warning lamp
Turn signal lamp
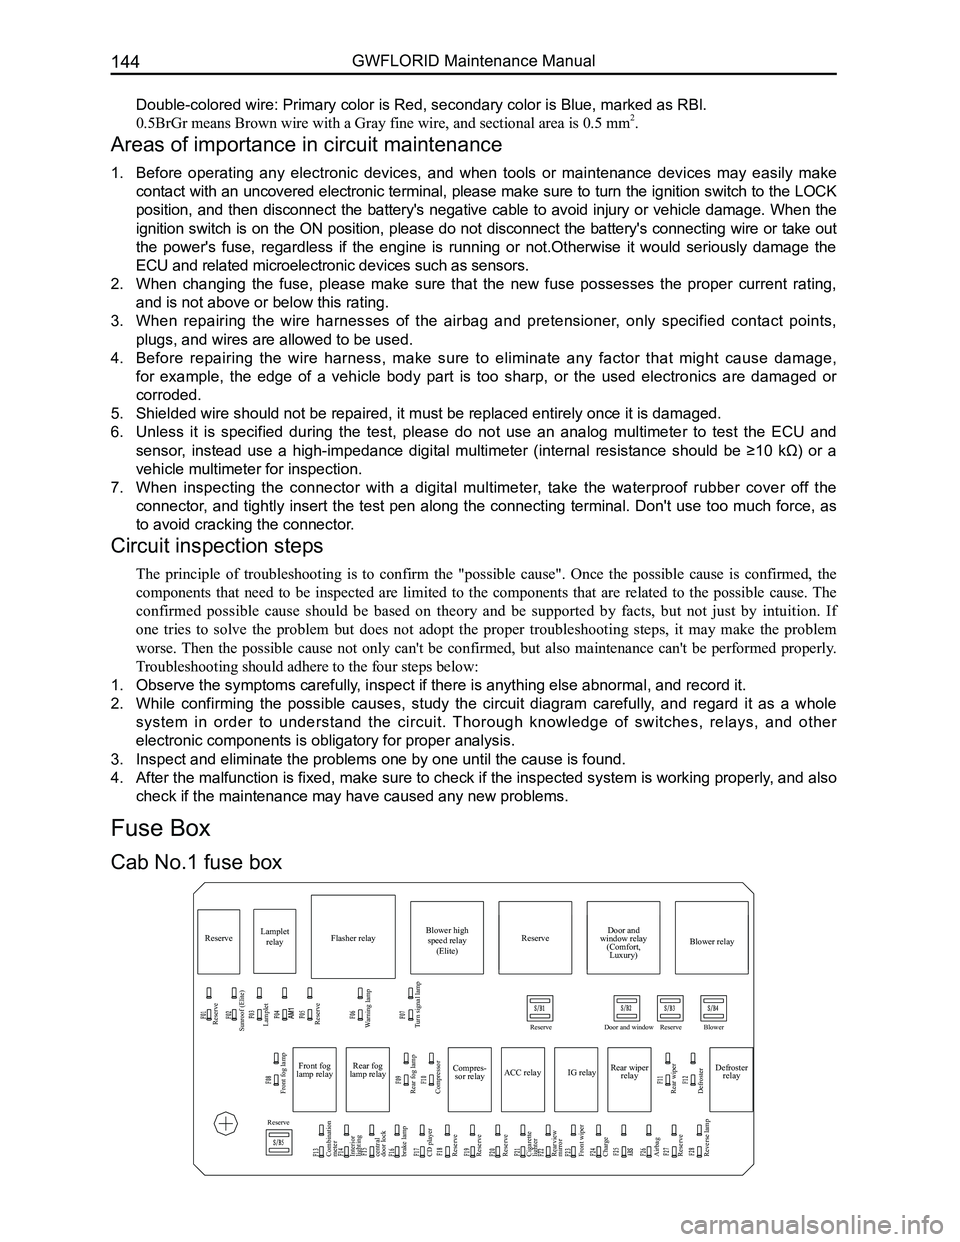
Cab No.1 fuse box
Fuse Box
Page 152 of 281

Downloaded from www.Manualslib.com manuals search engine 145Vehicle Body Electronic System
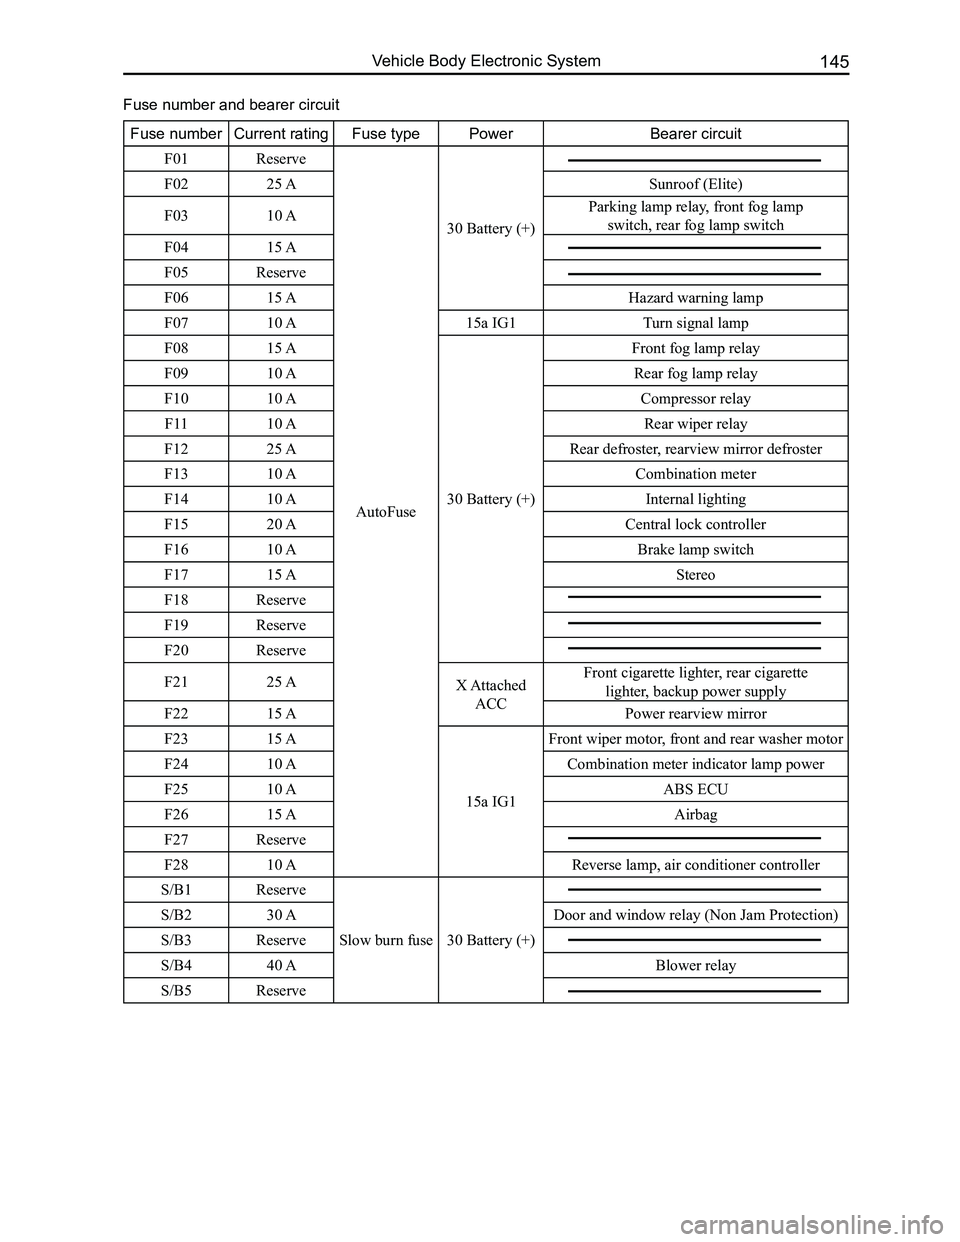
Fuse numberCurrent ratingFuse typePowerBearer circuit
F01Reserve
AutoFuse
30 Battery (+)
F0225 ASunroof (Elite)
F0310 AParking lamp relay, front fog lamp
switch, rear fog lamp switch
F0415 A
F05Reserve
F0615 AHazard warning lamp
F0710 A15a IG1 Turn signal lamp
F0815 A
30 Battery (+)
Front fog lamp relay
F0910 ARear fog lamp relay
F1010 ACompressor relay
F1110 ARear wiper relay
F1225 ARear defroster, rearview mirror defroster
F1310 ACombination meter
F1410 AInternal lighting
F1520 ACentral lock controller
F1610 ABrake lamp switch
F1715 AStereo
F18Reserve
F19Reserve
F20Reserve
F2125 AX Attached
ACC
Front cigarette lighter, rear cigarette
lighter, backup power supply
F2215 APower rearview mirror
F2315 A
15a IG1
Front wiper motor, front and rear washer motor
F2410 ACombination meter indicator lamp power
F2510 AABS ECU
F2615 AAirbag
F27Reserve
F2810 AReverse lamp, air conditioner controller
S/B1Reserve
Slow burn fuse 30 Battery (+)
S/B230 ADoor and window relay (Non Jam Protection)
S/B3Reserve
S/B440 ABlower relay
S/B5Reserve
Fuse number and bearer circuit
Page 153 of 281

Downloaded from www.Manualslib.com manuals search engine GWFLORID Maintenance Manual146
Main relay
10A backup 15A backup 25A backup
Compressor relay
Reserve
Reserve
Fuel pump
Starter relay Main
relay High
beam Low
beam
Engine ECU
Fan relay High
Starter relay High beam relay Low beam relay Reserve
Horn Reserve Reserve Fan relay Low
Fan relay Low
Fan relay High
Horn relay
Engine compartment No.2 fuse box
Fuse number and bearer circuit
Fuse numberCurrent ratingFuse typePowerBearer circuit
F2930 A
AutoFuse
30 Battery (+)
Starter relay
F3025 AMain relay
F3115 AFuel pump relay
F3230 ASlow burn fuse Low speed fan relay
F33ReserveAutoFuse
F3430 ASlow burn fuse High speed fan relay
F3515 A
AutoFuse
High & low pitched horn
F3615 AHigh beam light relay
F3715 ALow beam light relay
F3810 AEngine ECU, diagnostic port
F3925 AABS ECU
F40Reserve
F4115 AAM2
F42Reserve
F43Backup 10 A
F44Backup 15 A
F45Backup 25 A
Page 174 of 281

Downloaded from www.Manualslib.com manuals search engine 167Vehicle Body Electronic System
Electrical Wiring Diagram for the Overall Vehicle
Power & start-up system
Connected ABS #1
Main relay
Engine ECU 74 pin
Shift
positionPin
position Theft
deterrent
ECU 6
ABS motor 40A
Ignition switch
Starter relay
Clutch switch
Battery 12V 60Ah
Generator regulator
Ignition switch
Starter
Generator
Page 177 of 281

Downloaded from www.Manualslib.com manuals search engine GWFLORID Maintenance Manual170
Air conditioning and defrosting system
Rear window defroster
Connected position lamp relay Manually AC control sysytem
Defroster system Electric AC control system
Connected air conditioner
pressure switch
Blower relay
Air conditioner
panel lighting Defroster switch
Rear defroster indicator
Left outer rearview mirror defroster
Right outer rearview mirror defroster
Front passenger seat belt switch Defroster relay
To flasher relay
Blower relay Blower regulate module
Blower high speed relay
Rear defroster indicator
Front passenger seat belt unfastened indicator lamp
Air conditioner wind speed switch
Blower Speed adjustive
resistance
Rear defroster & alarm switch
(comfort, luxury) Right outer electric rearview mirror defroster (Elite) Left outer electric rearviewmirror
defroster (Elite) Front passenger seat
belt switch Connected speed adjustive resistance,
blower (Comfort, luxury) Connected rear
window defroster Connected cycle damper
actuator (Elite) Connected blower regulate
module (Elite) Connected temperature regulation
damper actuator (Elite)
AC switch (comfort, luxury)
Connected electric AC controller (Elite)
Connected AC governor & front
passenger seat belt unfastened indicator
lamp (comfort, luxury) Connected mode damper actuator (Elite) Connected blower (Elite)
Mode damper actuator
Cycle damper actuator Temperature regulation
damper actuator
Manually
air
conditioner
Electric AC controller
AC switch
Off
On Off On Terminal
Terminal Terminal
Location Location
Location