Page 105 of 259
 Owners Manual Starting-off and Driving
104
A warning signal sounds and the following text appears in the display* if you have
inadvertently driven off with the handbrake applied:
\"Handbrake on\"
The handbrake warni")
Starting-off and Driving
104
A warning signal sounds and the following text appears in the display* if you have
inadvertently driven off with the handbrake applied:
"Handbrake on"
The handbrake warning is activated if you drive at a speed of more than 5 km/h for
more than 3 seconds.
WARNING
•Please note that the handbrake mu st be fully released. A handbrake
which is only partially released can re sult in the rear brakes overheating
which will have a negative effect on th e operation of the brake system - risk
of accident! In addition this can result in premature wear of the rear brake
pads.
•Never leave children unattended in th e vehicle. The children might, for
example, release the handbrake or take the vehicle out of gear. The vehicle
might then move off - risk of accident!
Caution
After the car has come to a stop, always firs t of all apply the handbrake firmly before
then additionally engaging a gear (manual gearbox) or moving the selector lever
into position P (automatic gearbox).
Parking aid*
The parking aid provides a warning of obstacles behind the vehicle.
The audible parking aid determines the di stance between the rear bumper and an
obstacle located behind the vehicle with the aid of ultrasound sensors. The sensors
are integrated in the rear bumper.
Range of sensors
The clearance warning begins at a distance of about 160 cm from the obstacle (area ⇒ fig. 118 ). The interval between the warning signals becomes shorter as the
clearance is reduced.
A continuous tone sounds from a clearanc e of just 30 cm (Bereich ) - danger
area. From this moment on do not continue driving in the selected direction or
the direction from where the obstacle is reported!
Activating
The parking aid is activated automatically when reverse gear is engaged and the
ignition is turned on. This is confir med by a brief acknowledgement signal.
Deactivating
The parking aid is deactivated by removing the reverse gear.
B1Z-0042HB1Z-0042H
Fig. 118 Parking aid:
Detection range of rear
sensors
AA
AB
NKO B5 20.book Page 104 Friday, March 2, 2007 1:46 PM
Page 106 of 259
 Owners Manual Starting-off and Driving105
Using the systemSafetyDriving TipsGeneral MaintenanceBreakdown assistanceTechnical Data
WARNING
•The parking aid is not a substitute fo r the driver paying proper attenti")
Starting-off and Driving105
Using the systemSafetyDriving TipsGeneral MaintenanceBreakdown assistanceTechnical Data
WARNING
•The parking aid is not a substitute fo r the driver paying proper attention
and it is always the driver's responsibility to take care when parking the
vehicle or carrying out similar manoeuvres.
•You should therefore satisfy yourself, before reversing, that there is no
small obstacle, such as a rock, thin po st, trailer drawbar etc., behind your
vehicle. Such an obstacle might not be within the range detected by the
sensors.
Note
•The parking aid does not operate if you are towing a trailer (applies to models
which feature a factory-fitted towing device*).
•If a warning signal sounds for about 3 se conds after switching the ignition on
and engaging reverse gear, and there is no obstacle close to your car, this indicates
a system fault. Have the fault rectified by a specialist workshop.
•The sensors must be kept clean and free of ice to enable the parking aid to
operate properly.
Front and rear parking aid*
The parking aid provides a warning of obstacles in front and behind
the vehicle.
The audible parking aid determines the dist ance between the front or rear bumper
and an obstacle with the aid of ultrasound sensors. The sensors are integrated in the
front and rear bumper. The signal tones for the front parking aid sound lower than
for the rear parking aid.
Range of sensors
The distance warning begins at a distance of about 60 cm from the obstacle in front
of the vehicle (area ⇒fig. 120 ) and about 160 cm from the obstacle behind the
vehicle (area ⇒page 104, fig. 118 ). The interval between the warning signals
becomes shorter as the clearance is reduced.
A continuous tone sounds from a cleara nce of just 30 cm (Bereich ) - danger
area. From this moment on do not continue driving in the selected direction or
the direction from where the obstacle is reported!
Activating
The parking aid is activated when the reverse gear is engaged and the ignition is
turned on or by pressing the button ⇒fig. 119 - the symbol
lights up in the
button. The activation is confirmed by a brief acknowledgement signal.
Deactivating
The parking aid is deactivated after pressing the button
⇒ fig. 119 or at a speed
of more than 15 km/h - the symbol in the button is no longer illuminated.
B1Z-0042HB1Z-0042HFig. 119 Activating the
parking aid
B1Z-0042HB1Z-0042H
Fig. 120 Parking aid:
Detection range of the
front sensors
AAAA
AB
NKO B5 20.book Page 105 Friday, March 2, 2007 1:46 PM
Page 107 of 259
 Owners Manual Starting-off and Driving
106
WARNING
•The parking aid is not a substitute fo r the driver paying proper attention
and it is always the drivers responsibility to take care when reversing the
vehic")
Starting-off and Driving
106
WARNING
•The parking aid is not a substitute fo r the driver paying proper attention
and it is always the driver's responsibility to take care when reversing the
vehicle or carrying out similar manoeuvres.
•You should therefore satisfy yourself, before reversing, that there is no
small obstacle, such as a rock, thin post, trailer drawbar etc., in front or
behind your vehicle. Such an obstacle might not be within the range
detected by the sensors.
Note
•Only the front parking aid operates if yo u are towing a trailer (applies only to
models which feature a factor y-fitted towing device*).
•If a warning signal sounds for about 3 seconds after activating the system and
there is no obstacle close to your car, th is indicates a system fault. The fault is
confirmed additionally when the symbol
flashes in the button ⇒page 105,
fig. 119 . Have the fault rectified by a specialist workshop.
•The sensors must be kept clean and free of ice to enable the parking aid to
operate properly.
Cruise control system (CCS)*
Introduction
The cruise control system (CCS) maintains a constant speed, more than 30 km/h (20
mph), once it has been set, without you having to depress th e accelerator pedal.
This is only possible within the range which is permitted by the power output and
braking power of the engine. The cruise control system makes it possible - particu-
larly on long journeys - for you to rest your “accelerator foot”.
WARNING
•The cruise control system must not, for safety reasons, be used in dense
traffic or on unfavourable road surfaces (such as icy roads, slippery roads or
loose chippings) - risk of accident!
•In order to prevent unintentional use of the cruise control system, always
switch off the system after use.
Note
•Models fitted with a manual gearbox: Always depress the clutch pedal if you
switch on the cruise control system when the gearbox is in Neutral. Otherwise the
engine can rev up unintentionally.
•The cruise control system is not able to maintain a constant speed when driving
on steep downhill sections. The weight of the vehicle increases the speed at which
it travels. One should shift down in good time to a lower gear or slow the vehicle
down by applying the foot brake.
•It is not possible on vehicl es fitted with an automatic gearbox to switch on the
cruise control system if the selector lever is in the position P, N , R or 2.
Storing a speed
– Move the slide switch ⇒fig. 121 into the ON position.
B1Z-0042HB1Z-0042H
Fig. 121 Operating lever:
Rocker button and slide
switch on the cruise
control system
AA
NKO B5 20.book Page 106 Friday, March 2, 2007 1:46 PM
Page 108 of 259
 Owners Manual Starting-off and Driving107
Using the systemSafetyDriving TipsGeneral MaintenanceBreakdown assistanceTechnical Data
– After the desired speed has been reached, press the rocker button
into the S")
Starting-off and Driving107
Using the systemSafetyDriving TipsGeneral MaintenanceBreakdown assistanceTechnical Data
– After the desired speed has been reached, press the rocker button
into the SET position.
After you have pressed press rocker button into the SET position, the speed you
have just selected is maintained at a constant speed without having to depress the
accelerator.
Yo u c a n increase the speed by depressi ng the accelerator. Releasing the acceler-
ator will cause the speed to drop again to the set speed.
This does not apply, however, if you drive at a speed which is more than 10 km/h
higher than the set speed for a period of mo re than 5 minutes. The stored speed will
be cancelled in the memory. You then have to re-store the desired speed.
One can reduce the speed in the usual manner. The system is switched off tempo-
rarily by actuating the brake or clutch pedal ⇒page 107.
WARNING
First ensure that it is not too high for the traffic conditions which exist at that
moment before resuming the stored speed.
Changing a stored speed
You can also change the speed of the vehicle without depressing the
accelerator.
Fa s t e r
–You can increase the stored speed without depressing the acceler-
ator, by pressing the rocker button ⇒page 106, fig. 121 into the
RES position.
– The speed of the car will increase continuously if you hold the rocker
button pressed in the RES position. Once the car has reached the
desired speed, release the rocker button. The set speed is then stored
in the memory. Slower
–You can
decrease the stored speed by pressing the rocker button
in the SET position.
– Holding down the rocker button pressed in the SET position will cause
the speed of the vehicle to reduce continuously. Once the car has
reached the desired speed, release the rocker button. The set speed is
then stored in the memory.
– If you release the rocker button when the car is travelling at a speed of
less than 30 km/h, the speed is not stored, the memory is erased. It is
then necessary to again store the sp eed with the rocker button in
the position SET
after an increase in speed of the vehicle to more
than 30 km/h.
Switching off the cruise control system temporarily
–You can switch off the cruise control system temporarily by
depressing the brake pedal or clutch pedal, on models with auto-
matic gearbox and only with brake pedal.
– You can likewise switch off the cruise control system by pushing the switch ⇒page 106, fig. 121 to the right into the intermediate posi-
tion before the position OFF. The slide switch then moves back auto-
matically into the ON position.
The set speed remains stored in the memory.
The Resumption of the stored speed is achieved by releasing the brake or clutch
pedal, on vehicles fitted with automatic gearbox only after releasing the brake pedal
and after shortly pressing the rocker button ⇒page 106, fig. 121 into the posi-
tion RES.
AB
AB
AB
AB
AB
AA
AB
NKO B5 20.book Page 107 Friday, March 2, 2007 1:46 PM
Page 109 of 259
Starting-off and Driving
108
WARNING
First ensure that it is not too high for the traffic conditions which exist at that
moment before resuming the stored speed.
Switching off the cruise control system completely
– Move the slide switch ⇒page 106, fig. 121 up to the stop into the
OFF position.AA
NKO B5 20.book Page 108 Friday, March 2, 2007 1:46 PM
Page 110 of 259
 Owners Manual Automatic gearbox*109
Using the systemSafetyDriving TipsGeneral MaintenanceBreakdown assistanceTechnical Data
Automatic gearbox*
5-speed automatic gearbox
Information for driving with an automatic gea")
Automatic gearbox*109
Using the systemSafetyDriving TipsGeneral MaintenanceBreakdown assistanceTechnical Data
Automatic gearbox*
5-speed automatic gearbox
Information for driving with an automatic gearbox
Shifting up and down through the gears is performed automatically.
You can also, however, switch the gearbox over into the Tiptronic mode.
This mode makes it possible for you to also shift gears manually
⇒ page 113.
Starting-off and Driving
– Depress the brake pedal and hold it depressed.
– Press the Shiftlock button (button in handle of the selector lever),
move the selector lever into the desired position, e.g. D ⇒ page 110,
and then release the Shiftlock button.
– Wait a moment until the gearbox ha s shifted (a slight engagement
nudge can be felt).
– Release the brake pedal and depress the accelerator ⇒.
Stopping for a short time
– The selector lever position N does not have to be selected when stop-
p i n g j u s t fo r a s h o r t t im e, s u c h a s a t a cross roads. It is sufficient to hold
the vehicle stationary using the foot brake. The engine can, however,
be allowed just to idle.
Parking
– Depress the brake pedal and hold it depressed.
– Apply the handbrake firmly. – Press and Shiftlock button in the
selector lever, move the selector
lever to P and then release the Shiftlock button.
The engine can only be started when the selector lever is in position P or N
⇒ page 101.
It is sufficient to engage selector lever position P when parking on a flat surface.
When parking on a slope you should first apply the handbrake firmly and then
move the selector lever into position P. This is to ensure that there is no excessive
pressure acting on the lock mechanism and that it is easier to subsequently move
the selector lever out of position P.
If the selector lever position N is selected by accident while driving it is first neces-
sary to release pressure on the accelerato r pedal and wait for idling speed of the
engine to be reached before engaging a drive position in the selector lever.
WARNING
•Do not depress the accelerator when changing the position of the
selector lever if the car is stationary an d the engine is running - risk of acci-
dent!
•Never move the selector lever into position R or P when driving - risk of
an accident!
•When the engine is running and the ve hicle is stationary, it is necessary
to hold the car with the brake pedal in all the positions of the selector lever
(except P and N) since the power transmission is never completely inter-
rupted, also not when the engine is idling - the vehicle "creeps".
NKO B5 20.book Page 109 Friday, March 2, 2007 1:46 PM
Page 111 of 259
 Owners Manual Automatic gearbox*
110
Selector lever positions
The selector lever position you have engaged is shown in the information display
of the instrument cluster with the co rresponding gear symbol highligh")
Automatic gearbox*
110
Selector lever positions
The selector lever position you have engaged is shown in the information display
of the instrument cluster with the co rresponding gear symbol highlighted
⇒ fig. 123 .
P - Parklock
The driven wheels are locked mechanically in this position.
The Parklock must only be engaged when the vehicle is stationary ⇒.
If you wish to move the select or lever into or out of this position, you must press the
Shiftlock button in the handle of the select or lever and at the same time depress the
brake pedal. R - Reverse
Reverse gear must only be engaged when
the vehicle is stationary and the engine
idling ⇒ .
The brake pedal must be depressed and at the same time the Shiftlock must be
pressed, if you wish to obtain the selector lever positions R, P or N.
The reversing lights come on when the selector lever is moved into position R when
the ignition is also on.
N - Neutral
The transmission is in Neutral in this position.
The brake pedal must be depressed (if the lever is in its position for longer than 2
seconds) in order to move the selector lever out of the position N into another posi-
tion, with the ignition switched on, on a vehicle travelling at less than 5 km/h or on
a stationary vehicle.
D - Drive, position for driving forward
When the selector lever is in this position, the forward gears are shifted up and
down automatically in line with engine load, vehicle speed and the dynamic shift
programme (DSP).
You must depress the brake pedal ⇒ if you wish to move the selector lever into
position D from N when the vehicle is travelling at less than 5 km/h or is stationary.
In certain circumstances (e.g. when driving in mountainous regions or when towing
a trailer) it may be beneficial to select the manual shift programme ⇒page 113 for
a short time in order to adapt the gearbox ratios manually to the driving situations.
4 - Position when driving in hilly areas
We recommend this position if driving with the selector lever in position D would,
in certain circumstances, result in the gearbox frequently shifting between fourth
and fifth gears.
The gearbox then shifts up and down automa tically into the first, second, third and
fourth gears in line with engine load and vehicle speed. Fifth gear is not engaged in
this case. This makes it possible to expl oit greater engine braking power when the
accelerator is released ⇒.
Fig. 122 Selector lever
Fig. 123 Information
display: Selector lever
positions
NKO B5 20.book Page 110 Friday, March 2, 2007 1:46 PM
Page 112 of 259
 Owners Manual Automatic gearbox*111
Using the systemSafetyDriving TipsGeneral MaintenanceBreakdown assistanceTechnical Data
The Shiftlock on the selector lever grip must be pressed when moving out of posi-
tion
4")
Automatic gearbox*111
Using the systemSafetyDriving TipsGeneral MaintenanceBreakdown assistanceTechnical Data
The Shiftlock on the selector lever grip must be pressed when moving out of posi-
tion
4 into position D.
3 - Position when driving in mountainous regions
This position of the selector lever is suitable for long sloping sections.
The gearbox shifts up and down automatically into first, second and third gear in
line with engine load and vehicle speed. The fourth and fifth gears remain locked
out in order to avoid unnecess ary gear changes. Enhanced engine braking power is
thus available.
The Shiftlock on the selector lever grip must not be pressed when moving out of
position 3 into position 4.
2 - Position for extreme mountainous sections
This position of selector lever is suit able for very steep downhill sections.
T h e g e a r b o x s h i f t s u p a n d d o w n a u to m a ti c a l l y i n t o f i rs t a n d s e c o n d g e a r i n l i n e w i th
engine load and vehicle speed. Third, fourth and fifth gears are not engaged. This
position offers you the maximum possible engine braking power.
The Shiftlock on the selector lever grip must be pressed when moving out of posi-
tion 2 into position 3.
The cruise control system is locked in position 2.
WARNING
•Never move the selector lever into position R or P when driving - risk of
an accident!
•When the engine is running and the vehicle is stationary, it is necessary
to hold the car with the brake pedal in all the positions of the selector lever
(except P and N) since the power transmission is never completely inter-
rupted, also not when the engine is idling - the vehicle "creeps".
•You must on no account unintentionally operate the throttle (e.g. by
hand from the engine compartment) if a drive position is engaged when the
car is stationary. The vehicle would ot herwise immediately start off - also
when the handbrake is firmly applied - risk of an accident!
•You must move the selector lever into position P and firmly apply the
handbrake first before you or any othe r person opens the bonnet and starts
working on the engine when it is running - risk of accident! It is also essential
to observe all warnings ⇒page 185, “Working in the engine compartment”.
Note
•Take your foot off the accelerator if you inadvertently shift into N when driving
and wait until the engine speed has dropped to the idling speed range before
shifting into D.
•If you shift gear manually it is possible to select positions 4, 3 and 2, but the
automatic gearbox will not shift down until there is no risk of the engine
overrevving.
Selector lever lock
Automatic selector lever lock
With the ignition on, the selector lever is locked when it is in the positions P and N .
You must depress the brake pedal first and press the Shiftlock button at the same
time in order to move the selector lever out of these positions. The following will be
displayed in the information display*:
"Apply foot brake when selecting gear with vehicle stationary"
Symbol
also lights up in the selector lever cover until the brake pedal is actuated.
A time delay element ensures that the sele ctor lever is not blocked when rapidly
switching over the position N (e.g. from R to D). This does, for example, allow one
to seesaw out a stuck vehicle. The selector lever lock will click into place if the lever
is in the N position for more than 2 seconds without the brake pedal being pressed.
The selector lever lock is only active if th e vehicle is stationary or moving at speed
of less than 5 km/h. The lock is swit ched off automatically into position N when the
car is travelling at a higher speed.
WARNING (continued)
NKO B5 20.book Page 111 Friday, March 2, 2007 1:46 PM
 1
1 2
2 3
3 4
4 5
5 6
6 7
7 8
8 9
9 10
10 11
11 12
12 13
13 14
14 15
15 16
16 17
17 18
18 19
19 20
20 21
21 22
22 23
23 24
24 25
25 26
26 27
27 28
28 29
29 30
30 31
31 32
32 33
33 34
34 35
35 36
36 37
37 38
38 39
39 40
40 41
41 42
42 43
43 44
44 45
45 46
46 47
47 48
48 49
49 50
50 51
51 52
52 53
53 54
54 55
55 56
56 57
57 58
58 59
59 60
60 61
61 62
62 63
63 64
64 65
65 66
66 67
67 68
68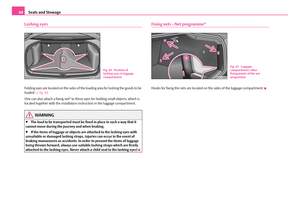 69
69 70
70 71
71 72
72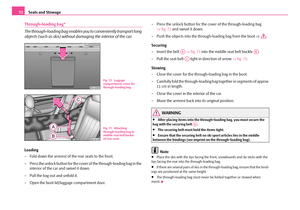 73
73 74
74 75
75 76
76 77
77 78
78 79
79 80
80 81
81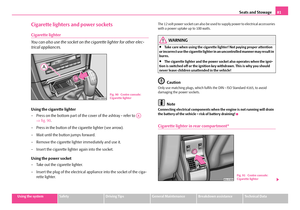 82
82 83
83 84
84 85
85 86
86 87
87 88
88 89
89 90
90 91
91 92
92 93
93 94
94 95
95 96
96 97
97 98
98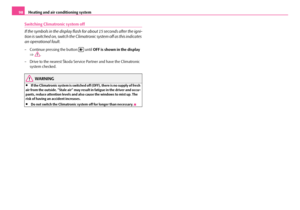 99
99 100
100 101
101 102
102 103
103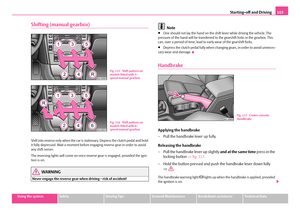 104
104 105
105 106
106 107
107 108
108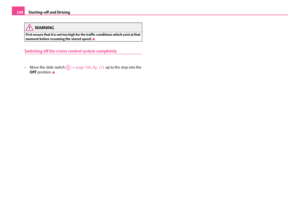 109
109 110
110 111
111 112
112 113
113 114
114 115
115 116
116 117
117 118
118 119
119 120
120 121
121 122
122 123
123 124
124 125
125 126
126 127
127 128
128 129
129 130
130 131
131 132
132 133
133 134
134 135
135 136
136 137
137 138
138 139
139 140
140 141
141 142
142 143
143 144
144 145
145 146
146 147
147 148
148 149
149 150
150 151
151 152
152 153
153 154
154 155
155 156
156 157
157 158
158 159
159 160
160 161
161 162
162 163
163 164
164 165
165 166
166 167
167 168
168 169
169 170
170 171
171 172
172 173
173 174
174 175
175 176
176 177
177 178
178 179
179 180
180 181
181 182
182 183
183 184
184 185
185 186
186 187
187 188
188 189
189 190
190 191
191 192
192 193
193 194
194 195
195 196
196 197
197 198
198 199
199 200
200 201
201 202
202 203
203 204
204 205
205 206
206 207
207 208
208 209
209 210
210 211
211 212
212 213
213 214
214 215
215 216
216 217
217 218
218 219
219 220
220 221
221 222
222 223
223 224
224 225
225 226
226 227
227 228
228 229
229 230
230 231
231 232
232 233
233 234
234 235
235 236
236 237
237 238
238 239
239 240
240 241
241 242
242 243
243 244
244 245
245 246
246 247
247 248
248 249
249 250
250 251
251 252
252 253
253 254
254 255
255 256
256 257
257 258
258 Owners Manual Starting-off and Driving
108
WARNING
First ensure that it is not too high for the traffic conditions which exist at that
moment before resuming the stored speed.
Switching off the cruise control syst")