Page 17 of 259

Instruments and Indicator/Warning Lights
16
Single-trip memory (memory 1)
The single-trip memory collates the driving information from the moment the igni-
tion is switched on until it is switched off. New data will also flow into the calcula-
tion of the current driving information if the trip is continued within 2 hours after
switching off the ignition. The memory will be is automatically erased, on the other
hand, if the trip is interrupted for more than 2 hours.
Total-trip memory (memory 2)
The total distance driven memory gathers data from any number of individual jour-
neys up to a total of 99 hours and 59 minutes driving or 9.999 kilometres driven.
The memory is deleted when either of these limits is reached and the calculation
starts from anew.
The total-trip memory will not, contrary to the single-trip memory, be deleted after
a period of interruption of driving of 2 hours.
Note
All information in the memory is eras ed if the battery of the vehicle is
disconnected.
Using the system
The rocker switch and the button are located in the grip of the
window wiper lever ⇒fig. 8 . Selecting the memory
– Repeated short-term pressing of th
e button allows one to select
the individual memories.
Selecting the functions
– Press the rocker switch up or do wn. This will cause the individual
functions of the multi-functional indicator to appear in the display
one after the other.
Setting function to zero
– Select the memory you want.
– Press button for more than 1 second.
The following readouts of the selected memory will be set to zero by button :
•average fuel consumption,
•distance driven,
•average speed,
•Driving time.
You can only operate the multi-functional indicator when the ignition is switched
on. After the ignition is switched on, the fu nction displayed is the one which you last
selected before switching off the ignition.
The outside temperature indicator will appear with a snowflake symbol and a
warning signal sounds* when the outside temperature lies between +5°C and -5°C.
The symbol warns the driver of the possible danger of ice on the road. After the
rocker switch is pressed, the function displays the one which you last selected
before switching off the ignition.
Outside temperature
The outside temperature appears in the display when the ignition is switched on.
The correct outside temperature will be indi cated with a delay of 5 minutes. If the
vehicle is stationary (or driven at a very low speed) the temperature indicated may
Fig. 8 Multi-functional
indicator: Control
elements
AAAB
AB
AA
AB
AB
AA
NKO B5 20.book Page 16 Friday, March 2, 2007 1:46 PM
Page 18 of 259

Instruments and Indicator/Warning Lights17
Using the systemSafetyDriving TipsGeneral MaintenanceBreakdown assistanceTechnical Data
be slightly higher than the actual outside temperature because of heat radiated by
the engine.
The outside temperature indicator will appear with a snowflake symbol (warning
signal for ice on the road) and a warning
signal sounds* when the outside temper-
ature lies between +5°C and -5°C.
WARNING
Do not only rely upon the information given on the outside temperature
display that there is no ice on the road. Please note that black ice may also be
present on the road surface even at temperatures around +5°C - warning,
drive with care!
Note
The outside temperature is not indicating when showing navigation data (guidance
to the destination). It must be called up over the menu (valid for vehicles which
have a navigation and information display).
Range
The estimated range in kilometres is shown on the display. It indicates the distance
you can still drive with your vehicle based on the present level of fuel in the tank for
the same style of driving. The readout is shown in steps of 5 km.
The fuel consumption for the last 50 km is taken as a basis for calculating the range.
If you drive in a more economical manner from this moment on, the range will be
increased accordingly.
You first drive 50 km if the readout is reset (after disconnecting the battery) before
a new readout for the range is displayed.
Fuel - present consumption
The current fuel consumption level is shown in the display in litres/100 km. This
information can help you to adapt your styl e of driving to the fuel consumption you
wish to achieve.
The display appears in litres/hour if the vehicle is stationary or driving at a low
speed.
Average fuel consumption
The average fuel consumption since the me mory was last erased is shown in the
display in litres/100 km ⇒page 15. This information can help you to adapt your
style of driving to the fuel co nsumption you wish to achieve.
If you wish to determine the average fuel consumption over a cert ain period of time
you must first erase the memory at the start of the new measurement using the
button ⇒page 16, fig. 8 . A zero appears in the display for the first 300 m you
drive after erasing the memory.
The indicated value will be updated every 30 metres while you are driving.
Note
The amount of fuel consum ed will not be indicated.
Driving time
The driving time which has elapsed since the memory was last erased, appears in
the display ⇒page 15. If you wish to calculate th e driving time from a particular
time of day you must first erase the memory at this moment in time by pressing the
button ⇒page 16, fig. 8 .
The maximum time indicated in both switch positions is 99 hours and 59 minutes.
The indicator is set back to nu ll if this period is exceeded.
AB
AB
NKO B5 20.book Page 17 Friday, March 2, 2007 1:46 PM
Page 19 of 259

Instruments and Indicator/Warning Lights
18
Distance driven
The distance driven since the memory was last erased appears in the display
⇒ page 15. If you wish to calculate the distance driven from a particular time of day
you must first erase the memory at this moment in time by pressing the button
⇒ page 16, fig. 8 .
The maximum distance indicated in both switch positions is 9 999 km. The indicator
is set back to null if this period is exceeded.
Average speed
The average speed since the memory was last erased is shown in the display in
km/h ⇒page 15. If you wish to determine the average speed over a certain period
of time you must first erase the memory at the start of the new measurement using
the button ⇒page 16, fig. 8 .
A zero appears in the display for the first 100 m you drive after erasing the
memory.
Information display*
Introduction
The information display provides you with information in a convenient way
concerning the current operating state of your vehicle . The information system
also provides you with data (depending on the equipment installed in the vehicle)
relating to the radio, multi-functional in dicator, navigation system and automatic
gearbox.
Certain functions and operating conditio ns are always being checked on the
vehicle when the ignition is switched on and also while driving.
Functional faults, if required repair work and other information are indicated by red
symbols ⇒page 21 and yellow symbols ⇒ page 21.
Lighting up of these symbols is combin ed with an acoustic warning signal.
Information and texts giving warnings are also shown in the display ⇒page 22.
The display of text is possible in the following languages: Czech, English, German, French, Italian, Spanish, Portuguese.
You can have the relevant langua ge set by a specialist garage.
The following information can be shown in the display (depending on the equip-
ment installed on the vehicle):
On models fitted with an automatic gearbox, the information in the display appears
only after a drive position is engaged.
AB
AB
Fig. 9 Instrument
cluster: Information
display
Menu⇒ page 19
Door, luggage compartment door and bonnet ajar
warning⇒page 19
Radio display⇒page 20
Information from the telephone⇒page 116
Service Interval Display⇒ page 14
Selector lever position for an automatic gearbox⇒page 110
NKO B5 20.book Page 18 Friday, March 2, 2007 1:46 PM
Page 20 of 259

Instruments and Indicator/Warning Lights19
Using the systemSafetyDriving TipsGeneral MaintenanceBreakdown assistanceTechnical Data
Menu
– You can activate the menu by pressing the rocker switch ⇒fig. 11
for more than 1 second.
– You can select the menu through the rocker switch . The selected information is displayed after pressing the button for a short time
or after releasing the rocker sw itch (after about 4 seconds).
You can select the following information (depending on the equipment installed on
the vehicle): After selecting the menu
DISPLAY OFF the display is switched off. Press rocker
switch for at least 1 second to switch the display on again.
The Information CAR STATUSflashes in the menu if there is something which is not
in proper order on the vehicle (e.g. warning of a low fuel level). The first warning will
be displayed after switching over to CAR STATUS. You can then display other oper-
ating conditions afterwards using the sw itch-over function (such as water level
low).
Door, luggage compartment door and bonnet ajar warning
The door, luggage compartment door and bonnet ajar warning lights up when at
least one of the three items door, luggage compartment or bonnet are not closed
when the ignition is turned on. The symbol indicates which door is still open or
whether the luggage compartment door or bonnet is not closed ⇒ fig. 12 .
The symbol goes out as soon as the door s, luggage compartment door and bonnet
are completely closed.
Fig. 10 Information
display: Menu
Fig. 11 Information
display: Control
elements
AA
AA
AB
AA
TRIP COMPUTER (AUTO COMPUTER)⇒ page 15
CAR STATUS⇒page 20
DISPLAY OFF
NAVIGATION⇒page 22
AA
Fig. 12 Information
display: Door warning
NKO B5 20.book Page 19 Friday, March 2, 2007 1:46 PM
Page 21 of 259

Instruments and Indicator/Warning Lights
20
As an additional warning signal, a 3 time peep sounds if the car is driven at a speed
of more than 6km/hour an d if the door is open.
Radio display
These displays appear in addition to the normal information in the radio display.
Auto Check Control
Car state
The Auto Check Control carries out a check of certain functions and vehicle compo-
nents. The check is performed constantly wh en the ignition is switched on, both
when the vehicle is stationary, as well as when driving.
Operational faults, urgent repairs, service work or other information appear in the
display of the instrument cluster. The displays are shown with a red or yellow light
symbol depending on the priority of the message.
The red symbols indicate danger (priority 1) while the yellow symbols indicate a
warning (priortity 2). Information for the driver may also appear in addition to the
symbols ⇒page 22. Investigate the displayed faults as soon as possible. If several operational faults exist
at the same time, the symbols will appear
one after the other and are each visible
for about 2 seconds.
The error messages are faded out after 10 seconds or by actuating the rocker switch
⇒ page 19, fig. 11 and are stored under the information CAR STATUS.
There is at least one error message to be read when the term CAR STATUS is
flashing in the main menu. The display will show STATUS 1/2 (for example) if a
number of error messages are present. This display indicates that the first of a total
of two error messages should be displayed.
Actuate the rocker switch , to call up the individual error messages.
If a fault occurs, a warning signal will also sound in addition to the symbol and text
in the display:
•Priority 1 - three warning signals
•Priority 2 - one warning signal
Operational check of the automatic gearbox
When the ignition is switched on, the Auto Check Control automatically carries out
an operational check. The following text will appear first if the selector lever is the
position P or N:
"APPLY FOOT BRAKE WHEN SELECTING GEAR WITH VEHICLE
STATIONARY." (Apply foot brake when selecting a gear while the vehicle is
stationary).
You must depress the brake pedal first and press the Shiftlock button at the same
time in order to move the selector lever out of these positions.
The text will disappear once you select a drive position ( R, D etc.), and the Auto
Check Control function is displayed.
If the Auto Check Control detects faults, these will be displayed about 15 seconds
after starting the engine in place of the text shown above. A warning signal sounds
at the same time.
Fig. 13 Information
display: Radio display
AA
AA
NKO B5 20.book Page 20 Friday, March 2, 2007 1:46 PM
Page 22 of 259

Instruments and Indicator/Warning Lights21
Using the systemSafetyDriving TipsGeneral MaintenanceBreakdown assistanceTechnical Data
Red symbols
A red symbol signals danger.
Proceed as follows if a red symbol is displayed:
– Stop the vehicle.
– Switch the engine off.
– Investigate the function indicated.
– Obtain professional assistance.
Meaning of the red symbols:
Three successive warning signals will sound if a red symbol appears. The symbol
continues flashing until the fault is rectified. If several operational faults of priority 1 exist, the symbols appear one after the
other and are each illumi
nated for about 2 seconds.
Yellow symbols
A yellow symbol signals a warning.
The meaning of the yellow symbols:
One warning signal will sound if a yellow symbol appears.
Faults in the brake surface⇒page 29
Coolant level too low/coolant temperature
too high⇒page 26
Engine oil pressure too low⇒page 27
Fig. 14 Information
display: Oil pressure is
low
Fuel level low⇒page 27
Check engine oil level, engine oil sensor faulty⇒page 27
Brake pad worn⇒page 26
Washer fluid level low⇒page 28
Light bulb defect⇒page 28
Light bulb in the brake light defect⇒page 28
Fig. 15 Information
display: Fuel level low
NKO B5 20.book Page 21 Friday, March 2, 2007 1:46 PM
Page 23 of 259
Instruments and Indicator/Warning Lights
22
If several operational faults of priority 2 exist, the symbols appear one after the
other and are each illuminated for about 2 seconds.
Check the relevant function as soon as possible.Navigation system*
The controls for the navigation system, radi o, CD player are located in the centre
console on both sides of the monitor screen. Navigation data is also shown in the
information display of the instrument cluster.
Information and warning texts are displayed preferentially when the navigation
system is switched on.
Operation of the navigation system is described in separate operating instructions
to be found in the on-board literature.
Warning lights
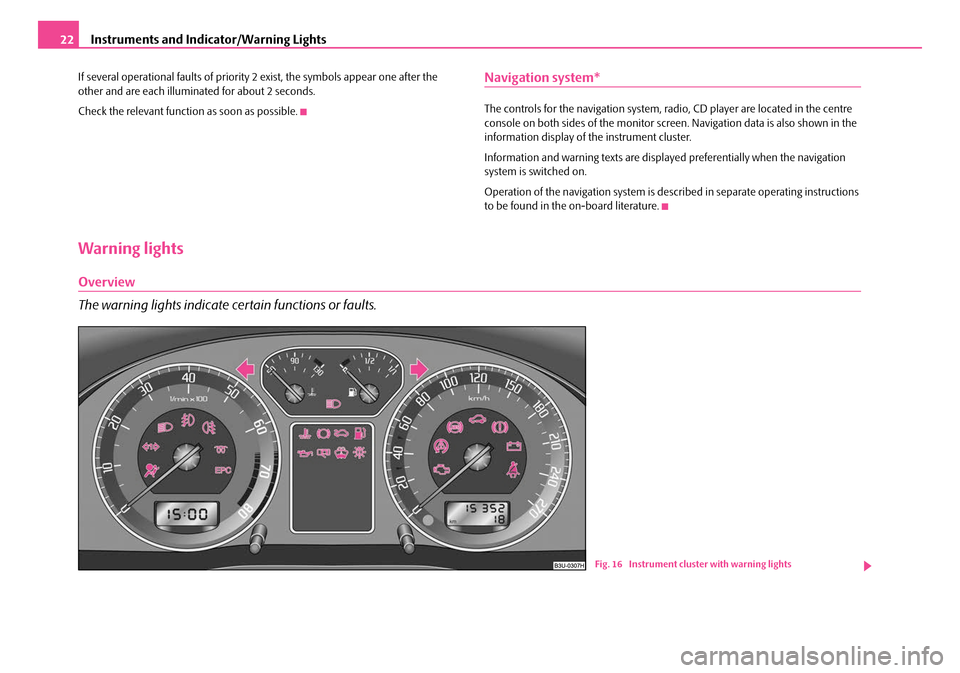
Overview
The warning lights indicate certain functions or faults.
Fig. 16 Instrument cluster with warning lights
NKO B5 20.book Page 22 Friday, March 2, 2007 1:46 PM
Page 24 of 259

Instruments and Indicator/Warning Lights23
Using the systemSafetyDriving TipsGeneral MaintenanceBreakdown assistanceTechnical Data
WARNING
•If you do not pay attention to the warning lights coming on and the corre-
sponding descriptions and warning notes, this may result in severe body
injuries or major vehicle damage.
•The engine compartment of your car is a hazardous area. There is a risk
of injuries, scalding, accidents and fire when working in the engine
compartment, e.g. inspecting and replenis hing oil and other fluids. It is also
essential to observe all warnings ⇒page 185.
Turn signal lights (to the left)⇒ page 24
Turn signal lights (to the right)⇒page 24
Main beam⇒page 24
Airbag system⇒page 24
Turn signal system for vehicles towing a trailer⇒page 24
Low beam⇒page 25
Fog lights⇒page 25
Rear fog light⇒page 25
EPC fault light (petrol engine)⇒page 25
Diesel particle filter (diesel engine)⇒page 25
Glow plug system (diesel engine)⇒page 26
Coolant temperature/coolant level⇒page 26
Brake pad wear⇒page 26
Bonnet⇒page 27
Fuel reserve⇒page 27
Engine oil⇒page 27
Open door⇒page 28
Fluid level in windshield washer system⇒page 28
Bulbs⇒page 28
Control system for exhaust⇒page 28
Electronic stability programme (ESP)*⇒page 28
Tra c t i o n c o n t r o l s y s t e m ( TC S ) *⇒page 28
Antilock brake system (ABS)⇒page 29
Electronic immobiliser⇒page 29
Brake system⇒page 29
Dynamo⇒page 30
Seat belt warning light⇒page 30
NKO B5 20.book Page 23 Friday, March 2, 2007 1:46 PM