2007 NISSAN TIIDA ABS
[x] Cancel search: ABSPage 4237 of 5883
![NISSAN TIIDA 2007 Service Repair Manual LU-30
< ON-VEHICLE REPAIR >[K9K]
OIL COOLER
OIL COOLER
Exploded ViewINFOID:0000000001381543
Removal and InstallationINFOID:0000000001381544
CAUTION:
Be careful not to get burned when the engine and NISSAN TIIDA 2007 Service Repair Manual LU-30
< ON-VEHICLE REPAIR >[K9K]
OIL COOLER
OIL COOLER
Exploded ViewINFOID:0000000001381543
Removal and InstallationINFOID:0000000001381544
CAUTION:
Be careful not to get burned when the engine and](/manual-img/5/57395/w960_57395-4236.png)
LU-30
< ON-VEHICLE REPAIR >[K9K]
OIL COOLER
OIL COOLER
Exploded ViewINFOID:0000000001381543
Removal and InstallationINFOID:0000000001381544
CAUTION:
Be careful not to get burned when the engine and engine oil are hot.
When removing, prepare a shop cloth to absorb any oil leakage or spillage.
Completely wipe off any oil that adhere to the engine and the vehicle.
REMOVAL
1. Remove engine undercover using power tool.
2. Drain engine coolant. Refer to CO-58, "
Draining".
CAUTION:
Perform when engine is cold.
3. Remove RH front wheel. Refer to WT-6, "
Rotation".
4. Remove RH fender protector. Refer to EXT-22, "
Removal and Installation".
5. Remove drive belt. Refer to EM-263, "
Removal and Installation".
6. Remove generator and position aside. Refer to CHG-43, "
Removal and Installation".
7. Remove A/C compressor and position aside. Refer to HA-35, "
Removal and Installation of Compressor -
K9K".
8. Remove oil filter and oil filter bracket. Refer to LU-28, "
Replacement".
1. Cylinder block 2. Water pipe 3. O-ring
4. O-ring 5. O-ring 6. Oil cooler
7. Connecting stud 8. O-ring 9. Oil filter bracket
10. Oil pressure switch 11. Oil filter 12. O-ring
13. Connecting bolt
A. To radiator lower hose B. To water pump
E1BIA0011GB
Page 4266 of 5883
MA-26
< ON-VEHICLE MAINTENANCE >
ENGINE MAINTENANCE (HR16DE)
AIR CLEANER FILTER : Removal and Installation
INFOID:0000000001730850
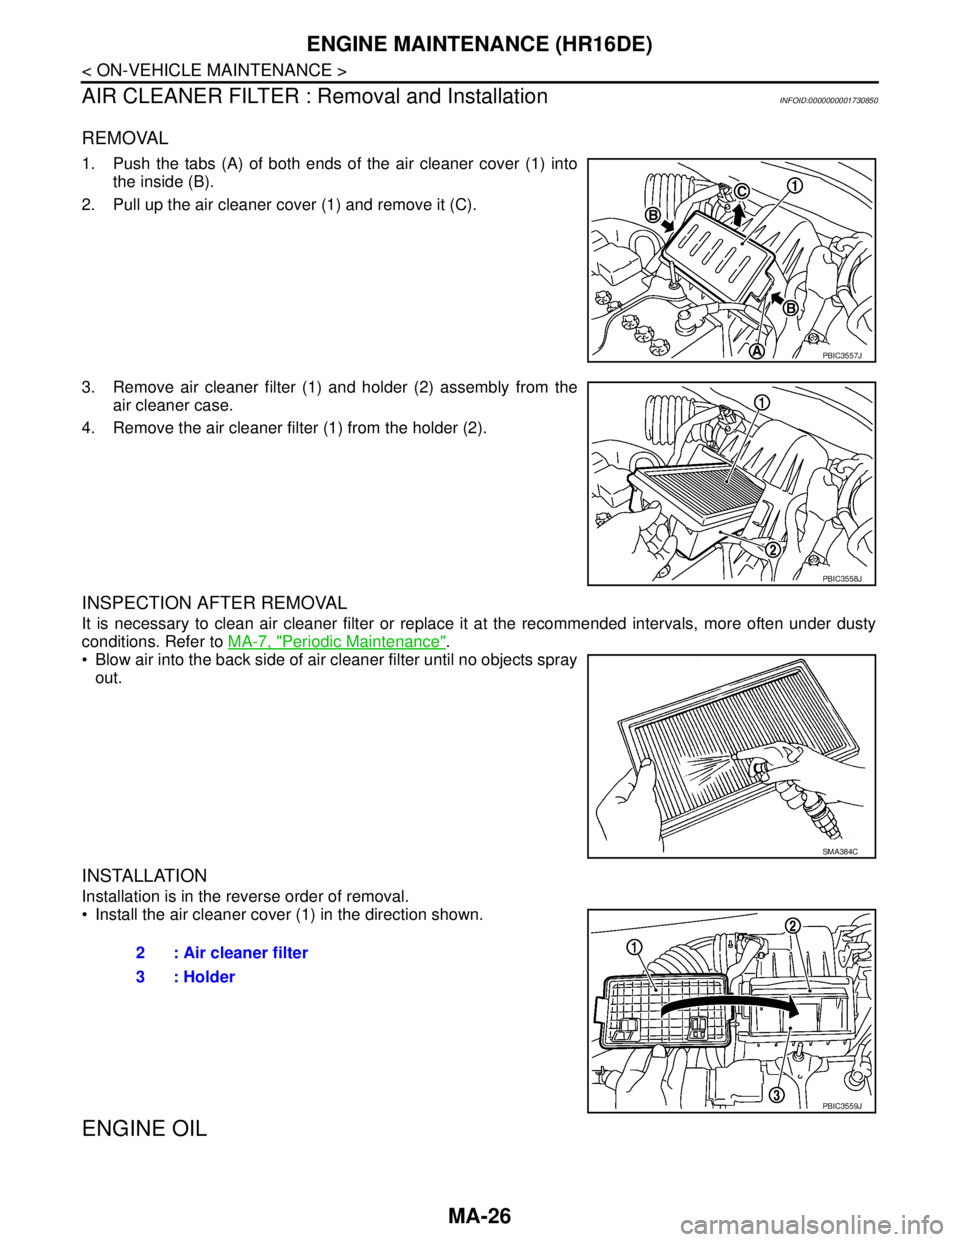
REMOVAL
1. Push the tabs (A) of both ends of the air cleaner cover (1) into
the inside (B).
2. Pull up the air cleaner cover (1) and remove it (C).
3. Remove air cleaner filter (1) and holder (2) assembly from the
air cleaner case.
4. Remove the air cleaner filter (1) from the holder (2).
INSPECTION AFTER REMOVAL
It is necessary to clean air cleaner filter or replace it at the recommended intervals, more often under dusty
conditions. Refer to MA-7, "
Periodic Maintenance".
Blow air into the back side of air cleaner filter until no objects spray
out.
INSTALLATION
Installation is in the reverse order of removal.
Install the air cleaner cover (1) in the direction shown.
ENGINE OIL
PBIC3557J
PBIC3558J
SMA384C
2 : Air cleaner filter
3 : Holder
PBIC3559J
Page 4267 of 5883
ENGINE MAINTENANCE (HR16DE)
MA-27
< ON-VEHICLE MAINTENANCE >
C
D
E
F
G
H
I
J
K
L
MB
MAN
OA
ENGINE OIL : DrainingINFOID:0000000001730852
WARNING:
Be careful not to get burned, as engine oil may be hot.
Prolonged and repeated contact with used engine oil may cause skin cancer. Try to avoid direct skin
contact with used engine oil. If skin contact is made, wash thoroughly with soap or hand cleaner as
soon as possible.
1. Warm up the engine, and check for engine oil leakage from engine components. Refer to LU-6, "
Inspec-
tion".
2. Stop the engine and wait for 10 minutes.
3. Loosen oil filler cap.
4. Remove drain plug and then drain engine oil.
ENGINE OIL : RefillingINFOID:0000000001730853
1. Install drain plug with new washer. Refer to EM-100, "Exploded View".
CAUTION:
Be sure to clean drain plug and install with new washer.
2. Refill with new engine oil.
Engine oil specification and viscosity: Refer to MA-19, "
Fluids and Lubricants".
CAUTION:
The refill capacity depends on the engine oil temperature and drain time. Use these specifica-
tions for reference only.
Always use oil level gauge to determine the proper amount of engine oil in the engine.
3. Warm up engine and check area around drain plug and oil filter for engine oil leakage.
4. Stop engine and wait for 10 minutes.
5. Check the engine oil level. Refer to LU-6, "
Inspection".
OIL FILTER
OIL FILTER : Removal and InstallationINFOID:0000000001730854
REMOVAL
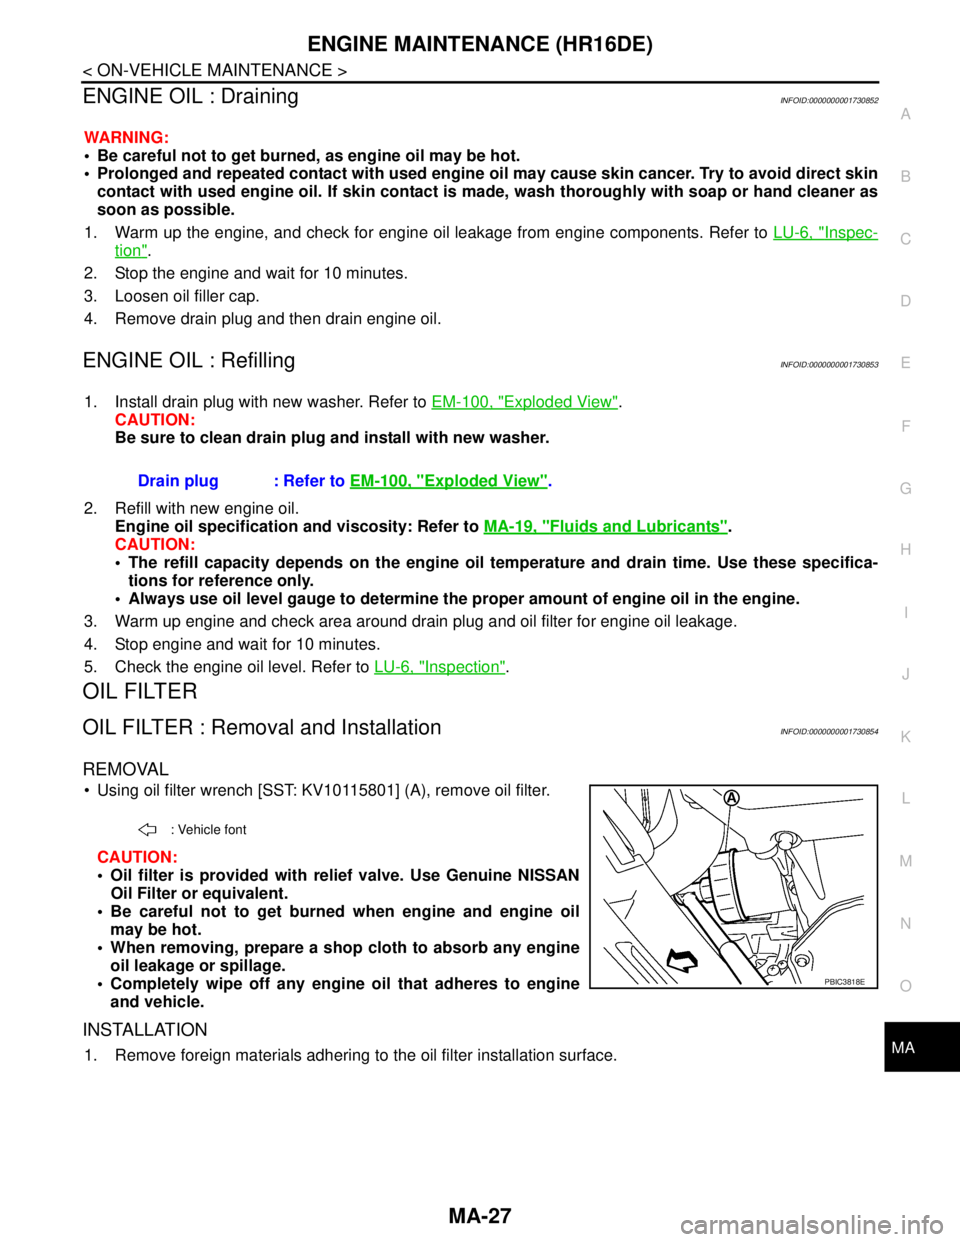
Using oil filter wrench [SST: KV10115801] (A), remove oil filter.
CAUTION:
Oil filter is provided with relief valve. Use Genuine NISSAN
Oil Filter or equivalent.
Be careful not to get burned when engine and engine oil
may be hot.
When removing, prepare a shop cloth to absorb any engine
oil leakage or spillage.
Completely wipe off any engine oil that adheres to engine
and vehicle.
INSTALLATION
1. Remove foreign materials adhering to the oil filter installation surface.Drain plug : Refer to EM-100, "
Exploded View".
: Vehicle font
PBIC3818E
Page 4275 of 5883
ENGINE MAINTENANCE (MR18DE)
MA-35
< ON-VEHICLE MAINTENANCE >
C
D
E
F
G
H
I
J
K
L
MB
MAN
OA
FUEL LINES : InspectionINFOID:0000000001277628
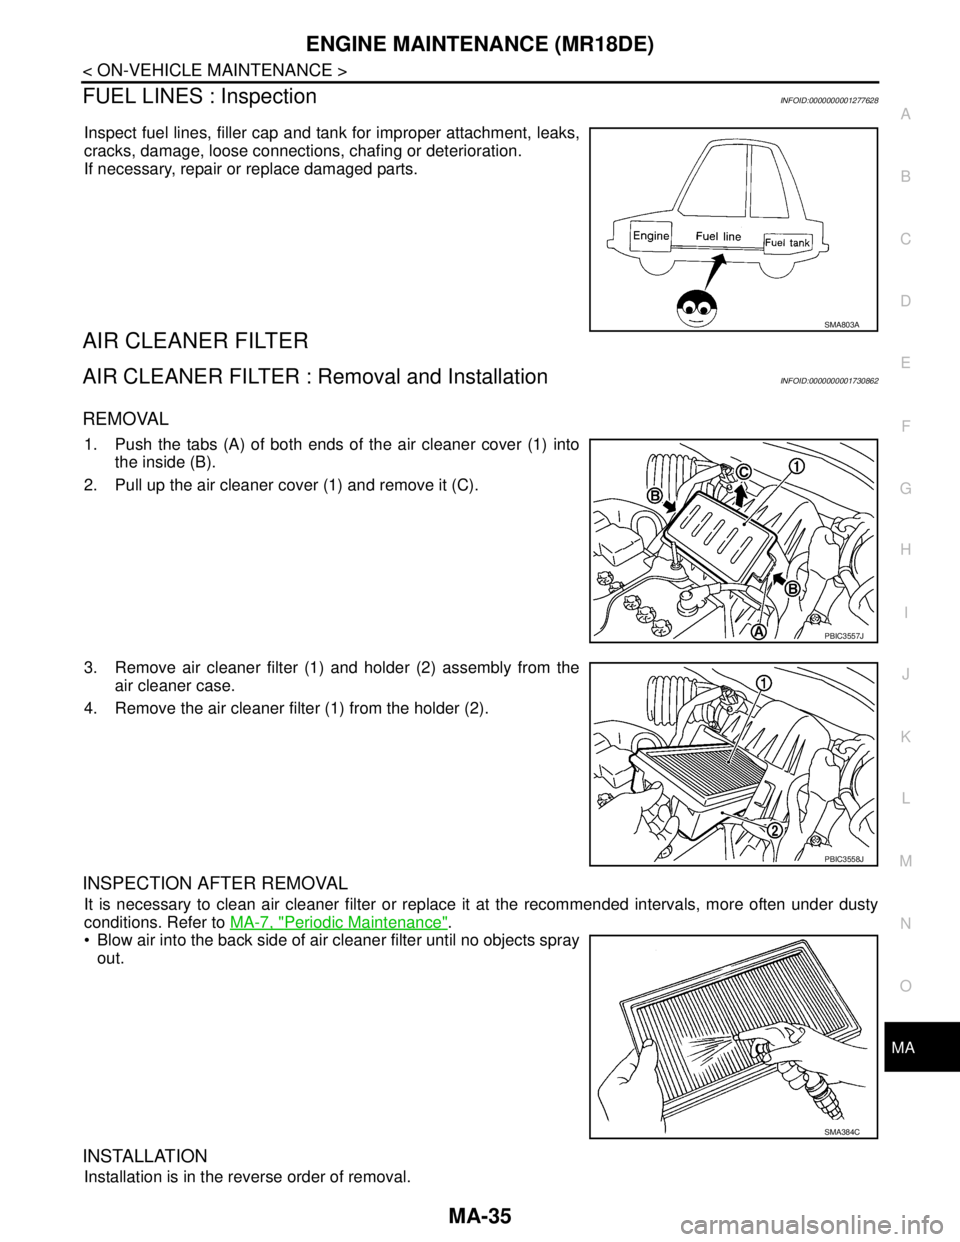
Inspect fuel lines, filler cap and tank for improper attachment, leaks,
cracks, damage, loose connections, chafing or deterioration.
If necessary, repair or replace damaged parts.
AIR CLEANER FILTER
AIR CLEANER FILTER : Removal and InstallationINFOID:0000000001730862
REMOVAL
1. Push the tabs (A) of both ends of the air cleaner cover (1) into
the inside (B).
2. Pull up the air cleaner cover (1) and remove it (C).
3. Remove air cleaner filter (1) and holder (2) assembly from the
air cleaner case.
4. Remove the air cleaner filter (1) from the holder (2).
INSPECTION AFTER REMOVAL
It is necessary to clean air cleaner filter or replace it at the recommended intervals, more often under dusty
conditions. Refer to MA-7, "
Periodic Maintenance".
Blow air into the back side of air cleaner filter until no objects spray
out.
INSTALLATION
Installation is in the reverse order of removal.
SMA803A
PBIC3557J
PBIC3558J
SMA384C
Page 4278 of 5883
MA-38
< ON-VEHICLE MAINTENANCE >
ENGINE MAINTENANCE (MR18DE)
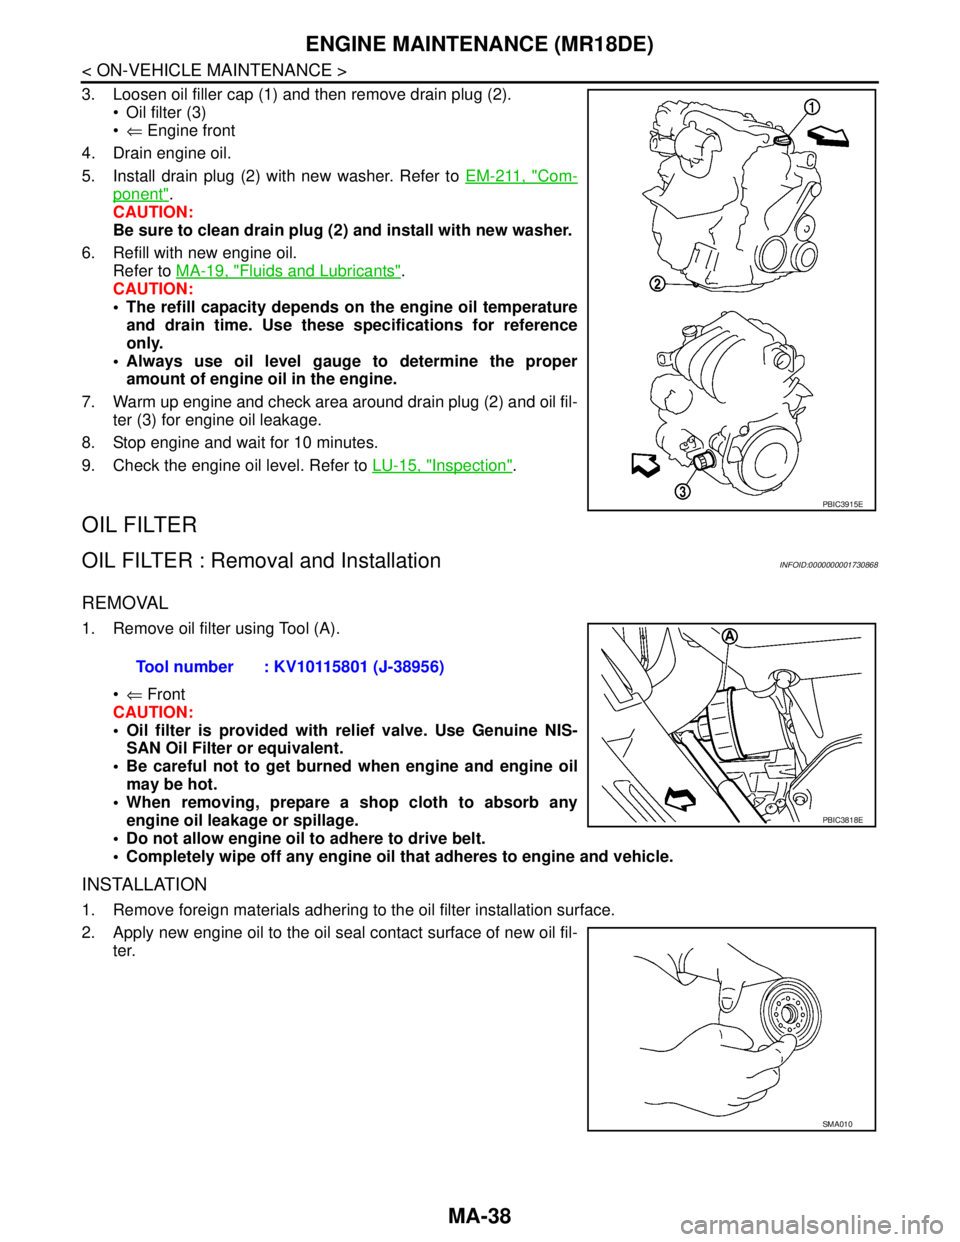
3. Loosen oil filler cap (1) and then remove drain plug (2).
Oil filter (3)
⇐ Engine front
4. Drain engine oil.
5. Install drain plug (2) with new washer. Refer to EM-211, "
Com-
ponent".
CAUTION:
Be sure to clean drain plug (2) and install with new washer.
6. Refill with new engine oil.
Refer to MA-19, "
Fluids and Lubricants".
CAUTION:
The refill capacity depends on the engine oil temperature
and drain time. Use these specifications for reference
only.
Always use oil level gauge to determine the proper
amount of engine oil in the engine.
7. Warm up engine and check area around drain plug (2) and oil fil-
ter (3) for engine oil leakage.
8. Stop engine and wait for 10 minutes.
9. Check the engine oil level. Refer to LU-15, "
Inspection".
OIL FILTER
OIL FILTER : Removal and InstallationINFOID:0000000001730868
REMOVAL
1. Remove oil filter using Tool (A).
⇐ Front
CAUTION:
Oil filter is provided with relief valve. Use Genuine NIS-
SAN Oil Filter or equivalent.
Be careful not to get burned when engine and engine oil
may be hot.
When removing, prepare a shop cloth to absorb any
engine oil leakage or spillage.
Do not allow engine oil to adhere to drive belt.
Completely wipe off any engine oil that adheres to engine and vehicle.
INSTALLATION
1. Remove foreign materials adhering to the oil filter installation surface.
2. Apply new engine oil to the oil seal contact surface of new oil fil-
ter.
PBIC3915E
Tool number : KV10115801 (J-38956)
PBIC3818E
SMA010
Page 4286 of 5883
MA-46
< ON-VEHICLE MAINTENANCE >
ENGINE MAINTENANCE (K9K)
AIR CLEANER FILTER
AIR CLEANER FILTER : Removal and InstallationINFOID:0000000001730875
REMOVAL
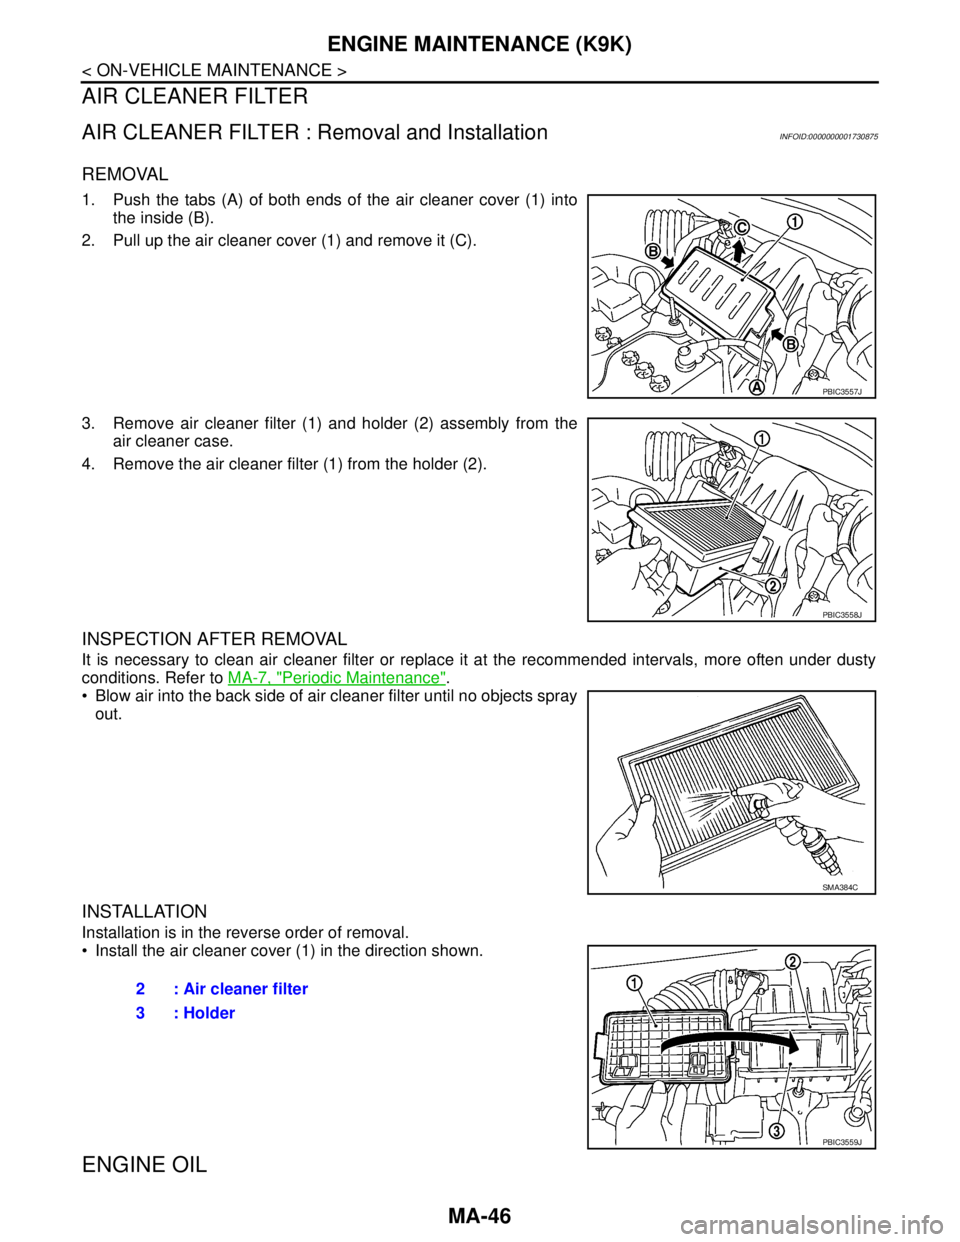
1. Push the tabs (A) of both ends of the air cleaner cover (1) into
the inside (B).
2. Pull up the air cleaner cover (1) and remove it (C).
3. Remove air cleaner filter (1) and holder (2) assembly from the
air cleaner case.
4. Remove the air cleaner filter (1) from the holder (2).
INSPECTION AFTER REMOVAL
It is necessary to clean air cleaner filter or replace it at the recommended intervals, more often under dusty
conditions. Refer to MA-7, "
Periodic Maintenance".
Blow air into the back side of air cleaner filter until no objects spray
out.
INSTALLATION
Installation is in the reverse order of removal.
Install the air cleaner cover (1) in the direction shown.
ENGINE OIL
PBIC3557J
PBIC3558J
SMA384C
2 : Air cleaner filter
3 : Holder
PBIC3559J
Page 4288 of 5883
MA-48
< ON-VEHICLE MAINTENANCE >
ENGINE MAINTENANCE (K9K)
Prolonged and repeated contact with used engine oil may cause skin cancer: try to avoid direct skin
contact with used oil. If skin contact is made, wash thoroughly with soap or hand cleaner as soon as
possible.
1. Put the vehicle on a level surface.
2. Warm up engine, and check for oil leakage from engine components.
3. Stop engine and wait for 10 minutes.
4. Loosen oil filler cap.
5. Remove drain plug and then drain engine oil.
ENGINE OIL : RefillingINFOID:0000000001730877
1. Refill with new engine oil.
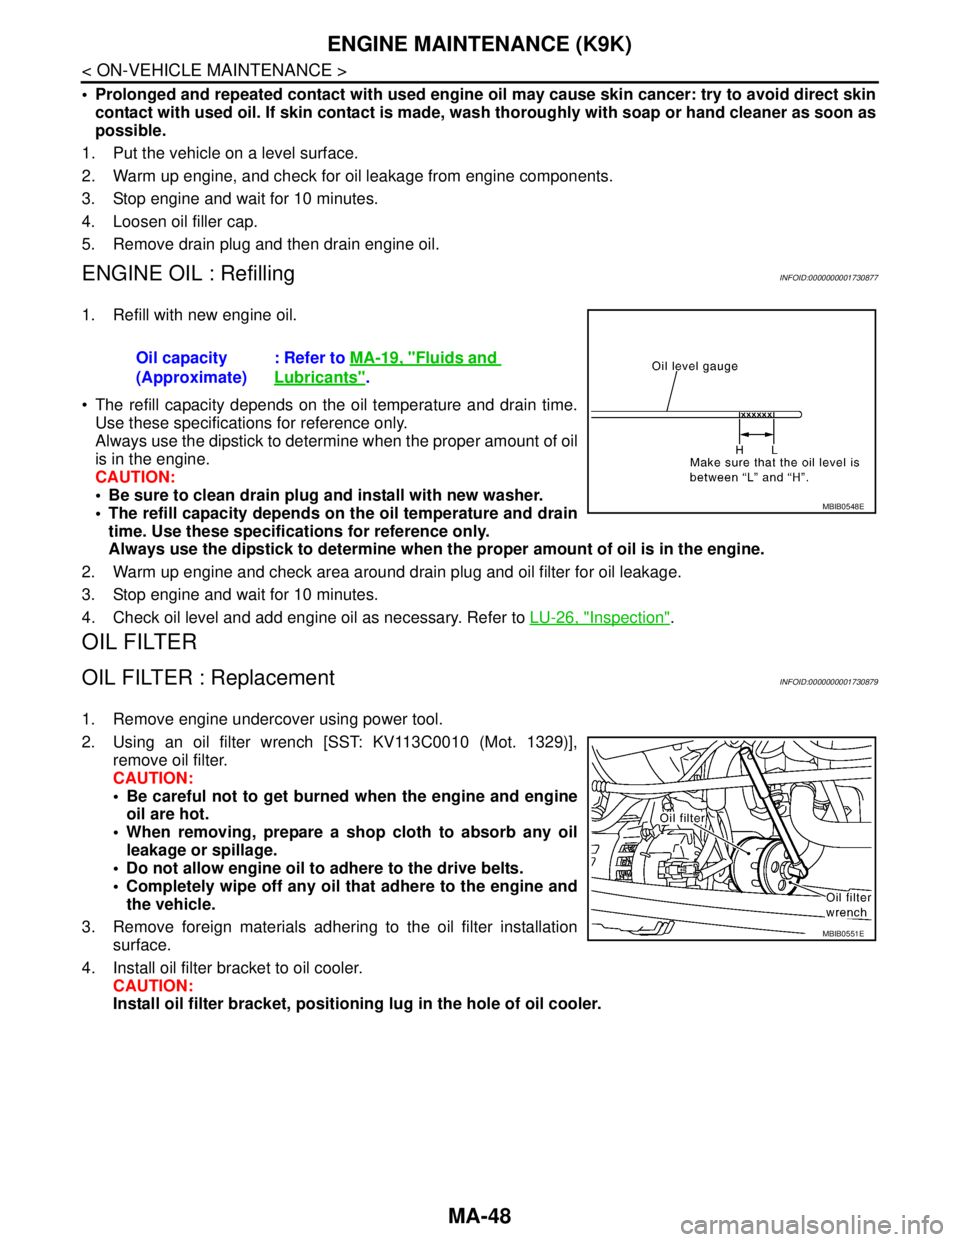
The refill capacity depends on the oil temperature and drain time.
Use these specifications for reference only.
Always use the dipstick to determine when the proper amount of oil
is in the engine.
CAUTION:
Be sure to clean drain plug and install with new washer.
The refill capacity depends on the oil temperature and drain
time. Use these specifications for reference only.
Always use the dipstick to determine when the proper amount of oil is in the engine.
2. Warm up engine and check area around drain plug and oil filter for oil leakage.
3. Stop engine and wait for 10 minutes.
4. Check oil level and add engine oil as necessary. Refer to LU-26, "
Inspection".
OIL FILTER
OIL FILTER : ReplacementINFOID:0000000001730879
1. Remove engine undercover using power tool.
2. Using an oil filter wrench [SST: KV113C0010 (Mot. 1329)],
remove oil filter.
CAUTION:
Be careful not to get burned when the engine and engine
oil are hot.
When removing, prepare a shop cloth to absorb any oil
leakage or spillage.
Do not allow engine oil to adhere to the drive belts.
Completely wipe off any oil that adhere to the engine and
the vehicle.
3. Remove foreign materials adhering to the oil filter installation
surface.
4. Install oil filter bracket to oil cooler.
CAUTION:
Install oil filter bracket, positioning lug in the hole of oil cooler. Oil capacity
(Approximate): Refer to MA-19, "
Fluids and
Lubricants".
MBIB0548E
MBIB0551E
Page 4294 of 5883
MA-54
< ON-VEHICLE MAINTENANCE >
CHASSIS AND BODY MAINTENANCE
Checking Brake Fluid Level and Leaks
INFOID:0000000001730905
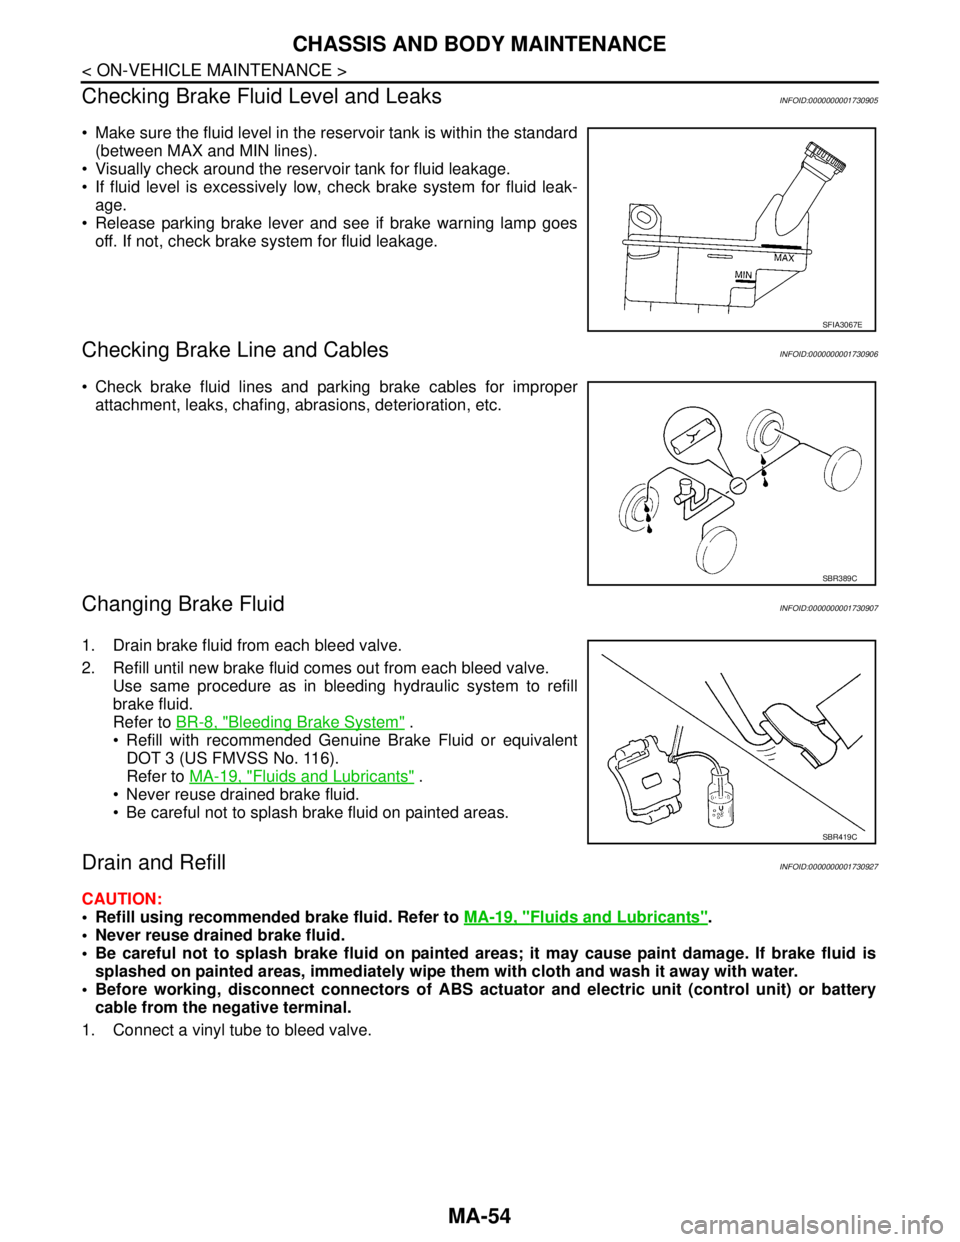
Make sure the fluid level in the reservoir tank is within the standard
(between MAX and MIN lines).
Visually check around the reservoir tank for fluid leakage.
If fluid level is excessively low, check brake system for fluid leak-
age.
Release parking brake lever and see if brake warning lamp goes
off. If not, check brake system for fluid leakage.
Checking Brake Line and CablesINFOID:0000000001730906
Check brake fluid lines and parking brake cables for improper
attachment, leaks, chafing, abrasions, deterioration, etc.
Changing Brake FluidINFOID:0000000001730907
1. Drain brake fluid from each bleed valve.
2. Refill until new brake fluid comes out from each bleed valve.
Use same procedure as in bleeding hydraulic system to refill
brake fluid.
Refer to BR-8, "
Bleeding Brake System" .
Refill with recommended Genuine Brake Fluid or equivalent
DOT 3 (US FMVSS No. 116).
Refer to MA-19, "
Fluids and Lubricants" .
Never reuse drained brake fluid.
Be careful not to splash brake fluid on painted areas.
Drain and RefillINFOID:0000000001730927
CAUTION:
Refill using recommended brake fluid. Refer to MA-19, "
Fluids and Lubricants".
Never reuse drained brake fluid.
Be careful not to splash brake fluid on painted areas; it may cause paint damage. If brake fluid is
splashed on painted areas, immediately wipe them with cloth and wash it away with water.
Before working, disconnect connectors of ABS actuator and electric unit (control unit) or battery
cable from the negative terminal.
1. Connect a vinyl tube to bleed valve.
SFIA3067E
SBR389C
SBR419C