Page 473 of 1449

ENGINE OVERHAUL -Timing Belt11B-19
Caution
(1) Measure when the belt’s surface temperature is
close to room temperature.
(2) Make sure that water or oil, etc., do not get on
the mike.
(3) If strong winds contact the mike or if noise is
generated in the area while measuring, a value
that differs from the actual value may be indicated.
(4) If the measurement is carried out with the mike
contacted against the belt, a value that differs
from the actual value may be indicated.
(5) Do not measure while the engine is running.
11. Disconnect MUT-II.
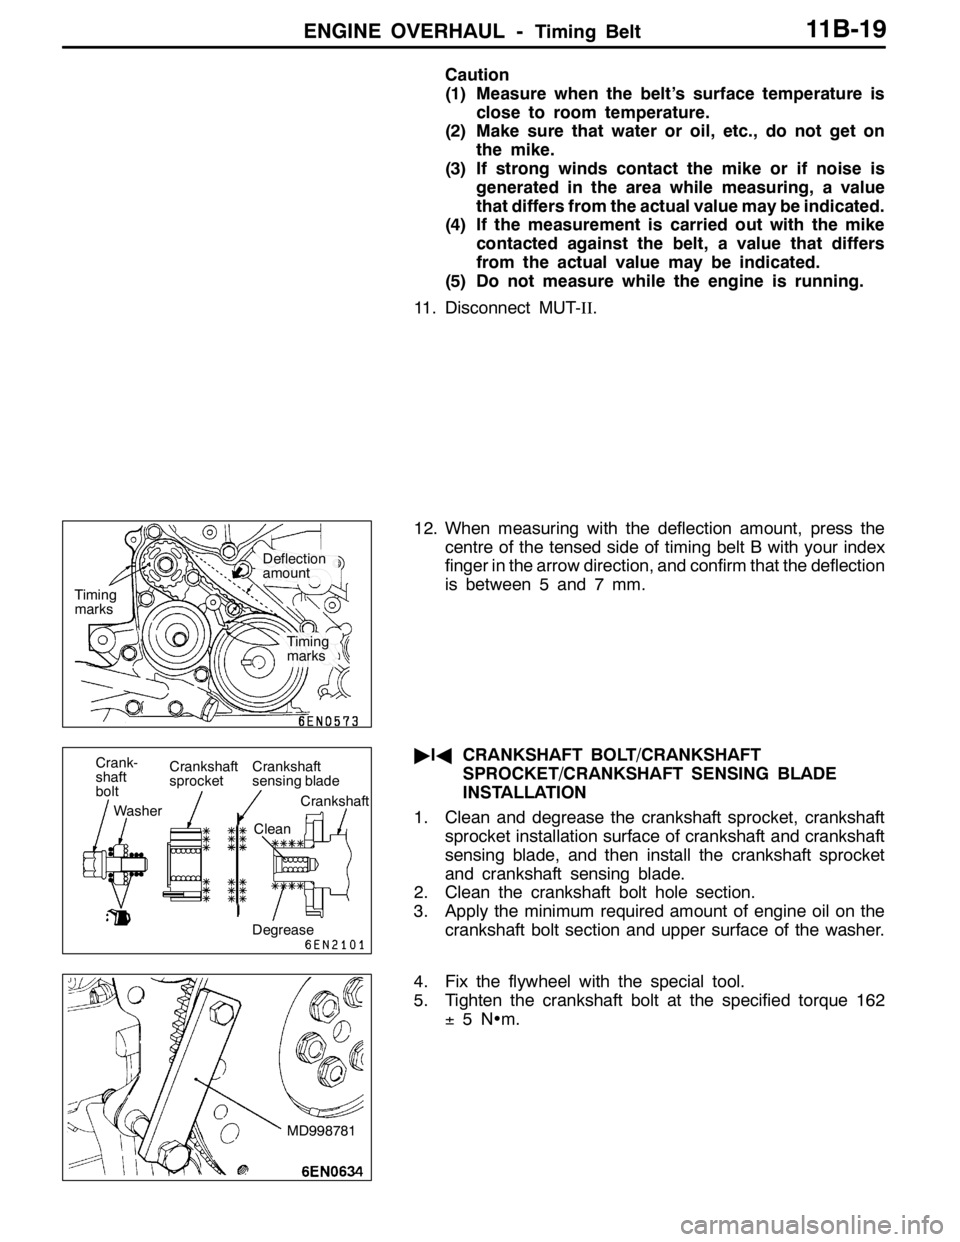
12. When measuring with the deflection amount, press the
centre of the tensed side of timing belt B with your index
finger in the arrow direction, and confirm that the deflection
is between 5 and 7 mm.
"IACRANKSHAFT BOLT/CRANKSHAFT
SPROCKET/CRANKSHAFT SENSING BLADE
INSTALLATION
1. Clean and degrease the crankshaft sprocket, crankshaft
sprocket installation surface of crankshaft and crankshaft
sensing blade, and then install the crankshaft sprocket
and crankshaft sensing blade.
2. Clean the crankshaft bolt hole section.
3. Apply the minimum required amount of engine oil on the
crankshaft bolt section and upper surface of the washer.
4. Fix the flywheel with the special tool.
5. Tighten the crankshaft bolt at the specified torque 162
±5N•m.
Timing
marks
Timing
marks
Deflection
amount
Crank-
shaft
bolt
WasherCrankshaft
sprocketCrankshaft
sensing blade
Crankshaft
Clean
Degrease
MD998781
Page 474 of 1449

ENGINE OVERHAUL -Timing Belt11B-20
"JAOIL PUMP SPROCKET INSTALLATION
1. Stop the rotation of the counter balance shaft in the same
manner as for removal.
2. Install the oil pump sprocket.
3. Apply the minimum required amount of engine oil on the
flange nut seat surface.
4. Tighten the flange nut at the specified torque 54±5
N•m.
"KAAUTO TENSIONER INSTALLATION
1. If the auto tensioner rod is in the extended state, set
it with the following steps.
(1) Set the rod of the auto tensioner into a vice so that
it is straight and not inclined.
(2) Press in the rod gradually with the vice, and align
the rod’s set hole A with the cylinder’s set hole B.
(3) Insert a wire (diameter 1.4 mm) into the set holes.
(4) Remove the auto tensioner from the vice.
2. Install the auto tensioner.
Do not remove the wire until the timing belt has been
installed.
"LATENSIONER PULLEY INSTALLATION
Set the tensioner pulley as shown in the illustration.
"MATIMING BELT INSTALLATION
1. Set the timing mark on the exhaust side camshaft sprocket
so that it is deviated by one tooth in the counterclockwise
direction from the timing mark on the rocker cover.
NOTE
Even if the sprocket and rocker cover timing marks are
aligned, the exhaust camshaft will return in the
counterclockwise direction by the force of the valve spring
and will stabilize at a position deviated by one tooth.
Phillips driver
A
B
Tensioner pulley holes
Timing marks
Page 475 of 1449

ENGINE OVERHAUL -Timing Belt11B-21
2. Align the timing mark of the intake side camshaft sprocket
to the timing mark on the rocker cover.
NOTE
Even when the sprocket and rocker cover timing marks
are aligned, the intake camshaft will rotate slightly in the
clockwise direction by the force of the valve spring and
will stabilize.
3. Shift and set the crankshaft sprocket timing mark by one
tooth in the counterclockwise direction in the same manner
as the exhaust side camshaft sprocket.
4. Align the oil pump sprocket timing marks.
5. When aligning the oil pump sprocket timing marks, remove
the cylinder block plug, and insert an 8 mm shaft diameter
Phillips driver into the plug hole, and confirm that the
driver shaft can be inserted by 60 mm or more. Do not
remove the Phillips driver until the timing belt has been
attached. If the driver shaft contacts the silent shaft and
only enters 20 to 25 mm, rotate the sprocket once, align
the timing marks again, and then confirm that the Phillips
driver can be inserted by 60 mm or more.
6. Remove the Phillips driver, and set the oil pump sprocket
at a position returned by one tooth in the counterclockwise
direction.
7. Attach the timing belt to the exhaust side camshaft
sprocket, and fix with a paper clip at the position shown
in the illustration.
Timing marks
Phillips driverPlug
Timing
marks
Page 476 of 1449

ENGINE OVERHAUL -Timing Belt11B-22
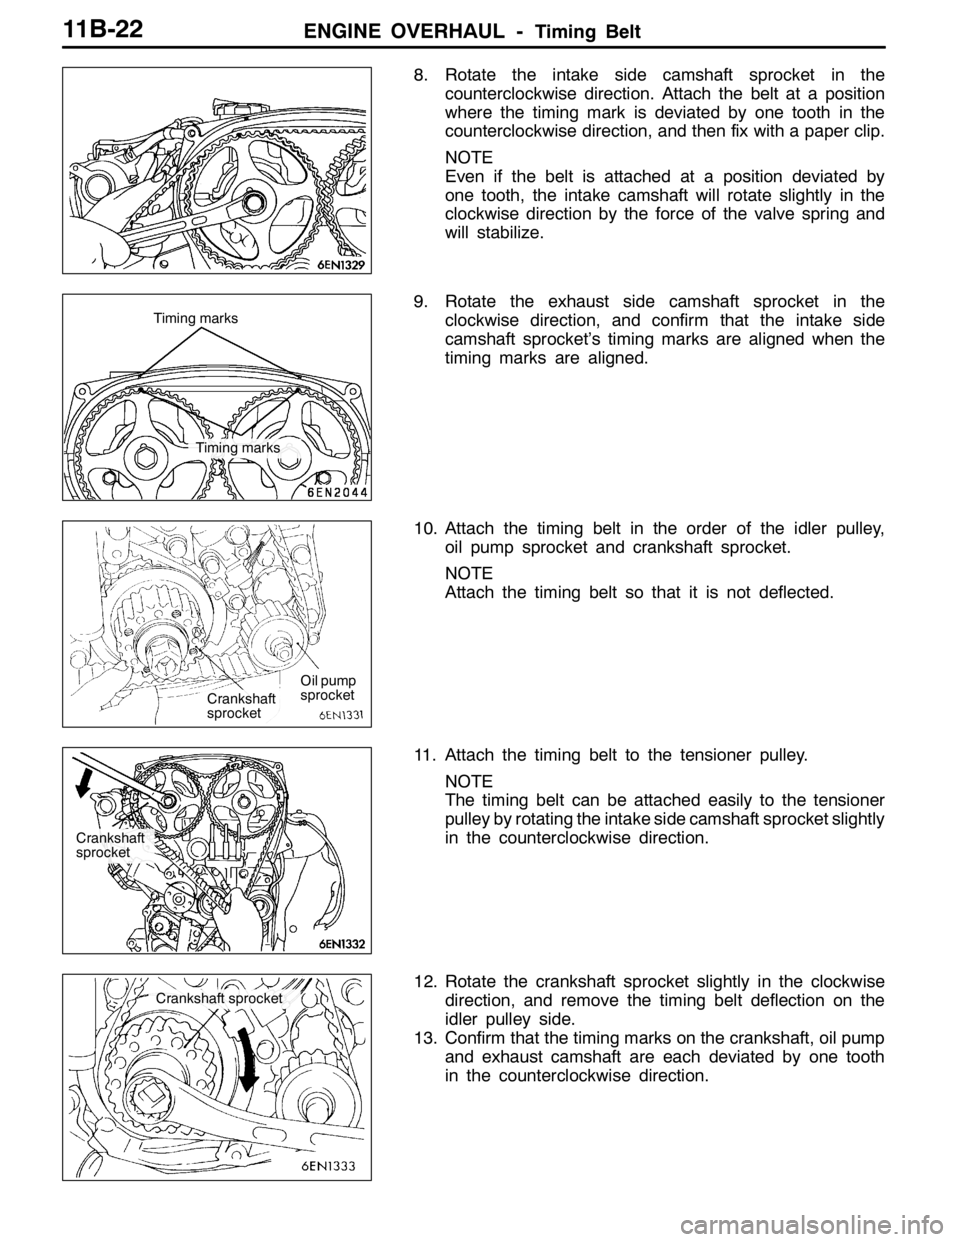
8. Rotate the intake side camshaft sprocket in the
counterclockwise direction. Attach the belt at a position
where the timing mark is deviated by one tooth in the
counterclockwise direction, and then fix with a paper clip.
NOTE
Even if the belt is attached at a position deviated by
one tooth, the intake camshaft will rotate slightly in the
clockwise direction by the force of the valve spring and
will stabilize.
9. Rotate the exhaust side camshaft sprocket in the
clockwise direction, and confirm that the intake side
camshaft sprocket’s timing marks are aligned when the
timing marks are aligned.
10. Attach the timing belt in the order of the idler pulley,
oil pump sprocket and crankshaft sprocket.
NOTE
Attach the timing belt so that it is not deflected.
11. Attach the timing belt to the tensioner pulley.
NOTE
The timing belt can be attached easily to the tensioner
pulley by rotating the intake side camshaft sprocket slightly
in the counterclockwise direction.
12. Rotate the crankshaft sprocket slightly in the clockwise
direction, and remove the timing belt deflection on the
idler pulley side.
13. Confirm that the timing marks on the crankshaft, oil pump
and exhaust camshaft are each deviated by one tooth
in the counterclockwise direction.
Timing marks Timing marks
Crankshaft
sprocketOil pump
sprocket
Crankshaft
sprocket
Crankshaft sprocket
Page 478 of 1449

ENGINE OVERHAUL -Timing Belt11B-24
INSPECTION
1. TIMING BELT
Inspect each section of the belt in detail, and if any of
the following type of damage is found, replace the belt
with a new part.
(1) Hardening of backface rubber.
The backface is glossy, marks are not made even
when a fingernail is run cross it, and there is no
elasticity.
(2) Cracking of backface rubber.
(3) Cracking of canvas.
(4) Cracking at root.
(5) Cracking on side of belt.
(6) Abnormal wear on side of belt.
NOTE
The state is normal if the cutting surface is neat as
if cut with a sharp knife.
(7) Abnormal wear of teeth.
First stages: Canvas is worn (canvas fibres are raised,
rubber is removed and whitish, and canvas seams
are unclear).
Latter stages: Canvas is worn off, and rubber is
exposed (face width is narrow).
(8) Teeth are missing.
2. AUTO TENSIONER
(1) Check for oil leaks. If any leaks are found, replace.
(2) Check whether the rod end is worn or damaged,
and replace if necessary.
(3) Measure the rod protrusion length. If not at the
standard value, replace the auto tensioner.
Standard value: 12 mm
Crack
Crack
Peeling of canvas
Cracking
on side
Cracking at root
Edges are rounded
Abnormal wear
(The core wires are frayed.)
Rubber exposed due to
worn canvas
Teeth are missing
12 mm
Page 481 of 1449

ENGINE OVERHAUL -Fuel System11B-27
INSTALLATION SERVICE POINTS
"AAINJECTOR INSTALLATION
1. Apply a small amount of new engine oil on the O-ring.
2. While rotating the injector to the left and right, insert the
O-ring into the delivery pipe while taking care not to
damage it.
Caution
Make sure that the engine oil does not enter the
delivery pipe.
3. Confirm that the injector rotates smoothly. If it does not
rotate smoothly, the O-ring may be biting in. Remove
the injector, check the O-ring for damage, and then insert
it into the delivery pipe. Check the rotation again.
"BAFUEL PRESSURE REGULATOR INSTALLATION
1. Apply a small amount of new engine oil on the O-ring.
2. While rotating the fuel pressure regulator to the left and
right, insert the O-ring into the delivery pipe while taking
care not to damage it.
Caution
Make sure that the engine oil does not enter the
delivery pipe.
3. Confirm that the fuel pressure regulator rotates smoothly.
If it does not rotate smoothly, the O-ring may be biting
in. Remove the fuel pressure regulator, check the O-ring
for damage, and then insert it into the delivery pipe. Check
the rotation again.
"CATHROTTLE BODY GASKET INSTALLATION
Assembly so that the protrusion on the throttle body gasket
is at the position shown in the illustration.
Protrusion
Page 484 of 1449
ENGINE OVERHAUL -Exhaust Manifold11B-30
EXHAUST MANIFOLD
REMOVAL AND INSTALLATION
1
17±2N•m
2 3
45
6
78
910
11 1213
11±1N•m
14±1N•m 59±5N•m
9±1N•m 10±1N•m 44±5N•m
31±2N•m
42±7N•m 10±1N•m
55±10 N•m59±5N•m
19±1N•m 14±1N•m
42±7N•m
19±3N•m18 19
14
15
16
17
33±6N•m
47±6N•m
Removal steps
1. Engine hanger
2. Turbocharger heat protector
3. Oxygen sensor
4. Exhaust fitting bracket
5. Exhaust fitting
6. Exhaust fitting gasket
7. Air outlet fitting
"CA8. Air outlet fitting gasket
9. Oil return pipe
10. Oil return pipe gasket"BA11. Oil return pipe gasket
12. Turbocharger assembly and pipe
assembly
13. Turbocharger gasket
14. Oil pipe
15. Water pipe B
16. Water pipe A
17. Turbocharger assembly
"AA18. Exhaust manifold
19. Exhaust manifold gasket
Page 485 of 1449

ENGINE OVERHAUL -Exhaust Manifold11B-31
INSTALLATION SERVICE POINTS
"AAEXHAUST MANIFOLD INSTALLATION
1. Lightly tighten the installation nut for the exhaust manifold.
2. Following the tightening order shown in the illustration,
tighten the M8 nuts at the tightening torque 29 N•m.
3. Following the tightening order shown in the illustration,
tighten the M10 nuts at the tightening torque 49 N•m.
4. Following the tightening order shown in the illustration,
tighten the M8 nuts again at the tightening torque 29
N•m.
5. Finally, following the tightening order shown in the
illustration, tighten the M10 nuts at the tightening torque
55±10 N•m, and tighten the M8 nuts at the tightening
torque 33±6N•m.
"BAOIL RETURN PIPE GASKET INSTALLATION
Assembly so that the protrusion of the oil return pipe gasket
on the oil pan side is at the position shown in the illustration.
NOTE
There is no designated assembly direction for the gasket
on the turbocharger side.
"CAAIR OUTLET FITTING GASKET
Assembly so that the protrusion of the air outlet fitting gasket
is at the position shown in the illustration.
7982 13456
Protrusion
Protrusion
AA