Page 1352 of 1449
CHASSIS ELECTRICAL-Rear Combination Lamp54A-32
REAR COMBINATION LAMP
SPECIAL TOOL
ToolNumberNameUse
MB990784Ornament removerRear combination lamp removal
TROUBLESHOOTING
For troubleshooting on rear combination lamps, refer to GROUP 54B.
REAR COMBINATION LAMP
REMOVAL AND INSTALLATION
4
2
1
5
3
1. Rear fog lamp switch
Removal steps
2. Rear combination lamp assembly
3. Rear combination lamp body4. Socket assembly
5. Bulb
Page 1354 of 1449
CHASSIS ELECTRICAL-High-Mounted Stop Lamp54A-34
HIGH-MOUNTED STOP LAMP
ON-VEHICLE SERVICE
HIGH-MOUNTED STOP LAMP BULB
REPLACEMENT
Remove socket from trunk compartment, and replace bulb.
Caution
Do not touch bulb surface bare-handed or with dirty
gloves. If dirt is attached on glass surface of the bulb,
immediately use alcohol or thinner to remove dirt, and
install the bulb after well dried.
HIGH-MOUNTED STOP LAMP
REMOVAL AND INSTALLATION
1
5
2
4
3
6
7
8
Removal steps
1. Socket assembly
2. Socket
3. Bulb
4. High-mounted stop lamp assembly5. Socket holder
6. High-mounted stop lamp cover (front)
7. High-mounted stop lamp cover (rear)
8. High-mounted stop lamp body
High-mounted
stop lamp
Page 1355 of 1449
CHASSIS ELECTRICAL-License Plate Lamp54A-35
LICENSE PLATE LAMP
ON-VEHICLE SERVICE
LICENSE PLATE LAMP REPLACEMENT
Remove socket between rear bumper and body, and remove
bulb.
Caution
Do not touch bulb surface bare-handed or with dirty
gloves. If dirt is attached on glass surface of the bulb,
immediately use alcohol or thinner to remove dirt, and
install the bulb after well dried.
LICENSE PLATE LAMP
REMOVAL AND INSTALLATION
12 3
X0261AU
456
Removal steps
1. License plate lamp lens
2. Packing
3. License plate lamp body
4. Bulb
5. Socket
6. Harness
License plate lamp
Page 1384 of 1449

SWS -Troubleshooting54B-20
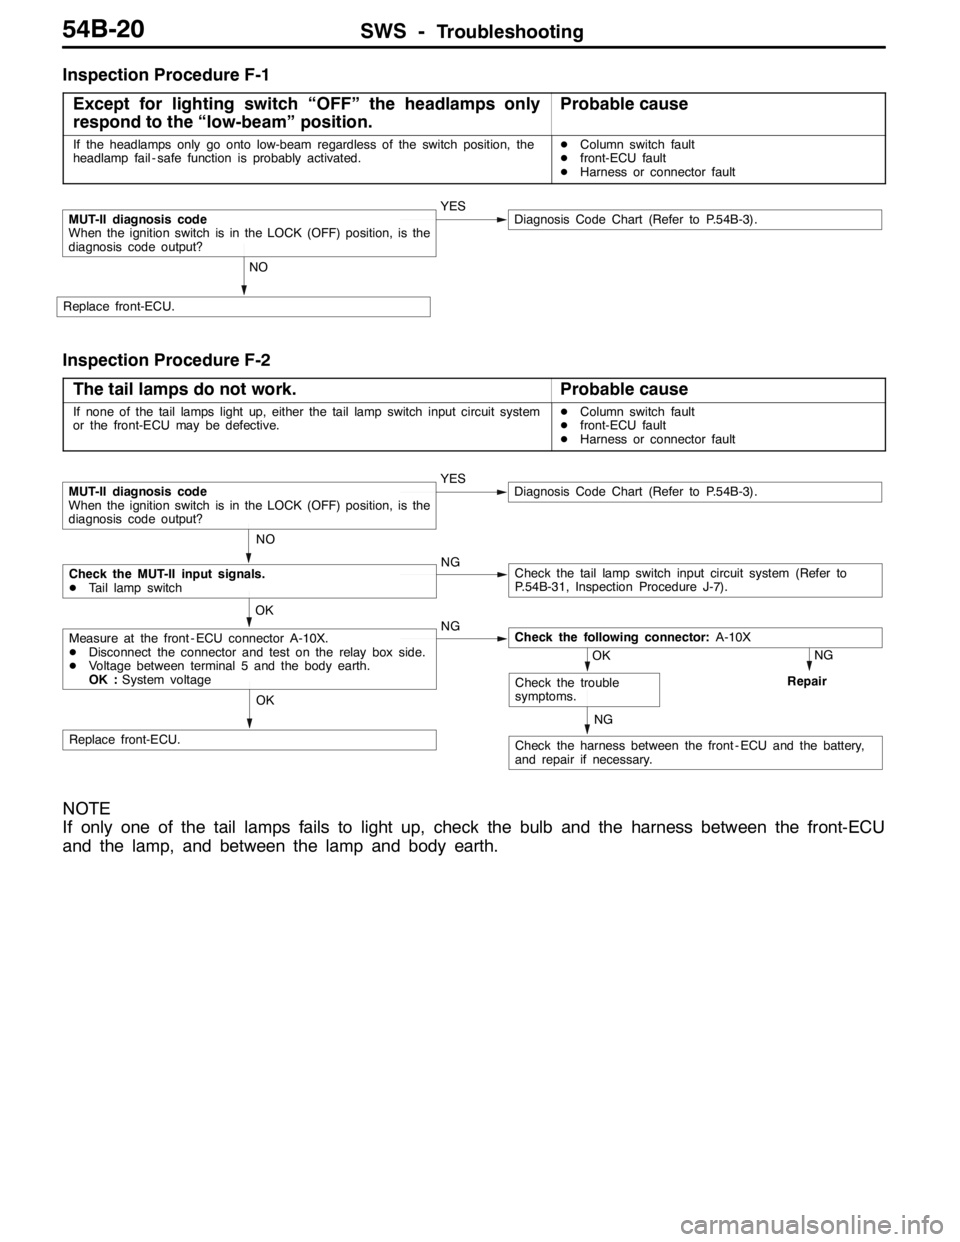
Inspection Procedure F-1
Except for lighting switch “OFF” the headlamps only
respond to the “low-beam” position.
Probable cause
If the headlamps only go onto low-beam regardless of the switch position, the
headlamp fail - safe function is probably activated.DColumn switch fault
Dfront-ECU fault
DHarness or connector fault
NO
Replace front-ECU.
MUT-II diagnosis code
When the ignition switch is in the LOCK (OFF) position, is the
diagnosis code output?YESDiagnosis Code Chart (Refer to P.54B-3).
Inspection Procedure F-2
The tail lamps do not work.
Probable cause
If none of the tail lamps light up, either the tail lamp switch input circuit system
or the front-ECU may be defective.DColumn switch fault
Dfront-ECU fault
DHarness or connector fault
NG
Repair
NG
Check the harness between the front - ECU and the battery,
and repair if necessary.
OK
Replace front-ECU.
OK
Check the trouble
symptoms.
OK
Measure at the front - ECU connector A-10X.
DDisconnect the connector and test on the relay box side.
DVoltage between terminal 5 and the body earth.
OK :System voltageNGCheck the following connector:A-10X
NO
Check the MUT-II input signals.
DTail lamp switchNGCheck the tail lamp switch input circuit system (Refer to
P.54B-31, Inspection Procedure J-7).
MUT-II diagnosis code
When the ignition switch is in the LOCK (OFF) position, is the
diagnosis code output?YESDiagnosis Code Chart (Refer to P.54B-3).
NOTE
If only one of the tail lamps fails to light up, check the bulb and the harness between the front-ECU
and the lamp, and between the lamp and body earth.
Page 1385 of 1449

SWS -Troubleshooting54B-21
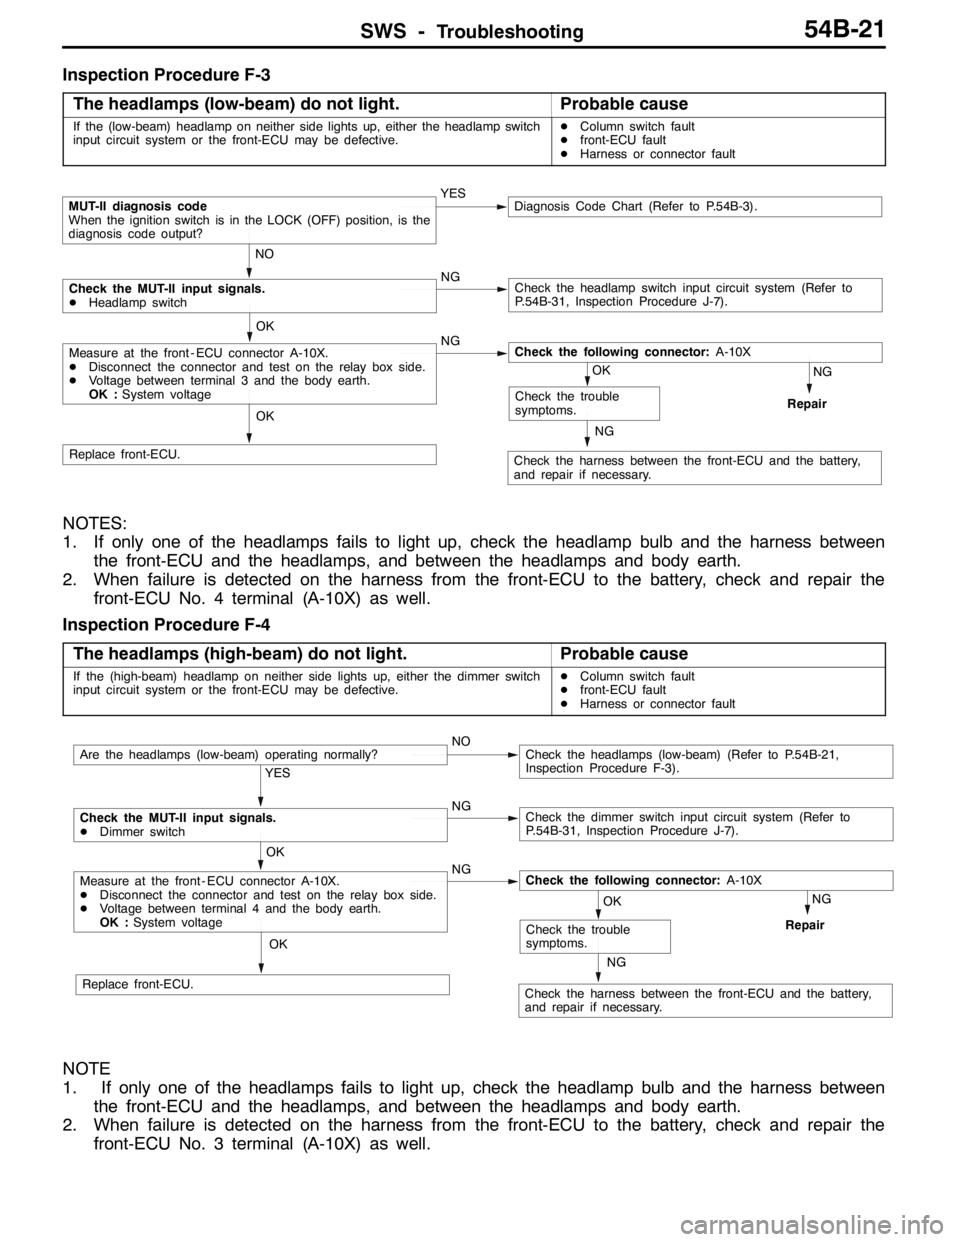
Inspection Procedure F-3
The headlamps (low-beam) do not light.
Probable cause
If the (low-beam) headlamp on neither side lights up, either the headlamp switch
input circuit system or the front-ECU may be defective.DColumn switch fault
Dfront-ECU fault
DHarness or connector fault
NO
Check the MUT-II input signals.
DHeadlamp switchNGCheck the headlamp switch input circuit system (Refer to
P.54B-31, Inspection Procedure J-7).
NG
Repair
NG
Check the harness between the front-ECU and the battery,
and repair if necessary.
OK
Replace front-ECU.
OK
Check the trouble
symptoms.
OK
Measure at the front - ECU connector A-10X.
DDisconnect the connector and test on the relay box side.
DVoltage between terminal 3 and the body earth.
OK :System voltageNGCheck the following connector:A-10X
MUT-II diagnosis code
When the ignition switch is in the LOCK (OFF) position, is the
diagnosis code output?YESDiagnosis Code Chart (Refer to P.54B-3).
NOTES:
1. If only one of the headlamps fails to light up, check the headlamp bulb and the harness between
the front-ECU and the headlamps, and between the headlamps and body earth.
2. When failure is detected on the harness from the front-ECU to the battery, check and repair the
front-ECU No. 4 terminal (A-10X) as well.
Inspection Procedure F-4
The headlamps (high-beam) do not light.
Probable cause
If the (high-beam) headlamp on neither side lights up, either the dimmer switch
input circuit system or the front-ECU may be defective.DColumn switch fault
Dfront-ECU fault
DHarness or connector fault
NG
Check the harness between the front-ECU and the battery,
and repair if necessary.OK
Check the trouble
symptoms.
NG
Repair
OK
Measure at the front - ECU connector A-10X.
DDisconnect the connector and test on the relay box side.
DVoltage between terminal 4 and the body earth.
OK :System voltageNGCheck the following connector:A-10X
YES
Check the MUT-II input signals.
DDimmer switchNGCheck the dimmer switch input circuit system (Refer to
P.54B-31, Inspection Procedure J-7).
OK
Replace front-ECU.
Are the headlamps (low-beam) operating normally?NOCheck the headlamps (low-beam) (Refer to P.54B-21,
Inspection Procedure F-3).
NOTE
1. If only one of the headlamps fails to light up, check the headlamp bulb and the harness between
the front-ECU and the headlamps, and between the headlamps and body earth.
2. When failure is detected on the harness from the front-ECU to the battery, check and repair the
front-ECU No. 3 terminal (A-10X) as well.
Page 1388 of 1449

SWS -TroubleshootingSWS -Troubleshooting54B-24
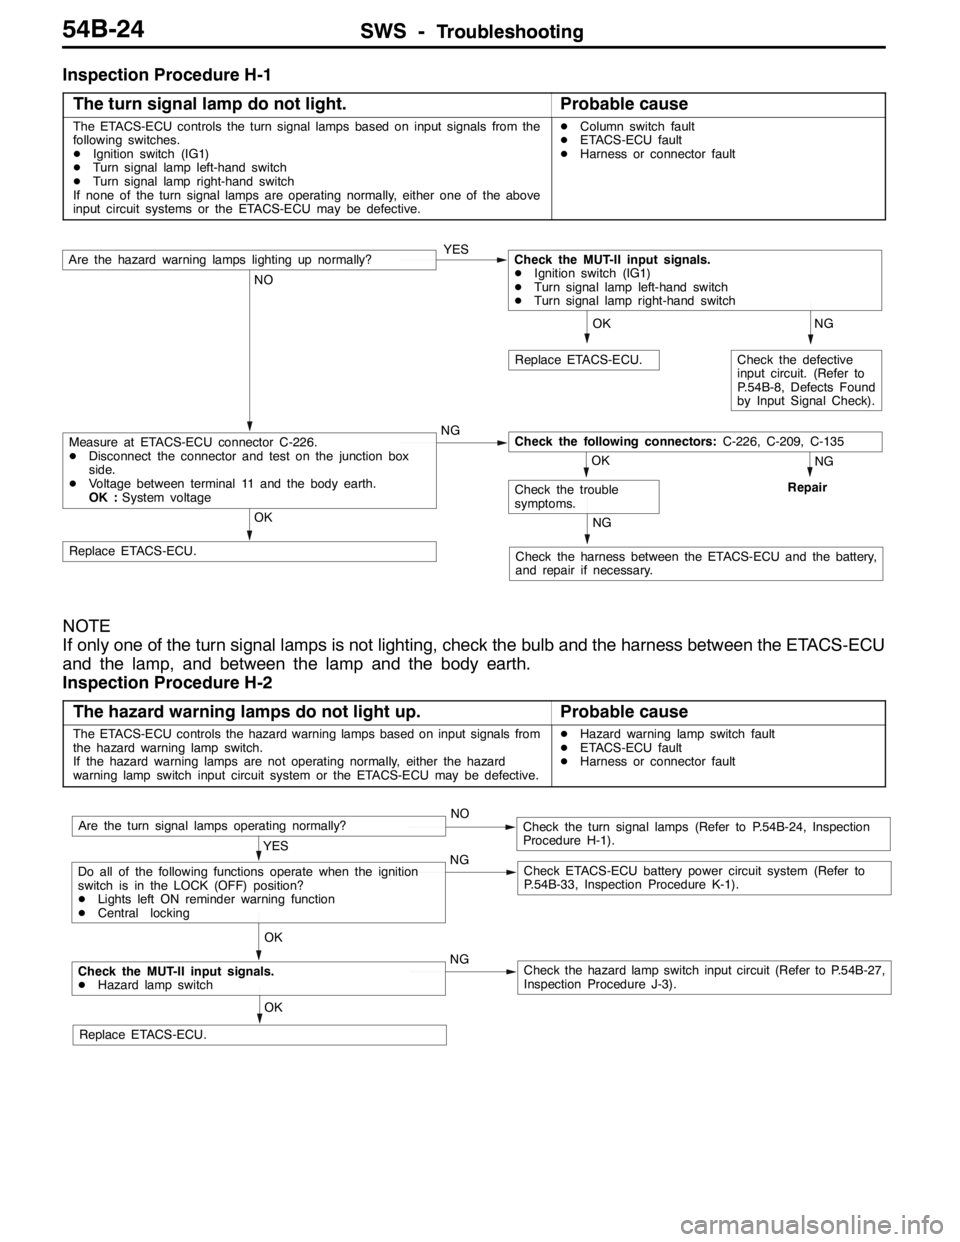
Inspection Procedure H-1
The turn signal lamp do not light.
Probable cause
The ETACS-ECU controls the turn signal lamps based on input signals from the
following switches.
DIgnition switch (IG1)
DTurn signal lamp left-hand switch
DTurn signal lamp right-hand switch
If none of the turn signal lamps are operating normally, either one of the above
input circuit systems or the ETACS-ECU may be defective.DColumn switch fault
DETACS-ECU fault
DHarness or connector fault
NG
Check the defective
input circuit. (Refer to
P.54B-8, Defects Found
by Input Signal Check).
OK
Replace ETACS-ECU.
NG
Repair
NG
Check the harness between the ETACS-ECU and the battery,
and repair if necessary.Replace ETACS-ECU.
OK
OK
Check the trouble
symptoms.
NO
Measure at ETACS-ECU connector C-226.
DDisconnect the connector and test on the junction box
side.
DVoltage between terminal 11 and the body earth.
OK :System voltageNGCheck the following connectors:C-226, C-209, C-135
Are the hazard warning lamps lighting up normally?YESCheck the MUT-II input signals.
DIgnition switch (IG1)
DTurn signal lamp left-hand switch
DTurn signal lamp right-hand switch
NOTE
If only one of the turn signal lamps is not lighting, check the bulb and the harness between the ETACS-ECU
and the lamp, and between the lamp and the body earth.
Inspection Procedure H-2
The hazard warning lamps do not light up.
Probable cause
The ETACS-ECU controls the hazard warning lamps based on input signals from
the hazard warning lamp switch.
If the hazard warning lamps are not operating normally, either the hazard
warning lamp switch input circuit system or the ETACS-ECU may be defective.DHazard warning lamp switch fault
DETACS-ECU fault
DHarness or connector fault
OK
Replace ETACS-ECU.
OK
Check the MUT-II input signals.
DHazard lamp switchNGCheck the hazard lamp switch input circuit (Refer to P.54B-27,
Inspection Procedure J-3).
YES
Do all of the following functions operate when the ignition
switch is in the LOCK (OFF) position?
DLights left ON reminder warning function
DCentral lockingNGCheck ETACS-ECU battery power circuit system (Refer to
P.54B-33, Inspection Procedure K-1).
Are the turn signal lamps operating normally?NOCheck the turn signal lamps (Refer to P.54B-24, Inspection
Procedure H-1).
Page 1389 of 1449

SWS -Troubleshooting54B-25
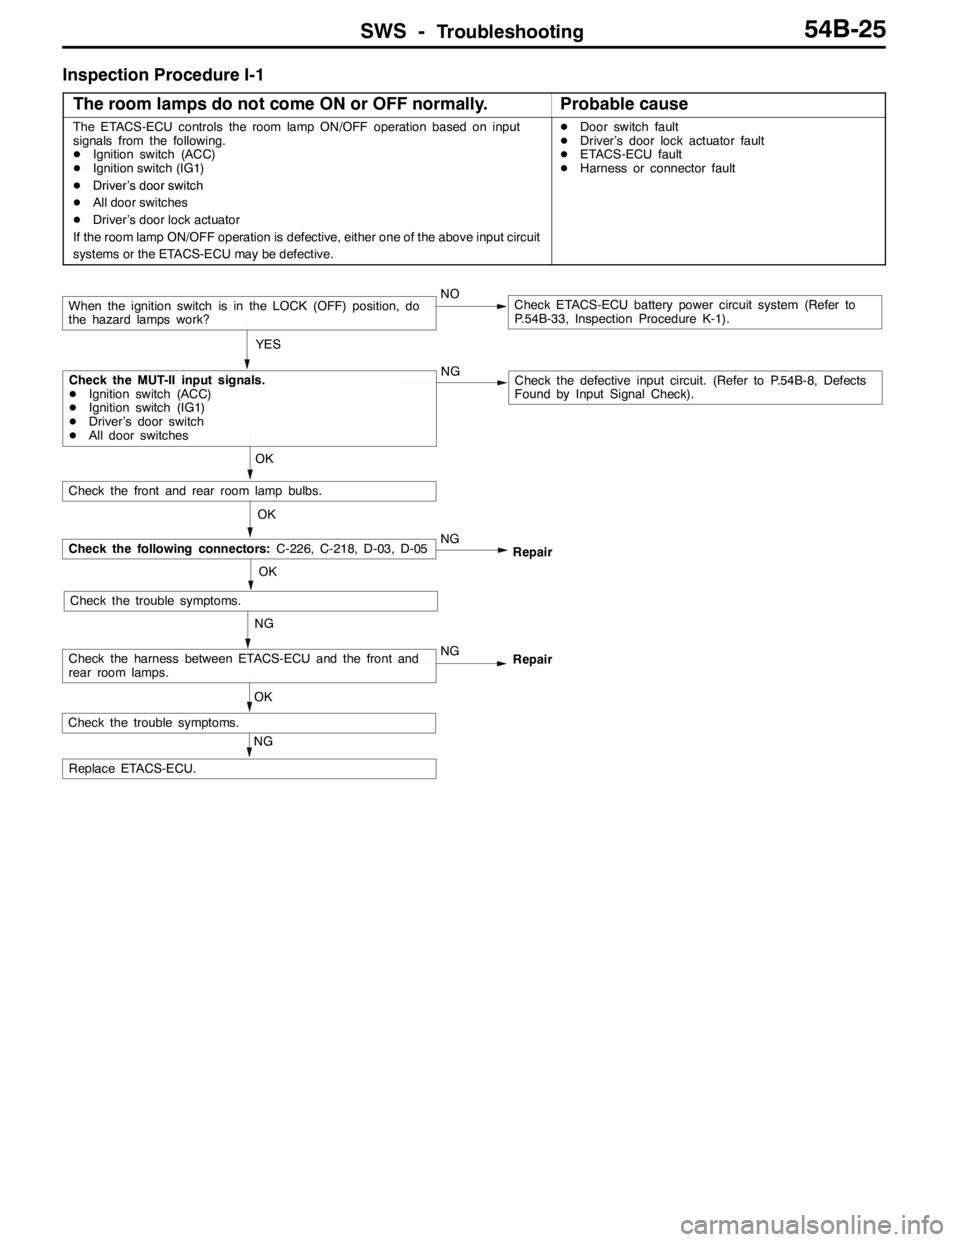
Inspection Procedure I-1
The room lamps do not come ON or OFF normally.
Probable cause
The ETACS-ECU controls the room lamp ON/OFF operation based on input
signals from the following.
DIgnition switch (ACC)
DIgnition switch (IG1)
DDriver’s door switchDDoor switch fault
DDriver’s door lock actuator fault
DETACS-ECU fault
DHarness or connector fault
DDriversdoorswitch
DAll door switches
DDriver’s door lock actuator
If the room lamp ON/OFF operation is defective, either one of the above input circuit
systems or the ETACS-ECU may be defective.
NGCheck the defective input circuit. (Refer to P.54B-8, Defects
Found by Input Signal Check).
OK
OK
NG
Check the trouble symptoms.
NG
RepairCheck the following connectors:C-226, C-218, D-03, D-05
NG
Repair
When the ignition switch is in the LOCK (OFF) position, do
the hazard lamps work?NOCheck ETACS-ECU battery power circuit system (Refer to
P.54B-33, Inspection Procedure K-1).
YES
Check the front and rear room lamp bulbs.
OK
Check the MUT-II input signals.
DIgnition switch (ACC)
DIgnition switch (IG1)
DDriver’s door switch
DAll door switches
NG
Replace ETACS-ECU.
OK
Check the trouble symptoms.
Check the harness between ETACS-ECU and the front and
rear room lamps.
Page:
< prev 1-8 9-16 17-24