2007 MITSUBISHI LANCER EVOLUTION relay
[x] Cancel search: relayPage 1398 of 1449

SWS -Troubleshooting54B-34
CHECKS AT ECU TERMINALS
ETACS-ECU
*
Y0795AU
NOTE
*See the list below for data on the ETACS-ECU terminal 1 - 20 connectors. As the ETACS-ECU connects
directly onto the junction box, the voltages cannot be measured.
Terminal
No.Check itemsChecking requirementsNormal condition
1Power window relay outputWhen power windows operating
normallySystem voltage
2Battery power supply (for central
locking)Any timeSystem voltage
3Earth (for ECU)Any time0V
4Ignition switch (ACC)Ignition switch: ACCSystem voltage
5Room lamp outputWhen room lamps ON2 V or below
6---
7Door switch inputWhen any one door switch ON (door
open)0V
8Ignition switch (IG1) power supplyIgnition switch: ONSystem voltage
9Right-hand turn signal lamp outputWhen right-hand turn signal lamp ONSystem voltage
10Driver’s door switch inputWhen driver’s door switch ON (door
open)0V
11Battery power supply (for hazard
lamps)Any timeSystem voltage
12Central locking (lock) outputWhen door lock actuator operating
(locking operation)System voltage
13Central locking (unlock) output (NOT
driver’s door)When door lock actuator operating
(unlocking)System voltage
14Left-hand turn signal lamp outputWhen left-hand turn signal lamp ONSystem voltage
15 - 17---
18Ignition switch (ACC) power supplyIgnition switch: ACCSystem voltage
19Battery power supply for interior lampWhen interior lamp ONSystem voltage
20Battery power supply (for ECU)Any timeSystem voltage
21Rear fog lamp switch inputWhen the rear fog lamp switch ON0V
22Central locking (unlock) output (for
driver’s door)When door lock actuator operating
(unlocking)System voltage
23---
24 - 32---
33Door lock key cylinder switch input
(unlock switch)When driver’s door lock unlocked0V
34Door lock key cylinder switch input
(lock switch)When driver’s door lock locked0V
Page 1400 of 1449

SWS -Troubleshooting54B-36
COLUMN SWITCHES
Terminal
No.Check itemChecking requirementsNormal condition
1Battery power supplyAny timeSystem voltage
2SWS request signal inputAny time0 - 12 V (pulse
signal)
3SWS communication lineAny time0 - 12 V (pulse
signal)
4EarthAny time0V
5-7---
8Windshield wiper switch backup
outputWindshield wiper low or high-speed
switch: ON0V
9Ignition switch (IG1) power supplyIgnition switch: ONSystem voltage
10Headlamp switch backup outputHeadlamp switch: ON0V
FRONT-ECU
NOTE
See the list below for data on the front-ECU terminals. As the front-ECU connects directly onto the relay
box, the voltages cannot be measured.
Terminal
No.Check itemChecking requirementsNormal condition
1---
2Headlamp (high-beam) outputWhen headlamp (high-beam) ONSystem voltage
3, 4Battery power supply (for headlamps)Any timeSystem voltage
5Battery power supply (for tail lamps)Any timeSystem voltage
6Headlamp (low-beam) outputWhen headlamp (low-beam) ONSystem voltage
7Battery power supply (for ECU)Any timeSystem voltage
8Tail lamp outputWhen tail lamps ONSystem voltage
9-11---
21Windshield washer outputWhen windshield washer operatingSystem voltage
22SWS communication lineAny time0 - 12 V (pulse
signal)
23Windshield wiper automatic STOP
signal inputWhen windshield wiper operatingSystem voltage
24Ignition switch (ACC) power supplyIgnition switch: ACCSystem voltage
25Headlamp switch backup inputHeadlamp switch: ON0V
26Windshield wiper switch backup inputWindshield wiper low or high-speed
switch: ON0V
27Windshield wiper (low-speed) outputWhen windshield wiper operating (at
low-speed)System voltage
28Windshield wiper (high-speed) outputWhen windshield wiper operating (at
high-speed)System voltage
Page 1401 of 1449

SWS -TroubleshootingSWS -Troubleshooting54B-37
Terminal
No.Normal condition Checking requirements Check item
30Ignition switch (IG2) power supplyIgnition switch: ONSystem voltage
31EarthAny time0V
POWER WINDOW MAIN SWITCH
Y0794AU
Terminal
No.Check itemChecking requirementsNormal condition
1---
2SWS communication line (with power
window motor assembly)Power window relay: ON0 - 12 V (pulse signal)
3-5---
6Power supplyPower window relay: ONSystem voltage
7---
8SWS communication line (with
ETACS-ECU)Any time0 - 12 V (pulse signal)
9EarthAny time0V
10---
POWER WINDOW MOTOR ASSEMBLY
Terminal
No.Check itemChecking requirementsNormal condition
1EarthAny time0V
2Power window sub-switch (DOWN)
input (passenger’s and rear doors only)Power window sub-switch: DOWN0V
3Power supplyPower window relay: ONSystem voltage
4Power window sub-switch (UP) input
(passenger’s and rear doors only)Power window sub-switch: UP0V
6SWS communication linePower window relay: ON0 - 12 V (pulse signal)
Page 1403 of 1449

55-1
HEATER, AIR
CONDITIONER AND
VENTILATION
CONTENTS
SERVICE SPECIFICATIONS 2.................
LUBRICANTS 2..............................
SPECIAL TOOLS 2...........................
TROUBLESHOOTING 3.......................
ON-VEHICLE SERVICE 14....................
Refrigerant Level Test through Performance Test 14.
Magnetic Clutch Test 14.........................
Receiver Drier Test 14..........................
Compressor Drive Belt Adjustment 15.............
Dual Pressure Switch Check 15..................
Charging 16...................................
Correcting Low Refrigerant Level in case the Service
can used 18...................................
Discharging System 19..........................
Refilling of Oil in the A/C System 19...............
Performance Test 20............................
Refrigerant Leak Repair 21......................
Blower Relay Continuity Check 22................
A/C Compressor Relay Continuity Check 22........Condenser Fan Relay (LO) Check 23.............
Condenser Fan Relay (HI) Check 23..............
Idle-up Operation Check 24.....................
HEATER CONTROL ASSEMBLY (A/C-ECU)
AND A/C SWITCH 25........................
HEATER UNIT AND BLOWER ASSEMBLY 28.
REGISTOR, BLOWER MOTOR AND
INSIDE/OUTSIDE AIR CHANGE OVER
DAMPER MOTOR 32.........................
EVAPORATOR AND AIR THERMO SENSOR
34 ...........................................
COMPRESSOR 36............................
CONDENSER ASSEMBLY AND CONDENSER
FAN ASSEMBLY 40...........................
REFRIGERANT LINES 42.....................
DUCTS 44...................................
VENTILATION 45.............................
Page 1406 of 1449

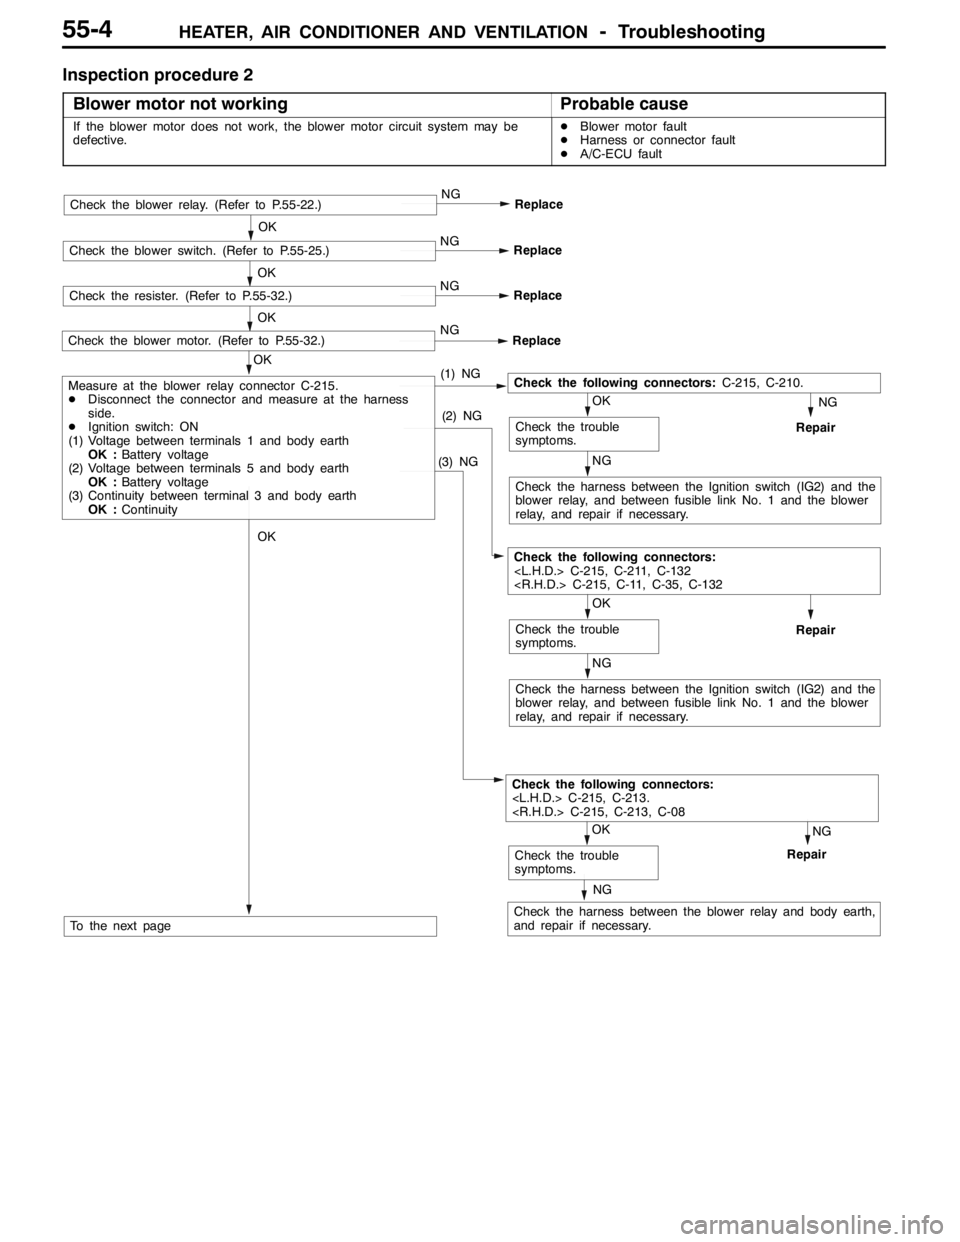
HEATER, AIR CONDITIONER AND VENTILATION-Troubleshooting55-4
Inspection procedure 2
Blower motor not working
Probable cause
If the blower motor does not work, the blower motor circuit system may be
defective.DBlower motor fault
DHarness or connector fault
DA/C-ECU fault
NG
Replace
NG
Check the harness between the Ignition switch (IG2) and the
blower relay, and between fusible link No. 1 and the blower
relay, and repair if necessary.
OK
Check the trouble
symptoms.
NG
Repair
NG
Replace
OK
Check the resister. (Refer to P.55-32.)
NG
Replace
OK
Check the blower switch. (Refer to P.55-25.)
NG
Replace
OK
Check the blower relay. (Refer to P.55-22.)
NG
Repair
NG
Check the harness between the blower relay and body earth,
and repair if necessary.
OK
Check the trouble
symptoms.
Check the following connectors:
(3) NG
OK
OK
(1) NG
Check the following connectors:C-215, C-210.
NG
Check the harness between the Ignition switch (IG2) and the
blower relay, and between fusible link No. 1 and the blower
relay, and repair if necessary.
OK
Check the trouble
symptoms.Repair
Check the following connectors:
(2) NG
Measure at the blower relay connector C-215.
DDisconnect the connector and measure at the harness
side.
DIgnition switch: ON
(1) Voltage between terminals 1 and body earth
OK :Battery voltage
(2) Voltage between terminals 5 and body earth
OK :Battery voltage
(3) Continuity between terminal 3 and body earth
OK :Continuity
To the next page
Check the blower motor. (Refer to P.55-32.)
Page 1407 of 1449

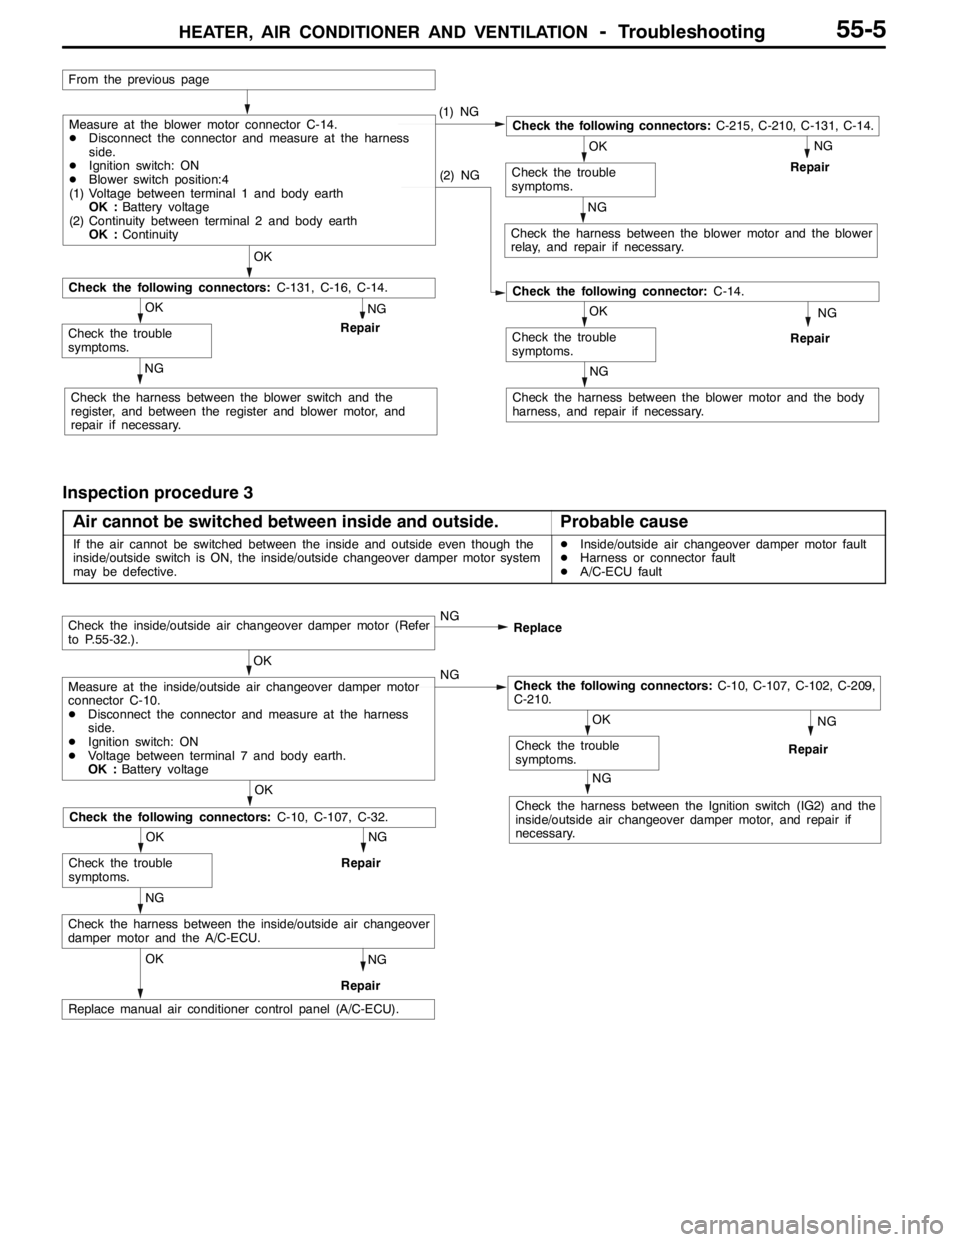
HEATER, AIR CONDITIONER AND VENTILATION-Troubleshooting55-5
NG
Repair
NG
Repair
NG
Check the harness between the blower motor and the body
harness, and repair if necessary.
OK
Check the trouble
symptoms.
NG
Check the harness between the blower motor and the blower
relay, and repair if necessary.
OK
Check the trouble
symptoms.
Check the following connector:C-14.
(2) NG
OK
Check the trouble
symptoms.
NG
Check the harness between the blower switch and the
register, and between the register and blower motor, and
repair if necessary.
NG
Repair
OK
Measure at the blower motor connector C-14.
DDisconnect the connector and measure at the harness
side.
DIgnition switch: ON
DBlower switch position:4
(1) Voltage between terminal 1 and body earth
OK :Battery voltage
(2) Continuity between terminal 2 and body earth
OK :Continuity(1) NG
From the previous page
Check the following connectors:C-131, C-16, C-14.
Check the following connectors:C-215, C-210, C-131, C-14.
Inspection procedure 3
Air cannot be switched between inside and outside.
Probable cause
If the air cannot be switched between the inside and outside even though the
inside/outside switch is ON, the inside/outside changeover damper motor system
may be defective.DInside/outside air changeover damper motor fault
DHarness or connector fault
DA/C-ECU fault
NG
Replace
NG
Repair
OK
OK
Check the following connectors:C-10, C-107, C-32.
NG
Check the harness between the Ignition switch (IG2) and the
inside/outside air changeover damper motor, and repair if
necessary.
OK
Check the trouble
symptoms.
NG
Repair
OK
Measure at the inside/outside air changeover damper motor
connector C-10.
DDisconnect the connector and measure at the harness
side.
DIgnition switch: ON
DVoltage between terminal 7 and body earth.
OK :Battery voltageNGCheck the following connectors:C-10, C-107, C-102, C-209,
C-210.
Check the inside/outside air changeover damper motor (Refer
to P.55-32.).
NG
Repair
OK
Replace manual air conditioner control panel (A/C-ECU).
NG
Check the trouble
symptoms.
Check the harness between the inside/outside air changeover
damper motor and the A/C-ECU.
Page 1408 of 1449

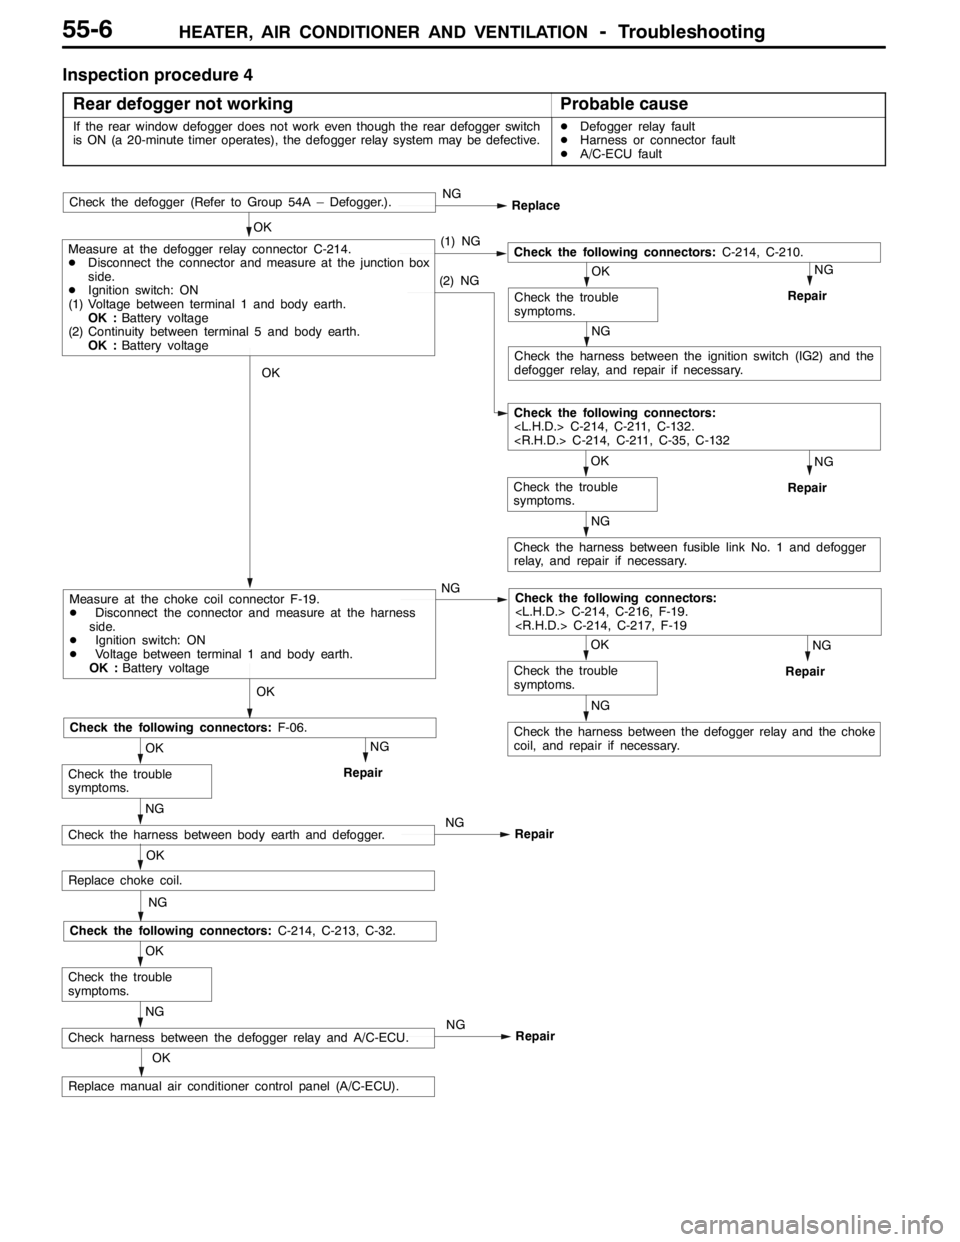
HEATER, AIR CONDITIONER AND VENTILATION-Troubleshooting55-6
Inspection procedure 4
Rear defogger not working
Probable cause
If the rear window defogger does not work even though the rear defogger switch
is ON (a 20-minute timer operates), the defogger relay system may be defective.DDefogger relay fault
DHarness or connector fault
DA/C-ECU fault
NG
Check the harness between the ignition switch (IG2) and the
defogger relay, and repair if necessary.
NG
Repair
Replace manual air conditioner control panel (A/C-ECU).
OK
OK
Check the trouble
symptoms.
NG
Check the following connectors:C-214, C-213, C-32.
OK
Check the trouble
symptoms.
NG
Replace
NG
Repair
NG
Check the harness between fusible link No. 1 and defogger
relay, and repair if necessary.
OK
Check the trouble
symptoms.
Check the following connectors:
(2) NG
NG
Repair
NG
Check the harness between the defogger relay and the choke
coil, and repair if necessary.
OK
Check the trouble
symptoms.
Check the following connectors:
NG
Repair
Check the following connectors:F-06.
OK
OK
Measure at the choke coil connector F-19.
DDisconnect the connector and measure at the harness
side.
DIgnition switch: ON
DVoltage between terminal 1 and body earth.
OK :Battery voltageNG
OK
Measure at the defogger relay connector C-214.
DDisconnect the connector and measure at the junction box
side.
DIgnition switch: ON
(1) Voltage between terminal 1 and body earth.
OK :Battery voltage
(2) Continuity between terminal 5 and body earth.
OK :Battery voltage(1) NGCheck the following connectors:C-214, C-210.
OK
Check the trouble
symptoms.
NG
RepairNG
Check the harness between body earth and defogger.
NG
RepairNG
Check harness between the defogger relay and A/C-ECU.
OK
Replace choke coil.
Check the defogger (Refer to Group 54A – Defogger.).
Page 1409 of 1449

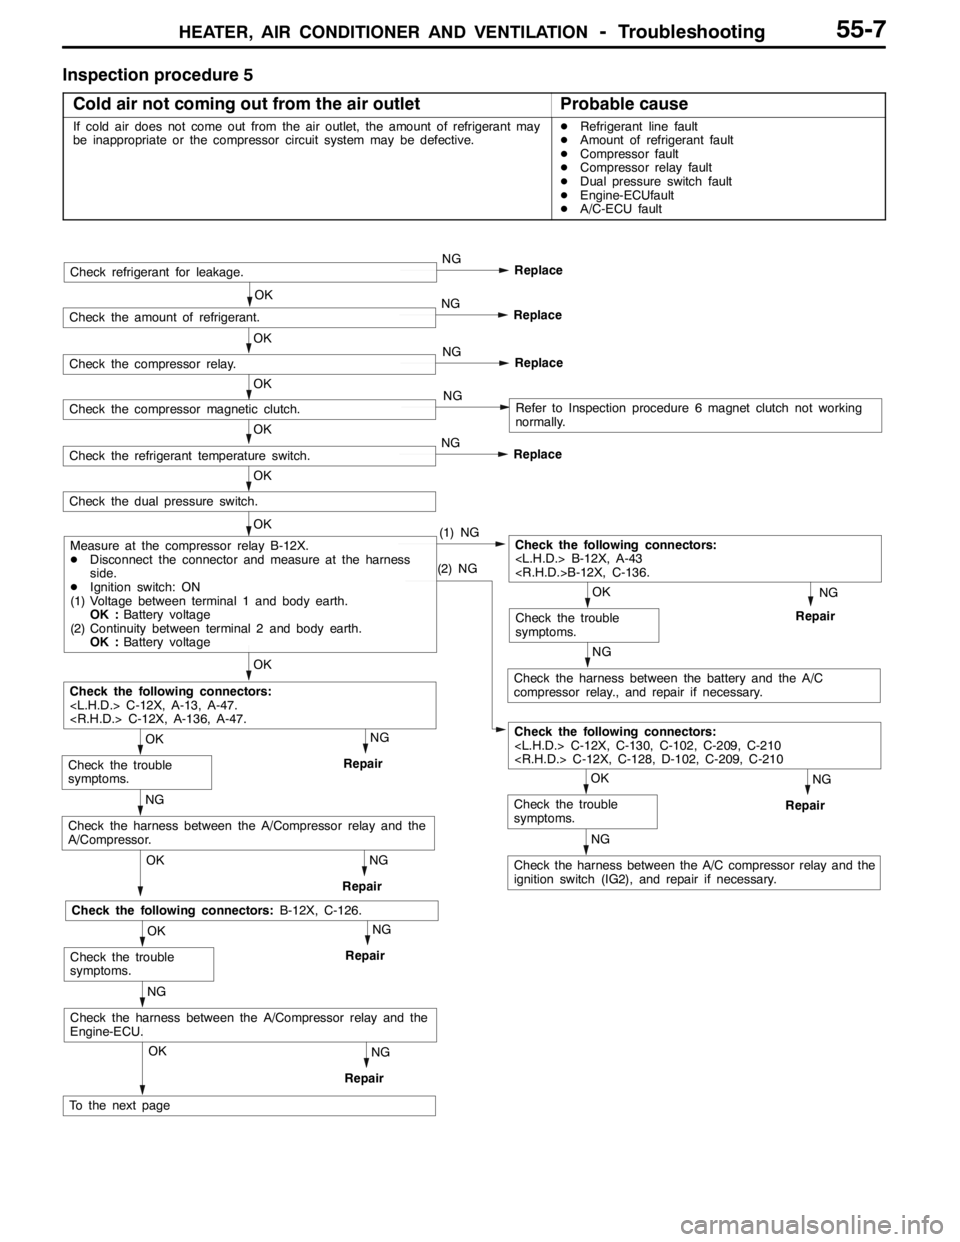
HEATER, AIR CONDITIONER AND VENTILATION-Troubleshooting55-7
Inspection procedure 5
Cold air not coming out from the air outlet
Probable cause
If cold air does not come out from the air outlet, the amount of refrigerant may
be inappropriate or the compressor circuit system may be defective.DRefrigerant line fault
DAmount of refrigerant fault
DCompressor fault
DCompressor relay fault
DDual pressure switch fault
DEngine-ECUfault
DA/C-ECU fault
OK
NG
Repair
NG
Check the harness between the A/C compressor relay and the
ignition switch (IG2), and repair if necessary.
OK
Check the trouble
symptoms.
Check the following connectors:
Repair
Check the following connectors:
OK
OK
Check the trouble
symptoms.
NG
OK
NG
Replace
OK
OK
OK
NG
Check the harness between the battery and the A/C
compressor relay., and repair if necessary.
OK
Check the trouble
symptoms.
Check the following connectors:
RepairNG
(2) NG
OK
Check the dual pressure switch.
OK
NG
Repair
Check the harness between the A/Compressor relay and the
A/Compressor.
NG
Repair
Check the following connectors:B-12X, C-126.
OK
Check the trouble
symptoms.
NG
OKNG
Repair
Check the harness between the A/Compressor relay and the
Engine-ECU.
To the next page
Check refrigerant for leakage.
NG
Replace
NG
Replace
NG
NG
Replace
Check the amount of refrigerant.
Check the compressor relay.
Check the compressor magnetic clutch.
Check the refrigerant temperature switch.
Measure at the compressor relay B-12X.
DDisconnect the connector and measure at the harness
side.
DIgnition switch: ON
(1) Voltage between terminal 1 and body earth.
OK :Battery voltage
(2) Continuity between terminal 2 and body earth.
OK :Battery voltage
Refer to Inspection procedure 6 magnet clutch not working
normally.