2007 MITSUBISHI LANCER EVOLUTION fuel
[x] Cancel search: fuelPage 647 of 1449

MPI -Troubleshooting13A-115
Terminal No. Normal condition (Check condition)Inspection item
3-12Fuel pressure control solenoid valve28 - 36Ω(at 20_C)
4-12Stepper motor coil (A1)28 - 33Ω(at 20_C)
17 - 12Stepper motor coil (A2)
5-12Stepper motor coil (B1)
18 - 12Stepper motor coil (B2)
6-12EGR control solenoid valve36 - 44Ω(at 20_C)
9-12Purge control solenoid valve22 - 26Ω(at 20_C)
11 - 1 2Waste gate solenoid valve62 - 74Ω(at 20_C)
13 - Body earthENGINE-ECU earthContinuity (0Ω)
26 - Body earthENGINE-ECU earth
53 - 12Secondary air control solenoid valve28 - 36Ω(at 20_C)
54 - 12Oxygen sensor heater (Rear)11 - 1 8Ω(at 20_C)
60 - 12Oxygen sensor heater (Front)4.5 - 8.0Ω(at 20_C)
72 - 92Intake air temperature sensor13 - 17 kΩ(When intake air temperature is - 20_C)
5.7 - 6.7 kΩ(When intake air temperature is 0_C)
2.3 - 3.0 kΩ(When intake air temperature is 20_C)
1.0 - 1.5 kΩ(When intake air temperature is 40_C)
0.56 - 0.76 kΩ(When intake air temperature is 60_C)
0.30 - 0.42 kΩ(When intake air temperature is 80_C)
83 - 92Engine coolant temperature sensor14 - 17 kΩ(When coolant temperature is - 20_C)
5.1 - 6.5 kΩ(When coolant temperature is 0_C)
2.1 - 2.7 kΩ(When coolant temperature is 20_C)
0.9 - 1.3 kΩ(When coolant temperature is 40_C)
0.48 - 0.68 kΩ(When coolant temperature is 60_C)
0.26 - 0.36 kΩ(When coolant temperature is 80_C)
Page 657 of 1449

MPI -On-vehicle Service13A-125
ON-VEHICLE SERVICE
FUEL PUMP CONNECTOR DISCONNECTION
(HOW TO REDUCE THE FUEL PRESSURE)
When removing the fuel pipe, hose, etc., since fuel pressure
in the fuel pipe line is high, do the following operation so
as to release the fuel pressure in the line and prevent fuel
from running out.
1. Remove the rear seat assembly. (Refer to GROUP 52A.)
2. Remove the protector.
3. Disconnect the fuel pump module connector.
4. After starting the engine and letting it run until it stops
naturally, turn the ignition switch to “LOOK” (OFF) position.
5. Connect the fuel pump module connector.
6. Install the protector and rear seat assembly.
(Refer to GROUP 52A.)
FUEL PUMP OPERATION CHECK
1. Check the operation of the fuel pump by using the MUT-II
to force-drive the fuel pump.
2. If the fuel pump will not operate, check by using the
following procedure, and if it is normal, check the drive
circuit.
(1) Turn the ignition switch to “LOOK” (OFF) position.
(2) Remove the rear seat assembly. (Refer to GROUP
52A.)
(3) Remove the protector.
(4) Disconnect the fuel pump module connector.
(5) When the fuel pump drive connector is attached
directly to the battery, check if the sound of the fuel
pump operation can be heard.
NOTE
As the fuel pump is an in-tank type, the fuel pump
sound is hard to hear, so remove the fuel filler cap
and check from the tank inlet.
(6) Check the fuel pressure by pinching the fuel hose
with the fingertips.
(7) Connect the fuel pump module connector.
(8) Install the protector and rear seat assembly. (Refer
to GROUP 52A.)
Page 660 of 1449

MPI -On-vehicle Service13A-128
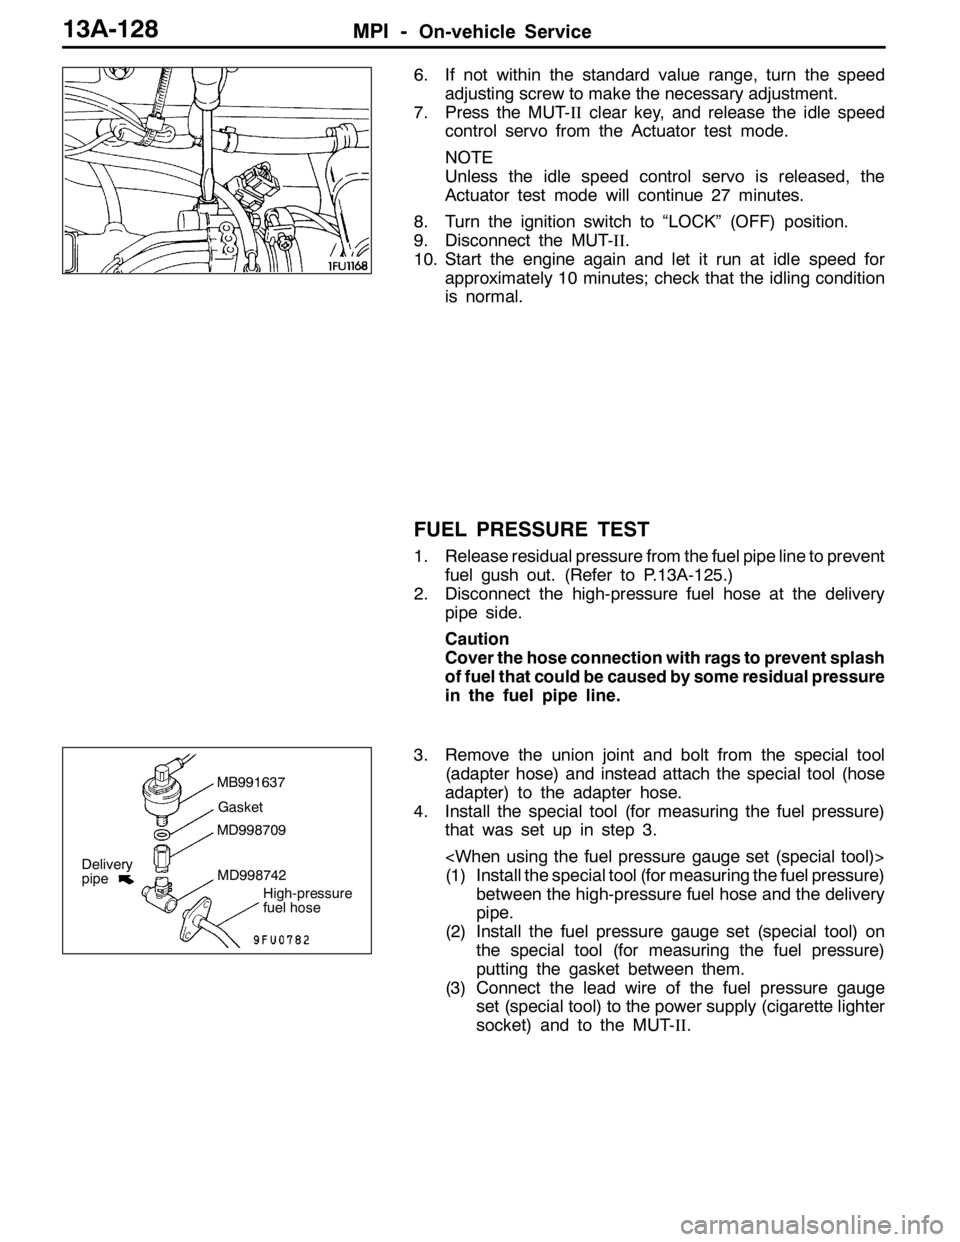
6. If not within the standard value range, turn the speed
adjusting screw to make the necessary adjustment.
7. Press the MUT-IIclear key, and release the idle speed
control servo from the Actuator test mode.
NOTE
Unless the idle speed control servo is released, the
Actuator test mode will continue 27 minutes.
8. Turn the ignition switch to “LOCK” (OFF) position.
9. Disconnect the MUT-II.
10. Start the engine again and let it run at idle speed for
approximately 10 minutes; check that the idling condition
is normal.
FUEL PRESSURE TEST
1. Release residual pressure from the fuel pipe line to prevent
fuel gush out. (Refer to P.13A-125.)
2. Disconnect the high-pressure fuel hose at the delivery
pipe side.
Caution
Cover the hose connection with rags to prevent splash
of fuel that could be caused by some residual pressure
in the fuel pipe line.
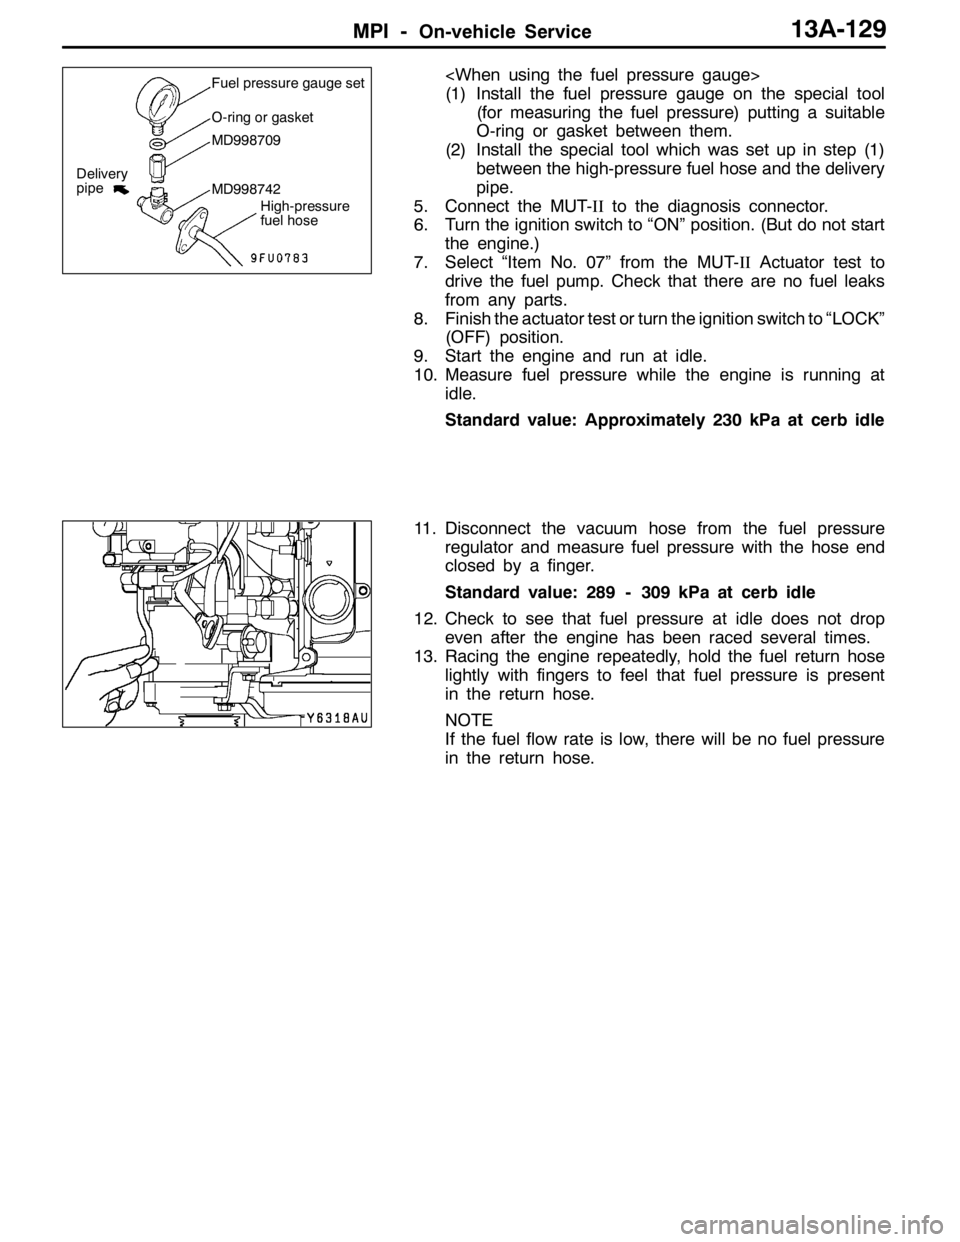
3. Remove the union joint and bolt from the special tool
(adapter hose) and instead attach the special tool (hose
adapter) to the adapter hose.
4. Install the special tool (for measuring the fuel pressure)
that was set up in step 3.
(1) Install the special tool (for measuring the fuel pressure)
between the high-pressure fuel hose and the delivery
pipe.
(2) Install the fuel pressure gauge set (special tool) on
the special tool (for measuring the fuel pressure)
putting the gasket between them.
(3) Connect the lead wire of the fuel pressure gauge
set (special tool) to the power supply (cigarette lighter
socket) and to the MUT-II.
MB991637
Gasket
MD998709
MD998742
High-pressure
fuel hose
Delivery
pipe
Page 661 of 1449

MPI -On-vehicle Service13A-129
(1) Install the fuel pressure gauge on the special tool
(for measuring the fuel pressure) putting a suitable
O-ring or gasket between them.
(2) Install the special tool which was set up in step (1)
between the high-pressure fuel hose and the delivery
pipe.
5. Connect the MUT-IIto the diagnosis connector.
6. Turn the ignition switch to “ON” position. (But do not start
the engine.)
7. Select “Item No. 07” from the MUT-IIActuator test to
drive the fuel pump. Check that there are no fuel leaks
from any parts.
8. Finish the actuator test or turn the ignition switch to “LOCK”
(OFF) position.
9. Start the engine and run at idle.
10. Measure fuel pressure while the engine is running at
idle.
Standard value: Approximately 230 kPa at cerb idle
11. Disconnect the vacuum hose from the fuel pressure
regulator and measure fuel pressure with the hose end
closed by a finger.
Standard value: 289 - 309 kPa at cerb idle
12. Check to see that fuel pressure at idle does not drop
even after the engine has been raced several times.
13. Racing the engine repeatedly, hold the fuel return hose
lightly with fingers to feel that fuel pressure is present
in the return hose.
NOTE
If the fuel flow rate is low, there will be no fuel pressure
in the return hose.Fuel pressure gauge set
O-ring or gasket
MD998709
MD998742
High-pressure
fuel hose
Delivery
pipe
Page 662 of 1449

MPI -On-vehicle Service13A-130
14. If any of fuel pressure measured in steps 10 to 13 is out of
specification, troubleshoot and repair according to the
table below.
SymptomProbable causeRemedy
DFuel pressure too low
DFuelpressuredropsafterracing
Clogged fuel filterReplace fuel filter
DFuelpressuredrops after racing
DNo fuel pressure in fuel return
hose
Fuel leaking to return side due to poor
fuel regulator valve seating or settled
springReplace fuel pressure regulator
Low fuel pump delivery pressureReplace fuel pump
Fuel pressure too highBinding valve in fuel pressure
regulatorReplace fuel pressure regulator
Clogged fuel return hose or pipeClean or replace hose or pipe
Same fuel pressure when vacuum
hose is connected and when
disconnected
Damaged vacuum hose or clogged
nippleReplace vacuum hose or clean nipple
disconnectedFuel pressure control system
malfunctionCheck the fuel pressure control
system
15. Stop the engine and check change of fuel pressure gauge
reading. Normal if the reading does not drop within 2
minutes. If it does, observe the rate of drop and
troubleshoot and repair according to the table below.
SymptomProbable causeRemedy
Fuel pressure drops gradually after
engineisstopped
Leaky injectorReplace injector
engineisstopped
Leaky fuel regulator valve seatReplace fuel pressure regulator
Fuel pressure drops sharply
immediately after engine is stoppedCheck valve in fuel pump is held openReplace fuel pump
16. Release residual pressure from the fuel pipe line.
(Refer to P.13A-125.)
17. Remove the fuel pressure gauge and special tool from
the delivery pipe.
Caution
Cover the hose connection with rags to prevent splash
of fuel that could be caused by some residual pressure
in the fuel pipe line.
18. Replace the O-ring at the end of the fuel high pressure
hose with a new one. Furthermore, apply engine oil to
the new O-ring before replacement.
19. Fit the fuel high pressure hose over the delivery pipe
and tighten the bolt to specified torque.
Tightening torque: 5.0±1.0 N·m
20. Check for any fuel leaks by following the procedure in
step 7.
21. Disconnect the MUT-II.
Page 663 of 1449

MPI -On-vehicle Service13A-131
COMPONENT LOCATION
NameSymbolNameSymbol
A/C relayJFuel pump relay 1, 2Q
A/C switchTFuel pump relay 3H
Air flow sensor (integrated intake air tempera-
ture sensor and barometric pressure sensor)OFuel pump resistorH
Camshaft position sensorNIdle speed control servo (stepper motor)G
Crank angle sensorKIgnition coil (integrated power transister)M
Detonation sensorEInjectorC
Diagnosis connectorSOxygen sensor (front)L
EGR control solenoid valveDOxygen sensor (rear)X
Engine control relayIPower steering fluid pressure switchA
Engine coolant temperature sensorNResistor (for injector)H
Engine warning lamp (check engine lamp)RSecondary air control solenoid valveD
Engine-ECUUThrottle position sensorG
Fan motor relayJVehicle speed sensorF
Fuel pressure control solenoid valveBWaste gate solenoid valveP
ABCDEFGHIJK
LMNOP
QRSTU
Page 664 of 1449

MPI -On-vehicle Service13A-132
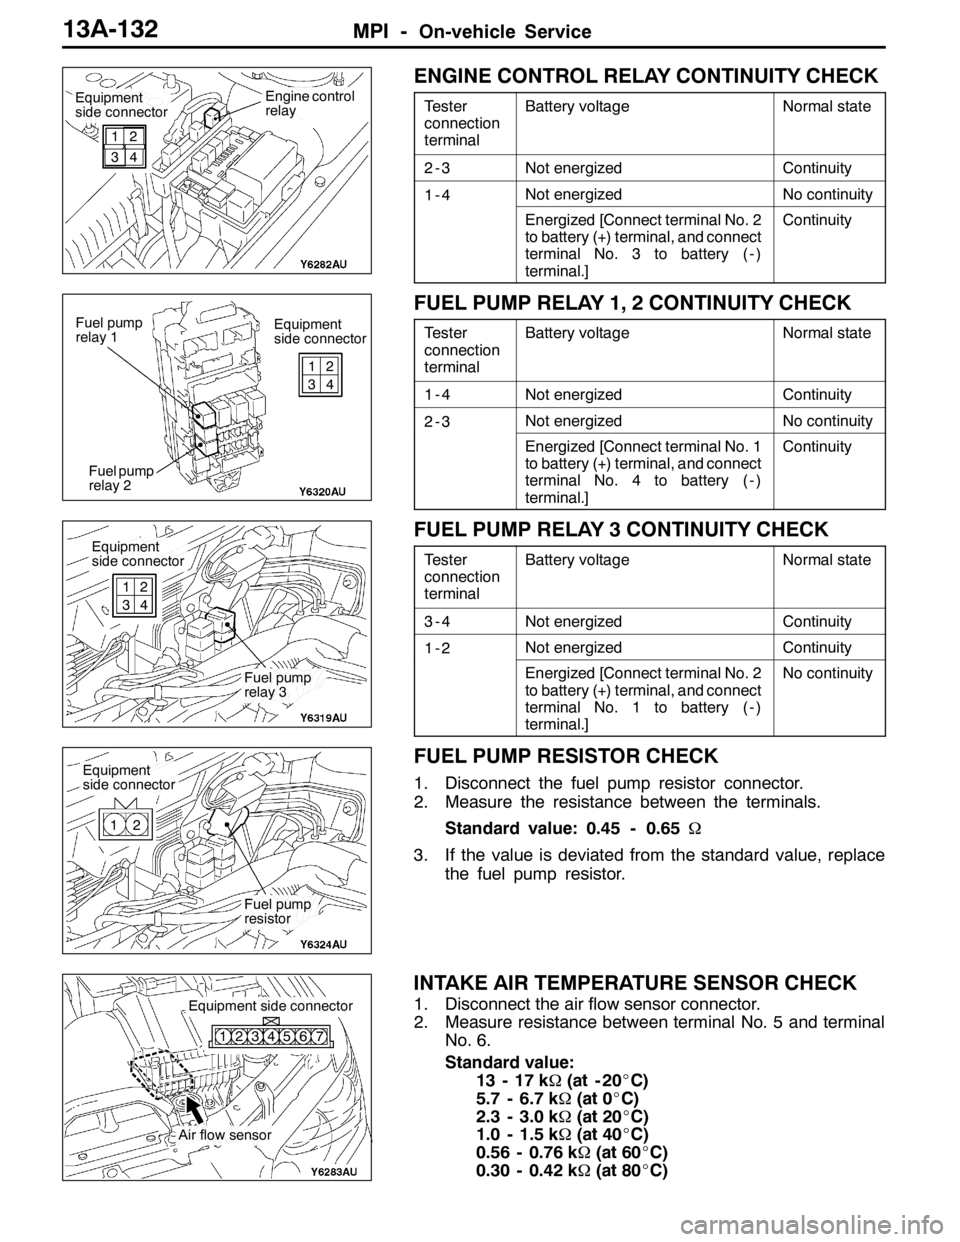
ENGINE CONTROL RELAY CONTINUITY CHECK
Tester
connection
terminalBattery voltageNormal state
2-3Not energizedContinuity
1-4Not energizedNo continuity
Energized [Connect terminal No. 2
to battery (+) terminal, and connect
terminal No. 3 to battery ( - )
terminal.]Continuity
FUEL PUMP RELAY 1, 2 CONTINUITY CHECK
Tester
connection
terminalBattery voltageNormal state
1-4Not energizedContinuity
2-3Not energizedNo continuity
Energized [Connect terminal No. 1
to battery (+) terminal, and connect
terminal No. 4 to battery ( - )
terminal.]Continuity
FUEL PUMP RELAY 3 CONTINUITY CHECK
Tester
connection
terminalBattery voltageNormal state
3-4Not energizedContinuity
1-2Not energizedContinuity
Energized [Connect terminal No. 2
to battery (+) terminal, and connect
terminal No. 1 to battery ( - )
terminal.]No continuity
FUEL PUMP RESISTOR CHECK
1. Disconnect the fuel pump resistor connector.
2. Measure the resistance between the terminals.
Standard value: 0.45 - 0.65Ω
3. If the value is deviated from the standard value, replace
the fuel pump resistor.
INTAKE AIR TEMPERATURE SENSOR CHECK
1. Disconnect the air flow sensor connector.
2. Measure resistance between terminal No. 5 and terminal
No. 6.
Standard value:
13 - 17 kΩ(at - 20_C)
5.7 - 6.7 kΩ(at 0_C)
2.3 - 3.0 kΩ(at 20_C)
1.0 - 1.5 kΩ(at 40_C)
0.56 - 0.76 kΩ(at 60_C)
0.30 - 0.42 kΩ(at 80_C)
Equipment
side connectorEngine control
relay
1
32
4
Equipment
side connector Fuel pump
relay 1
Fuel pump
relay 21
32
4
Equipment
side connector
Fuel pump
relay 3 1
32
4
Equipment
side connector
Fuel pump
resistor 12
Air flow sensor
Equipment side connector
123456 7
Page 667 of 1449

MPI -On-vehicle Service13A-135
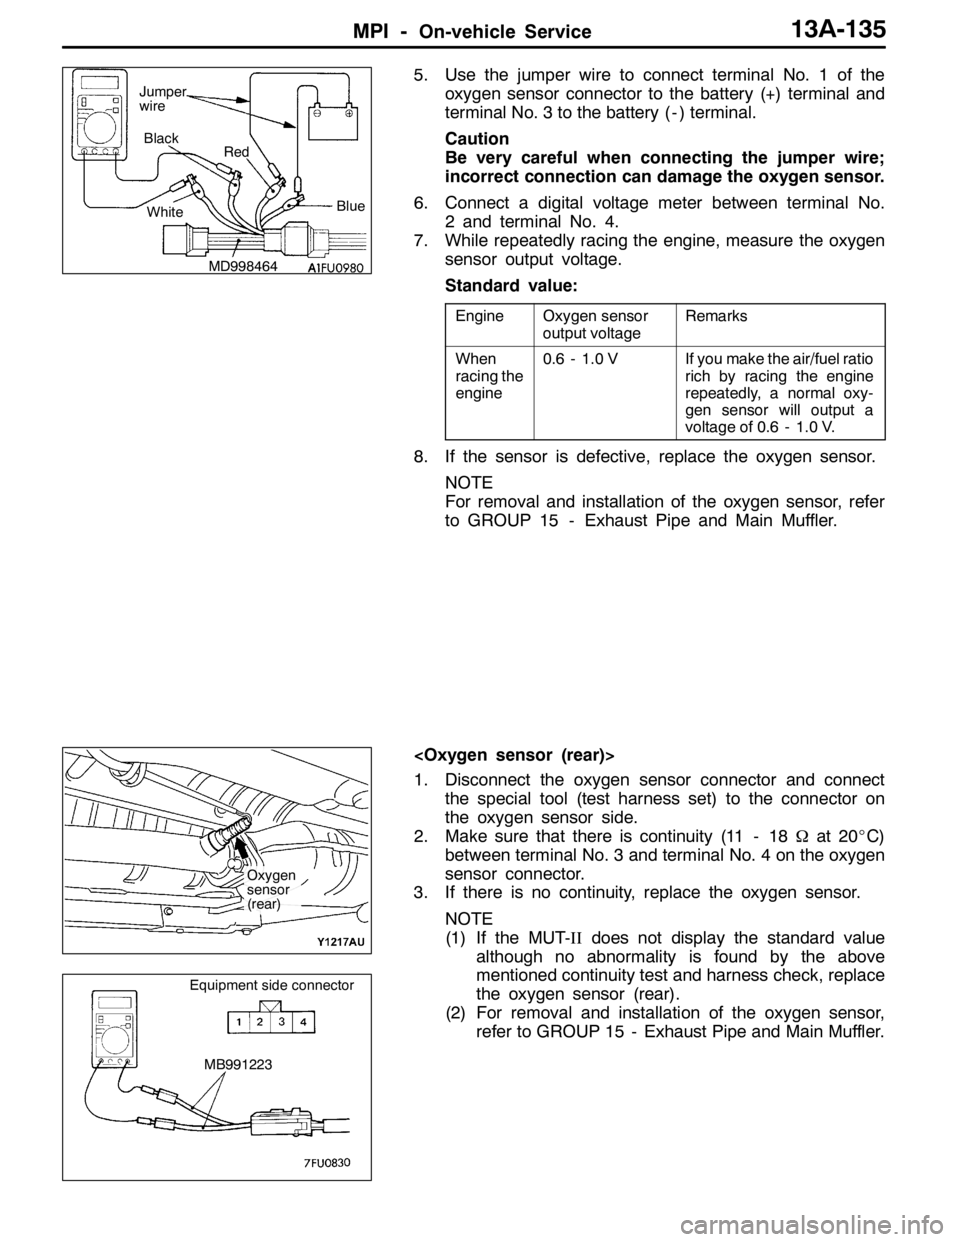
5. Use the jumper wire to connect terminal No. 1 of the
oxygen sensor connector to the battery (+) terminal and
terminal No. 3 to the battery ( - ) terminal.
Caution
Be very careful when connecting the jumper wire;
incorrect connection can damage the oxygen sensor.
6. Connect a digital voltage meter between terminal No.
2 and terminal No. 4.
7. While repeatedly racing the engine, measure the oxygen
sensor output voltage.
Standard value:
EngineOxygen sensor
output voltageRemarks
When
racing the
engine0.6 - 1.0 VIf you make the air/fuel ratio
rich by racing the engine
repeatedly, a normal oxy-
gen sensor will output a
voltage of 0.6 - 1.0 V.
8. If the sensor is defective, replace the oxygen sensor.
NOTE
For removal and installation of the oxygen sensor, refer
to GROUP 15 - Exhaust Pipe and Main Muffler.
1. Disconnect the oxygen sensor connector and connect
the special tool (test harness set) to the connector on
the oxygen sensor side.
2. Make sure that there is continuity (11 - 18Ωat 20_C)
between terminal No. 3 and terminal No. 4 on the oxygen
sensor connector.
3. If there is no continuity, replace the oxygen sensor.
NOTE
(1) If the MUT-IIdoes not display the standard value
although no abnormality is found by the above
mentioned continuity test and harness check, replace
the oxygen sensor (rear).
(2) For removal and installation of the oxygen sensor,
refer to GROUP 15 - Exhaust Pipe and Main Muffler.
MD998464Blue Black
Red
White Jumper
wire
Oxygen
sensor
(rear)
MB991223
Equipment side connector