2007 ISUZU KB P190 cooling
[x] Cancel search: coolingPage 2115 of 6020
ENGINE COOLING 6B-11
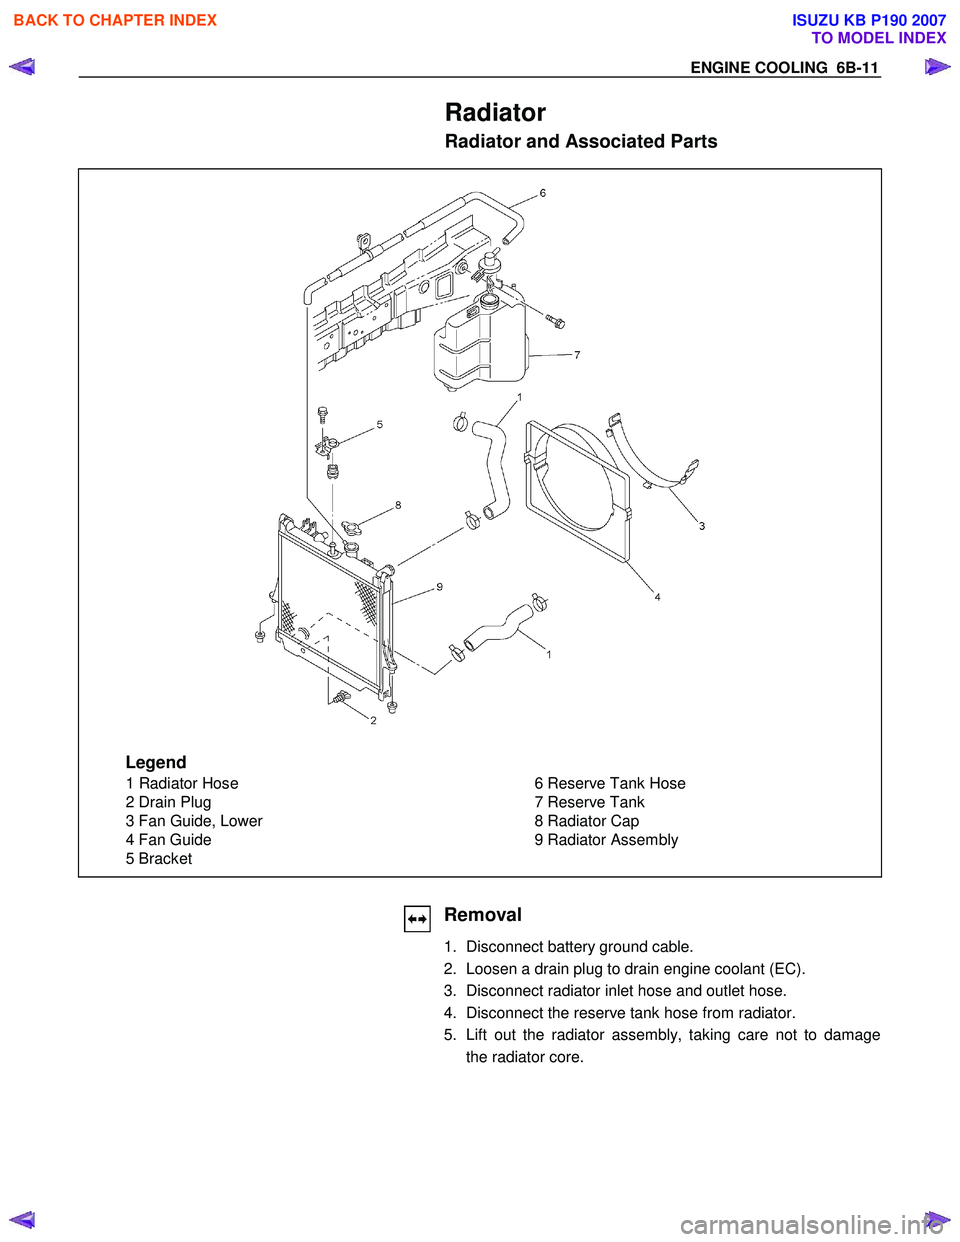
Radiator
Radiator and Associated Parts
Legend
1 Radiator Hose
2 Drain Plug
3 Fan Guide, Lower
4 Fan Guide
5 Bracket 6 Reserve Tank Hose
7 Reserve Tank
8 Radiator Cap
9 Radiator Assembly
Removal
1. Disconnect battery ground cable.
2. Loosen a drain plug to drain engine coolant (EC).
3. Disconnect radiator inlet hose and outlet hose.
4. Disconnect the reserve tank hose from radiator.
5. Lift out the radiator assembly, taking care not to damage the radiator core.
BACK TO CHAPTER INDEX
TO MODEL INDEX
ISUZU KB P190 2007
Page 2116 of 6020
6B-12 ENGINE COOLING
Inspection
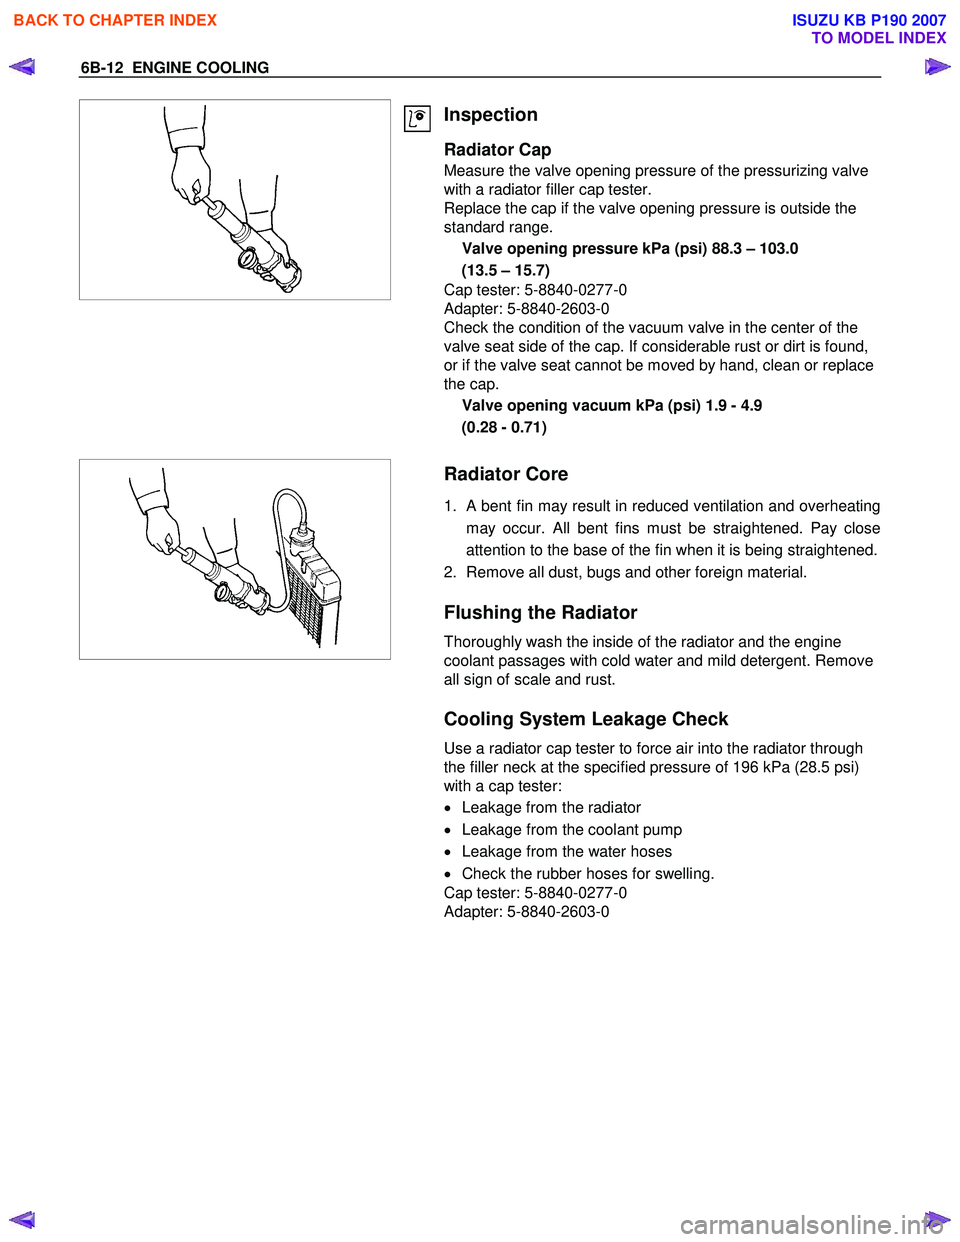
Radiator Cap
Measure the valve opening pressure of the pressurizing valve
with a radiator filler cap tester.
Replace the cap if the valve opening pressure is outside the
standard range.
Valve opening pressure kPa (psi) 88.3 – 103.0
(13.5 – 15.7)
Cap tester: 5-8840-0277-0
Adapter: 5-8840-2603-0
Check the condition of the vacuum valve in the center of the
valve seat side of the cap. If considerable rust or dirt is found,
or if the valve seat cannot be moved by hand, clean or replace
the cap.
Valve opening vacuum kPa (psi) 1.9 - 4.9
(0.28 - 0.71)
Radiator Core
1. A bent fin may result in reduced ventilation and overheating
may occur. All bent fins must be straightened. Pay close
attention to the base of the fin when it is being straightened.
2. Remove all dust, bugs and other foreign material.
Flushing the Radiator
Thoroughly wash the inside of the radiator and the engine
coolant passages with cold water and mild detergent. Remove
all sign of scale and rust.
Cooling System Leakage Check
Use a radiator cap tester to force air into the radiator through
the filler neck at the specified pressure of 196 kPa (28.5 psi)
with a cap tester:
• Leakage from the radiator
• Leakage from the coolant pump
• Leakage from the water hoses
• Check the rubber hoses for swelling.
Cap tester: 5-8840-0277-0
Adapter: 5-8840-2603-0
BACK TO CHAPTER INDEX
TO MODEL INDEX
ISUZU KB P190 2007
Page 2117 of 6020
ENGINE COOLING 6B-13
Installation
1. Install radiator assembly, taking care not to damage theradiator core.
2. Install the radiator assembly.
3. Connect reserve tank hose.
4. Connect radiator inlet hose and outlet hose.
5. Pour engine coolant up to filler neck of radiator, and up to MAX mark of reserve tank.
Important operation (in case of 100% engine coolant change) procedure for filling with engine coolant.
• Remove radiator cap.
• Fill with engine coolant to the radiator filler neck.
• Fill with EC to the "MAX" line on the reservoir tank.
• Start the engine with the radiator cap removed and bring to
operating temperature by running engine at 2,500 - 3,000
rpm for 30 minutes.
• By engine coolant temperature gauge reading make sure
that the thermostat is open.
• If air bubbles come up to the radiator filler neck, replenish
with engine coolant. Repeat until the EC level does not drop
any further. Install the radiator cap and stop the engine.
• Replenish engine coolant to the "MAX" line on the reservoi
r
tank and leave as it is until the engine gets cool.
•
After the engine gets cool, start the engine and make sure
there is no water running noise heard from the heater core
while the engine runs at 3000 rpm.
• Should water running noise be heard, repeat the same
procedure from the beginning.
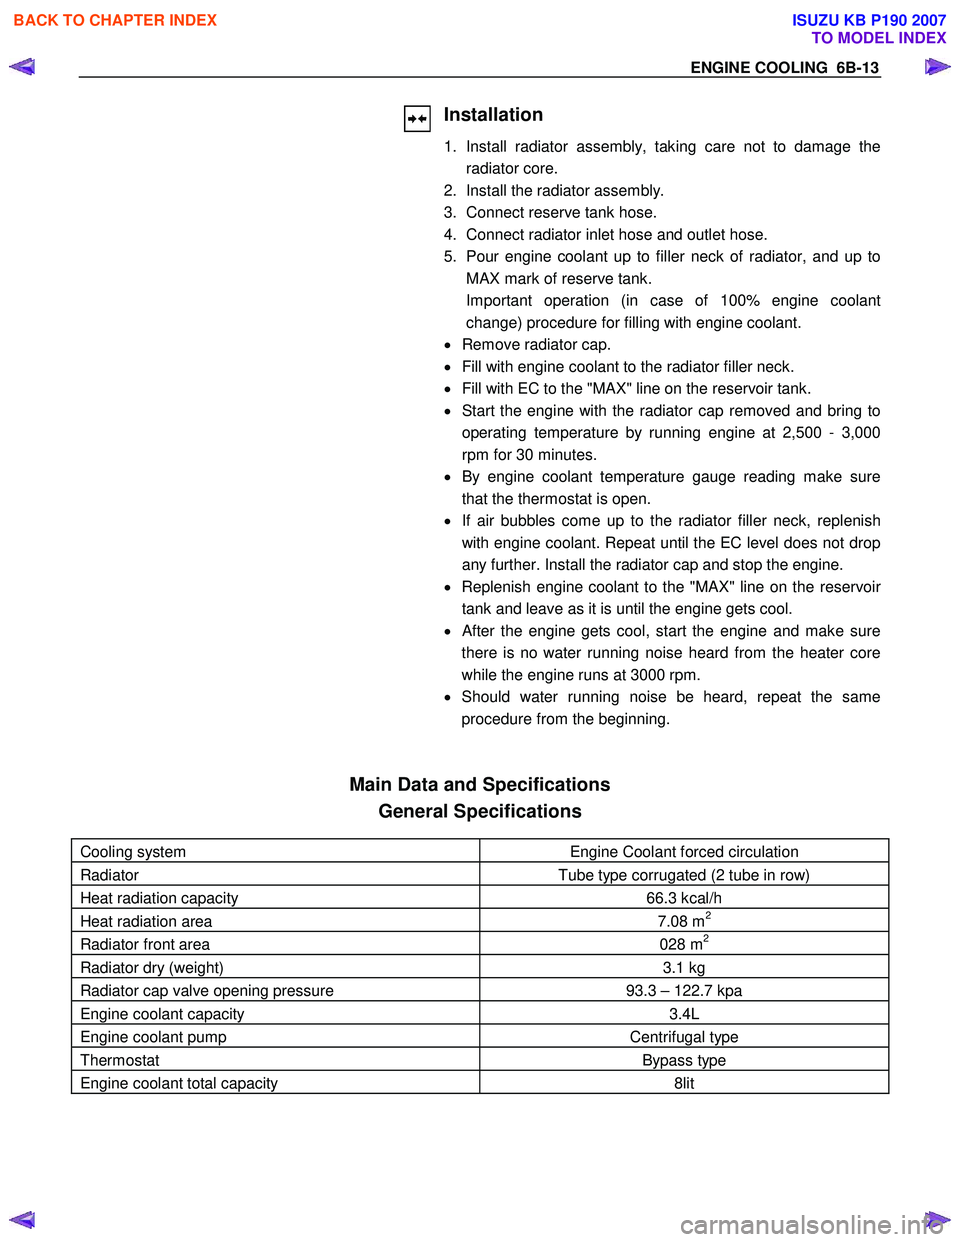
Main Data and Specifications
General Specifications
Cooling system Engine Coolant forced circulation
Radiator Tube type corrugated (2 tube in row)
Heat radiation capacity 66.3 kcal/h
Heat radiation area 7.08 m2
Radiator front area 028 m2
Radiator dry (weight) 3.1 kg
Radiator cap valve opening pressure 93.3 – 122.7 kpa
Engine coolant capacity 3.4L
Engine coolant pump Centrifugal type
Thermostat Bypass type
Engine coolant total capacity 8lit
BACK TO CHAPTER INDEX
TO MODEL INDEX
ISUZU KB P190 2007
Page 2118 of 6020
6B-14 ENGINE COOLING
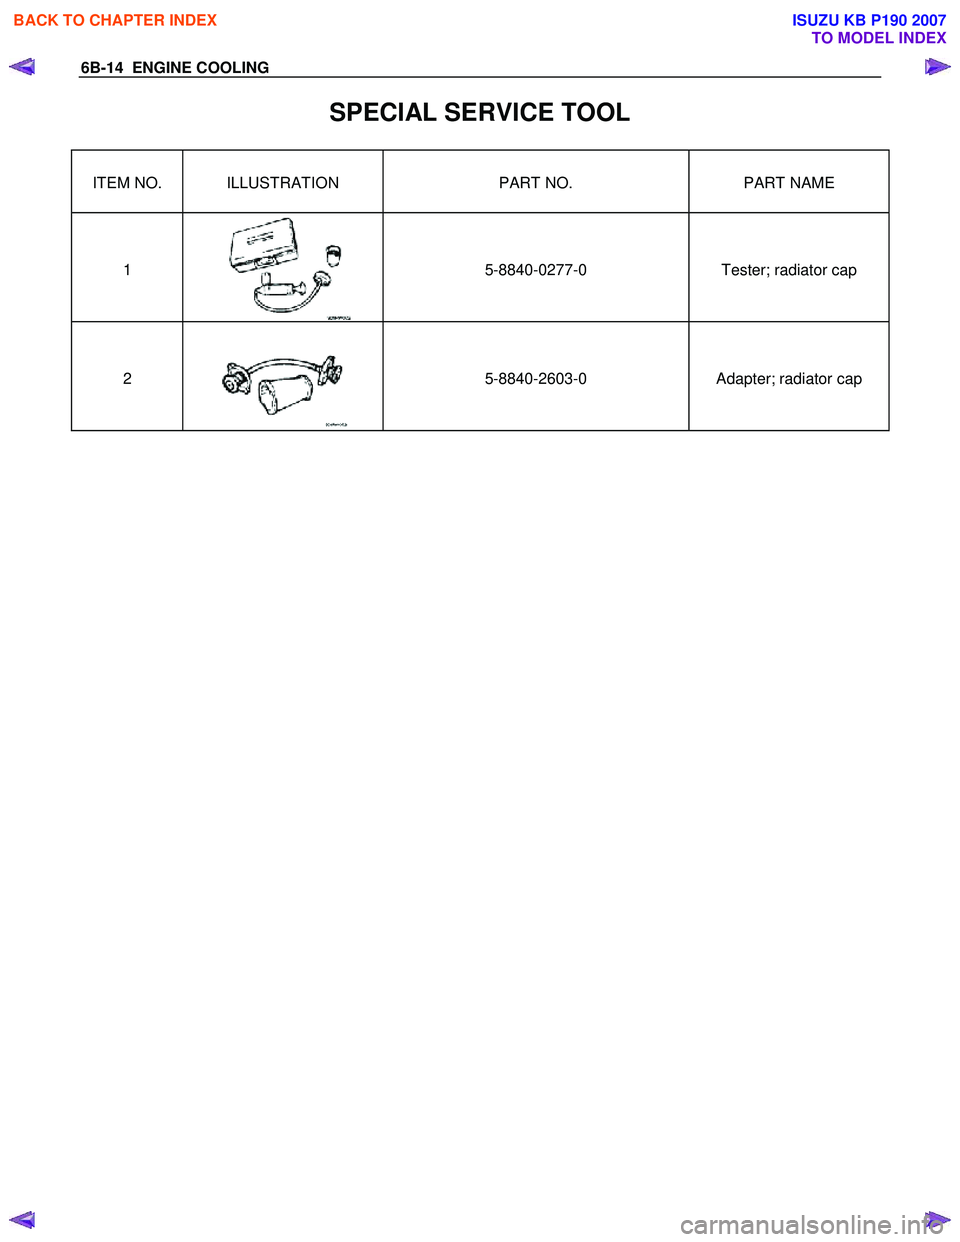
SPECIAL SERVICE TOOL
ITEM NO. ILLUSTRATION PART NO. PART NAME
1
5-8840-0277-0
Tester; radiator cap
2
5-8840-2603-0
Adapter; radiator cap
BACK TO CHAPTER INDEX
TO MODEL INDEX
ISUZU KB P190 2007
Page 2225 of 6020
ENGINE DRIVEABILITY AND EMISSIONS 6E–55
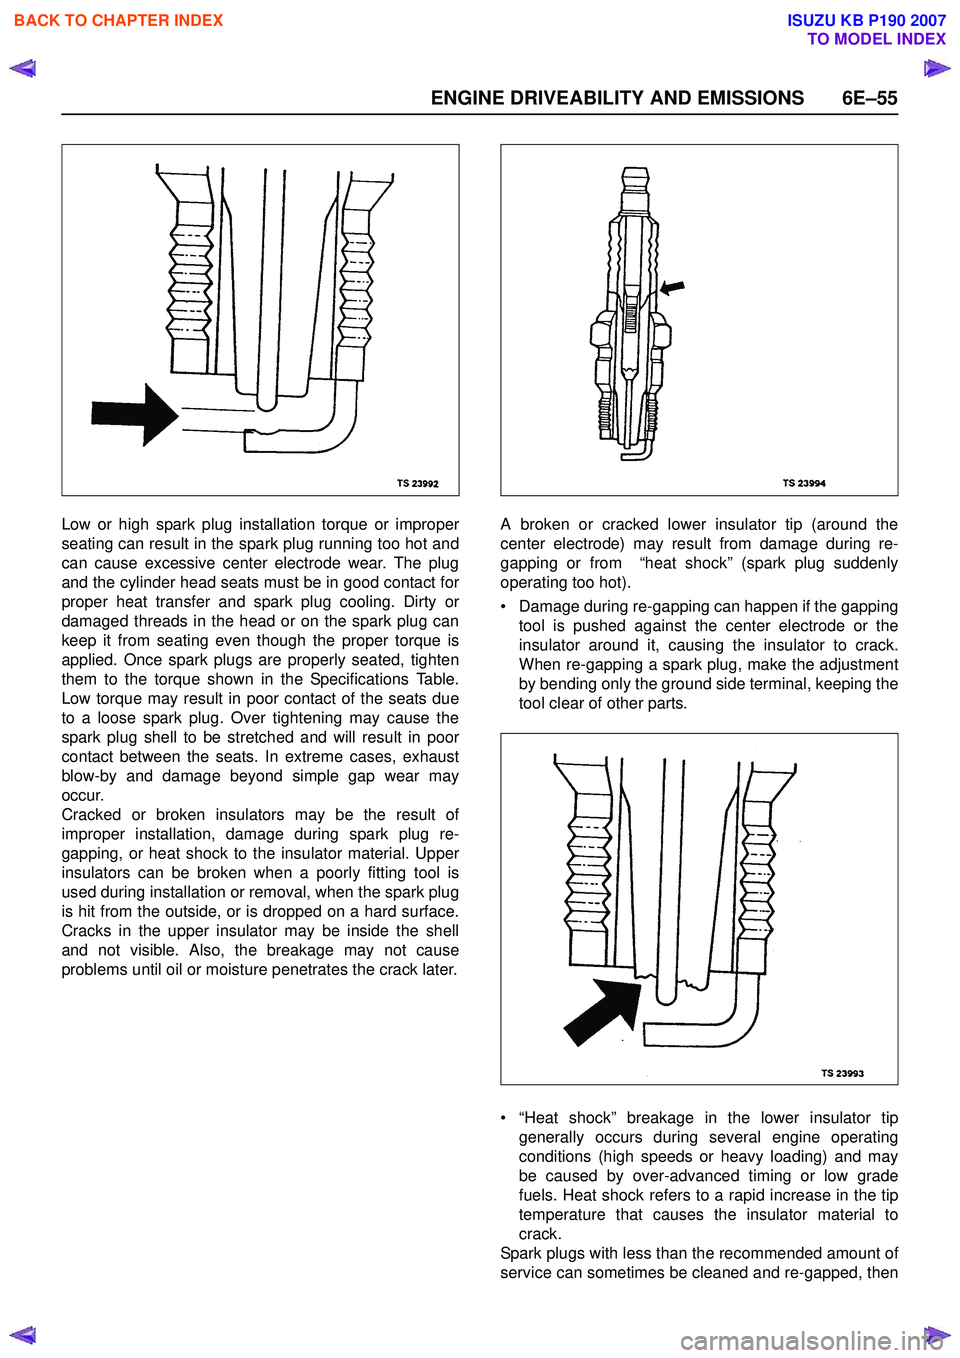
Low or high spark plug installation torque or improper
seating can result in the spark plug running too hot and
can cause excessive center electrode wear. The plug
and the cylinder head seats must be in good contact for
proper heat transfer and spark plug cooling. Dirty or
damaged threads in the head or on the spark plug can
keep it from seating even though the proper torque is
applied. Once spark plugs are properly seated, tighten
them to the torque shown in the Specifications Table.
Low torque may result in poor contact of the seats due
to a loose spark plug. Over tightening may cause the
spark plug shell to be stretched and will result in poor
contact between the seats. In extreme cases, exhaust
blow-by and damage beyond simple gap wear may
occur.
Cracked or broken insulators may be the result of
improper installation, damage during spark plug re-
gapping, or heat shock to the insulator material. Upper
insulators can be broken when a poorly fitting tool is
used during installation or removal, when the spark plug
is hit from the outside, or is dropped on a hard surface.
Cracks in the upper insulator may be inside the shell
and not visible. Also, the breakage may not cause
problems until oil or moisture penetrates the crack later. A broken or cracked lower insulator tip (around the
center electrode) may result from damage during re-
gapping or from “heat shock” (spark plug suddenly
operating too hot).
• Damage during re-gapping can happen if the gapping tool is pushed against the center electrode or the
insulator around it, causing the insulator to crack.
When re-gapping a spark plug, make the adjustment
by bending only the ground side terminal, keeping the
tool clear of other parts.
• “Heat shock” breakage in the lower insulator tip generally occurs during several engine operating
conditions (high speeds or heavy loading) and may
be caused by over-advanced timing or low grade
fuels. Heat shock refers to a rapid increase in the tip
temperature that causes the insulator material to
crack.
Spark plugs with less than the recommended amount of
service can sometimes be cleaned and re-gapped, then
BACK TO CHAPTER INDEX
TO MODEL INDEX
ISUZU KB P190 2007
Page 2426 of 6020
6E–256 ENGINE DRIVEABILITY AND EMISSIONS
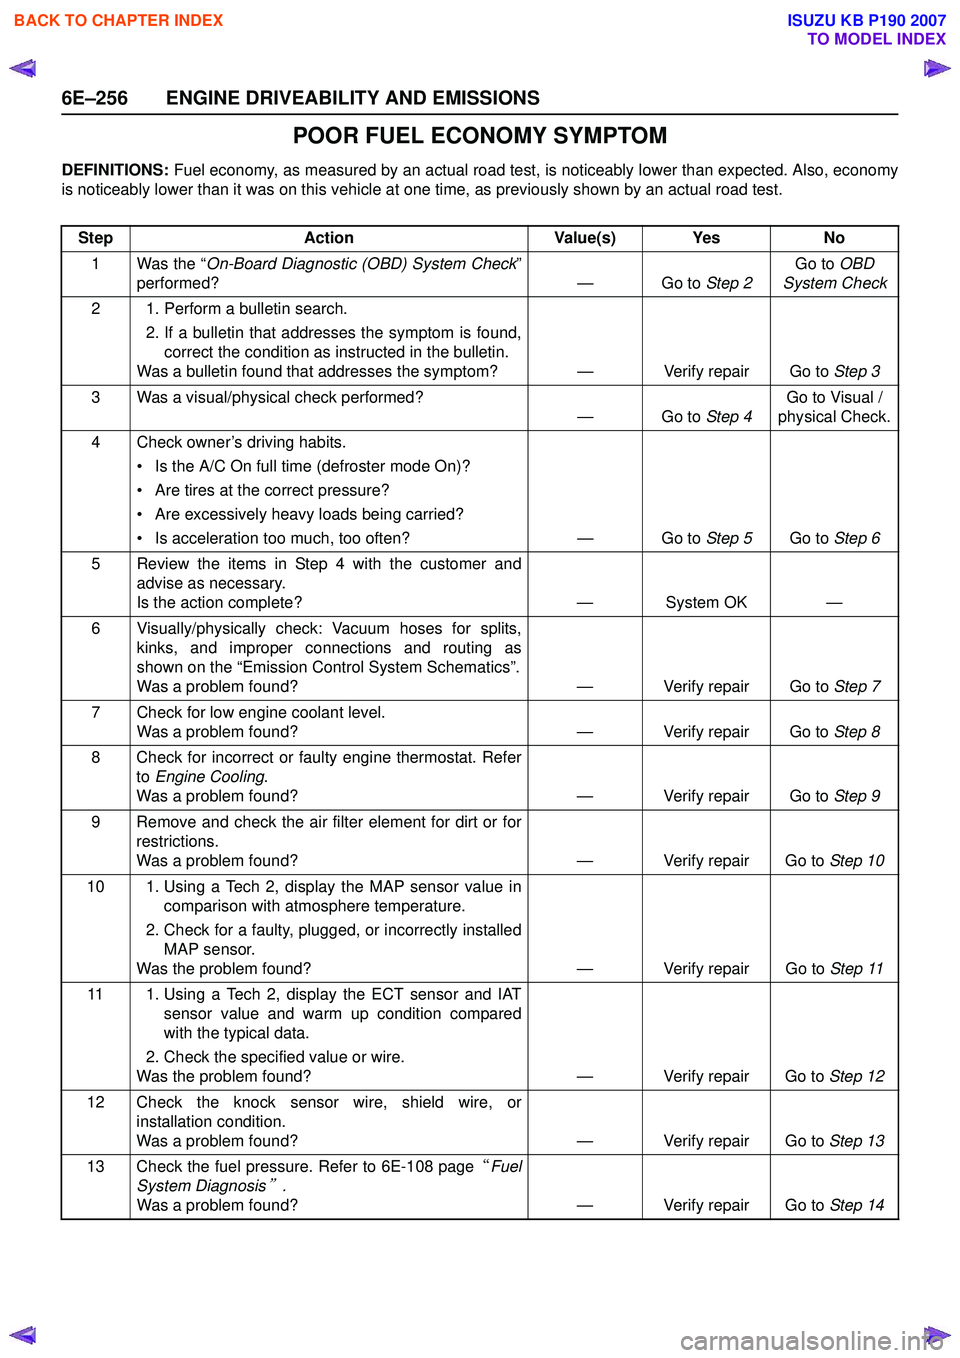
POOR FUEL ECONOMY SYMPTOM
DEFINITIONS: Fuel economy, as measured by an actual road test, is noticeably lower than expected. Also, economy
is noticeably lower than it was on this vehicle at one time, as previously shown by an actual road test.
Step Action Value(s) Yes No
1 Was the “ On-Board Diagnostic (OBD) System Check ”
performed? — Go to Step 2Go to
OBD
System Check
2 1. Perform a bulletin search. 2. If a bulletin that addresses the symptom is found,correct the condition as instructed in the bulletin.
Was a bulletin found that addresses the symptom? — Verify repair Go to Step 3
3 Was a visual/physical check performed? —Go to Step 4Go to Visual /
physical Check.
4 Check owner’s driving habits. • Is the A/C On full time (defroster mode On)?
• Are tires at the correct pressure?
• Are excessively heavy loads being carried?
• Is acceleration too much, too often? — Go to Step 5Go to Step 6
5 Review the items in Step 4 with the customer and advise as necessary.
Is the action complete? — System OK —
6 Visually/physically check: Vacuum hoses for splits, kinks, and improper connections and routing as
shown on the “Emission Control System Schematics”.
Was a problem found? — Verify repair Go to Step 7
7 Check for low engine coolant level. Was a problem found? — Verify repair Go to Step 8
8 Check for incorrect or faulty engine thermostat. Refer to Engine Cooling .
Was a problem found? — Verify repair Go to Step 9
9 Remove and check the air filter element for dirt or for restrictions.
Was a problem found? — Verify repair Go to Step 10
10 1. Using a Tech 2, display the MAP sensor value in comparison with atmosphere temperature.
2. Check for a faulty, plugged, or incorrectly installed MAP sensor.
Was the problem found? — Verify repair Go to Step 11
11 1. Using a Tech 2, display the ECT sensor and IAT sensor value and warm up condition compared
with the typical data.
2. Check the specified value or wire.
Was the problem found? — Verify repair Go to Step 12
12 Check the knock sensor wire, shield wire, or installation condition.
Was a problem found? — Verify repair Go to Step 13
13 Check the fuel pressure. Refer to 6E-108 page “Fuel
System Diagnosis
” .
Was a problem found? — Verify repair Go to Step 14
BACK TO CHAPTER INDEX
TO MODEL INDEX
ISUZU KB P190 2007
Page 2428 of 6020
6E–258 ENGINE DRIVEABILITY AND EMISSIONS
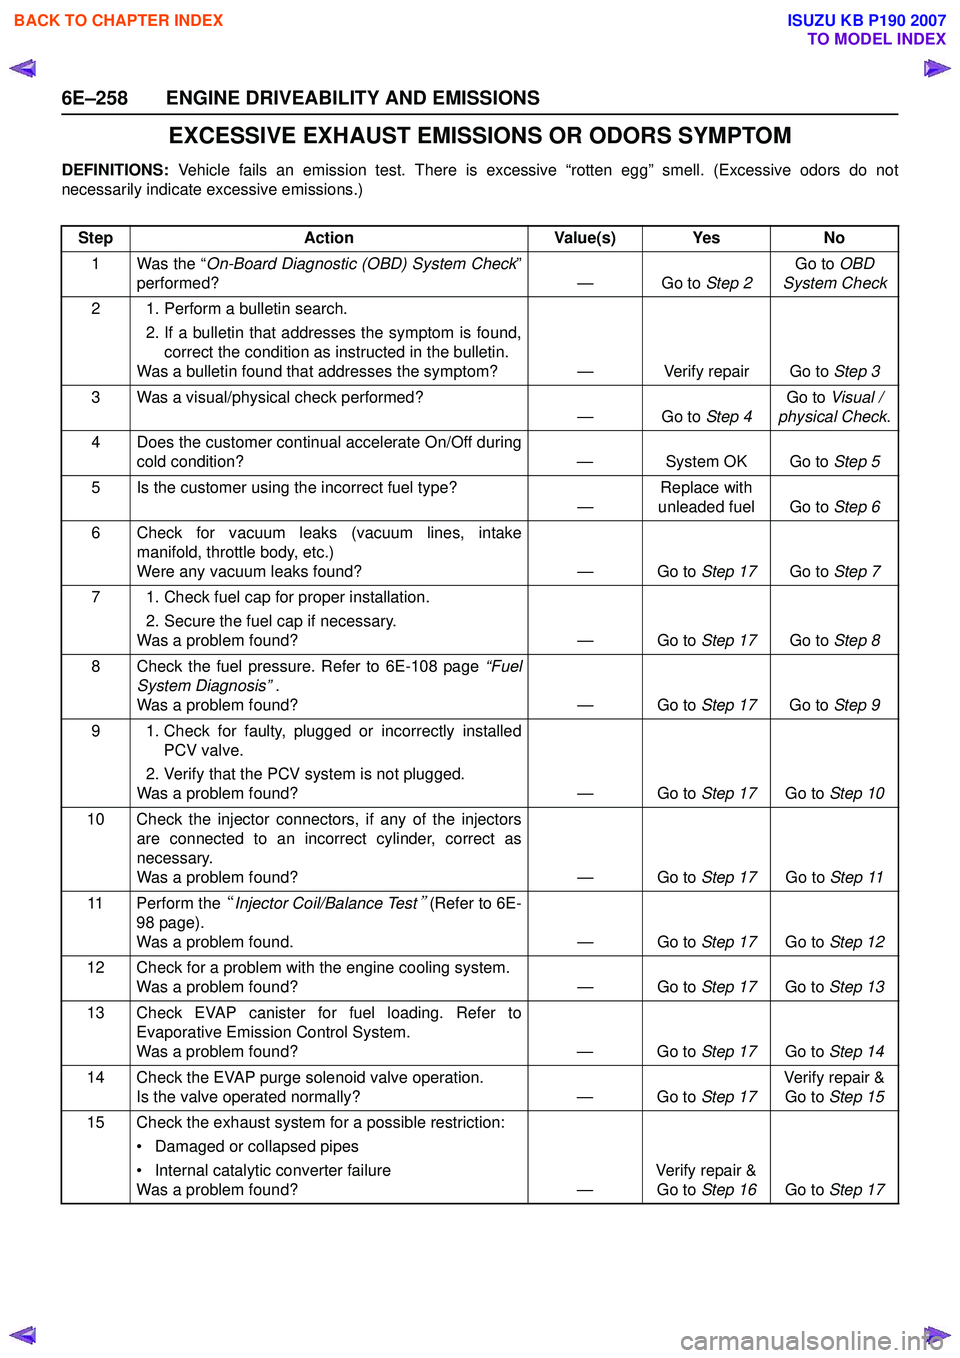
EXCESSIVE EXHAUST EMISSIONS OR ODORS SYMPTOM
DEFINITIONS: Vehicle fails an emission test. There is excessive “rotten egg” smell. (Excessive odors do not
necessarily indicate excessive emissions.)
Step Action Value(s) Yes No
1 Was the “ On-Board Diagnostic (OBD) System Check ”
performed? — Go to Step 2Go to
OBD
System Check
2 1. Perform a bulletin search. 2. If a bulletin that addresses the symptom is found,correct the condition as instructed in the bulletin.
Was a bulletin found that addresses the symptom? — Verify repair Go to Step 3
3 Was a visual/physical check performed? —Go to Step 4Go to
Visual /
physical Check .
4 Does the customer continual accelerate On/Off during cold condition? — System OK Go to Step 5
5 Is the customer using the incorrect fuel type? —Replace with
unleaded fuel Go to Step 6
6 Check for vacuum leaks (vacuum lines, intake manifold, throttle body, etc.)
Were any vacuum leaks found? — Go to Step 17Go to Step 7
7 1. Check fuel cap for proper installation. 2. Secure the fuel cap if necessary.
Was a problem found? — Go to Step 17Go to Step 8
8 Check the fuel pressure. Refer to 6E-108 page “Fuel
System Diagnosis” .
Was a problem found? — Go to Step 17Go to Step 9
9 1. Check for faulty, plugged or incorrectly installed PCV valve.
2. Verify that the PCV system is not plugged.
Was a problem found? — Go to Step 17Go to Step 10
10 Check the injector connectors, if any of the injectors are connected to an incorrect cylinder, correct as
necessary.
Was a problem found? — Go to Step 17Go to Step 11
11 Perform the “Injector Coil/Balance Test
” (Refer to 6E-
98 page).
Was a problem found. — Go to Step 17Go to Step 12
12 Check for a problem with the engine cooling system. Was a problem found? — Go to Step 17Go to Step 13
13 Check EVAP canister for fuel loading. Refer to Evaporative Emission Control System.
Was a problem found? — Go to Step 17Go to Step 14
14 Check the EVAP purge solenoid valve operation. Is the valve operated normally? — Go to Step 17Verify repair &
Go to Step 15
15 Check the exhaust system for a possible restriction: • Damaged or collapsed pipes
• Internal catalytic converter failure
Was a problem found? —Verify repair &
Go to Step 16 Go to Step 17
BACK TO CHAPTER INDEX
TO MODEL INDEX
ISUZU KB P190 2007
Page 2479 of 6020
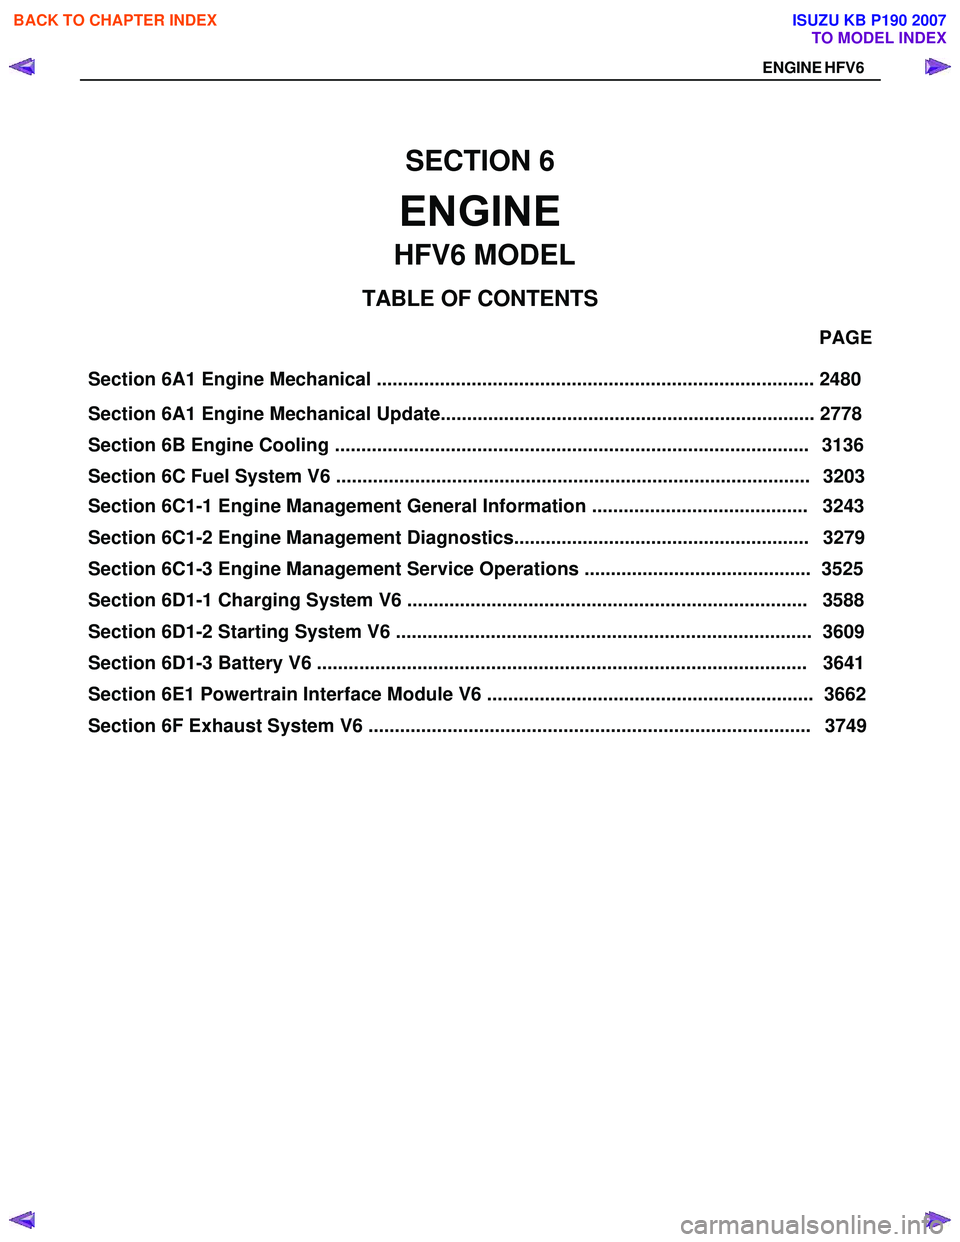
Section 6A1 Engine Mechanical ................................................................................... 2480 PAGE
Section 6A1 Engine Mechanical Update....................................................................... 2778
Section 6C1-1 Engine Management General Information ......................................... 3243
Section 6C1-2 Engine Management Diagnostics........................................................ 3279
Section 6C1-3 Engine Management Service Operations ........................................... 3525
Section 6D1-1 Charging System V6 ............................................................................ 3588
SECTION 6
ENGINE
TA BLE OF CONTENTS
Section 6D1-3 Battery V6 ............................................................................................. 3641
Section 6E1 Powertrain Interface Module V6 .............................................................. 3662
HFV6 MODEL
ENGINE HFV6
Section 6B Engine Cooling .......................................................................................... 3136
Section 6C Fuel System V6 .......................................................................................... 3203
Section 6 D1-2 St art ing Syste m V 6 ............................................................................... 36 09
Section 6F Exhaust System V6 .................................................................................... 3749
BACK TO CHAPTER INDEX
TO MODEL INDEX
ISUZU KB P190 2007