2007 ISUZU KB P190 check engine light
[x] Cancel search: check engine lightPage 5304 of 6020
8A-366 ELECTRICAL-BODY AND CHASSIS
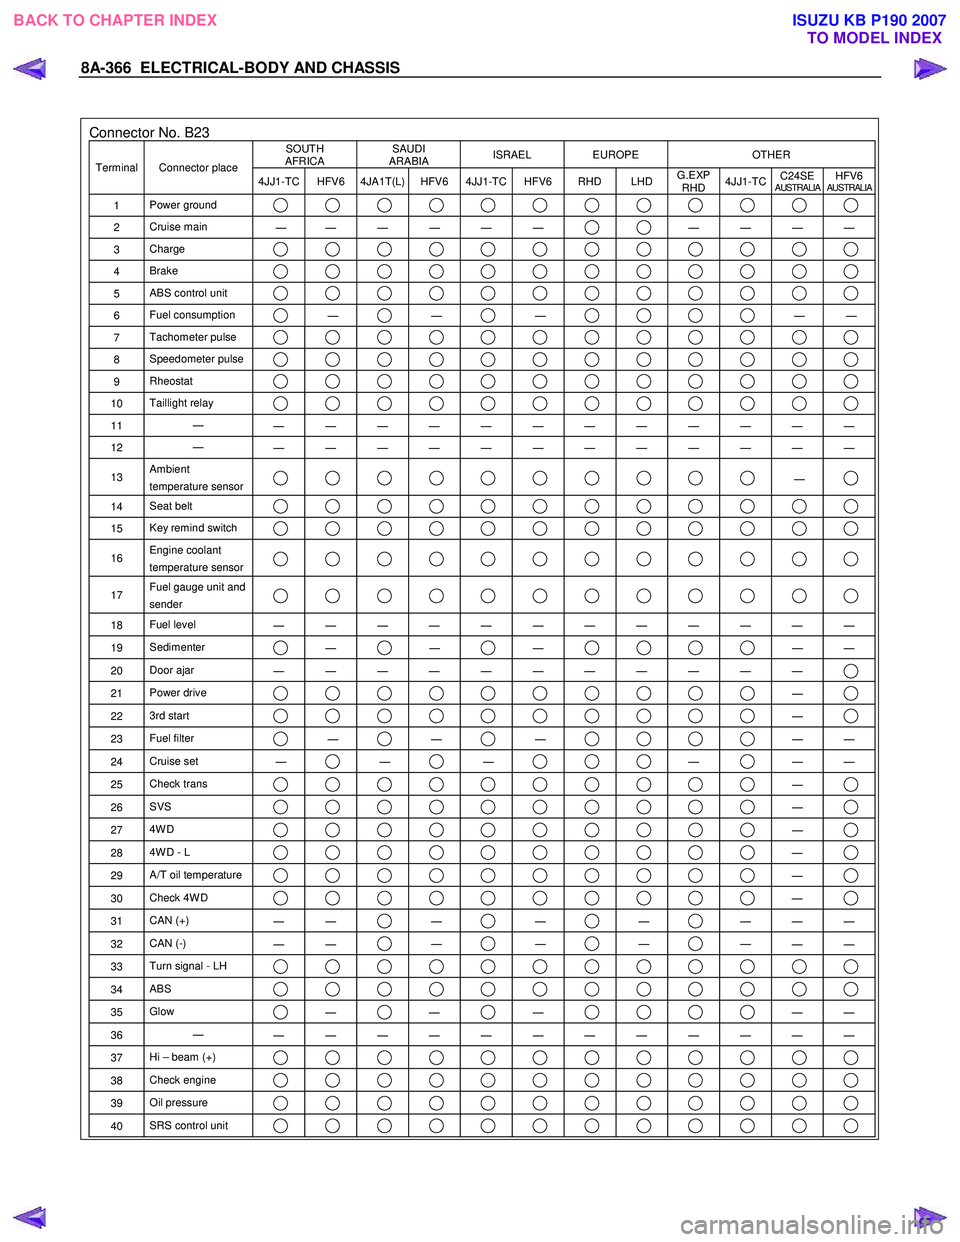
Connector No. B23 SOUTH
AFRICA SAUDI
ARABIA ISRAEL EUROPE OTHER
Terminal Connector place
4JJ1-TC HFV6 4JA1T(L) HFV6 4JJ1-TC HFV6 RHD LHD G.EXP
RHD 4JJ1-TC
C24SE
AUSTRALIAHFV6AUSTRALIA
1
Power ground
2 Cruise main
―
― ― ― ― ― ― ― ― ―
3
Charge
4 Brake
5 ABS control unit
6 Fuel consumption ―
―
―
―
―
7 Tachometer pulse
8 Speedometer pulse
9 Rheostat
10 Taillight relay
11 ―
― ― ― ― ― ― ― ― ― ― ― ―
12 ―
― ― ― ― ― ― ― ― ― ― ― ―
13 Ambient
temperature sensor ―
14 Seat belt
15 Key remind switch
16 Engine coolant
temperature sensor
17 Fuel gauge unit and
sender
18 Fuel level
― ― ― ― ― ― ― ― ― ― ― ―
19 Sedimenter ―
―
―
―
―
20 Door ajar
― ― ― ― ― ― ― ― ― ― ―
21 Power drive ―
22 3rd start ―
23 Fuel filter ―
―
―
―
―
24 Cruise set
― ―
―
―
―
―
25 Check trans ―
26 SVS ―
27 4W D ―
28 4W D - L ―
29 A/T oil temperature ―
30 Check 4W D ―
31 CAN (+)
― ― ―
―
―
― ― ―
32
CAN (-)
― ― ―
―
―
― ― ―
33
Turn signal - LH
34 ABS
35 Glow ―
―
―
―
―
36 ―
― ― ― ― ― ― ― ― ― ― ― ―
37 Hi – beam (+)
38 Check engine
39 Oil pressure
40 SRS control unit
BACK TO CHAPTER INDEX
TO MODEL INDEXISUZU KB P190 2007
Page 5307 of 6020
ELECTRICAL-BODY AND CHASSIS 8A-369
Low Fuel Indicator Light
1. Disconnect the fuel gauge unit wire connector.
2. Turn the key switch on. Check that the bulb lights.
If operation is not correct, remove and check the bulb or circuit.
or If check whether low fuel turns on fuel input (B-24) at the
time of open and key on.
∗ meter is check at low fuel
RTW 78ASH001501
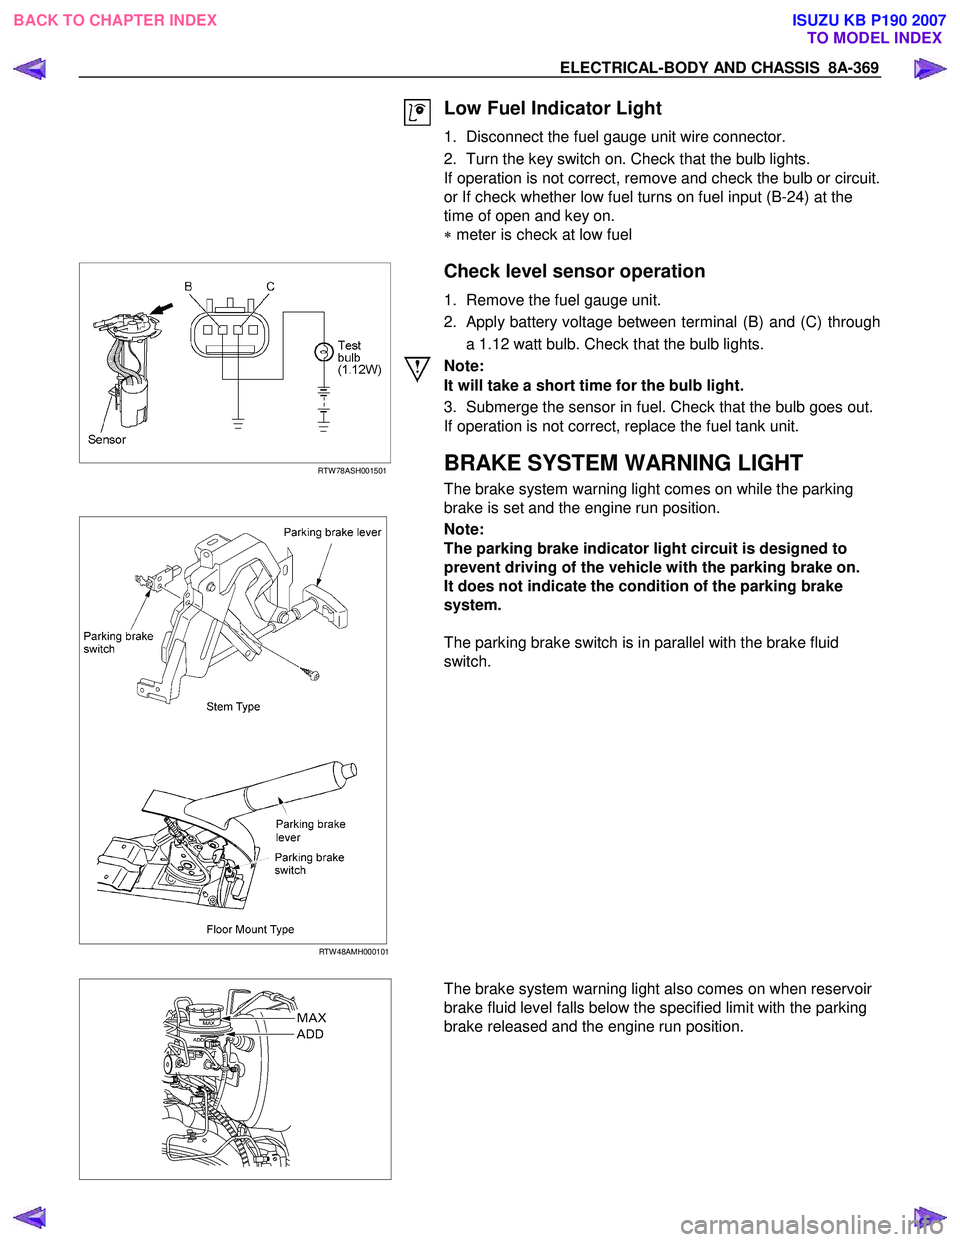
Check level sensor operation
1. Remove the fuel gauge unit.
2. Apply battery voltage between terminal (B) and (C) through a 1.12 watt bulb. Check that the bulb lights.
Note:
It will take a short time for the bulb light.
3. Submerge the sensor in fuel. Check that the bulb goes out.
If operation is not correct, replace the fuel tank unit.
BRAKE SYSTEM WARNING LIGHT
The brake system warning light comes on while the parking
brake is set and the engine run position.
RTW 48AMH000101
Note:
The parking brake indicator light circuit is designed to
prevent driving of the vehicle with the parking brake on.
It does not indicate the condition of the parking brake
system.
The parking brake switch is in parallel with the brake fluid
switch.
The brake system warning light also comes on when reservoir
brake fluid level falls below the specified limit with the parking
brake released and the engine run position.
BACK TO CHAPTER INDEX TO MODEL INDEXISUZU KB P190 2007
Page 5889 of 6020
11A-38 IMMOBILIZER CONTROL SYSTEM (4JK1/4JJ1/HFV6)
PIM Programming Procedure must be done
whenever any of the following condtions are met:
• Diagnostic chart instructs you to program PIM
• New PIM is installed
• PIM is reused that was rest in an original vehicle
ICU & PIM Programming Procedure must be done
whenever any of the following condition is met:
• New or resued ICU and PIM are installed at the same time
ECM & PIM Programming Procedure must be done
whenever any of the following condition is met:
• New or reused ECM and PIM are installed at the same time
ICU & ECM Programming Procedure must be done
whenever any of the following condition is met:
• New or reused ICU and ECM are installed at the same time (transponder key(s) also replaced)
ICU, ECM & PIM Programming Procdure must be
done whenever any of the following condition is met:
• New or reused ICU, ECM and PIM are installed at the same time (transponder key(s) also replaced)
Notice: During programming of the new transponder
key(s), an authentication code is programmed into the
transponder chip and it cannot be reprogrammed
again. When replacing both ICU and ECM at the same
time, a new authentication code to be programmed into
the newly installed ECM is based on information of
newly installed ICU. However, the transponder keys
cannot be reprogrammed therefore it must be replaced.
Do not replace the ICU and the ECM at the same time
to avoid needless transponder key(s) replacement
simultaneously unless complete damaging was
encountered (e.g. both modules cannot be
communicated with a scan tool).
Transponder Key Erasing Procedure
1. Install a scan tool.
2. Turn ON the ignition, with the engine OFF.
3. Select Diagnostics > Appropriate vehicle identification > Body > Immobilizer > Additional
Functions > Erase Transponder Keys.
4. The on-screen displays a message "See Checking Procedure Before Programming!", then press
Confirm.
5. Input four digits of correct security code that belongs to this vehicle and follow the on-screen
instructions. Notice:
An incorrect security code input causes a
security wait time.
6. The on-screen displays a message "Caution All Transponder Keys Will Be Erased!", then press
Confirm.
7. Operate the ignition switch by following the on- screen instructions.
8. The on-screen displays a message "Erase Transponder Keys Erasing Completed
Successfully!" if transponder erasing has been
completed, then press Confirm.
9. Turn OFF the ignition for 30 seconds.
10. Verify the engine fails to run using all transponder key(s).
Transponder Key Programming Procedure
1. Install a scan tool.
2. Turn ON the ignition, with the engine OFF.
3. Select Diagnostics > Appropriate vehicle identification > Body > Immobilizer > Programming
> Program Transponder Keys.
4. In order to get a programming approval, the on- screen displays a message to user. Get
programming approval from the TIS 2000 using
the following procedure:
a. Connect a scan tool to the terminal that installed TIS 2000 with the latest software and
the hardware key is plugged into port.
b. Turn ON the scan tool and keep at title screen.
c. Launch the TIS application.
d. Select the Security Access at the main screen.
e. Highlight "Tech 2" on the Diagnostic Tool Selection screen and click "Next".
f. Click "Close" on the Security Access Enabled screen.
g. Turn OFF the scan tool.
h. Disconnect the scan tool from the terminal.
5. Reinstall a scan tool to the vehicle.
6. Turn ON the ignition, with the engine OFF.
7. Select Diagnostics > Appropriate vehicle identification > Body > Immobilizer > Programming
> Program Transponder Keys.
8. The on-screen displays a message "See Checking Procedure Before Programming!", then press
Confirm.
9. Input four digits of correct security code that belongs to this vehicle and follow the on-screen
instructions.
Notice: An incorrect security code input causes a
security wait time.
10. Operate the ignition switch by following the on- screen instructions.
BACK TO CHAPTER INDEX TO MODEL INDEX
ISUZU KB P190 2007
Page 5890 of 6020
IMMOBILIZER CONTROL SYSTEM (4JK1/4JJ1/HFV6) 11A-39
Notice:Keep away another key, another transponder
key, key number plate or other metal items from the
transponder key that is going to program.
11. The on-screen displays a message "Program more Transponder Keys?" If all transponder key(s) has
been programmed, press No and go to next step. If
more transponder key(s) need to be programmed,
press Yes and repeat from previous step.
12. The on-screen displays a message "Program Transponder Keys Programming Completed
Successfully!" if all transponder key(s)
programming has been completed, then press
Confirm.
13. Turn OFF the ignition for 30 seconds.
14. Verify the engine starts using all programmed transponder key(s).
ICU Resetting Procedure
1. Install a scan tool.
2. Turn ON the ignition, with the engine OFF.
3. Select Diagnostics > Appropriate vehicle identification > Body > Immobilizer > Additional
Functions > Reset Immobilizer.
4. The on-screen displays a message "See Checking Procedure Before Programming!", then press
Confirm.
5. Input four digits of correct security code that belongs to this vehicle and follow the on-screen
instructions.
Notice: An incorrect security code input causes a
security wait time.
6. The on-screen displays a message "Warning Engine will not start after Reset!", then press
Confirm.
7. The on-screen displays a message "Reset Immobilizer Reset Completed Successfully!" if ICU
resetting has been completed, then press Confirm.
8. Turn OFF the ignition for 30 seconds.
9. Verify the engine fails to run using all transponder key(s).
ICU Programming Procedure
1. Install a scan tool.
2. Turn ON the ignition, with the engine OFF.
3. Select Diagnostics > Appropriate vehicle identification > Body > Immobilizer > Programming
> Program Immobilizer Function or Immobilizer
Link To ECM/ PIM.
4. In order to get a programming approval, the on- screen displays a message to user. Get
programming approval from the TIS 2000 using
the following procedure: a. Connect a scan tool to the terminal that
installed TIS 2000 with the latest software and
the hardware key is plugged into port.
b. Turn ON the scan tool and keep at title screen.
c. Launch the TIS application.
d. Select the Security Access at the main screen.
e. Highlight "Tech 2" on the Diagnostic Tool Selection screen and click "Next".
f. Click "Close" on the Security Access Enabled screen.
g. Turn OFF the scan tool.
h. Disconnect the scan tool from the terminal.
5. Reinstall a scan tool to the vehicle.
6. Turn ON the ignition, with the engine OFF.
7. Select Diagnostics > Appropriate vehicle identification > Body > Immobilizer > Programming
> Program Immobilizer Function or Immobilizer
Link To ECM/ PIM.
8. The on-screen displays a message "See Checking Procedure Before Programming!", then press
Confirm.
9. Select "Immobilizer Installed" or select "Imoobilizer Replaced" Yes.
10. Select "PIM or ECM Replaced" No, if displayed.
11. Input four digits of correct security code that belongs to this vehicle and follow the on-screen
instructions. The on-screen instruction may repeat
twice.
Notice: An incorrect security code input causes a
security wait time.
12. Input 17 digits of correct VIN that is based on stamped VIN or affixed VIN plate on this vehicle.
13. Operate the ignition switch by following the on- screen instructions.
Notice: Keep away another key, another transponder
key, key number plate or other metal items from the
transponder key that is going to program.
14. The on-screen displays a message "Program more Transponder Keys?" If all transponder key(s) has
been programmed, press No and go to next step. If
more transponder key(s) need to be programmed,
press Yes and repeat from previous step.
15. The on-screen displays a message "Programming Successfully!" if ICU and all transponder key(s)
programming has been completed, then press
Confirm.
16. Turn OFF the ignition for 30 seconds.
17. Verify the engine starts using all programmed transponder key(s).
ECM Resetting Procedure
1. Install a scan tool.
2. Turn ON the ignition, with the engine OFF.
BACK TO CHAPTER INDEX TO MODEL INDEX
ISUZU KB P190 2007
Page 5891 of 6020
11A-40 IMMOBILIZER CONTROL SYSTEM (4JK1/4JJ1/HFV6)
3. Select Diagnostics > Appropriate vehicleidentification > Body > Immobilizer > Additional
Functions > Reset Engine Control Module. (4JK1/
4JJ1)
Select Diagnostics > Appropriate vehicle
identification > Engine > V6 Engine >
Programming > Reset ECU. (HFV6)
4. The on-screen may display a message "See Checking Procedure Before Programming!", then
press Confirm.
5. Input four digits of correct security code that belongs to this vehicle and follow the on-screen
instructions.
Notice: An incorrect security code input causes a
security wait time.
6. The on-screen displays a message "Warning! Engine will not start after Reset!", then press
Reset.
7. The on-screen displays a message "Reset Successfully!" if ECM resetting has been
completed, then press Confirm.
8. Turn OFF the ignition for 30 seconds.
9. Verify the engine fails to run using all transponder key(s).
ECM Programming Procedure
1. Install a scan tool.
2. Turn ON the ignition, with the engine OFF.
3. Select Diagnostics > Appropriate vehicle identification > Body > Immobilizer > Programming
> Program Immobilizer Function or Immobilizer
Link To ECM/ PIM.
4. In order to get a programming approval, the on- screen displays a message to user. Get
programming approval from the TIS 2000 using
the following procedure:
a. Connect a scan tool to the terminal that installed TIS 2000 with the latest software and
the hardware key is plugged into port.
b. Turn ON the scan tool and keep at title screen.
c. Launch the TIS application.
d. Select the Security Access at the main screen.
e. Highlight "Tech 2" on the Diagnostic Tool Selection screen and click "Next".
f. Click "Close" on the Security Access Enabled screen.
g. Turn OFF the scan tool.
h. Disconnect the scan tool from the terminal.
5. Reinstall a scan tool to the vehicle.
6. Turn ON the ignition, with the engine OFF.
7. Select Diagnostics > Appropriate vehicle identification > Body > Immobilizer > Programming
> Program Immobilizer Function or Immobilizer
Link To ECM/ PIM. 8. The on-screen may display a message "See
Checking Procedure Before Programming!", then
press Confirm.
9. Select "Imoobilizer Replaced" No and select "PIM or ECM Replaced" Yes, if displayed.
10. Input four digits of correct security code that belongs to this vehicle and follow the on-screen
instructions. The on-screen instruction may repeat
twice.
Notice: An incorrect security code input causes a
security wait time.
11. Select "Engine Controller Installed" or select "ECM Replaced".
12. Operate the ignition switch by following the on- screen instructions.
13. The on-screen displays a message "Programming Successfully!" if ECM programming has been
completed, then press Confirm.
14. Turn OFF the ignition for 30 seconds.
15. Verify the engine starts using all transponder key(s).
PIM Resetting Procedure
1. Install a scan tool.
2. Turn ON the ignition, with the engine OFF.
3. Select Diagnostics > Appropriate vehicle identification > Body > Powertrain Interface
Module > Security > Reset PIM.
4. Input four digits of correct security code that belongs to this vehicle and follow the on-screen
instructions.
Notice: An incorrect security code input causes a
security wait time.
5. The on-screen displays a message "Warning! Engine will not start after Reset!", then press
Reset.
6. The on-screen displays a message "Reset Completed Successfully!" if PIM resetting has
been completed, then press Confirm.
7. Turn OFF the ignition for 30 seconds.
PIM Programming Procedure
1. Install a scan tool.
2. Turn ON the ignition, with the engine OFF.
3. Select Diagnostics > Appropriate vehicle identification > Body > Immobilizer > Programming
> Immobilizer Link To ECM/ PIM.
4. In order to get a programming approval, the onscreen displays a message to user. Get
programming approval from the TIS 2000 using
the following procedure:
BACK TO CHAPTER INDEX TO MODEL INDEX
ISUZU KB P190 2007
Page 5893 of 6020
11A-42 IMMOBILIZER CONTROL SYSTEM (4JK1/4JJ1/HFV6)
e. Highlight "Tech 2" on the Diagnostic ToolSelection screen and click "Next".
f. Click "Close" on the Security Access Enabled screen.
g. Turn OFF the scan tool.
h. Disconnect the scan tool from the terminal.
5. Reinstall a scan tool to the vehicle.
6. Turn ON the ignition, with the engine OFF.
7. Select Diagnostics > Appropriate vehicle identification > Body > Immobilizer > Programming
> Immobilizer Link To ECM/ PIM.
8. Select "Immobilizer Replaced" No and select "PIM or ECM Replaced" Yes.
9. Input four digits of correct security code that belongs to this vehicle and follow the on-screen
instructions. The on-screen instruction repeats
twice.
Notice: An incorrect security code input causes a
security wait time.
10. Select "PIM and ECM Replaced". 11. Operate the ignition switch by following the on- screen instructions.
12. The on-screen displays a message "Programming Successfully!" if ECM and PIM programming has
been completed, the press Confirm.
ICU & ECM Programming Procedure
1. Install a scan tool.
2. Turn ON the ignition, with the engine OFF.
3. Select Diagnostics > Appropriate vehicle identification > Body > Immobilizer > Programming
> Program Immobilizer Function or Immobilizer
Link To ECM/ PIM.
4. In order to get a programming approval, the on- screen displays a message to user. Get
programming approval from the TIS 2000 using
the following procedure:
a. Connect a scan tool to the terminal that installed TIS 2000 with the latest software and
the hardware key is plugged into port.
b. Turn ON the scan tool and keep at title screen.
c. Launch the TIS application.
d. Select the Security Access at the main screen.
e. Highlight "Tech 2" on the Diagnostic Tool Selection screen and click "Next".
f. Click "Close" on the Security Access Enabled screen.
g. Turn OFF the scan tool.
h. Disconnect the scan tool from the terminal.
5. Reinstall a scan tool to the vehicle.
6. Turn ON the ignition, with the engine OFF. 7. Select Diagnostics > Appropriate vehicle
identification > Body > Immobilizer > Programming
> Program Immobilizer Function or Immobilizer
Link To ECM/ PIM.
8. The on-screen may display a message "See Checking Procedure Before Programming!", then
press Confirm.
9. Select "Immobilizer and ECM Installed" or select "Immobilizer Replaced" Yes.
10. Select "PIM or ECM Replaced" Yes, if displayed. 11. Input four digits of correct security code that belongs to this vehicle and follow the on-screen
instructions. The on-screen instruction repeats
twice.
Notice: An incorrect security code input causes a
security wait time.
12. Select "ECM Replaced" if displayed.
13. Input 17 digits of correct VIN that is based on stamped VIN or affixed VIN plate on this vehicle.
14. Operate the ignition switch by following the on- screen instructions.
Notice: Keep away another key, another transponder
key, key number plate or other metal items from the
transponder key that is going to program.
15. The on-screen displays a message "Program more Transponder Keys?" If all transponder key(s) has
been programmed, press No and go to next step. If
more transponder key(s) need to be programmed,
press Yes and repeat from previous step.
16. The on-screen displays a message "Programming Successfully!" if ICU, ECM and all transponder
key(s) programming has been completed, then
press Confirm.
17. Turn OFF the ignition for 30 seconds.
18. Verify the engine starts using all programmed transponder key(s).
ICU, ECM & PIM Programming Procedure
1. Install a scan tool.
2. Turn ON the ignition, with the engine OFF.
3. Select Diagnostics > Appropriate vehicle identification > Body > Immobilizer > Programming
> Immobilizer Link To ECM/ PIM.
4. In order to get a programming approval, the onscreen displays a message to user. Get
programming approval from the TIS 2000 using
the following procedure:
a. Connect a scan tool to the terminal that installed TIS 2000 with the latest software and
the hardware key is plugged into port.
b. Turn ON the scan tool and keep at title screen.
c. Launch the TIS application.
d. Select the Security Access at the main screen.
BACK TO CHAPTER INDEX TO MODEL INDEX
ISUZU KB P190 2007