Page 4679 of 6020

MANUAL TRANSMISSION 7B1-73
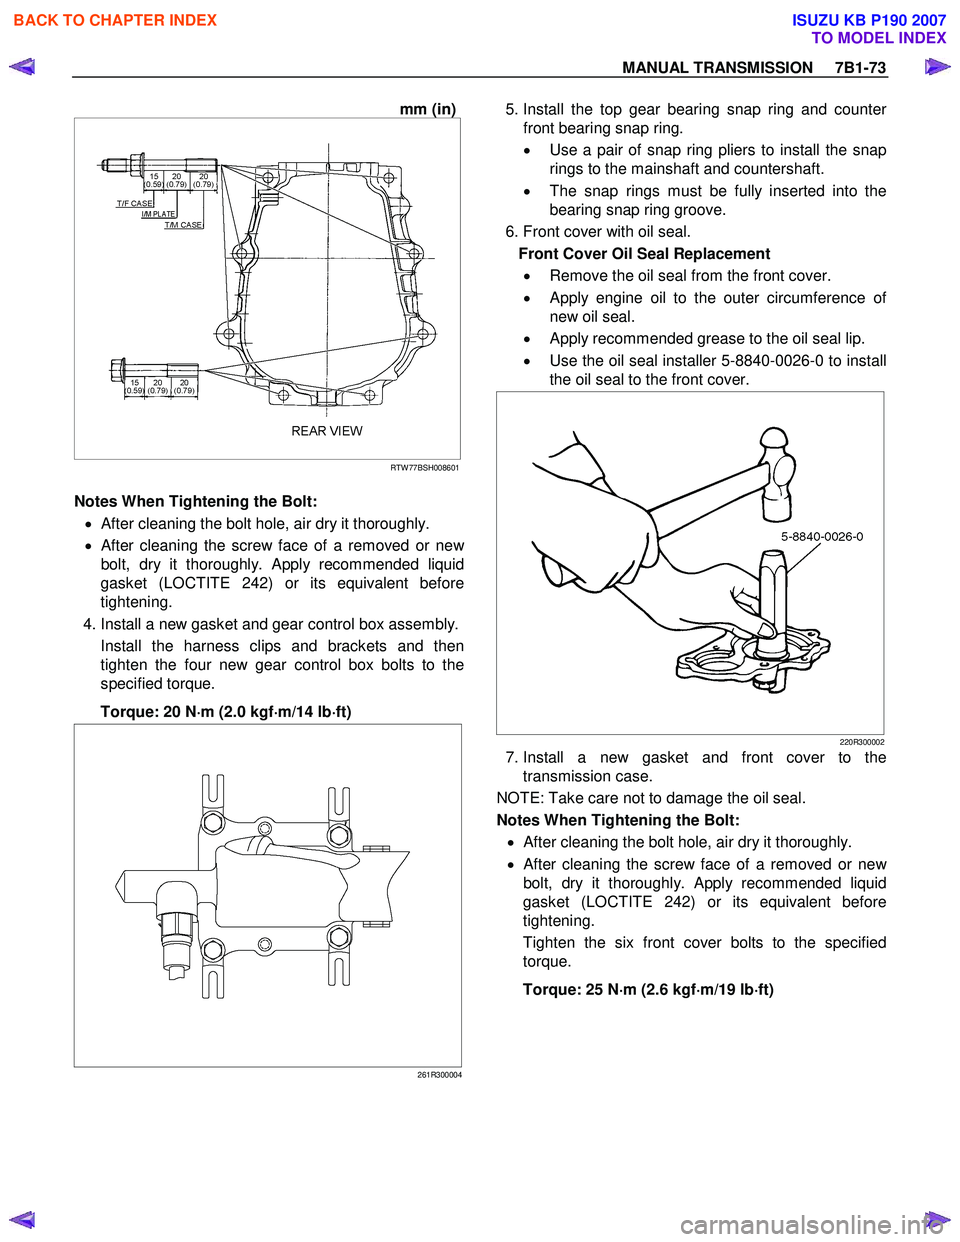
mm (in)
RTW 77BSH008601
Notes When Tightening the Bolt:
• After cleaning the bolt hole, air dry it thoroughly.
•
After cleaning the screw face of a removed or new
bolt, dry it thoroughly. Apply recommended liquid
gasket (LOCTITE 242) or its equivalent before
tightening.
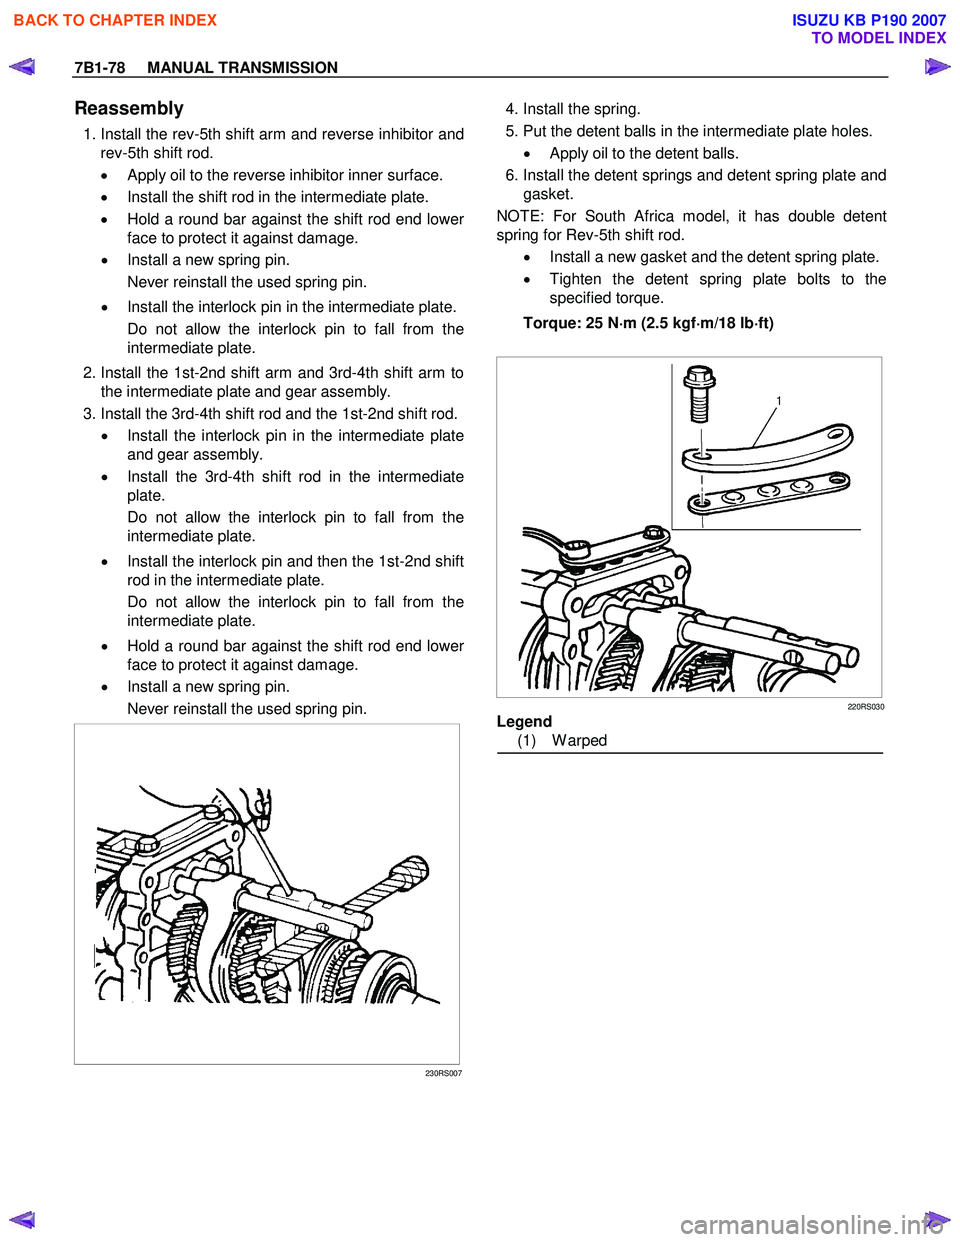
4. Install a new gasket and gear control box assembly. Install the harness clips and brackets and then
tighten the four new gear control box bolts to the
specified torque.
Torque: 20 N ⋅
⋅⋅
⋅
m (2.0 kgf ⋅
⋅⋅
⋅
m/14 lb ⋅
⋅⋅
⋅
ft)
261R300004
5. Install the top gear bearing snap ring and counte
r
front bearing snap ring.
• Use a pair of snap ring pliers to install the snap
rings to the mainshaft and countershaft.
• The snap rings must be fully inserted into the
bearing snap ring groove.
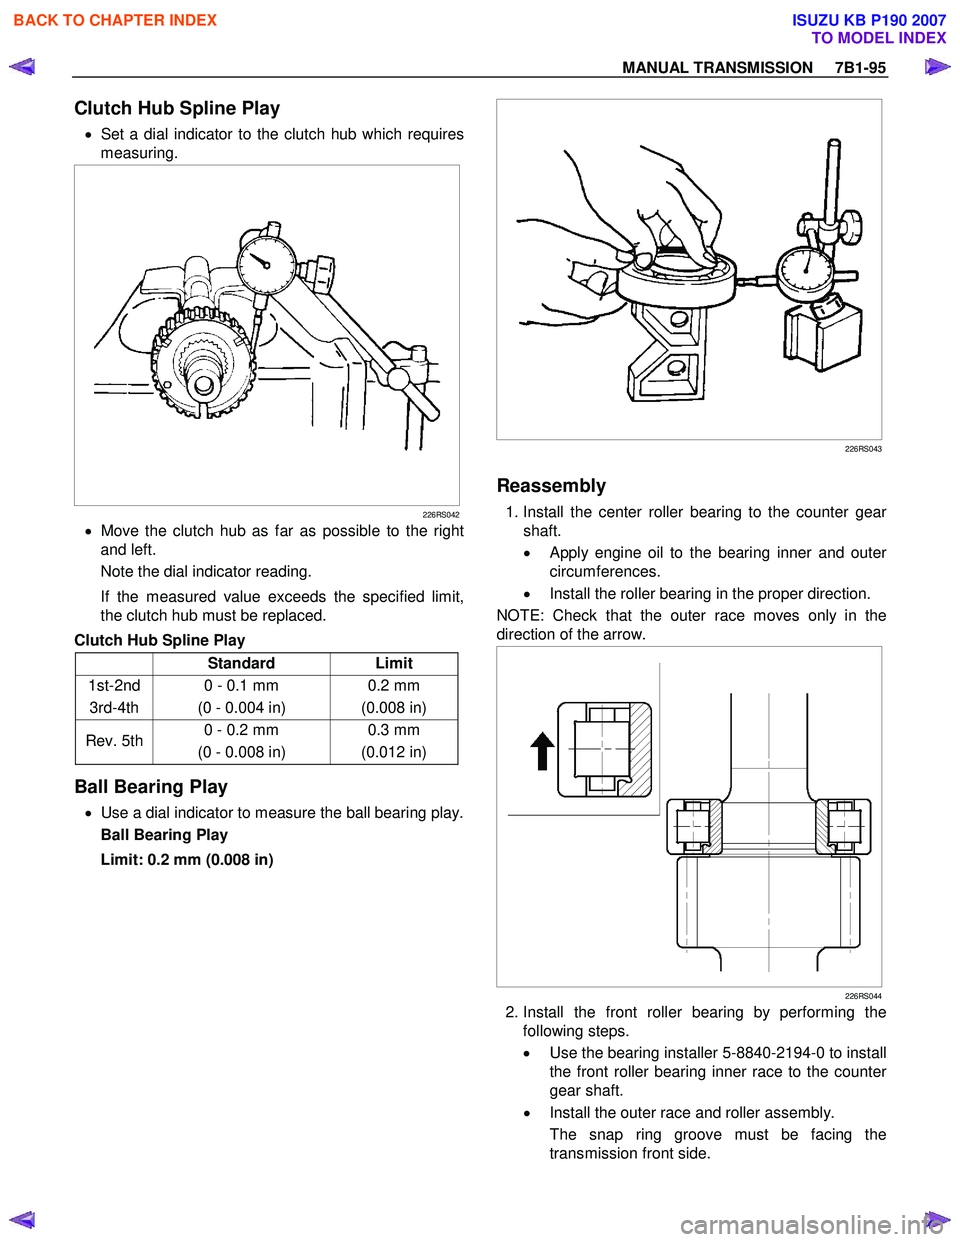
6. Front cover with oil seal. Front Cover Oil Seal Replacement • Remove the oil seal from the front cover.
• Apply engine oil to the outer circumference o
f
new oil seal.
• Apply recommended grease to the oil seal lip.
• Use the oil seal installer 5-8840-0026-0 to install
the oil seal to the front cover.
220R300002
7. Install a new gasket and front cover to the transmission case.
NOTE: Take care not to damage the oil seal.
Notes When Tightening the Bolt:
• After cleaning the bolt hole, air dry it thoroughly.
•
After cleaning the screw face of a removed or new
bolt, dry it thoroughly.
Apply recommended liquid
gasket (LOCTITE 242) or its equivalent before
tightening.
Tighten the six front cover bolts to the specified
torque.
Torque: 25 N ⋅
⋅⋅
⋅
m (2.6 kgf ⋅
⋅⋅
⋅
m/19 lb ⋅
⋅⋅
⋅
ft)
BACK TO CHAPTER INDEX
TO MODEL INDEX
ISUZU KB P190 2007
Page 4684 of 6020

7B1-78 MANUAL TRANSMISSION
Reassembly
1. Install the rev-5th shift arm and reverse inhibitor and
rev-5th shift rod.
• Apply oil to the reverse inhibitor inner surface.
• Install the shift rod in the intermediate plate.
• Hold a round bar against the shift rod end lowe
r
face to protect it against damage.
• Install a new spring pin.
Never reinstall the used spring pin.
• Install the interlock pin in the intermediate plate.
Do not allow the interlock pin to fall from the
intermediate plate.
2. Install the 1st-2nd shift arm and 3rd-4th shift arm to the intermediate plate and gear assembly.
3. Install the 3rd-4th shift rod and the 1st-2nd shift rod. • Install the interlock pin in the intermediate plate
and gear assembly.
• Install the 3rd-4th shift rod in the intermediate
plate.
Do not allow the interlock pin to fall from the
intermediate plate.
• Install the interlock pin and then the 1st-2nd shift
rod in the intermediate plate.
Do not allow the interlock pin to fall from the
intermediate plate.
• Hold a round bar against the shift rod end lowe
r
face to protect it against damage.
• Install a new spring pin.
Never reinstall the used spring pin.
230RS007
4. Install the spring.
5. Put the detent balls in the intermediate plate holes.• Apply oil to the detent balls.
6. Install the detent springs and detent spring plate and gasket.
NOTE: For South Africa model, it has double detent
spring for Rev-5th shift rod.
• Install a new gasket and the detent spring plate.
• Tighten the detent spring plate bolts to the
specified torque.
Torque: 25 N ⋅
⋅⋅
⋅
m (2.5 kgf ⋅
⋅⋅
⋅
m/18 lb ⋅
⋅⋅
⋅
ft)
220RS030
Legend
(1) W arped
BACK TO CHAPTER INDEX
TO MODEL INDEX
ISUZU KB P190 2007
Page 4685 of 6020
MANUAL TRANSMISSION 7B1-79
Reverse Gear and 5th Gear
Disassembled View
226R300024
Legend
(1) Collar Snap Ring (15) Counter 5th Gear
(2) Oil Seal Collar (16) Counter Reverse Gear
(3) Ball Bearing (17) 5th Gear
(4) Retainer (18) 5th Block Ring
(5) Thrust Plate (19) Needle Bearing
(6) Thrust W asher and Lock Ball (20) Mainshaft Nut
(7) Reverse Idler Gear Snap Ring (21) Rev-5th Synchronizer Assembly
(8) Reverse Idler Gear Assembly (22) Reverse Block Ring
(9) Idle Shaft Pin (23) Reverse Gear
(10) Thrust W asher (24) Needle Baring
(11) Reverse Idler Gear (25) Bearing Plate and Screw
(12) Reverse Idler Shaft (26) Bearing Snap Ring
(13) Bearing Snap Ring (27) Intermediate Plate
(14) Ball Bearing
BACK TO CHAPTER INDEX
TO MODEL INDEX
ISUZU KB P190 2007
Page 4686 of 6020
7B1-80 MANUAL TRANSMISSION
Disassembly
1. Use a pair of snap ring pliers to remove the collar
snap ring.
2. Set the mainshaft retainer remover 5-8840-2158-0 and puller 5-8840-2027-0 to the retainer and the
mainshaft end.
262RW 079
3. Remove the retainer together with the bearing and the oil seal collar.
The universal puller may be used in place of the
retaining ring remover.
4. Remove the thrust plate, thrust washer and lock ball.
5. Use a pair of snap ring pliers to remove reverse idle
r
gear snap ring.
226RS004
6. Remove the reverse idler gear assembly from the
intermediate plate.
226RS005
7. Remove the idle shaft pin, thrust washer, reverse idler gear, and reverse idler shaft.
8. Use a pair of snap ring pliers to remove the snap ring.
9. Attach a universal puller to the counter gear shaft. Use a universal puller to remove the ball bearing
and the counter 5th gear.
226RS006
10. Remove the counter reverse gear.
BACK TO CHAPTER INDEX
TO MODEL INDEX
ISUZU KB P190 2007
Page 4690 of 6020
7B1-84 MANUAL TRANSMISSION
6. Mesh the 1st-2nd and 3rd-4th synchronizers with
both the 1st and 3rd gears (double engagement).
226RS015
This will prevent the mainshaft from turning.
7. Install the new mainshaft hub nut. Use the mainshaft nut wrench 5-8840-2156-0 to
tighten the mainshaft nut to the specified torque.
Torque: 137 N ⋅
⋅⋅
⋅
m (14.0 kgf ⋅
⋅⋅
⋅
m/101 lb ⋅
⋅⋅
⋅
ft)
226RW 214
8. Use a punch to stake the mainshaft nut.
226RW 153
9. Install the needle bearing, 5th block ring, and 5th gear.
10.
Apply engine oil to the counter reverse gear and the
reverse gear.
Install the counter reverse gear to the counter shaft.
The reverse gear projection must be facing the
intermediate plate.
226RW 151
BACK TO CHAPTER INDEX
TO MODEL INDEX
ISUZU KB P190 2007
Page 4691 of 6020

MANUAL TRANSMISSION 7B1-85
11. Install the counter 5th gear to the counter shaft.
226RS019
12. Install the ball bearing and bearing snap ring by
performing the following steps:
• Select the snap ring which will provide the
minimum clearance between the ball bearing
and the snap ring.
226RS020
• There are six snap ring sizes available.
The snap rings are color‐ coded to
indicate their thickness.
226RS021
Ball Bearing and Snap Ring Clearance
Standard: 0 - 0.15 mm (0 - 0.0059 in)
Snap Ring Availability
Thickness Color Coding
1.1 mm (0.043 in) W hite
1.2 mm (0.047 in) Yellow
1.3 mm (0.051 in) Blue
1.4 mm (0.055 in) Pink
1.5 mm (0.059 in) Green
1.6 mm (0.063 in) Brown
• Use a pair of snap ring pliers to install the snap
ring to the counter gear shaft.
The snap ring must be fully inserted into the
counter gear shaft snap ring groove.
13. Assemble the reverse idler shaft, reverse idler gear, thrust washer, and idle shaft pin into the reverse
idler gear assembly.
The thrust washer should be assembled with the oil
groove faces to gear side.
BACK TO CHAPTER INDEX
TO MODEL INDEX
ISUZU KB P190 2007
Page 4693 of 6020
MANUAL TRANSMISSION 7B1-87
226RS024
• Apply grease to the thrust washer and the lock
ball.
• Install the thrust washer and the lock ball.
16. Install the thrust plate and retainer.
17. Apply engine oil to the bearing inner and oute
r
circumference.
Use the installer 5-8840-2159-0 to install the ball
bearing to the mainshaft.
226L100002
18.
Apply engine oil to the oil seal collar inner
circumference.
Install the oil seal collar to the mainshaft by using
the installer 5-8840-2159-0.
19. Install the oil seal collar snap ring.
BACK TO CHAPTER INDEX
TO MODEL INDEX
ISUZU KB P190 2007
Page 4701 of 6020

MANUAL TRANSMISSION 7B1-95
Clutch Hub Spline Play
• Set a dial indicator to the clutch hub which requires
measuring.
226RS042
• Move the clutch hub as far as possible to the right
and left.
Note the dial indicator reading.
If the measured value exceeds the specified limit,
the clutch hub must be replaced.
Clutch Hub Spline Play
Standard Limit
1st-2nd 3rd-4th 0 - 0.1 mm
(0 - 0.004 in) 0.2 mm
(0.008 in)
Rev. 5th 0 - 0.2 mm
(0 - 0.008 in) 0.3 mm
(0.012 in)
Ball Bearing Play
• Use a dial indicator to measure the ball bearing play.
Ball Bearing Play
Limit: 0.2 mm (0.008 in)
226RS043
Reassembly
1. Install the center roller bearing to the counter gear
shaft.
•
Apply engine oil to the bearing inner and outer
circumferences.
• Install the roller bearing in the proper direction.
NOTE: Check that the outer race moves only in the
direction of the arrow.
226RS044
2. Install the front roller bearing by performing the following steps.
• Use the bearing installer 5-8840-2194-0 to install
the front roller bearing inner race to the counte
r
gear shaft.
• Install the outer race and roller assembly.
The snap ring groove must be facing the
transmission front side.
BACK TO CHAPTER INDEX
TO MODEL INDEX
ISUZU KB P190 2007