2007 ISUZU KB P190 sensor
[x] Cancel search: sensorPage 4917 of 6020
TRANSFER CONTROL SYSTEM 7D1-43
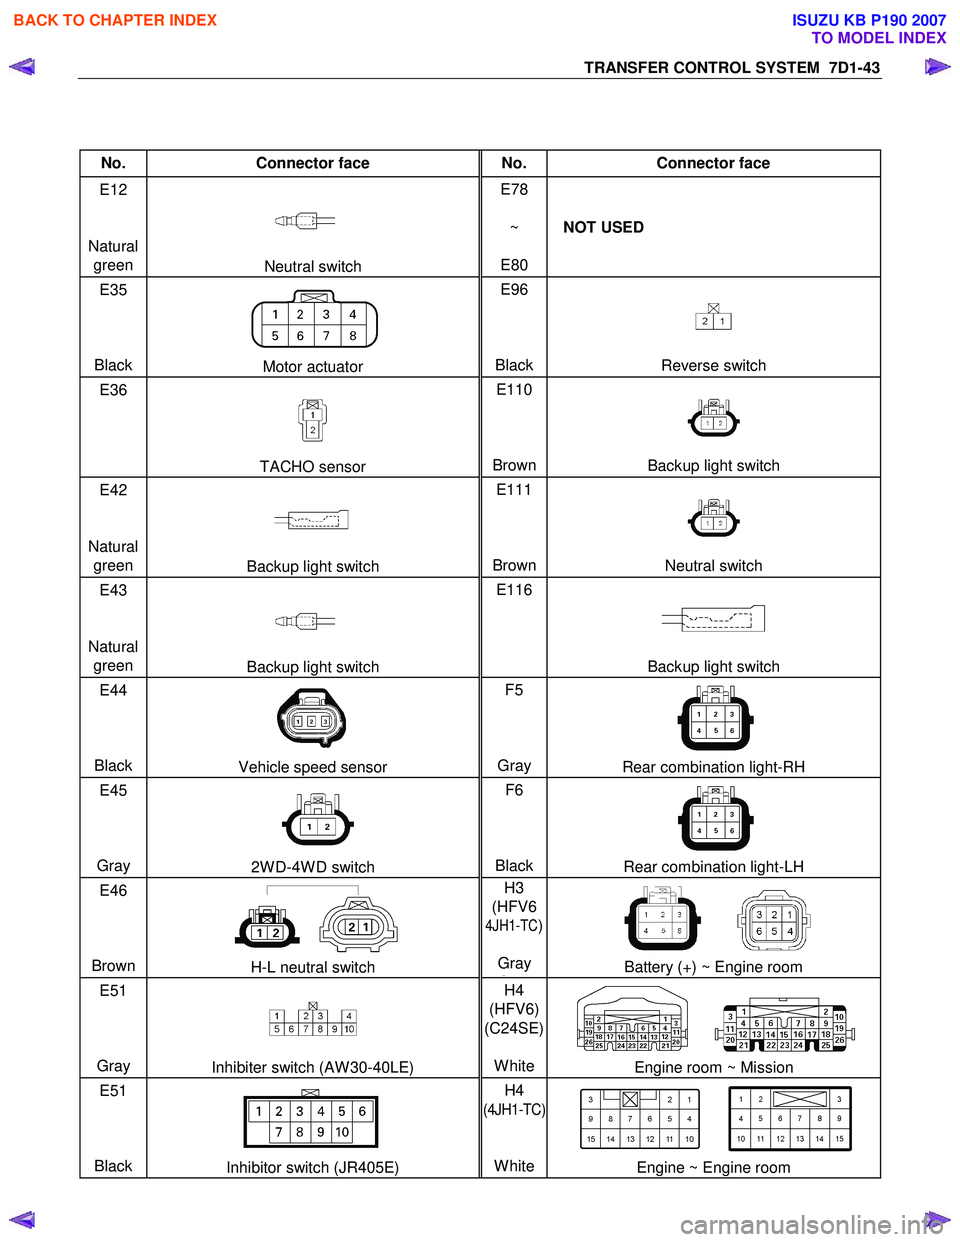
No. Connector face No. Connector face
E12
Natural green
Neutral switch E78
~
E80 NOT USED
E35
Black
Motor actuator E96
BlackReverse switch
E36
TACHO sensor E110
BrownBackup light switch
E42
Natural green
Backup light switch E111
BrownNeutral switch
E43
Natural green
Backup light switch E116
Backup light switch
E44
Black
Vehicle speed sensor F5
Gray Rear combination light-RH
E45
Gray
2W D-4W D switch F6
BlackRear combination light-LH
E46
Brown
H-L neutral switch H3
(HFV6
4JH1-TC)
Gray
GBattery (+) ~ Engine room
E51
Gray
Inhibiter switch (AW 30-40LE) H4
(HFV6)
(C24SE)
WhiteEngine room ~ Mission
E51
Black
Inhibitor switch (JR405E) H4
(4JH1-TC)
White
Engine ~ Engine room
BACK TO CHAPTER INDEX
TO MODEL INDEX
ISUZU KB P190 2007
Page 4935 of 6020
TRANSFER CONTROL SYSTEM 7D1-61
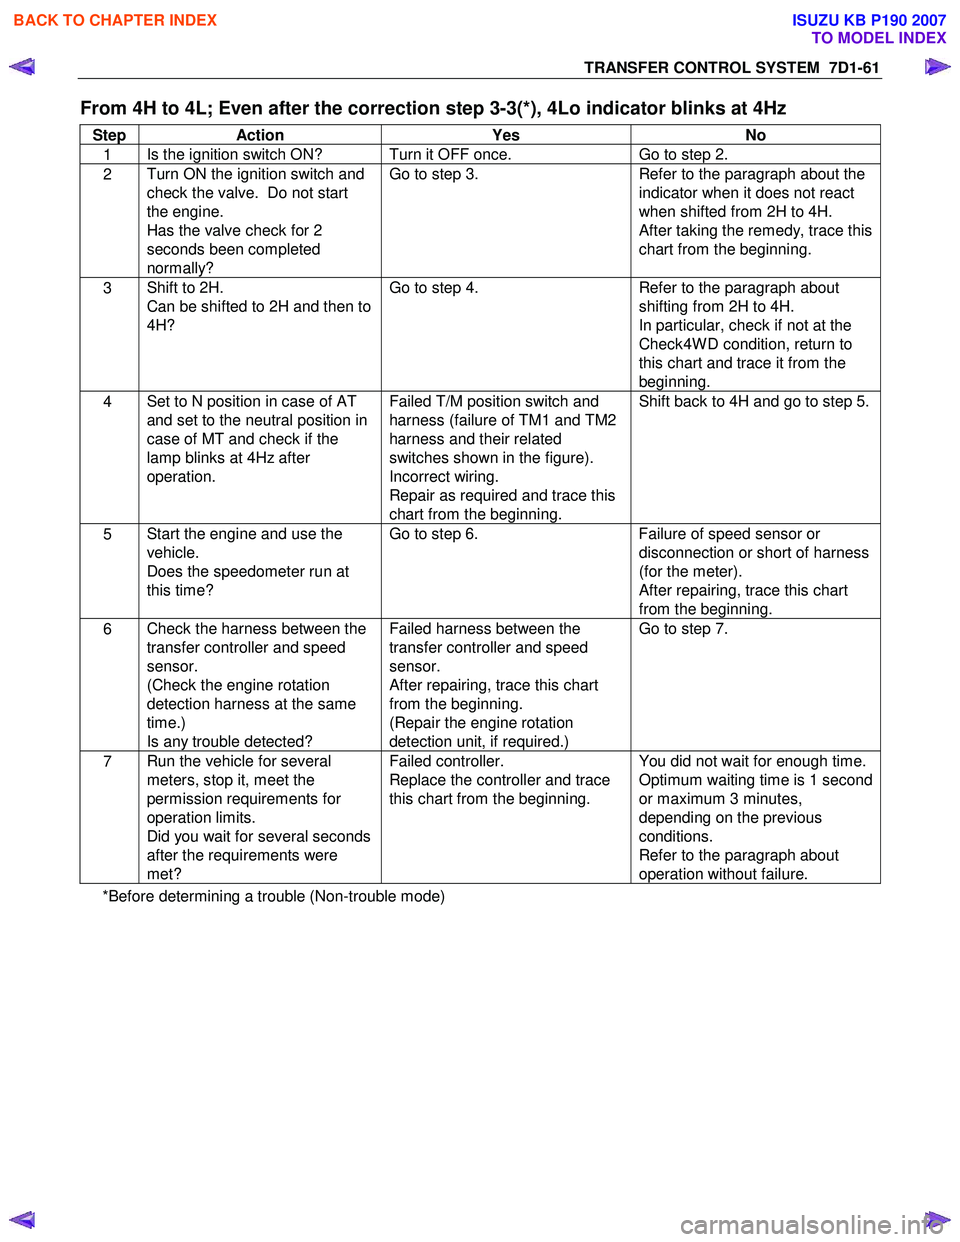
From 4H to 4L; Even after the correction step 3-3(*), 4Lo indicator blinks at 4Hz
Step Action Yes No
1 Is the ignition switch ON? Turn it OFF once.
Go to step 2.
2 Turn ON the ignition switch and
check the valve. Do not start
the engine.
Has the valve check for 2
seconds been completed
normally? Go to step 3.
Refer to the paragraph about the
indicator when it does not react
when shifted from 2H to 4H.
After taking the remedy, trace this
chart from the beginning.
3 Shift to 2H.
Can be shifted to 2H and then to
4H? Go to step 4.
Refer to the paragraph about
shifting from 2H to 4H.
In particular, check if not at the
Check4W D condition, return to
this chart and trace it from the
beginning.
4 Set to N position in case of AT
and set to the neutral position in
case of MT and check if the
lamp blinks at 4Hz after
operation.
Failed T/M position switch and
harness (failure of TM1 and TM2
harness and their related
switches shown in the figure).
Incorrect wiring.
Repair as required and trace this
chart from the beginning. Shift back to 4H and go to step 5.
5
Start the engine and use the
vehicle.
Does the speedometer run at
this time? Go to step 6.
Failure of speed sensor or
disconnection or short of harness
(for the meter).
After repairing, trace this chart
from the beginning.
6 Check the harness between the
transfer controller and speed
sensor.
(Check the engine rotation
detection harness at the same
time.)
Is any trouble detected? Failed harness between the
transfer controller and speed
sensor.
After repairing, trace this chart
from the beginning.
(Repair the engine rotation
detection unit, if required.) Go to step 7.
7
Run the vehicle for several
meters, stop it, meet the
permission requirements for
operation limits.
Did you wait for several seconds
after the requirements were
met? Failed controller.
Replace the controller and trace
this chart from the beginning. You did not wait for enough time.
Optimum waiting time is 1 second
or maximum 3 minutes,
depending on the previous
conditions.
Refer to the paragraph about
operation without failure.
*Before determining a trouble (Non-trouble mode)
BACK TO CHAPTER INDEX
TO MODEL INDEX
ISUZU KB P190 2007
Page 4936 of 6020
7D1-62 TRANSFER CONTROL SYSTEM
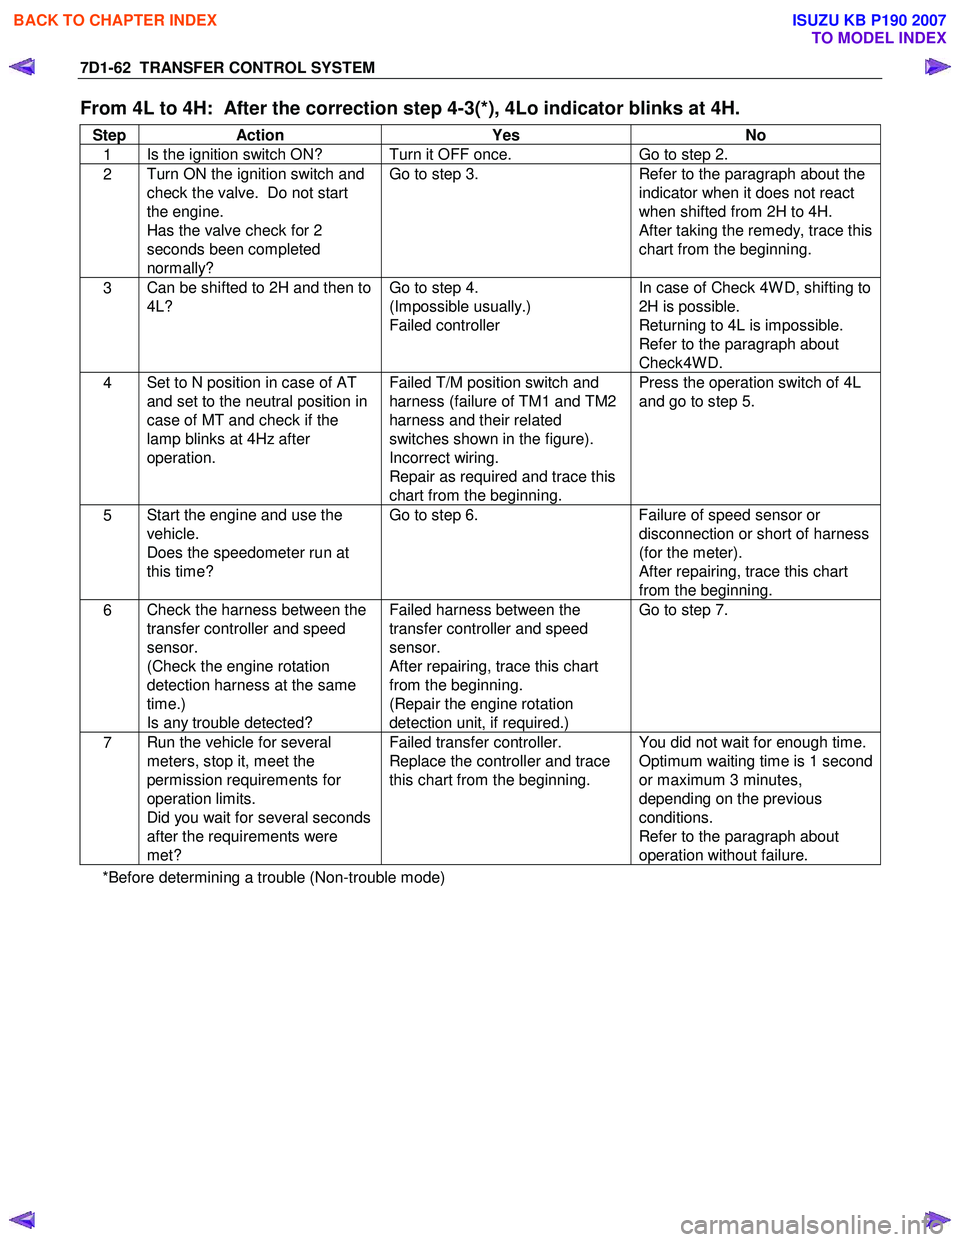
From 4L to 4H: After the correction step 4-3(*), 4Lo indicator blinks at 4H.
Step Action Yes No
1 Is the ignition switch ON? Turn it OFF once.
Go to step 2.
2 Turn ON the ignition switch and
check the valve. Do not start
the engine.
Has the valve check for 2
seconds been completed
normally? Go to step 3.
Refer to the paragraph about the
indicator when it does not react
when shifted from 2H to 4H.
After taking the remedy, trace this
chart from the beginning.
3 Can be shifted to 2H and then to
4L? Go to step 4.
(Impossible usually.)
Failed controller In case of Check 4W D, shifting to
2H is possible.
Returning to 4L is impossible.
Refer to the paragraph about
Check4W D.
4 Set to N position in case of AT
and set to the neutral position in
case of MT and check if the
lamp blinks at 4Hz after
operation.
Failed T/M position switch and
harness (failure of TM1 and TM2
harness and their related
switches shown in the figure).
Incorrect wiring.
Repair as required and trace this
chart from the beginning. Press the operation switch of 4L
and go to step 5.
5 Start the engine and use the
vehicle.
Does the speedometer run at
this time? Go to step 6.
Failure of speed sensor or
disconnection or short of harness
(for the meter).
After repairing, trace this chart
from the beginning.
6 Check the harness between the
transfer controller and speed
sensor.
(Check the engine rotation
detection harness at the same
time.)
Is any trouble detected? Failed harness between the
transfer controller and speed
sensor.
After repairing, trace this chart
from the beginning.
(Repair the engine rotation
detection unit, if required.) Go to step 7.
7
Run the vehicle for several
meters, stop it, meet the
permission requirements for
operation limits.
Did you wait for several seconds
after the requirements were
met? Failed transfer controller.
Replace the controller and trace
this chart from the beginning. You did not wait for enough time.
Optimum waiting time is 1 second
or maximum 3 minutes,
depending on the previous
conditions.
Refer to the paragraph about
operation without failure.
*Before determining a trouble (Non-trouble mode)
BACK TO CHAPTER INDEX
TO MODEL INDEX
ISUZU KB P190 2007
Page 4937 of 6020
TRANSFER CONTROL SYSTEM 7D1-63
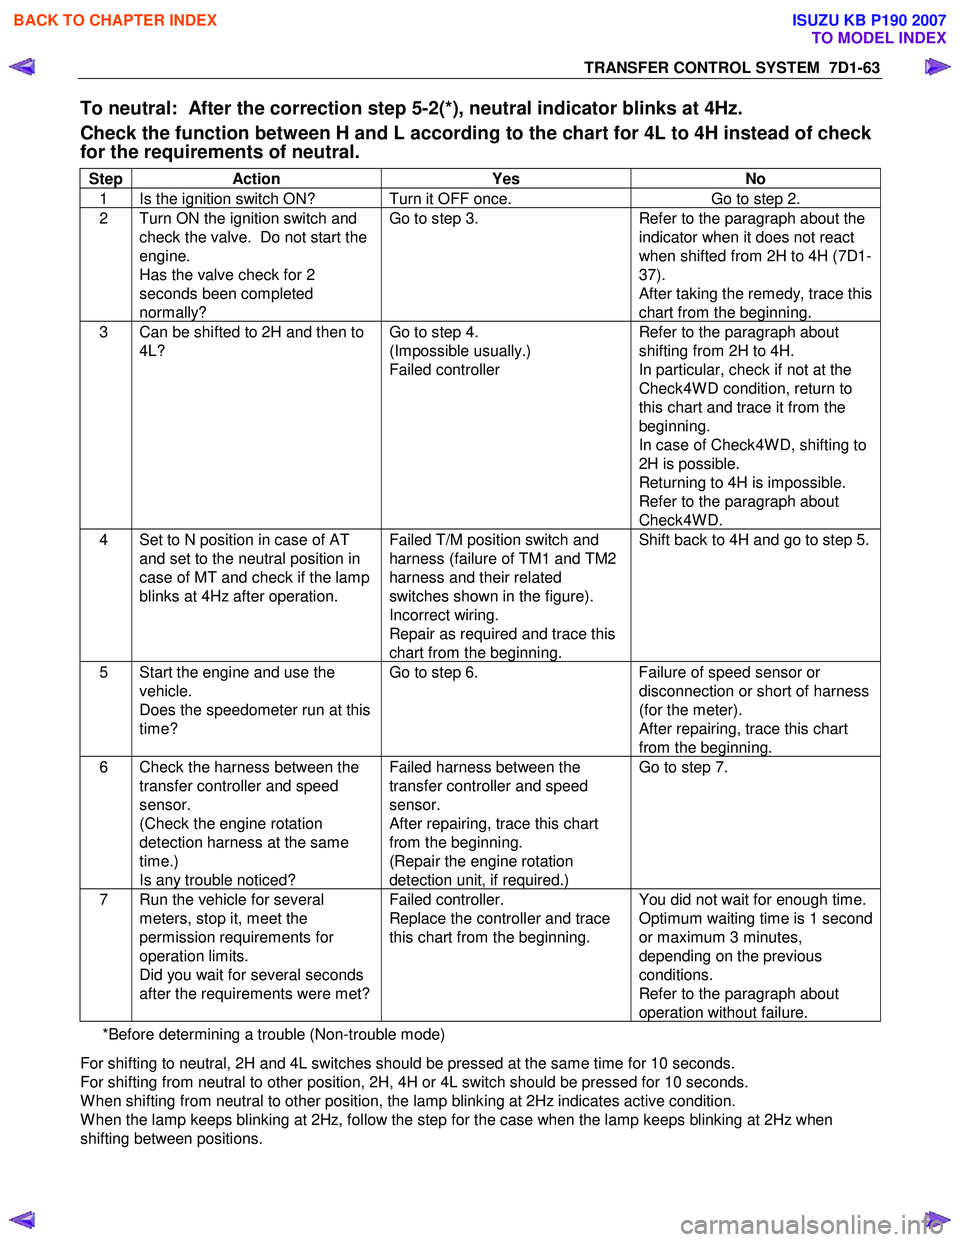
To neutral: After the correction step 5-2(*), neutral indicator blinks at 4Hz.
Check the function between H and L according to the chart for 4L to 4H instead of check
for the requirements of neutral.
Step Action Yes No
1 Is the ignition switch ON? Turn it OFF once. Go to step 2.
2 Turn ON the ignition switch and
check the valve. Do not start the
engine.
Has the valve check for 2
seconds been completed
normally? Go to step 3.
Refer to the paragraph about the
indicator when it does not react
when shifted from 2H to 4H (7D1-
37).
After taking the remedy, trace this
chart from the beginning.
3 Can be shifted to 2H and then to 4L? Go to step 4.
(Impossible usually.)
Failed controller Refer to the paragraph about
shifting from 2H to 4H.
In particular, check if not at the
Check4W D condition, return to
this chart and trace it from the
beginning.
In case of Check4W D, shifting to
2H is possible.
Returning to 4H is impossible.
Refer to the paragraph about
Check4W D.
4 Set to N position in case of AT and set to the neutral position in
case of MT and check if the lamp
blinks at 4Hz after operation. Failed T/M position switch and
harness (failure of TM1 and TM2
harness and their related
switches shown in the figure).
Incorrect wiring.
Repair as required and trace this
chart from the beginning. Shift back to 4H and go to step 5.
5 Start the engine and use the
vehicle.
Does the speedometer run at this
time? Go to step 6.
Failure of speed sensor or
disconnection or short of harness
(for the meter).
After repairing, trace this chart
from the beginning.
6 Check the harness between the transfer controller and speed
sensor.
(Check the engine rotation
detection harness at the same
time.)
Is any trouble noticed? Failed harness between the
transfer controller and speed
sensor.
After repairing, trace this chart
from the beginning.
(Repair the engine rotation
detection unit, if required.) Go to step 7.
7 Run the vehicle for several
meters, stop it, meet the
permission requirements for
operation limits.
Did you wait for several seconds
after the requirements were met? Failed controller.
Replace the controller and trace
this chart from the beginning. You did not wait for enough time.
Optimum waiting time is 1 second
or maximum 3 minutes,
depending on the previous
conditions.
Refer to the paragraph about
operation without failure.
*Before determining a trouble (Non-trouble mode)
For shifting to neutral, 2H and 4L switches should be pressed at the same time for 10 seconds.
For shifting from neutral to other position, 2H, 4H or 4L switch should be pressed for 10 seconds.
W hen shifting from neutral to other position, the lamp blinking at 2Hz indicates active condition.
W hen the lamp keeps blinking at 2Hz, follow the step for the case when the lamp keeps blinking at 2Hz when
shifting between positions.
BACK TO CHAPTER INDEX
TO MODEL INDEX
ISUZU KB P190 2007
Page 4969 of 6020
ELECTRICAL-BODY AND CHASSIS 8A-31
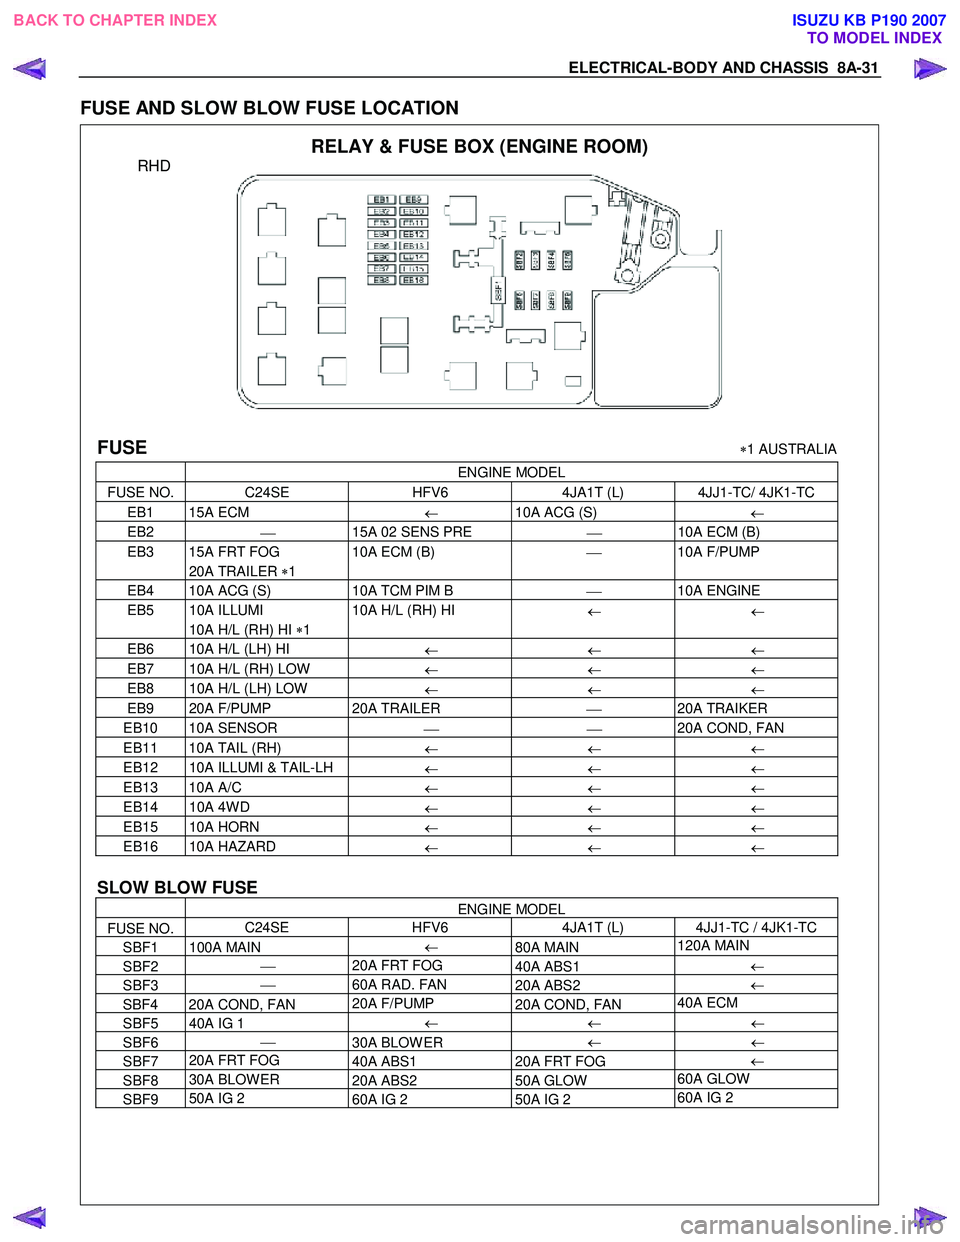
FUSE AND SLOW BLOW FUSE LOCATION
RELAY & FUSE BOX (ENGINE ROOM)
RHD
FUSE ∗1 AUSTRALIA
ENGINE MODEL
FUSE NO. C24SE
HFV6 4JA1T (L) 4JJ1-TC/ 4JK1-TC
EB1 15A ECM
← 10A ACG (S)
←
EB2
15A 02 SENS PRE
10A ECM (B)
EB3 15A FRT FOG 10A ECM (B)
10A F/PUMP
20A TRAILER ∗1
EB4 10A ACG (S)
10A TCM PIM B
10A ENGINE
EB5 10A ILLUMI
10A H/L (RH) HI
← ←
10A H/L (RH) HI ∗1
EB6 10A H/L (LH) HI
← ← ←
EB7 10A H/L (RH) LOW
← ← ←
EB8 10A H/L (LH) LOW
← ← ←
EB9 20A F/PUMP 20A TRAILER
20A TRAIKER
EB10 10A SENSOR 20A COND, FAN
EB11 10A TAIL (RH)
← ← ←
EB12 10A ILLUMI & TAIL-LH
← ← ←
EB13 10A A/C
← ← ←
EB14 10A 4W D
← ← ←
EB15 10A HORN
← ← ←
EB16 10A HAZARD
← ← ←
SLOW BLOW FUSE
ENGINE MODEL
FUSE NO. C24SE
HFV6 4JA1T (L) 4JJ1-TC / 4JK1-TC
SBF1 100A MAIN ←
80A MAIN 120A MAIN
SBF2
20A FRT FOG
40A ABS1 ←
SBF3
60A RAD. FAN
20A ABS2 ←
SBF4 20A COND, FAN 20A F/PUMP
20A COND, FAN 40A ECM
SBF5 40A IG 1
←
← ←
SBF6
30A BLOW ER ←
←
SBF7 20A FRT FOG
40A ABS1 20A FRT FOG ←
SBF8 30A BLOW ER
20A ABS2 50A GLOW 60A GLOW
SBF9
50A IG 2
60A IG 2 50A IG 2 60A IG 2
BACK TO CHAPTER INDEX TO MODEL INDEXISUZU KB P190 2007
Page 4970 of 6020
8A-32 ELECTRICAL-BODY AND CHASSIS
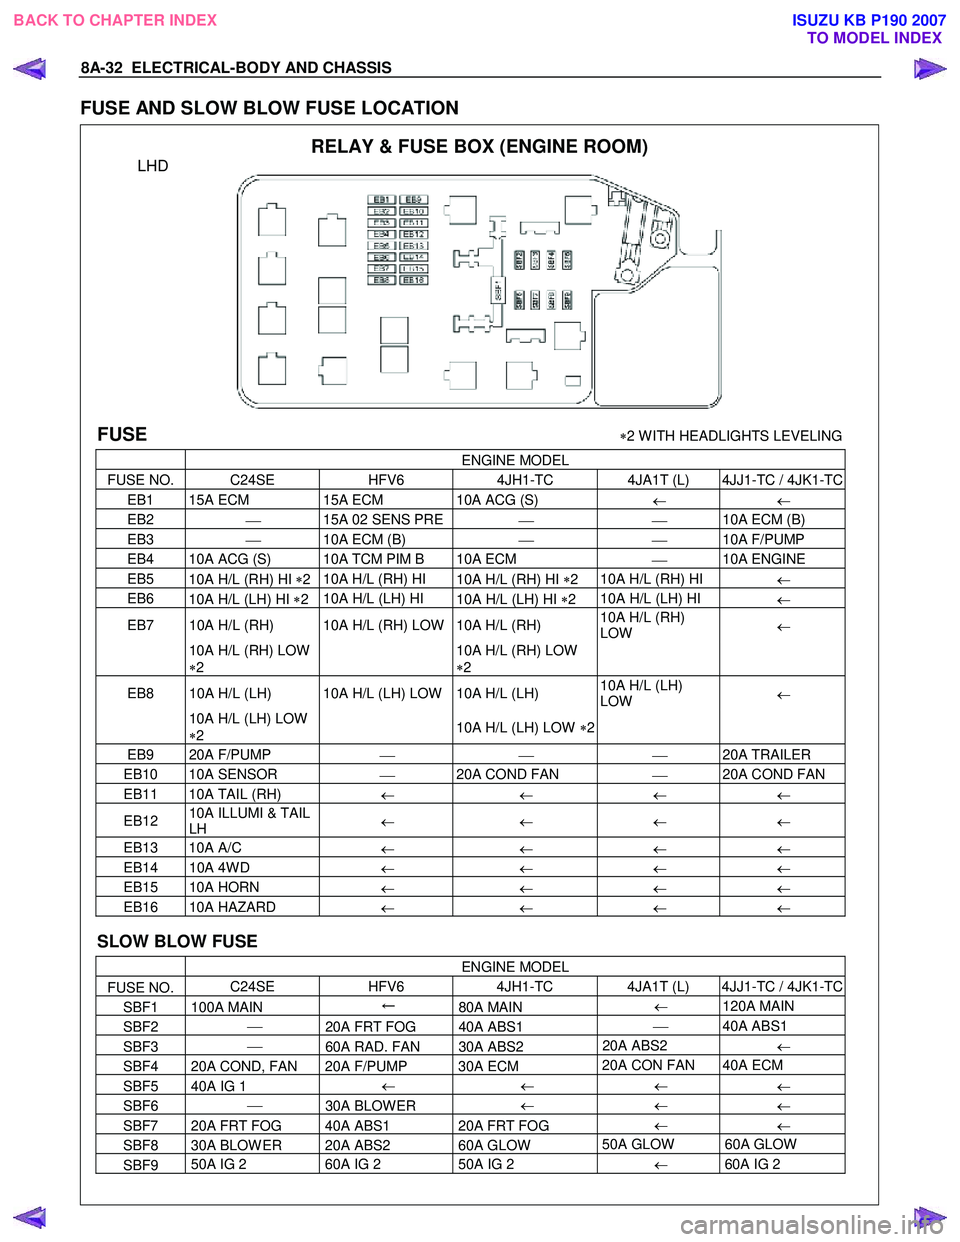
FUSE AND SLOW BLOW FUSE LOCATION
RELAY & FUSE BOX (ENGINE ROOM)
LHD
FUSE ∗2 W ITH HEADLIGHTS LEVELING
ENGINE MODEL
FUSE NO. C24SE HFV6 4JH1-TC 4JA1T (L) 4JJ1-TC / 4JK1-TC
EB1 15A ECM 15A ECM 10A ACG (S)
← ←
EB2
15A 02 SENS PRE
10A ECM (B)
EB3
10A ECM (B)
10A F/PUMP
EB4 10A ACG (S) 10A TCM PIM B 10A ECM
10A ENGINE
EB5
10A H/L (RH) HI ∗2 10A H/L (RH) HI
10A H/L (RH) HI ∗2 10A H/L (RH) HI
←
EB6
10A H/L (LH) HI ∗2 10A H/L (LH) HI
10A H/L (LH) HI ∗2 10A H/L (LH) HI
←
EB7 10A H/L (RH) 10A H/L (RH) LOW 10A H/L (RH) 10A H/L (RH)
LOW ←
10A H/L (RH) LOW
∗ 2
10A H/L (RH) LOW
∗ 2
EB8 10A H/L (LH) 10A H/L (LH) LOW 10A H/L (LH)
10A H/L (LH)
LOW ←
10A H/L (LH) LOW
∗ 2
10A H/L (LH) LOW ∗2
EB9 20A F/PUMP
20A TRAILER
EB10 10A SENSOR
20A COND FAN
20A COND FAN
EB11 10A TAIL (RH)
← ← ← ←
EB12 10A ILLUMI & TAIL
LH ←
← ← ←
EB13 10A A/C
← ← ← ←
EB14 10A 4W D
← ← ← ←
EB15 10A HORN
← ← ← ←
EB16 10A HAZARD
← ← ← ←
SLOW BLOW FUSE
ENGINE MODEL
FUSE NO. C24SE
HFV6 4JH1-TC 4JA1T (L) 4JJ1-TC / 4JK1-TC
SBF1 100A MAIN ←
80A MAIN ←
120A MAIN
SBF2
20A FRT FOG 40A ABS1
40A ABS1
SBF3
60A RAD. FAN 30A ABS2 20A ABS2
←
SBF4 20A COND, FAN 20A F/PUMP 30A ECM 20A CON FAN 40A ECM
SBF5 40A IG 1
←
← ←
←
SBF6
30A BLOW ER ←
←
←
SBF7 20A FRT FOG 40A ABS1 20A FRT FOG ←
←
SBF8 30A BLOW ER 20A ABS2 60A GLOW 50A GLOW 60A GLOW
SBF9 50A IG 2
60A IG 2 50A IG 2
← 60A IG 2
BACK TO CHAPTER INDEX
TO MODEL INDEXISUZU KB P190 2007
Page 5281 of 6020
ELECTRICAL-BODY AND CHASSIS 8A-343
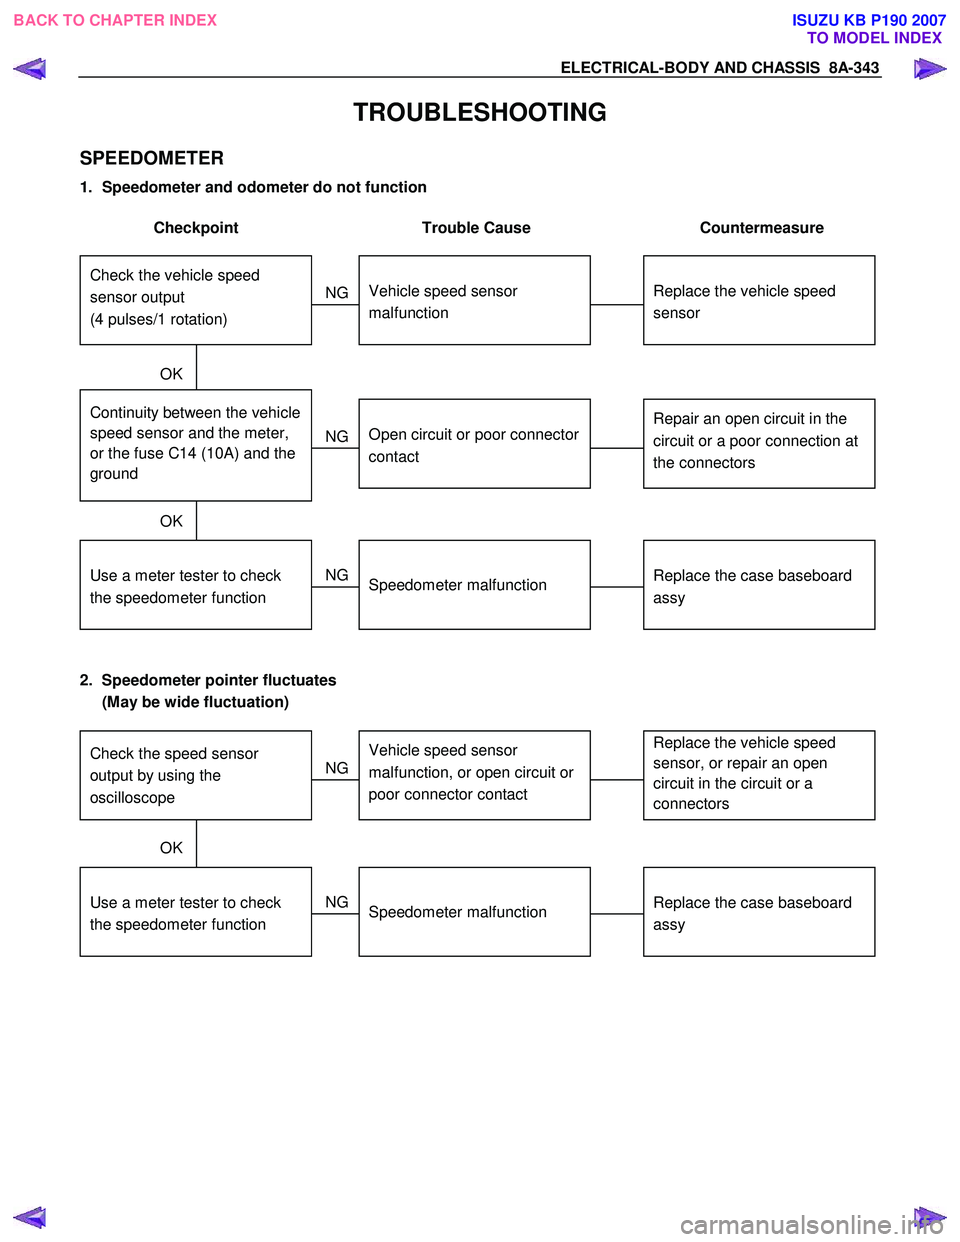
TROUBLESHOOTING
SPEEDOMETER
1. Speedometer and odometer do not function
Checkpoint Trouble Cause Countermeasure
Replace the vehicle speed
sensor
Vehicle speed sensor
malfunction
NG
Repair an open circuit in the
circuit or a poor connection at
the connectors Continuity between the vehicle
speed sensor and the meter,
or the fuse C14 (10A) and the
ground
Open circuit or poor connector
contact
Replace the case baseboard
assy
Use a meter tester to check
the speedometer function
Speedometer malfunction
NG
NG
OK
OK
Check the vehicle speed
sensor output
(4 pulses/1 rotation)
2. Speedometer pointer fluctuates
(May be wide fluctuation)
Replace the vehicle speed
sensor, or repair an open
circuit in the circuit or a
connectors Vehicle speed sensor
malfunction, or open circuit or
poor connector contact
NG
Replace the case baseboard
assy
Use a meter tester to check
the speedometer function
Speedometer malfunction
NG
OK
Check the speed sensor
output by using the
oscilloscope
BACK TO CHAPTER INDEX TO MODEL INDEXISUZU KB P190 2007
Page 5282 of 6020
8A-344 ELECTRICAL-BODY AND CHASSIS
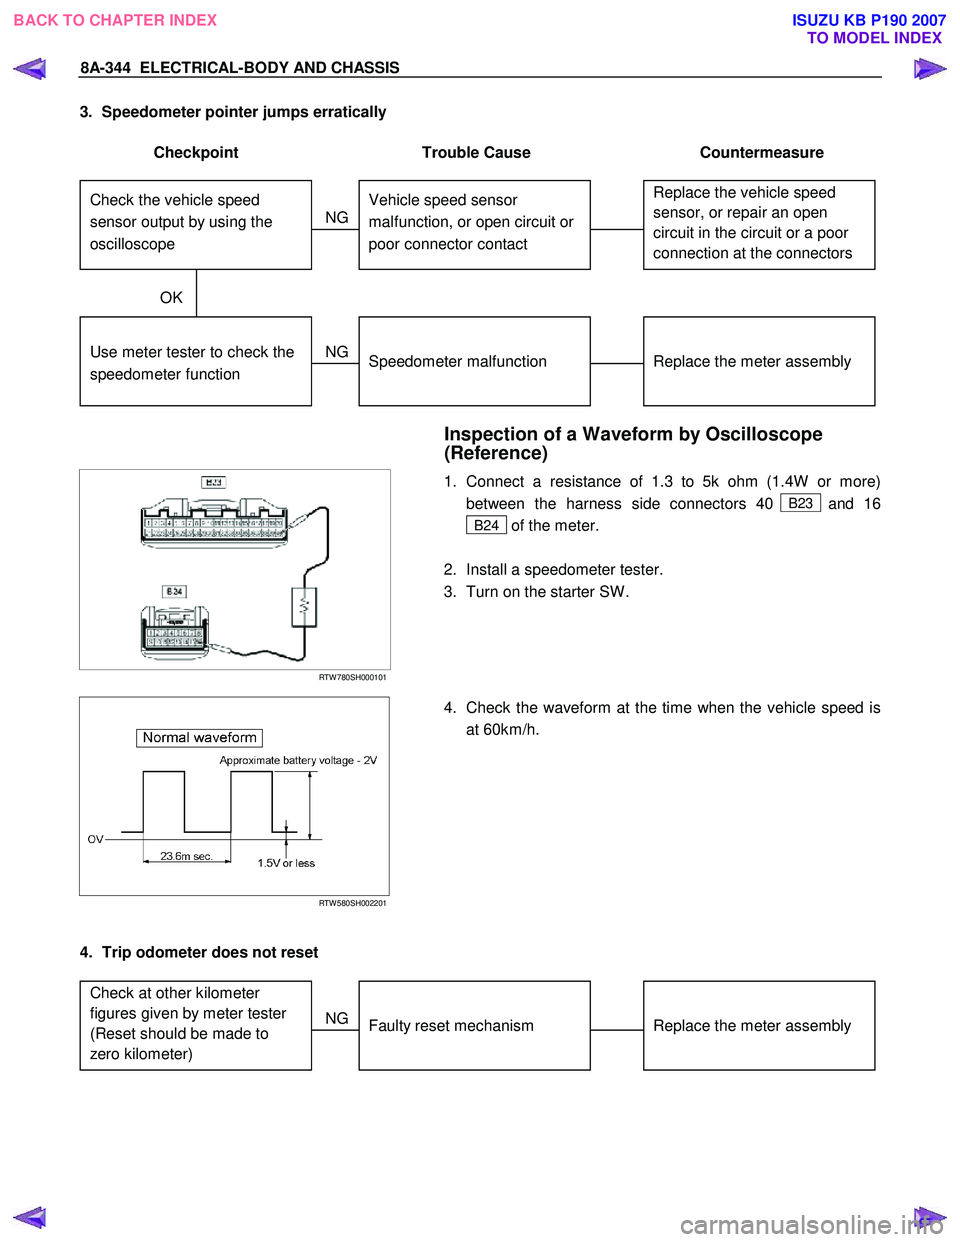
3. Speedometer pointer jumps erratically
Checkpoint Trouble Cause Countermeasure
Replace the vehicle speed
sensor, or repair an open
circuit in the circuit or a poor
connection at the connectors Vehicle speed sensor
malfunction, or open circuit or
poor connector contact
NG
Replace the meter assembly
Use meter tester to check the
speedometer function
Speedometer malfunction
NG
OK
Check the vehicle speed
sensor output by using the
oscilloscope
Inspection of a Waveform by Oscilloscope
(Reference)
RTW 780SH000101
1. Connect a resistance of 1.3 to 5k ohm (1.4W or more)
between the harness side connectors 40
B23 and 16
B24 of the meter.
2. Install a speedometer tester.
3. Turn on the starter SW .
RTW 580SH002201
4. Check the waveform at the time when the vehicle speed is
at 60km/h.
4. Trip odometer does not reset
Replace the meter assembly
Faulty reset mechanism
NG
Check at other kilometer
figures given by meter tester
(Reset should be made to
zero kilometer)
BACK TO CHAPTER INDEX
TO MODEL INDEXISUZU KB P190 2007