2007 ISUZU KB P190 oil
[x] Cancel search: oilPage 3923 of 6020
Automatic Transmission – 4L60E – On-vehicle Servicing Page 7C4–10
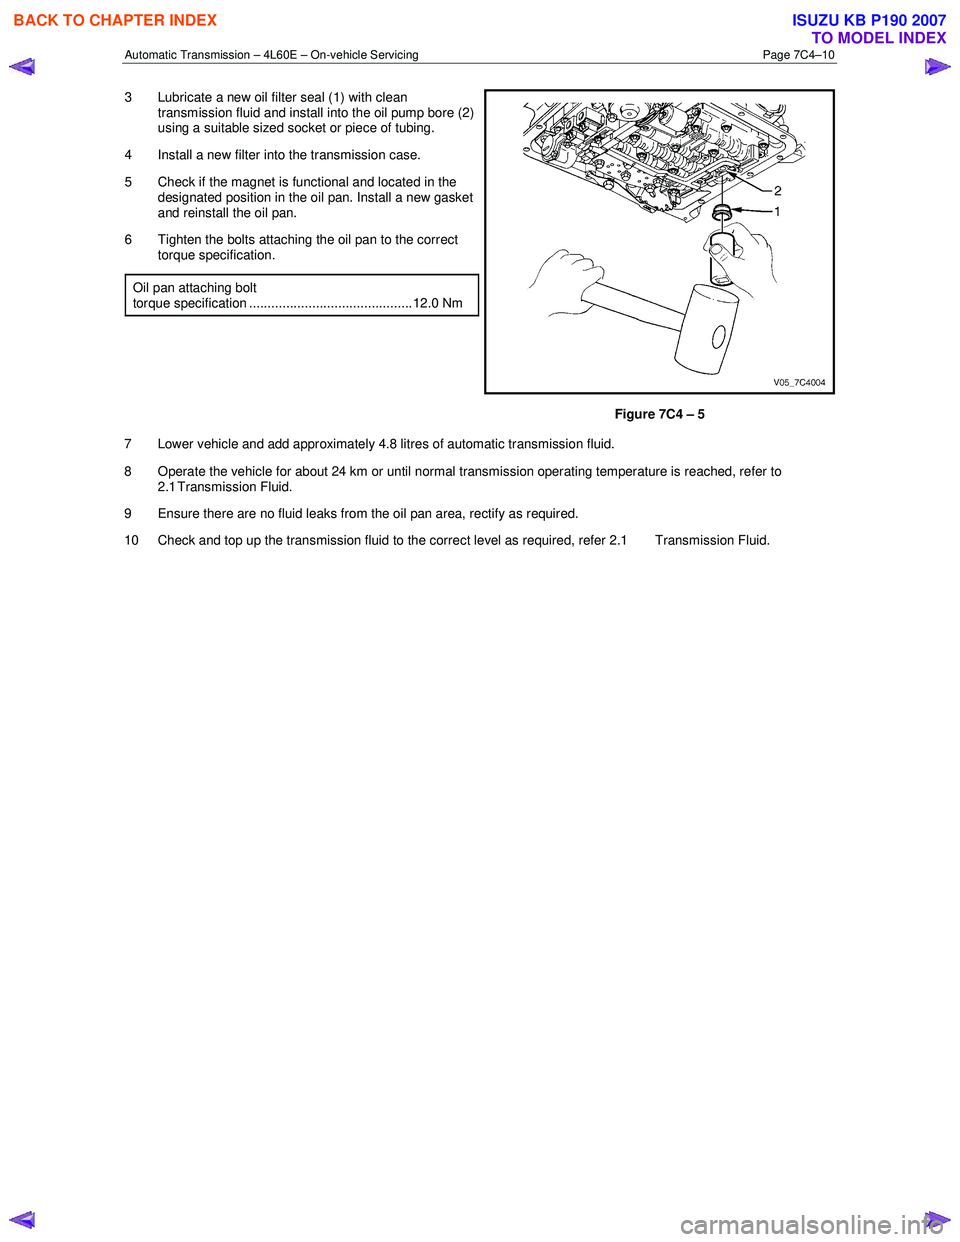
3 Lubricate a new oil filter seal (1) with clean
transmission fluid and install into the oil pump bore (2)
using a suitable sized socket or piece of tubing.
4 Install a new filter into the transmission case.
5 Check if the magnet is functional and located in the designated position in the oil pan. Install a new gasket
and reinstall the oil pan.
6 Tighten the bolts attaching the oil pan to the correct torque specification.
Oil pan attaching bolt
torque specification ............................................ 12.0 Nm
Figure 7C4 – 5
7 Lower vehicle and add approximately 4.8 litres of automatic transmission fluid.
8 Operate the vehicle for about 24 km or until normal transmission operating temperature is reached, refer to 2.1 Transmission Fluid.
9 Ensure there are no fluid leaks from the oil pan area, rectify as required.
10 Check and top up the transmission fluid to the correct level as required, refer 2.1 Transmission Fluid.
BACK TO CHAPTER INDEX
TO MODEL INDEX
ISUZU KB P190 2007
Page 3932 of 6020
Automatic Transmission – 4L60E – On-vehicle Servicing Page 7C4–19
Reinstall
1 Lubricate a new O-ring seal with petroleum jelly and install it to the vehicle speed sensor.
2 Install the speed sensor to the transmission extension housing.
3 Install the attaching bolt and tighten to the correct torque specification.
Vehicle speed sensor attaching bolt
torque specification ............................................ 12.0 Nm
4 Connect the connector to the speed sensor.
5 Lower the vehicle to the ground.
3.6 Manual Shaft Oil Seal
Replace
NOTE
This procedure requires the use of special tool
No. AU583.
1 Raise the vehicle and support in a safe manner, refer to 0A General Information for the location of support points.
2 Remove the neutral start and back-up lamp switch, refer to 3.4 Neutral Start and Back-up Lamp Switch.
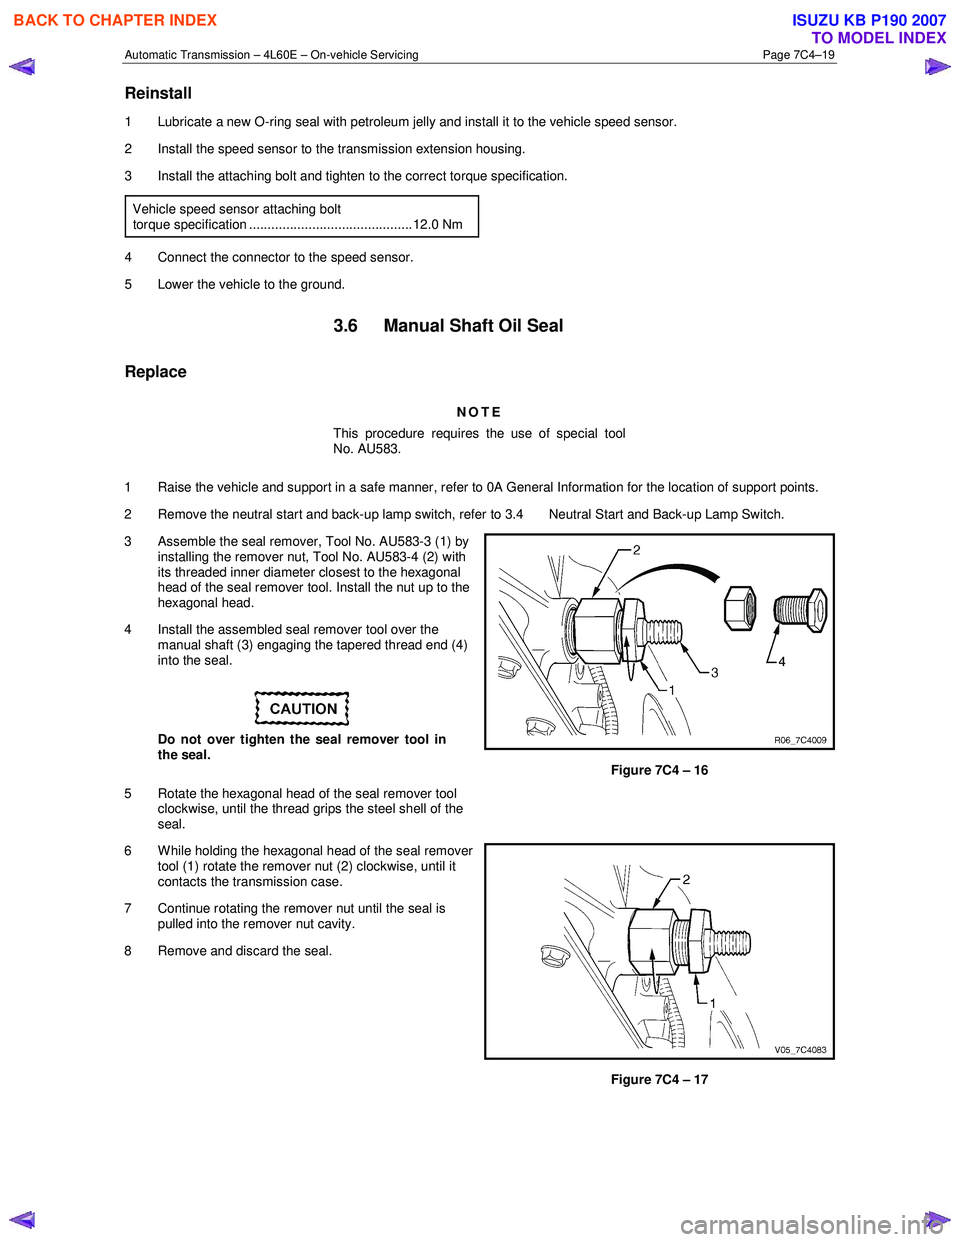
3 Assemble the seal remover, Tool No. AU583-3 (1) by installing the remover nut, Tool No. AU583-4 (2) with
its threaded inner diameter closest to the hexagonal
head of the seal remover tool. Install the nut up to the
hexagonal head.
4 Install the assembled seal remover tool over the manual shaft (3) engaging the tapered thread end (4)
into the seal.
Do not over tighten the seal remover tool in
the seal.
5 Rotate the hexagonal head of the seal remover tool clockwise, until the thread grips the steel shell of the
seal.
Figure 7C4 – 16
6 W hile holding the hexagonal head of the seal remover tool (1) rotate the remover nut (2) clockwise, until it
contacts the transmission case.
7 Continue rotating the remover nut until the seal is pulled into the remover nut cavity.
8 Remove and discard the seal.
Figure 7C4 – 17
BACK TO CHAPTER INDEX
TO MODEL INDEX
ISUZU KB P190 2007
Page 3933 of 6020
Automatic Transmission – 4L60E – On-vehicle Servicing Page 7C4–20
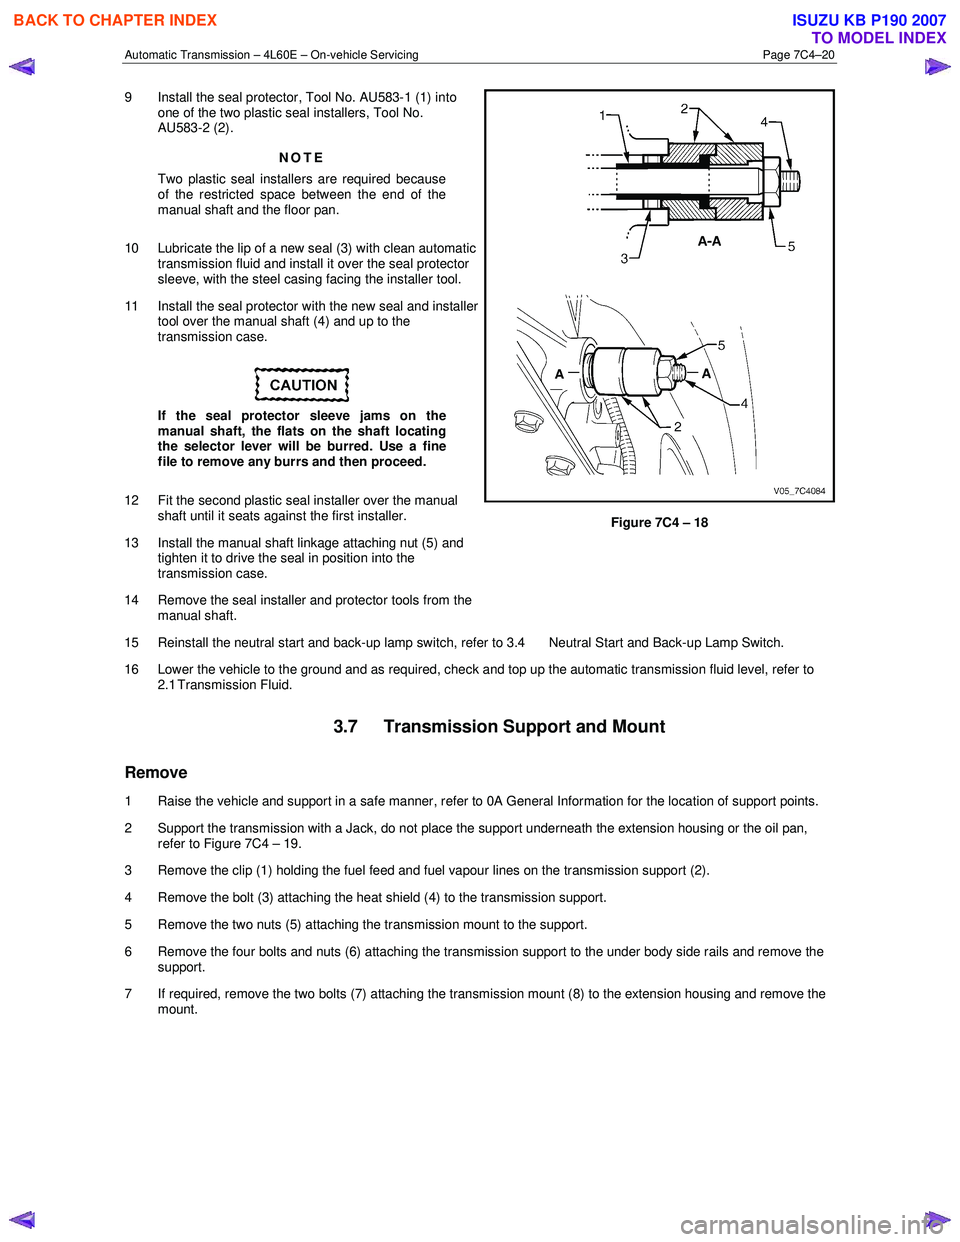
9 Install the seal protector, Tool No. AU583-1 (1) into
one of the two plastic seal installers, Tool No.
AU583-2 (2).
NOTE
Two plastic seal installers are required because
of the restricted space between the end of the
manual shaft and the floor pan.
10 Lubricate the lip of a new seal (3) with clean automatic transmission fluid and install it over the seal protector
sleeve, with the steel casing facing the installer tool.
11 Install the seal protector with the new seal and installer tool over the manual shaft (4) and up to the
transmission case.
If the seal protector sleeve jams on the
manual shaft, the flats on the shaft locating
the selector lever will be burred. Use a fine
file to remove any burrs and then proceed.
12 Fit the second plastic seal installer over the manual shaft until it seats against the first installer.
13 Install the manual shaft linkage attaching nut (5) and tighten it to drive the seal in position into the
transmission case.
14 Remove the seal installer and protector tools from the manual shaft.
Figure 7C4 – 18
15 Reinstall the neutral start and back-up lamp switch, refer to 3.4 Neutral Start and Back-up Lamp Switch.
16 Lower the vehicle to the ground and as required, check and top up the automatic transmission fluid level, refer to 2.1 Transmission Fluid.
3.7 Transmission Support and Mount
Remove
1 Raise the vehicle and support in a safe manner, refer to 0A General Information for the location of support points.
2 Support the transmission with a Jack, do not place the support underneath the extension housing or the oil pan, refer to Figure 7C4 – 19.
3 Remove the clip (1) holding the fuel feed and fuel vapour lines on the transmission support (2).
4 Remove the bolt (3) attaching the heat shield (4) to the transmission support.
5 Remove the two nuts (5) attaching the transmission mount to the support.
6 Remove the four bolts and nuts (6) attaching the transmission support to the under body side rails and remove the support.
7 If required, remove the two bolts (7) attaching the transmission mount (8) to the extension housing and remove the mount.
BACK TO CHAPTER INDEX
TO MODEL INDEX
ISUZU KB P190 2007
Page 3935 of 6020
Automatic Transmission – 4L60E – On-vehicle Servicing Page 7C4–22
3.8 Extension Housing Oil Seal, RWD
Replace
1 Raise the vehicle and support in a safe manner, refer to 0A General Information for the location of support points.
2 Remove the rear propeller shaft, refer to 4A Propeller Shaft.
3 Place a suitable size drip tray underneath rear of transmission.
Take care not to scratch the machined seal
recess in the extension housing as
transmission fluid may weep past the outer
diameter of the installed seal.
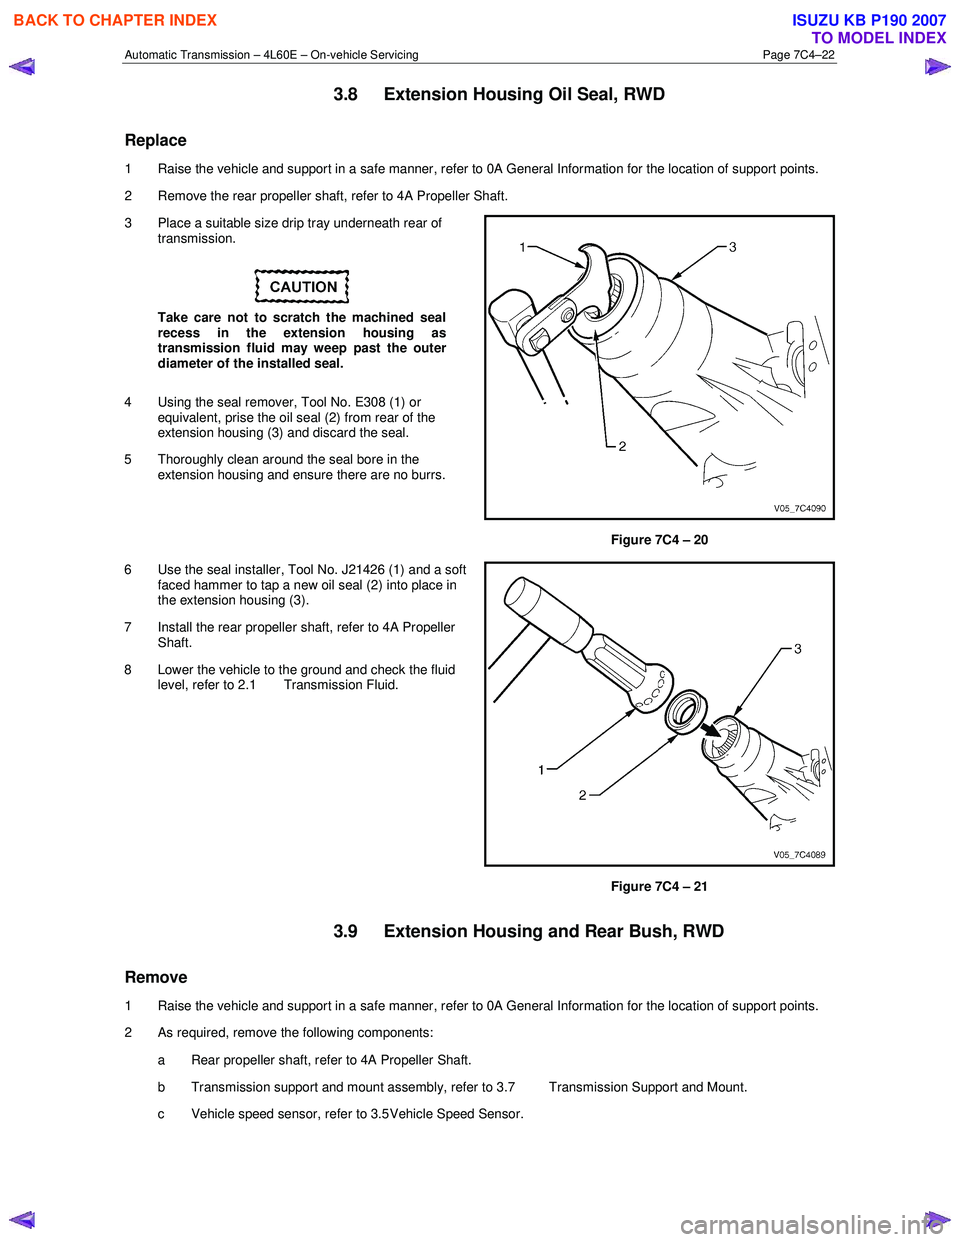
4 Using the seal remover, Tool No. E308 (1) or equivalent, prise the oil seal (2) from rear of the
extension housing (3) and discard the seal.
5 Thoroughly clean around the seal bore in the extension housing and ensure there are no burrs.
Figure 7C4 – 20
6 Use the seal installer, Tool No. J21426 (1) and a soft faced hammer to tap a new oil seal (2) into place in
the extension housing (3).
7 Install the rear propeller shaft, refer to 4A Propeller Shaft.
8 Lower the vehicle to the ground and check the fluid level, refer to 2.1 Transmission Fluid.
Figure 7C4 – 21
3.9 Extension Housing and Rear Bush, RWD
Remove
1 Raise the vehicle and support in a safe manner, refer to 0A General Information for the location of support points.
2 As required, remove the following components:
a Rear propeller shaft, refer to 4A Propeller Shaft.
b Transmission support and mount assembly, refer to 3.7 Transmission Support and Mount.
c Vehicle speed sensor, refer to 3.5 Vehicle Speed Sensor.
BACK TO CHAPTER INDEX
TO MODEL INDEX
ISUZU KB P190 2007
Page 3936 of 6020
Automatic Transmission – 4L60E – On-vehicle Servicing Page 7C4–23
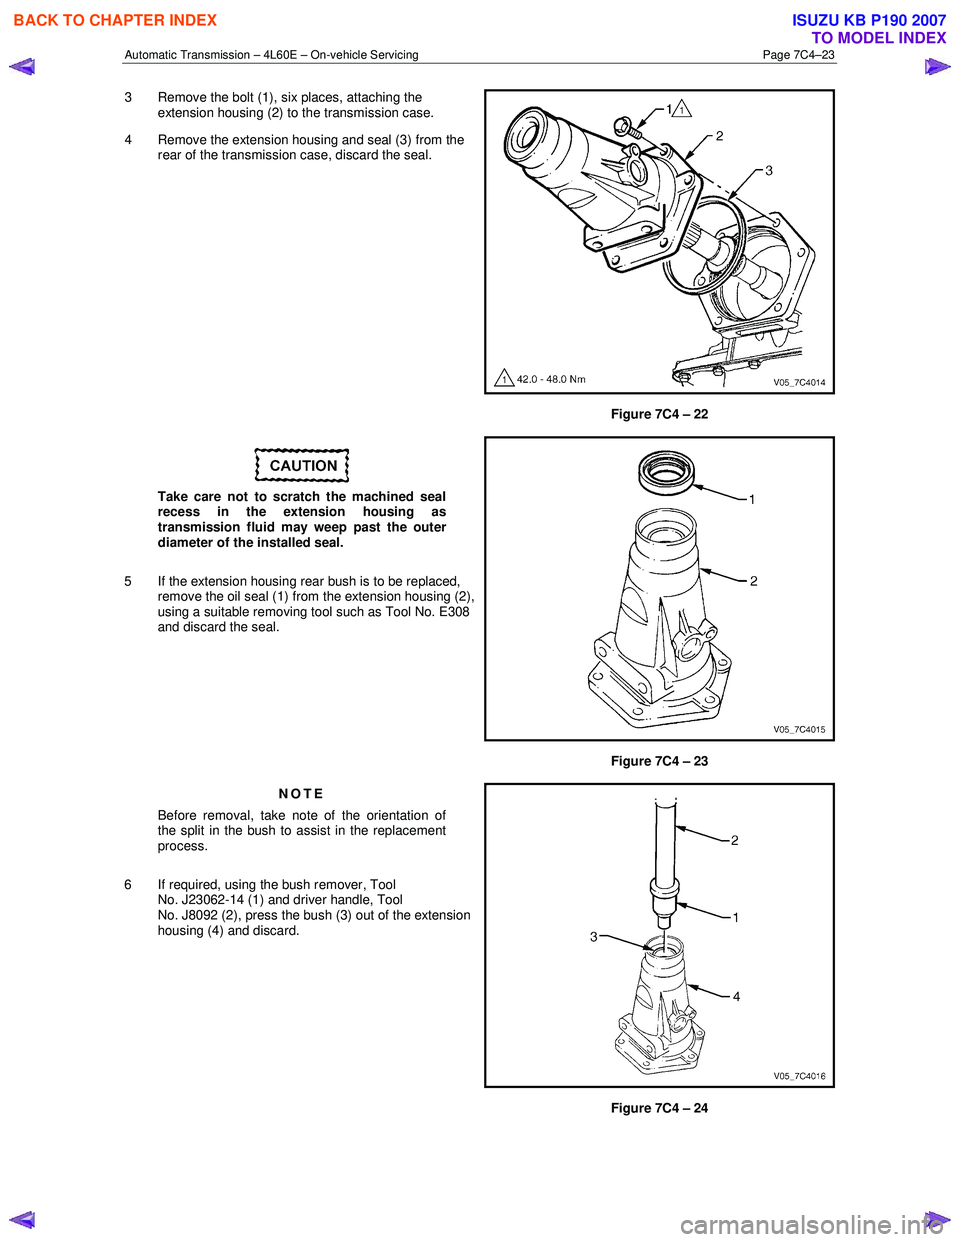
3 Remove the bolt (1), six places, attaching the
extension housing (2) to the transmission case.
4 Remove the extension housing and seal (3) from the rear of the transmission case, discard the seal.
Figure 7C4 – 22
Take care not to scratch the machined seal
recess in the extension housing as
transmission fluid may weep past the outer
diameter of the installed seal.
5 If the extension housing rear bush is to be replaced, remove the oil seal (1) from the extension housing (2),
using a suitable removing tool such as Tool No. E308
and discard the seal.
Figure 7C4 – 23
NOTE
Before removal, take note of the orientation of
the split in the bush to assist in the replacement
process.
6 If required, using the bush remover, Tool No. J23062-14 (1) and driver handle, Tool
No. J8092 (2), press the bush (3) out of the extension
housing (4) and discard.
Figure 7C4 – 24
BACK TO CHAPTER INDEX
TO MODEL INDEX
ISUZU KB P190 2007
Page 3937 of 6020
Automatic Transmission – 4L60E – On-vehicle Servicing Page 7C4–24
7 Lubricate the outside of a new bush with automatic
transmission fluid to reduce the chance of material
pick-up.
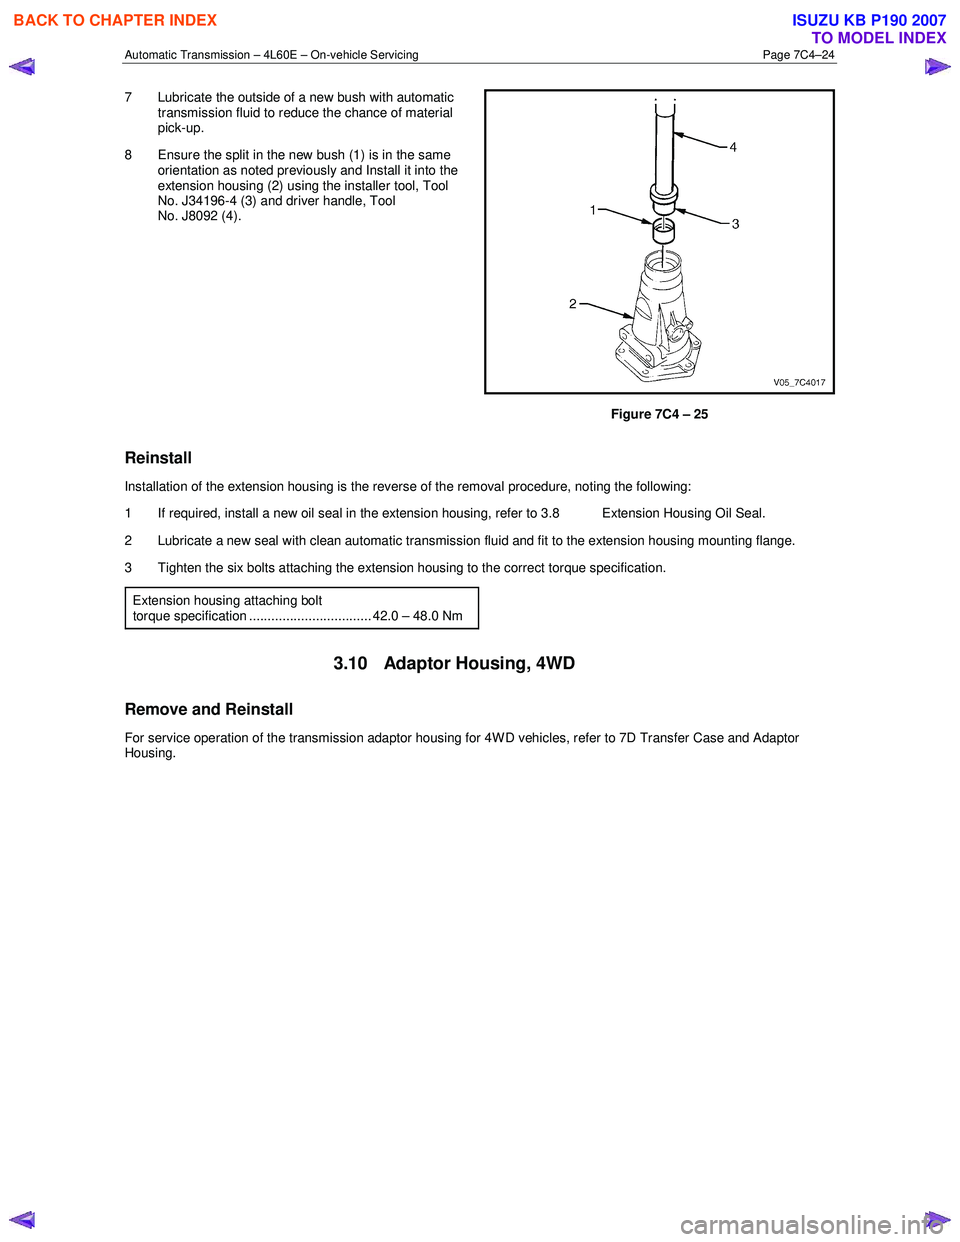
8 Ensure the split in the new bush (1) is in the same orientation as noted previously and Install it into the
extension housing (2) using the installer tool, Tool
No. J34196-4 (3) and driver handle, Tool
No. J8092 (4).
Figure 7C4 – 25
Reinstall
Installation of the extension housing is the reverse of the removal procedure, noting the following:
1 If required, install a new oil seal in the extension housing, refer to 3.8 Extension Housing Oil Seal.
2 Lubricate a new seal with clean automatic transmission fluid and fit to the extension housing mounting flange.
3 Tighten the six bolts attaching the extension housing to the correct torque specification.
Extension housing attaching bolt
torque specification ................................. 42.0 – 48.0 Nm
3.10 Adaptor Housing, 4WD
Remove and Reinstall
For service operation of the transmission adaptor housing for 4W D vehicles, refer to 7D Transfer Case and Adaptor
Housing.
BACK TO CHAPTER INDEX
TO MODEL INDEX
ISUZU KB P190 2007
Page 3938 of 6020
Automatic Transmission – 4L60E – On-vehicle Servicing Page 7C4–25
3.11 Shift Solenoid Locations
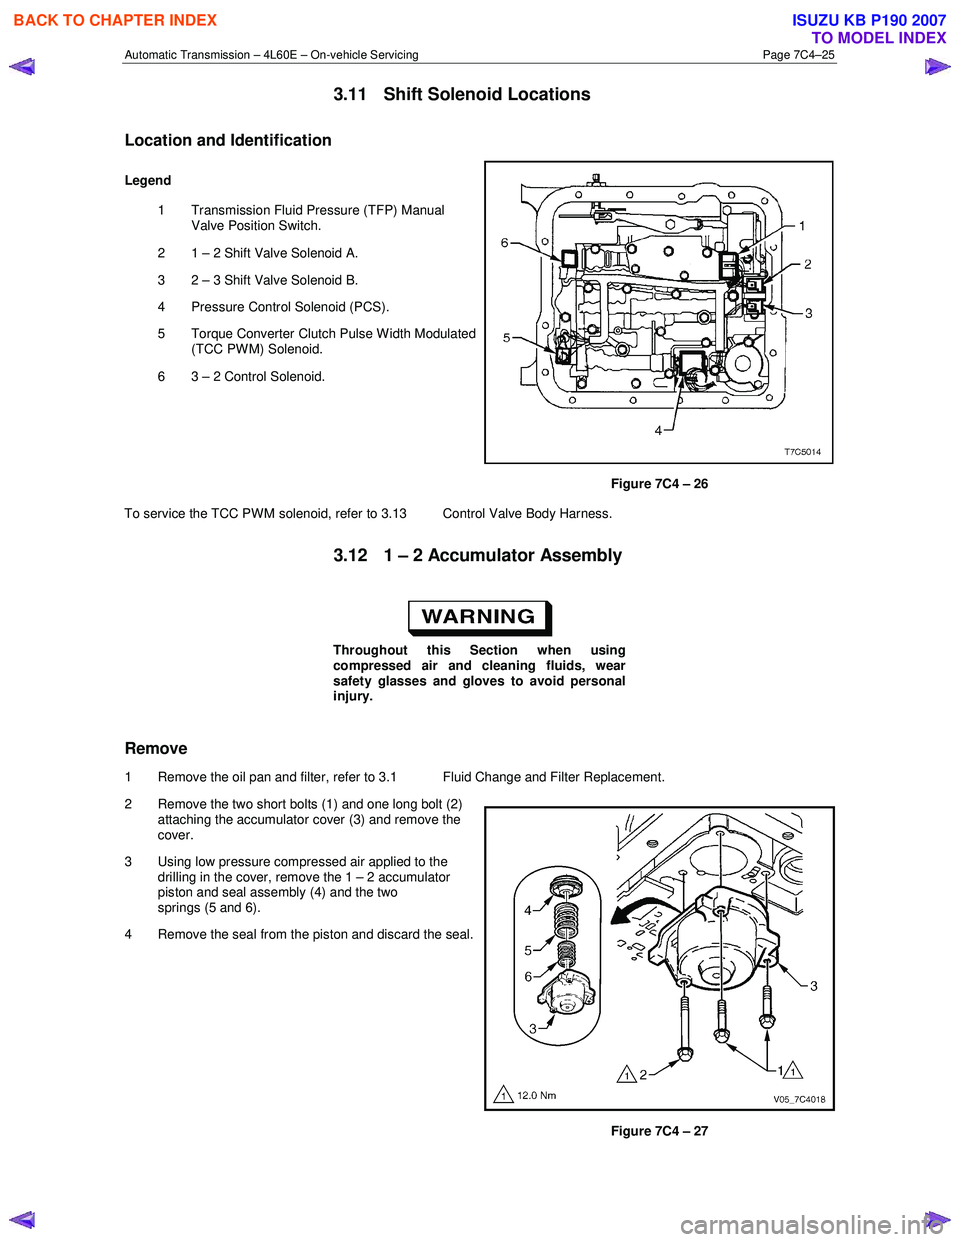
Location and Identification
Legend
1 Transmission Fluid Pressure (TFP) Manual Valve Position Switch.
2 1 – 2 Shift Valve Solenoid A.
3 2 – 3 Shift Valve Solenoid B.
4 Pressure Control Solenoid (PCS).
5 Torque Converter Clutch Pulse W idth Modulated (TCC PWM) Solenoid.
6 3 – 2 Control Solenoid.
Figure 7C4 – 26
To service the TCC PWM solenoid, refer to 3.13 Control Valve Body Harness.
3.12 1 – 2 Accumulator Assembly
Throughout this Section when using
compressed air and cleaning fluids, wear
safety glasses and gloves to avoid personal
injury.
Remove
1 Remove the oil pan and filter, refer to 3.1 Fluid Change and Filter Replacement.
2 Remove the two short bolts (1) and one long bolt (2) attaching the accumulator cover (3) and remove the
cover.
3 Using low pressure compressed air applied to the drilling in the cover, remove the 1 – 2 accumulator
piston and seal assembly (4) and the two
springs (5 and 6).
4 Remove the seal from the piston and discard the seal.
Figure 7C4 – 27
BACK TO CHAPTER INDEX
TO MODEL INDEX
ISUZU KB P190 2007
Page 3939 of 6020
Automatic Transmission – 4L60E – On-vehicle Servicing Page 7C4–26
Clean and Inspect
1 Clean all components in a commercially available cleaning fluid and blow dry using compressed air.
2 Inspect the springs and ensure they are not distorted or broken, replace as required.
3 Inspect all machined surfaces for damage, wear or burrs.
Reinstall
Reinstallation of the 1 – 2 accumulator assembly is the reverse of the removal procedure, noting the following:
1 Lubricate a new seal with petroleum jelly and install it to the piston. Ensure the piston seal does not bind in the piston groove.
2 Tighten the three bolts attaching the accumulator cover to the correct torque specification.
1 – 2 Accumulator cover attaching
bolt torque specification ..................................... 12.0 Nm
3.13 Control Valve Body Harness
Remove
1 Raise the vehicle and support in a safe manner, refer to 0A General Information for the location of support points.
2 As required, remove the oil pan and filter, refer to 3.1 Fluid Change and Filter Replacement.
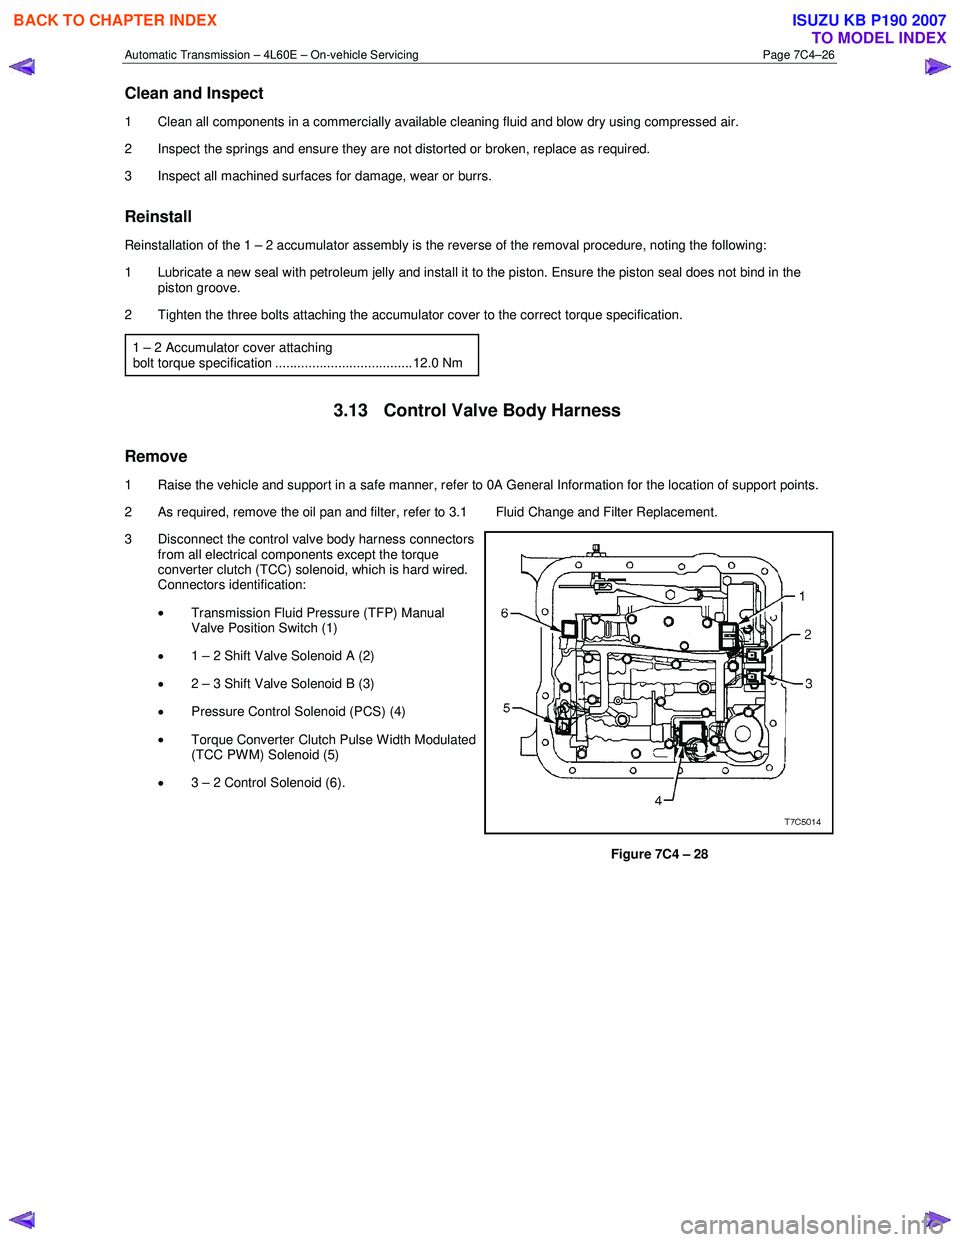
3 Disconnect the control valve body harness connectors from all electrical components except the torque
converter clutch (TCC) solenoid, which is hard wired.
Connectors identification:
• Transmission Fluid Pressure (TFP) Manual
Valve Position Switch (1)
• 1 – 2 Shift Valve Solenoid A (2)
• 2 – 3 Shift Valve Solenoid B (3)
• Pressure Control Solenoid (PCS) (4)
• Torque Converter Clutch Pulse W idth Modulated
(TCC PWM) Solenoid (5)
• 3 – 2 Control Solenoid (6).
Figure 7C4 – 28
BACK TO CHAPTER INDEX
TO MODEL INDEX
ISUZU KB P190 2007