2007 ISUZU KB P190 stop start
[x] Cancel search: stop startPage 4371 of 6020
TRANSMISSION CONTROL SYSTEM (JR405E) 7A2-87
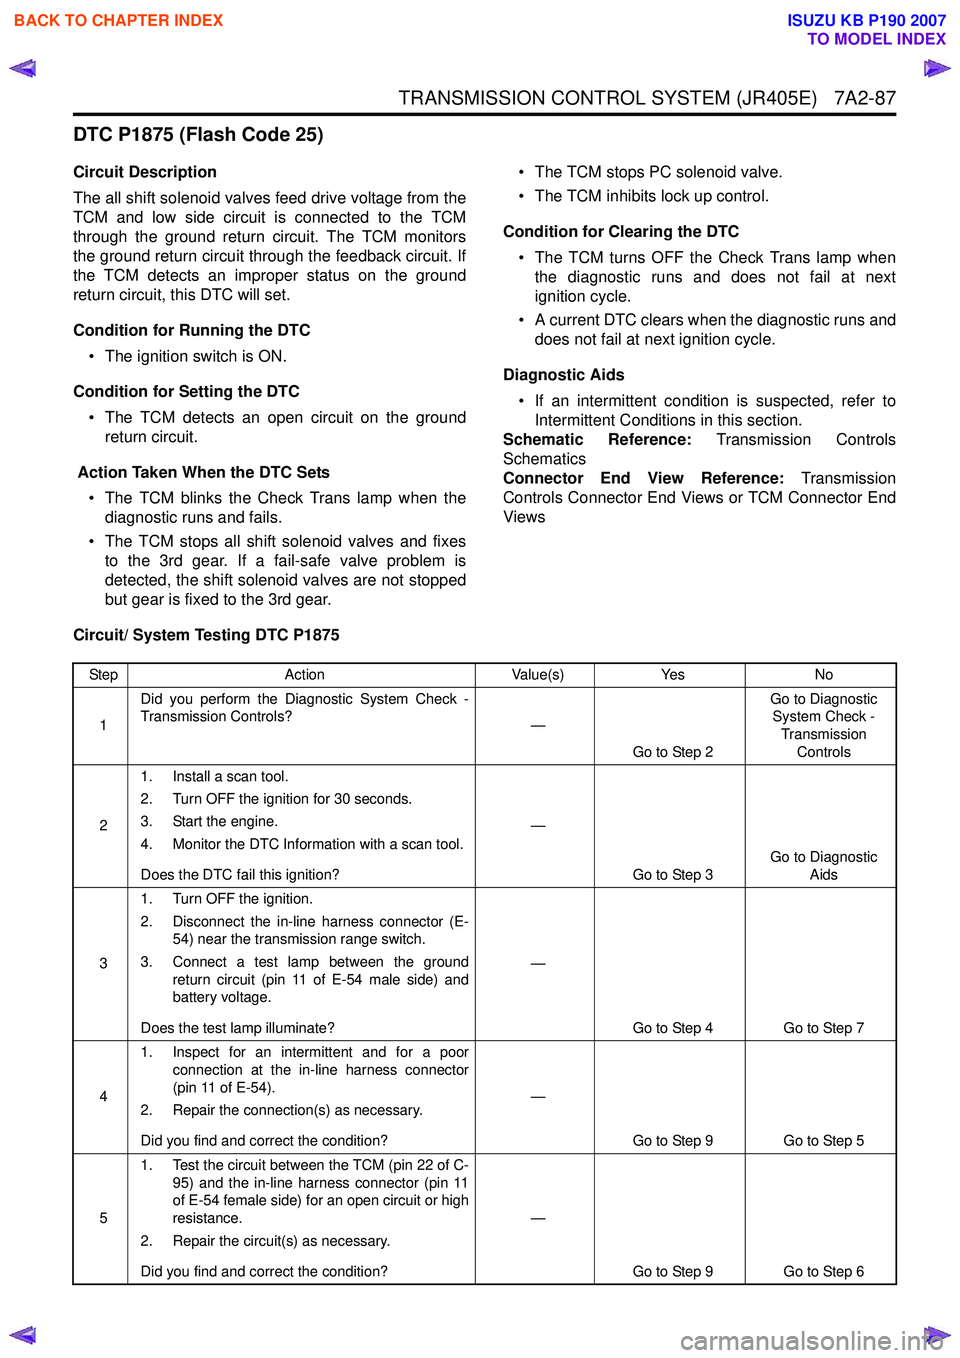
DTC P1875 (Flash Code 25)
Circuit Description
The all shift solenoid valves feed drive voltage from the
TCM and low side circuit is connected to the TCM
through the ground return circuit. The TCM monitors
the ground return circuit through the feedback circuit. If
the TCM detects an improper status on the ground
return circuit, this DTC will set.
Condition for Running the DTC • The ignition switch is ON.
Condition for Setting the DTC • The TCM detects an open circuit on the ground return circuit.
Action Taken When the DTC Sets • The TCM blinks the Check Trans lamp when the diagnostic runs and fails.
• The TCM stops all shift solenoid valves and fixes to the 3rd gear. If a fail-safe valve problem is
detected, the shift solenoid valves are not stopped
but gear is fixed to the 3rd gear. • The TCM stops PC solenoid valve.
• The TCM inhibits lock up control.
Condition for Clearing the DTC • The TCM turns OFF the Check Trans lamp when the diagnostic runs and does not fail at next
ignition cycle.
• A current DTC clears when the diagnostic runs and does not fail at next ignition cycle.
Diagnostic Aids • If an intermittent condition is suspected, refer to Intermittent Conditions in this section.
Schematic Reference: Transmission Controls
Schematics
Connector End View Reference: Transmission
Controls Connector End Views or TCM Connector End
Views
Circuit/ System Testing DTC P1875
Step Action Value(s)Yes No
1 Did you perform the Diagnostic System Check -
Transmission Controls? —
Go to Step 2 Go to Diagnostic
System Check -
Transmission Controls
2 1. Install a scan tool.
2. Turn OFF the ignition for 30 seconds.
3. Start the engine.
4. Monitor the DTC Information with a scan tool.
Does the DTC fail this ignition? —
Go to Step 3 Go to Diagnostic
Aids
3 1. Turn OFF the ignition.
2. Disconnect the in-line harness connector (E- 54) near the transmission range switch.
3. Connect a test lamp between the ground return circuit (pin 11 of E-54 male side) and
battery voltage.
Does the test lamp illuminate? —
Go to Step 4 Go to Step 7
4 1. Inspect for an intermittent and for a poor
connection at the in-line harness connector
(pin 11 of E-54).
2. Repair the connection(s) as necessary.
Did you find and correct the condition? —
Go to Step 9 Go to Step 5
5 1. Test the circuit between the TCM (pin 22 of C-
95) and the in-line harness connector (pin 11
of E-54 female side) for an open circuit or high
resistance.
2. Repair the circuit(s) as necessary.
Did you find and correct the condition? —
Go to Step 9 Go to Step 6
BACK TO CHAPTER INDEX
TO MODEL INDEX
ISUZU KB P190 2007
Page 4376 of 6020
7A2-92 TRANSMISSION CONTROL SYSTEM (JR405E)
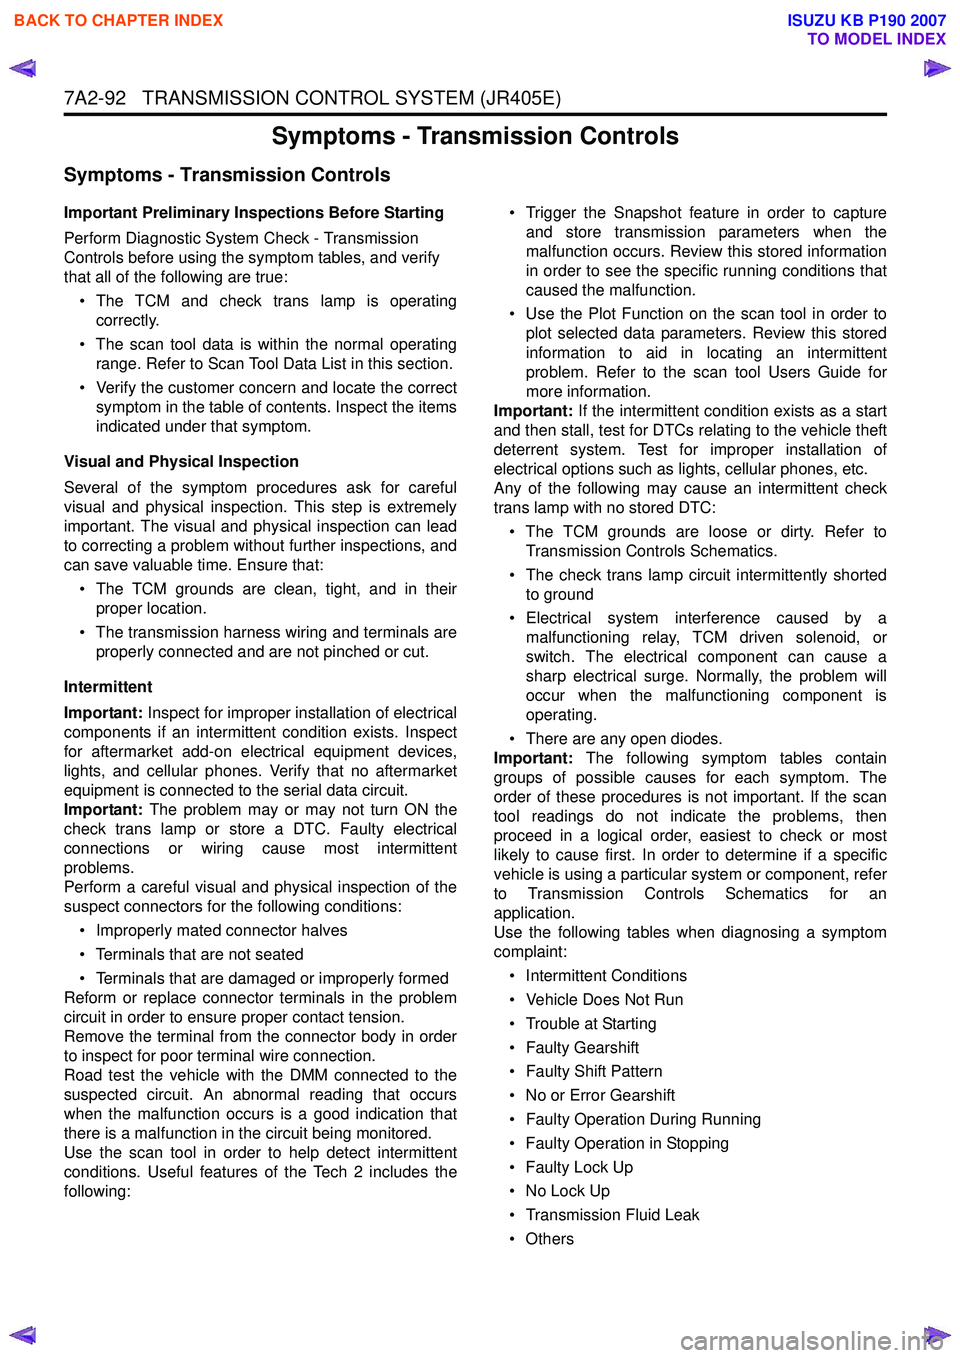
Symptoms - Transmission Controls
Symptoms - Transmission Controls
Important Preliminary Inspections Before Starting
Perform Diagnostic System Check - Transmission
Controls before using the symptom tables, and verify
that all of the following are true:
• The TCM and check trans lamp is operating correctly.
• The scan tool data is within the normal operating range. Refer to Scan Tool Data List in this section.
• Verify the customer concern and locate the correct symptom in the table of contents. Inspect the items
indicated under that symptom.
Visual and Physical Inspection
Several of the symptom procedures ask for careful
visual and physical inspection. This step is extremely
important. The visual and physical inspection can lead
to correcting a problem without further inspections, and
can save valuable time. Ensure that:
• The TCM grounds are clean, tight, and in their proper location.
• The transmission harness wiring and terminals are properly connected and are not pinched or cut.
Intermittent
Important: Inspect for improper installation of electrical
components if an intermittent condition exists. Inspect
for aftermarket add-on electrical equipment devices,
lights, and cellular phones. Verify that no aftermarket
equipment is connected to the serial data circuit.
Important: The problem may or may not turn ON the
check trans lamp or store a DTC. Faulty electrical
connections or wiring cause most intermittent
problems.
Perform a careful visual and physical inspection of the
suspect connectors for the following conditions:
• Improperly mated connector halves
• Terminals that are not seated
• Terminals that are damaged or improperly formed
Reform or replace connector terminals in the problem
circuit in order to ensure proper contact tension.
Remove the terminal from the connector body in order
to inspect for poor terminal wire connection.
Road test the vehicle with the DMM connected to the
suspected circuit. An abnormal reading that occurs
when the malfunction occurs is a good indication that
there is a malfunction in the circuit being monitored.
Use the scan tool in order to help detect intermittent
conditions. Useful features of the Tech 2 includes the
following: • Trigger the Snapshot feature in order to capture
and store transmission parameters when the
malfunction occurs. Review this stored information
in order to see the specific running conditions that
caused the malfunction.
• Use the Plot Function on the scan tool in order to plot selected data parameters. Review this stored
information to aid in locating an intermittent
problem. Refer to the scan tool Users Guide for
more information.
Important: If the intermittent condition exists as a start
and then stall, test for DTCs relating to the vehicle theft
deterrent system. Test for improper installation of
electrical options such as lights, cellular phones, etc.
Any of the following may cause an intermittent check
trans lamp with no stored DTC:
• The TCM grounds are loose or dirty. Refer to Transmission Controls Schematics.
• The check trans lamp circuit intermittently shorted to ground
• Electrical system interference caused by a malfunctioning relay, TCM driven solenoid, or
switch. The electrical component can cause a
sharp electrical surge. Normally, the problem will
occur when the malfunctioning component is
operating.
• There are any open diodes.
Important: The following symptom tables contain
groups of possible causes for each symptom. The
order of these procedures is not important. If the scan
tool readings do not indicate the problems, then
proceed in a logical order, easiest to check or most
likely to cause first. In order to determine if a specific
vehicle is using a particular system or component, refer
to Transmission Controls Schematics for an
application.
Use the following tables when diagnosing a symptom
complaint:
• Intermittent Conditions
• Vehicle Does Not Run
• Trouble at Starting
• Faulty Gearshift
• Faulty Shift Pattern
• No or Error Gearshift
• Faulty Operation During Running
• Faulty Operation in Stopping
• Faulty Lock Up
• No Lock Up
• Transmission Fluid Leak
•Others
BACK TO CHAPTER INDEX
TO MODEL INDEX
ISUZU KB P190 2007
Page 4379 of 6020
TRANSMISSION CONTROL SYSTEM (JR405E) 7A2-95
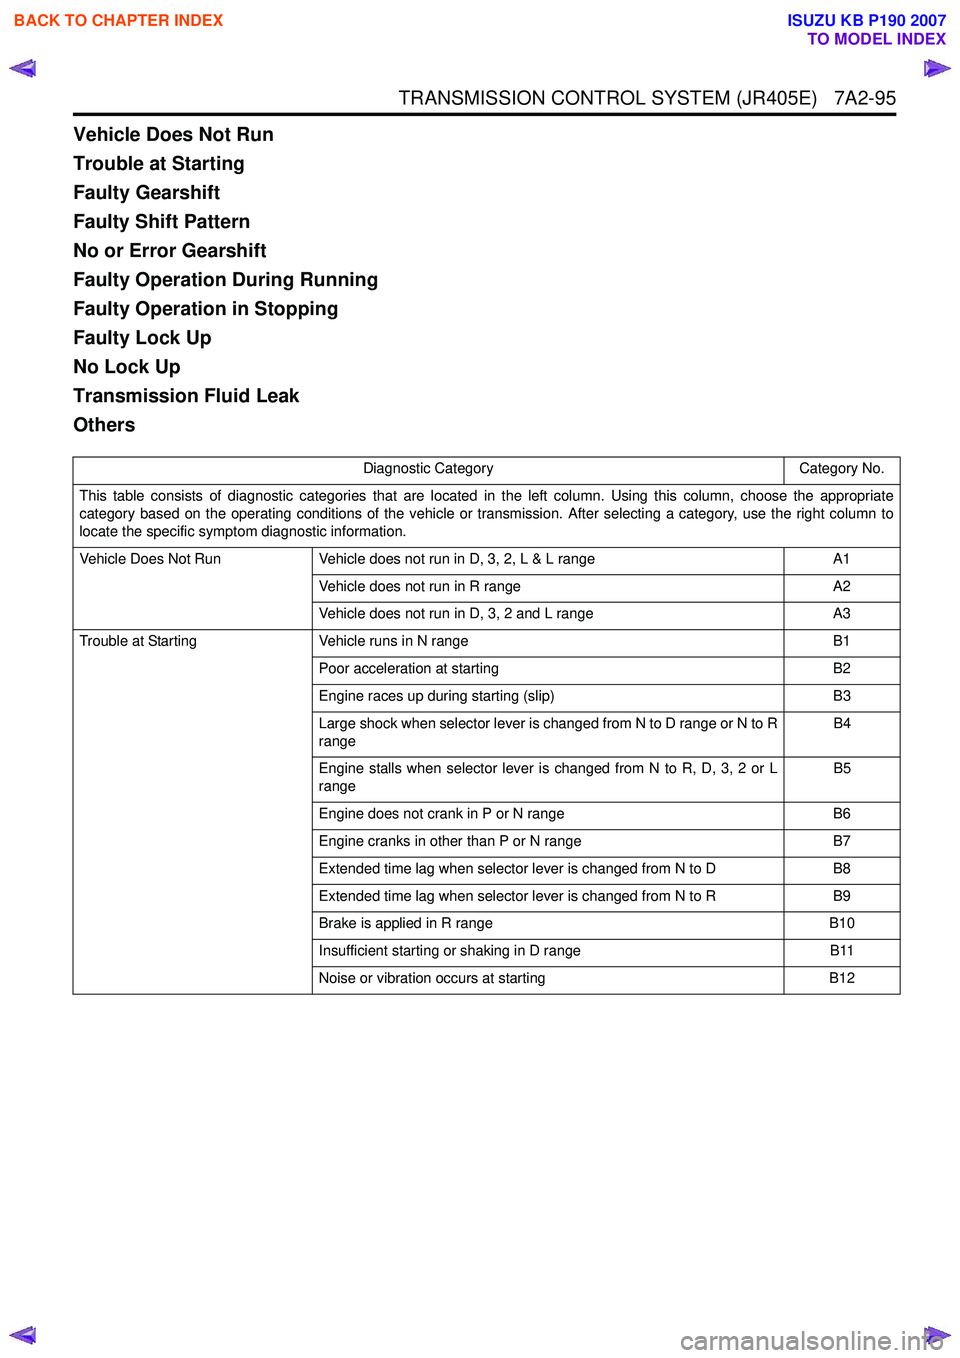
Vehicle Does Not Run
Trouble at Starting
Faulty Gearshift
Faulty Shift Pattern
No or Error Gearshift
Faulty Operation During Running
Faulty Operation in Stopping
Faulty Lock Up
No Lock Up
Transmission Fluid Leak
Others
Diagnostic CategoryCategory No.
This table consists of diagnostic categories that are located in the left column. Using this column, choose the appropriate
category based on the operating conditions of the vehicle or transmission. After selecting a category, use the right column to
locate the specific symptom diagnostic information.
Vehicle Does Not Run Vehicle does not run in D, 3, 2, L & L range A1
Vehicle does not run in R range A2
Vehicle does not run in D, 3, 2 and L range A3
Trouble at Starting Vehicle runs in N range B1
Poor acceleration at starting B2
Engine races up during starting (slip) B3
Large shock when selector lever is changed from N to D range or N to R
range B4
Engine stalls when selector lever is changed from N to R, D, 3, 2 or L
range B5
Engine does not crank in P or N range B6
Engine cranks in other than P or N range B7
Extended time lag when selector lever is changed from N to D B8
Extended time lag when selector lever is changed from N to R B9
Brake is applied in R range B10
Insufficient starting or shaking in D range B11
Noise or vibration occurs at starting B12
BACK TO CHAPTER INDEX
TO MODEL INDEX
ISUZU KB P190 2007
Page 4381 of 6020
TRANSMISSION CONTROL SYSTEM (JR405E) 7A2-97
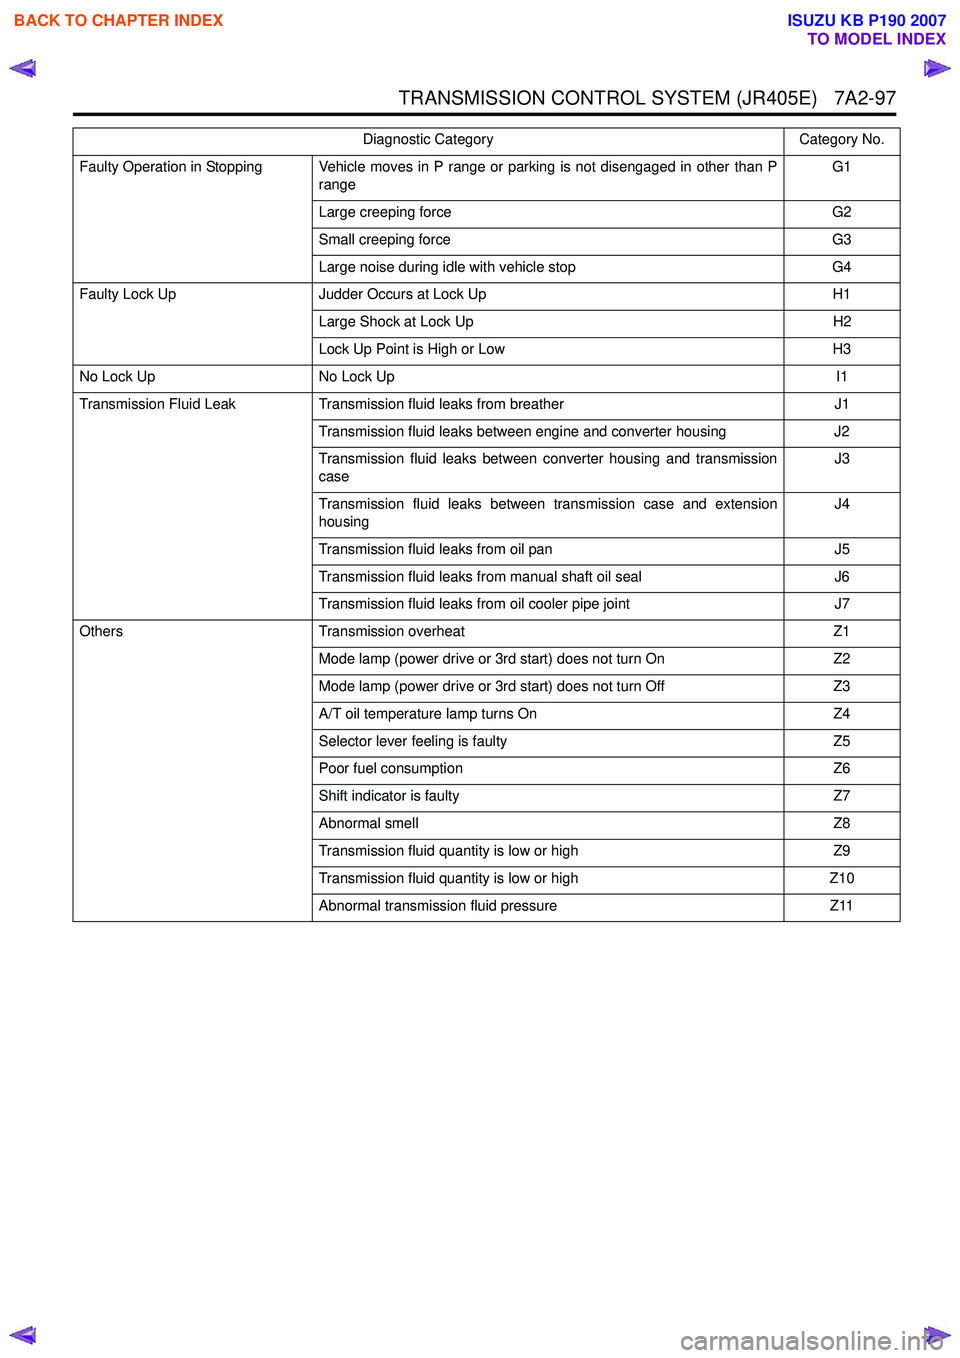
Faulty Operation in Stopping Vehicle moves in P range or parking is not disengaged in other than Prange G1
Large creeping force G2
Small creeping force G3
Large noise during idle with vehicle stop G4
Faulty Lock Up Judder Occurs at Lock Up H1
Large Shock at Lock Up H2
Lock Up Point is High or Low H3
No Lock Up No Lock Up I1
Transmission Fluid Leak Transmission fluid leaks from breather J1
Transmission fluid leaks between engine and converter housing J2
Transmission fluid leaks between converter housing and transmission
case J3
Transmission fluid leaks between transmission case and extension
housing J4
Transmission fluid leaks from oil pan J5
Transmission fluid leaks from manual shaft oil seal J6
Transmission fluid leaks from oil cooler pipe joint J7
Others Transmission overheat Z1
Mode lamp (power drive or 3rd start) does not turn On Z2
Mode lamp (power drive or 3rd start) does not turn Off Z3
A/T oil temperature lamp turns On Z4
Selector lever feeling is faulty Z5
Poor fuel consumption Z6
Shift indicator is faulty Z7
Abnormal smell Z8
Transmission fluid quantity is low or high Z9
Transmission fluid quantity is low or high Z10
Abnormal transmission fluid pressure Z11
Diagnostic Category
Category No.
BACK TO CHAPTER INDEX
TO MODEL INDEX
ISUZU KB P190 2007
Page 4383 of 6020
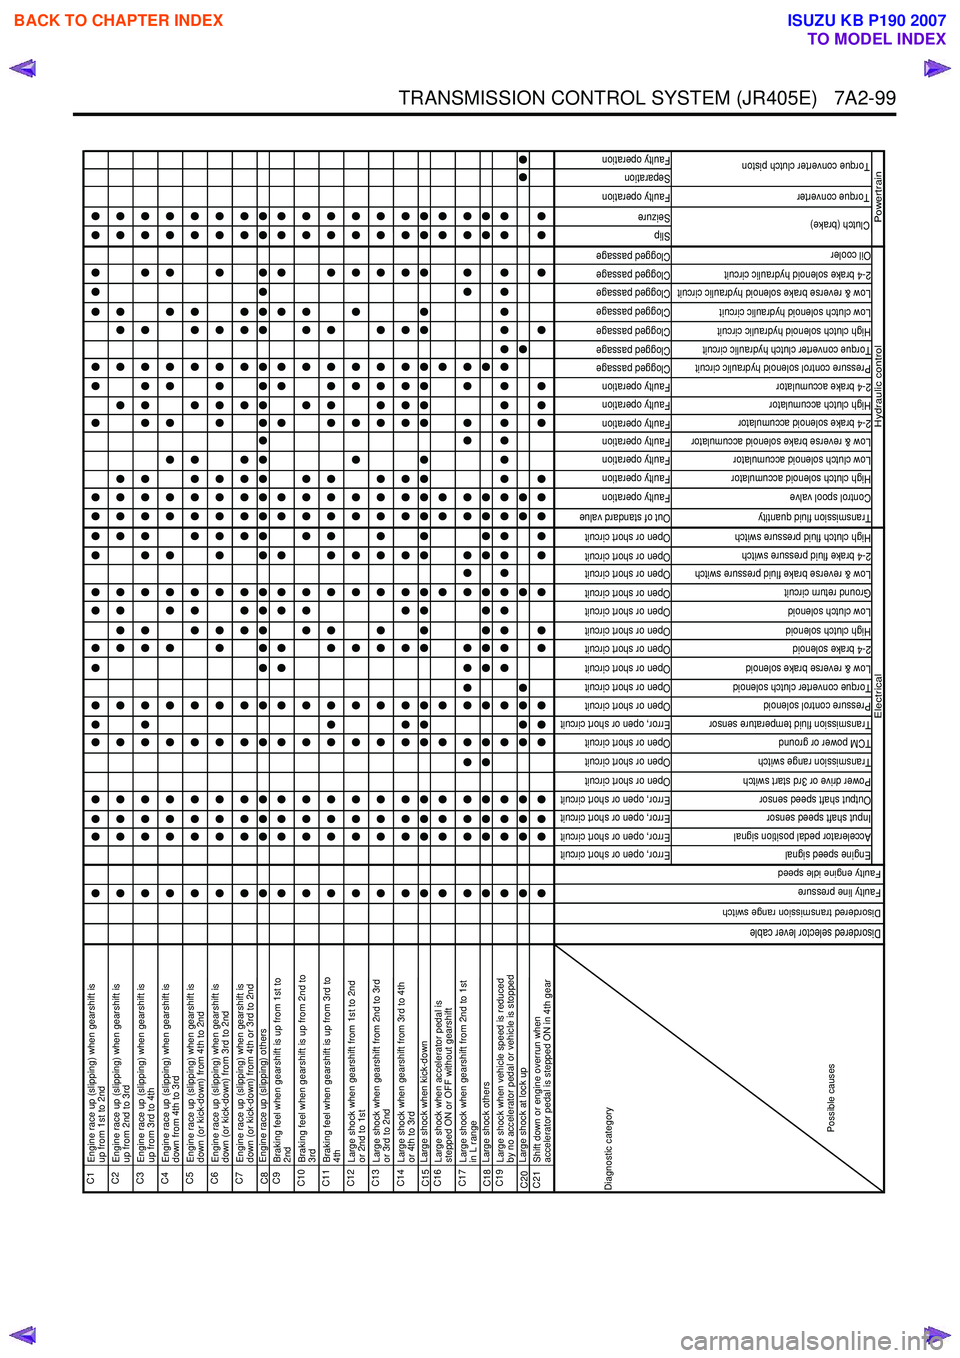
TRANSMISSION CONTROL SYSTEM (JR405E) 7A2-99
C1
Engine race up (slipping) when gearshift is
up from 1st to 2nd
C2
Engine race up (slipping) when gearshift is
up from 2nd to 3rd
C3
Engine race up (slipping) when gearshift is
up from 3rd to 4th
C4
Engine race up (slipping) when gearshift is
down from 4th to 3rd
C5
Engine race up (slipping) when gearshift is
down (or kick-down) from 4th to 2nd
C6
Engine race up (slipping) when gearshift is
down (or kick-down) from 3rd to 2nd
C7
Engine race up (slipping) when gearshift is
down (or kick-down) from 4th or 3rd to 2nd
C8 Engine race up (slipping) othersC9
Braking feel when gearshift is up from 1st to
2nd
C10
Braking feel when gearshift is up from 2nd to
3rd
C11
Braking feel when gearshift is up from 3rd to
4th
C12
Large shock when gearshift from 1st to 2nd
or 2nd to 1st
C13
Large shock when gearshift from 2nd to 3rd
or 3rd to 2nd
C14
Large shock when gearshift from 3rd to 4th
or 4th to 3rd
C15 Large shock when kick-downC16
Large shock when accelerator pedal is
stepped ON or OFF without gearshift
C17
Large shock when gearshift from 2nd to 1st
in L range
C18 Large shock othersC19
Large shock when vehicle speed is reduced
by no accelerator pedal or vehicle is stopped
C20 Large shock at lock upC21
Shift down or engine overrun when
accelerator pedal is stepped ON in 4th gear
Error, open or short circuit
Error, open or short circuit
Error, open or short circuit
Error, open or short circuit
Open or short circuit
Open or short circuit
Open or short circuit
Error, open or short circuit
Open or short circuit
Open or short circuit
Open or short circuit
Open or short circuit
Open or short circuit
Open or short circuit
Open or short circuit
Open or short circuit
Open or short circuit
Open or short circuit
Out of standard value
Faulty operation
Faulty operation
Faulty operation
Faulty operation
Faulty operation
Faulty operation
Faulty operation
Clogged passage
Clogged passage
Clogged passage
Clogged passage
Clogged passage
Clogged passage
Clogged passage
Slip
Seizure
Faulty operation
Separation
Faulty operation
Engine speed signal
Accelerator pedal position signal
Input shaft speed sensor
Output shaft speed sensor
Power drive or 3rd start switch
Transmission range switch
TCM power or ground
Transmission fluid temperature sensor
Pressure control solenoid
Torque converter clutch solenoid
Low & reverse brake solenoid
2-4 brake solenoid
High clutch solenoid
Low clutch solenoid
Ground return circuit
Low & reverse brake fluid pressure switch
2-4 brake fluid pressure switch
High clutch fluid pressure switch
Transmission fluid quantity
Control spool valve
High clutch solenoid accumulator
Low clutch solenoid accumulator
Low & reverse brake solenoid accumulator
2-4 brake solenoid accumulator
High clutch accumulator
2-4 brake accumulator
Pressure control solenoid hydraulic circuit
Torque converter clutch hydraulic circuit
High clutch solenoid hydraulic circuit
Low clutch solenoid hydraulic circuit
Low & reverse brake solenoid hydraulic circuit
2-4 brake solenoid hydraulic circuit
Oil cooler
Torque converter
Clutch (brake)
Torque converter clutch piston
Hydraulic control
Powertrain
Diagnostic category
Possible causes
Electrical
Disordered selector lever cable
Disordered transmission range switch
Faulty line pressure
Faulty engine idle speed
BACK TO CHAPTER INDEX
TO MODEL INDEX
ISUZU KB P190 2007
Page 4384 of 6020
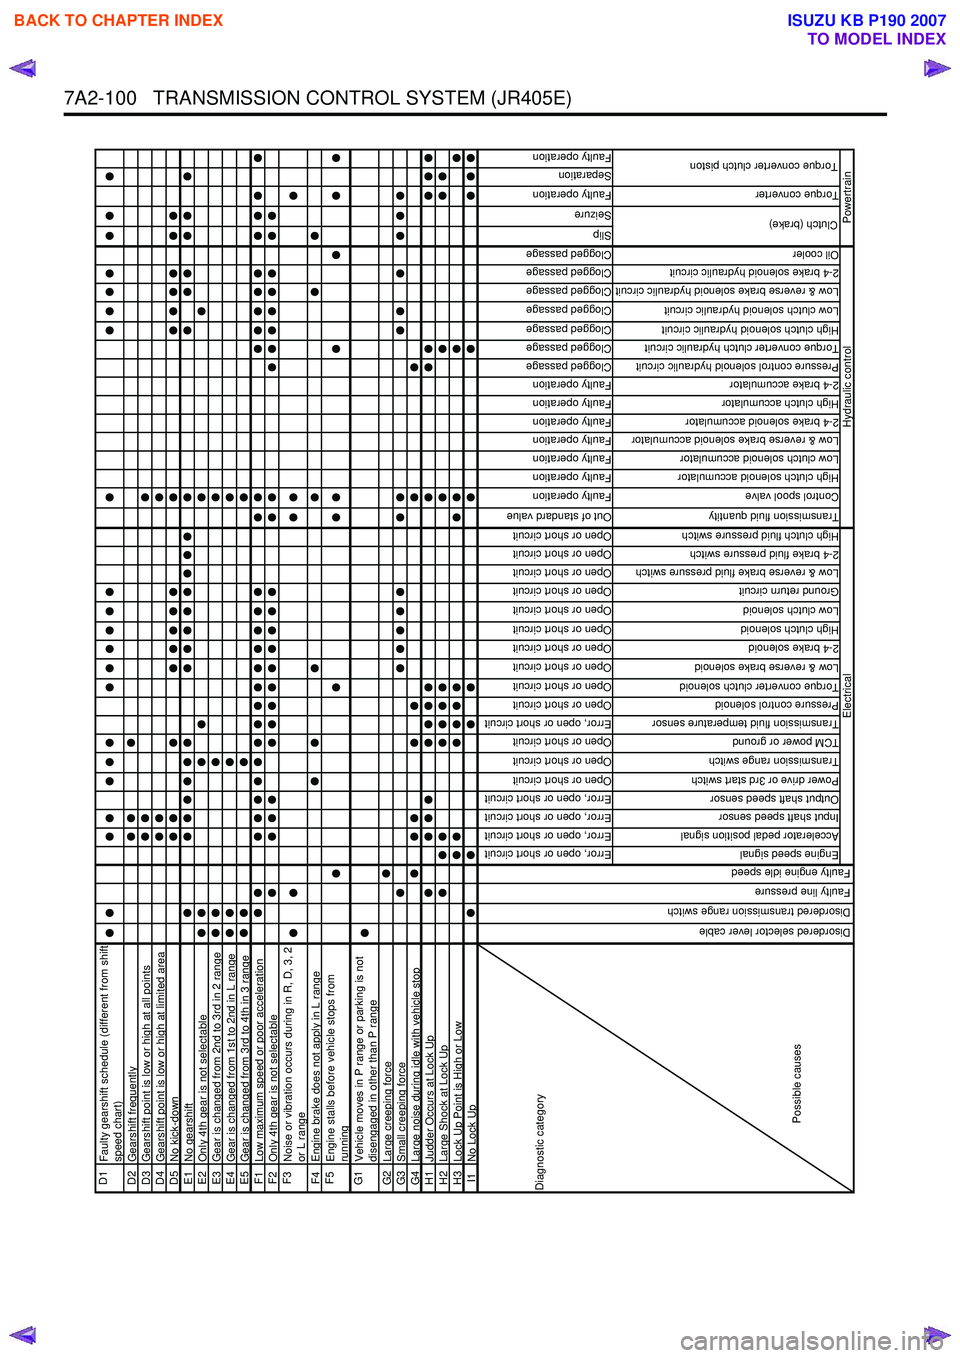
7A2-100 TRANSMISSION CONTROL SYSTEM (JR405E)
D1
Faulty gearshift schedule (different from shift
speed chart)
D2 Gearshift frequentlyD3Gearshift point is low or high at all pointsD4Gearshift point is low or high at limited areaD5No kick-downE1No gearshiftE2Only 4th gear is not selectableE3Gear is changed from 2nd to 3rd in 2 rangeE4Gear is changed from 1st to 2nd in L rangeE5Gear is changed from 3rd to 4th in 3 rangeF1Low maximum speed or poor accelerationF2Only 4th gear is not selectableF3
Noise or vibration occurs during in R, D, 3, 2
or L range
F4 Engine brake does not apply in L rangeF5
Engine stalls before vehicle stops from
running
G1
Vehicle moves in P range or parking is not
disengaged in other than P range
G2 Large creeping forceG3Small creeping forceG4Large noise during idle with vehicle stopH1Judder Occurs at Lock UpH2Large Shock at Lock UpH3Lock Up Point is High or LowI1No Lock Up
Error, open or short circuit
Error, open or short circuit
Error, open or short circuit
Error, open or short circuit
Open or short circuit
Open or short circuit
Open or short circuit
Error, open or short circuit
Open or short circuit
Open or short circuit
Open or short circuit
Open or short circuit
Open or short circuit
Open or short circuit
Open or short circuit
Open or short circuit
Open or short circuit
Open or short circuit
Out of standard value
Faulty operation
Faulty operation
Faulty operation
Faulty operation
Faulty operation
Faulty operation
Faulty operation
Clogged passage
Clogged passage
Clogged passage
Clogged passage
Clogged passage
Clogged passage
Clogged passage
Slip
Seizure
Faulty operation
Separation
Faulty operation
Engine speed signal
Accelerator pedal position signal
Input shaft speed sensor
Output shaft speed sensor
Power drive or 3rd start switch
Transmission range switch
TCM power or ground
Transmission fluid temperature sensor
Pressure control solenoid
Torque converter clutch solenoid
Low & reverse brake solenoid
2-4 brake solenoid
High clutch solenoid
Low clutch solenoid
Ground return circuit
Low & reverse brake fluid pressure switch
2-4 brake fluid pressure switch
High clutch fluid pressure switch
Transmission fluid quantity
Control spool valve
High clutch solenoid accumulator
Low clutch solenoid accumulator
Low & reverse brake solenoid accumulator
2-4 brake solenoid accumulator
High clutch accumulator
2-4 brake accumulator
Pressure control solenoid hydraulic circuit
Torque converter clutch hydraulic circuit
High clutch solenoid hydraulic circuit
Low clutch solenoid hydraulic circuit
Low & reverse brake solenoid hydraulic circuit
2-4 brake solenoid hydraulic circuit
Oil cooler
Torque converter
Diagnostic category
Possible causes
Electrical
Disordered selector lever cable
Disordered transmission range switch
Faulty line pressure
Faulty engine idle speed
Clutch (brake)
Torque converter clutch piston
Hydraulic control
Powertrain
BACK TO CHAPTER INDEX
TO MODEL INDEX
ISUZU KB P190 2007
Page 4457 of 6020
ON-VEHICLE SERVICE (JR405E) 7A3-3
Cold Level
The vehicle must not have been driven so that the
temperature reaches around 20 °C (68 °F) before the
cold level check is made.
1. Park the vehicle on a level surface.
2. Apply the parking brake firmly.
3. Start the engine and allow it to warm up.
The engine coolant temperature gauge needle should be midway between the “C” mark and “H”
mark.
4. Let the engine run at idle.
Move the select lever slowly through all the gea
r
ranges.
Stop in each range just long enough for the transmission to engage.
5. Return the select lever either “P” or “N”.
6. Remove the ATF level dipstick.
7. W ipe the dipstick clean with a paper towel.
8. Reinsert the dipstick and wait several seconds.
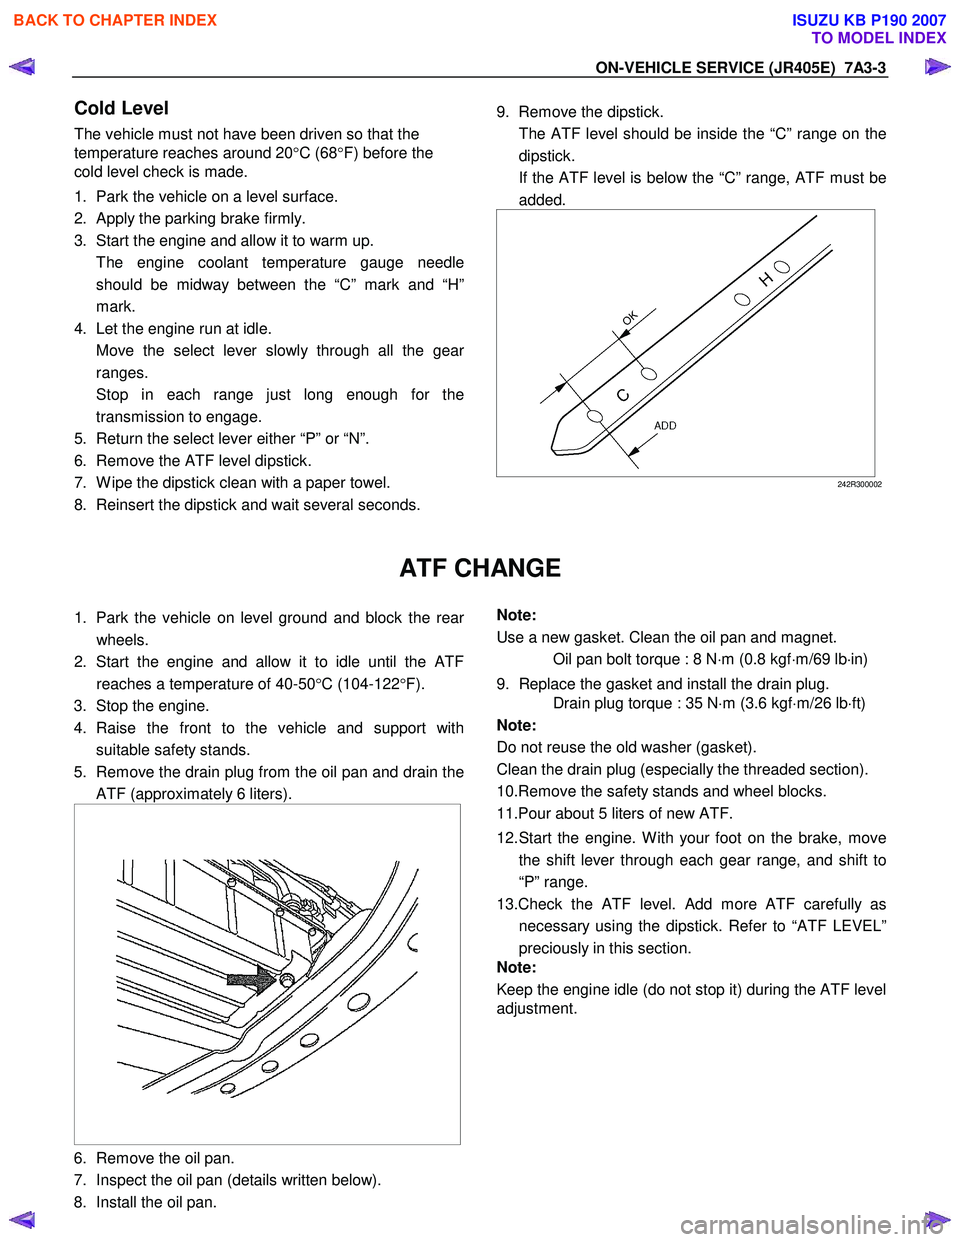
9. Remove the dipstick.
The ATF level should be inside the “C” range on the dipstick.
If the ATF level is below the “C” range, ATF must be added.
242R300002
ATF CHANGE
1. Park the vehicle on level ground and block the rear
wheels.
2. Start the engine and allow it to idle until the ATF reaches a temperature of 40-50 °C (104-122 °F).
3. Stop the engine.
4. Raise the front to the vehicle and support with suitable safety stands.
5. Remove the drain plug from the oil pan and drain the ATF (approximately 6 liters).
6. Remove the oil pan.
7. Inspect the oil pan (details written below).
8. Install the oil pan.
Note:
Use a new gasket. Clean the oil pan and magnet.
Oil pan bolt torque : 8 N ⋅m (0.8 kgf ⋅m/69 lb ⋅in)
9. Replace the gasket and install the drain plug.
Drain plug torque : 35 N ⋅m (3.6 kgf ⋅m/26 lb ⋅ft)
Note:
Do not reuse the old washer (gasket).
Clean the drain plug (especially the threaded section).
10.Remove the safety stands and wheel blocks.
11.Pour about 5 liters of new ATF.
12. Start the engine. W ith your foot on the brake, move the shift lever through each gear range, and shift to
“P” range.
13.Check the ATF level. Add more ATF carefully as necessary using the dipstick. Refer to “ATF LEVEL”
preciously in this section.
Note:
Keep the engine idle (do not stop it) during the ATF level
adjustment.
BACK TO CHAPTER INDEX
TO MODEL INDEX
ISUZU KB P190 2007
Page 4921 of 6020
TRANSFER CONTROL SYSTEM 7D1-47
3. Shifting from 4H to 4L
3-1 When the 4L indicator flashes at 2Hz
W hen shifting from 4H to 4L, the 4L indicator continues flashing at 2Hz until shifting in the transfer case is
completed. The phases of the engaged splines may sometimes deviate preventing completion of shifting. By
correcting the deviation of phases, shifting is completed.
Step 3-1:
(In case of AT): Set the select bar of the transmission to the D position.
(In case of MT): Set the lever of the transmission to a position allowing running and engage the clutch gently.
At this time, some rotating force acts on the engaged splines, phase is corrected and the engagement is
completed.
3-2 When the 4L indicator flashes at 2Hz for 10 seconds and then keeps ON again (AT vehicle)
This condition occurs when torsional torque has been generated between the transmission and road surface
and the transfer standby mechanism cannot absorb it completely.
Step 3-2:
Set the select lever of the transmission to the N position. (Stepping on the brake pedal is effective at
this time.)
3-3 When the 4L indicator flashes at a frequency of 4Hz
Shifting from 4H to 4L is restricted.
W hen the vehicle is running, the transmission lever is at the running range and the engine speed is high (L4:
3000rpm or more V6: 2000rpm), the transfer cannot be shifted from 4H to 4L (restriction on operation).
Restriction on operation (Except 4JA1-T)
The 4H, neutral and 4L shifting mechanism has no synchronization function. Therefore, if relative rotations in the
mechanism become excessive, shifting exerts adverse influence on the internal mechanism of the transfer. To
avoid such a trouble, vehicle condition is detected to restrict the operation (vehicle speed, engine speed and TM
position).
Requirement to restrict the speed: Vehicle should be in stop. Due to the detection logic, time to wait for start of operation may be required.
A/T: If the vehicle is in stop for a long time at the TM running range (D, 1, 2) before operating the AT, waiting
time becomes longer (from 1 second to 3 minutes at the maximum).
M/T: If the vehicle is at stop with the clutch stepped on at the T/M running position (1 – R), the time to wait
becomes longer.
W aiting time means the time commencing from when other requirements (engine speed and T/M position) are
met to permission of the speed restriction. Operation during the waiting time is not permissible.
The waiting time is 1 second at the minimum and increases up to 5 seconds if the above condition continues for
3 minutes. After that, the waiting time increases up to 3 minutes in 2 minute intervals.
W hen it is clear that the above condition has continued and reduction of waiting time is required, turn on or off
the ignition or start and stop the vehicle several meters.
Requirements for permission of restriction on engine speed: Engine speed should be decreased.
The engine speed of 3000rpm (V6: 2000rpm) or below is advisable.
Requirements for permission of restriction on T/M position restriction:
(AT) N range is recommended
(MT) should be at the neutral.
These requirements for permission should all be met before the switch is operated. If the requirements are met
after operation, operation is not automatically effected but re-operation is required after permission is given.
BACK TO CHAPTER INDEX
TO MODEL INDEX
ISUZU KB P190 2007