2007 ISUZU KB P190 stop start
[x] Cancel search: stop startPage 4923 of 6020
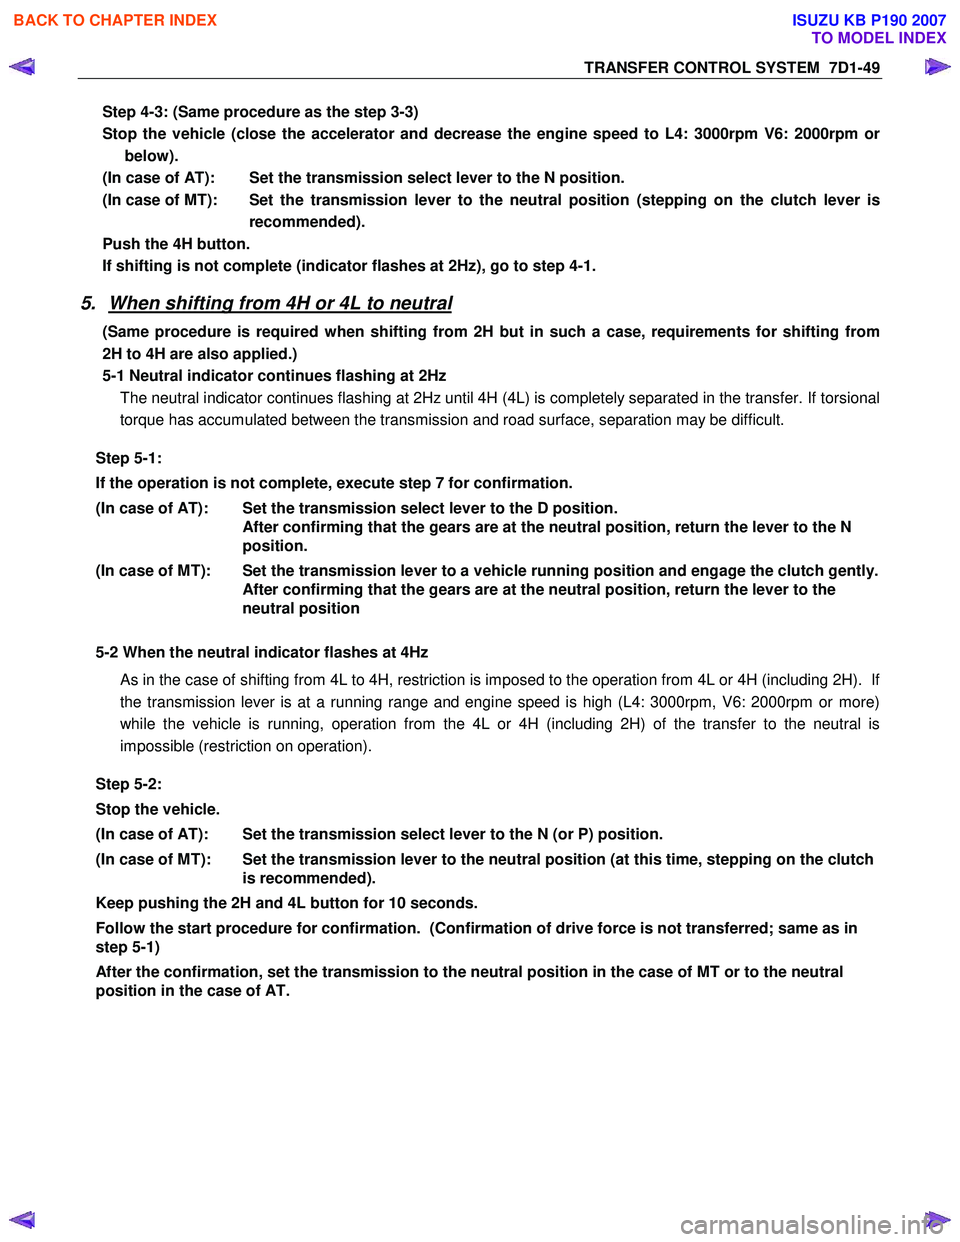
TRANSFER CONTROL SYSTEM 7D1-49
Step 4-3: (Same procedure as the step 3-3)
Stop the vehicle (close the accelerator and decrease the engine speed to L4: 3000rpm V6: 2000rpm or below).
(In case of AT): Set the transmission select lever to the N position.
(In case of MT): Set the transmission lever to the neutral position (stepping on the clutch lever is recommended).
Push the 4H button.
If shifting is not complete (indicator flashes at 2Hz), go to step 4-1.
5. When shifting from 4H or 4L to neutral
(Same procedure is required when shifting from 2H but in such a case, requirements for shifting from
2H to 4H are also applied.)
5-1 Neutral indicator continues flashing at 2Hz The neutral indicator continues flashing at 2Hz until 4H (4L) is completely separated in the transfer. If torsional
torque has accumulated between the transmission and road surface, separation may be difficult.
Step 5-1:
If the operation is not complete, execute step 7 for confirmation.
(In case of AT): Set the transmission select lever to the D position. After confirming that the gears are at the neutral position, return the lever to the N
position.
(In case of MT): Set the transmission lever to a vehicle running position and engage the clutch gently. After confirming that the gears are at the neutral position, return the lever to the
neutral position
5-2 When the neutral indicator flashes at 4Hz
As in the case of shifting from 4L to 4H, restriction is imposed to the operation from 4L or 4H (including 2H). If
the transmission lever is at a running range and engine speed is high (L4: 3000rpm, V6: 2000rpm or more)
while the vehicle is running, operation from the 4L or 4H (including 2H) of the transfer to the neutral is
impossible (restriction on operation).
Step 5-2:
Stop the vehicle.
(In case of AT): Set the transmission select lever to the N (or P) position.
(In case of MT): Set the transmission lever to the neutral position (at this time, stepping on the clutch is recommended).
Keep pushing the 2H and 4L button for 10 seconds.
Follow the start procedure for confirmation. (Confirmation of drive force is not transferred; same as in
step 5-1)
After the confirmation, set the transmission to the neutral position in the case of MT or to the neutral
position in the case of AT.
BACK TO CHAPTER INDEX
TO MODEL INDEX
ISUZU KB P190 2007
Page 4935 of 6020
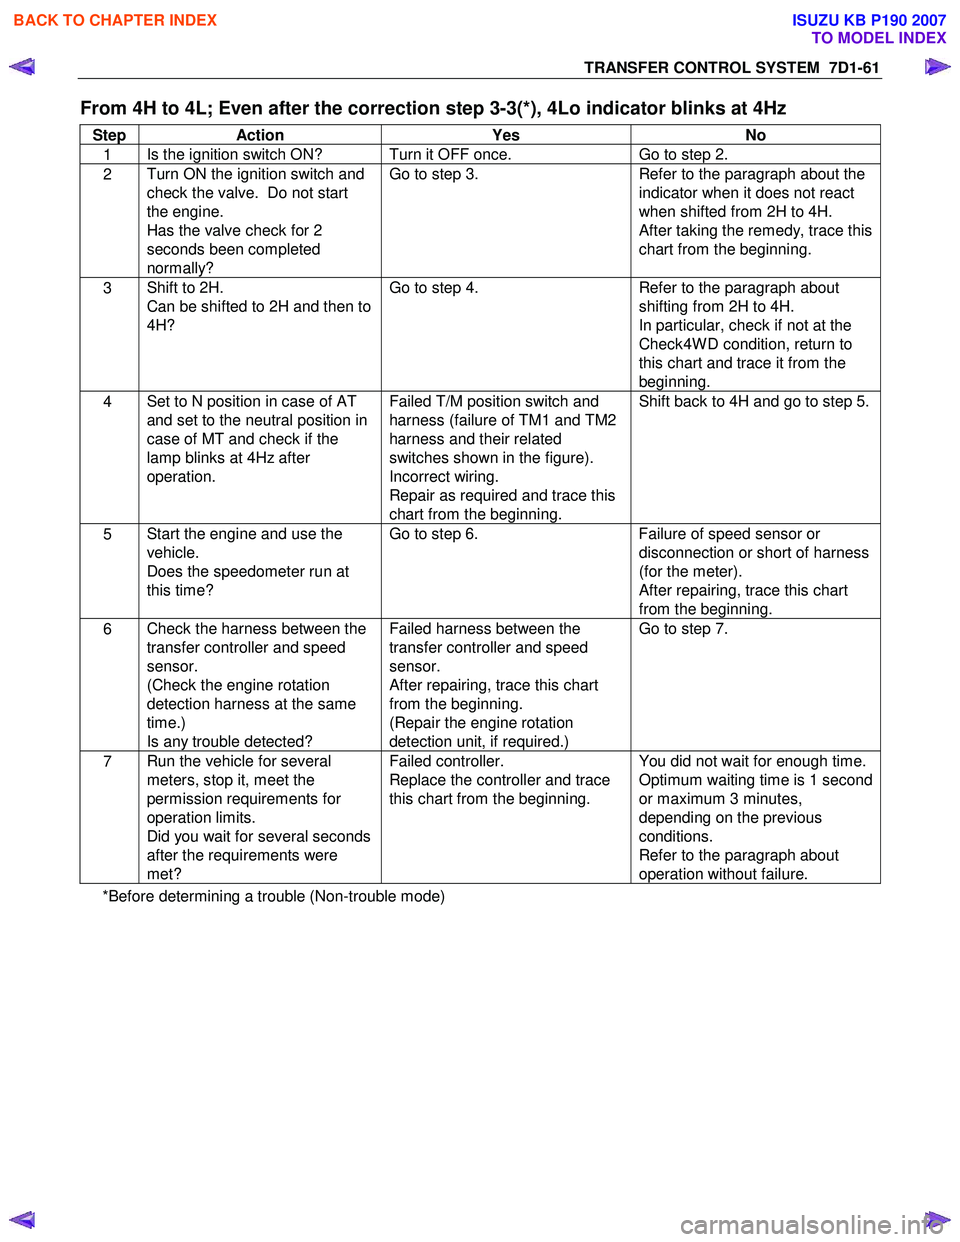
TRANSFER CONTROL SYSTEM 7D1-61
From 4H to 4L; Even after the correction step 3-3(*), 4Lo indicator blinks at 4Hz
Step Action Yes No
1 Is the ignition switch ON? Turn it OFF once.
Go to step 2.
2 Turn ON the ignition switch and
check the valve. Do not start
the engine.
Has the valve check for 2
seconds been completed
normally? Go to step 3.
Refer to the paragraph about the
indicator when it does not react
when shifted from 2H to 4H.
After taking the remedy, trace this
chart from the beginning.
3 Shift to 2H.
Can be shifted to 2H and then to
4H? Go to step 4.
Refer to the paragraph about
shifting from 2H to 4H.
In particular, check if not at the
Check4W D condition, return to
this chart and trace it from the
beginning.
4 Set to N position in case of AT
and set to the neutral position in
case of MT and check if the
lamp blinks at 4Hz after
operation.
Failed T/M position switch and
harness (failure of TM1 and TM2
harness and their related
switches shown in the figure).
Incorrect wiring.
Repair as required and trace this
chart from the beginning. Shift back to 4H and go to step 5.
5
Start the engine and use the
vehicle.
Does the speedometer run at
this time? Go to step 6.
Failure of speed sensor or
disconnection or short of harness
(for the meter).
After repairing, trace this chart
from the beginning.
6 Check the harness between the
transfer controller and speed
sensor.
(Check the engine rotation
detection harness at the same
time.)
Is any trouble detected? Failed harness between the
transfer controller and speed
sensor.
After repairing, trace this chart
from the beginning.
(Repair the engine rotation
detection unit, if required.) Go to step 7.
7
Run the vehicle for several
meters, stop it, meet the
permission requirements for
operation limits.
Did you wait for several seconds
after the requirements were
met? Failed controller.
Replace the controller and trace
this chart from the beginning. You did not wait for enough time.
Optimum waiting time is 1 second
or maximum 3 minutes,
depending on the previous
conditions.
Refer to the paragraph about
operation without failure.
*Before determining a trouble (Non-trouble mode)
BACK TO CHAPTER INDEX
TO MODEL INDEX
ISUZU KB P190 2007
Page 4936 of 6020
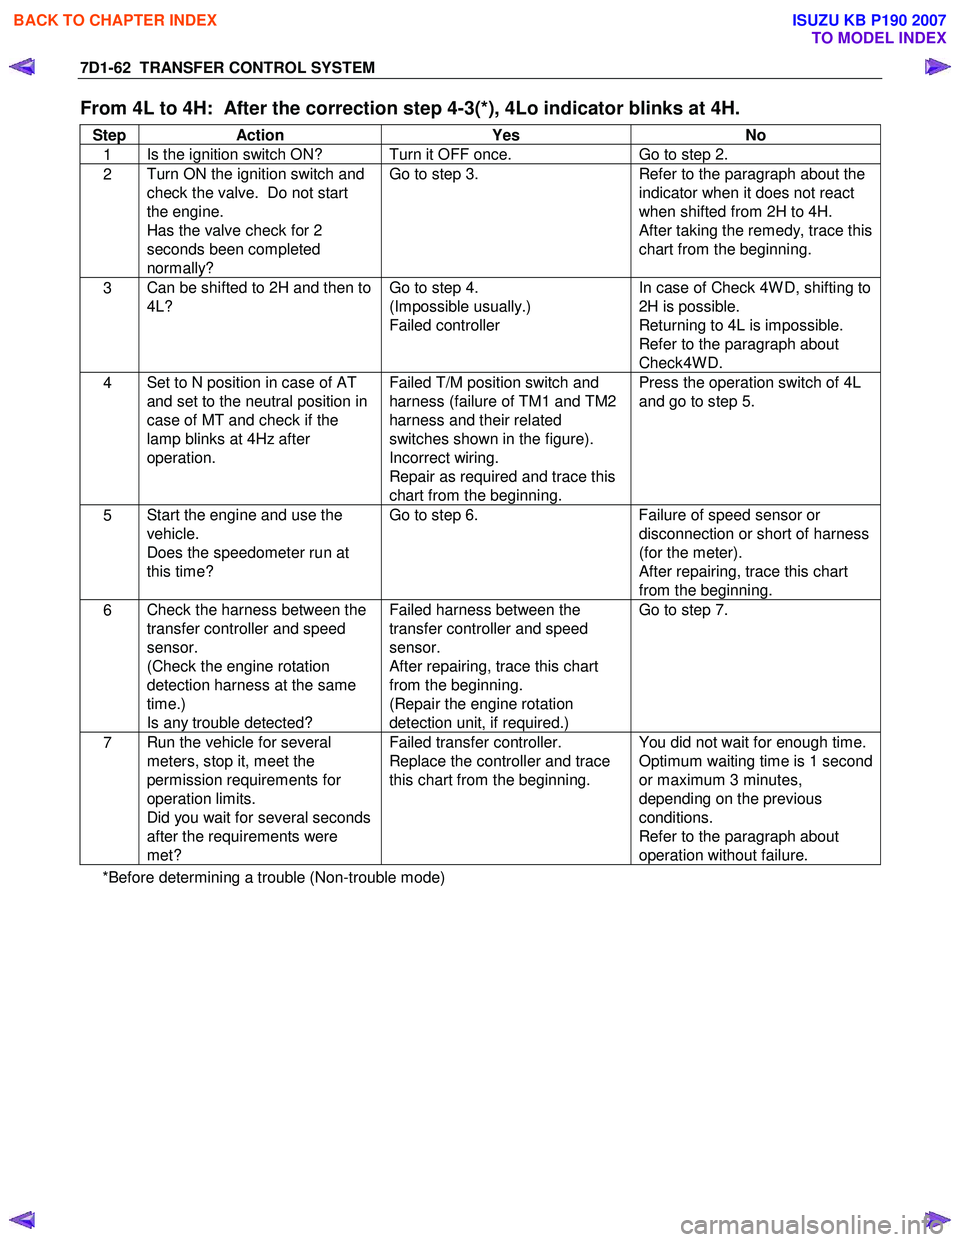
7D1-62 TRANSFER CONTROL SYSTEM
From 4L to 4H: After the correction step 4-3(*), 4Lo indicator blinks at 4H.
Step Action Yes No
1 Is the ignition switch ON? Turn it OFF once.
Go to step 2.
2 Turn ON the ignition switch and
check the valve. Do not start
the engine.
Has the valve check for 2
seconds been completed
normally? Go to step 3.
Refer to the paragraph about the
indicator when it does not react
when shifted from 2H to 4H.
After taking the remedy, trace this
chart from the beginning.
3 Can be shifted to 2H and then to
4L? Go to step 4.
(Impossible usually.)
Failed controller In case of Check 4W D, shifting to
2H is possible.
Returning to 4L is impossible.
Refer to the paragraph about
Check4W D.
4 Set to N position in case of AT
and set to the neutral position in
case of MT and check if the
lamp blinks at 4Hz after
operation.
Failed T/M position switch and
harness (failure of TM1 and TM2
harness and their related
switches shown in the figure).
Incorrect wiring.
Repair as required and trace this
chart from the beginning. Press the operation switch of 4L
and go to step 5.
5 Start the engine and use the
vehicle.
Does the speedometer run at
this time? Go to step 6.
Failure of speed sensor or
disconnection or short of harness
(for the meter).
After repairing, trace this chart
from the beginning.
6 Check the harness between the
transfer controller and speed
sensor.
(Check the engine rotation
detection harness at the same
time.)
Is any trouble detected? Failed harness between the
transfer controller and speed
sensor.
After repairing, trace this chart
from the beginning.
(Repair the engine rotation
detection unit, if required.) Go to step 7.
7
Run the vehicle for several
meters, stop it, meet the
permission requirements for
operation limits.
Did you wait for several seconds
after the requirements were
met? Failed transfer controller.
Replace the controller and trace
this chart from the beginning. You did not wait for enough time.
Optimum waiting time is 1 second
or maximum 3 minutes,
depending on the previous
conditions.
Refer to the paragraph about
operation without failure.
*Before determining a trouble (Non-trouble mode)
BACK TO CHAPTER INDEX
TO MODEL INDEX
ISUZU KB P190 2007
Page 4937 of 6020
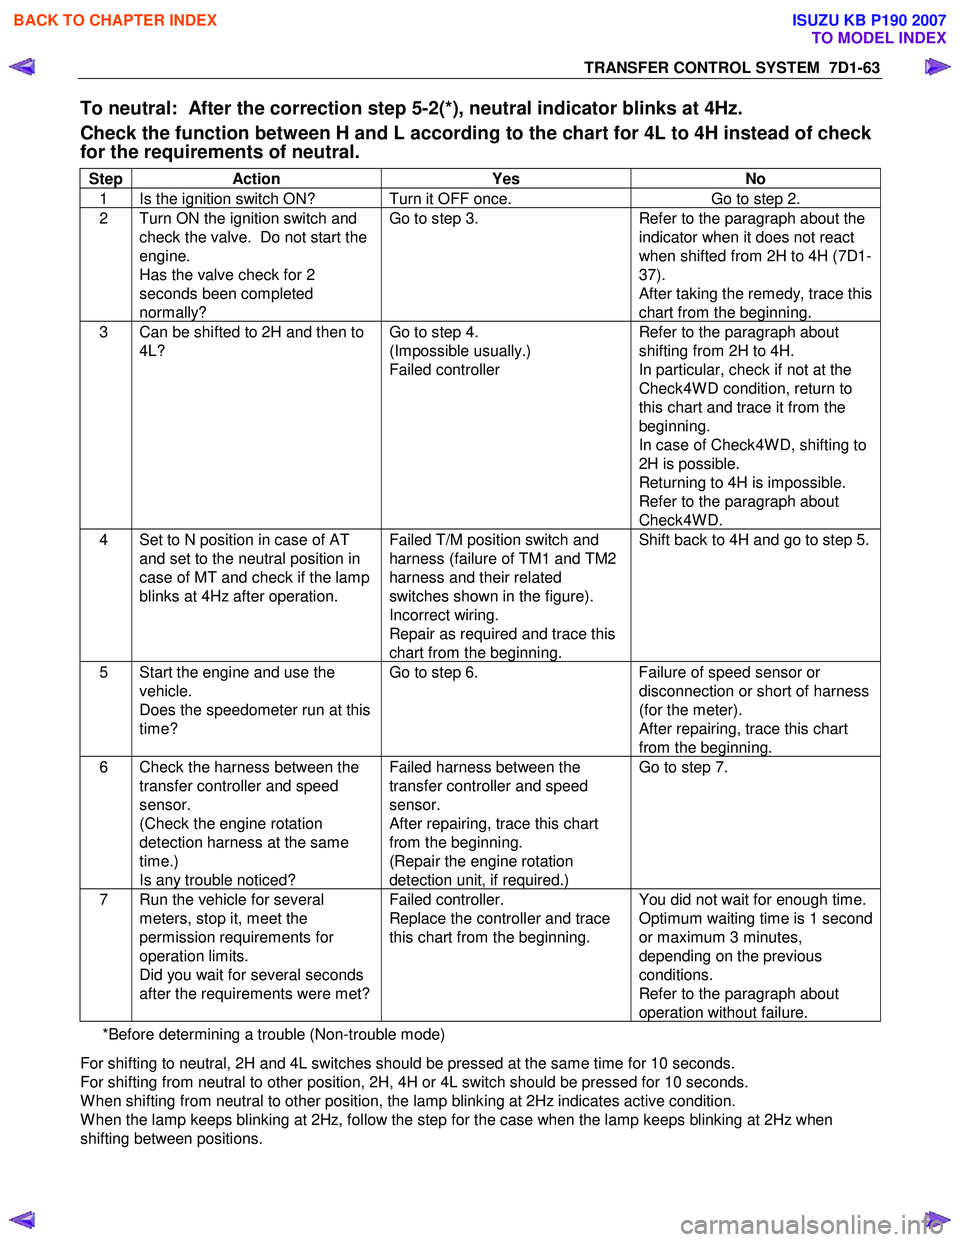
TRANSFER CONTROL SYSTEM 7D1-63
To neutral: After the correction step 5-2(*), neutral indicator blinks at 4Hz.
Check the function between H and L according to the chart for 4L to 4H instead of check
for the requirements of neutral.
Step Action Yes No
1 Is the ignition switch ON? Turn it OFF once. Go to step 2.
2 Turn ON the ignition switch and
check the valve. Do not start the
engine.
Has the valve check for 2
seconds been completed
normally? Go to step 3.
Refer to the paragraph about the
indicator when it does not react
when shifted from 2H to 4H (7D1-
37).
After taking the remedy, trace this
chart from the beginning.
3 Can be shifted to 2H and then to 4L? Go to step 4.
(Impossible usually.)
Failed controller Refer to the paragraph about
shifting from 2H to 4H.
In particular, check if not at the
Check4W D condition, return to
this chart and trace it from the
beginning.
In case of Check4W D, shifting to
2H is possible.
Returning to 4H is impossible.
Refer to the paragraph about
Check4W D.
4 Set to N position in case of AT and set to the neutral position in
case of MT and check if the lamp
blinks at 4Hz after operation. Failed T/M position switch and
harness (failure of TM1 and TM2
harness and their related
switches shown in the figure).
Incorrect wiring.
Repair as required and trace this
chart from the beginning. Shift back to 4H and go to step 5.
5 Start the engine and use the
vehicle.
Does the speedometer run at this
time? Go to step 6.
Failure of speed sensor or
disconnection or short of harness
(for the meter).
After repairing, trace this chart
from the beginning.
6 Check the harness between the transfer controller and speed
sensor.
(Check the engine rotation
detection harness at the same
time.)
Is any trouble noticed? Failed harness between the
transfer controller and speed
sensor.
After repairing, trace this chart
from the beginning.
(Repair the engine rotation
detection unit, if required.) Go to step 7.
7 Run the vehicle for several
meters, stop it, meet the
permission requirements for
operation limits.
Did you wait for several seconds
after the requirements were met? Failed controller.
Replace the controller and trace
this chart from the beginning. You did not wait for enough time.
Optimum waiting time is 1 second
or maximum 3 minutes,
depending on the previous
conditions.
Refer to the paragraph about
operation without failure.
*Before determining a trouble (Non-trouble mode)
For shifting to neutral, 2H and 4L switches should be pressed at the same time for 10 seconds.
For shifting from neutral to other position, 2H, 4H or 4L switch should be pressed for 10 seconds.
W hen shifting from neutral to other position, the lamp blinking at 2Hz indicates active condition.
W hen the lamp keeps blinking at 2Hz, follow the step for the case when the lamp keeps blinking at 2Hz when
shifting between positions.
BACK TO CHAPTER INDEX
TO MODEL INDEX
ISUZU KB P190 2007
Page 4940 of 6020
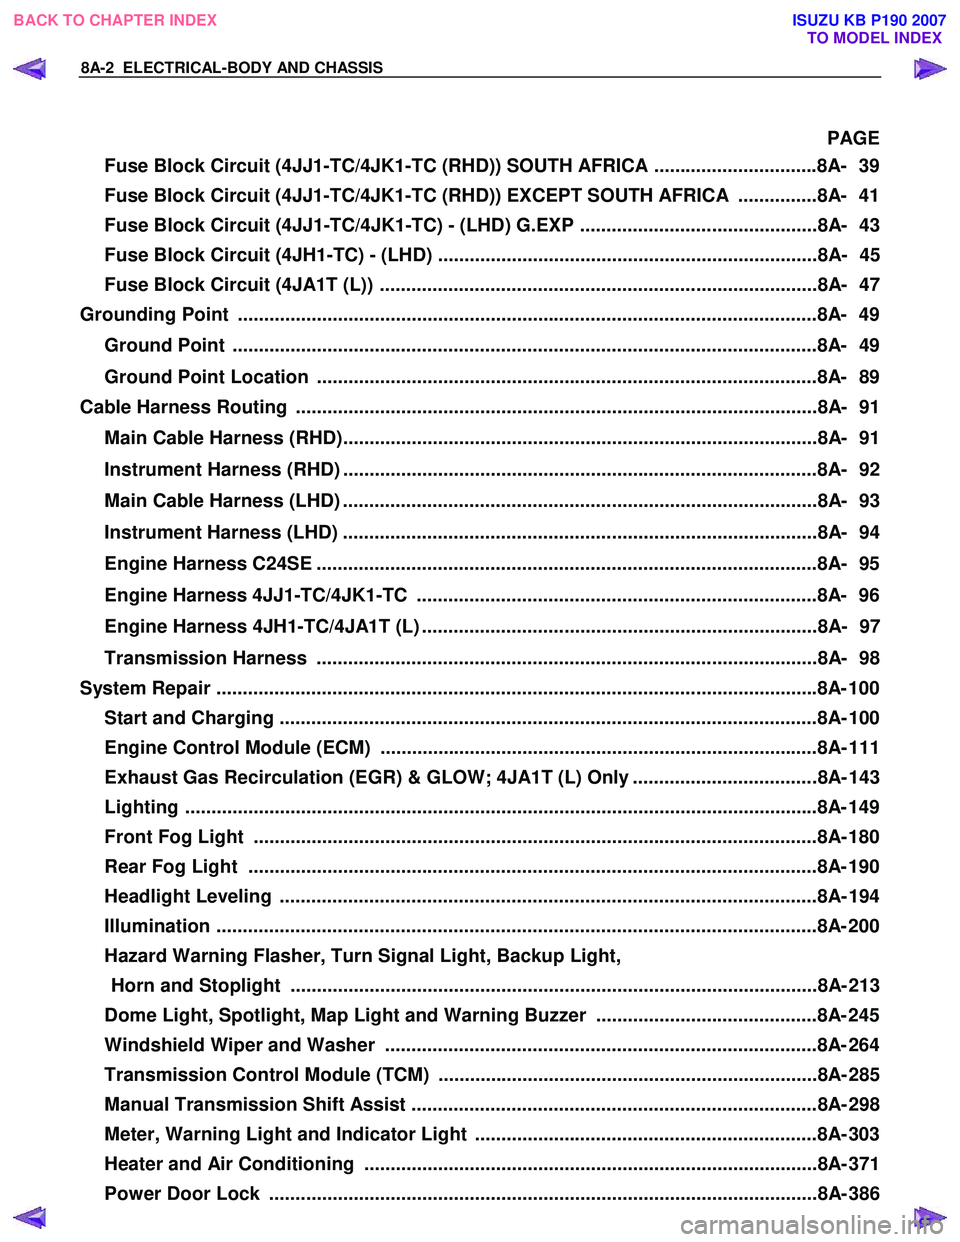
8A-2 ELECTRICAL-BODY AND CHASSIS
PAGE
Fuse Block Circuit (4JJ1-TC/4JK1-TC (RHD)) SOUTH AFRICA ...............................8A- 39
Fuse Block Circuit (4JJ1-TC/4JK1-TC (RHD)) EXCEPT SOUTH AFRICA ...............8A- 41
Fuse Block Circuit (4JJ1-TC/4JK1-TC) - (LHD) G.EXP .............................................8A- 43
Fuse Block Circuit (4JH1-TC) - (LHD) ........................................................................8A- 45
Fuse Block Circuit (4JA1T (L)) ...................................................................................8A- 47
Grounding Point ..............................................................................................................8 A- 49
Ground Point ...............................................................................................................8A- 49
Ground Point Location ...............................................................................................8A- 89
Cable Harness Routing ...................................................................................................8A- 91
Main Cable Harness (RHD)..........................................................................................8A- 91
Instrument Harness (RHD) ..........................................................................................8A- 92
Main Cable Harness (LHD) ..........................................................................................8A- 93
Instrument Harness (LHD) ..........................................................................................8A- 94
Engine Harness C24SE ...............................................................................................8A- 95
Engine Harness 4JJ1-TC/4JK1-TC ............................................................................8A- 96
Engine Harness 4JH1-TC/4JA1T (L) ...........................................................................8A- 97
Transmission Harness ...............................................................................................8A- 98
System Repair ................................................................................................................. .8A- 100
Start and Charging ......................................................................................................8A- 10 0
Engine Control Module (ECM) ...................................................................................8A- 111
Exhaust Gas Recirculation (EGR) & GLOW; 4JA1T (L) Only ...................................8A- 143
Lighting ...................................................................................................................... ..8A- 149
Front Fog Light ...........................................................................................................8A- 180
Rear Fog Light ............................................................................................................8A- 190
Headlight Leveling ......................................................................................................8A- 19 4
Illumination .................................................................................................................. 8A- 200
Hazard Warning Flasher, Turn Signal Light, Backup Light, Horn and Stoplight ....................................................................................................8A- 213
Dome Light, Spotlight, Map Light and Warning Buzzer ..........................................8A- 245
Windshield Wiper and Washer ..................................................................................8A- 264
Transmission Control Module (TCM) ........................................................................8A- 285
Manual Transmission Shift Assist .............................................................................8A- 298
Meter, Warning Light and Indicator Light .................................................................8A- 303
Heater and Air Conditioning ......................................................................................8A- 371
Power Door Lock ........................................................................................................8A- 386
BACK TO CHAPTER INDEX
TO MODEL INDEX
ISUZU KB P190 2007
Page 4971 of 6020
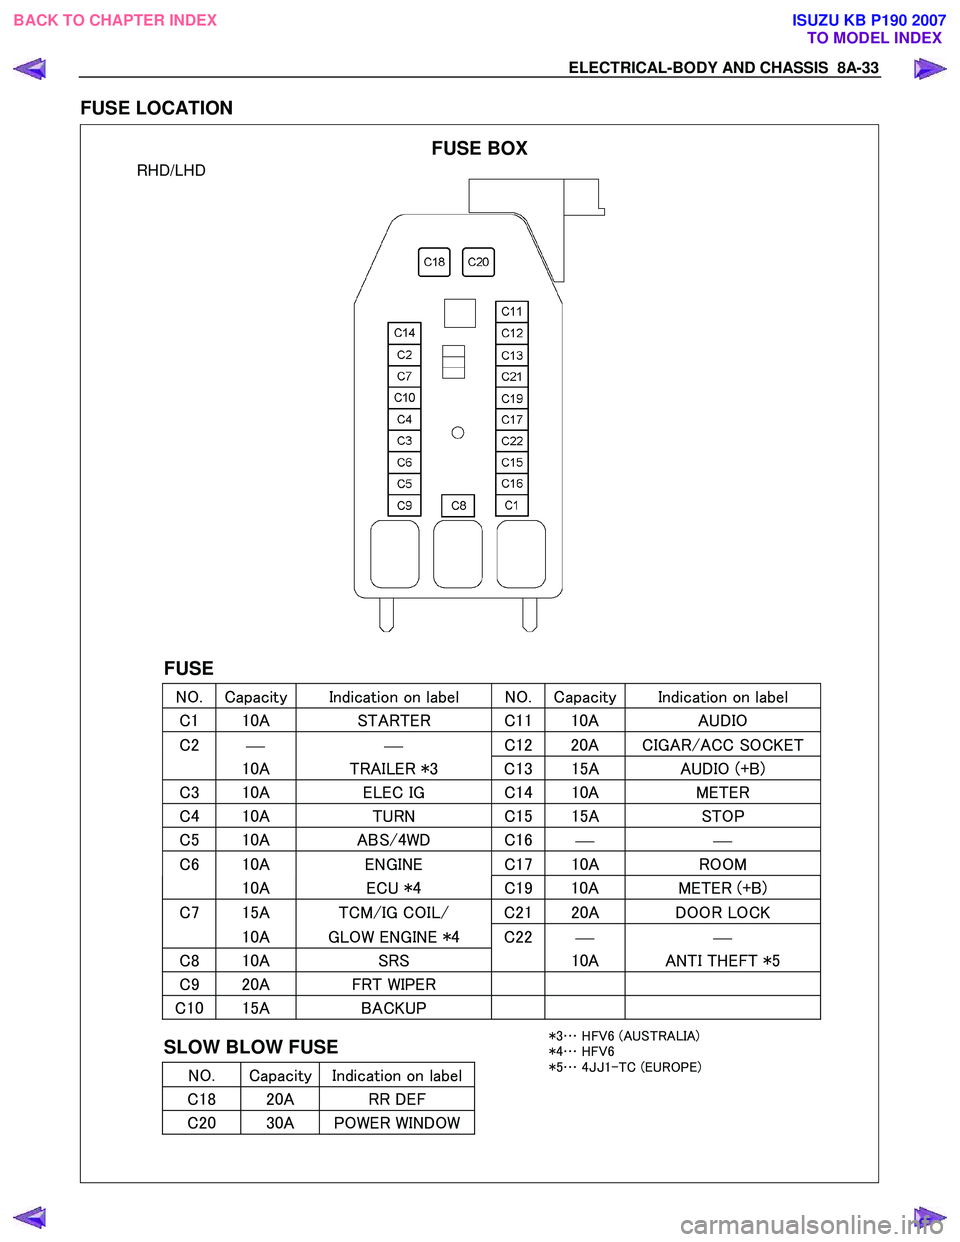
ELECTRICAL-BODY AND CHASSIS 8A-33
FUSE LOCATION
RHD/LHD
FUSE
NO. Capacity Indication on label NO. Capacity Indication on label
C 1 10A STARTER C 1110A AUDIO
C2
C
12 20A CIGAR/ACC SOCKET
10A TRAILER *3 C 13 15A AUDIO (+B)
C3 10A ELEC IG C 14 10A METER
C4 10A TURN C 15 15A STOP
C5 10A ABS/4WD C 16
C6 10A ENGINE C 17 10A ROOM
10A ECU *4 C19 10A METER (+B)
C7 15A TCM/IG COIL/ C2 120A DOOR LOCK
10A GLOW ENGINE *4 C22
C8 10A SRS 10A ANTI THEFT *5
C9 20A FRT WIPER
C10 15A BACKUP
SLOW BLOW FUSE
NO. Capacity Indication on label
C 18 20A RR DEF
C20 30A POWER WINDOW
FUSE BOX
*3 … HFV6 (AUSTRALIA)
*4 … HFV6
*5 … 4JJ 1-TC (EUROPE)
BACK TO CHAPTER INDEX
TO MODEL INDEXISUZU KB P190 2007
Page 5201 of 6020
ELECTRICAL-BODY AND CHASSIS 8A-263
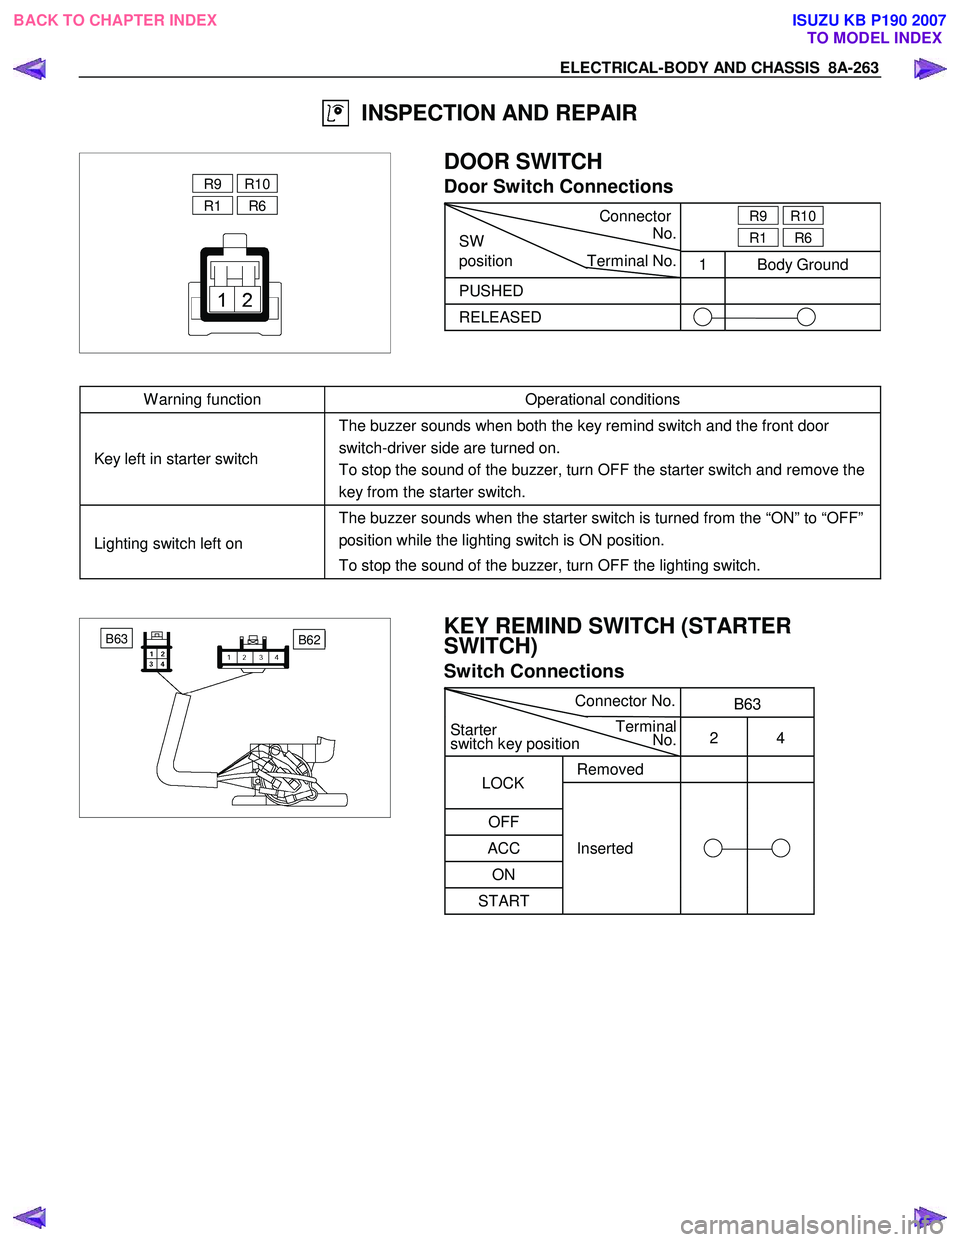
INSPECTION AND REPAIR
R9 R10
R1 R6
DOOR SWITCH
Door Switch Connections
Connector
SW No.
R9
R10
R1 R6
position Terminal No.
1 Body Ground
PUSHED
RELEASED
W arning function Operational conditions
Key left in starter switch The buzzer sounds when both the key remind switch and the front door
switch-driver side are turned on.
To stop the sound of the buzzer, turn OFF the starter switch and remove the
key from the starter switch.
Lighting switch left on The buzzer sounds when the starter switch is turned from the “ON” to “OFF”
position while the lighting switch is ON position.
To stop the sound of the buzzer, turn OFF the lighting switch.
B62 B63
KEY REMIND SWITCH (STARTER
SWITCH)
Switch Connections
Connector
No. B63
Starter Terminal
switch key position No.
2 4
Removed
OFF
ACC Inserted
ON
START
LOCK
BACK TO CHAPTER INDEX TO MODEL INDEXISUZU KB P190 2007
Page 5218 of 6020

8A-280 ELECTRICAL-BODY AND CHASSIS
High Speed Inspection
1. Clamp the wiper motor in a vise.
The moving parts must be clear of the vise.
2. Connect the connector terminals to the battery.
Refer to the illustration.
3. Check the wiper motor high speed operation.
Auto-Stop Inspection
1. Clamp the wiper motor in a vise.
The moving parts must be clear of the vise.
2. Connect the connector terminals to the battery.
Refer to the illustration.
3. Check the wiper motor low speed operation.
4. Disconnect the positive battery terminal.
This will stop the motor.
5. Connect the connector terminals No. 3 and No. 6 with a
lead wire.
Refer to the illustration.
6. Reconnect the positive battery terminal to connecto
r
terminal No. 4.
This will restart the motor.
Refer to the illustration.
7. Check the auto-stop operation.
Washer Motor Inspection
1. Fill the washer tank with washing solution.
2. Disconnect the motor connector.
3. Apply battery voltage to the washer motor connector.
4. Check the washer motor operation.
BACK TO CHAPTER INDEX TO MODEL INDEXISUZU KB P190 2007