Page 2255 of 3061
LT-48
< SERVICE INFORMATION >
HEADLAMP AIMING CONTROL
2. Carefully release the headlamp aiming switch retaining pawls
and remove the switch.
Installation
Installation is in the reverse order of removal.
Switch Circuit InspectionINFOID:0000000003533387
Using a circuit tester, check continuity between the headlamp aiming
switch connector terminals in each operation status of the aiming
switch.
WKIA1879E
Resistor tolerance : ±5%
WKIA1882E
Page 2256 of 3061

FRONT FOG LAMP
LT-49
< SERVICE INFORMATION >
C
D
E
F
G
H
I
J
L
MA
B
LT
N
O
P
FRONT FOG LAMP
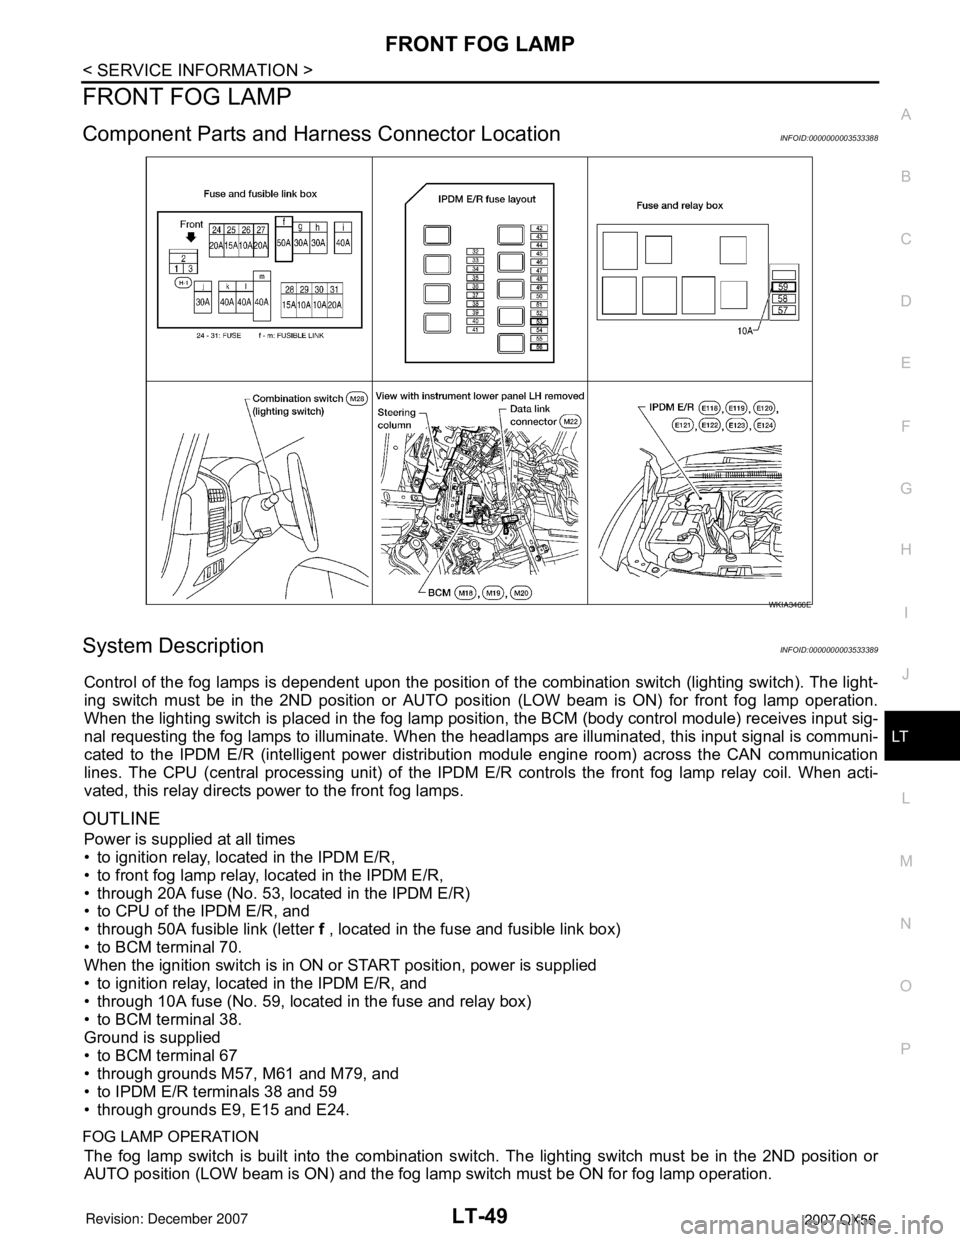
Component Parts and Harness Connector LocationINFOID:0000000003533388
System DescriptionINFOID:0000000003533389
Control of the fog lamps is dependent upon the position of the combination switch (lighting switch). The light-
ing switch must be in the 2ND position or AUTO position (LOW beam is ON) for front fog lamp operation.
When the lighting switch is placed in the fog lamp position, the BCM (body control module) receives input sig-
nal requesting the fog lamps to illuminate. When the headlamps are illuminated, this input signal is communi-
cated to the IPDM E/R (intelligent power distribution module engine room) across the CAN communication
lines. The CPU (central processing unit) of the IPDM E/R controls the front fog lamp relay coil. When acti-
vated, this relay directs power to the front fog lamps.
OUTLINE
Power is supplied at all times
• to ignition relay, located in the IPDM E/R,
• to front fog lamp relay, located in the IPDM E/R,
• through 20A fuse (No. 53, located in the IPDM E/R)
• to CPU of the IPDM E/R, and
• through 50A fusible link (letter f , located in the fuse and fusible link box)
• to BCM terminal 70.
When the ignition switch is in ON or START position, power is supplied
• to ignition relay, located in the IPDM E/R, and
• through 10A fuse (No. 59, located in the fuse and relay box)
• to BCM terminal 38.
Ground is supplied
• to BCM terminal 67
• through grounds M57, M61 and M79, and
• to IPDM E/R terminals 38 and 59
• through grounds E9, E15 and E24.
FOG LAMP OPERATION
The fog lamp switch is built into the combination switch. The lighting switch must be in the 2ND position or
AUTO position (LOW beam is ON) and the fog lamp switch must be ON for fog lamp operation.
WKIA3466E
Page 2257 of 3061

LT-50
< SERVICE INFORMATION >
FRONT FOG LAMP
With the fog lamp switch in the ON position, the CPU of the IPDM E/R grounds the coil side of the fog lamp
relay. The fog lamp relay then directs power
• through 20A fuse (No. 56, located in the IPDM E/R)
• through IPDM E/R terminal 50
• to front turn/fog lamp LH terminal 1, and
• through IPDM E/R terminal 51
• to front turn/fog lamp RH terminal 1.
Ground is supplied
• to front turn/fog lamp LH and RH terminal 3
• through grounds E9, E15 and E24.
With power and ground supplied, the front fog lamps illuminate.
COMBINATION SWITCH READING FUNCTION
Refer to BCS-3, "System Description" .
EXTERIOR LAMP BATTERY SAVER CONTROL
When the combination switch (lighting switch) is in the 2ND position (ON), the fog lamp switch is ON, and the
ignition switch is turned from ON or ACC to OFF, the battery saver control feature is activated.
Under this condition, the fog lamps (and headlamps) remain illuminated for 5 minutes, then the fog lamps (and
headlamps) are turned off.
Exterior lamp battery saver control mode can be changed by the function setting of CONSULT-II.
CAN Communication System DescriptionINFOID:0000000003533390
Refer to LAN-4, "CAN Communication System" .
Page 2258 of 3061
FRONT FOG LAMP
LT-51
< SERVICE INFORMATION >
C
D
E
F
G
H
I
J
L
MA
B
LT
N
O
P
Wiring Diagram - F/FOG -INFOID:0000000003533391
WKWA3652E
Page 2259 of 3061
LT-52
< SERVICE INFORMATION >
FRONT FOG LAMP
Terminal and Reference Value for BCM
INFOID:0000000003533392
Refer to BCS-11, "Terminal and Reference Value for BCM" .
Terminal and Reference Value for IPDM E/RINFOID:0000000003533393
Refer to PG-22, "Terminal and Reference Value for IPDM E/R" .
WKWA3653E
Page 2260 of 3061

FRONT FOG LAMP
LT-53
< SERVICE INFORMATION >
C
D
E
F
G
H
I
J
L
MA
B
LT
N
O
P
How to Proceed with Trouble DiagnosisINFOID:0000000003533394
1. Confirm the symptom or customer complaint.
2. Understand operation description and function description. Refer to LT-49, "
System Description" .
3. Perform the Preliminary Check. Refer toLT-53, "
Preliminary Check" .
4. Check symptom and repair or replace the component.
5. Does the front fog lamp operate normally? If YES: GO TO 6. If NO: GO TO 4.
6. Inspection End.
Preliminary CheckINFOID:0000000003533395
CHECK POWER SUPPLY AND GROUND CIRCUIT FOR BCM
Refer to BCS-15, "BCM Power Supply and Ground Circuit Inspection" .
CHECK POWER SUPPLY AND GROUND CIRCUIT FOR IPDM E/R
Refer to PG-26, "IPDM E/R Power/Ground Circuit Inspection" .
CONSULT-II Function for BCMINFOID:0000000003533396
Refer to BCS-16, "CONSULT-II Function (BCM)" .
CONSULT-II Function for IPDM E/RINFOID:0000000003533397
Refer to PG-18, "CONSULT-II Function (IPDM E/R)" .
Front Fog Lamps Do Not Illuminate (Both Sides)INFOID:0000000003533398
1.CHECK FUSE
Inspect 20A fuse (No. 56, located in the IPDM E/R).
OK or NG
OK >> GO TO 2.
NG >> Repair harness.
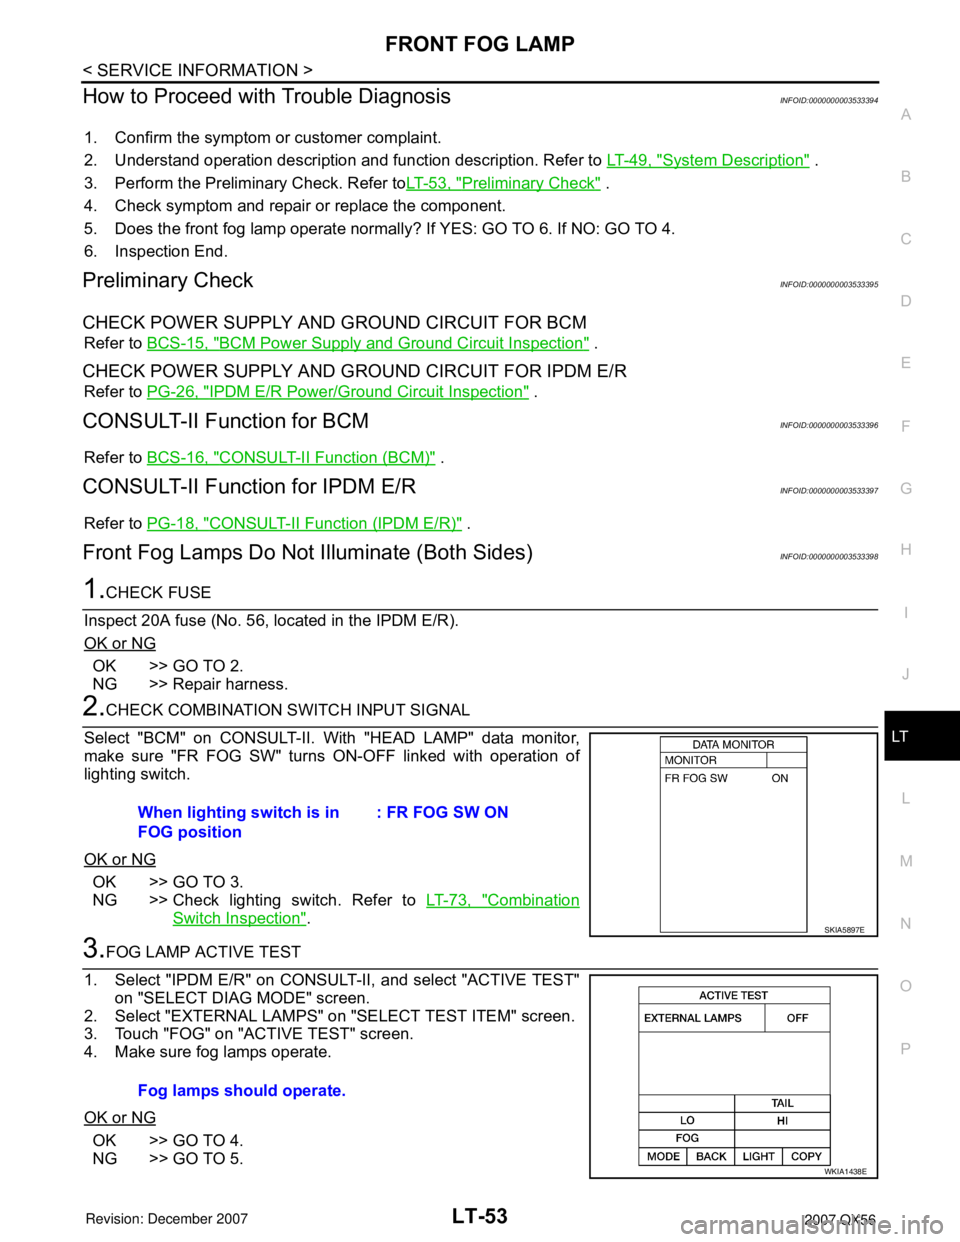
2.CHECK COMBINATION SWITCH INPUT SIGNAL
Select "BCM" on CONSULT-II. With "HEAD LAMP" data monitor,
make sure "FR FOG SW" turns ON-OFF linked with operation of
lighting switch.
OK or NG
OK >> GO TO 3.
NG >> Check lighting switch. Refer to LT-73, "
Combination
Switch Inspection".
3.FOG LAMP ACTIVE TEST
1. Select "IPDM E/R" on CONSULT-II, and select "ACTIVE TEST"
on "SELECT DIAG MODE" screen.
2. Select "EXTERNAL LAMPS" on "SELECT TEST ITEM" screen.
3. Touch "FOG" on "ACTIVE TEST" screen.
4. Make sure fog lamps operate.
OK or NG
OK >> GO TO 4.
NG >> GO TO 5.When lighting switch is in
FOG position: FR FOG SW ON
SKIA5897E
Fog lamps should operate.
WKIA1438E
Page 2261 of 3061

LT-54
< SERVICE INFORMATION >
FRONT FOG LAMP
4.CHECK IPDM E/R
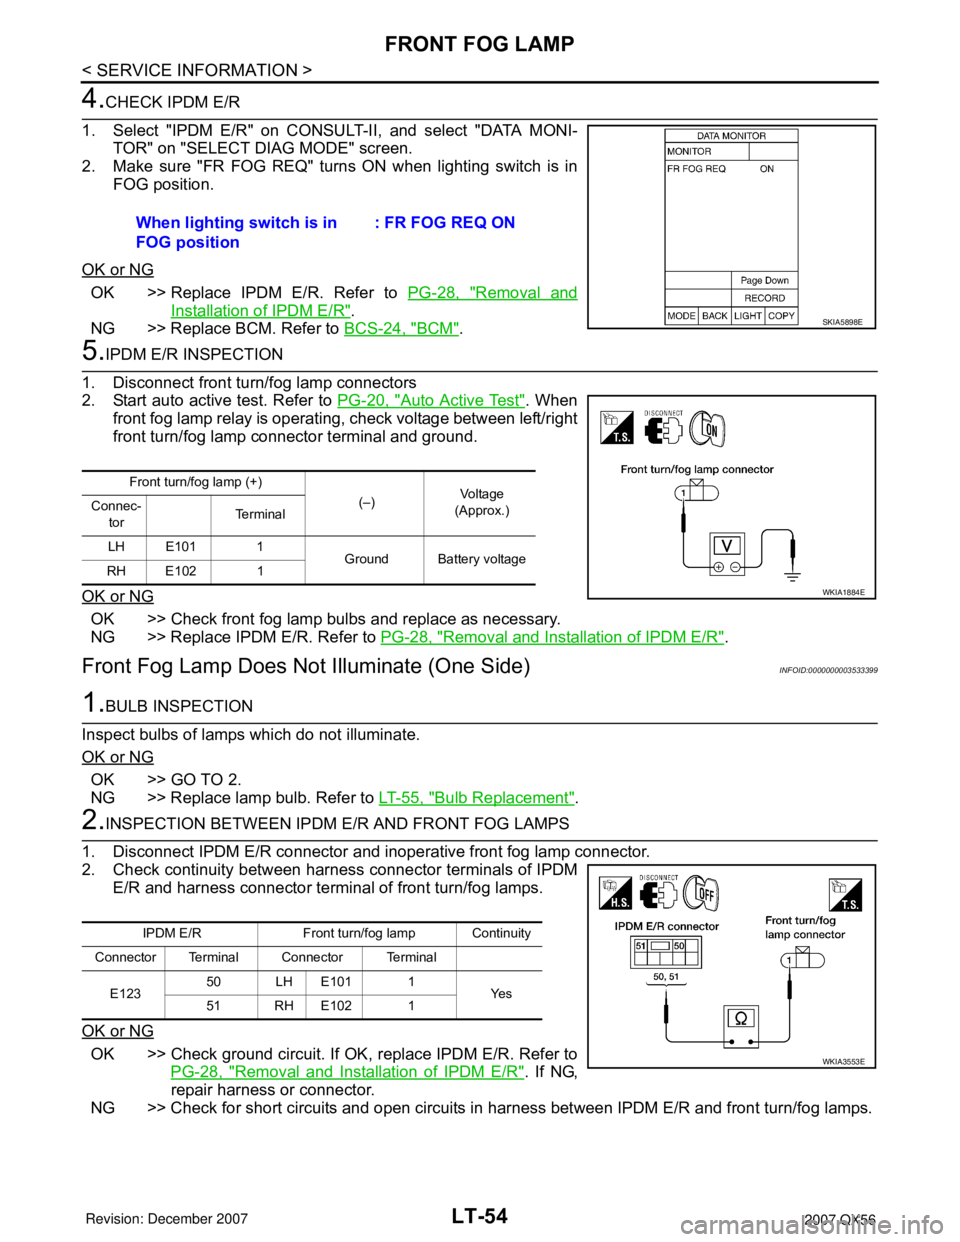
1. Select "IPDM E/R" on CONSULT-II, and select "DATA MONI-
TOR" on "SELECT DIAG MODE" screen.
2. Make sure "FR FOG REQ" turns ON when lighting switch is in
FOG position.
OK or NG
OK >> Replace IPDM E/R. Refer to PG-28, "Removal and
Installation of IPDM E/R".
NG >> Replace BCM. Refer to BCS-24, "
BCM".
5.IPDM E/R INSPECTION
1. Disconnect front turn/fog lamp connectors
2. Start auto active test. Refer to PG-20, "
Auto Active Test". When
front fog lamp relay is operating, check voltage between left/right
front turn/fog lamp connector terminal and ground.
OK or NG
OK >> Check front fog lamp bulbs and replace as necessary.
NG >> Replace IPDM E/R. Refer to PG-28, "
Removal and Installation of IPDM E/R".
Front Fog Lamp Does Not Illuminate (One Side)INFOID:0000000003533399
1.BULB INSPECTION
Inspect bulbs of lamps which do not illuminate.
OK or NG
OK >> GO TO 2.
NG >> Replace lamp bulb. Refer to LT-55, "
Bulb Replacement".
2.INSPECTION BETWEEN IPDM E/R AND FRONT FOG LAMPS
1. Disconnect IPDM E/R connector and inoperative front fog lamp connector.
2. Check continuity between harness connector terminals of IPDM
E/R and harness connector terminal of front turn/fog lamps.
OK or NG
OK >> Check ground circuit. If OK, replace IPDM E/R. Refer to
PG-28, "
Removal and Installation of IPDM E/R". If NG,
repair harness or connector.
NG >> Check for short circuits and open circuits in harness between IPDM E/R and front turn/fog lamps. When lighting switch is in
FOG position: FR FOG REQ ON
SKIA5898E
Front turn/fog lamp (+)
(–)Vo l ta g e
(Approx.) Connec-
torTe r m i n a l
LH E101 1
Ground Battery voltage
RH E102 1
WKIA1884E
IPDM E/R Front turn/fog lamp Continuity
Connector Terminal Connector Terminal
E12350 LH E101 1
Ye s
51 RH E102 1
WKIA3553E
Page 2262 of 3061

FRONT FOG LAMP
LT-55
< SERVICE INFORMATION >
C
D
E
F
G
H
I
J
L
MA
B
LT
N
O
P
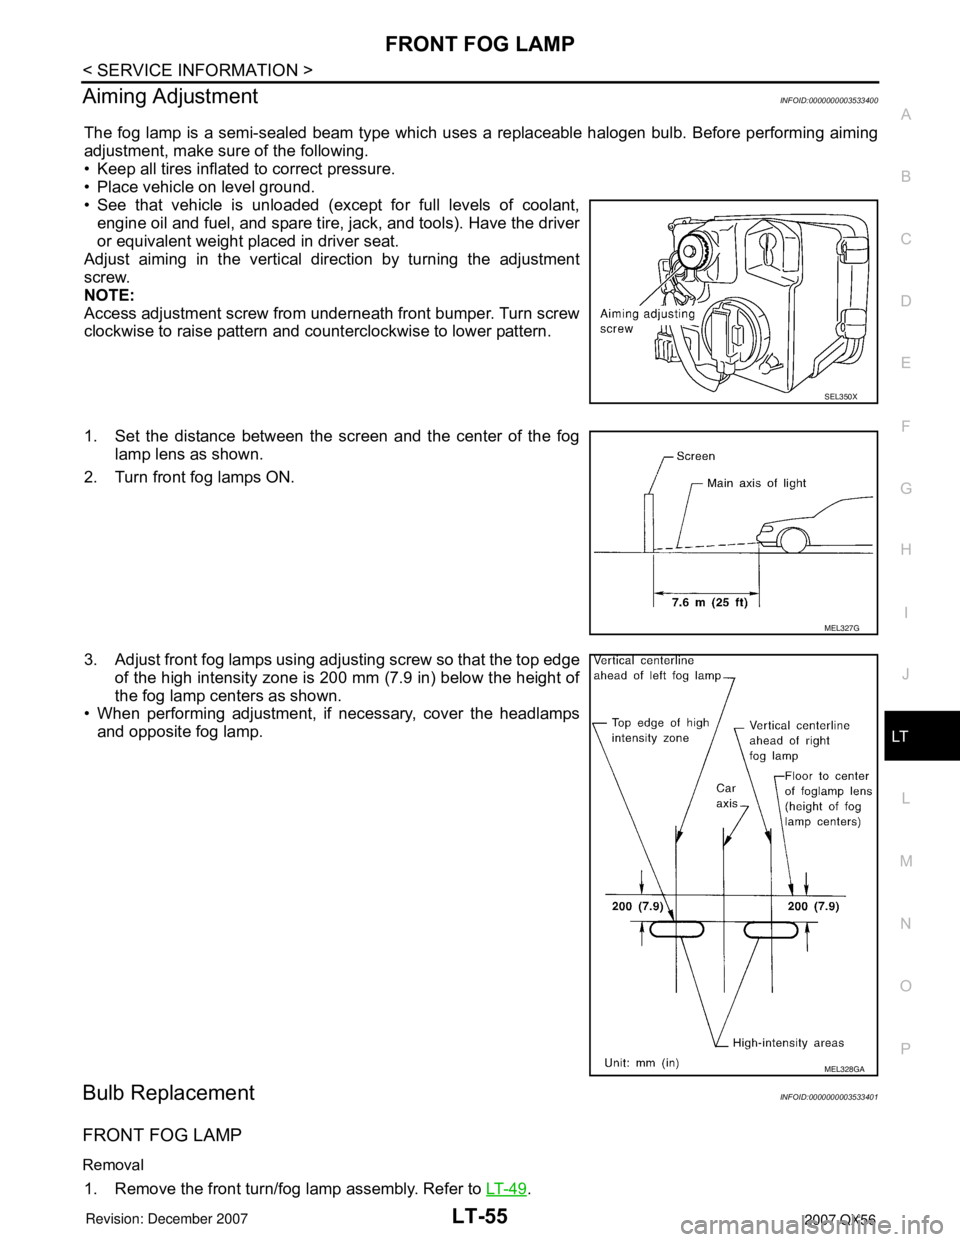
Aiming AdjustmentINFOID:0000000003533400
The fog lamp is a semi-sealed beam type which uses a replaceable halogen bulb. Before performing aiming
adjustment, make sure of the following.
• Keep all tires inflated to correct pressure.
• Place vehicle on level ground.
• See that vehicle is unloaded (except for full levels of coolant,
engine oil and fuel, and spare tire, jack, and tools). Have the driver
or equivalent weight placed in driver seat.
Adjust aiming in the vertical direction by turning the adjustment
screw.
NOTE:
Access adjustment screw from underneath front bumper. Turn screw
clockwise to raise pattern and counterclockwise to lower pattern.
1. Set the distance between the screen and the center of the fog
lamp lens as shown.
2. Turn front fog lamps ON.
3. Adjust front fog lamps using adjusting screw so that the top edge
of the high intensity zone is 200 mm (7.9 in) below the height of
the fog lamp centers as shown.
• When performing adjustment, if necessary, cover the headlamps
and opposite fog lamp.
Bulb ReplacementINFOID:0000000003533401
FRONT FOG LAMP
Removal
1. Remove the front turn/fog lamp assembly. Refer to LT- 4 9.
SEL350X
MEL327G
MEL328GA