Page 405 of 2000
AH–8AXLE – FRONT AXLE HUB
AH
10. REMOVE STEERING KNUCKLE WITH AXLE HUB
(a) Remove the 2 bolts and 2 nuts, and disconnect the
shock absorber from the steering knuckle.
HINT:
While fixing the nuts in place, loosen and remove
the bolts.
(b) Put matchmarks on the drive shaft and the axle hub.
(c) Using a plastic-faced hammer, remove the steering
knuckle with axle hub.
NOTICE:
Be careful not to damage the boot and speed
sensor rotor. Do not excessively push out the
drive shaft from the axle assembly.
11. REMOVE FRONT LOWER BALL JOINT ASSEMBLY
LH (See page SP-27)
12. REMOVE FRONT AXLE HUB SUB-ASSEMBLY LH
(a) Remove the 4 bolts and axle hub from the steering
knuckle.
NOTICE:
Do not place the hub and bearing's magnet rotor
side so that it is facing downward, and do not
allow the magnet rotor side to become damaged
or contact foreign matter.
(b) Remove the dust cover from the steering knuckle.
C127533
C129488E01
C127536
Page 406 of 2000

SP–10SUSPENSION – FRONT SHOCK ABSORBER WITH COIL SPRING
SP
DISASSEMBLY
HINT:
• Use the same procedures for the RH side and LH side.
• The procedures listed below are for the LH side.
1. REMOVE FRONT SUSPENSION SUPPORT PLATE LH
(a) Remove the plate from the shock absorber.
2. REMOVE FRONT SUSPENSION SUPPORT DUST
COVER LH
(a) Using a screwdriver, remove the dust cover from the
suspension support.
HINT:
Tape the screwdriver tip before use.
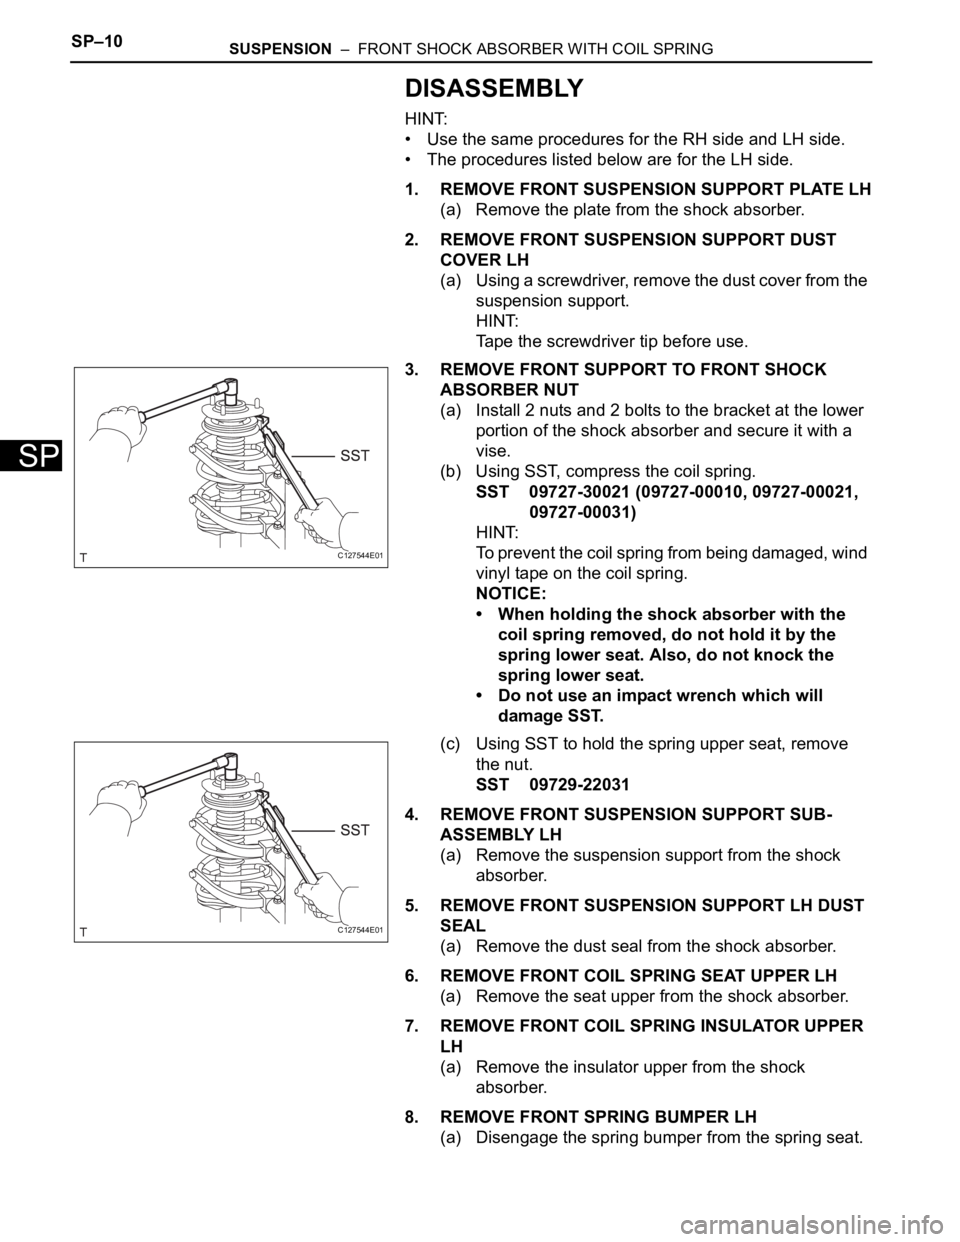
3. REMOVE FRONT SUPPORT TO FRONT SHOCK
ABSORBER NUT
(a) Install 2 nuts and 2 bolts to the bracket at the lower
portion of the shock absorber and secure it with a
vise.
(b) Using SST, compress the coil spring.
SST 09727-30021 (09727-00010, 09727-00021,
09727-00031)
HINT:
To prevent the coil spring from being damaged, wind
vinyl tape on the coil spring.
NOTICE:
• When holding the shock absorber with the
coil spring removed, do not hold it by the
spring lower seat. Also, do not knock the
spring lower seat.
• Do not use an impact wrench which will
damage SST.
(c) Using SST to hold the spring upper seat, remove
the nut.
SST 09729-22031
4. REMOVE FRONT SUSPENSION SUPPORT SUB-
ASSEMBLY LH
(a) Remove the suspension support from the shock
absorber.
5. REMOVE FRONT SUSPENSION SUPPORT LH DUST
SEAL
(a) Remove the dust seal from the shock absorber.
6. REMOVE FRONT COIL SPRING SEAT UPPER LH
(a) Remove the seat upper from the shock absorber.
7. REMOVE FRONT COIL SPRING INSULATOR UPPER
LH
(a) Remove the insulator upper from the shock
absorber.
8. REMOVE FRONT SPRING BUMPER LH
(a) Disengage the spring bumper from the spring seat.
C127544E01
C127544E01
Page 407 of 2000
SUSPENSION – FRONT SHOCK ABSORBER WITH COIL SPRINGSP–11
SP
9. REMOVE FRONT COIL SPRING LH
(a) Remove the coil spring from the shock absorber.
(b) Remove SST from the coil spring.
10. REMOVE FRONT COIL SPRING INSULATOR LOWER
LH
(a) Remove the insulator lower from the shock
absorber.
INSPECTION
1. INSPECT FRONT SHOCK ABSORBER ASSEMBLY
LH
(a) Compress and extend the shock absorber rod 4
times or more. Check that there is no abnormal
resistance or unusual sound during the operation.
If there is any abnormality, replace the shock
absorber assembly with a new one.
NOTICE:
When disposing of the shock absorber, see
DISPOSAL (see page SP-13).
C127545
Page 408 of 2000

SP–12SUSPENSION – FRONT SHOCK ABSORBER WITH COIL SPRING
SP
REASSEMBLY
HINT:
• Use the same procedures for the RH side and LH side.
• The procedures listed below are for the LH side.
1. INSTALL FRONT COIL SPRING INSULATOR LOWER
LH
(a) Install the insulator lower to the shock absorber.
2. INSTALL FRONT SPRING BUMPER LH
(a) Engage the spring bumper to the spring seat.
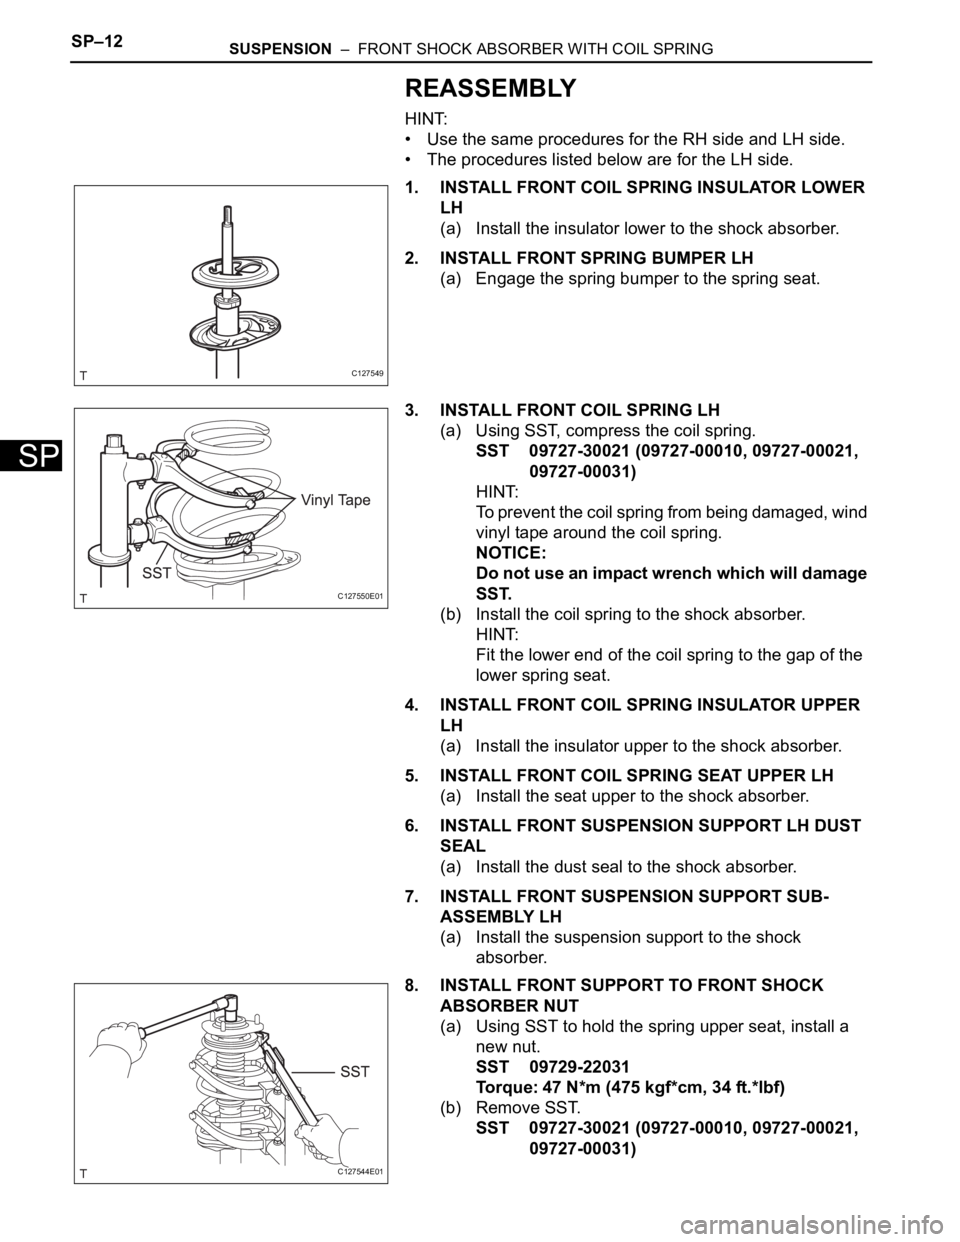
3. INSTALL FRONT COIL SPRING LH
(a) Using SST, compress the coil spring.
SST 09727-30021 (09727-00010, 09727-00021,
09727-00031)
HINT:
To prevent the coil spring from being damaged, wind
vinyl tape around the coil spring.
NOTICE:
Do not use an impact wrench which will damage
SST.
(b) Install the coil spring to the shock absorber.
HINT:
Fit the lower end of the coil spring to the gap of the
lower spring seat.
4. INSTALL FRONT COIL SPRING INSULATOR UPPER
LH
(a) Install the insulator upper to the shock absorber.
5. INSTALL FRONT COIL SPRING SEAT UPPER LH
(a) Install the seat upper to the shock absorber.
6. INSTALL FRONT SUSPENSION SUPPORT LH DUST
SEAL
(a) Install the dust seal to the shock absorber.
7. INSTALL FRONT SUSPENSION SUPPORT SUB-
ASSEMBLY LH
(a) Install the suspension support to the shock
absorber.
8. INSTALL FRONT SUPPORT TO FRONT SHOCK
ABSORBER NUT
(a) Using SST to hold the spring upper seat, install a
new nut.
SST 09729-22031
Torque: 47 N*m (475 kgf*cm, 34 ft.*lbf)
(b) Remove SST.
SST 09727-30021 (09727-00010, 09727-00021,
09727-00031)
C127549
C127550E01
C127544E01
Page 409 of 2000
SUSPENSION – FRONT SHOCK ABSORBER WITH COIL SPRINGSP–13
SP
(c) Pack the suspension support with MP grease.
9. INSTALL FRONT SUSPENSION SUPPORT DUST
COVER LH
(a) Install the dust cover to the shock absorber.
10. INSTALL FRONT SUSPENSION SUPPORT PLATE LH
(a) Install the support plate to the shock absorber with
coil spring.
C127553E01
Page 410 of 2000
SP–38SUSPENSION – REAR SHOCK ABSORBER
SP
DISPOSAL
1. DISPOSE OF REAR SHOCK ABSORBER ASSEMBLY
LH
(a) Fully extend the shock absorber rod, and clamp it in
a vise at an angle.
(b) Using a drill, make a hole near the center of the
cylinder in the hatched area shown in the illustration
to discharge the gas inside.
CAUTION:
As metal debris may be blown outward by the
gas, you must:
• Wear protective glasses.
• Cover the area being cut.
NOTICE:
The gas is colorless, odorless and harmless.
C127563
Page 511 of 2000
EXTERIOR – FRONT BUMPERET–5
ET
6. REMOVE FRONT BUMPER COVER
(a) Remove the 8 screws.
(b) Apply protective tape under the front fender and
headlight.
(c) Using a screwdriver, detach the 4 claws.
HINT:
Tape the screwdriver tip before use.
(d) w/ Fog Light:
Disconnect the 2 fog light connectors.
(e) Using a clip remover, remove the hood cushion
center.
(f) Using a clip remover, remove the 4 clips and
remove the front bumper cover.
7. REMOVE NO. 2 FRONT BUMPER ENERGY
ABSORBER
(a) Remove the absorber.
B136793
B127932
B136791
B136792
B139377
Page 1451 of 2000
AH–10AXLE – FRONT AXLE HUB
AH
10. REMOVE STEERING KNUCKLE WITH AXLE HUB
(a) Remove the 2 bolts and 2 nuts, and disconnect the
shock absorber from the steering knuckle.
HINT:
While fixing the nuts in place, loosen and remove
the bolts.
(b) Put matchmarks on the drive shaft and axle hub.
(c) Using a plastic-faced hammer, remove the steering
knuckle with axle hub.
NOTICE:
Be careful not to damage the boot and speed
sensor rotor. Do not excessively push out the
drive shaft from the axle assembly.
11. REMOVE FRONT LOWER BALL JOINT ASSEMBLY
LH (See page SP-27)
12. REMOVE FRONT AXLE HUB SUB-ASSEMBLY LH
(a) Remove the 4 bolts and axle hub from the steering
knuckle.
NOTICE:
Do not place the hub and bearing's magnet rotor
side so that it is facing downward, and do not
allow the magnet rotor side to become damaged
or contact foreign matter.
(b) Remove the dust cover from the steering knuckle.
C127533
C129488E01
C127536