Page 639 of 2000
EM–1042AZ-FE ENGINE MECHANICAL – ENGINE ASSEMBLY
EM
(b) Remove the 4 bolts and engine mounting insulator
LH.
48. REMOVE DRIVE SHAFT BEARING BRACKET (for
2WD)
(a) Remove the 3 bolts and bracket.
49. REMOVE DRIVE SHAFT BEARING BRACKET (for
4WD)
(a) Remove the 3 bolts and bracket.
50. REMOVE TRANSFER ASSEMBLY (for 4WD) (See
page TF-59)
51. REMOVE STARTER ASSEMBLY (See page ST-7)
52. REMOVE AUTOMATIC TRANSAXLE ASSEMBLY
(a) Remove the automatic transaxle for U241E (2WD)
(see page AX-147).
(b) Remove the automatic transaxle for U140F (4WD)
(see page AX-148).
53. REMOVE TORQUE CONVERTER CLUTCH
ASSEMBLY
(a) Remove the torque converter clutch for U241E
(2WD) (see page AX-148).
(b) Remove the torque converter clutch for U140F
(4WD) (see page AX-149).
54. REMOVE DRIVE PLATE SUB-ASSEMBLY
(a) Using SST, hold the crankshaft.
SST 09213-54015 (91651-60855), 09330-00021
A124845
A098759E01
A114345
A126932E01
Page 642 of 2000
2AZ-FE ENGINE MECHANICAL – ENGINE ASSEMBLYEM–107
EM
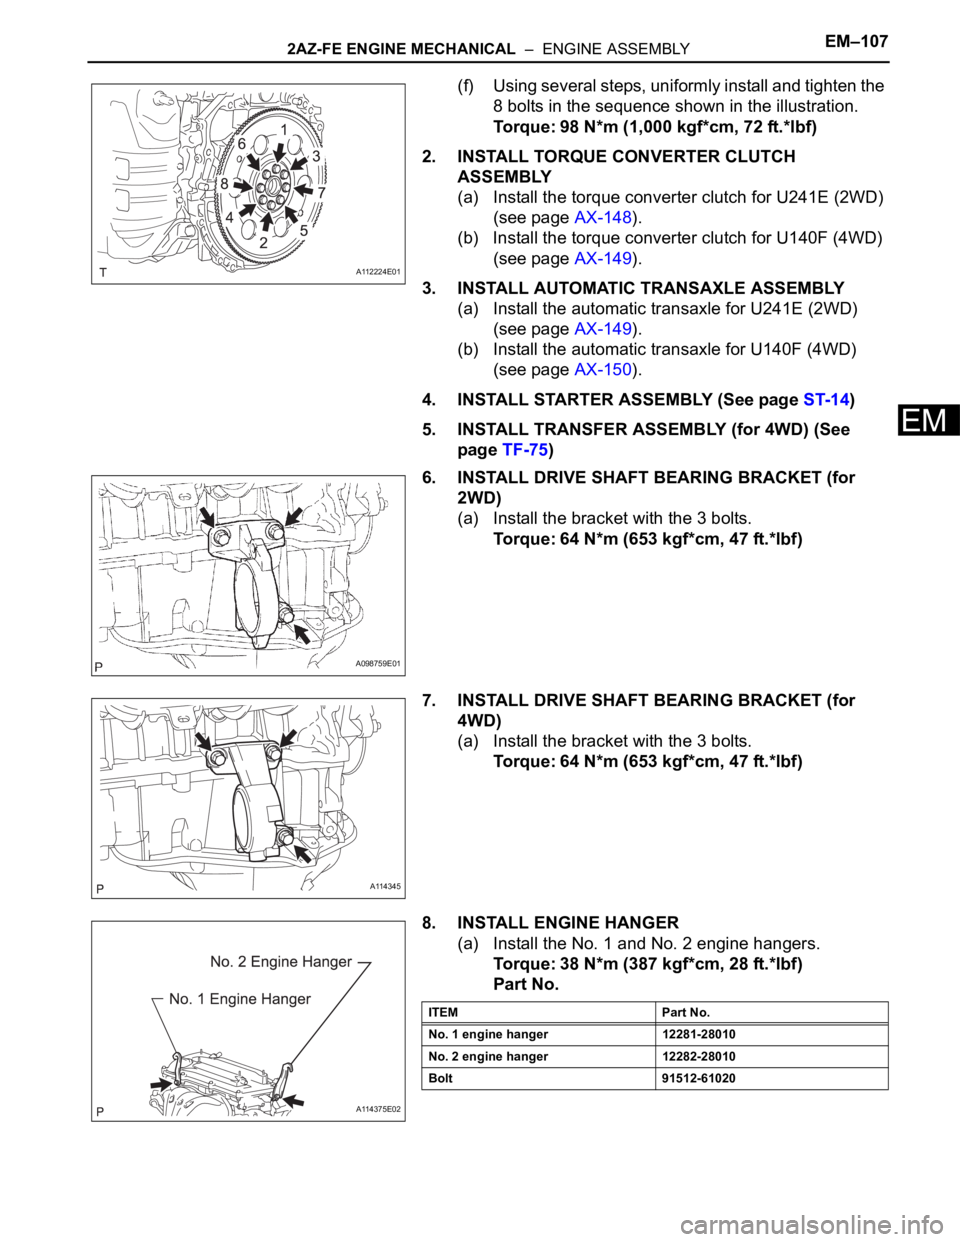
(f) Using several steps, uniformly install and tighten the
8 bolts in the sequence shown in the illustration.
Torque: 98 N*m (1,000 kgf*cm, 72 ft.*lbf)
2. INSTALL TORQUE CONVERTER CLUTCH
ASSEMBLY
(a) Install the torque converter clutch for U241E (2WD)
(see page AX-148).
(b) Install the torque converter clutch for U140F (4WD)
(see page AX-149).
3. INSTALL AUTOMATIC TRANSAXLE ASSEMBLY
(a) Install the automatic transaxle for U241E (2WD)
(see page AX-149).
(b) Install the automatic transaxle for U140F (4WD)
(see page AX-150).
4. INSTALL STARTER ASSEMBLY (See page ST-14)
5. INSTALL TRANSFER ASSEMBLY (for 4WD) (See
page TF-75)
6. INSTALL DRIVE SHAFT BEARING BRACKET (for
2WD)
(a) Install the bracket with the 3 bolts.
Torque: 64 N*m (653 kgf*cm, 47 ft.*lbf)
7. INSTALL DRIVE SHAFT BEARING BRACKET (for
4WD)
(a) Install the bracket with the 3 bolts.
Torque: 64 N*m (653 kgf*cm, 47 ft.*lbf)
8. INSTALL ENGINE HANGER
(a) Install the No. 1 and No. 2 engine hangers.
Torque: 38 N*m (387 kgf*cm, 28 ft.*lbf)
Part No.
A112224E01
A098759E01
A114345
A114375E02
ITEM Part No.
No. 1 engine hanger 12281-28010
No. 2 engine hanger 12282-28010
Bolt 91512-61020
Page 643 of 2000
EM–1082AZ-FE ENGINE MECHANICAL – ENGINE ASSEMBLY
EM
(b) Attach the sling device and the engine with the
chain block.
9. INSTALL ENGINE ASSEMBLY WITH TRANSAXLE
(a) Lift the engine assembly (with transaxle) with the
chain block.
(b) Lower the engine out of the vehicle slowly and
carefully.
NOTICE:
Make sure the engine is clear of all wiring, hoses
and cables.
10. INSTALL ENGINE MOUNTING INSULATOR LH
(a) Install the engine mounting insulator LH with the 4
bolts.
Torque: 95 N*m (969 kgf*cm, 70 ft.*lbf)
(b) Install the engine mounting insulator LH with the
through bolt and nut.
HINT:
Install the through bolt by tightening the nut.
Torque: 56 N*m (571 kgf*cm, 41 ft.*lbf)
11. INSTALL ENGINE MOUNTING INSULATOR RH
(a) Install the engine mounting insulator RH with the 2
bolts and 2 nuts.
Torque: 95 N*m (969 kgf*cm, 70 ft.*lbf) for bolt
95 N*m (969 kgf*cm, 70 ft.*lbf) for nut A
52 N*m (530 kgf*cm, 38 ft.*lbf) for nut B
A114336
A114337
A124845
A124844E01
A124843E01
Page 646 of 2000
2AZ-FE ENGINE MECHANICAL – ENGINE ASSEMBLYEM–111
EM
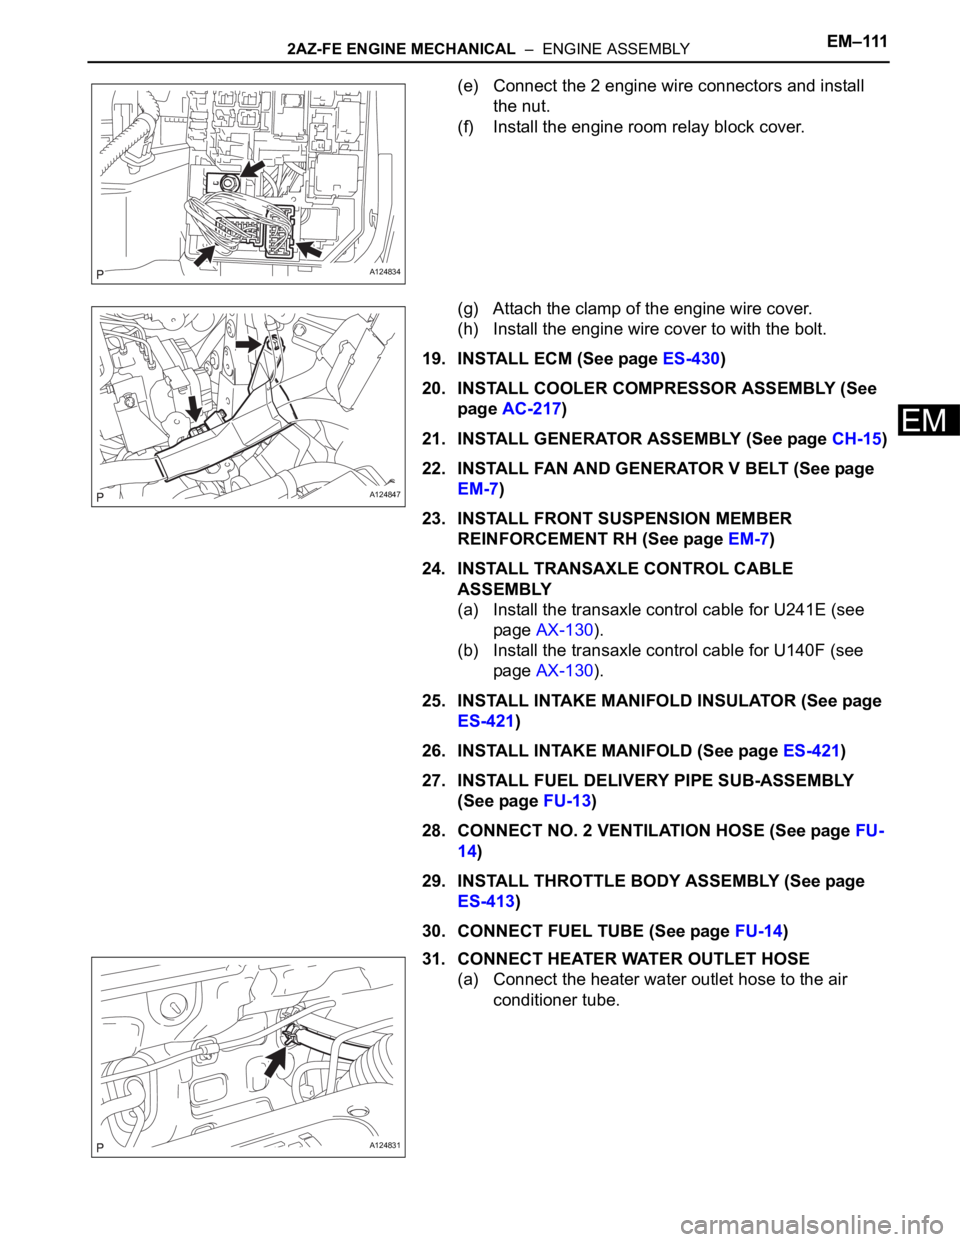
(e) Connect the 2 engine wire connectors and install
the nut.
(f) Install the engine room relay block cover.
(g) Attach the clamp of the engine wire cover.
(h) Install the engine wire cover to with the bolt.
19. INSTALL ECM (See page ES-430)
20. INSTALL COOLER COMPRESSOR ASSEMBLY (See
page AC-217)
21. INSTALL GENERATOR ASSEMBLY (See page CH-15)
22. INSTALL FAN AND GENERATOR V BELT (See page
EM-7)
23. INSTALL FRONT SUSPENSION MEMBER
REINFORCEMENT RH (See page EM-7)
24. INSTALL TRANSAXLE CONTROL CABLE
ASSEMBLY
(a) Install the transaxle control cable for U241E (see
page AX-130).
(b) Install the transaxle control cable for U140F (see
page AX-130).
25. INSTALL INTAKE MANIFOLD INSULATOR (See page
ES-421)
26. INSTALL INTAKE MANIFOLD (See page ES-421)
27. INSTALL FUEL DELIVERY PIPE SUB-ASSEMBLY
(See page FU-13)
28. CONNECT NO. 2 VENTILATION HOSE (See page FU-
14)
29. INSTALL THROTTLE BODY ASSEMBLY (See page
ES-413)
30. CONNECT FUEL TUBE (See page FU-14)
31. CONNECT HEATER WATER OUTLET HOSE
(a) Connect the heater water outlet hose to the air
conditioner tube.
A124834
A124847
A124831
Page 648 of 2000
2AZ-FE ENGINE MECHANICAL – ENGINE ASSEMBLYEM–113
EM
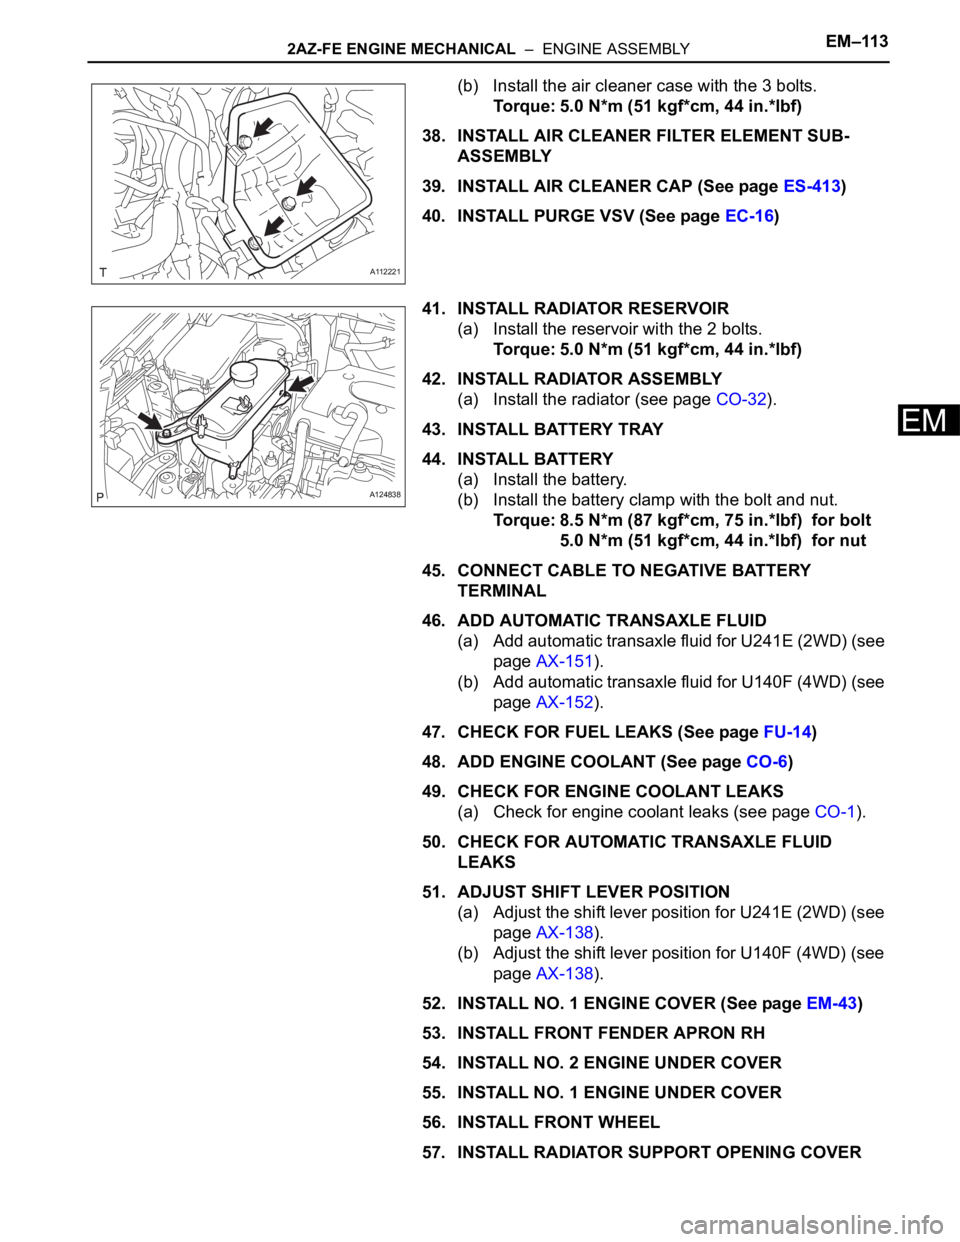
(b) Install the air cleaner case with the 3 bolts.
Torque: 5.0 N*m (51 kgf*cm, 44 in.*lbf)
38. INSTALL AIR CLEANER FILTER ELEMENT SUB-
ASSEMBLY
39. INSTALL AIR CLEANER CAP (See page ES-413)
40. INSTALL PURGE VSV (See page EC-16)
41. INSTALL RADIATOR RESERVOIR
(a) Install the reservoir with the 2 bolts.
Torque: 5.0 N*m (51 kgf*cm, 44 in.*lbf)
42. INSTALL RADIATOR ASSEMBLY
(a) Install the radiator (see page CO-32).
43. INSTALL BATTERY TRAY
44. INSTALL BATTERY
(a) Install the battery.
(b) Install the battery clamp with the bolt and nut.
Torque: 8.5 N*m (87 kgf*cm, 75 in.*lbf) for bolt
5.0 N*m (51 kgf*cm, 44 in.*lbf) for nut
45. CONNECT CABLE TO NEGATIVE BATTERY
TERMINAL
46. ADD AUTOMATIC TRANSAXLE FLUID
(a) Add automatic transaxle fluid for U241E (2WD) (see
page AX-151).
(b) Add automatic transaxle fluid for U140F (4WD) (see
page AX-152).
47. CHECK FOR FUEL LEAKS (See page FU-14)
48. ADD ENGINE COOLANT (See page CO-6)
49. CHECK FOR ENGINE COOLANT LEAKS
(a) Check for engine coolant leaks (see page CO-1).
50. CHECK FOR AUTOMATIC TRANSAXLE FLUID
LEAKS
51. ADJUST SHIFT LEVER POSITION
(a) Adjust the shift lever position for U241E (2WD) (see
page AX-138).
(b) Adjust the shift lever position for U140F (4WD) (see
page AX-138).
52. INSTALL NO. 1 ENGINE COVER (See page EM-43)
53. INSTALL FRONT FENDER APRON RH
54. INSTALL NO. 2 ENGINE UNDER COVER
55. INSTALL NO. 1 ENGINE UNDER COVER
56. INSTALL FRONT WHEEL
57. INSTALL RADIATOR SUPPORT OPENING COVER
A112221
A124838
Page 649 of 2000
EM–1142AZ-FE ENGINE MECHANICAL – ENGINE ASSEMBLY
EM
58. INSTALL HOOD SUB-ASSEMBLY
(a) Install the hood (see page ED-7).
(b) Adjust the hood (see page ED-5).
59. INSPECT AND ADJUST FRONT WHEEL ALIGNMENT
(a) Inspect and adjust the front wheel alignment (see
page SP-3).
60. PERFORM REGISTRATION
(a) When replacing the engine assembly, perform
vehicle stability control system recognition in ECM
(see page CC-12).
61. RESET MEMORY (for Automatic Transaxle)
(a) When replacing the engine assembly, perform the
RESET MEMORY procedure (A/T initialization) for
U241E (2WD) (see page AX-18) and for U140F
(4WD) (see page AX-18).
Page 681 of 2000
2GR-FE ENGINE MECHANICAL – ENGINE ASSEMBLYEM–35
EM
(f) Connect the union to check valve hose.
(g) Connect the No. 2 ventilation hose.
(h) Install the clamp and connect the throttle body
connector.
(i) Connect the vapor feed hose.
(j) Connect the 2 water by-pass hoses to the throttle
body.
23. REMOVE ENGINE FROM ENGINE STAND
(a) Install a sling device and chain block to the engine.
(b) Remove the engine from the engine stand.
24. INSTALL DRIVE PLATE AND RING GEAR SUB-
ASSEMBLY
(a) Clean the bolt and its hole.
(b) Apply adhesive to 2 or 3 threads of the bolt end.
Adhesive:
Toyota Genuine Adhesive 1324, Three Bond
1324 or Equivalent
(c) Using SST, hold the crankshaft.
SST 09213-70011, 09330-00021
(d) Install the flywheel, drive plate and drive plate
spacer on the crankshaft.
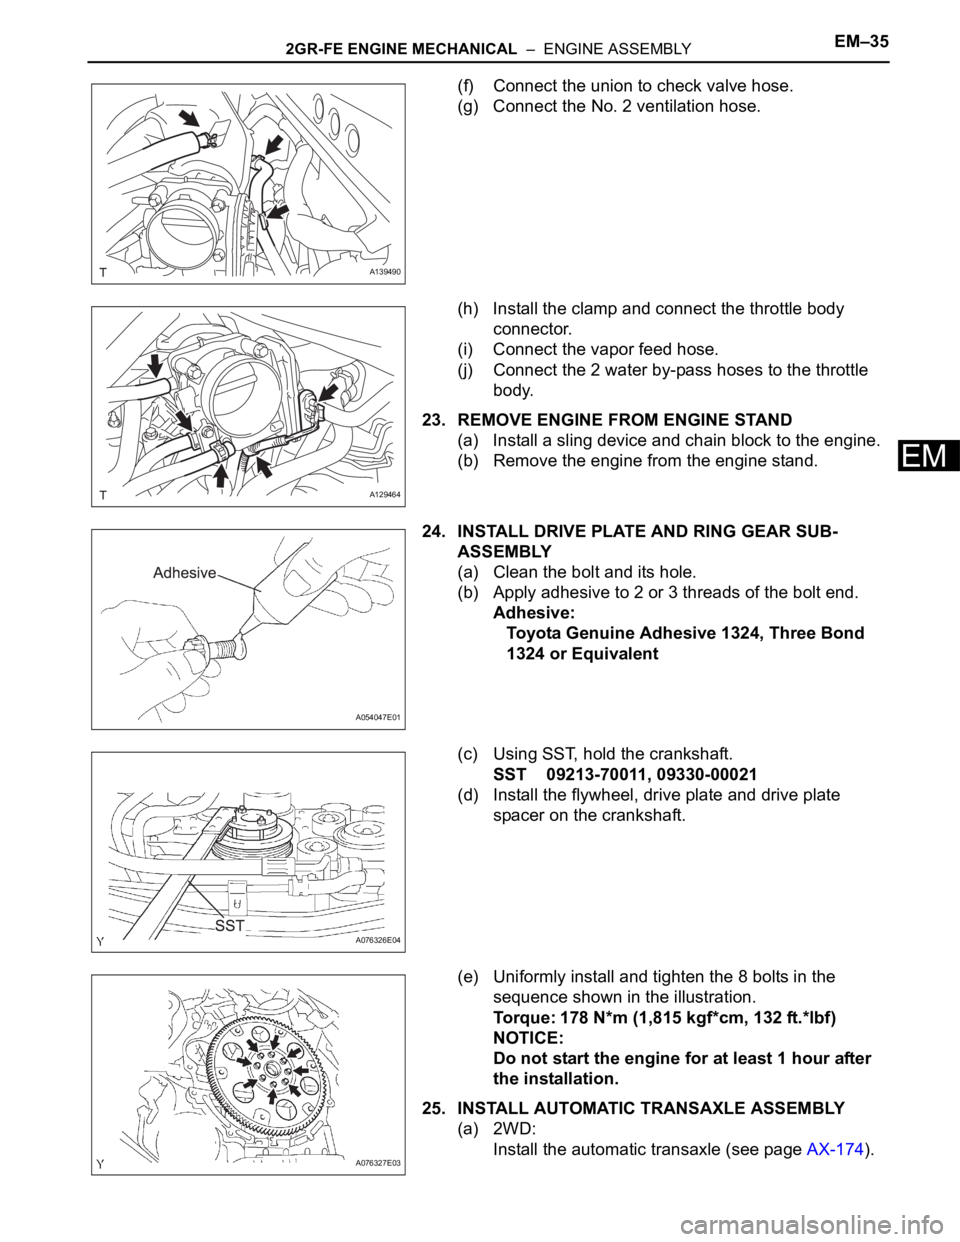
(e) Uniformly install and tighten the 8 bolts in the
sequence shown in the illustration.
Torque: 178 N*m (1,815 kgf*cm, 132 ft.*lbf)
NOTICE:
Do not start the engine for at least 1 hour after
the installation.
25. INSTALL AUTOMATIC TRANSAXLE ASSEMBLY
(a) 2WD:
Install the automatic transaxle (see page AX-174).
A139490
A129464
A054047E01
A076326E04
A076327E03
Page 682 of 2000
EM–362GR-FE ENGINE MECHANICAL – ENGINE ASSEMBLY
EM
(b) 4WD:
Install the automatic transaxle (see page AX-175).
26. INSTALL TRANSFER ASSEMBLY (for 4WD) (See
page TF-75)
27. INSTALL STARTER ASSEMBLY (See page ST-14)
28. INSTALL ENGINE WIRE
(a) Install the engine wire to the engine.
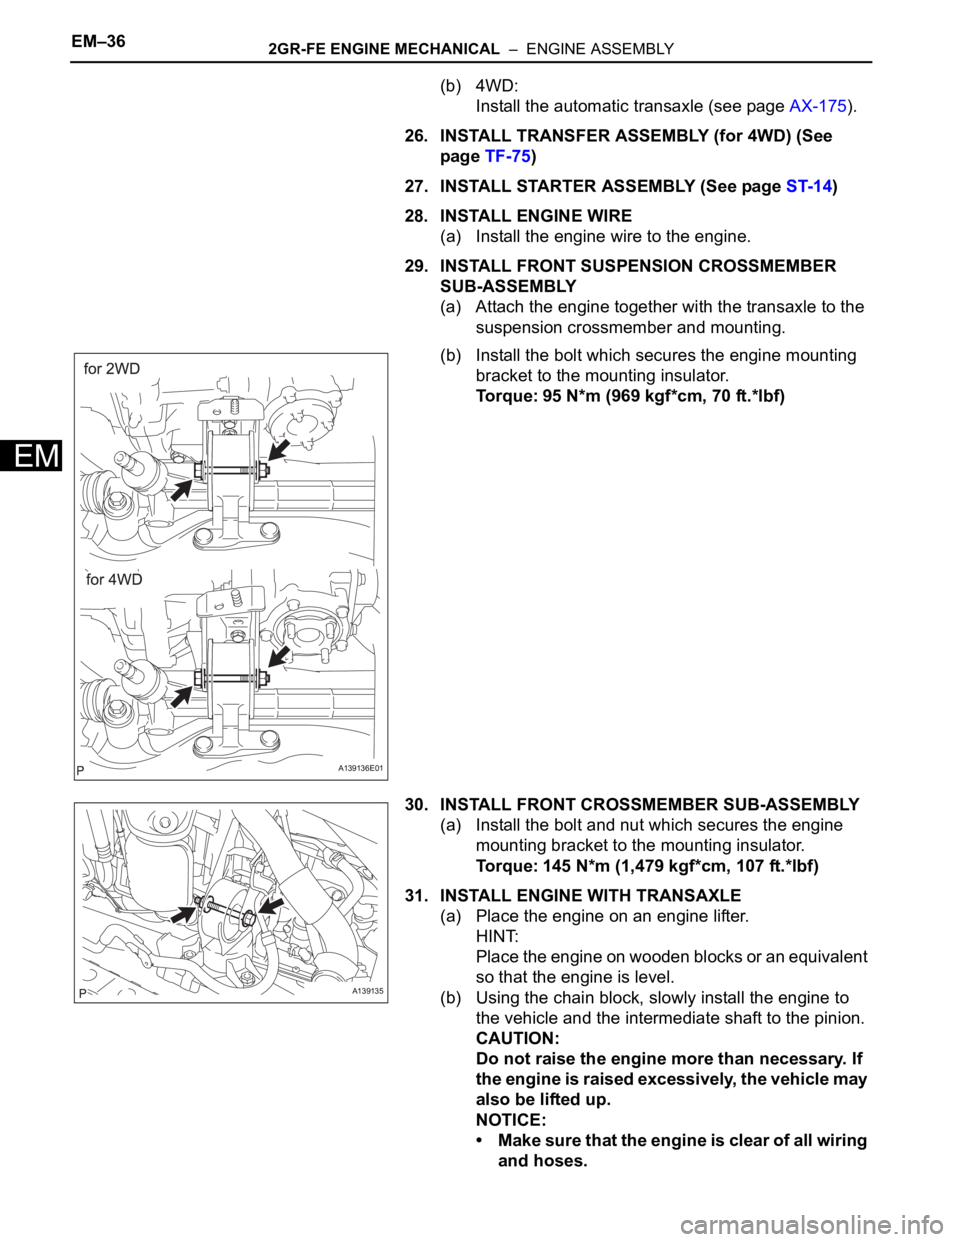
29. INSTALL FRONT SUSPENSION CROSSMEMBER
SUB-ASSEMBLY
(a) Attach the engine together with the transaxle to the
suspension crossmember and mounting.
(b) Install the bolt which secures the engine mounting
bracket to the mounting insulator.
Torque: 95 N*m (969 kgf*cm, 70 ft.*lbf)
30. INSTALL FRONT CROSSMEMBER SUB-ASSEMBLY
(a) Install the bolt and nut which secures the engine
mounting bracket to the mounting insulator.
Torque: 145 N*m (1,479 kgf*cm, 107 ft.*lbf)
31. INSTALL ENGINE WITH TRANSAXLE
(a) Place the engine on an engine lifter.
HINT:
Place the engine on wooden blocks or an equivalent
so that the engine is level.
(b) Using the chain block, slowly install the engine to
the vehicle and the intermediate shaft to the pinion.
CAUTION:
Do not raise the engine more than necessary. If
the engine is raised excessively, the vehicle may
also be lifted up.
NOTICE:
• Make sure that the engine is clear of all wiring
and hoses.
A139136E01
A139135