2006 SUZUKI SX4 parking brake
[x] Cancel search: parking brakePage 792 of 1556

Downloaded from www.Manualslib.com manuals search engine 5A-144 Automatic Transmission/Transaxle:
Automatic Transaxle Unit AssemblyS6RW0D5106058
CAUTION!
• Automatic transaxle consists of highly
precise parts. As even flaw in small part
may cause oil leakage or decrease in
function, check each part carefully before
installation.
• Clean all parts with compressed air. Never
use wiping cloths or rags.
• Before assembling new clutch or brake
discs, soak them in automatic transaxle
fluid for at least 2 hours.
• Be sure to use new gaskets and O-rings.
• Lubricate O-rings with automatic transaxle
fluid.
• Apply automatic transaxle fluid on sliding
or rotating surfaces of the parts before
assembly.
• Use Suzuki Super Grease “C” to retain
parts in place.
• Be sure to install thrust bearings and races
in correct direction and position.
• Make sure that snap ring ends are not
aligned with one of cutouts and are
installed in groove correctly.
• Do not use adhesive cements on gaskets
and similar parts.
• Be sure to torque each bolt and nut to
specification.
1) Install new manual shift shaft oil seal to transaxle
case.
Use special tool and hammer to install it, and then
apply grease to its lip.
Special tool
(A): 09925–98210
“A”: Grease 99000–25030 (SUZUKI Super
Grease C)
Manual shift shaft oil seal installing depth
“a”: 0.75 – 1.25 mm (0.03 – 0.05 in.)2) Install manual detent spring (1) to transaxle case
and tighten manual detent spring bolt to specified
torque.
Tightening torque
Manual detent spring bolt (a): 10 N·m (1.0 kgf-
m, 7.5 lb-ft)
3) Install parking lock pawl rod (2) to manual valve lever
(1).
4) After applying A/T fluid to new manual valve lever
(1), install new manual shift shaft (4), new spacer (3)
and manual valve lever to transaxle case.
5) After installing manual valve lever pin (2) by using
spring pin remover with 3 mm (0.12 in.) in diameter
(5) and hammer, turn spacer to set the position as
shown in figure. Then caulk spacer with a punch.
“a”
(A)
“A”
I2RH0B510258-01
I2RH0B510259-01
I2RH0B510260-01
I2RH0B510261-01
Page 793 of 1556

Downloaded from www.Manualslib.com manuals search engine Automatic Transmission/Transaxle: 5A-145
6) Install parking lock pawl bracket (1) to transaxle
case.
Tightening torque
Parking lock pawl bracket bolt (a): 7.5 N·m (0.75
kgf-m, 5.5 lb-ft)
7) After applying A/T fluid to new O-rings, install them
to 1st and reverse brake piston (3).
8) Install 1st and reverse brake piston (1) to transaxle
case (2).
NOTE
Be careful not to damage O-ring when
installing 1st and reverse brake piston.
9) Install 1st and reverse brake return spring
subassembly (1) to transaxle case (2).
10) Apply A/T fluid to 1st and reverse brake discs (3),
separator plates (2) and retaining plate (1), then
install them to transaxle case.
11) Compress 1st and reverse brake return spring using
special tool and hydraulic press, then attach snap
ring.
CAUTION!
Do not damage 1st and reverse brake return
spring subassembly discs, plates and piston
by pressing in 1st and reverse brake return
spring subassembly passing through its
original installing position over 0.8 mm (0.031
in.).
Special tool
(A): 09926–97620
1. Inner O-ring 2. Outer O-ring
I2RH0B510262-01
I2RH0B510263-01
I2RH0B510264-01
I2RH0B510265-01
I2RH0B510266-01
I2RH0B510267-01
Page 794 of 1556

Downloaded from www.Manualslib.com manuals search engine 5A-146 Automatic Transmission/Transaxle:
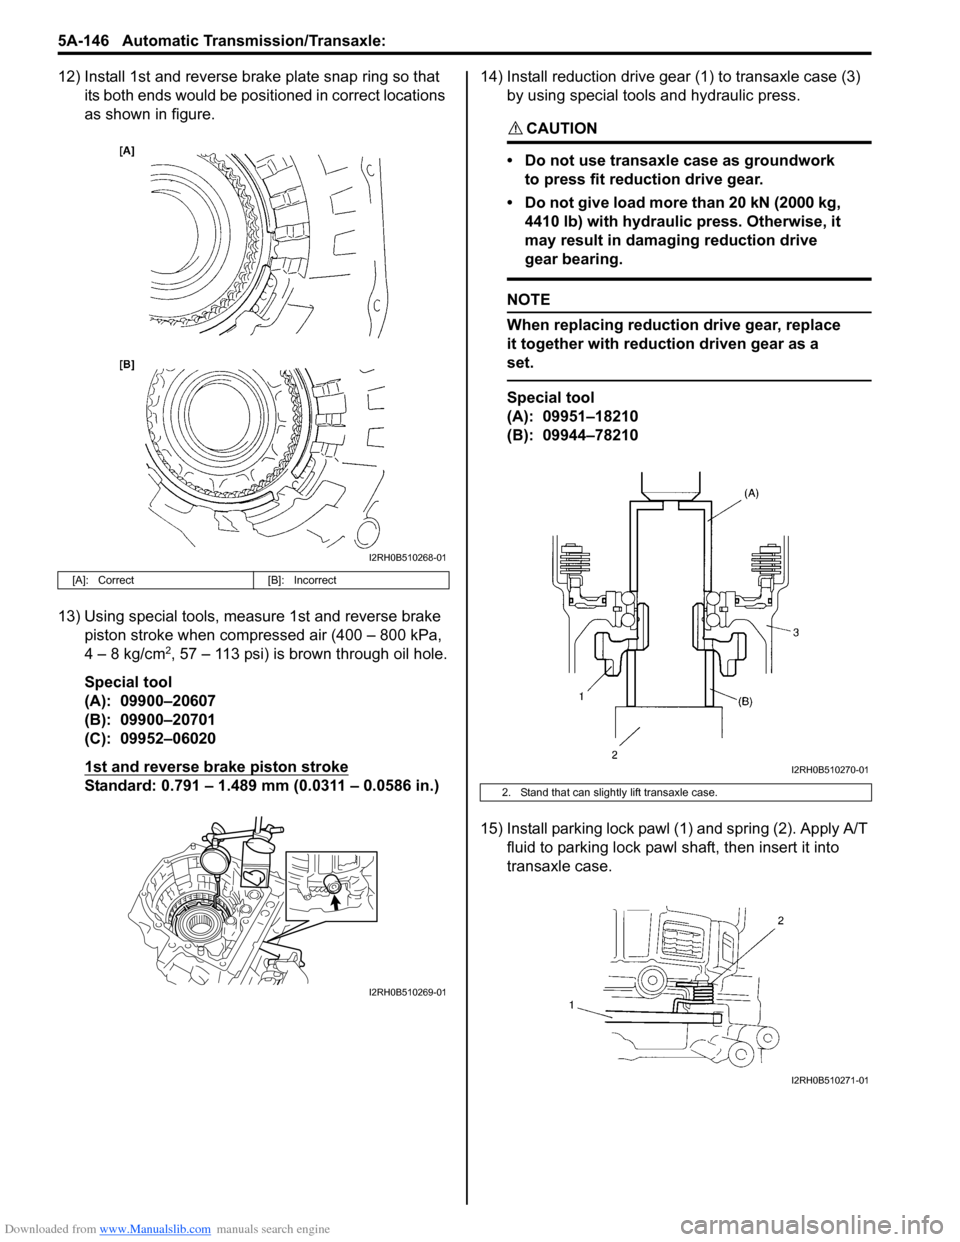
12) Install 1st and reverse brake plate snap ring so that
its both ends would be positioned in correct locations
as shown in figure.
13) Using special tools, measure 1st and reverse brake
piston stroke when compressed air (400 – 800 kPa,
4 – 8 kg/cm
2, 57 – 113 psi) is brown through oil hole.
Special tool
(A): 09900–20607
(B): 09900–20701
(C): 09952–06020
1st and reverse brake piston stroke
Standard: 0.791 – 1.489 mm (0.0311 – 0.0586 in.)14) Install reduction drive gear (1) to transaxle case (3)
by using special tools and hydraulic press.
CAUTION!
• Do not use transaxle case as groundwork
to press fit reduction drive gear.
• Do not give load more than 20 kN (2000 kg,
4410 lb) with hydraulic press. Otherwise, it
may result in damaging reduction drive
gear bearing.
NOTE
When replacing reduction drive gear, replace
it together with reduction driven gear as a
set.
Special tool
(A): 09951–18210
(B): 09944–78210
15) Install parking lock pawl (1) and spring (2). Apply A/T
fluid to parking lock pawl shaft, then insert it into
transaxle case.
[A]: Correct [B]: Incorrect
I2RH0B510268-01
I2RH0B510269-01
2. Stand that can slightly lift transaxle case.
I2RH0B510270-01
I2RH0B510271-01
Page 809 of 1556

Downloaded from www.Manualslib.com manuals search engine Automatic Transmission/Transaxle: 5A-161
Specifications
Tightening Torque SpecificationsS6RW0D5107001
NOTE
The specified tightening torque is also described in the following.
“Select Cable Components”
“Automatic Transaxle Unit Components”
“Automatic Transaxle Assembly Components”
“Oil Pump Assembly Components”
“Transaxle Rear Cover (O/D and 2nd Coast Brake Piston) Assembly Components”
“Valve Body Assembly Components”
“Differential Assembly Components”
Reference:
For the tightening torque of fastener not specified in this section, refer to “Fasteners Information in Section 0A”. Fastening partTightening torque
Note
N⋅mkgf-mlb-ft
A/T fluid drain plug 17 1.7 12.5�) / �) / �)
Transmission range sensor bolt 5.5 0.55 4.0�) / �)
Output shaft speed sensor (VSS) bolt 13 1.3 9.5�) / �)
Input shaft speed sensor bolt 5.5 0.55 4.0�) / �)
Valve body harness connector bolt 5.5 0.55 4.0�) / �)
Shift solenoid bolt 11 1.1 8.0�)
Oil strainer bolt 10 1.0 7.5�) / �)
Oil pan bolt 7.0 0.7 5.0�) / �)
Engine oil pan bolt 55 5.5 40.0�)
Transaxle and engine fastening bolt 85 8.5 61.5�)
Transaxle and engine fastening nut 85 8.5 61.5�)
Drive plate to torque converter bolt 19 1.9 14.0�)
Transaxle housing lower plate bolt 11 1.1 8.0�)
Oil pump subassembly bolt 10 1.0 7.5�)
Rear cover plug 7.5 0.75 5.5�)
Solenoid valve bolt 11 1.1 8.0�)
Final gear bolt 78 7.8 56.5�)
Torque converter housing plug 7.5 0.75 5.5�)
Lubrication tube clamp bolt 5.5 0.55 4.0�)
Fluid reservoir RH plate bolt 5.5 0.55 4.0�)
Torque converter housing bolt 33 3.3 24.0�) / �) / �)
Manual detent spring bolt 10 1.0 7.5�)
Parking lock pawl bracket bolt 7.5 0.75 5.5�)
Rear cover bolt 25 2.5 18.0�)
Fluid reservoir LH plate bolt 10 1.0 7.5�)
Oil pump assembly bolt 25 2.5 18.0�)
Transaxle case plug 7.5 0.75 5.5�)
Valve body bolt 11 1.1 8.0�)
Fluid cooler pipe union 25 2.5 18.0�)
Fluid cooler pipe union bolt 35 3.5 25.5�)
Fluid cooler pipe bracket bolt 10 1.0 7.5�)
Fluid filler tube bolt 10 1.0 7.5�)
Select cable bracket bolt 23 2.3 17.0�)
Select cable clamp bolt 13 1.3 9.5�)
Transmission range sensor lock nut 7 0.7 5.0�)
Manual select lever nut 13 1.3 9.5�)
Page 856 of 1556

Downloaded from www.Manualslib.com manuals search engine 5C-3 Clutch:
Repair Instructions
Clutch Pedal InspectionS6RW0D5306001
Cylinder Push Rod Play “a”
1) Press clutch pedal (1) gradually with finger, stop
when slight increase of resistance is felt and
measure how much pedal has moved (push rod
play) as represented by “a” as shown.
Push rod play
“a”: Max. 3 mm (0.12 in.)
2) If “a” is not within specification, replace master
cylinder (3) or pedal arm (2).
Clutch Pedal Free Travel “b”
1) Depress clutch pedal (1), stop the moment clutch
resistance is felt, and measure how much pedal has
moved (clutch pedal free travel) as represented by
“b” in the figure.
Clutch pedal free travel
“b”
: 2 – 8 mm (0.08 – 0.31 in.)
2) If “b” is not within specification, check pedal arm (2)
and master cylinder (3) and replace defective part.
Clutch Release Margin “c”
1) Pull up parking brake fully and block wheels.
2) Start engine and keep engine at idle with neutral
gear position.
3) Without clutch pedal (1) depressed, slightly push the
shift lever to reverse position until transaxle emits
gear contact noise. Do not shift the lever to reverse
position.
4) With emitting gear contact noise, be slow to depress
clutch pedal (1), and at gear contact noise died
position (release point) stop depressing.
5) Measure distance between release point (4) and full
stroke point (5) on clutch pedal (1) which is shown by
“c” in the figure.
Clutch release margin
“c”: 25 – 55 mm (0.98 – 2.17 in.)6) If “c” is not within specification, it is possible that air
is trapped in this system. If suspected so, bleed air
referring to “Air Bleeding of Clutch System”.Upon
completion of above inspection, start engine and
check clutch for proper operation.
Clutch Fluid Level InspectionS6RW0D5306002
Refer to “Brake Fluid Level Inspection in Section 4A”.
Clutch fluid specification
: Refer to the reservoir cap of the brake master
cylinder.
Air Bleeding of Clutch SystemS6RW0D5306003
CAUTION!
When operating the pedal stroke for air
bleeding of clutch system, after releasing the
clutch pedal, be sure to wait 1 second or
more before depressing it again. Otherwise,
the oil seal of operating cylinder will be
damaged, resulting in oil leakage.
Bleed air from clutch system.
Refer to “Air Bleeding of Brake System in Section 4A”.
I5RW0A530002-01
Page 1061 of 1556

Downloaded from www.Manualslib.com manuals search engine Air Bag System: 8B-22
“AIR BAG” Warning Light Does Not Come ONS6RW0D8204008
Wiring Diagram
Refer to ““AIR BAG” Warning Light Comes ON Steady”.
Troubleshooting
NOTE
Upon completion of inspection and repair work, perform the following items.
• Reconnect all air bag system components and ensure all components are properly mounted.
• Repeat “Air Bag Diagnostic System Check” to confirm that the trouble has been corrected.
Step Action Yes No
1Was “Air Bag Diagnostic System Check Flow” performed?Go to Step 2. Go to “Air Bag
Diagnostic System
Check Flow”.
2Combination meter power feed circuit check
1) Set parking brake.
2) Note combination meter when ignition switch is turned
ON.
Does the “BRAKE” indicator (warning light) come ON?Go to Step 3. Check combination
meter power and
ground circuit referring
to “C-1 Combination
Meter Circuit Diagram
(Meter) in Section 9A”.
3“AIR BAG” warning light circuit check
1) Disconnect SDM connector “L04”.
2) Note combination meter when ignition switch is turned
ON.
Does the “AIR BAG” warning light come ON?Substitute a known-
good SDM and recheck.Go to Step 4.
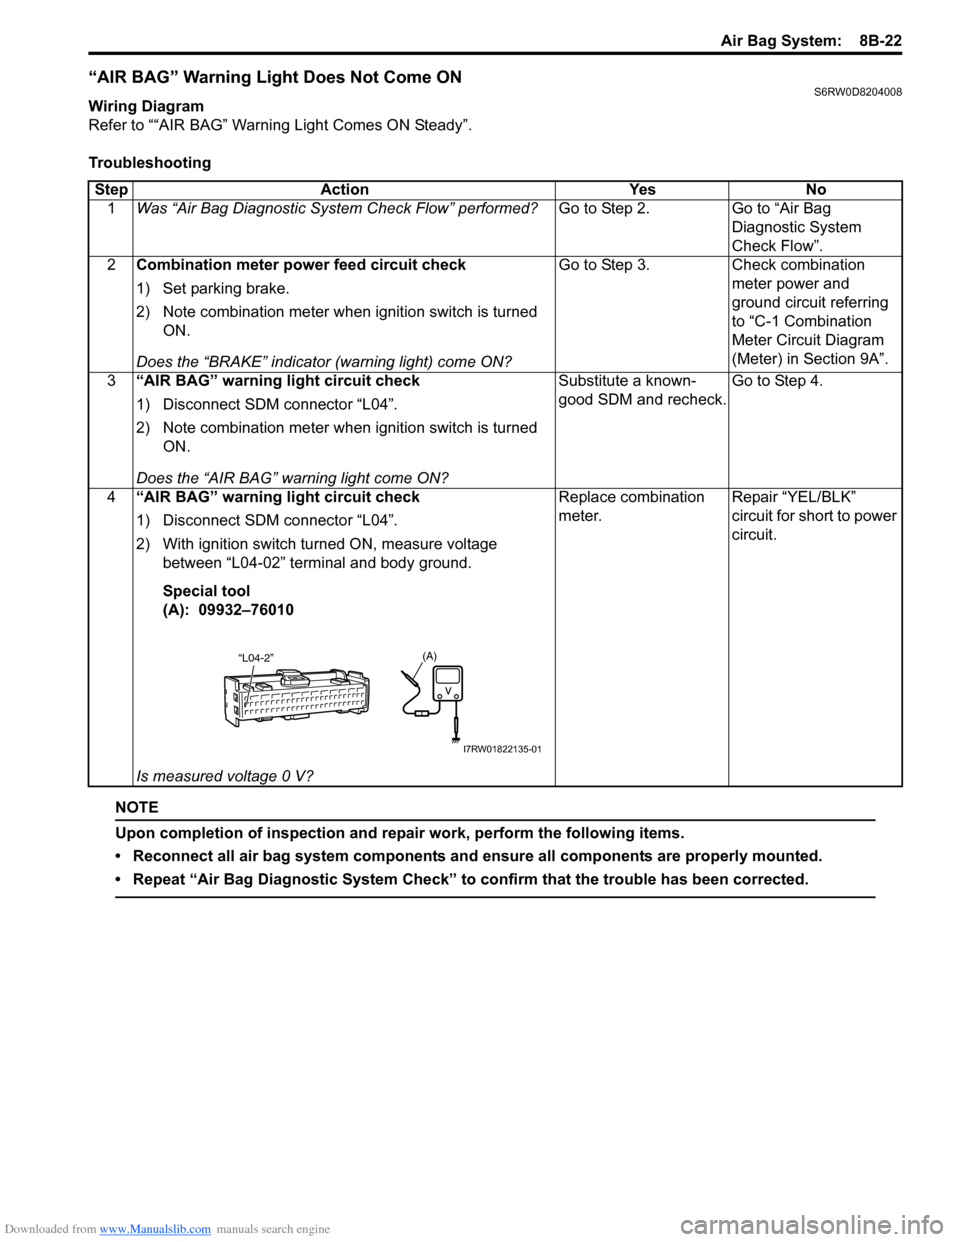
4“AIR BAG” warning light circuit check
1) Disconnect SDM connector “L04”.
2) With ignition switch turned ON, measure voltage
between “L04-02” terminal and body ground.
Special tool
(A): 09932–76010
Is measured voltage 0 V?Replace combination
meter.Repair “YEL/BLK”
circuit for short to power
circuit.
(A)“L04-2”
I7RW01822135-01
Page 1163 of 1556

Downloaded from www.Manualslib.com manuals search engine Table of Contents 9-iii
Headlight Bulb Replacement (Discharge
Headlight Model) ............................................. 9B-19
Ballast Removal and Installation (Discharge
Headlight Model) ............................................. 9B-19
Igniter Removal and Installation (Discharge
Headlight Model) ............................................. 9B-20
Headlight Aiming Adjustment with Screen ........ 9B-20
Headlight Switch (in Lighting Switch)
Removal and Installation................................. 9B-22
Headlight Switch (in Lighting Switch)
Inspection........................................................ 9B-22
Hazard Warning Switch Removal and
Installation ....................................................... 9B-23
Hazard Warning Switch Inspection ................... 9B-23
Brake Light Switch Inspection ........................... 9B-23
Turn Signal Light Switch (in Lighting Switch)
Removal and Installation................................. 9B-24
Turn Signal Light Switch (in Lighting Switch)
Inspection........................................................ 9B-24
Turn Signal and Hazard Warning Relay
Removal and Installation................................. 9B-24
Turn Signal and Hazard Warning Relay
Inspection........................................................ 9B-25
License Light Assembly Removal and
Installation ....................................................... 9B-25
Front Fog Light Assembly Removal and
Installation (If Equipped) ................................. 9B-26
Front Fog Light Switch Inspection (If
Equipped)........................................................ 9B-26
Front Fog Light Aiming Adjustment with
Screen (If Equipped) ....................................... 9B-26
Rear Fog Light Switch Inspection (If
Equipped)........................................................ 9B-27
Headlight Manual Levering Switch Inspection
(If Equipped) ................................................... 9B-28
Headlight Leveling Actuator Inspection (If
Equipped)........................................................ 9B-28
Height Sensor Removal and Installation (If
Equipped)........................................................ 9B-29
Height Sensor and Its Circuit Inspection (If
Equipped)........................................................ 9B-30
Headlight Leveling Control Module Removal
and Installation (If Equipped) .......................... 9B-30
Initialization of Headlight Auto Leveling
System ............................................................ 9B-30
Auto-On Headlight Sensor Inspection (If
Equipped)........................................................ 9B-31
Illumination Cancel Switch Inspection (If
Equipped)........................................................ 9B-32
Tail Light Relay, Headlight Relay, Front Fog
Light Relay Inspection (If Equipped) ............... 9B-32
Specifications..................................................... 9B-33
Tightening Torque Specifications ...................... 9B-33
Instrumentation / Driver Info. / Horn ...... 9C-1
Precautions........................................................... 9C-1
Precautions in Diagnosing Troubles for
Combination Meter............................................ 9C-1
General Description ............................................. 9C-1
CAN Communication System Description........... 9C-1Auto Volume Control System Description (If
Equipped) ..........................................................9C-3
Schematic and Routing Diagram ........................9C-4
Combination Meter Circuit Diagram ....................9C-4
Component Location ...........................................9C-5
Audio System Component Location ....................9C-5
Diagnostic Information and Procedures ............9C-6
Speedometer and VSS Symptom Diagnosis ......9C-6
Tachometer Symptom Diagnosis ........................9C-6
Engine Coolant Temperature (ECT) Meter
Symptom Diagnosis ..........................................9C-6
Fuel Meter Symptom Diagnosis ..........................9C-6
Low Fuel Warning Light Symptom Diagnosis .....9C-7
Oil Pressure Warning Light Symptom
Diagnosis ..........................................................9C-7
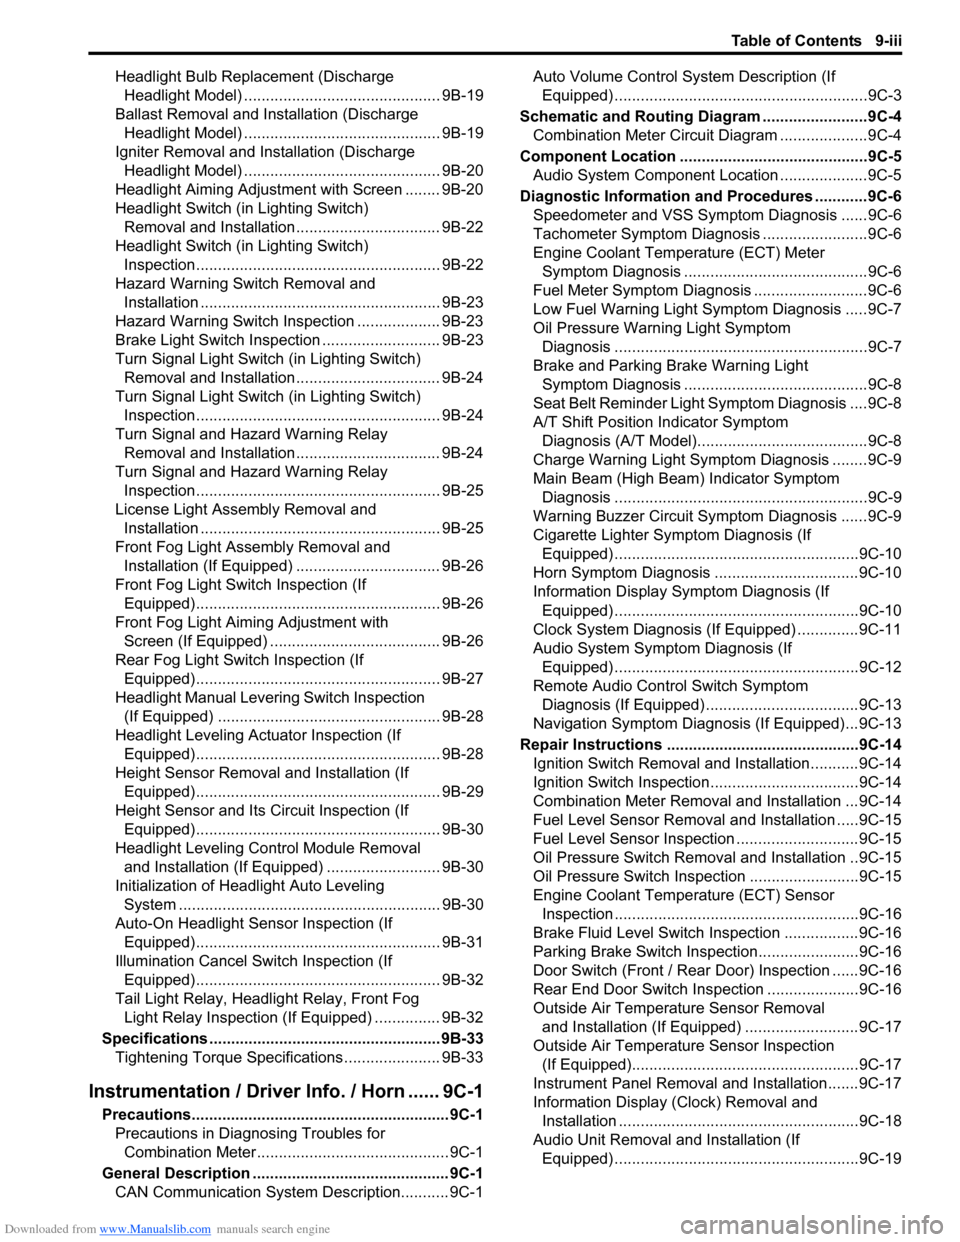
Brake and Parking Brake Warning Light
Symptom Diagnosis ..........................................9C-8
Seat Belt Reminder Light Symptom Diagnosis ....9C-8
A/T Shift Position Indicator Symptom
Diagnosis (A/T Model).......................................9C-8
Charge Warning Light Symptom Diagnosis ........9C-9
Main Beam (High Beam) Indicator Symptom
Diagnosis ..........................................................9C-9
Warning Buzzer Circuit Symptom Diagnosis ......9C-9
Cigarette Lighter Symptom Diagnosis (If
Equipped) ........................................................9C-10
Horn Symptom Diagnosis .................................9C-10
Information Display Symptom Diagnosis (If
Equipped) ........................................................9C-10
Clock System Diagnosis (If Equipped) ..............9C-11
Audio System Symptom Diagnosis (If
Equipped) ........................................................9C-12
Remote Audio Control Switch Symptom
Diagnosis (If Equipped) ...................................9C-13
Navigation Symptom Diagnosis (If Equipped)...9C-13
Repair Instructions ............................................9C-14
Ignition Switch Removal and Installation...........9C-14
Ignition Switch Inspection..................................9C-14
Combination Meter Removal and Installation ...9C-14
Fuel Level Sensor Removal and Installation .....9C-15
Fuel Level Sensor Inspection ............................9C-15
Oil Pressure Switch Removal and Installation ..9C-15
Oil Pressure Switch Inspection .........................9C-15
Engine Coolant Temperature (ECT) Sensor
Inspection ........................................................9C-16
Brake Fluid Level Switch Inspection .................9C-16
Parking Brake Switch Inspection.......................9C-16
Door Switch (Front / Rear Door) Inspection ......9C-16
Rear End Door Switch Inspection .....................9C-16
Outside Air Temperature Sensor Removal
and Installation (If Equipped) ..........................9C-17
Outside Air Temperature Sensor Inspection
(If Equipped)....................................................9C-17
Instrument Panel Removal and Installation.......9C-17
Information Display (Clock) Removal and
Installation .......................................................9C-18
Audio Unit Removal and Installation (If
Equipped) ........................................................9C-19
Page 1196 of 1556

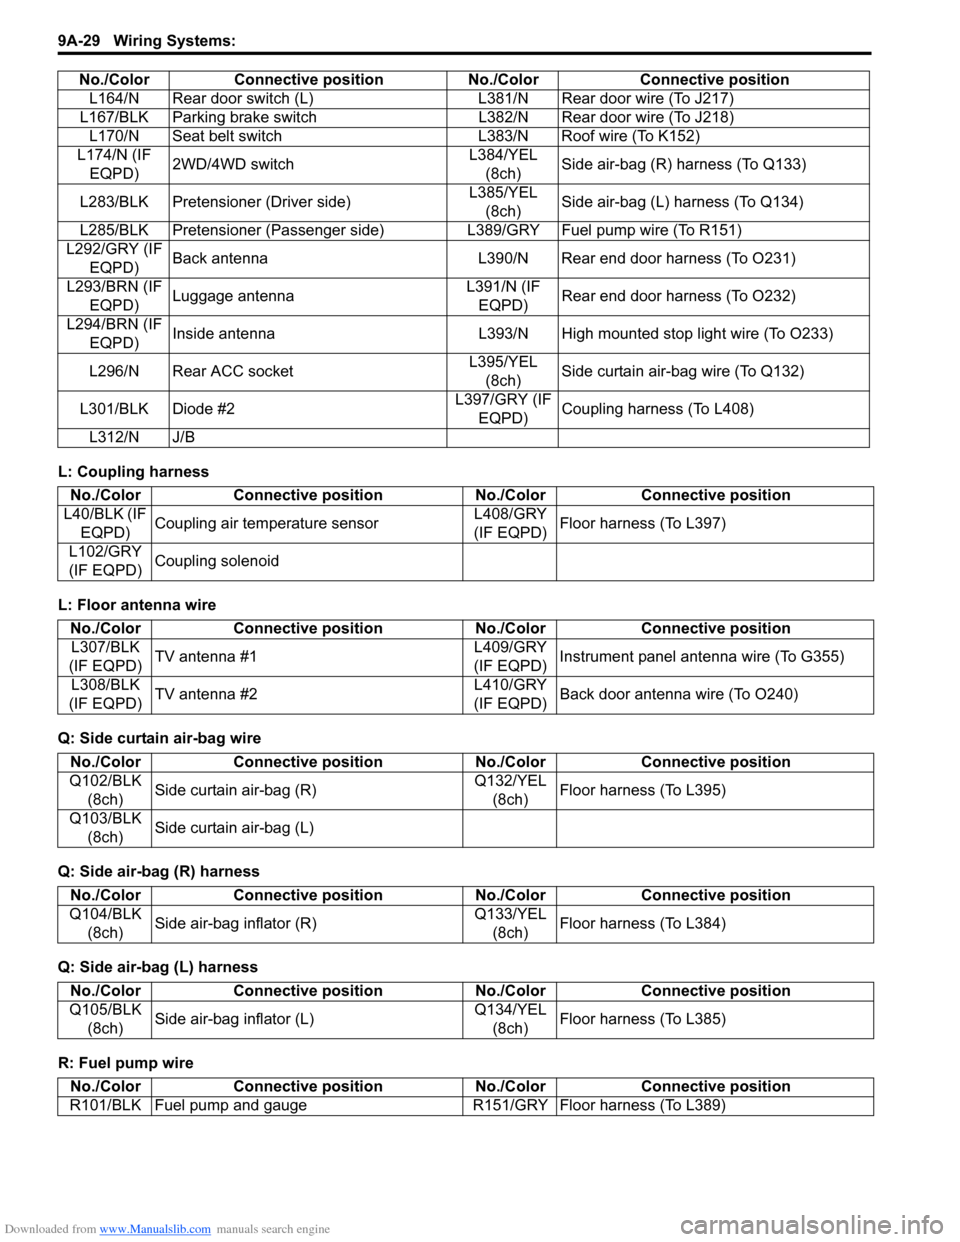
Downloaded from www.Manualslib.com manuals search engine 9A-29 Wiring Systems:
L: Coupling harness
L: Floor antenna wire
Q: Side curtain air-bag wire
Q: Side air-bag (R) harness
Q: Side air-bag (L) harness
R: Fuel pump wireL164/N Rear door switch (L) L381/N Rear door wire (To J217)
L167/BLK Parking brake switch L382/N Rear door wire (To J218)
L170/N Seat belt switch L383/N Roof wire (To K152)
L174/N (IF
EQPD)2WD/4WD switchL384/YEL
(8ch)Side air-bag (R) harness (To Q133)
L283/BLK Pretensioner (Driver side)L385/YEL
(8ch)Side air-bag (L) harness (To Q134)
L285/BLK Pretensioner (Passenger side) L389/GRY Fuel pump wire (To R151)
L292/GRY (IF
EQPD)Back antenna L390/N Rear end door harness (To O231)
L293/BRN (IF
EQPD)Luggage antennaL391/N (IF
EQPD)Rear end door harness (To O232)
L294/BRN (IF
EQPD)Inside antenna L393/N High mounted stop light wire (To O233)
L296/N Rear ACC socketL395/YEL
(8ch)Side curtain air-bag wire (To Q132)
L301/BLK Diode #2L397/GRY (IF
EQPD)Coupling harness (To L408)
L312/N J/B No./Color Connective position No./Color Connective position
No./Color Connective position No./Color Connective position
L40/BLK (IF
EQPD)Coupling air temperature sensorL408/GRY
(IF EQPD)Floor harness (To L397)
L102/GRY
(IF EQPD)Coupling solenoid
No./Color Connective position No./Color Connective position
L307/BLK
(IF EQPD)TV antenna #1L409/GRY
(IF EQPD)Instrument panel antenna wire (To G355)
L308/BLK
(IF EQPD)TV antenna #2L410/GRY
(IF EQPD)Back door antenna wire (To O240)
No./Color Connective position No./Color Connective position
Q102/BLK
(8ch)Side curtain air-bag (R)Q132/YEL
(8ch)Floor harness (To L395)
Q103/BLK
(8ch)Side curtain air-bag (L)
No./Color Connective position No./Color Connective position
Q104/BLK
(8ch)Side air-bag inflator (R)Q133/YEL
(8ch)Floor harness (To L384)
No./Color Connective position No./Color Connective position
Q105/BLK
(8ch)Side air-bag inflator (L)Q134/YEL
(8ch)Floor harness (To L385)
No./Color Connective position No./Color Connective position
R101/BLK Fuel pump and gauge R151/GRY Floor harness (To L389)