2006 SUZUKI SX4 Ignition coil
[x] Cancel search: Ignition coilPage 917 of 1556

Downloaded from www.Manualslib.com manuals search engine Power Assisted Steering System: 6C-37
3) Inspect for proper toe referring to “Front Wheel
Alignment Inspection and Adjustment in Section 2B”.
4) After confirming proper toe, tighten tie-rod end lock
nut to specified torque.
Tightening torque
Tie-rod end lock nut (a): 45 N·m (4.5 kgf-m, 32.5
lb-ft)
5) Tighten wheel bolts to specified torque and lower
hoist.
Tightening torque
Wheel bolt: 85 N·m (8.5 kgf-m, 61.5 lb-ft)
Tie-Rod End InspectionS6RW0D6306004
• Inspect for play in ball joint.
• Inspect for play in rack end ball joint.
In either case, if found defective, replace.
Steering Shaft Joint On-Vehicle InspectionS6RW0D6306005
Check shaft joint for wear, breakage and any other
damage and replace if any defect exists.
Steering Gear Case Assembly Removal and
Installation
S6RW0D6306006
Removal
CAUTION!
Be sure to set front wheels (tires) in straight
direction and remove ignition key from key
cylinder before performing the following
steps, otherwise, contact coil of air bag
system may get damaged.
1) Remove steering joint cover.
2) Make alignment marks (1) on pinion shaft (2) and
joint of steering lower shaft (3) for a guide during
reinstallation.
3) Loosen joint bolt (steering column side) (4) and
remove joint bolt (pinion shaft side) (5) and
disconnect steering lower shaft (3) from pinion shaft
(2).
4) Disconnect torque sensor connector and P/S motor
connector from steering gear case.
5) Remove front suspension frame referring to “Front
Suspension Frame, Stabilizer Bar and/or Bushing
Removal and Installation in Section 2B”, and then
remove steering gear case.
Installation
1) Install grommet (1) as shown in figure.
I3RM0A630030-01
I4RS0A630043-01
I4RS0B630012-01
2. Protrusion
5
2
1
5
34
3
I4RS0B630013-01
1
2
1
2
I5RW0A630018-02
Page 1048 of 1556
![SUZUKI SX4 2006 1.G Service Workshop Manual Downloaded from www.Manualslib.com manuals search engine 8B-9 Air Bag System:
Terminal arrangement of SDM (viewed from harness side)
[A]: Shorting bar 11. BCM 25. Driver seat belt pretensioner
[B]: C SUZUKI SX4 2006 1.G Service Workshop Manual Downloaded from www.Manualslib.com manuals search engine 8B-9 Air Bag System:
Terminal arrangement of SDM (viewed from harness side)
[A]: Shorting bar 11. BCM 25. Driver seat belt pretensioner
[B]: C](/manual-img/20/7612/w960_7612-1047.png)
Downloaded from www.Manualslib.com manuals search engine 8B-9 Air Bag System:
Terminal arrangement of SDM (viewed from harness side)
[A]: Shorting bar 11. BCM 25. Driver seat belt pretensioner
[B]: Connector 12. Combination meter 26. Passenger seat belt pretensioner
[C]: Junction block with BCM model 13. “AIR BAG” warning light27. Driver side-air bag (inflator) module (8-channel system)
[D]: Junction block without BCM model 14. Light driver 28. Passenger side-air bag (inflator) module (8-channel system)
1. Battery 15. SDM 29. Driver side curtain-air bag (inflator) module (8-channel
system)
2. Main fuse 16. To HVAC control module (auto A/C model) 30. Passenger side curtain-air bag (inflator) module (8-channel
system)
3. Fuse 17. Data link connector (DLC) 31. Safing power driver
4. Individual circuit fuse box No.1 18. Forward impact-sensor 32. X-Y-G (longitudinal / lateral acceleration)
5. “IGN” fuse 19. Driver side impact-sensor (8-channel
system)33. DC / DC converter
6. Ignition switch 20. Passenger side impact-sensor (8-channel
system)34. Mechanical longitudinal G sensor (switch)
7. Junction block assembly 21. Ground for air bag system 35. Back up capacitor
8. “DOME” fuse 22. Contact coil assembly
9. “METER” fuse 23. Driver air bag (inflator) module
10. “A/B” fuse 24. Passenger air bag (inflator) module
1
2 3 4 5 6 7 8 9 10 11 12 13 14 15 16 17 18 19 20 21 22 23 24 25 26
27 28 29 30 31 32 33 34 35 36 37 38 39 40 41 42 43 44 45 46 47 48 49 50 51
1
I7RW01822003-02
1. SDM Connector “L04”
Page 1070 of 1556
Downloaded from www.Manualslib.com manuals search engine 8B-31 Air Bag System:
NOTE
Upon completion of inspection and repair work, perform the following items.
• Reconnect all air bag system components and ensure all components are properly mounted.
• Repeat “Air Bag Diagnostic System Check” to confirm that the trouble has been corrected.
• Clear DTC B1157 (air bag deployed) of BCM referring to “DTC Clearance in Section 10B”, if any.
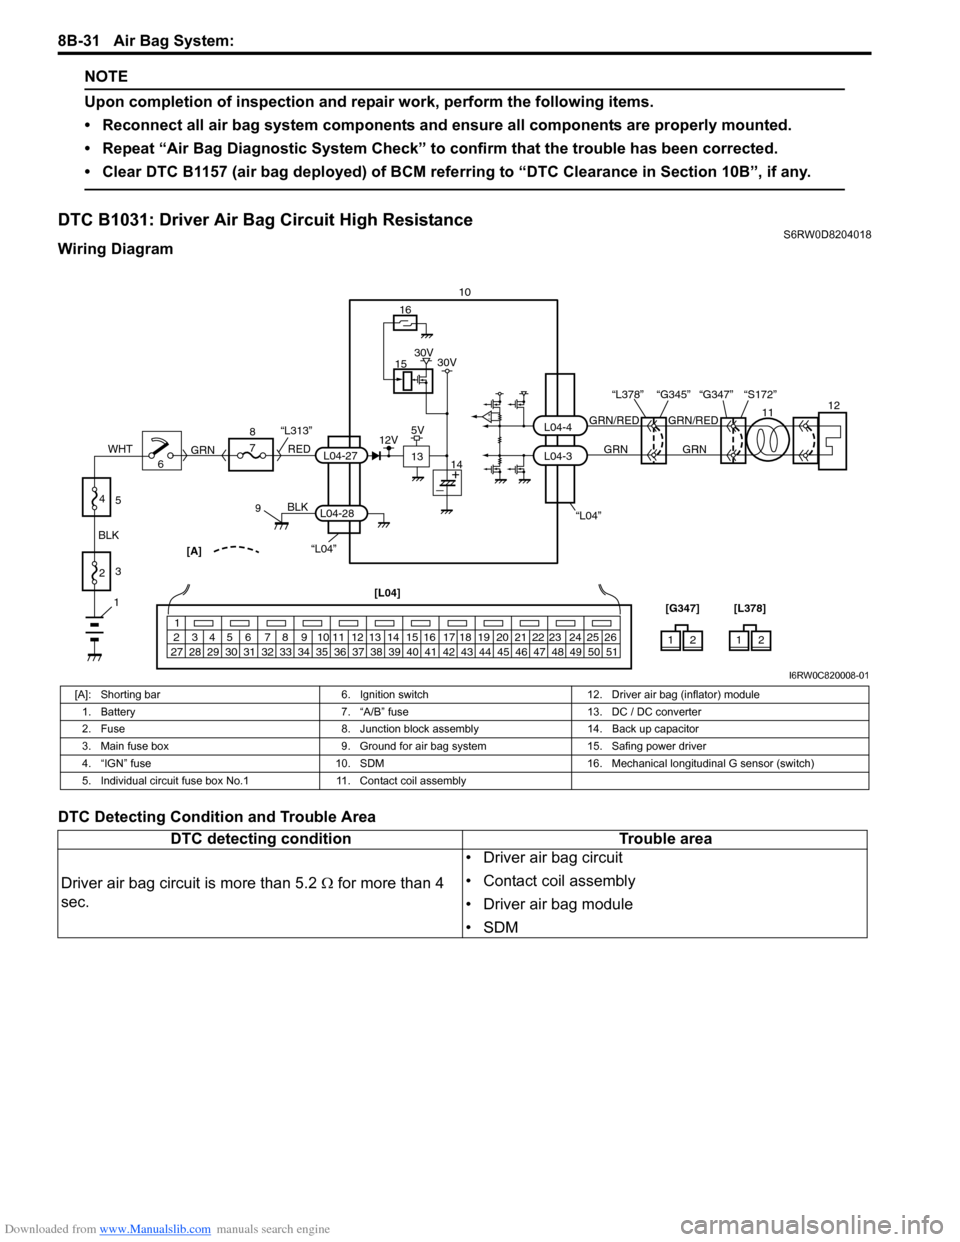
DTC B1031: Driver Air Bag Circuit High Resistance S6RW0D8204018
Wiring Diagram
DTC Detecting Condition and Trouble Area
“L04”“L04”[A]
BLK
L04-28
6 8
7
RED
GRN“L313”L04-27
910
L04-3 L04-4
1
2 3 4 5 6 7 8 9 10 11 12 13 14 15 16 17 18 19 20 21 22 23 24 25 26
27 28 29 30 31 32 33 34 35 36 37 38 39 40 41 42 43 44 45 46 47 48 49 50 51
12 [L04]
[G347]12 [L378]
15
13
16
12V5V30V 30V
141112
GRN/RED GRN/RED
GRN GRN
“G347” “S172” “L378” “G345”
1
2 BLKWHT3
4
5
I6RW0C820008-01
[A]: Shorting bar 6. Ignition switch 12. Driver air bag (inflator) module
1. Battery 7. “A/B” fuse 13. DC / DC converter
2. Fuse 8. Junction block assembly 14. Back up capacitor
3. Main fuse box 9. Ground for air bag system 15. Safing power driver
4. “IGN” fuse 10. SDM 16. Mechanical longitudinal G sensor (switch)
5. Individual circuit fuse box No.1 11. Contact coil assembly
DTC detecting condition Trouble area
Driver air bag circuit is more than 5.2 Ω for more than 4
sec.• Driver air bag circuit
• Contact coil assembly
• Driver air bag module
•SDM
Page 1071 of 1556
Downloaded from www.Manualslib.com manuals search engine Air Bag System: 8B-32
DTC Troubleshooting
Step Action Yes No
1Was “Air Bag Diagnostic System Check Flow” performed?Go to Step 2. Go to “Air Bag
Diagnostic System
Check Flow”.
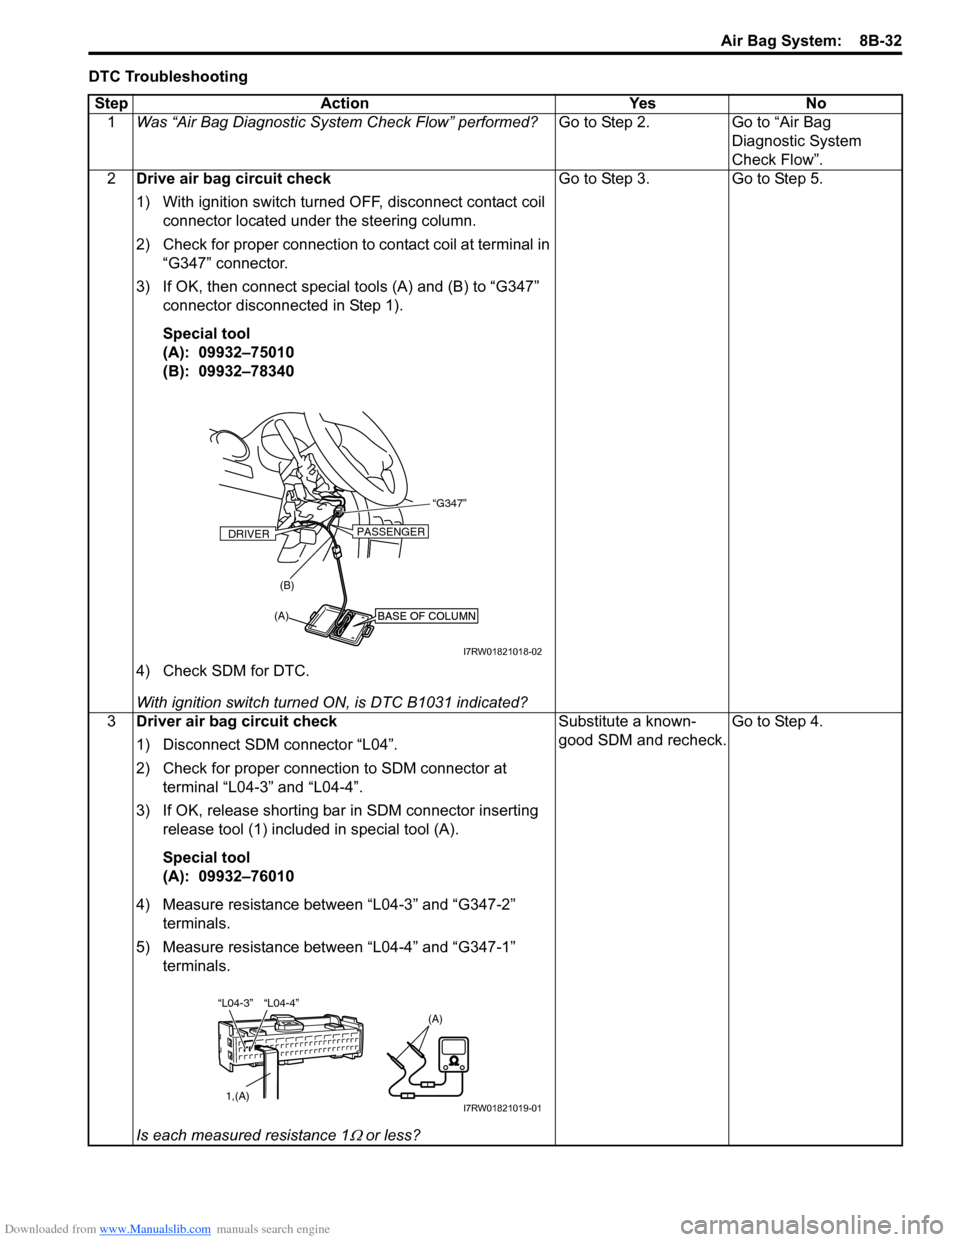
2Drive air bag circuit check
1) With ignition switch turned OFF, disconnect contact coil
connector located under the steering column.
2) Check for proper connection to contact coil at terminal in
“G347” connector.
3) If OK, then connect special tools (A) and (B) to “G347”
connector disconnected in Step 1).
Special tool
(A): 09932–75010
(B): 09932–78340
4) Check SDM for DTC.
With ignition switch turned ON, is DTC B1031 indicated?Go to Step 3. Go to Step 5.
3Driver air bag circuit check
1) Disconnect SDM connector “L04”.
2) Check for proper connection to SDM connector at
terminal “L04-3” and “L04-4”.
3) If OK, release shorting bar in SDM connector inserting
release tool (1) included in special tool (A).
Special tool
(A): 09932–76010
4) Measure resistance between “L04-3” and “G347-2”
terminals.
5) Measure resistance between “L04-4” and “G347-1”
terminals.
Is each measured resistance 1
Ω or less?Substitute a known-
good SDM and recheck.Go to Step 4.
BASE OF COLUMNBASE OF COLUMN
“G347”
(A)(B)
DRIVERPASSENGER
I7RW01821018-02
“L04-4” “L04-3”
1,(A)
(A)
I7RW01821019-01
Page 1073 of 1556
Downloaded from www.Manualslib.com manuals search engine Air Bag System: 8B-34
DTC Troubleshooting
Step Action Yes No
1Was “Air Bag Diagnostic System Check Flow” performed?Go to Step 2. Go to “Air Bag
Diagnostic System
Check Flow”.
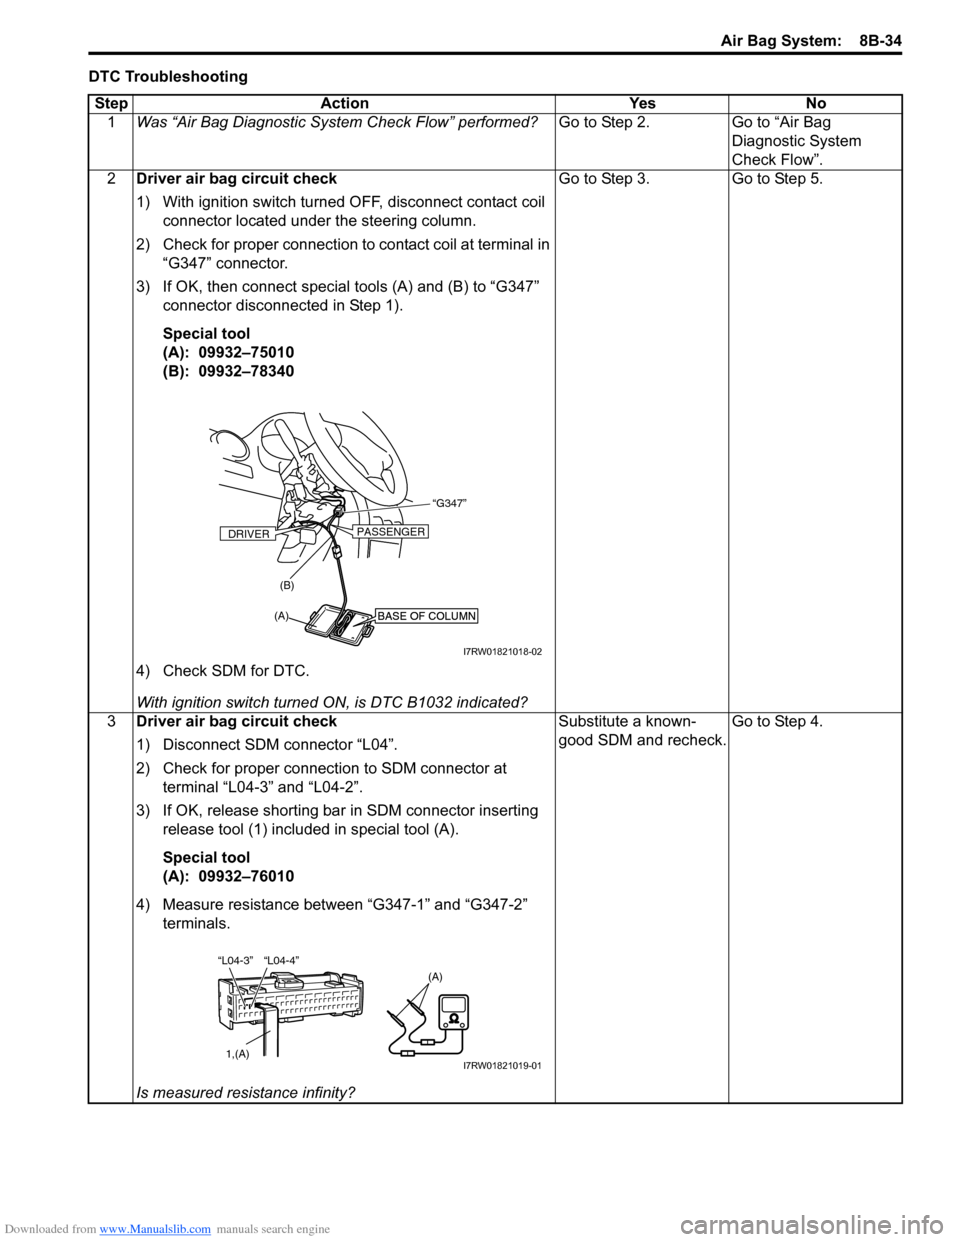
2Driver air bag circuit check
1) With ignition switch turned OFF, disconnect contact coil
connector located under the steering column.
2) Check for proper connection to contact coil at terminal in
“G347” connector.
3) If OK, then connect special tools (A) and (B) to “G347”
connector disconnected in Step 1).
Special tool
(A): 09932–75010
(B): 09932–78340
4) Check SDM for DTC.
With ignition switch turned ON, is DTC B1032 indicated?Go to Step 3. Go to Step 5.
3Driver air bag circuit check
1) Disconnect SDM connector “L04”.
2) Check for proper connection to SDM connector at
terminal “L04-3” and “L04-2”.
3) If OK, release shorting bar in SDM connector inserting
release tool (1) included in special tool (A).
Special tool
(A): 09932–76010
4) Measure resistance between “G347-1” and “G347-2”
terminals.
Is measured resistance infinity?Substitute a known-
good SDM and recheck.Go to Step 4.
BASE OF COLUMNBASE OF COLUMN
“G347”
(A)(B)
DRIVERPASSENGER
I7RW01821018-02
“L04-4” “L04-3”
1,(A)
(A)
I7RW01821019-01
Page 1075 of 1556
Downloaded from www.Manualslib.com manuals search engine Air Bag System: 8B-36
DTC Troubleshooting
Step Action Yes No
1Was “Air Bag Diagnostic System Check Flow” performed?Go to Step 2. Go to “Air Bag
Diagnostic System
Check Flow”.
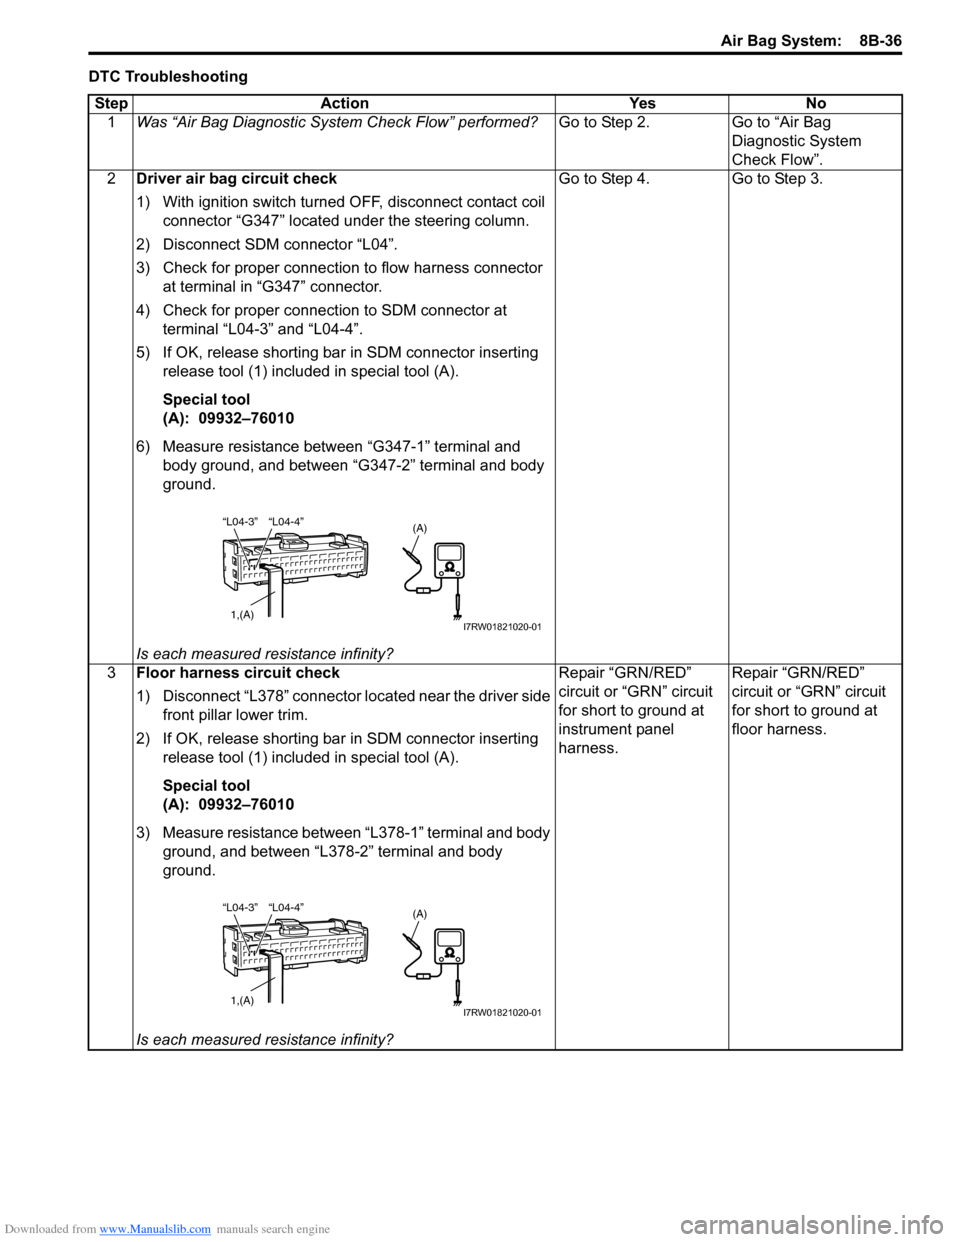
2Driver air bag circuit check
1) With ignition switch turned OFF, disconnect contact coil
connector “G347” located under the steering column.
2) Disconnect SDM connector “L04”.
3) Check for proper connection to flow harness connector
at terminal in “G347” connector.
4) Check for proper connection to SDM connector at
terminal “L04-3” and “L04-4”.
5) If OK, release shorting bar in SDM connector inserting
release tool (1) included in special tool (A).
Special tool
(A): 09932–76010
6) Measure resistance between “G347-1” terminal and
body ground, and between “G347-2” terminal and body
ground.
Is each measured resistance infinity?Go to Step 4. Go to Step 3.
3Floor harness circuit check
1) Disconnect “L378” connector located near the driver side
front pillar lower trim.
2) If OK, release shorting bar in SDM connector inserting
release tool (1) included in special tool (A).
Special tool
(A): 09932–76010
3) Measure resistance between “L378-1” terminal and body
ground, and between “L378-2” terminal and body
ground.
Is each measured resistance infinity?Repair “GRN/RED”
circuit or “GRN” circuit
for short to ground at
instrument panel
harness.Repair “GRN/RED”
circuit or “GRN” circuit
for short to ground at
floor harness.
“L04-4” “L04-3”
1,(A)
(A)
I7RW01821020-01
“L04-4” “L04-3”
1,(A)
(A)
I7RW01821020-01
Page 1077 of 1556
Downloaded from www.Manualslib.com manuals search engine Air Bag System: 8B-38
DTC Troubleshooting
Step Action Yes No
1Was “Air Bag Diagnostic System Check Flow” performed?Go to Step 2. Go to “Air Bag
Diagnostic System
Check Flow”.
2Driver air bag circuit check
1) With ignition switch turned OFF, disconnect contact coil
connector “G347” located under the steering column.
2) Disconnect SDM connector “L04”.
3) Check for proper connection to contact coil connector at
terminal in “G347” connector.
4) Check for proper connection to SDM connector at
terminal “L04-3” and “L04-4”.
5) If OK, release shorting bar in SDM connector inserting
release tool (1) included in special tool (A).
Special tool
(A): 09932–76010
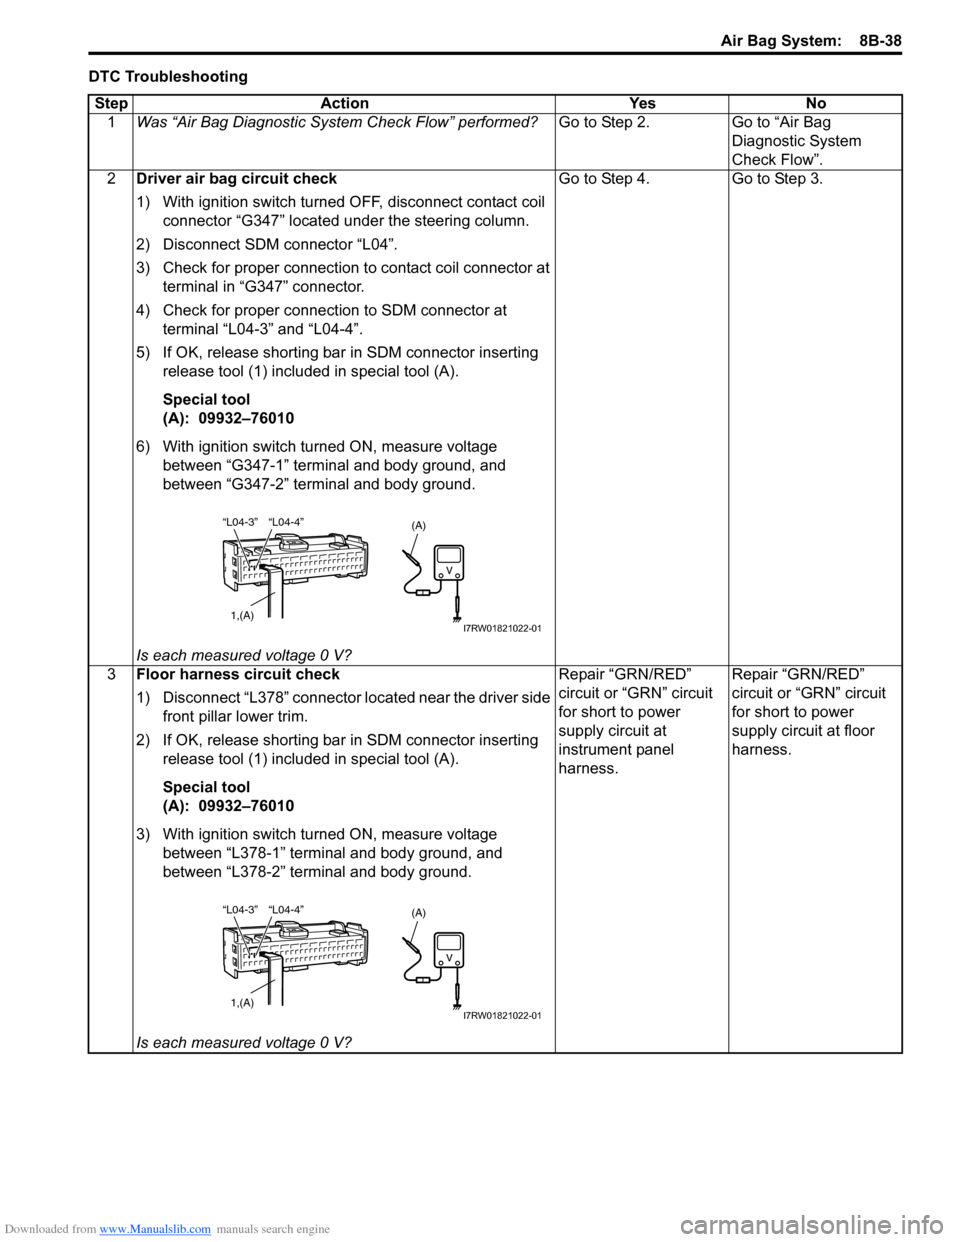
6) With ignition switch turned ON, measure voltage
between “G347-1” terminal and body ground, and
between “G347-2” terminal and body ground.
Is each measured voltage 0 V?Go to Step 4. Go to Step 3.
3Floor harness circuit check
1) Disconnect “L378” connector located near the driver side
front pillar lower trim.
2) If OK, release shorting bar in SDM connector inserting
release tool (1) included in special tool (A).
Special tool
(A): 09932–76010
3) With ignition switch turned ON, measure voltage
between “L378-1” terminal and body ground, and
between “L378-2” terminal and body ground.
Is each measured voltage 0 V?Repair “GRN/RED”
circuit or “GRN” circuit
for short to power
supply circuit at
instrument panel
harness.Repair “GRN/RED”
circuit or “GRN” circuit
for short to power
supply circuit at floor
harness.
“L04-4” “L04-3”
1,(A)
(A)
I7RW01821022-01
“L04-4” “L04-3”
1,(A)
(A)
I7RW01821022-01
Page 1078 of 1556
Downloaded from www.Manualslib.com manuals search engine 8B-39 Air Bag System:
NOTE
Upon completion of inspection and repair work, perform the following items.
• Reconnect all air bag system components and ensure all components are properly mounted.
• Clear DTCs referring to “DTC Clearance”, if any.
• Repeat “Air Bag Diagnostic System Check” to confirm that the trouble has been corrected.
4Contact coil circuit check
1) Connect contact coil connector “G347” located under the
steering column.
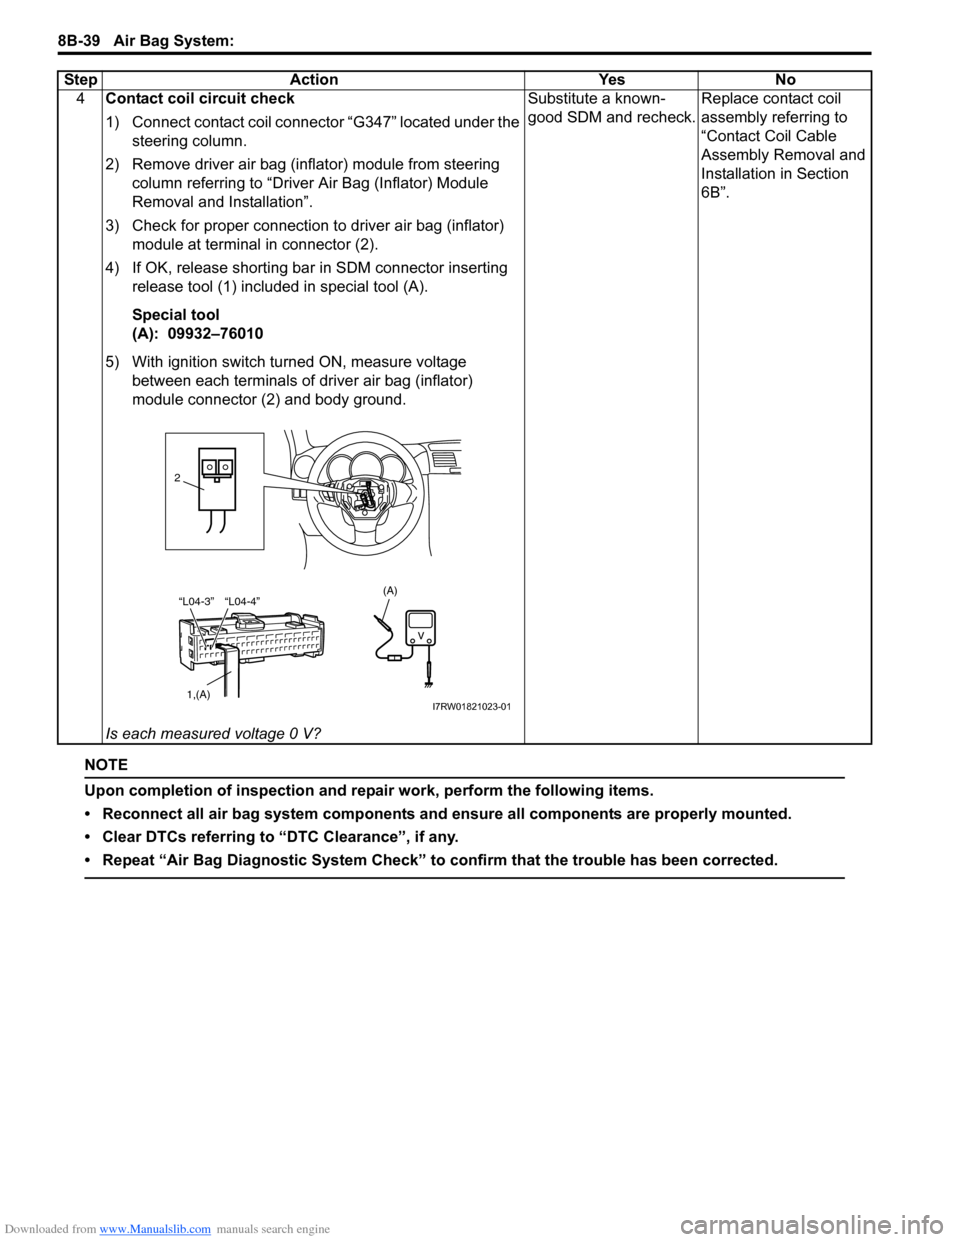
2) Remove driver air bag (inflator) module from steering
column referring to “Driver Air Bag (Inflator) Module
Removal and Installation”.
3) Check for proper connection to driver air bag (inflator)
module at terminal in connector (2).
4) If OK, release shorting bar in SDM connector inserting
release tool (1) included in special tool (A).
Special tool
(A): 09932–76010
5) With ignition switch turned ON, measure voltage
between each terminals of driver air bag (inflator)
module connector (2) and body ground.
Is each measured voltage 0 V?Substitute a known-
good SDM and recheck.Replace contact coil
assembly referring to
“Contact Coil Cable
Assembly Removal and
Installation in Section
6B”. Step Action Yes No
“L04-4” “L04-3”
1,(A)
2
(A)
I7RW01821023-01