2006 SUBARU IMPREZA clock
[x] Cancel search: clockPage 152 of 365
Climate control 4-3
CONTINUED
Center and side ventilators
Center ventilators
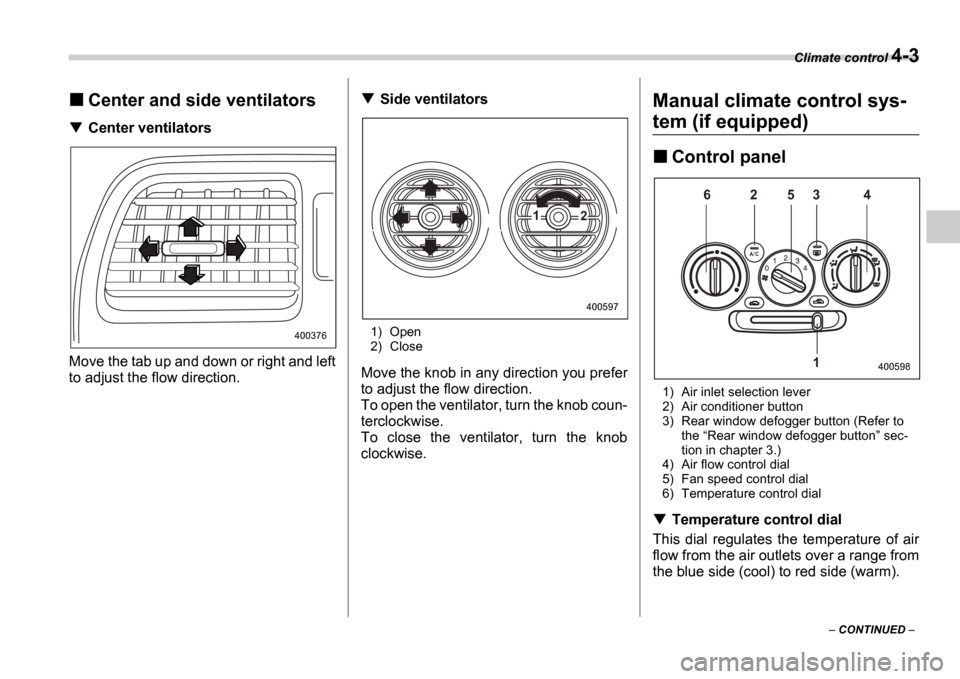
Move the tab up and down or right and left
to adjust the flow direction.
Side ventilators
1) Open
2) Close
Move the knob in any direction you prefer
to adjust the flow direction.
To open the ventilator, turn the knob coun-
terclockwise.
To close the ventilator, turn the knob
clockwise.
Manual climate control sys-
tem (if equipped)
Control panel
1) Air inlet selection lever
2) Air conditioner button
3) Rear window defogger button (Refer to the Rear window defogger button sec-
tion in chapter 3.)
4) Air flow control dial
5) Fan speed control dial
6) Temperature control dial
Temperature control dial
This dial regulates the temperature of air
flow from the air outlets over a range from
the blue side (cool) to red side (warm).
400376
1 2
400597
6 2 5 3 4
1
400598
Page 154 of 365
Climate control 4-5
CONTINUED
Heater operation
Defrosting or defogging the wind-
shield
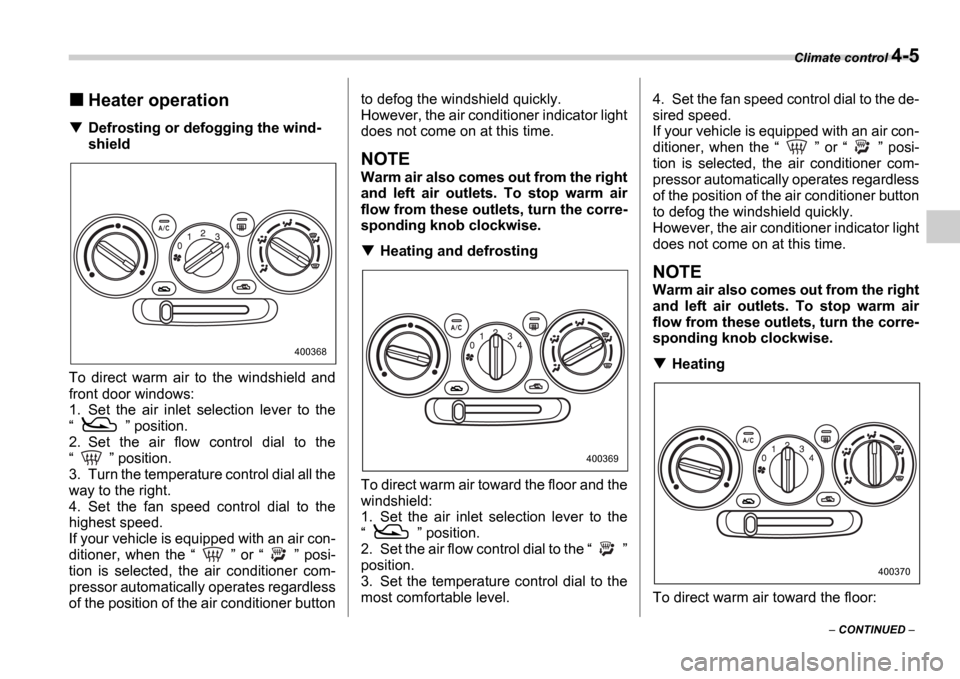
To direct warm air to the windshield and
front door windows:
1. Set the air inlet selection lever to the
position.
2. Set the air flow control dial to the
position.
3. Turn the temperature control dial all the
way to the right.
4. Set the fan speed control dial to the
highest speed.
If your vehicle is equipped with an air con-
ditioner, when the or posi-
tion is selected, the air conditioner com-
pressor automatically operates regardless
of the position of the air conditioner button to defog the windshield quickly.
However, the air conditioner indicator light
does not come on at this time.
NOTE
Warm air also comes out from the right
and left air outlets. To stop warm air
flow from these outlets, turn the corre-
sponding knob clockwise.
Heating and defrosting
To direct warm air toward the floor and the
windshield:
1. Set the air inlet selection lever to the
position.
2. Set the air flow control dial to the
position.
3. Set the temperature control dial to the
most comfortable level. 4. Set the fan speed control dial to the de-
sired speed.
If your vehicle is equipped with an air con-
ditioner, when the
or posi-
tion is selected, the air conditioner com-
pressor automatically operates regardless
of the position of the air conditioner button
to defog the windshield quickly.
However, the air conditioner indicator light
does not come on at this time.
NOTE
Warm air also comes out from the right
and left air outlets. To stop warm air
flow from these outlets, turn the corre-
sponding knob clockwise.
Heating
To direct warm air toward the floor:
400368
400369
400370
Page 155 of 365
4-6 Climate control
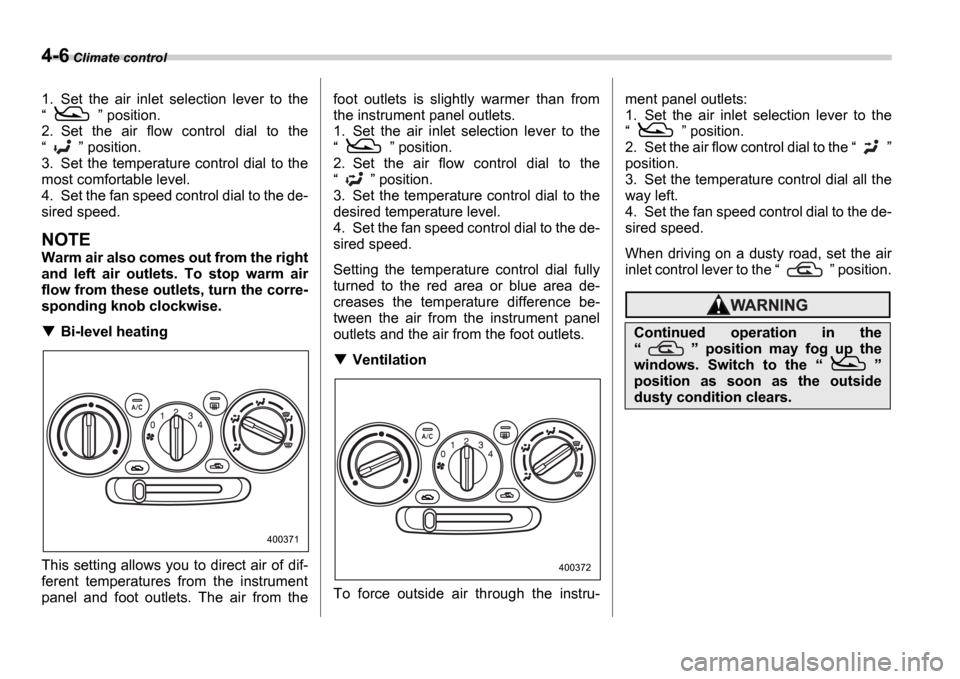
1. Set the air inlet selection lever to the
position.
2. Set the air flow control dial to the
position.
3. Set the temperature control dial to the
most comfortable level.
4. Set the fan speed control dial to the de-
sired speed.
NOTE
Warm air also comes out from the right
and left air outlets. To stop warm air
flow from these outlets, turn the corre-
sponding knob clockwise.
Bi-level heating
This setting allows you to direct air of dif-
ferent temperatures from the instrument
panel and foot outlets. The air from the foot outlets is slightly warmer than from
the instrument panel outlets.
1. Set the air inlet selection lever to the
position.
2. Set the air flow control dial to the
position.
3. Set the temperature control dial to the
desired temperature level.
4. Set the fan speed control dial to the de-
sired speed.
Setting the temperature control dial fully
turned to the red area or blue area de-
creases the temperature difference be-
tween the air from the instrument panel
outlets and the air from the foot outlets.
Ventilation
To force outside air through the instru- ment panel outlets:
1. Set the air inlet selection lever to the
position.
2. Set the air flow control dial to the
position.
3. Set the temperature control dial all the
way left.
4. Set the fan speed control dial to the de-
sired speed.
When driving on a dusty road, set the air
inlet control lever to the position.
400371
400372
Continued operation in the
position may fog up the
windows. Switch to the
position as soon as the outside
dusty condition clears.
Page 158 of 365
Climate control 4-9
CONTINUED
AUTO position and the air flow control
dial in the
, , or po-
sition, the fan does not operate during
engine warmup until the engine cool-
ant temperature exceeds approx. 122 F
(50 C).
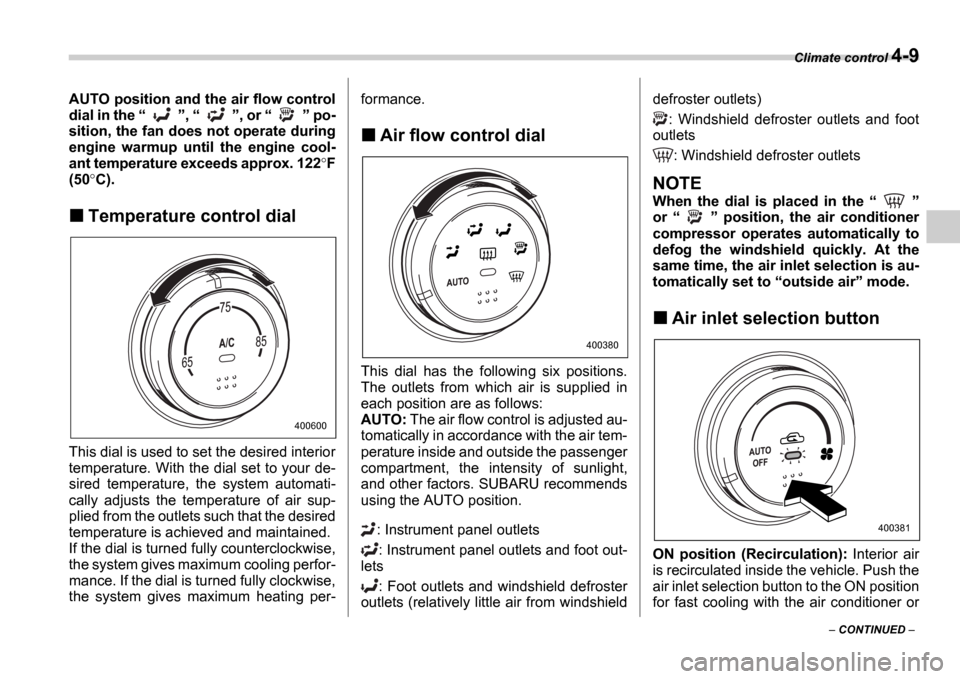
Temperature control dial
This dial is used to set the desired interior
temperature. With the dial set to your de-
sired temperature, the system automati-
cally adjusts the temperature of air sup-
plied from the outlets such that the desired
temperature is achieved and maintained.
If the dial is turned fully counterclockwise,
the system gives maximum cooling perfor-
mance. If the dial is turned fully clockwise,
the system gives maximum heating per- formance.
Air flow control dial
This dial has the following six positions.
The outlets from which air is supplied in
each position are as follows:
AUTO:
The air flow control is adjusted au-
tomatically in accordance with the air tem-
perature inside and outside the passenger
compartment, the intensity of sunlight,
and other factors. SUBARU recommends
using the AUTO position.
: Instrument panel outlets: Instrument panel outlets and foot out-
lets
: Foot outlets and windshield defroster
outlets (relatively little air from windshield defroster outlets)
: Windshield defroster outlets and foot
outlets
: Windshield defroster outlets
NOTE
When the dial is placed in the
or position, the air conditioner
compressor operates automatically to
defog the windshield quickly. At the
same time, the air inlet selection is au-
tomatically set to outside air mode.
Air inlet selection button
ON position (Recirculation): Interior air
is recirculated inside the vehicle. Push the
air inlet selection button to the ON position
for fast cooling with the air conditioner or
400600
400380
400381
Page 168 of 365
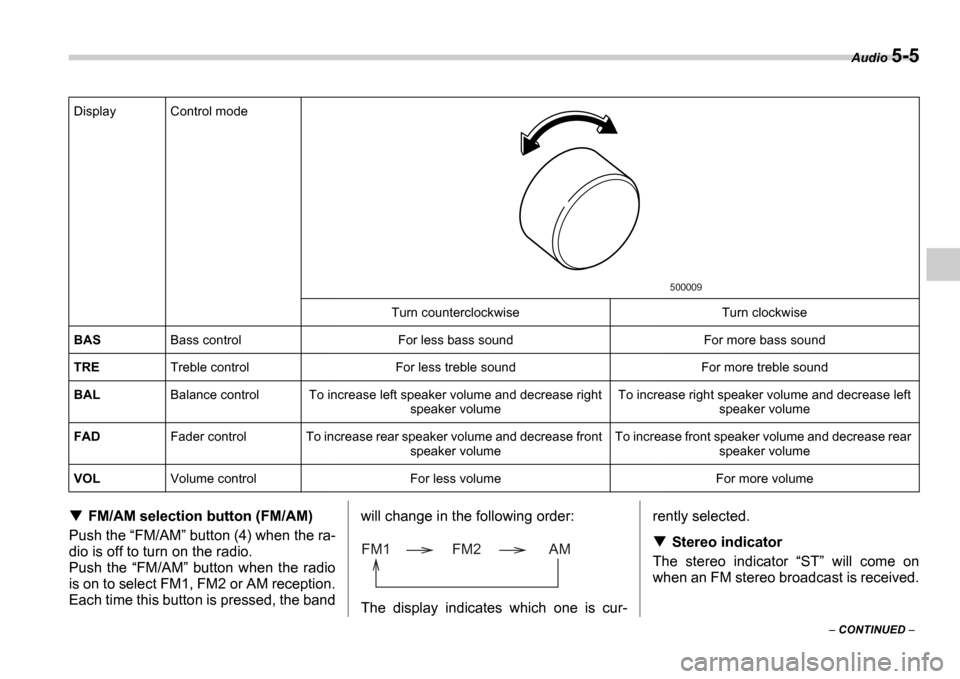
Audio 5-5
CONTINUED
FM/AM selection button (FM/AM)
Push the FM/AM button (4) when the ra-
dio is off to turn on the radio.
Push the FM/AM button when the radio
is on to select FM1, FM2 or AM reception.
Each time this button is pressed, the band will change in the following order:
The display indicates which one is cur-rently selected.
Stereo indicator
The stereo indicator ST will come on
when an FM stereo broadcast is received.
Display Control mode
Turn counterclockwise Turn clockwise
BAS Bass control For less bass sound For more bass sound
TRE Treble control For less treble sound For more treble sound
BAL Balance control To increase left speaker volume and decrease right
speaker volume To increase right speaker volume and decrease left
speaker volume
FAD Fader control To increase rear speaker volume and de crease front
speaker volume To increase front speaker volume and decrease rear
speaker volume
VOL Volume control For less volume For more volume
500009
FM1 FM2 AM
Page 175 of 365
5-12 Audio
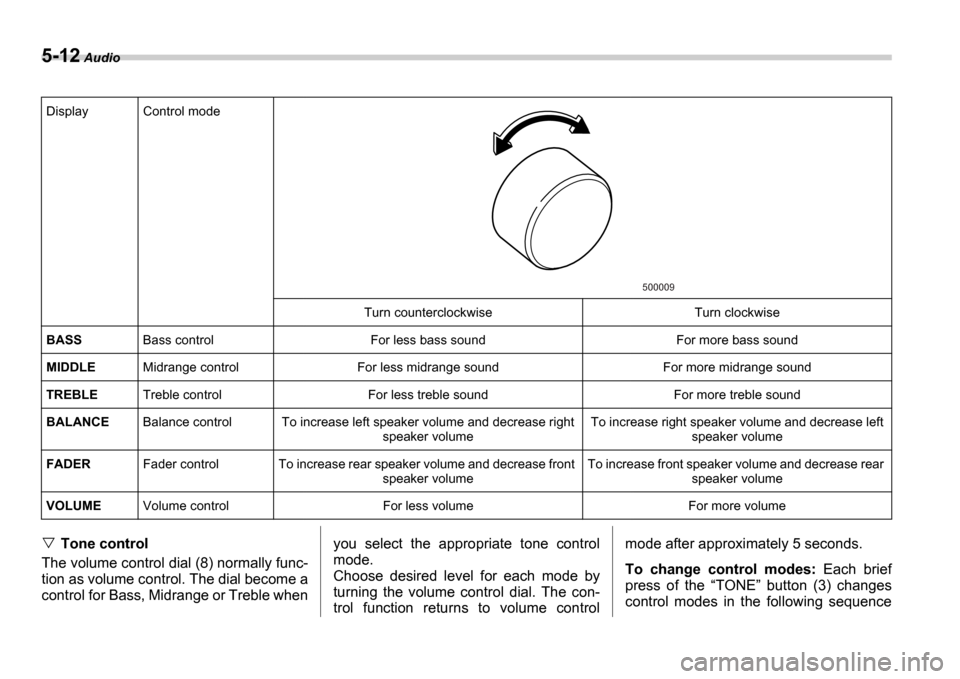
Tone control
The volume control dial (8) normally func-
tion as volume control. The dial become a
control for Bass, Midrange or Treble when you select the appropriate tone control
mode.
Choose desired level for each mode by
turning the volume control dial. The con-
trol function returns to volume controlmode after approximately 5 seconds.
To change control modes:
Each brief
press of the TONE button (3) changes
control modes in the following sequence
Display Control mode
Turn counterclockwise Turn clockwise
BASS Bass control For less bass sound For more bass sound
MIDDLE Midrange control For less midrange sound For more mid range sound
TREBLE Treble control For less treble sound For more treble sound
BALANCE Balance control To increase left speaker volume and decrease right
speaker volume To increase right speaker volume and decrease left
speaker volume
FADER Fader control To increase rear speaker volume and de crease front
speaker volume To increase front speaker volume and decrease rear
speaker volume
VOLUME Volume control For less volume For more volume
500009
Page 176 of 365
Audio 5-13
CONTINUED
starting from bass control mode. (When
the radio is first turned on, the control
mode is in the volume control.)
Fader and balance control
The volume control dial (8) normally func-
tion as volume control. The dial become
the controls for Fader or Balance when
you select the appropriate fader and bal-
ance control mode.
Choose desired setting for each mode by
turning the volume control dial. The con-
trol function returns to volume control
mode after approximately 5 seconds.
To change control modes: Each brief
press of the BAL button (4) changes
control modes in the following sequence
starting from fader control mode. (When
the radio is turned on, the control mode is
in the volume control.)
Display illumination dimness can-
cellation (BRIGHT)
The brightness of the radio display dims
when the light switch is in the or
positions. If this makes the display
difficult to read, press the volume dial for
more than 1.5 seconds to return the dis-
play to original brightness.
Subsequently pressing the volume dial
again for more than 1.5 seconds or if you
can safely do so, turning the light switch to
the OFF position and back to the
or position makes the radio display
dim again.
FM/AM selection button
Push the FM (1) or AM (2) button when
the radio is off to turn on the radio.
Push the FM or AM button when the ra-
dio is on to select FM1, FM2 or AM recep-
tion.
Stereo indicator
The stereo indicator ST will come on
when an FM stereo broadcast is received.
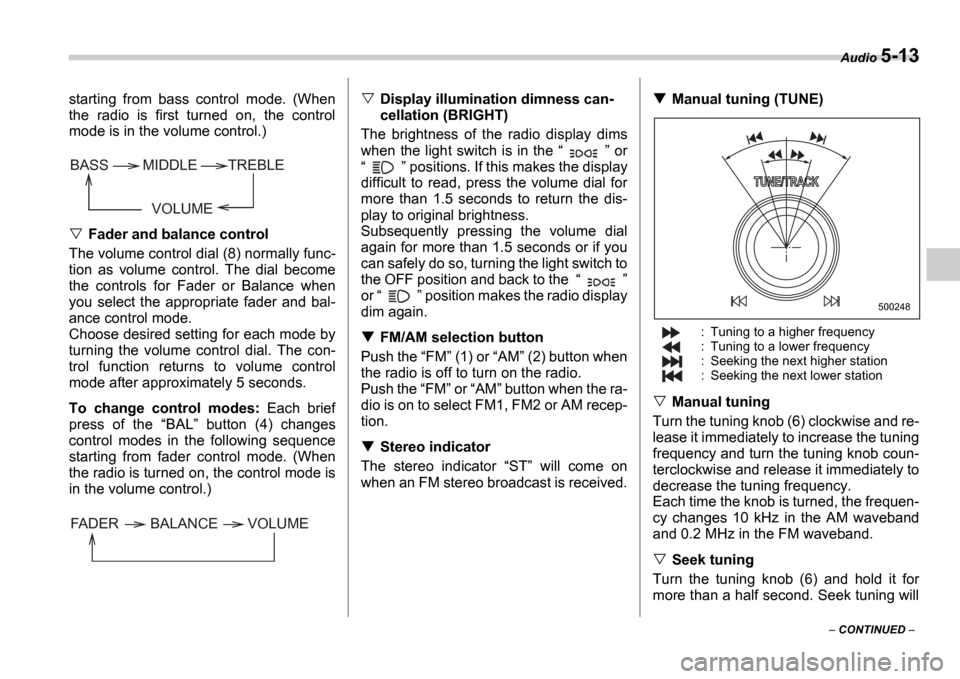
Manual tuning (TUNE)
: Tuning to a higher frequency
: Tuning to a lower frequency
: Seeking the next higher station
: Seeking the next lower station
Manual tuning
Turn the tuning knob (6) clockwise and re-
lease it immediately to increase the tuning
frequency and turn the tuning knob coun-
terclockwise and release it immediately to
decrease the tuning frequency.
Each time the knob is turned, the frequen-
cy changes 10 kHz in the AM waveband
and 0.2 MHz in the FM waveband.
Seek tuning
Turn the tuning knob (6) and hold it for
more than a half second. Seek tuning will
VOLUME
BASS TREBLE
MIDDLE
FADER BALANCE VOLUME
500248
Page 180 of 365

Audio 5-17
CONTINUED
Selecting a desired track (TRACK)
: Skipping forward
: Skipping backward
: Fast-forwarding
: Fast-reversing
Skipping forward
Turn the TRACK knob (16) clockwise
and release it immediately to skip to the
beginning of the next track. Each time the
knob is turned and released, the indicated
track number will increase.
Skipping backward
Turn the TRACK knob (16) counter-
clockwise and release it immediately to
skip to the beginning of the current track.
If you continue to turn and release the
knob, the indicated track number will de- crease.
Fast-forwarding
Turn the TRACK knob (16) clockwise
and hold it continuously to fast-forward the
disc.
Release the knob to stop fast-forwarding.
Fast-reversing
Turn the TRACK knob (16) counter-
clockwise and hold it continuously to fast-
reverse the disc.
Release the knob to stop fast-reversing.
Repeat playback
Press the RPT button (11) while a song
is playing to play the song repeatedly. The RPT indicator will come on and the song
will be played continuously. To cancel the
repeat mode, press the button again.
Then the RPT indicator goes out, and
normal playback mode is restored.
Random playback
Press the RDM button (12) while a disc
is being played back to play all songs on
the disc in a random order. The RDM in-
dicator will come on and all songs on the
disc will be played in a random order.
To cancel the random mode, press the
button again. Then the RDM indicator
goes out, and normal playback mode is
restored.
Scan
When the SCAN button (13) is pressed
while the disc is being played back, you
can hear the first 10 seconds of each track
to search for the desired program. To con-
tinue listening to the program, press the SCAN button again. After all tracks on
the disc have been scanned, normal play-
back mode is restored.
How to unload CDs from the player
Ejecting a CD from the player
Of the discs loaded, you can select and re-
move only one disc.
1. Press the Disc select button (17) of
the disc whose DISC indicator is ON.
2. Press the Eject button (15). Then the
DISC indicator associated with the disc
you have selected will blink, and the disc
will be ejected.
To remove more discs in succession, re-
peat Steps 1 and 2.
Ejecting all discs from the player
(All disc ejection mode)
1. If you continue to press the Eject but-
ton (15), the player will produce beep
sound and will enter the all disc ejection
mode.
2. Remove the disc that has been eject-
ed. The other discs loaded will then be
ejected one after another. If you do not re-
500248