2006 SUBARU IMPREZA automatic transmission fluid
[x] Cancel search: automatic transmission fluidPage 130 of 365

Instruments and controls 3-17
CONTINUED
is at the proper level but the light remains
on, contact your nearest SUBARU dealer
immediately.
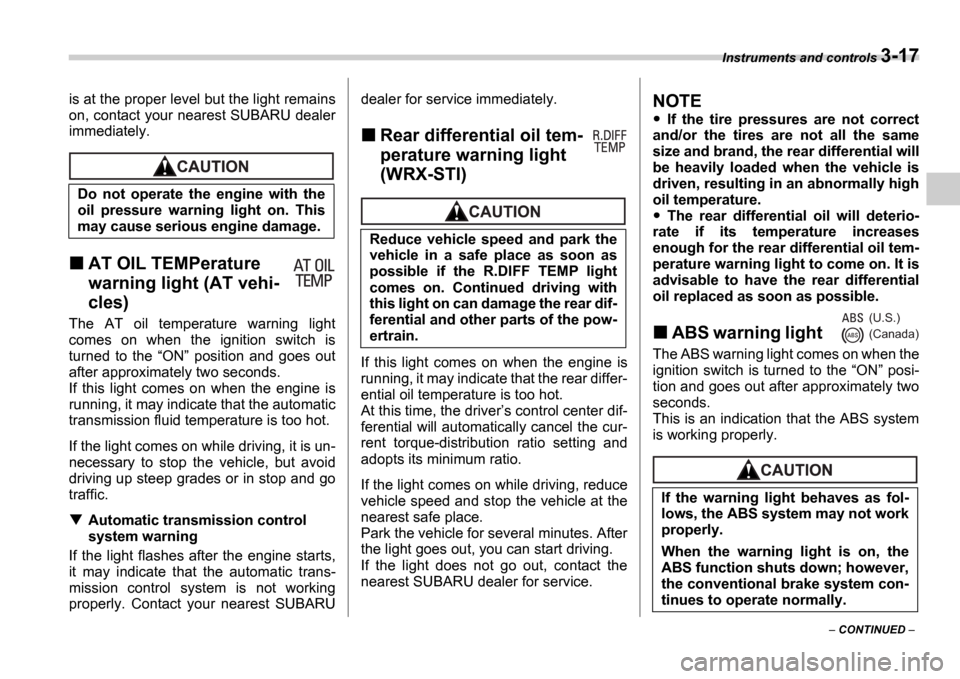
AT OIL TEMPerature
warning light (AT vehi-
cles)
The AT oil temperature warning light
comes on when the ignition switch is
turned to the
ON position and goes out
after approximately two seconds.
If this light comes on when the engine is
running, it may indicate that the automatic
transmission fluid temperature is too hot.
If the light comes on while driving, it is un-
necessary to stop the vehicle, but avoid
driving up steep grades or in stop and go
traffic.
Automatic transmission control
system warning
If the light flashes after the engine starts,
it may indicate that the automatic trans-
mission control system is not working
properly. Contact your nearest SUBARU dealer for service immediately.
Rear differential oil tem-
perature warning light
(WRX-STI)
If this light comes on when the engine is
running, it may indicate that the rear differ-
ential oil temperature is too hot.
At this time, the driver
s control center dif-
ferential will automatically cancel the cur-
rent torque-distribution ratio setting and
adopts its minimum ratio.
If the light comes on while driving, reduce
vehicle speed and stop the vehicle at the
nearest safe place.
Park the vehicle for several minutes. After
the light goes out, you can start driving.
If the light does not go out, contact the
nearest SUBARU dealer for service.
NOTE
If the tire pressures are not correct
and/or the tires are not all the same
size and brand, the rear differential will
be heavily loaded when the vehicle is
driven, resulting in an abnormally high
oil temperature.
The rear differential oil will deterio-
rate if its temperature increases
enough for the rear differential oil tem-
perature warning light to come on. It is
advisable to have the rear differential
oil replaced as soon as possible.
ABS warning light
The ABS warning light comes on when the
ignition switch is turned to the ON posi-
tion and goes out after approximately two
seconds.
This is an indication that the ABS system
is working properly.
Do not operate the engine with the
oil pressure warning light on. This
may cause serious engine damage.
Reduce vehicle speed and park the
vehicle in a safe place as soon as
possible if the R.DIFF TEMP light
comes on. Continued driving with
this light on can damage the rear dif-
ferential and other parts of the pow-
ertrain.
If the warning light behaves as fol-
lows, the ABS system may not work
properly.
When the warning light is on, the
ABS function shuts down; however,
the conventional brake system con-
tinues to operate normally.
(U.S.)
(Canada)
Page 213 of 365

7-16 Starting and operating
Automatic transmission
The automatic transmission is electroni-
cally controlled with 4-forward speeds and
1-reverse speed.
NOTE
When the engine coolant tempera-
ture is still low, your vehicle s automat-
ic transmission will up-shift at higher
engine speeds than when the coolant
temperature is sufficiently high in or-
der to shorten the warm-up time and
improve driveability. The gearshift tim-
ing will automatically shift to the nor-
mal timing after the engine has warmed
up.
Immediately after ATF (automatic
transmission fluid) is replaced, you
may feel that the automatic transmis-
sion operation is somewhat unusual.
This results from invalidation of data
the on-board computer has collected
and stored in memory to allow the
transmission to shift at the most ap-
propriate times for the current condi-
tion of your vehicle. Optimized shifting
will be restored as the vehicle contin-
ues to be driven for a while.
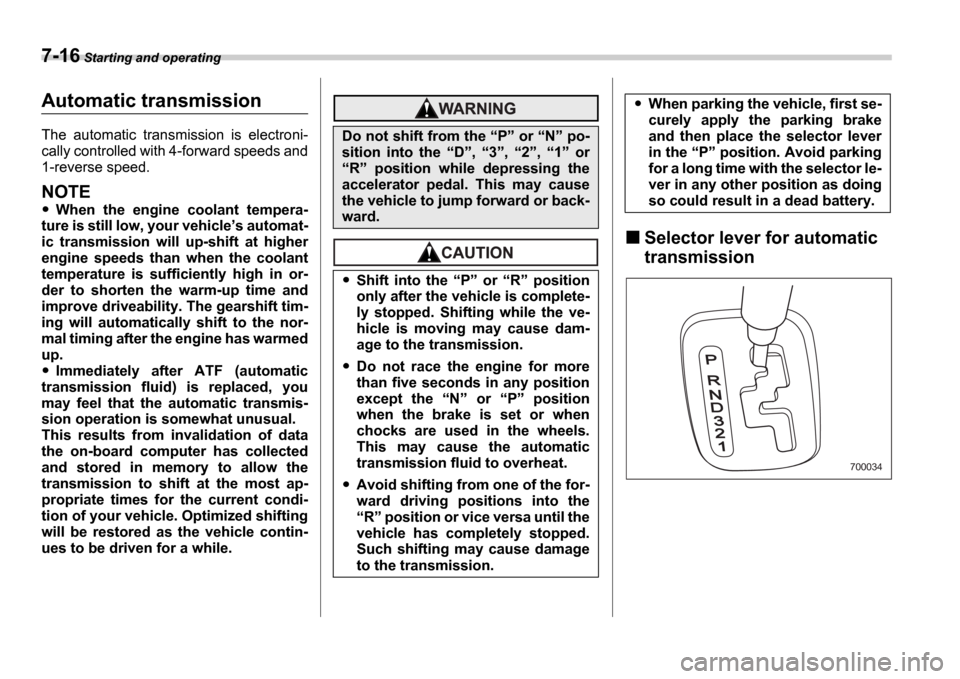
Selector lever for automatic
transmission
Do not shift from the P or N po-
sition into the D , 3 , 2 , 1 or
R position while depressing the
accelerator pedal. This may cause
the vehicle to jump forward or back-
ward.
Shift into the P or R position
only after the vehicle is complete-
ly stopped. Shifting while the ve-
hicle is moving may cause dam-
age to the transmission.
Do not race the engine for more
than five seconds in any position
except the N or P position
when the brake is set or when
chocks are used in the wheels.
This may cause the automatic
transmission fluid to overheat.
Avoid shifting from one of the for-
ward driving positions into the R position or vice versa until the
vehicle has completely stopped.
Such shifting may cause damage
to the transmission.
When parking the vehicle, first se-
curely apply the parking brake
and then place the selector lever
in the P position. Avoid parking
for a long time with the selector le-
ver in any other position as doing
so could result in a dead battery.
700034
Page 215 of 365

7-18 Starting and operating
the original gear position.
While climbing a grade
When driving up hill, undesired upshift to
4th gear is prevented from taking place
when the accelerator pedal is released.
This minimizes the chances of subse-
quent downshifting to a lower gear when
accelerating again. This prevents repeat-
ed upshifting and downshifting resulting in
a smoother operation of the vehicle.
NOTE
The transmission may downshift to
2nd or 1st gear, depending on the way
the accelerator pedal is pressed to ac-
celerate the vehicle again.
While going down a hill
When descending a steep hill, depressing
the brake pedal will cause the transmis-
sion to downshift to 3rd gear, thus apply-
ing engine braking. Reacceleration for a
short time will cause the transmission to
upshift normally.
NOTE
In some cases, depressing the brake
pedal on a downhill grade does not re-
sult in an automatic downshift to 3rd
gear. This can happen when the auto-
matic transmission fluid temperature is
very low, for example, during driving shortly after the vehicle has been
parked for an extended period of time.
When the ATF temperature has risen to
a certain level, automatic downshift
normally takes place. In the meantime,
downshift manually for engine braking
as required.
Also, downshifting when braking
downhill will not occur at speeds
above approximately 48 mph (78 km/h).
3 (Third)
This position is for using engine braking
when going down a hill or for climbing a
grade.
The transmission automatically shifts into
a suitable gear from 1st to 3rd according
to the vehicle speed and the acceleration
you require.
When more acceleration is required in this
position, press the accelerator pedal fully
to the floor and hold that position. The
transmission will automatically downshift
to 2nd or 1st gear. When you release the
pedal, the transmission will return to the
original gear position.
2 (Second)
This position is for using engine braking
when going down a hill or for climbing a
steep grade.
In this position, the transmission holds in the 2nd gear.
Use this position when starting off from a
standstill on slippery road surfaces such
as mud or snow. It will ensure greater trac-
tion.
1 (First)
This position is for driving up or down very
steep grades, or driving through mud or
sand, or on slippery surfaces. In this posi-
tion, the transmission holds in the 1st
gear.
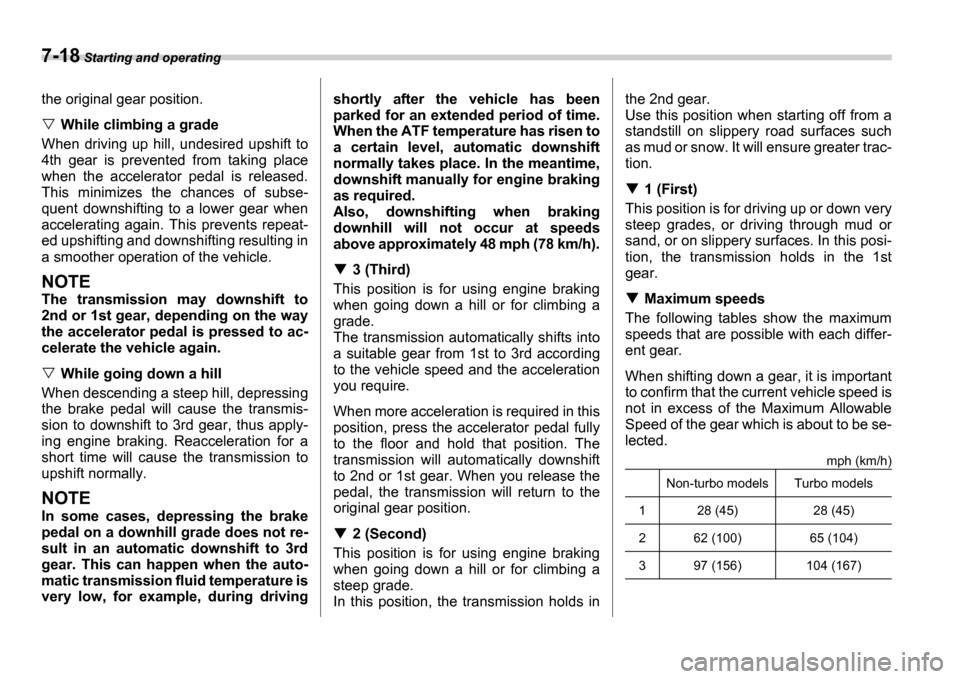
Maximum speeds
The following tables show the maximum
speeds that are possible with each differ-
ent gear.
When shifting down a gear, it is important
to confirm that the current vehicle speed is
not in excess of the Maximum Allowable
Speed of the gear which is about to be se-
lected.
mph (km/h)
Non-turbo models Turbo models
1 28 (45) 28 (45)
2 62 (100) 65 (104)
3 97 (156) 104 (167)
Page 254 of 365

Driving tips 8-27
heating of your vehicle s brakes. Do not
make sudden downshifts.
When driving uphill in hot weather, the
air conditioner may turn off automatically
to protect the engine from overheating.
When driving uphill in hot weather, pay
attention to the water temperature gauge
pointer (for all vehicles) and AT OIL TEMP
warning light (for AT vehicles) since the
engine and transmission are relatively
prone to overheating under these condi-
tions. If the water temperature gauge
pointer approaches the OVERHEAT zone
or the AT OIL TEMP warning light illumi-
nates, immediately switch off the air con-
ditioner and stop the vehicle at the nearest
safe place. Refer to the Engine overheat-
ing section in chapter 9, and Warning
and indicator lights section in chapter 3.
If your vehicle has an automatic trans-
mission, avoid using the accelerator pedal
to stay stationary on an uphill slope in-
stead of using the parking brake or foot
brake. That may cause the transmission
fluid to overheat.
If your vehicle has an automatic trans-
mission, place the selector lever as fol-
lows:
Uphill slopes: D position
Downhill slopes: A low-speed gear posi-
tion to use engine braking
Parking on a grade
Always block the wheels under both vehi-
cle and trailer when parking. Apply the
parking brake firmly. You should not park
on a hill or slope. But if parking on a hill or
slope cannot be avoided, you should take
the following steps:
1. Apply the brakes and hold the pedal
down.
2. Have someone place wheel blocks un-
der both the vehicle and trailer wheels.
3. When the wheel blocks are in place, re-
lease the regular brakes slowly until the
blocks absorb the load.
4. Apply the regular brakes and then ap-
ply the parking brake; slowly release the
regular brakes.
5. Shift into 1st or reverse gear (manual
transmission) or P (automatic transmis-
sion) and shut off the engine.
Page 280 of 365

11
Maintenance and service
Maintenance schedule ....................................... 11-3
Maintenance precautions ........................... ....... 11-3
Before checking or servicing in the engine compartment ....................................... ................. 11-4
When you do checking or servicing in the engine
compartment while the engine is running ......... 11 -4
Engine hood ....................................... ................ 11-4
Engine compartment overview ....................... .. 11-6
Non-turbo models .................................. ................. 11-6
Turbo models ...................................... .................... 11-7
Engine oil ........................................ .................... 11-8
Checking the oil level ............................ ................. 11-8
Changing the oil and oil filter ................... ............. 11-8
Recommended grade and viscosity ................... .. 11-10
Recommended grade and viscosity under severe driving conditions ......................... ........... 11-11
Synthetic oil ..................................... ....................... 11-11
Cooling system .................................... .............. 11-12
Cooling fan, hose and connections ................. ..... 11-12
Engine coolant .................................... .................... 11-12
Air cleaner element ............................... ............. 11-15
Replacing the air cleaner element ................. ........ 11-15
Spark plugs ....................................... .................. 11-17
Recommended spark plugs ........................... ........ 11-17
Drive belts ....................................... .................... 11-18
Manual transmission oil ........................... ......... 11-18
Checking the oil level ............................ ................. 11-18
Recommended grade and viscosity ................... .. 11-19Automatic transmission fluid ......................
...... 11-20
Checking the fluid level .......................... ................ 11-20
Recommended fluid ................................. .............. 11-21
Front differential gear oil (AT vehicles) ......... ... 11-21
Checking the oil level ............................ ................. 11-21
Recommended grade and viscosity ................... .. 11-22
Rear differential gear oil ........................ ............ 11-22
Checking the gear oil level ....................... ............. 11-22
Recommended grade and viscosity ................... .. 11-23
Power steering fluid .............................. ............. 11-24
Checking the fluid level .......................... ................ 11-24
Recommended fluid ................................. .............. 11-24
Brake fluid ....................................... .................... 11-25
Checking the fluid level .......................... ................ 11-25
Recommended brake fluid ........................... .......... 11-25
Clutch fluid (MT vehicles) ........................ .......... 11-26
Checking the fluid level .......................... ................ 11-26
Recommended clutch fluid .......................... .......... 11-26
Brake booster ..................................... ................ 11-27
Brake pedal ....................................... .................. 11-27
Checking the brake pedal free play ................ ...... 11-27
Checking the brake pedal reserve distance ......... 11-27
Clutch pedal (MT vehicles) ........................ ........ 11-28
Checking the clutch function ...................... .......... 11-28
Checking the clutch pedal free play ............... ...... 11-28
Replacement of brake pad and lining ............... 11-28
Breaking-in of new brake pads and linings ......... . 11-29
Parking brake stroke .............................. ............ 11-29
Page 285 of 365

11-6 Maintenance and service
Engine compartment overview
Non-turbo models
1 2 3 4 5 6
7
8
9
10
11
13 12
B00464
1) Air cleaner element (page 11-15)
2) Manual transmission oil level gauge
(MT) (page 11-18) or Differential gear
oil level gauge (AT) (page 11-21)
3) Clutch fluid reservoir (page 11-26)
4) Automatic transmission fluid level gauge (page 11-20)
5) Brake fluid reservoir (page 11-25)
6) Fuse box (page 11-41)
7) Battery (page 11-40)
8) Windshield washer tank (page 11-36)
9) Engine coolant reservoir (page 11-
12)
10) Engine oil level gauge (page 11-8)
11) Engine oil filler cap (page 11-8)
12) Radiator cap (page 11-12)
13) Power steering fluid reservoir (page
11-24)
Page 286 of 365

Maintenance and service 11-7
Turbo models
1 2 3 4 5 6
7
8
9
10
11
12
13
B00466
1) Air cleaner element (page 11-15)
2) Manual transmission oil level gauge
(MT) (page 11-18) or Differential gear
oil level gauge (AT) (page 11-21)
3) Automatic transmission fluid level gauge (page 11-20)
4) Clutch fluid reservoir (page 11-26)
5) Brake fluid reservoir (page 11-25)
6) Fuse box (page 11-41)
7) Battery (page 11-40)
8) Windshield washer tank (page 11-36)
9) Engine oil filler cap (page 11-8)
10) Engine coolant reservoir (page 11- 12)
11) Engine oil level gauge (page 11-8)
12) Radiator cap (page 11-12)
13) Power steering fluid reservoir (page
11-24)
Page 299 of 365

11-20 Maintenance and service
Automatic transmission fluid
Checking the fluid level
The automatic transmission fluid expands
largely as its temperature rises; the fluid
level differs according to fluid tempera-
ture. Therefore, there are two different
scales for checking the level of hot fluid
and cold fluid on the dipstick.
Though the fluid level can be checked
without warming up the fluid on theCOLD range, we recommend checking
the fluid level when the fluid is at operating
temperature.
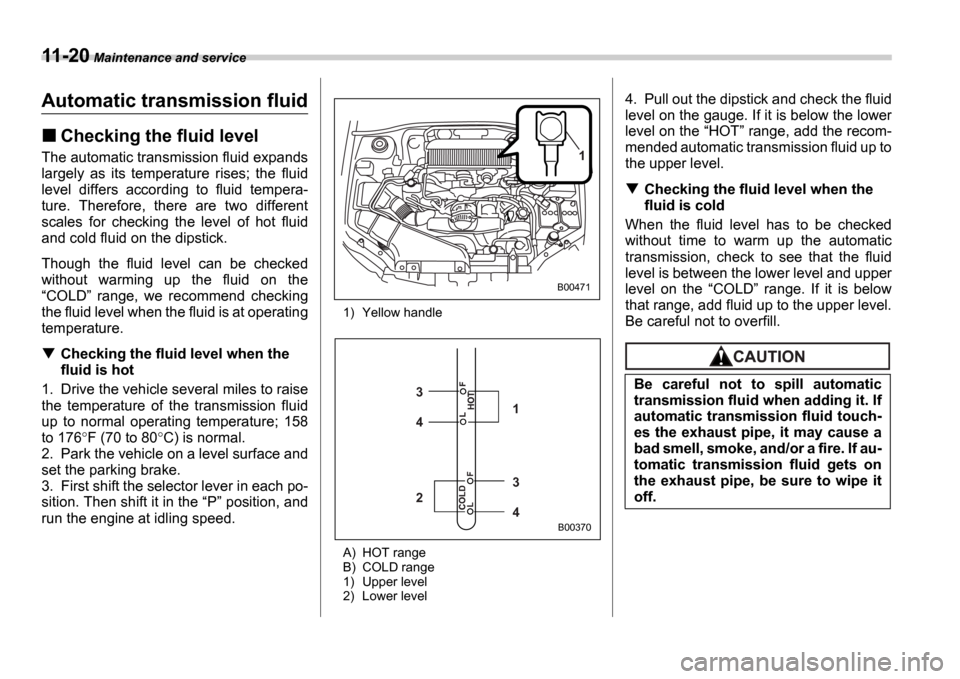
Checking the fluid level when the
fluid is hot
1. Drive the vehicle several miles to raise
the temperature of the transmission fluid
up to normal operating temperature; 158
to 176 F (70 to 80 C) is normal.
2. Park the vehicle on a level surface and
set the parking brake.
3. First shift the selector lever in each po-
sition. Then shift it in the P position, and
run the engine at idling speed.
1) Yellow handle
A) HOT range
B) COLD range
1) Upper level
2) Lower level
4. Pull out the dipstick and check the fluid
level on the gauge. If it is below the lower
level on the HOT range, add the recom-
mended automatic transmission fluid up to
the upper level.
Checking the fluid level when the
fluid is cold
When the fluid level has to be checked
without time to warm up the automatic
transmission, check to see that the fluid
level is between the lower level and upper
level on the COLD range. If it is below
that range, add fluid up to the upper level.
Be careful not to overfill.
1
B00471
3 4
34 2
1
B00370
Be careful not to spill automatic
transmission fluid when adding it. If
automatic transmission fluid touch-
es the exhaust pipe, it may cause a
bad smell, smoke, and/or a fire. If au-
tomatic transmission fluid gets on
the exhaust pipe, be sure to wipe it
off.