Page 189 of 365
6-4 Interior equipment
Storage compartments
Glove box
1) Lock
2) Unlock
To open the glove box, pull the handle. To close it, push the lid firmly upward.
To lock the glove box, insert the key and
turn it clockwise.
Center console
To open the lid, pull up the lock release.
Coin tray
To open the coin tray, pull the upper edge
of the lid.
Always keep the storage compart-
ment closed while driving to re-
duce the risk of injury in the event
of sudden stops or an accident.
Do not store spray cans, contain-
ers with flammable or corrosive
liquids or any other dangerous
items in the storage compartment.
1
2
600471
600220
600088
Page 201 of 365

7-4 Starting and operating
Fuel filler lid and cap
Refueling0
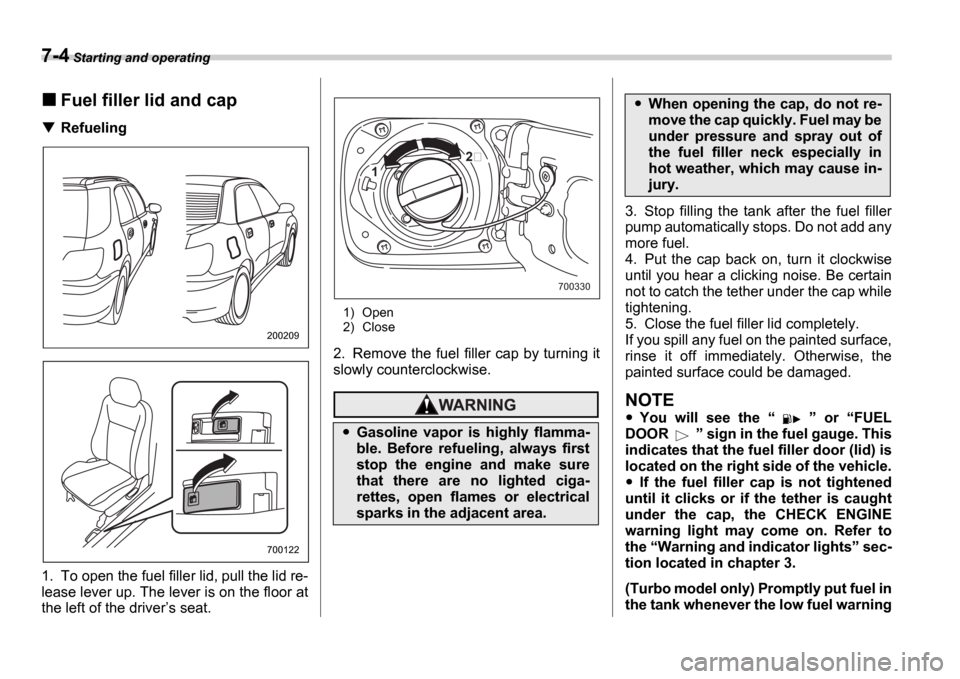
1. To open the fuel filler lid, pull the lid re-
lease lever up. The lever is on the floor at
the left of the driver s seat.
1) Open
2) Close
2. Remove the fuel filler cap by turning it
slowly counterclockwise.
3. Stop filling the tank after the fuel filler
pump automatically stops. Do not add any
more fuel.
4. Put the cap back on, turn it clockwise
until you hear a clicking noise. Be certain
not to catch the tether under the cap while
tightening.
5. Close the fuel filler lid completely.
If you spill any fuel on the painted surface,
rinse it off immediately. Otherwise, the
painted surface could be damaged.
NOTE
You will see the or FUEL
DOOR sign in the fuel gauge. This
indicates that the fuel filler door (lid) is
located on the right side of the vehicle.
If the fuel filler cap is not tightened
until it clicks or if the tether is caught
under the cap, the CHECK ENGINE
warning light may come on. Refer to
the Warning and indicator lights sec-
tion located in chapter 3.
(Turbo model only) Promptly put fuel in
the tank whenever the low fuel warning
200209
700122
Gasoline vapor is highly flamma-
ble. Before refueling, always first
stop the engine and make sure
that there are no lighted ciga-
rettes, open flames or electrical
sparks in the adjacent area.
1
700330
When opening the cap, do not re-
move the cap quickly. Fuel may be
under pressure and spray out of
the fuel filler neck especially in
hot weather, which may cause in-
jury.
Page 260 of 365
In case of emergency 9-5
CONTINUED
Wagon
1) Jack
2) Jack handle
3) Spare tire
5. Take out the spare tire, jack, and wheel
nut wrench.
The spare tire is stored under the floor of
the trunk or cargo area.
To remove the spare tire, proceed as fol-
lows: Sedan:
Remove the floor cover from the
trunk. Remove the storage compartment
(if so equipped).Turn the attaching bolt
counterclockwise, then take the spare tire
out.
Wagon: Open the lid.
Remove the storage compartment (if so
equipped). Turn the attaching bolt coun-
terclockwise, then take spare tire out.
If the spare tire provided in your vehicle is
a temporary spare tire, carefully read the
3
1
2
900268900047
900290
Page 261 of 365
9-6 In case of emergency
section Temporary spare tire in this
chapter and strictly follow the instructions.
The jack is stored on the left side of the
trunk or cargo area.
To take out the jack:
Remove the cover, turn the jackscrew counterclockwise to loosen it, then re-
move the jack.
If the jackscrew is too tight to be loosened
by hand, loosen it using a screwdriver or
the jack handle.
The jack handle is stored under the spare
tire cover.
NOTE
Make sure the jack is well lubricated
before using it.
6. Loosen the wheel nuts using the wheel
nut wrench but do not remove the nuts.
Jack-up points (Vehicle with side sill
skirt)
900049
900050
900269
900053
Page 262 of 365
In case of emergency 9-7
CONTINUED
Jack-up points (Others)
7. Place the jack under the side sill at the
front or rear jack-up point closest to the flat
tire.
Turn the jackscrew by hand until the jack
head engages firmly into the jack-up point. 8. Insert the jack handle into the jack-
screw, and turn the handle until the tire
clears the ground. Do not raise the vehicle
higher than necessary.
9. Remove the wheel nuts and the flat
tire.
10.Before putting the spare tire on, clean
the mounting surface of the wheel and
hub with a cloth.
11.Put on the spare tire. Replace the
wheel nuts. Tighten them by hand.
12.Turn the jack handle counterclockwise
to lower the vehicle.
900054900055
900009
Do not use oil or grease on the
wheel studs or nuts when the spare
tire is installed. This could cause the
nuts to become loose and lead to an
accident.
900073
Page 263 of 365

9-8 In case of emergency
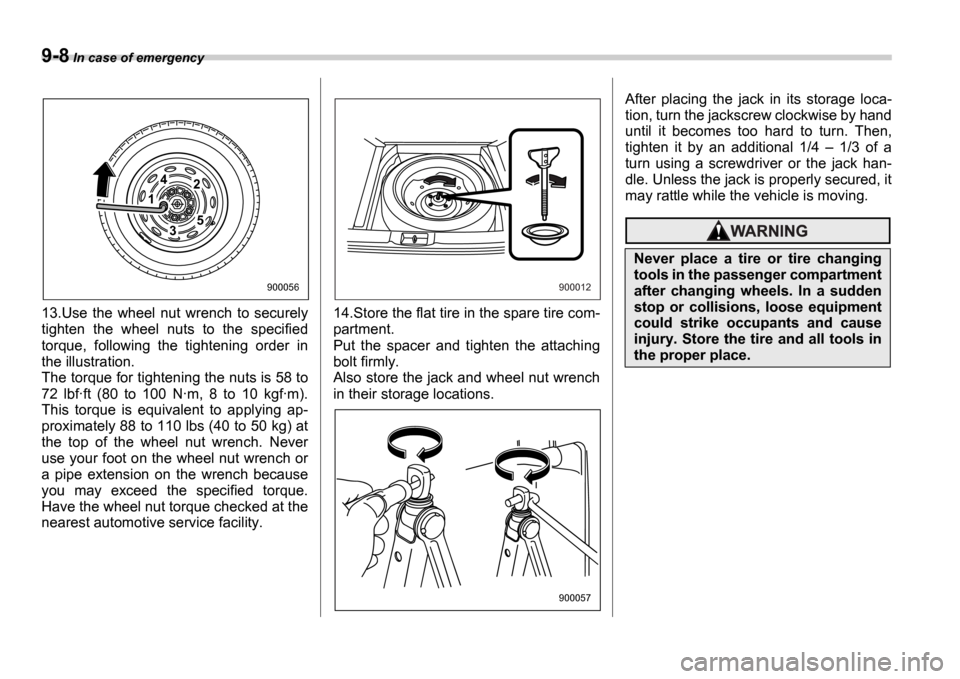
13.Use the wheel nut wrench to securely
tighten the wheel nuts to the specified
torque, following the tightening order in
the illustration.
The torque for tightening the nuts is 58 to
72 lbf ∑ft (80 to 100 N ∑m, 8 to 10 kgf ∑m).
This torque is equivalent to applying ap-
proximately 88 to 110 lbs (40 to 50 kg) at
the top of the wheel nut wrench. Never
use your foot on the wheel nut wrench or
a pipe extension on the wrench because
you may exceed the specified torque.
Have the wheel nut torque checked at the
nearest automotive service facility. 14.Store the flat tire in the spare tire com-
partment.
Put the spacer and tighten the attaching
bolt firmly.
Also store the jack and wheel nut wrench
in their storage locations.After placing the jack in its storage loca-
tion, turn the jackscrew clockwise by hand
until it becomes too hard to turn. Then,
tighten it by an additional 1/4
1/3 of a
turn using a screwdriver or the jack han-
dle. Unless the jack is properly secured, it
may rattle while the vehicle is moving.
1
42
53
900056900012
900057
Never place a tire or tire changing
tools in the passenger compartment
after changing wheels. In a sudden
stop or collisions, loose equipment
could strike occupants and cause
injury. Store the tire and all tools in
the proper place.
Page 266 of 365

In case of emergency 9-11
CONTINUED
Engine overheating
If the engine overheats, safely pull off the
road and stop the vehicle in a safe place.
If steam is coming from the
engine compartment
Turn off the engine and get everyone
away from the vehicle until it cools down.
If no steam is coming from
the engine compartment
1. Keep the engine running at idling
speed.
2. Open the hood to ventilate the engine
compartment.
Confirm that the cooling fan is turning. If
the fan is not turning, immediately turn off the engine and contact your authorized
dealer for repair.
3. After the engine coolant temperature
has dropped, turn off the engine.
If the temperature gauge stays at the
overheated zone, turn off the engine.
4. After the engine has fully cooled down,
check the coolant level in the reserve
tank.
If the coolant level is below the
LOW
mark, add coolant up to the FULL mark.
5. If there is no coolant in the reserve
tank, add coolant to the reserve tank.
Then remove the radiator cap and fill the
radiator with coolant.
If you remove the radiator cap from a hot
radiator, first wrap a thick cloth around the
radiator cap, then turn the cap counter-
clockwise slowly without pressing down
until it stops. Release the pressure from
the radiator. After the pressure has been
fully released, remove the cap by pressing
down and turning it.
Towing
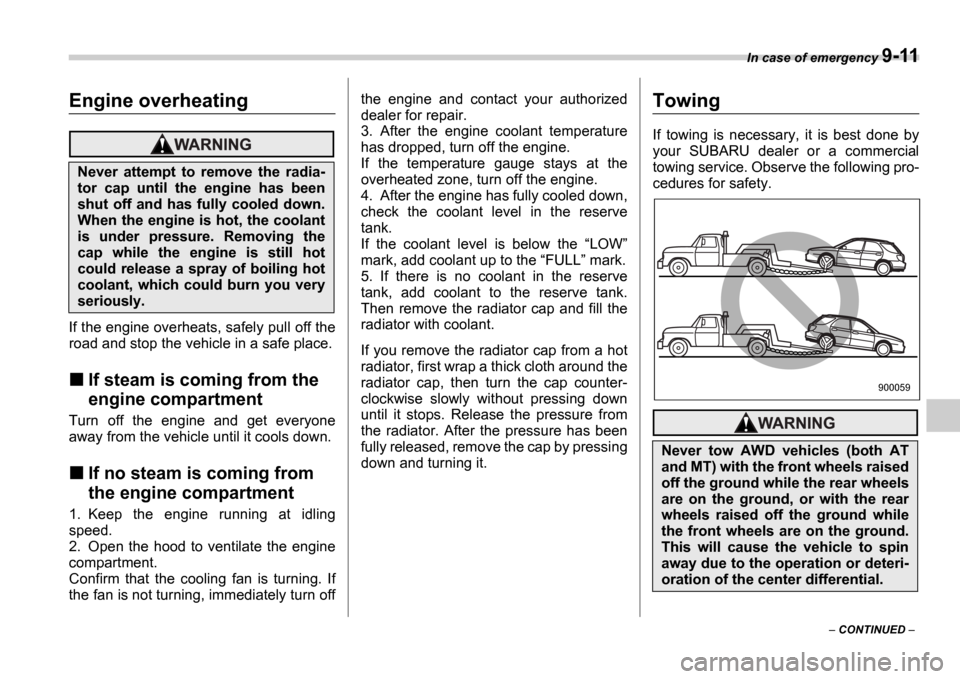
If towing is necessary, it is best done by
your SUBARU dealer or a commercial
towing service. Observe the following pro-
cedures for safety.
Never attempt to remove the radia-
tor cap until the engine has been
shut off and has fully cooled down.
When the engine is hot, the coolant
is under pressure. Removing the
cap while the engine is still hot
could release a spray of boiling hot
coolant, which could burn you very
seriously.
Never tow AWD vehicles (both AT
and MT) with the front wheels raised
off the ground while the rear wheels
are on the ground, or with the rear
wheels raised off the ground while
the front wheels are on the ground.
This will cause the vehicle to spin
away due to the operation or deteri-
oration of the center differential.
900059
Page 271 of 365
9-16 In case of emergency
4. Insert the wrench in the end of the mo-
tor shaft.
To lower the moonroof, turn the wrench
clockwise.
To close the moonroof, turn the wrench
counterclockwise.
Have your vehicle checked and repaired
by an authorized SUBARU dealer.
Maintenance tools
Your vehicle is equipped with the following
maintenance tools:
Screwdriver
Towing hook (eye bolt)
Wheel nut wrench
Hex-headed wrench (vehicles with
moonroof)
Jack and jack handle
The jack is stored on the left side of the
trunk (Sedan) or cargo area (Wagon).
To take out the jack, turn the jackscrew
counterclockwise to loosen it, then re-
900069
900070
900049