Page 121 of 218

Button Action
Radio, traffic information CD/CD changer/MP3 Navigation3
Press briefly
Changing to the previously stored radio station
Changing to the previously stored traffic information Interrupting the traffic report Changing to the previous title3 Press button for a
long period of time Interruption of the traffic report
Fast rewind4
Press briefly
changing the audio source5
Press briefly
Call up the main menu6
Press briefly
Interruption of the traffic report without function6
Turn upwards
Display of the stored/accessible stations
Scroll upwards
Interruption of the traffic report Changing to the previous title
without
function 6
Turn downwards
Display of the stored/accessible stations
Scroll downwards
Interruption of the traffic report Changing to the next titlea)
Only valid for the navigation system Columbus. Note
■ The loudspeakers in the vehicle are adjusted to the power output of the radio
and navigation system of 4x20°W. ■ The sound system equipment comprises loudspeakers that are adjusted to the
amplifier power output of 4x50°W + 6x25 W. ÐAUX-IN and MDI inputs
The AUX-IN input is located below the front armrest and is marked with .
The input MDI is located in the storage compartment on the front passenger side.
The AUX-IN and MDI inputs are used to connect external audio sources (e.g. iPod
or mp3 player) and to play back music from these devices via the factory-fitted ra-
dio or navigation system.
For a description of use, refer to the operating instructions for the relevant radio
or navigation system. Ð CD change
Fig. 109
The CD changer
The CD changer for the radio and navigation system is located in the left side
compartment of the boot.
Inserting the CD
› Touch the button C
» Fig. 109
and guide the CD (compact disc) into the CD-
case B
. The CD is automatically loaded onto the lowest free position in the CD
changer. The warning light in the corresponding button D
stops flashing.
£
119
Communication
Page 122 of 218
 into the CD case B
. The warning
lights")
Filling the CD changer with CDs
›
Press and hold the button C
» Fig. 109 for longer than 2
seconds and guide the
CDs one after the other (maximum 6 CDs) into the CD case B
. The warning
lights in the buttons D
stop flashing.
Inserting a CD at a specific position
› Press the button C
» Fig. 109. The warning lights in the buttons D
illuminate
the memory spaces that are already assigned and flash in the case of free mem-
ory spaces.
› Touch the desired button D
and guide the CD into the CD-case B
.
Ejecting a CD
› Press the button A
» Fig. 109 to eject a CD. For assigned memory spaces, the
warning lights now illuminate in the buttons D
.
› Press the corresponding button D
. The CD is ejected.
Ejecting all CDs
› Press and hold the button A
» Fig. 109 for more than 2
seconds to eject the
CDs. All CDs in the CD-changer are ejected consecutively. Note
■ Always guide the CD into the CD case B
» Fig. 109 with the printed side facing
upwards.
■ Never force the CD into the CD case as it is drawn in automatically.
■ After loading a CD into the CD changer, wait until the warning light of the corre-
sponding button D
is illuminated. Then the CD case B
is free to load the next
CD.
■ If a position is selected, on which a CD is already located, this CD is ejected. Re-
move the ejected CD and load the desired CD. Ð
120 Using the system
Page 123 of 218

Safety
Passive Safety
General information
ä
Introduction
This chapter contains information on the following subjects:
Safety equipment 121
Before setting off 121
What influences the driving safety? 122
In this section you will find important information, tips and notes on the subject
of passive safety in your vehicle. We have combined everything here which you
should be familiar with, for example, regarding seat belts, airbags, child seats and
safety of children. It is therefore important, in particular, to comply with the notes
and warnings in this section for your own interest and in the interest of those
travelling with you. WARNING
■ This chapter contains important information on how to use the vehicle for
the driver and his occupants. You will find further information on safety, which
concerns you and those travelling with you, in the following chapters of this
Owner's Manual.
■ The complete on-board literature should always be in the vehicle. This ap-
plies in particular, if you rent out or sell the vehicle. ÐSafety equipment
First read and observe the introductory information and safety warn-
ings on page 121.
The following list contains part of the safety equipment in your vehicle:
› three-point seat belts for all the seats;
› belt force limiter for front and outer rear seats;
ä ›
belt tensioners for front seats;
› seat belt height adjusters for front seats;
› Front airbag for the driver and the front seat passenger;
› side airbags;
› head airbags;
› anchoring points for child seat using the
ISOFIX system;
› anchoring points for child seat using the TOP TETHER system;
› head restraints adjustable for height;
› adjustable steering column.
The specified safety equipment works together, in order to optimally protect you
and those travelling with you in accident situations. The safety equipment does
not protect you or the people travelling with you, if you or your occupants adopt
an incorrect seated position or the equipment is not correctly adjusted or used. Ð Before setting off
First read and observe the introductory information and safety warn-
ings on page 121.
For your own safety and the safety of the people travelling with you, please pay
attention to the following points before setting off.
›
Ensure that the lighting and the turn signal system are functioning properly.
› Check the tyre inflation pressure.
› Ensure that all of the windows offer good visibility to the outside.
› Secure all items of luggage
» page 60, Boot.
› Ensure that no objects can obstruct the pedals.
› Adjust the mirrors, the front seat and head restraint to your body size.
› Advise your passengers to adjust the head restraints to their body size.
› Protect children in suitable child seats with correctly fastened seat
belts
» page 135, Transporting children safely .
› Adopt the correct seated position
» page 122, Correct seated position . Tell your
passengers to assume the correct seated position.
› Correctly fasten the seat belt. Also inform passengers to fasten the seat belt
correctly » page 125, Seat belts . Ð
ä
121
Passive Safety
Page 124 of 218

What influences the driving safety?
First read and observe the introductory information and safety warn-
ings on page 121.
The driver is fully responsible for himself and his occupants. If your driving safety
is effected, you place yourself and the oncoming traffic at risk.
The following guidelines must therefore be observed. › Do not get distracted from concentrating on the traffic situation, e.g. by your
passengers or mobile phone calls.
› Never drive when your driving ability is impaired, e.g. through medication, alco-
hol, drugs.
› Keep to the traffic regulations and the permissible speed limit.
› Always adjust the driving speed to the road, traffic and weather conditions.
› Take regular breaks on long journeys – at least every two hours. ÐCorrect seated position
ä
Introduction
This chapter contains information on the following subjects:
Correct seated position for the driver 123
Correct seated position for the front passenger 123
Correct seated position for the occupants on the rear seats 123
Examples of an incorrect seated position 124
WARNING
■ The front seats and the head restraints must always be adjusted to match
the body size of the seat occupant as well as the seat belts must always be
correctly fastened in order to provide an optimal protection for you and your
occupants.
■ Always assume the correct seated position before setting off and do not
change this position while driving. Also advise your passengers to adopt the
correct seated position and not to change this position while the car is mov-
ing.
ä WARNING (Continued)
■ If the occupant adopts an incorrect seated position, he is exposed to life-
threatening injuries, in case he is hit by a deployed airbag.
■ If the occupants on the rear seats are not sitting upright, the risk of injury is
increased due to incorrect routing of the seat belt.
■ The driver must maintain a distance of at least 25 cm to the steering wheel.
The front passenger must maintain a distance of at least 25 cm to the dash
panel. Not maintaining this minimum distance will mean that the airbag sys-
tem will not be able to properly protect you - hazard!
■ When driving, hold the steering wheel with both hands firmly on the outer
edge in the 9
o'clock and 3 o'clock position. Never hold the steering wheel in
the 12 o'clock position or in any other way (e.g. in the middle or inner edge of
the steering wheel). In such cases, you could severely injure the arms, hands
and head when the driver airbag is deployed.
■ The seat backrests must not be angled too far back when driving otherwise
this will affect proper operation of the seat belts and of the airbag system -
risk of injury!
■ Ensure that there are no objects in the driver's footwell as they may get
caught behind the pedals when driving or applying the braking. You would
then no longer be able to operate the clutch, brake or accelerate.
■ Always keep your feet in the footwell when the car is being driven - never
place your feet on the instrument panel, out of the window or on the surfaces
of the seats. You will be exposed to increased risk of injury if it becomes nec-
essary to apply the brake or in the event of an accident. If an airbag is de-
ployed, you may suffer fatal injuries when adopting an incorrect seated posi-
tion! Ð
122 Safety
Page 125 of 218

Correct seated position for the driver
Fig. 110
The correct distance of the driver to the steering wheel/The correct
head restraint adjustment
First read and observe the introductory information and safety warn-
ings on page 122.
For your own safety and to reduce the risk of injury in the event of an accident,
we recommend the following setting.
› Adjust the steering wheel so that the distance A
» Fig. 110 between the steer-
ing wheel and your chest is at least 25 cm.
› Adjust the driver’s seat in the forward/back direction so that the pedals can be
fully depressed with slightly bent legs.
› Adjust the seat backrest so that the highest point of the steering wheel can be
reached with your arms at a slight angle.
› Adjust the head restraint so that the top edge B
of the head restraint is at the
same level as the upper part of your head.
› Correctly fasten the seat belt
» page 125, Seat belts.
Manual driver seat adjustment » page 55, Manually adjusting the front seats .
Electrical driver seat adjustment » page 55, Adjusting front seats electrically .Ð Correct seated position for the front passenger
First read and observe the introductory information and safety warn-
ings on page 122.ä
ä For the safety of the front passenger and to reduce the risk of injury in the event
of an accident, we recommend the following setting.
› Position the front passenger seat back as far as possible. The front passenger
must maintain a distance of at least 25
cm to the dash panel so that the airbag
offers the greatest possible safety if it is deployed.
› Adjust the head restraint such that the top edge of the head restraint is at the
same level as the upper part of your head B
» Fig. 110
on page
123.
› Correctly fasten the seat belt
» page 125.
In exceptional cases the front passenger airbag can be deactivated » page 133,
Deactivating airbags .
Manual front passenger adjustment » page 55, Manually adjusting the front
seats .
Electrical front passenger seat adjustment » page 55, Adjusting front seats elec-
trically. Ð Correct seated position for the occupants on the rear seats
First read and observe the introductory information and safety warn-
ings on page 122.
To reduce the risk of injury in the event of a sudden braking manoeuvre or an ac-
cident, the occupants on the rear seats must observe the following.
› Adjust the head restraint such that the top edge of the head restraint is at the
same level as the upper part of the head B
» Fig. 110 on page 123.
› Correctly fasten the seat belt
» page 125, Seat belts.
› Use a suitable child restraint system if transporting children in the vehi-
cle » page 135, Transporting children safely . Ð
ä
123
Passive Safety
Page 126 of 218

Examples of an incorrect seated position
First read and observe the introductory information and safety warn-
ings on page 122.
Seat belts offer their optimum protection only if the webbing of the seat belts is
properly routed. Incorrect seated positions considerably reduce the protective
functions of the seat belts and therefore increase the risk of injury due to an in-
correct routing of the seat belt. The driver is fully responsible for himself and pas-
sengers, especially children. Never allow a passenger to adopt an incorrect seated
position when the car is moving.
The following list contains examples of which seated positions can cause serious
injuries or death. This list is not complete, however we would like you to familiar-
ise yourself with this subject.
Therefore, while the car is moving never:
› stand up in the vehicle;
› stand up on the seats;
› kneel on the seats;
› tilt the seat backrest fully to the back;
› lean against the dash panel;
› lie on the rear seat bench;
› only sit on the front area of the seat;
› sit to the side;
› lean out of the window;
› put the feet out of the window;
› put the feet on the dash panel;
› put the feet on the seat upholstery;
› transport somebody in the footwell;
› have the seat belt not fastened when driving;
› be in the boot. Ðä
124 Safety
Page 127 of 218

Seat belts
Seat belts
ä
Introduction Fig. 111
Driver wearing seat belt
This chapter contains information on the following subjects:
The physical principle of a frontal collision 126
Fastening and unfastening seat belts 127
Seat belt height adjuster on the front seats 128
Belt tensioners 128
Seat belts that are fastened correctly offer good protection in the event of an ac-
cident. They reduce the risk of an injury and increase the chance of survival in the
event of a major accident.
Correctly fastened seat belts hold occupants of the car in the correct seated posi-
tion » Fig. 111.
The seat belts reduce the kinetic energy (energy of motion) to a considerable ex-
tent. They also prevent uncontrolled movements which, in turn, may well result in
severe injuries.
The occupants of a vehicle who have fastened and correctly adjusted their seat
belt, profit to a major extent from the fact that the kinetic energy is optimally ab-
sorbed by the belts. The structure of the front end of the vehicle and other pas-
sive safety measures, such as the airbag system, also contribute to reducing the
kinetic energy. The energy produced is thus absorbed and there is less risk of in-
jury. Particular safety aspects must be observed when transporting children in the ve-
hicle
» page 135. WARNING
■ Fasten your seat belt before each journey - even when driving in town! This
also applies to the people seated at the rear - risk of injury!
■ Expectant women must also always wear a seat belt. This is the only way of
ensuring optimal protection for the unborn child » page 127, Fastening and
unfastening seat belts .
■ Adjust the height of the belt in such a way that the shoulder part of the belt
is roughly positioned across the middle of your shoulder - on no account
across your neck.
■ Always ensure that the webbing of the seat belts is properly routed. Seat
belts which are not correctly adjusted can themselves cause injuries even in
minor accidents.
■ The maximum protection which seat belts can offer is only achieved if you
are correctly seated » page 122, Correct seated position .
■ The seat backrests of the front seats must not be tilted too far to the rear
otherwise the seatbelts can lose their effectiveness.
■ The belt webbing must not be jammed in-between at any point or twisted,
or chafe against any sharp edges.
■ Make sure you do not catch the seat belt in the door when closing it.
■ A seat belt which is hanging too loose can result in injuries as your body is
moved forward by the kinetic energy produced in an accident and is then sud-
denly held firm by the belt.
■ The belt webbing must not run across solid or fragile objects (e.g. specta-
cles, ball-point pens, keys etc.) as this may be a cause of injuries.
■ No two persons (also not children) should ever use a single seat belt togeth-
er.
■ The lock tongue should only be inserted into the lock which is the correct
one for your seat. Wrong use of the safety belt will reduce its capacity to pro-
tect and the risk of injury increases.
■ The slot of the belt tongue must not be blocked by paper or similar objects
otherwise the belt tongue will not lock in place properly.
■ Many layers of clothing and loose clothing (e. g. a winter coat over a jacket)
do not allow you to be correctly seated and impairs proper operation of the
seat belts.
■ It is prohibited to use clamps or other objects to adjust seat belts (e. g. for
shortening the belts for smaller persons). £
125
Seat belts
Page 128 of 218

■ The seat belts for the rear seats can only fulfil their function reliably when
the seat backrests are correctly locked into position » page 59, Rear seats.
■ The belt webbi")
WARNING (Continued)
■ The seat belts for the rear seats can only fulfil their function reliably when
the seat backrests are correctly locked into position » page 59, Rear seats.
■ The belt webbing must always be kept clean. Soiled belt webbing may im-
pair proper operation of the inertia reel » page 154, Seat belts.
■ The seat belts must not be removed or changed in any way. Do not attempt
to repair the seat belts yourself.
■ Check the condition of all the seat belts on a regular basis. If any damage to
the seat belts, seat belt connections, inertia reel or the lock is detected, the
relevant seat belt must be replaced by a
ŠKODA specialist garage.
■ Damaged seat belts which have been subjected to stress in an accident and
were therefore stretched, must be replaced - this is best done by a
ŠKODA
specialist garage. The anchorage points for the belts should also be checked. Note
The national legal requirements must be observed when using seat belts. ÐThe physical principle of a frontal collision
Fig. 112
Driver without a fastened seat belt/rear seat passenger without a
fastened seat belt
First read and observe the introductory information and safety warn-
ings on page 125.
The physical principle of a frontal collision can be explained quite simply.
ä As soon as the vehicle is moving, so-called kinetic energy (the energy of motion)
is produced both in terms of the car as well as in terms of the occupants. The
magnitude of this kinetic energy depends essentially on the speed at which the
vehicle is travelling and on the weight of the vehicle including the occupants. The
greater the speed and weight increase, the greater the amount of energy which
has to be absorbed in the event of an accident.
The speed of the vehicle is, nevertheless, the most important factor. Doubling the
speed of the vehicle from 25 km/h up to 50 km/hour increases the kinetic energy
four times.
The common opinion that it is possible to support your body in a minor accident
with your hands, is incorrect. Even in a collision at only a low speed, the forces
acting on the body are such that it is no longer possible to support your body.
Even if you only drive at a speed of 30
km/h to 50 km/h, the forces that your body
is exposed to in the event of an accident can exceed a tonne (1 000 kg).
In the event of a frontal collision, occupants of the car not wearing a seat belt, are
thrown forward and strike in an uncontrolled way parts of the interior of the car,
such as steering wheel, dash panel or windscreen » Fig. 112 - . In certain circum-
stances you could even be thrown out of the vehicle, which could cause life
threatening or even fatal injuries.
It is also important that rear seat occupants fasten their seat belts as they will
otherwise be thrown through the vehicle in an uncontrolled manner in the event
of an accident A rear seat passenger who has not fastened the seat belt is a dan-
ger not only to himself but also for those seated at the front » Fig. 112 - . Ð
126 Safety
 1
1 2
2 3
3 4
4 5
5 6
6 7
7 8
8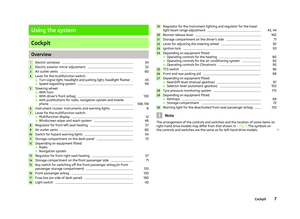 9
9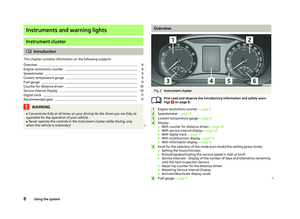 10
10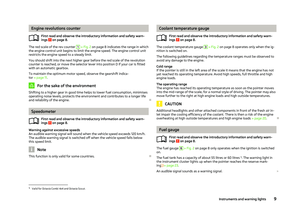 11
11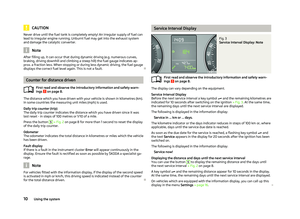 12
12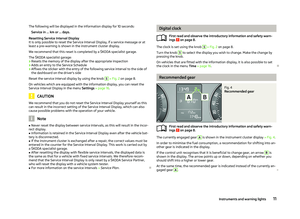 13
13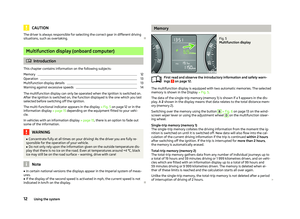 14
14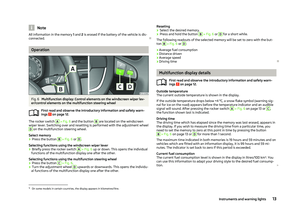 15
15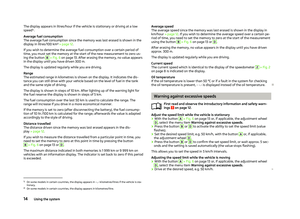 16
16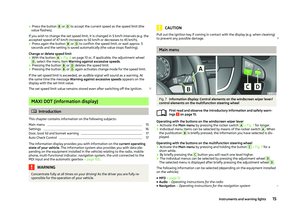 17
17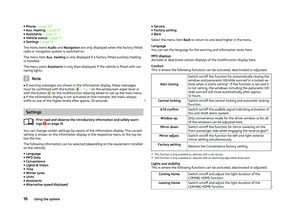 18
18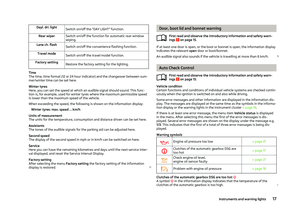 19
19 20
20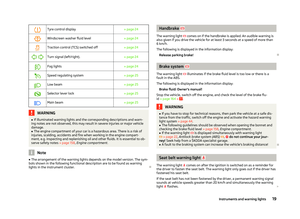 21
21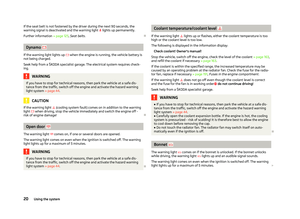 22
22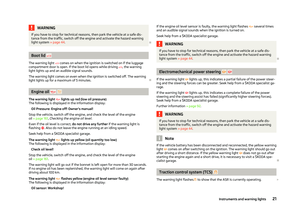 23
23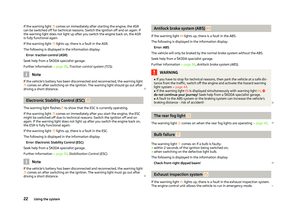 24
24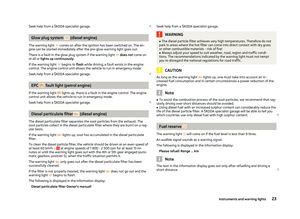 25
25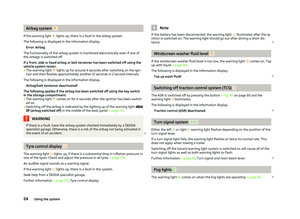 26
26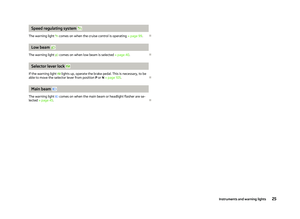 27
27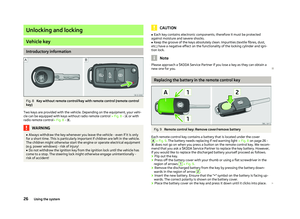 28
28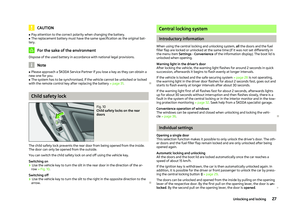 29
29 30
30 31
31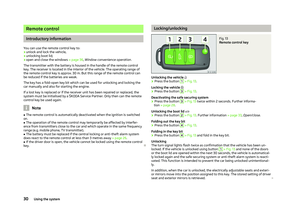 32
32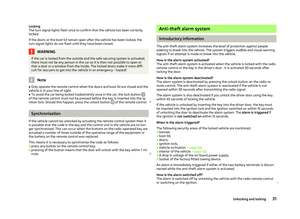 33
33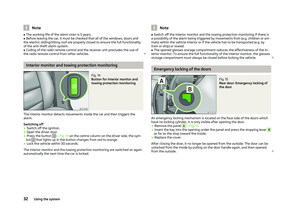 34
34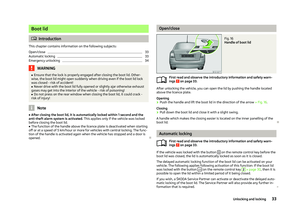 35
35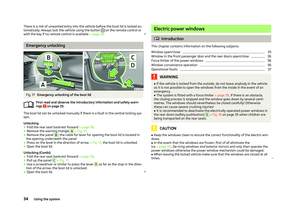 36
36 37
37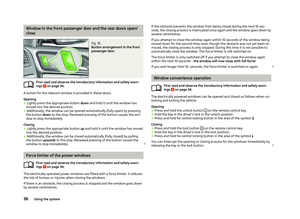 38
38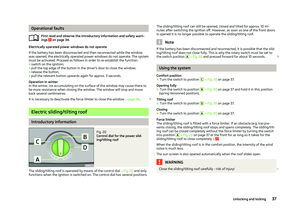 39
39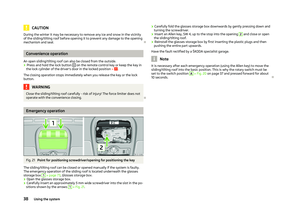 40
40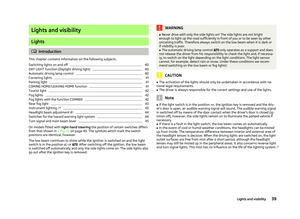 41
41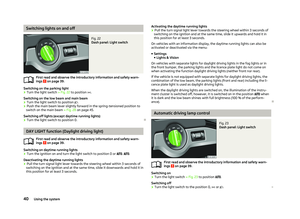 42
42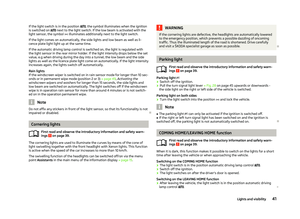 43
43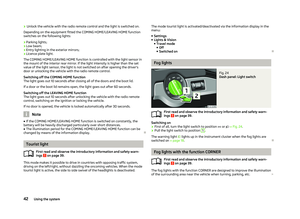 44
44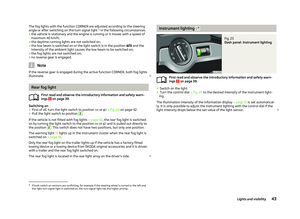 45
45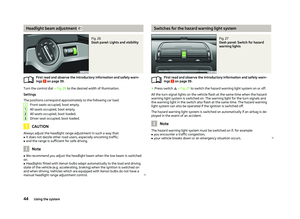 46
46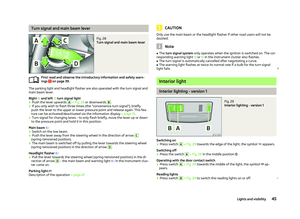 47
47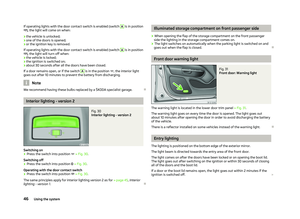 48
48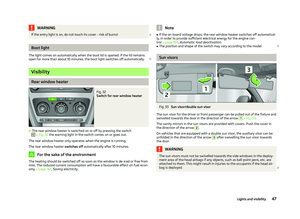 49
49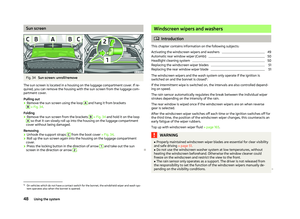 50
50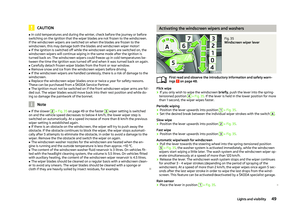 51
51 52
52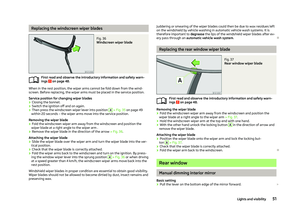 53
53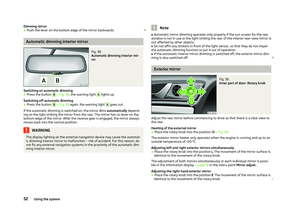 54
54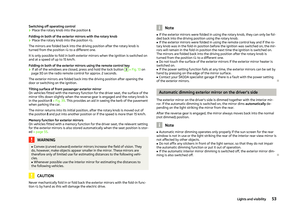 55
55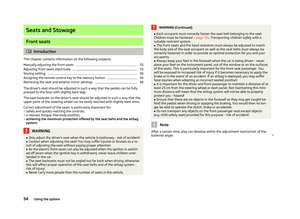 56
56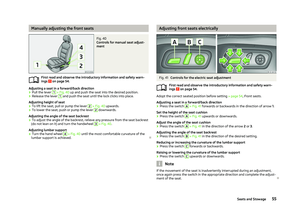 57
57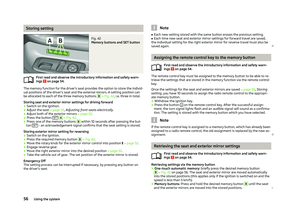 58
58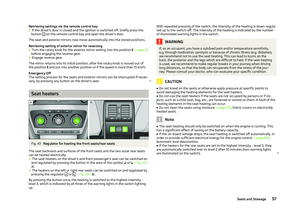 59
59 60
60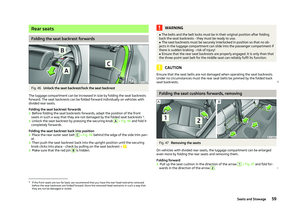 61
61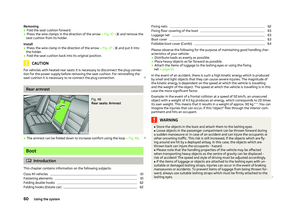 62
62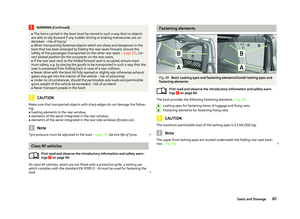 63
63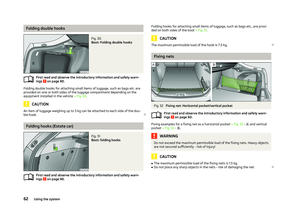 64
64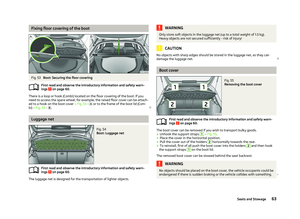 65
65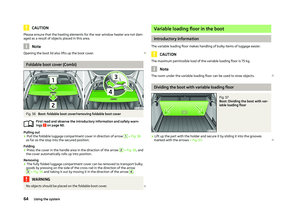 66
66 67
67 68
68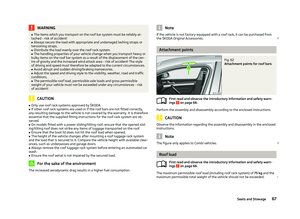 69
69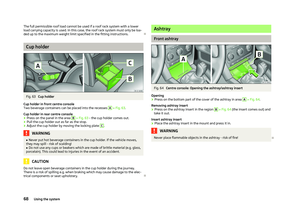 70
70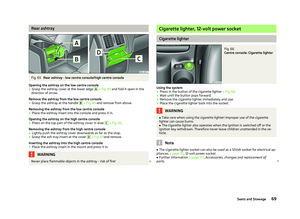 71
71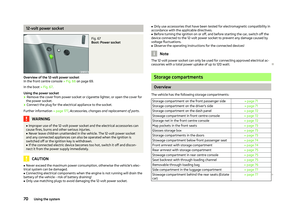 72
72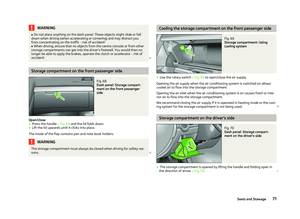 73
73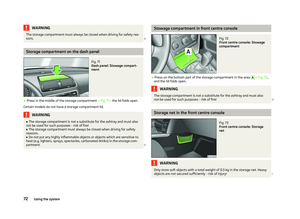 74
74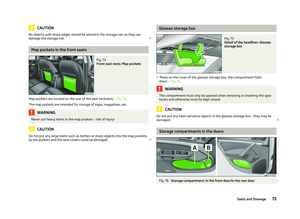 75
75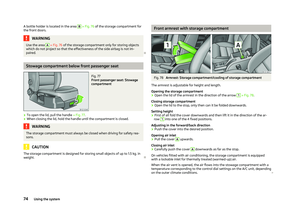 76
76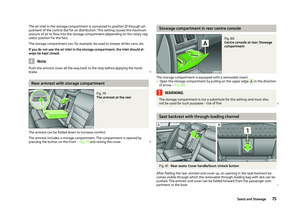 77
77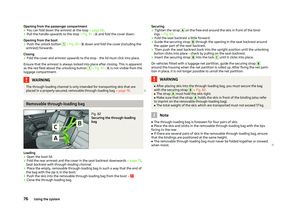 78
78 79
79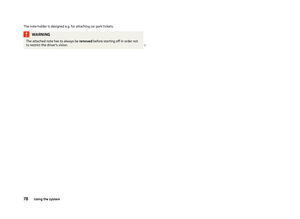 80
80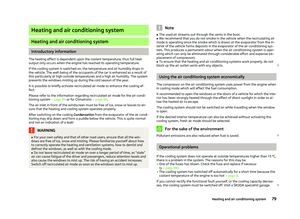 81
81 82
82 83
83 84
84 85
85 86
86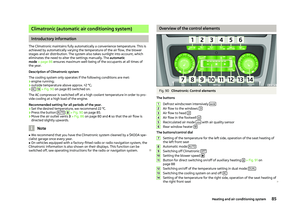 87
87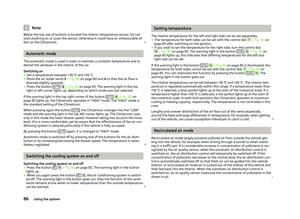 88
88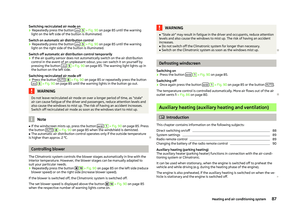 89
89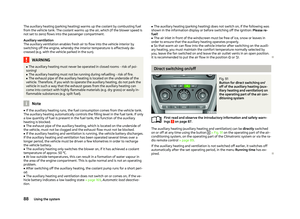 90
90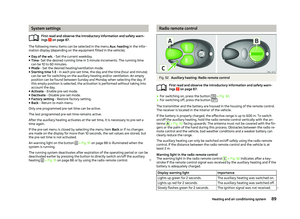 91
91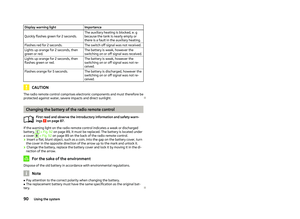 92
92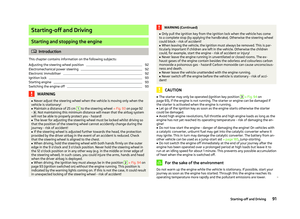 93
93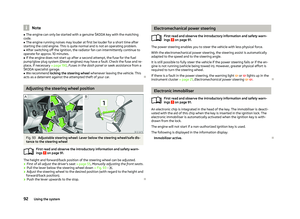 94
94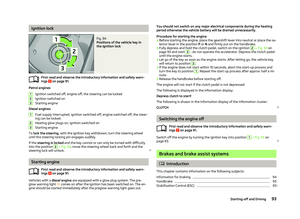 95
95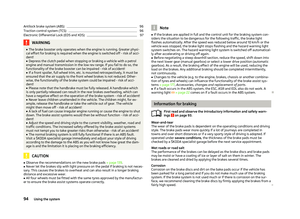 96
96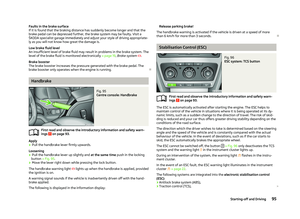 97
97 98
98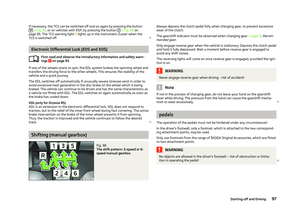 99
99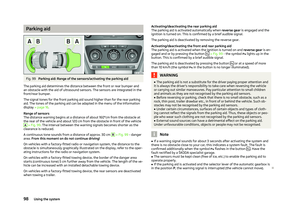 100
100 101
101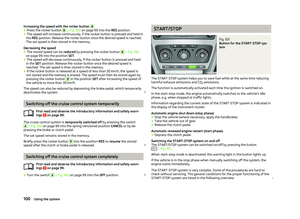 102
102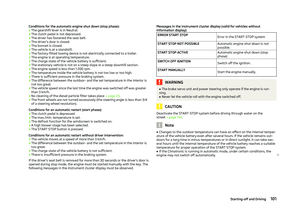 103
103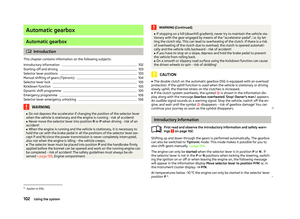 104
104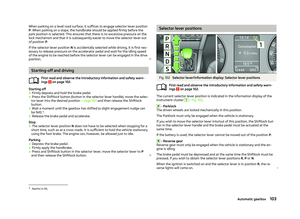 105
105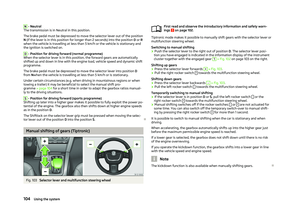 106
106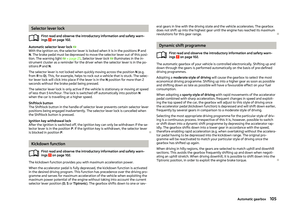 107
107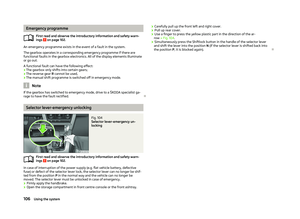 108
108 109
109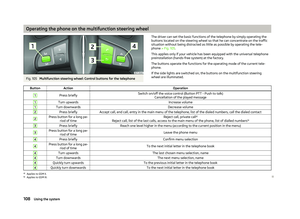 110
110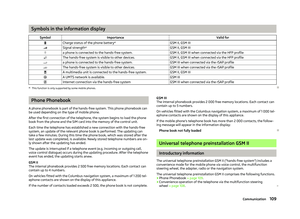 111
111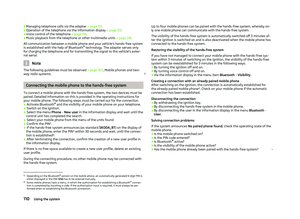 112
112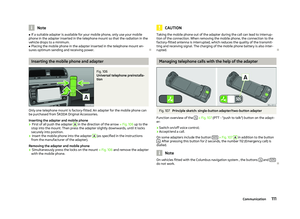 113
113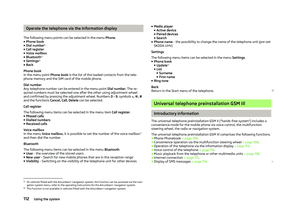 114
114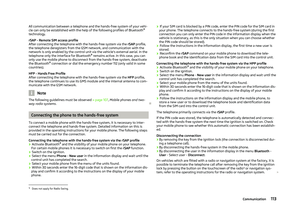 115
115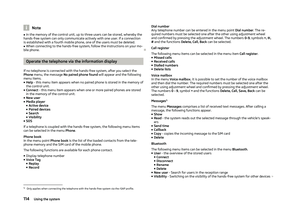 116
116 117
117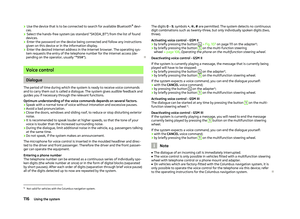 118
118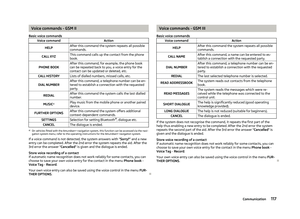 119
119 120
120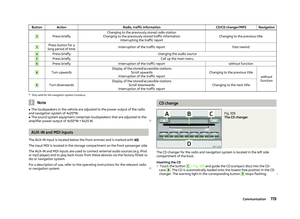 121
121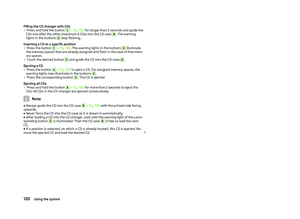 122
122 123
123 124
124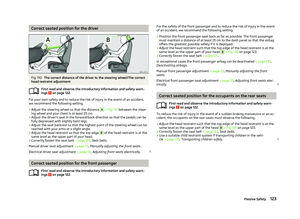 125
125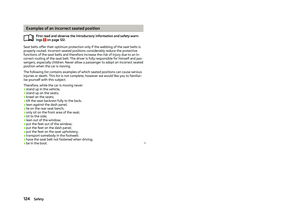 126
126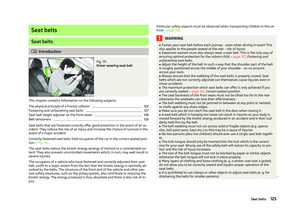 127
127 128
128 129
129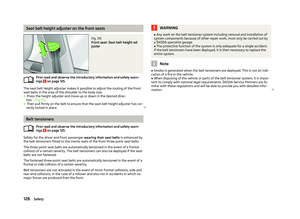 130
130 131
131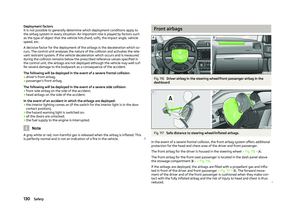 132
132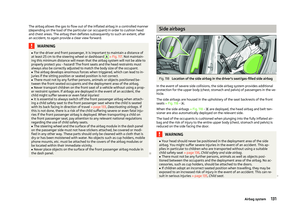 133
133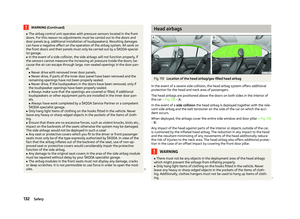 134
134 135
135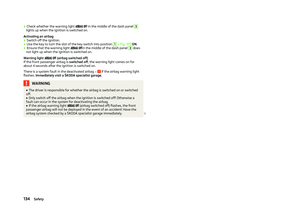 136
136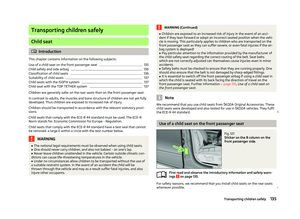 137
137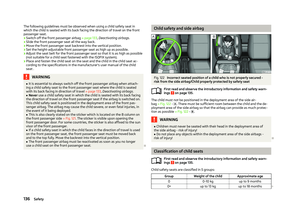 138
138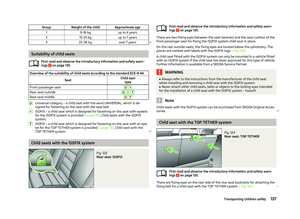 139
139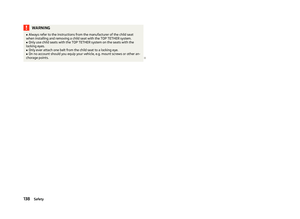 140
140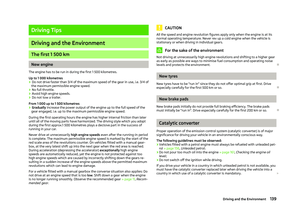 141
141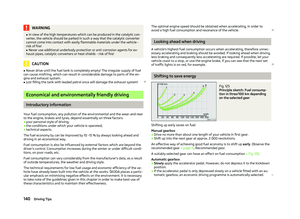 142
142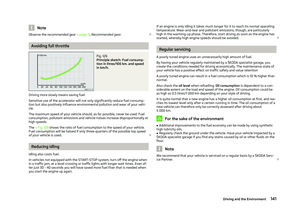 143
143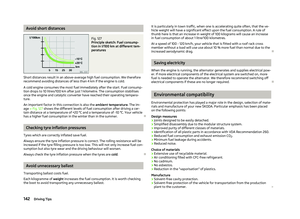 144
144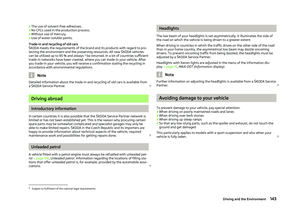 145
145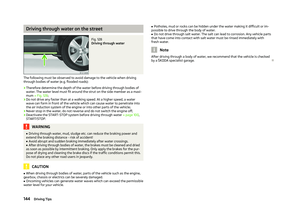 146
146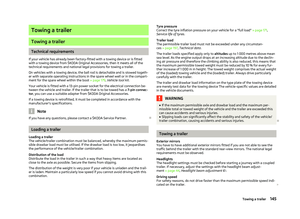 147
147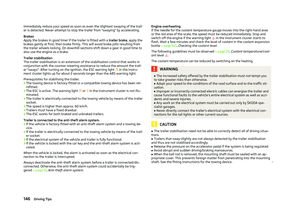 148
148 149
149 150
150 151
151 152
152 153
153 154
154 155
155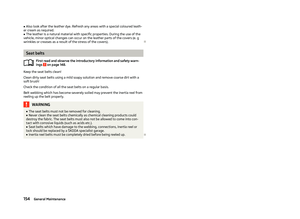 156
156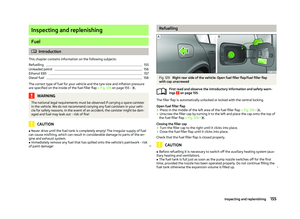 157
157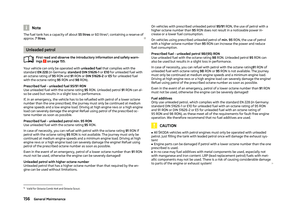 158
158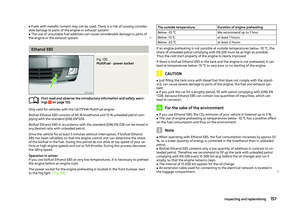 159
159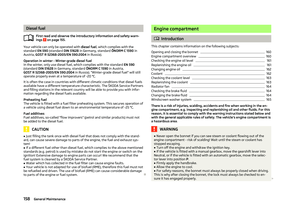 160
160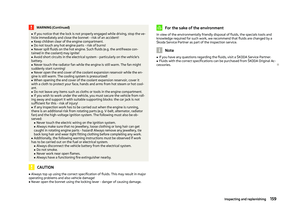 161
161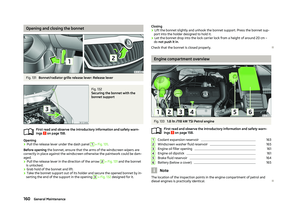 162
162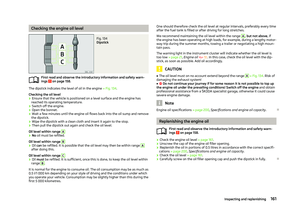 163
163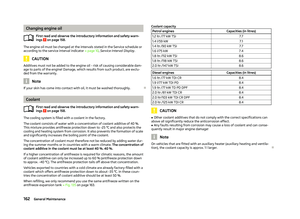 164
164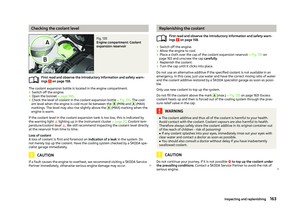 165
165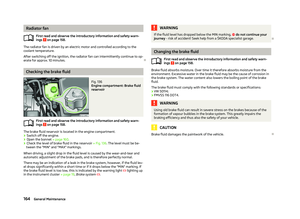 166
166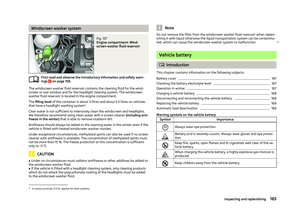 167
167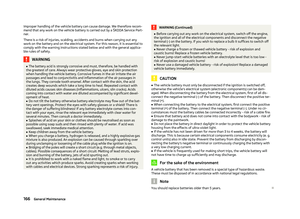 168
168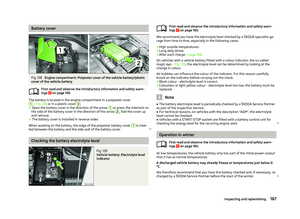 169
169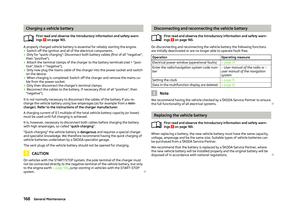 170
170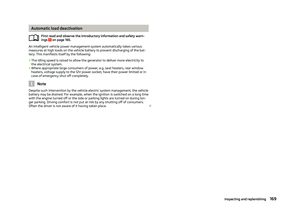 171
171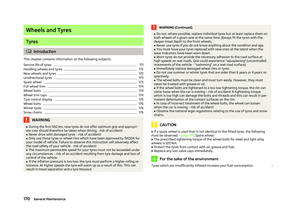 172
172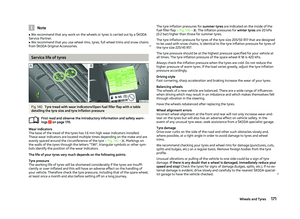 173
173 174
174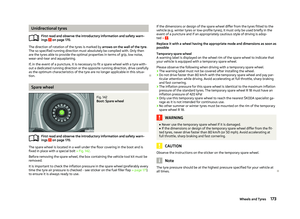 175
175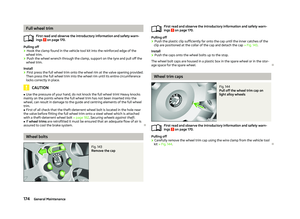 176
176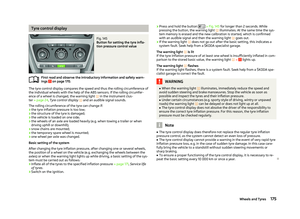 177
177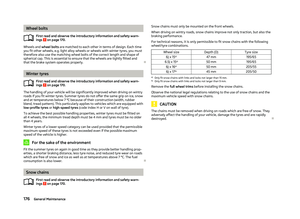 178
178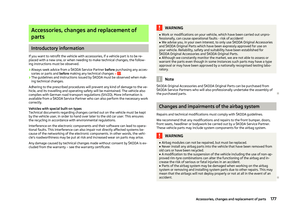 179
179 180
180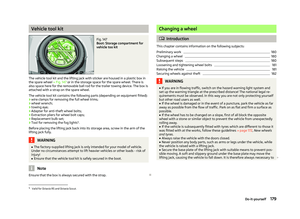 181
181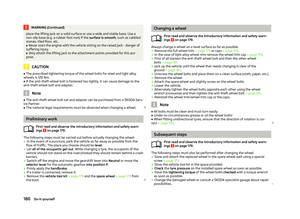 182
182 183
183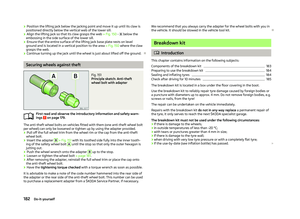 184
184 185
185 186
186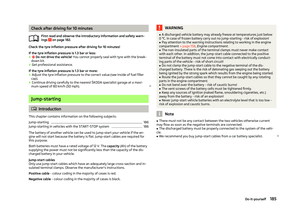 187
187 188
188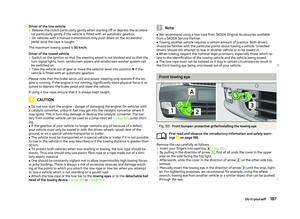 189
189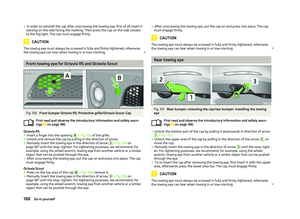 190
190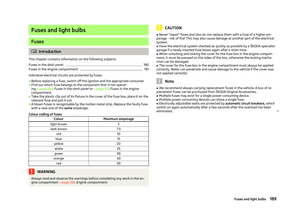 191
191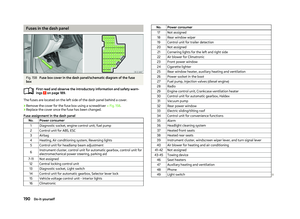 192
192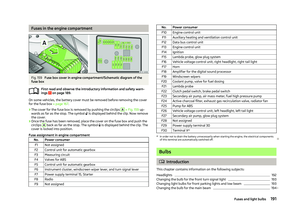 193
193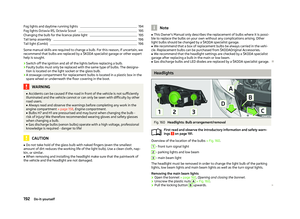 194
194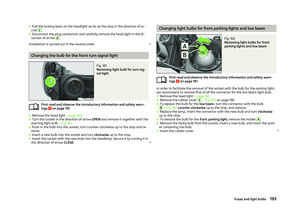 195
195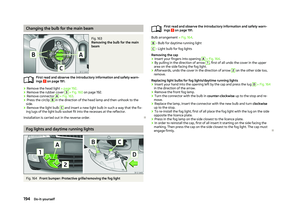 196
196 197
197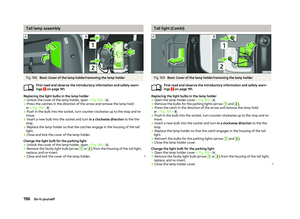 198
198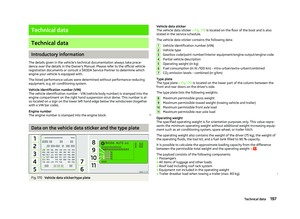 199
199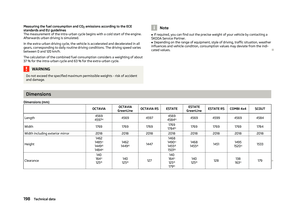 200
200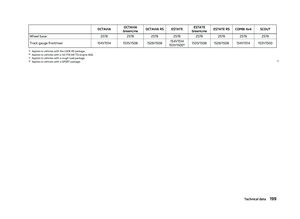 201
201 202
202 203
203 204
204 205
205 206
206 207
207 208
208 209
209 210
210 211
211 212
212 213
213 214
214 215
215 216
216 217
217