Page 680 of 1226

6. Fit compression gauge adapter to cylinder head.
7. Crank engine and read gauge indication.
Crank speed: 200 rpm
Compression pressure:
Standard
3,040 kPa (30.4 bar, 31 kg/cm
2, 441 psi)
Limit
2,452 kPa (24.5 bar, 25 kg/cm
2, 356 psi)
Differential limit between cylinders
490 kPa (4.9 bar, 5 kg/cm
2, 71 psi)
8. If the pressure appears low, pour about 3 m!(0.11 Imp ¯ oz)
of engine oil through nozzle holes and repeat test.
For indications of test, refer to the following table.
Gauge indication during tests Trouble diagnosis
SEM857
+Piston rings are worn or
damaged.
SEM858
+If two adjacent cylinders
are low, gasket is dam-
aged.
+Valve is sticking.
+Valve seat or valve con-
tact surface is incorrected.
9. Replace nozzle gaskets and install injection nozzles.
New nozzle gasket installation direction is as shown.
Nozzle to cylinder head:
:59-69Nzm
(6.0 - 7.0 kg-m, 43 - 51 ft-lb)
SEM706B
SEM708B
COMPRESSION PRESSURE
Measurement of Compression Pressure
(Cont'd)
EM-12
First readingSecond
reading
Increased
reading
Same reading
maintained
Page 725 of 1226
General Speci®cations
Cylinder arrangement In-line 6
Displacement cm
3(cu in) 2,826 (172.44)
Bore and stroke mm (in) 85 x 83 (3.35 x 3.27)
Valve arrangement OHC
Firing order 1-5-3-6-2-4
Number of piston rings
Compression 2
Oil 1
Number of main bearings 7
Compression ratio 21.8
VALVE TIMING
Without warm-up three way catalyst
EM120Unit: degree
abcde f
248 220 7 33 8 60
Inspection and Adjustment
COMPRESSION PRESSURE
Unit: kPa (bar, kg/cm2, psi)/200 rpm
Compression pressure
Standard 3,040 (30.4, 31, 441)
Minimum 2,452 (24.5, 25, 356)
Differential limit between
cylinders490 (4.9, 5, 71)
CYLINDER HEAD
Unit: mm (in)
Standard Limit
Head surface distortionLess than
0.03 (0.0012)0.1 (0.004)
SEM795F
Nominal cylinder head height ``H''139.9 - 140.1
(5.508 - 5.516)
Resurfacing limit 0.1 (0.004)
SERVICE DATA AND SPECIFICATIONS (SDS)
EM-57
Page 729 of 1226

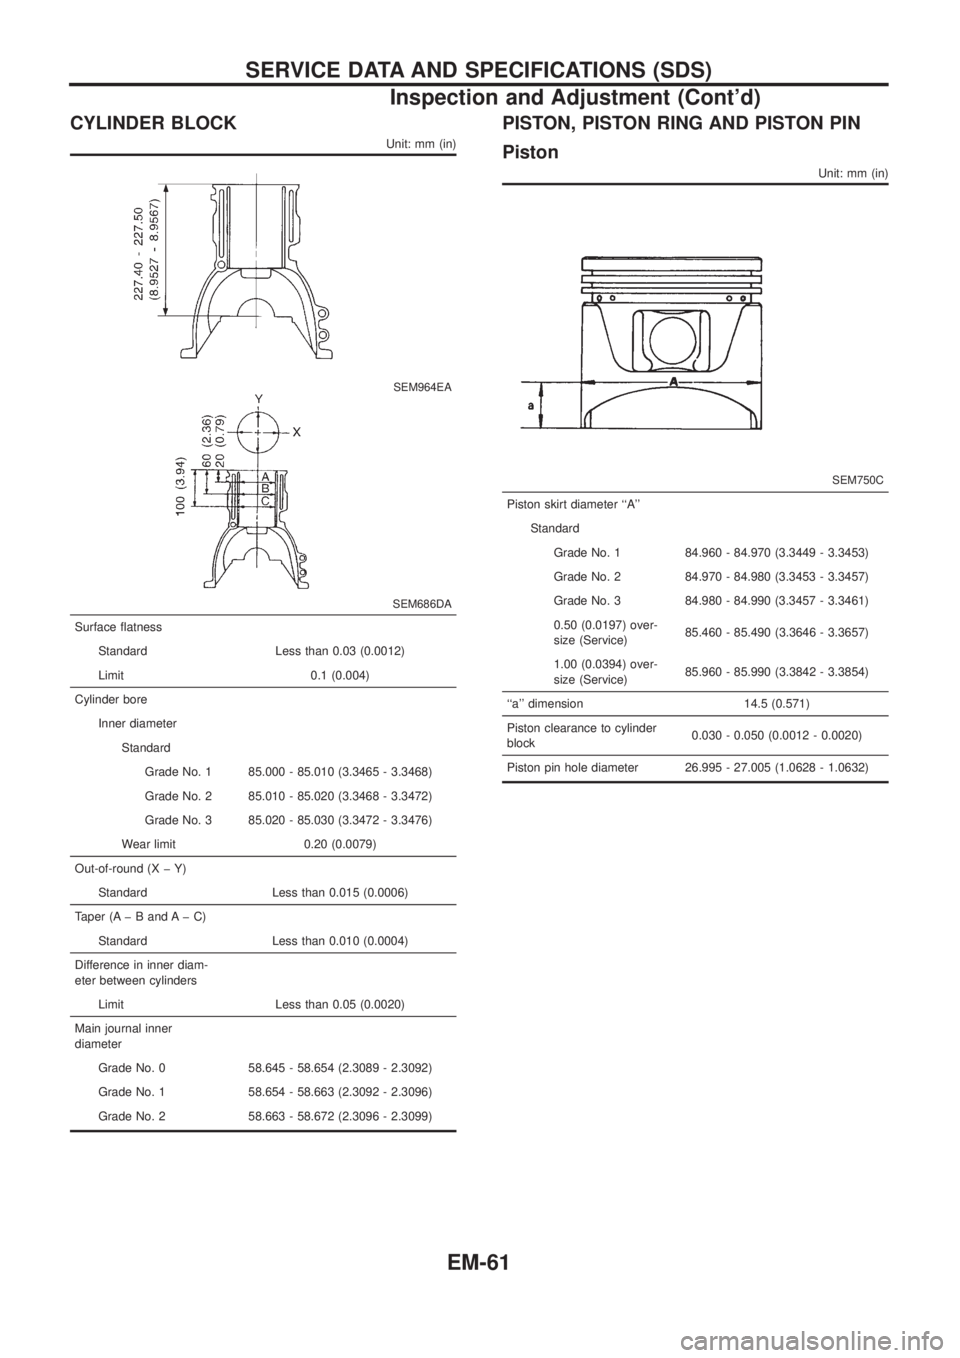
CYLINDER BLOCK
Unit: mm (in)
SEM964EA
SEM686DA
Surface ¯atness
Standard Less than 0.03 (0.0012)
Limit 0.1 (0.004)
Cylinder bore
Inner diameter
Standard
Grade No. 1 85.000 - 85.010 (3.3465 - 3.3468)
Grade No. 2 85.010 - 85.020 (3.3468 - 3.3472)
Grade No. 3 85.020 - 85.030 (3.3472 - 3.3476)
Wear limit 0.20 (0.0079)
Out-of-round (X þ Y)
Standard Less than 0.015 (0.0006)
Taper (A þ B and A þ C)
Standard Less than 0.010 (0.0004)
Difference in inner diam-
eter between cylinders
Limit Less than 0.05 (0.0020)
Main journal inner
diameter
Grade No. 0 58.645 - 58.654 (2.3089 - 2.3092)
Grade No. 1 58.654 - 58.663 (2.3092 - 2.3096)
Grade No. 2 58.663 - 58.672 (2.3096 - 2.3099)
PISTON, PISTON RING AND PISTON PIN
Piston
Unit: mm (in)
SEM750C
Piston skirt diameter ``A''
Standard
Grade No. 1 84.960 - 84.970 (3.3449 - 3.3453)
Grade No. 2 84.970 - 84.980 (3.3453 - 3.3457)
Grade No. 3 84.980 - 84.990 (3.3457 - 3.3461)
0.50 (0.0197) over-
size (Service)85.460 - 85.490 (3.3646 - 3.3657)
1.00 (0.0394) over-
size (Service)85.960 - 85.990 (3.3842 - 3.3854)
``a'' dimension 14.5 (0.571)
Piston clearance to cylinder
block0.030 - 0.050 (0.0012 - 0.0020)
Piston pin hole diameter 26.995 - 27.005 (1.0628 - 1.0632)
SERVICE DATA AND SPECIFICATIONS (SDS)
Inspection and Adjustment (Cont'd)
EM-61
Page 736 of 1226

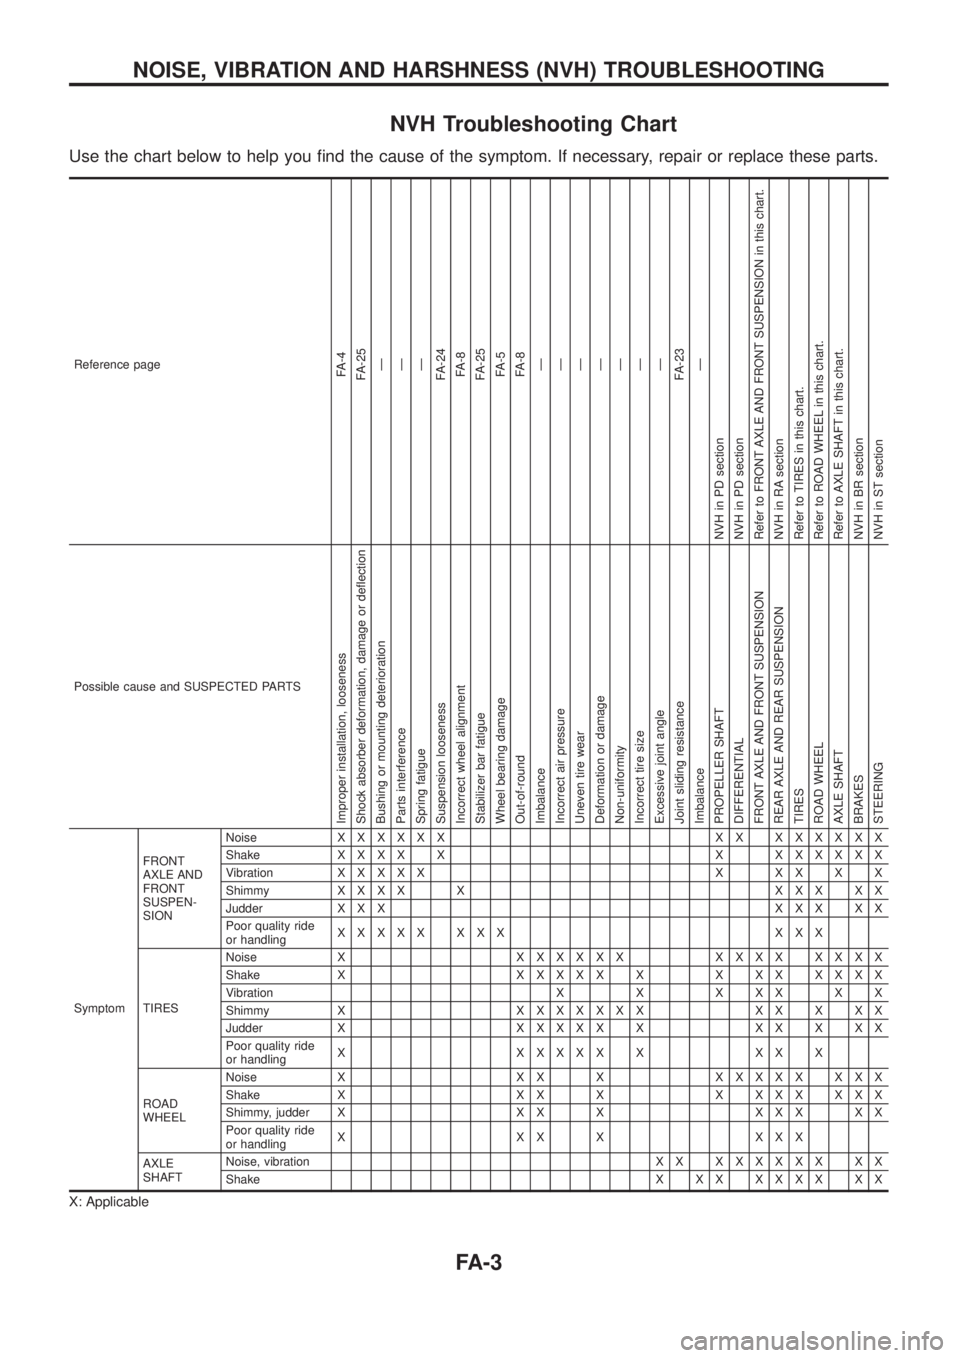
NVH Troubleshooting Chart
Use the chart below to help you ®nd the cause of the symptom. If necessary, repair or replace these parts.
Reference pageFA-4
FA-25
Ð
Ð
Ð
FA-24
FA-8
FA-25
FA-5
FA-8
Ð
Ð
Ð
Ð
Ð
Ð
Ð
FA-23
Ð
NVH in PD section
NVH in PD section
Refer to FRONT AXLE AND FRONT SUSPENSION in this chart.
NVH in RA section
Refer to TIRES in this chart.
Refer to ROAD WHEEL in this chart.
Refer to AXLE SHAFT in this chart.
NVH in BR section
NVH in ST section
Possible cause and SUSPECTED PARTS
Improper installation, looseness
Shock absorber deformation, damage or de¯ection
Bushing or mounting deterioration
Parts interference
Spring fatigue
Suspension looseness
Incorrect wheel alignment
Stabilizer bar fatigue
Wheel bearing damage
Out-of-round
Imbalance
Incorrect air pressure
Uneven tire wear
Deformation or damage
Non-uniformity
Incorrect tire size
Excessive joint angle
Joint sliding resistance
Imbalance
PROPELLER SHAFT
DIFFERENTIAL
FRONT AXLE AND FRONT SUSPENSION
REAR AXLE AND REAR SUSPENSION
TIRES
ROAD WHEEL
AXLE SHAFT
BRAKES
STEERING
SymptomFRONT
AXLE AND
FRONT
SUSPEN-
SIONNoiseXXXXXX XX XXXXXX
ShakeXXXX X X XXXXXX
VibrationXXXXX X XX X X
ShimmyXXXX X XXX XX
Judder X X XXXX XX
Poor quality ride
or handlingXXXXX XXX XXX
TIRESNoise XXXXXXX XXXX XXXX
Shake XXXXXX X X XX XXXX
Vibration X X X X X X X
Shimmy XXXXXXXX XX X XX
Judder XXXXXX X XX X XX
Poor quality ride
or handlingX XXXXX X XX X
ROAD
WHEELNoise X X X XXXXXX XXX
Shake X X X X X X X X X X X
Shimmy, judder X X X X X X X X X
Poor quality ride
or handlingX XX X XXX
AXLE
SHAFTNoise, vibration X XXXXXXX XX
ShakeX XX XXXX XX
X: Applicable
NOISE, VIBRATION AND HARSHNESS (NVH) TROUBLESHOOTING
FA-3
Page 750 of 1226
Removal
Drain differential oil completely prior to removal.
1. Remove baffle plate and knuckle spindle.
2. Draw out drive shaft.
Draw out to remove the drive shaft in the axial direction with
the ¯at surface facing up.
SFA867B
SFA868B
SFA869B
FRONT AXLE Ð Knuckle Flange
FA-17
Page 760 of 1226

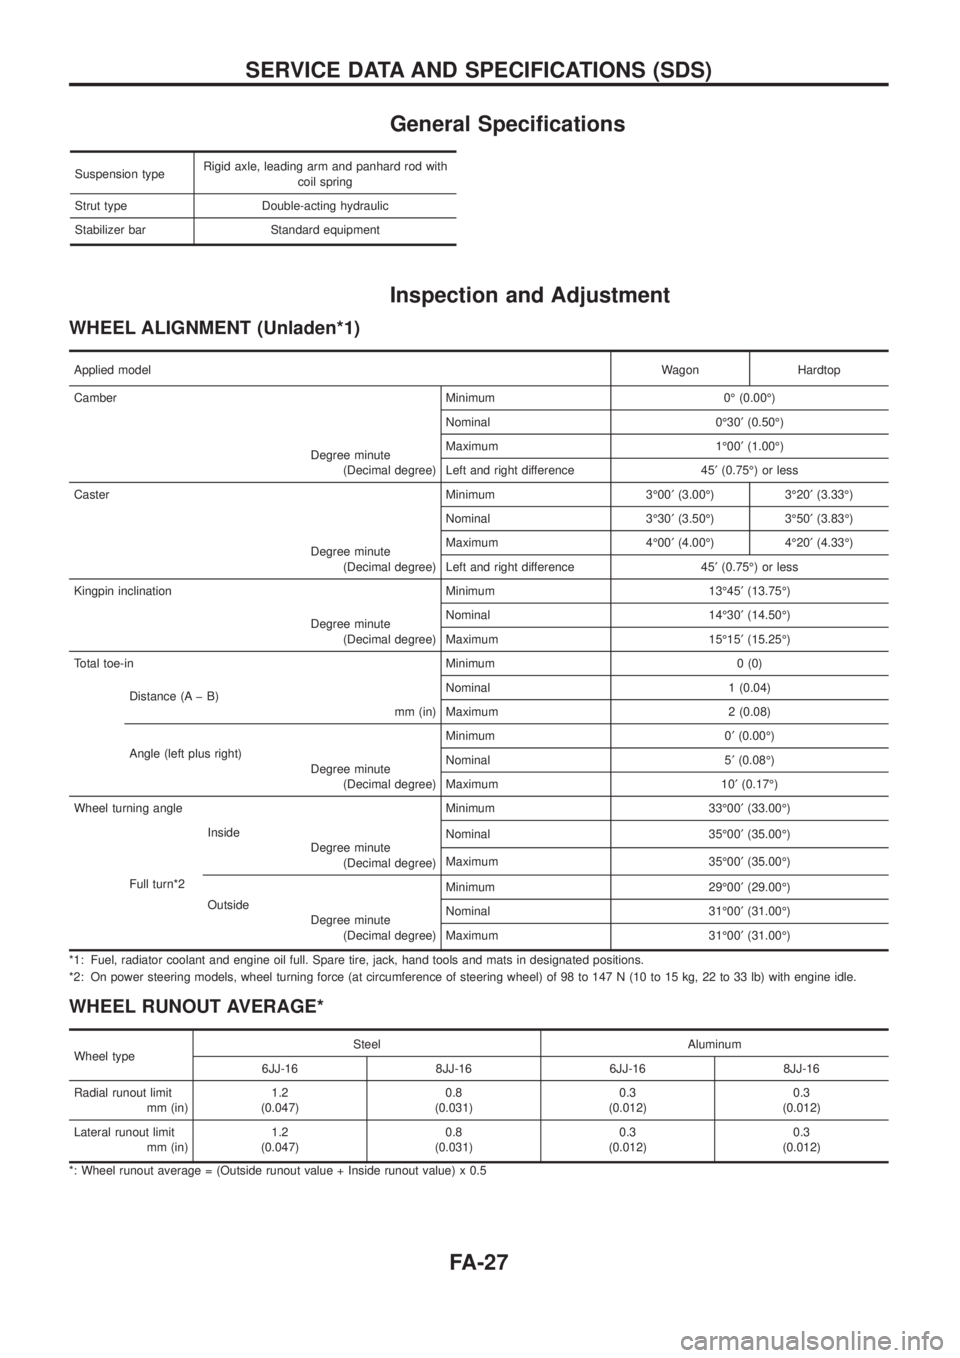
General Speci®cations
Suspension typeRigid axle, leading arm and panhard rod with
coil spring
Strut type Double-acting hydraulic
Stabilizer bar Standard equipment
Inspection and Adjustment
WHEEL ALIGNMENT (Unladen*1)
Applied modelWagon Hardtop
Camber Minimum 0É (0.00É)
Degree minute
(Decimal degree)Nominal 0É30¢(0.50É)
Maximum 1É00¢(1.00É)
Left and right difference 45¢(0.75É) or less
Caster Minimum 3É00¢(3.00É) 3É20¢(3.33É)
Degree minute
(Decimal degree)Nominal 3É30¢(3.50É) 3É50¢(3.83É)
Maximum 4É00¢(4.00É) 4É20¢(4.33É)
Left and right difference 45¢(0.75É) or less
Kingpin inclination Minimum 13É45¢(13.75É)
Degree minute
(Decimal degree)Nominal 14É30¢(14.50É)
Maximum 15É15¢(15.25É)
Total toe-in Minimum 0 (0)
Distance (A þ B)
mm (in)Nominal 1 (0.04)
Maximum 2 (0.08)
Angle (left plus right)
Degree minute
(Decimal degree)Minimum 0¢(0.00É)
Nominal 5¢(0.08É)
Maximum 10¢(0.17É)
Wheel turning angle Minimum 33É00¢(33.00É)
Full turn*2Inside
Degree minute
(Decimal degree)Nominal 35É00¢(35.00É)
Maximum 35É00¢(35.00É)
Outside
Degree minute
(Decimal degree)Minimum 29É00¢(29.00É)
Nominal 31É00¢(31.00É)
Maximum 31É00¢(31.00É)
*1: Fuel, radiator coolant and engine oil full. Spare tire, jack, hand tools and mats in designated positions.
*2: On power steering models, wheel turning force (at circumference of steering wheel) of 98 to 147 N (10 to 15 kg, 22 to 33 lb) with engine idle.
WHEEL RUNOUT AVERAGE*
Wheel typeSteel Aluminum
6JJ-16 8JJ-16 6JJ-16 8JJ-16
Radial runout limit
mm (in)1.2
(0.047)0.8
(0.031)0.3
(0.012)0.3
(0.012)
Lateral runout limit
mm (in)1.2
(0.047)0.8
(0.031)0.3
(0.012)0.3
(0.012)
*: Wheel runout average = (Outside runout value + Inside runout value) x 0.5
SERVICE DATA AND SPECIFICATIONS (SDS)
FA-27
Page 784 of 1226

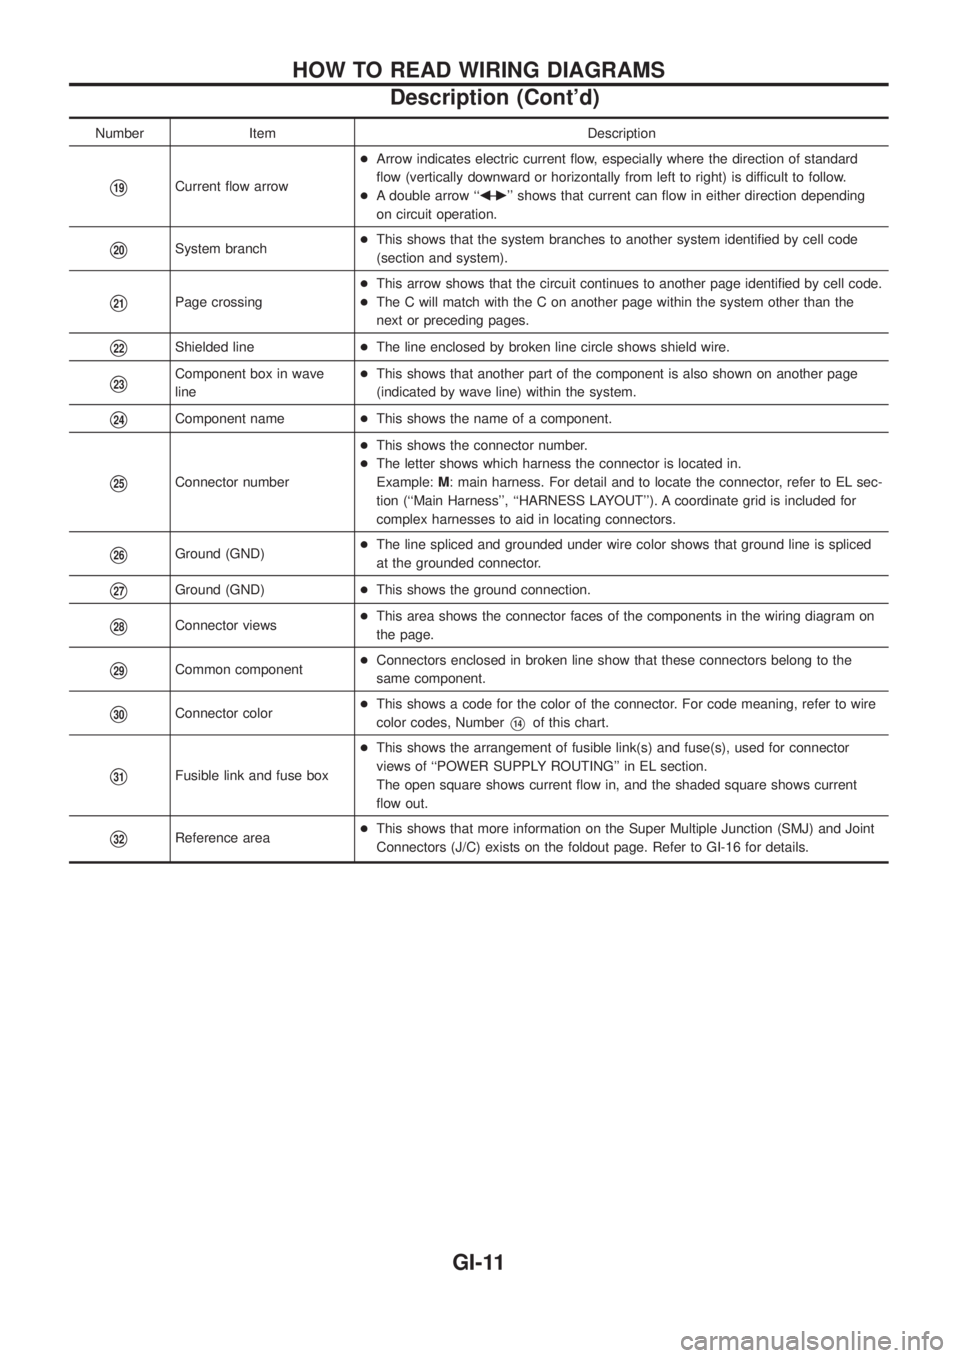
Number Item Description
V19Current ¯ow arrow+Arrow indicates electric current ¯ow, especially where the direction of standard
¯ow (vertically downward or horizontally from left to right) is difficult to follow.
+A double arrow ``bÐ
c'' shows that current can ¯ow in either direction depending
on circuit operation.
V20System branch+This shows that the system branches to another system identi®ed by cell code
(section and system).
V21Page crossing+This arrow shows that the circuit continues to another page identi®ed by cell code.
+The C will match with the C on another page within the system other than the
next or preceding pages.
V22Shielded line+The line enclosed by broken line circle shows shield wire.
V23Component box in wave
line+This shows that another part of the component is also shown on another page
(indicated by wave line) within the system.
V24Component name+This shows the name of a component.
V25Connector number+This shows the connector number.
+The letter shows which harness the connector is located in.
Example:M: main harness. For detail and to locate the connector, refer to EL sec-
tion (``Main Harness'', ``HARNESS LAYOUT''). A coordinate grid is included for
complex harnesses to aid in locating connectors.
V26Ground (GND)+The line spliced and grounded under wire color shows that ground line is spliced
at the grounded connector.
V27Ground (GND)+This shows the ground connection.
V28Connector views+This area shows the connector faces of the components in the wiring diagram on
the page.
V29Common component+Connectors enclosed in broken line show that these connectors belong to the
same component.
V30Connector color+This shows a code for the color of the connector. For code meaning, refer to wire
color codes, NumberV14of this chart.
V31Fusible link and fuse box+This shows the arrangement of fusible link(s) and fuse(s), used for connector
views of ``POWER SUPPLY ROUTING'' in EL section.
The open square shows current ¯ow in, and the shaded square shows current
¯ow out.
V32Reference area+This shows that more information on the Super Multiple Junction (SMJ) and Joint
Connectors (J/C) exists on the foldout page. Refer to GI-16 for details.
HOW TO READ WIRING DIAGRAMS
Description (Cont'd)
GI-11
Page 787 of 1226
DETECTABLE LINES AND NON-DETECTABLE LINES
In some wiring diagrams, two kinds of lines, representing wires,
with different weight are used.
+A line with regular weight (wider line) represents a ``detectable
line for DTC (Diagnostic Trouble Code)''. A ``detectable line for
DTC'' is a circuit in which ECM (Engine Control Module) can
detect its malfunctions with the on board diagnostic system.
+A line with less weight (thinner line) represents a ``non-detect-
able line for DTC''. A ``non-detectable line for DTC'' is a circuit
in which ECM cannot detect its malfunctions with the on board
diagnostic system.
SGI862-A
HOW TO READ WIRING DIAGRAMS
Description (Cont'd)
GI-14