2006 MERCEDES-BENZ SPRINTER lock
[x] Cancel search: lockPage 1873 of 2305
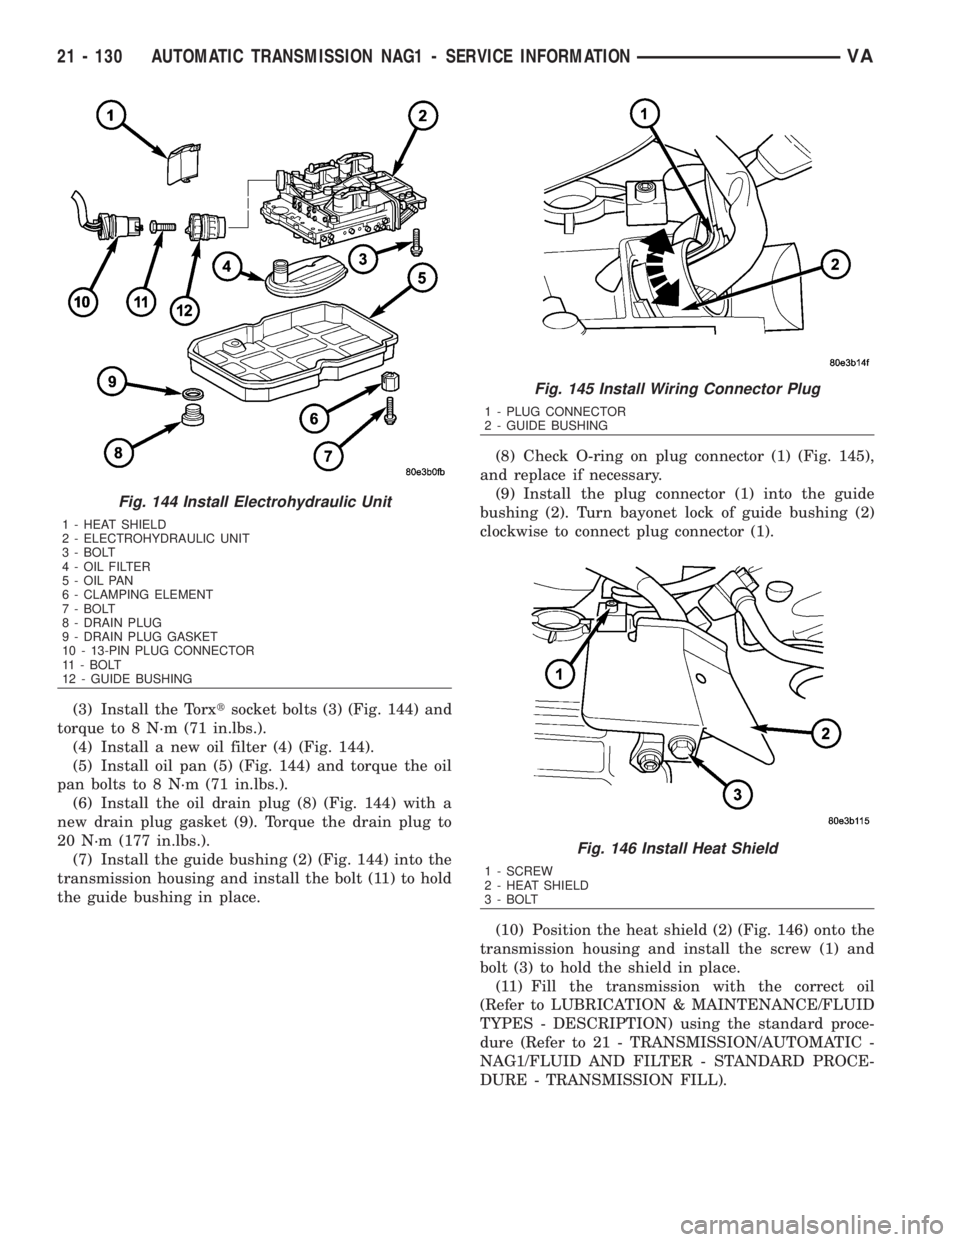
(3) Install the Torxtsocket bolts (3) (Fig. 144) and
torque to 8 N´m (71 in.lbs.).
(4) Install a new oil filter (4) (Fig. 144).
(5) Install oil pan (5) (Fig. 144) and torque the oil
pan bolts to 8 N´m (71 in.lbs.).
(6) Install the oil drain plug (8) (Fig. 144) with a
new drain plug gasket (9). Torque the drain plug to
20 N´m (177 in.lbs.).
(7) Install the guide bushing (2) (Fig. 144) into the
transmission housing and install the bolt (11) to hold
the guide bushing in place.(8) Check O-ring on plug connector (1) (Fig. 145),
and replace if necessary.
(9) Install the plug connector (1) into the guide
bushing (2). Turn bayonet lock of guide bushing (2)
clockwise to connect plug connector (1).
(10) Position the heat shield (2) (Fig. 146) onto the
transmission housing and install the screw (1) and
bolt (3) to hold the shield in place.
(11) Fill the transmission with the correct oil
(Refer to LUBRICATION & MAINTENANCE/FLUID
TYPES - DESCRIPTION) using the standard proce-
dure (Refer to 21 - TRANSMISSION/AUTOMATIC -
NAG1/FLUID AND FILTER - STANDARD PROCE-
DURE - TRANSMISSION FILL).
Fig. 144 Install Electrohydraulic Unit
1 - HEAT SHIELD
2 - ELECTROHYDRAULIC UNIT
3 - BOLT
4 - OIL FILTER
5 - OIL PAN
6 - CLAMPING ELEMENT
7 - BOLT
8 - DRAIN PLUG
9 - DRAIN PLUG GASKET
10 - 13-PIN PLUG CONNECTOR
11 - BOLT
12 - GUIDE BUSHING
Fig. 145 Install Wiring Connector Plug
1 - PLUG CONNECTOR
2 - GUIDE BUSHING
Fig. 146 Install Heat Shield
1 - SCREW
2 - HEAT SHIELD
3 - BOLT
21 - 130 AUTOMATIC TRANSMISSION NAG1 - SERVICE INFORMATIONVA
Page 1875 of 2305
CAUSES OF BURNT FLUID
Burnt, discolored fluid is a result of overheating
which has three primary causes.
1. Internal clutch slippage, usually caused by low
line pressure, inadequate clutch apply pressure, or
clutch seal failure.
2. A result of restricted fluid flow through the
main and/or auxiliary cooler. This condition is usu-
ally the result of a faulty or improperly installed
drainback valve, a damaged oil cooler, or severe
restrictions in the coolers and lines caused by debris
or kinked lines.
3. Heavy duty operation with a vehicle not prop-
erly equipped for this type of operation. Trailer tow-
ing or similar high load operation will overheat the
transmission fluid if the vehicle is improperly
equipped. Such vehicles should have an auxiliary
transmission fluid cooler, a heavy duty cooling sys-
tem, and the engine/axle ratio combination needed to
handle heavy loads.
FLUID CONTAMINATION
Transmission fluid contamination is generally a
result of:
²adding incorrect fluid
²failure to clean dipstick and fill tube when
checking level
²engine coolant entering the fluid
²internal failure that generates debris
²overheat that generates sludge (fluid break-
down)
²failure to replace contaminated converter after
repair
The use of non-recommended fluids can result in
transmission failure. The usual results are erratic
shifts, slippage, abnormal wear and eventual failure
due to fluid breakdown and sludge formation. Avoid
this condition by using recommended fluids only.
The dipstick cap and fill tube should be wiped
clean before checking fluid level. Dirt, grease and
other foreign material on the cap and tube could fall
into the tube if not removed beforehand. Take the
time to wipe the cap and tube clean before withdraw-
ing the dipstick.
Engine coolant in the transmission fluid is gener-
ally caused by a cooler malfunction. The only remedy
is to replace the radiator as the cooler in the radiator
is not a serviceable part. If coolant has circulated
through the transmission, an overhaul is necessary.
The torque converter should be replaced whenever
a failure generates sludge and debris. This is neces-
sary because normal converter flushing procedures
will not remove all contaminants.
STANDARD PROCEDURE
CHECK OIL LEVEL
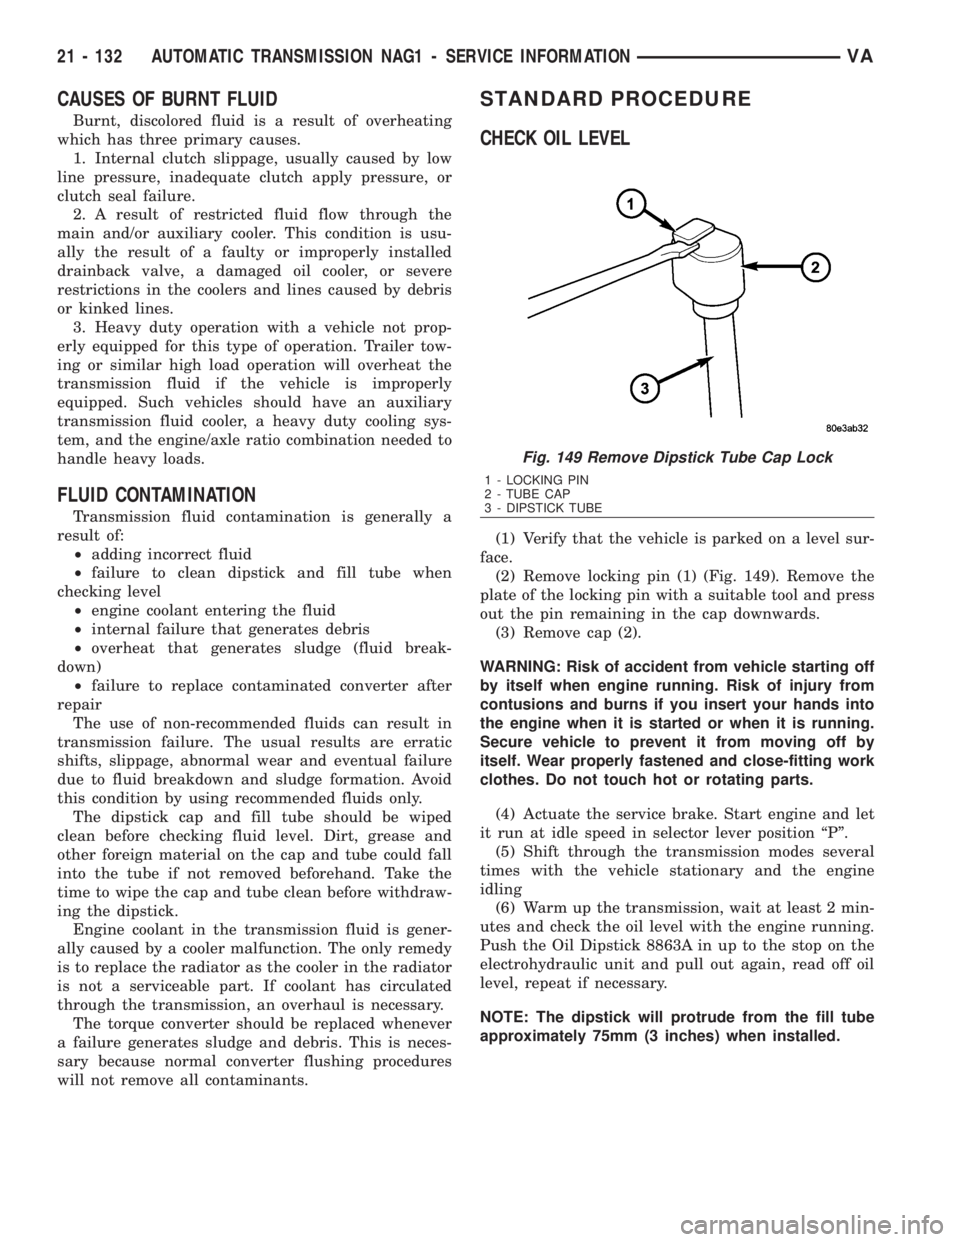
(1) Verify that the vehicle is parked on a level sur-
face.
(2) Remove locking pin (1) (Fig. 149). Remove the
plate of the locking pin with a suitable tool and press
out the pin remaining in the cap downwards.
(3) Remove cap (2).
WARNING: Risk of accident from vehicle starting off
by itself when engine running. Risk of injury from
contusions and burns if you insert your hands into
the engine when it is started or when it is running.
Secure vehicle to prevent it from moving off by
itself. Wear properly fastened and close-fitting work
clothes. Do not touch hot or rotating parts.
(4) Actuate the service brake. Start engine and let
it run at idle speed in selector lever position ªPº.
(5) Shift through the transmission modes several
times with the vehicle stationary and the engine
idling
(6) Warm up the transmission, wait at least 2 min-
utes and check the oil level with the engine running.
Push the Oil Dipstick 8863A in up to the stop on the
electrohydraulic unit and pull out again, read off oil
level, repeat if necessary.
NOTE: The dipstick will protrude from the fill tube
approximately 75mm (3 inches) when installed.
Fig. 149 Remove Dipstick Tube Cap Lock
1 - LOCKING PIN
2 - TUBE CAP
3 - DIPSTICK TUBE
21 - 132 AUTOMATIC TRANSMISSION NAG1 - SERVICE INFORMATIONVA
Page 1876 of 2305
(7) Check transmission oil temperature.
NOTE: The true transmission oil temperature can
only be read by a scan tool in REVERSE or any for-
ward gear position. (Refer to 21 - AUTOMATIC
TRANSMISSION- NAG1/TRANSMISSION TEMPERA-
TURE SENSOR/PARK-NEUTRAL SWITCH - OPERA-
TION)
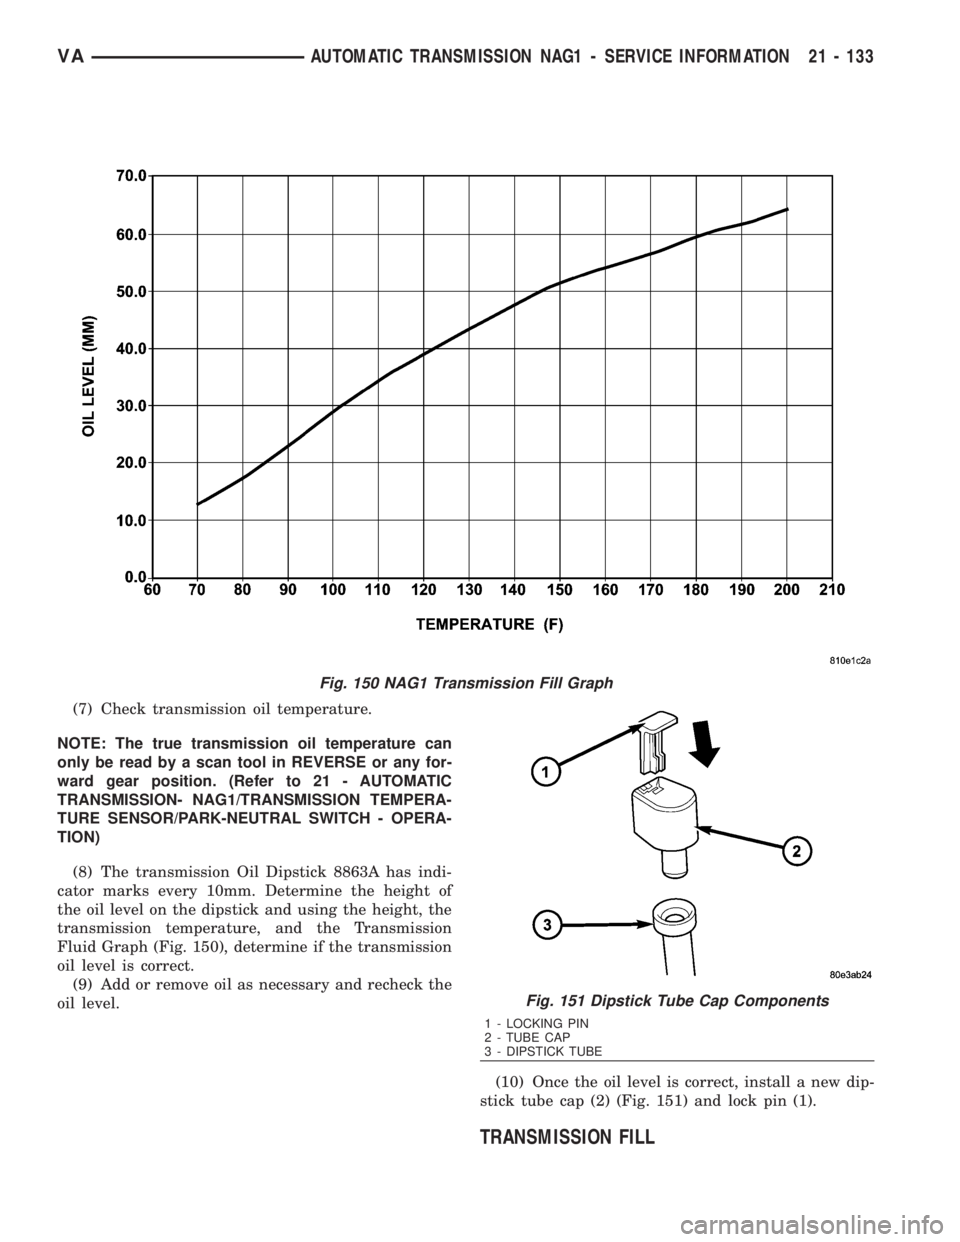
(8) The transmission Oil Dipstick 8863A has indi-
cator marks every 10mm. Determine the height of
the oil level on the dipstick and using the height, the
transmission temperature, and the Transmission
Fluid Graph (Fig. 150), determine if the transmission
oil level is correct.
(9) Add or remove oil as necessary and recheck the
oil level.
(10) Once the oil level is correct, install a new dip-
stick tube cap (2) (Fig. 151) and lock pin (1).
TRANSMISSION FILL
Fig. 150 NAG1 Transmission Fill Graph
Fig. 151 Dipstick Tube Cap Components
1 - LOCKING PIN
2 - TUBE CAP
3 - DIPSTICK TUBE
VAAUTOMATIC TRANSMISSION NAG1 - SERVICE INFORMATION 21 - 133
Page 1877 of 2305
To avoid overfilling transmission after a fluid
change or overhaul, perform the following procedure:
(1) Verify that the vehicle is parked on a level sur-
face.
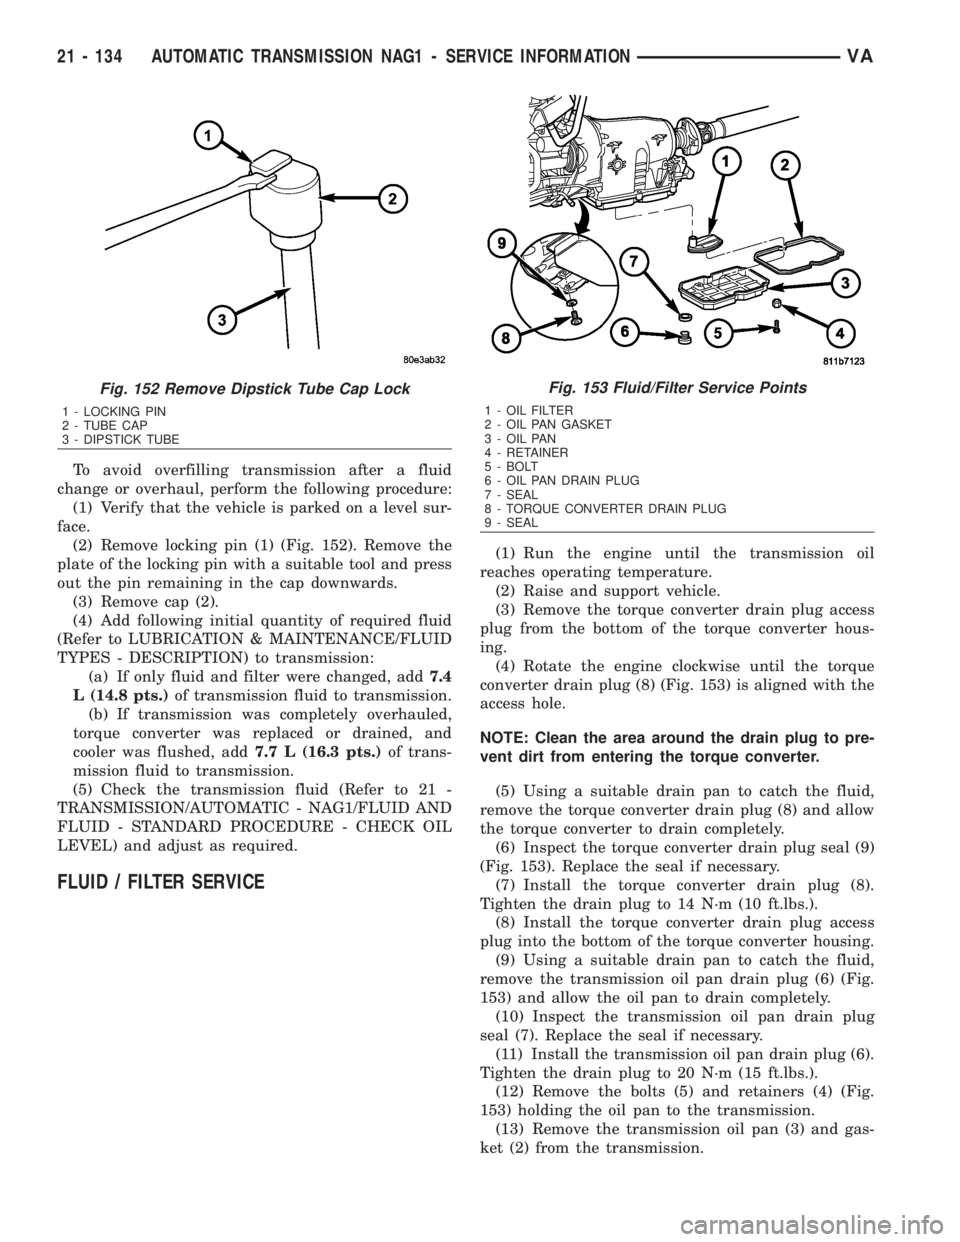
(2) Remove locking pin (1) (Fig. 152). Remove the
plate of the locking pin with a suitable tool and press
out the pin remaining in the cap downwards.
(3) Remove cap (2).
(4) Add following initial quantity of required fluid
(Refer to LUBRICATION & MAINTENANCE/FLUID
TYPES - DESCRIPTION) to transmission:
(a) If only fluid and filter were changed, add7.4
L (14.8 pts.)of transmission fluid to transmission.
(b) If transmission was completely overhauled,
torque converter was replaced or drained, and
cooler was flushed, add7.7 L (16.3 pts.)of trans-
mission fluid to transmission.
(5) Check the transmission fluid (Refer to 21 -
TRANSMISSION/AUTOMATIC - NAG1/FLUID AND
FLUID - STANDARD PROCEDURE - CHECK OIL
LEVEL) and adjust as required.
FLUID / FILTER SERVICE
(1) Run the engine until the transmission oil
reaches operating temperature.
(2) Raise and support vehicle.
(3) Remove the torque converter drain plug access
plug from the bottom of the torque converter hous-
ing.
(4) Rotate the engine clockwise until the torque
converter drain plug (8) (Fig. 153) is aligned with the
access hole.
NOTE: Clean the area around the drain plug to pre-
vent dirt from entering the torque converter.
(5) Using a suitable drain pan to catch the fluid,
remove the torque converter drain plug (8) and allow
the torque converter to drain completely.
(6) Inspect the torque converter drain plug seal (9)
(Fig. 153). Replace the seal if necessary.
(7) Install the torque converter drain plug (8).
Tighten the drain plug to 14 N´m (10 ft.lbs.).
(8) Install the torque converter drain plug access
plug into the bottom of the torque converter housing.
(9) Using a suitable drain pan to catch the fluid,
remove the transmission oil pan drain plug (6) (Fig.
153) and allow the oil pan to drain completely.
(10) Inspect the transmission oil pan drain plug
seal (7). Replace the seal if necessary.
(11) Install the transmission oil pan drain plug (6).
Tighten the drain plug to 20 N´m (15 ft.lbs.).
(12) Remove the bolts (5) and retainers (4) (Fig.
153) holding the oil pan to the transmission.
(13) Remove the transmission oil pan (3) and gas-
ket (2) from the transmission.
Fig. 152 Remove Dipstick Tube Cap Lock
1 - LOCKING PIN
2 - TUBE CAP
3 - DIPSTICK TUBE
Fig. 153 Fluid/Filter Service Points
1 - OIL FILTER
2 - OIL PAN GASKET
3 - OIL PAN
4 - RETAINER
5 - BOLT
6 - OIL PAN DRAIN PLUG
7 - SEAL
8 - TORQUE CONVERTER DRAIN PLUG
9 - SEAL
21 - 134 AUTOMATIC TRANSMISSION NAG1 - SERVICE INFORMATIONVA
Page 1878 of 2305
(14) Remove the transmission oil filter (1) and
o-ring from the electrohydraulic control unit.
(15) Clean the inside of the oil pan (3) of any
debris. Inspect the oil pan gasket (2) and replace if
necessary.
(16) Install a new oil filter (1) and o-ring into the
electrohydraulic control unit.
(17) Install the oil pan (3) and gasket (2) onto the
transmission.
(18) Install the oil pan bolts (5) and retainers (4).
Torque the bolts to 8 N´m (70 in.lbs.).
(19) Lower the vehicle and add 7.0 L (7.4 qts.) of
transmission fluid to the transmission.
(20) Check the oil level (Refer to 21 - TRANSMIS-
SION/AUTOMATIC - NAG1/FLUID AND FILTER -
STANDARD PROCEDURE - CHECK OIL LEVEL).
FREEWHEELING CLUTCH
DESCRIPTION
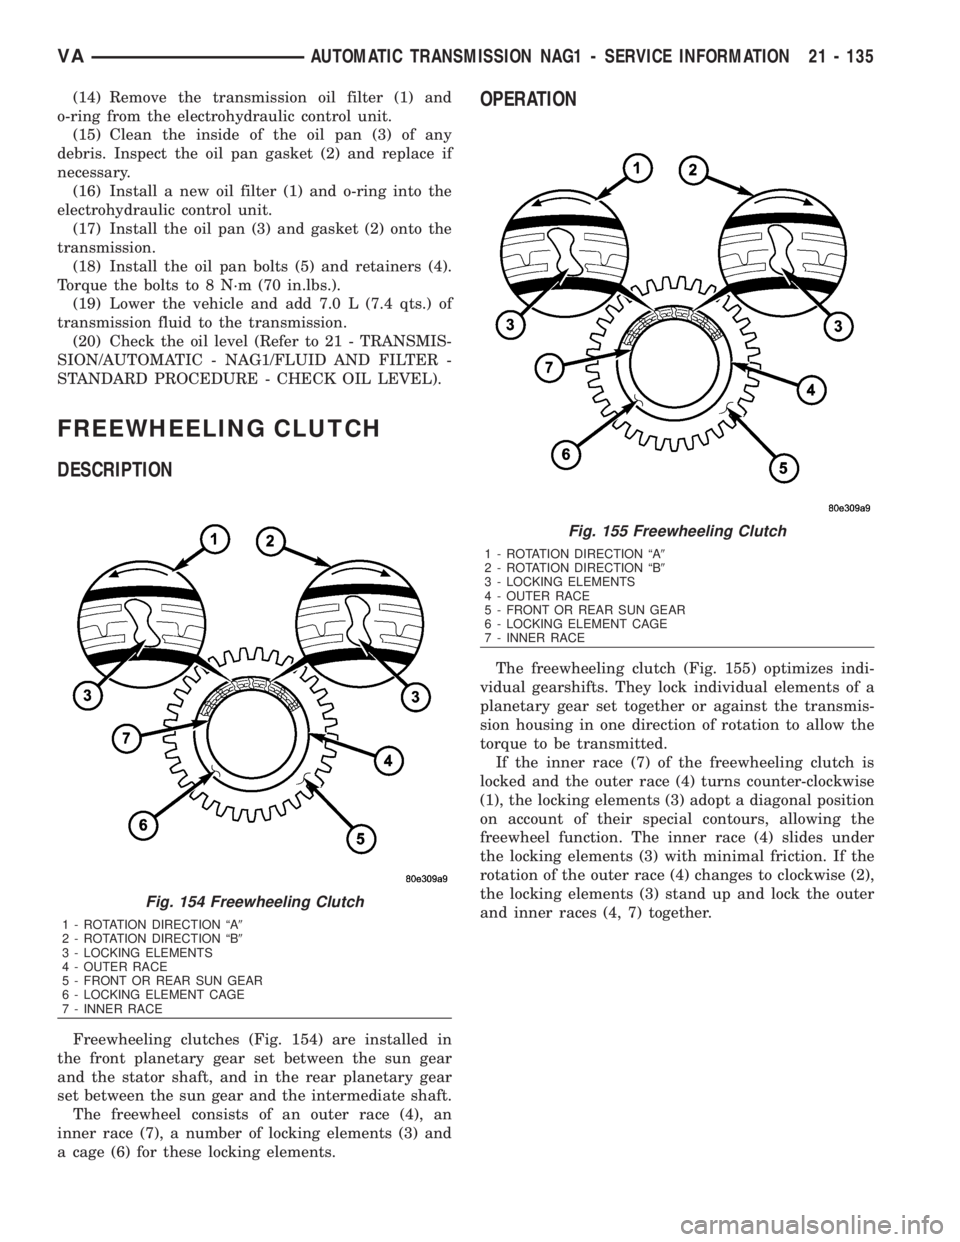
Freewheeling clutches (Fig. 154) are installed in
the front planetary gear set between the sun gear
and the stator shaft, and in the rear planetary gear
set between the sun gear and the intermediate shaft.
The freewheel consists of an outer race (4), an
inner race (7), a number of locking elements (3) and
a cage (6) for these locking elements.
OPERATION
The freewheeling clutch (Fig. 155) optimizes indi-
vidual gearshifts. They lock individual elements of a
planetary gear set together or against the transmis-
sion housing in one direction of rotation to allow the
torque to be transmitted.
If the inner race (7) of the freewheeling clutch is
locked and the outer race (4) turns counter-clockwise
(1), the locking elements (3) adopt a diagonal position
on account of their special contours, allowing the
freewheel function. The inner race (4) slides under
the locking elements (3) with minimal friction. If the
rotation of the outer race (4) changes to clockwise (2),
the locking elements (3) stand up and lock the outer
and inner races (4, 7) together.
Fig. 154 Freewheeling Clutch
1 - ROTATION DIRECTION ªA9
2 - ROTATION DIRECTION ªB9
3 - LOCKING ELEMENTS
4 - OUTER RACE
5 - FRONT OR REAR SUN GEAR
6 - LOCKING ELEMENT CAGE
7 - INNER RACE
Fig. 155 Freewheeling Clutch
1 - ROTATION DIRECTION ªA9
2 - ROTATION DIRECTION ªB9
3 - LOCKING ELEMENTS
4 - OUTER RACE
5 - FRONT OR REAR SUN GEAR
6 - LOCKING ELEMENT CAGE
7 - INNER RACE
VAAUTOMATIC TRANSMISSION NAG1 - SERVICE INFORMATION 21 - 135
Page 1881 of 2305
ASSEMBLY
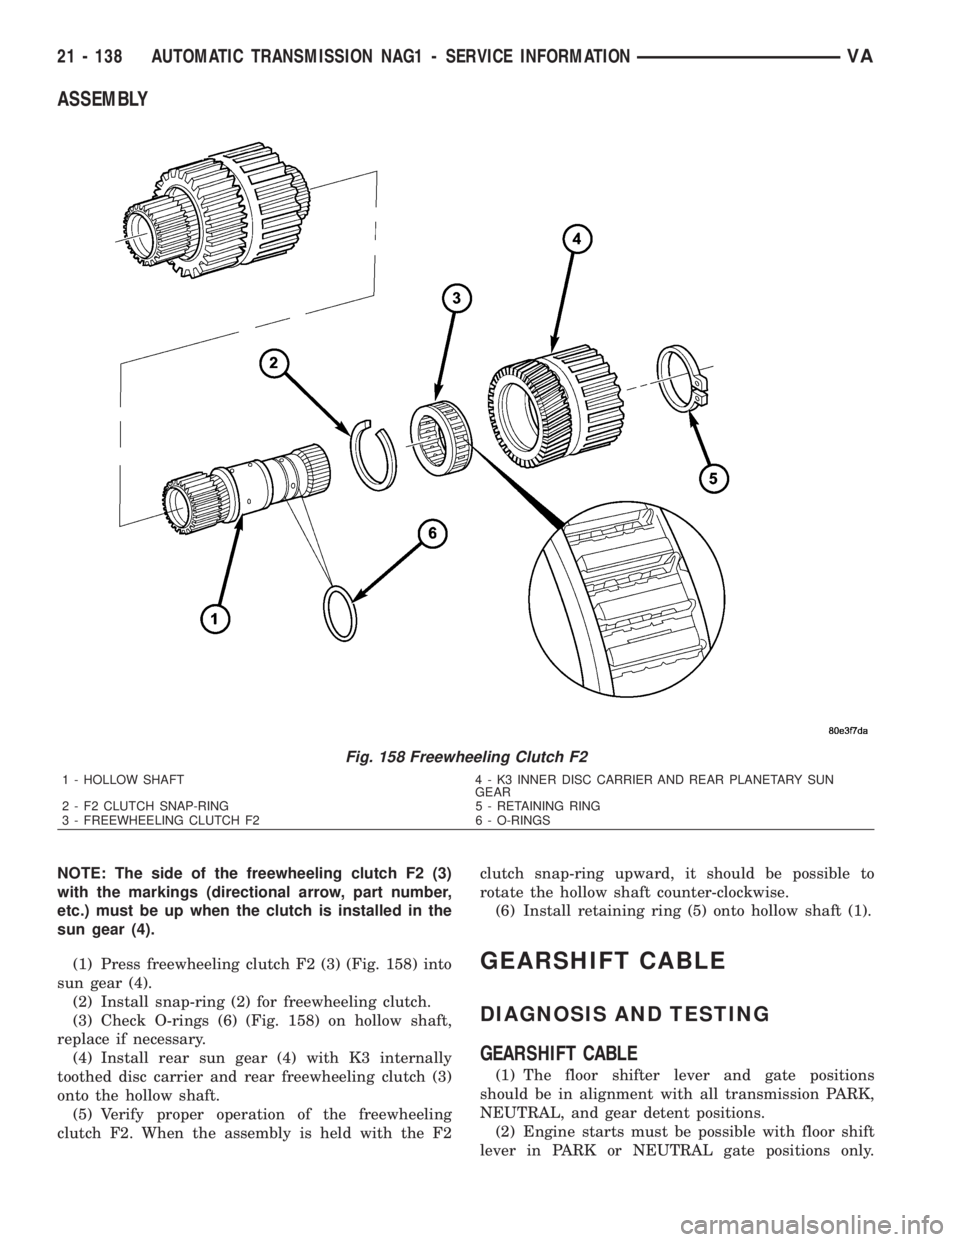
NOTE: The side of the freewheeling clutch F2 (3)
with the markings (directional arrow, part number,
etc.) must be up when the clutch is installed in the
sun gear (4).
(1) Press freewheeling clutch F2 (3) (Fig. 158) into
sun gear (4).
(2) Install snap-ring (2) for freewheeling clutch.
(3) Check O-rings (6) (Fig. 158) on hollow shaft,
replace if necessary.
(4) Install rear sun gear (4) with K3 internally
toothed disc carrier and rear freewheeling clutch (3)
onto the hollow shaft.
(5) Verify proper operation of the freewheeling
clutch F2. When the assembly is held with the F2clutch snap-ring upward, it should be possible to
rotate the hollow shaft counter-clockwise.
(6) Install retaining ring (5) onto hollow shaft (1).
GEARSHIFT CABLE
DIAGNOSIS AND TESTING
GEARSHIFT CABLE
(1) The floor shifter lever and gate positions
should be in alignment with all transmission PARK,
NEUTRAL, and gear detent positions.
(2) Engine starts must be possible with floor shift
lever in PARK or NEUTRAL gate positions only.
Fig. 158 Freewheeling Clutch F2
1 - HOLLOW SHAFT 4 - K3 INNER DISC CARRIER AND REAR PLANETARY SUN
GEAR
2 - F2 CLUTCH SNAP-RING 5 - RETAINING RING
3 - FREEWHEELING CLUTCH F2 6 - O-RINGS
21 - 138 AUTOMATIC TRANSMISSION NAG1 - SERVICE INFORMATIONVA
Page 1885 of 2305
OPERATION
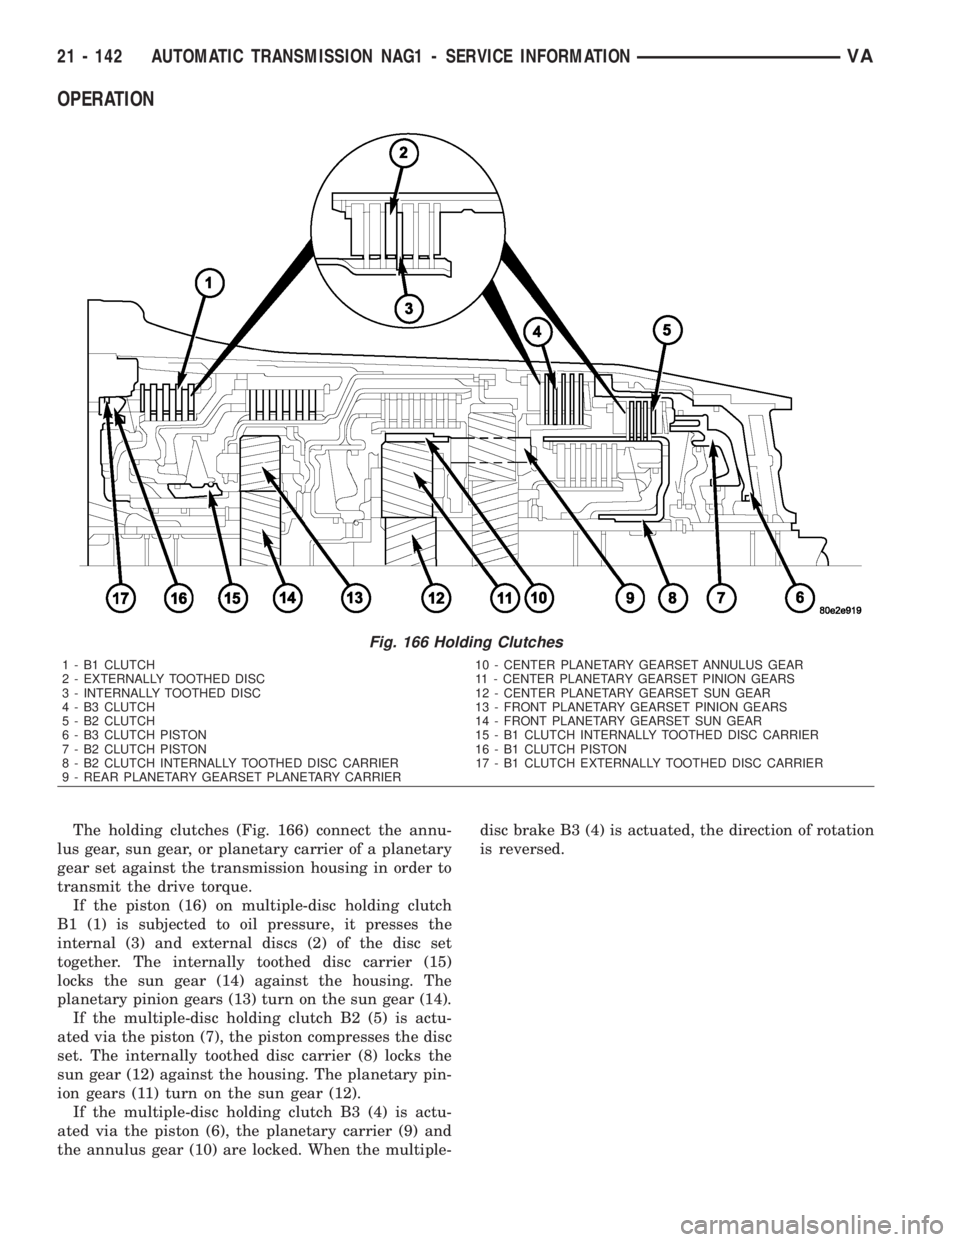
The holding clutches (Fig. 166) connect the annu-
lus gear, sun gear, or planetary carrier of a planetary
gear set against the transmission housing in order to
transmit the drive torque.
If the piston (16) on multiple-disc holding clutch
B1 (1) is subjected to oil pressure, it presses the
internal (3) and external discs (2) of the disc set
together. The internally toothed disc carrier (15)
locks the sun gear (14) against the housing. The
planetary pinion gears (13) turn on the sun gear (14).
If the multiple-disc holding clutch B2 (5) is actu-
ated via the piston (7), the piston compresses the disc
set. The internally toothed disc carrier (8) locks the
sun gear (12) against the housing. The planetary pin-
ion gears (11) turn on the sun gear (12).
If the multiple-disc holding clutch B3 (4) is actu-
ated via the piston (6), the planetary carrier (9) and
the annulus gear (10) are locked. When the multiple-disc brake B3 (4) is actuated, the direction of rotation
is reversed.
Fig. 166 Holding Clutches
1 - B1 CLUTCH 10 - CENTER PLANETARY GEARSET ANNULUS GEAR
2 - EXTERNALLY TOOTHED DISC 11 - CENTER PLANETARY GEARSET PINION GEARS
3 - INTERNALLY TOOTHED DISC 12 - CENTER PLANETARY GEARSET SUN GEAR
4 - B3 CLUTCH 13 - FRONT PLANETARY GEARSET PINION GEARS
5 - B2 CLUTCH 14 - FRONT PLANETARY GEARSET SUN GEAR
6 - B3 CLUTCH PISTON 15 - B1 CLUTCH INTERNALLY TOOTHED DISC CARRIER
7 - B2 CLUTCH PISTON 16 - B1 CLUTCH PISTON
8 - B2 CLUTCH INTERNALLY TOOTHED DISC CARRIER 17 - B1 CLUTCH EXTERNALLY TOOTHED DISC CARRIER
9 - REAR PLANETARY GEARSET PLANETARY CARRIER
21 - 142 AUTOMATIC TRANSMISSION NAG1 - SERVICE INFORMATIONVA
Page 1901 of 2305
INSTALLATION
CAUTION: Verify that the geartrain end-play shim is
properly installed over the output shaft and against
the park gear.
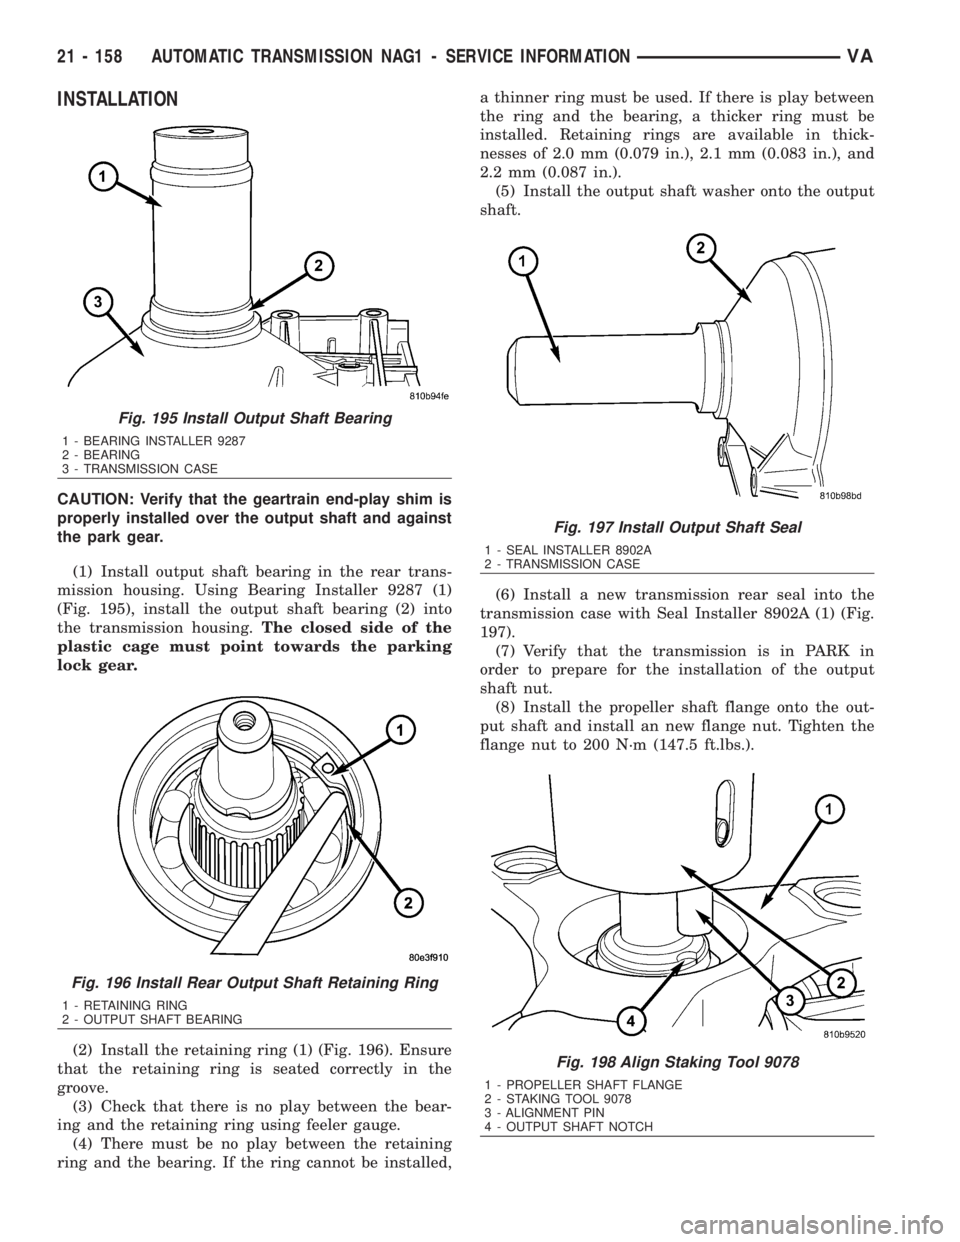
(1) Install output shaft bearing in the rear trans-
mission housing. Using Bearing Installer 9287 (1)
(Fig. 195), install the output shaft bearing (2) into
the transmission housing.The closed side of the
plastic cage must point towards the parking
lock gear.
(2) Install the retaining ring (1) (Fig. 196). Ensure
that the retaining ring is seated correctly in the
groove.
(3) Check that there is no play between the bear-
ing and the retaining ring using feeler gauge.
(4) There must be no play between the retaining
ring and the bearing. If the ring cannot be installed,a thinner ring must be used. If there is play between
the ring and the bearing, a thicker ring must be
installed. Retaining rings are available in thick-
nesses of 2.0 mm (0.079 in.), 2.1 mm (0.083 in.), and
2.2 mm (0.087 in.).
(5) Install the output shaft washer onto the output
shaft.
(6) Install a new transmission rear seal into the
transmission case with Seal Installer 8902A (1) (Fig.
197).
(7) Verify that the transmission is in PARK in
order to prepare for the installation of the output
shaft nut.
(8) Install the propeller shaft flange onto the out-
put shaft and install an new flange nut. Tighten the
flange nut to 200 N´m (147.5 ft.lbs.).
Fig. 195 Install Output Shaft Bearing
1 - BEARING INSTALLER 9287
2 - BEARING
3 - TRANSMISSION CASE
Fig. 196 Install Rear Output Shaft Retaining Ring
1 - RETAINING RING
2 - OUTPUT SHAFT BEARING
Fig. 197 Install Output Shaft Seal
1 - SEAL INSTALLER 8902A
2 - TRANSMISSION CASE
Fig. 198 Align Staking Tool 9078
1 - PROPELLER SHAFT FLANGE
2 - STAKING TOOL 9078
3 - ALIGNMENT PIN
4 - OUTPUT SHAFT NOTCH
21 - 158 AUTOMATIC TRANSMISSION NAG1 - SERVICE INFORMATIONVA