2006 MERCEDES-BENZ SPRINTER engine
[x] Cancel search: enginePage 897 of 2305
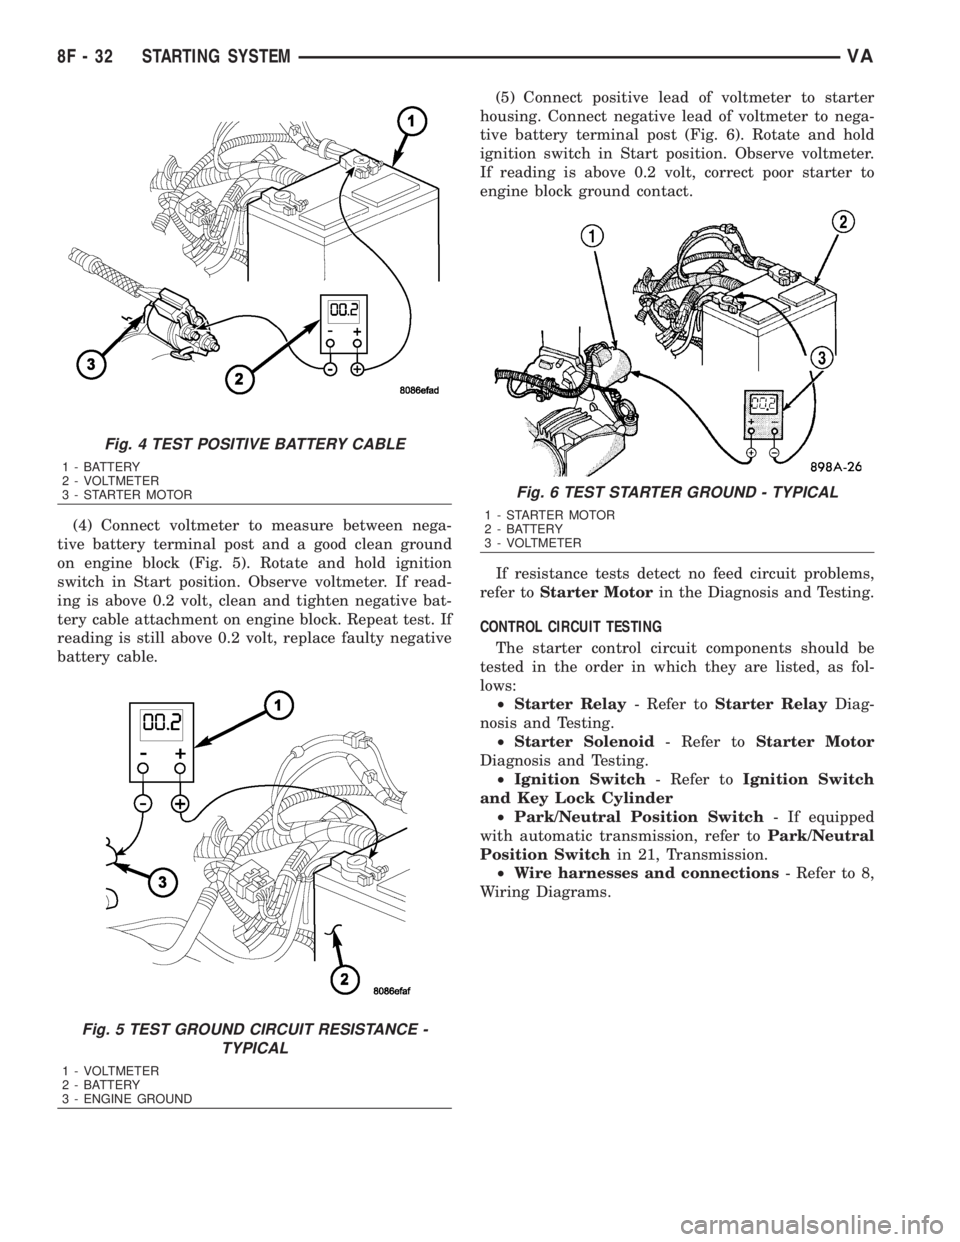
(4) Connect voltmeter to measure between nega-
tive battery terminal post and a good clean ground
on engine block (Fig. 5). Rotate and hold ignition
switch in Start position. Observe voltmeter. If read-
ing is above 0.2 volt, clean and tighten negative bat-
tery cable attachment on engine block. Repeat test. If
reading is still above 0.2 volt, replace faulty negative
battery cable.(5) Connect positive lead of voltmeter to starter
housing. Connect negative lead of voltmeter to nega-
tive battery terminal post (Fig. 6). Rotate and hold
ignition switch in Start position. Observe voltmeter.
If reading is above 0.2 volt, correct poor starter to
engine block ground contact.
If resistance tests detect no feed circuit problems,
refer toStarter Motorin the Diagnosis and Testing.
CONTROL CIRCUIT TESTING
The starter control circuit components should be
tested in the order in which they are listed, as fol-
lows:
²Starter Relay- Refer toStarter RelayDiag-
nosis and Testing.
²Starter Solenoid- Refer toStarter Motor
Diagnosis and Testing.
²Ignition Switch- Refer toIgnition Switch
and Key Lock Cylinder
²Park/Neutral Position Switch- If equipped
with automatic transmission, refer toPark/Neutral
Position Switchin 21, Transmission.
²Wire harnesses and connections- Refer to 8,
Wiring Diagrams.
Fig. 4 TEST POSITIVE BATTERY CABLE
1 - BATTERY
2 - VOLTMETER
3 - STARTER MOTOR
Fig. 5 TEST GROUND CIRCUIT RESISTANCE -
TYPICAL
1 - VOLTMETER
2 - BATTERY
3 - ENGINE GROUND
Fig. 6 TEST STARTER GROUND - TYPICAL
1 - STARTER MOTOR
2 - BATTERY
3 - VOLTMETER
8F - 32 STARTING SYSTEMVA
Page 898 of 2305
SPECIFICATIONS
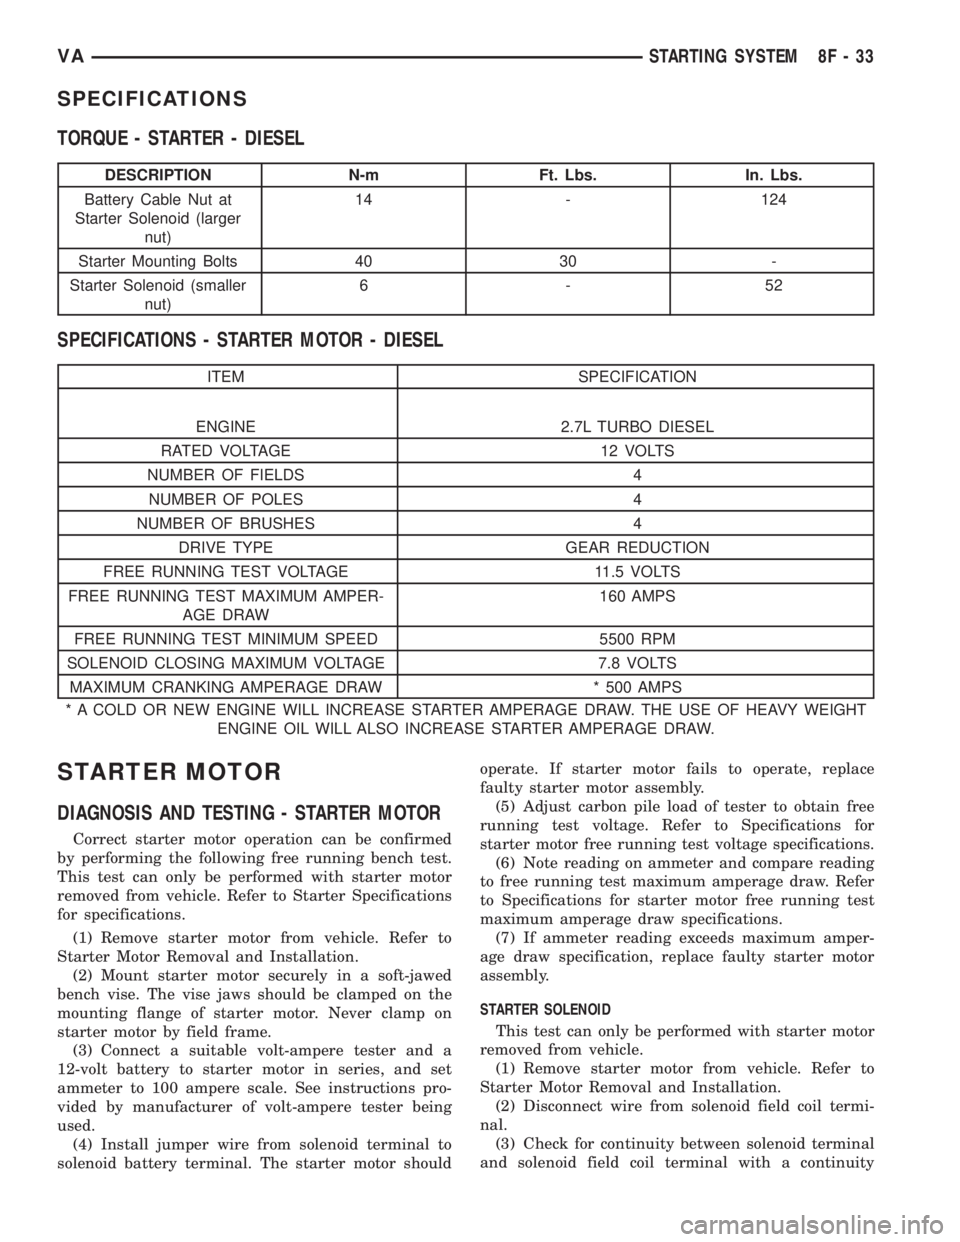
TORQUE - STARTER - DIESEL
DESCRIPTION N-m Ft. Lbs. In. Lbs.
Battery Cable Nut at
Starter Solenoid (larger
nut)14 - 124
Starter Mounting Bolts 40 30 -
Starter Solenoid (smaller
nut)6-52
SPECIFICATIONS - STARTER MOTOR - DIESEL
ITEM SPECIFICATION
ENGINE 2.7L TURBO DIESEL
RATED VOLTAGE 12 VOLTS
NUMBER OF FIELDS 4
NUMBER OF POLES 4
NUMBER OF BRUSHES 4
DRIVE TYPE GEAR REDUCTION
FREE RUNNING TEST VOLTAGE 11.5 VOLTS
FREE RUNNING TEST MAXIMUM AMPER-
AGE DRAW160 AMPS
FREE RUNNING TEST MINIMUM SPEED 5500 RPM
SOLENOID CLOSING MAXIMUM VOLTAGE 7.8 VOLTS
MAXIMUM CRANKING AMPERAGE DRAW * 500 AMPS
* A COLD OR NEW ENGINE WILL INCREASE STARTER AMPERAGE DRAW. THE USE OF HEAVY WEIGHT
ENGINE OIL WILL ALSO INCREASE STARTER AMPERAGE DRAW.
STARTER MOTOR
DIAGNOSIS AND TESTING - STARTER MOTOR
Correct starter motor operation can be confirmed
by performing the following free running bench test.
This test can only be performed with starter motor
removed from vehicle. Refer to Starter Specifications
for specifications.
(1) Remove starter motor from vehicle. Refer to
Starter Motor Removal and Installation.
(2) Mount starter motor securely in a soft-jawed
bench vise. The vise jaws should be clamped on the
mounting flange of starter motor. Never clamp on
starter motor by field frame.
(3) Connect a suitable volt-ampere tester and a
12-volt battery to starter motor in series, and set
ammeter to 100 ampere scale. See instructions pro-
vided by manufacturer of volt-ampere tester being
used.
(4) Install jumper wire from solenoid terminal to
solenoid battery terminal. The starter motor shouldoperate. If starter motor fails to operate, replace
faulty starter motor assembly.
(5) Adjust carbon pile load of tester to obtain free
running test voltage. Refer to Specifications for
starter motor free running test voltage specifications.
(6) Note reading on ammeter and compare reading
to free running test maximum amperage draw. Refer
to Specifications for starter motor free running test
maximum amperage draw specifications.
(7) If ammeter reading exceeds maximum amper-
age draw specification, replace faulty starter motor
assembly.
STARTER SOLENOID
This test can only be performed with starter motor
removed from vehicle.
(1) Remove starter motor from vehicle. Refer to
Starter Motor Removal and Installation.
(2) Disconnect wire from solenoid field coil termi-
nal.
(3) Check for continuity between solenoid terminal
and solenoid field coil terminal with a continuity
VASTARTING SYSTEM 8F - 33
Page 899 of 2305
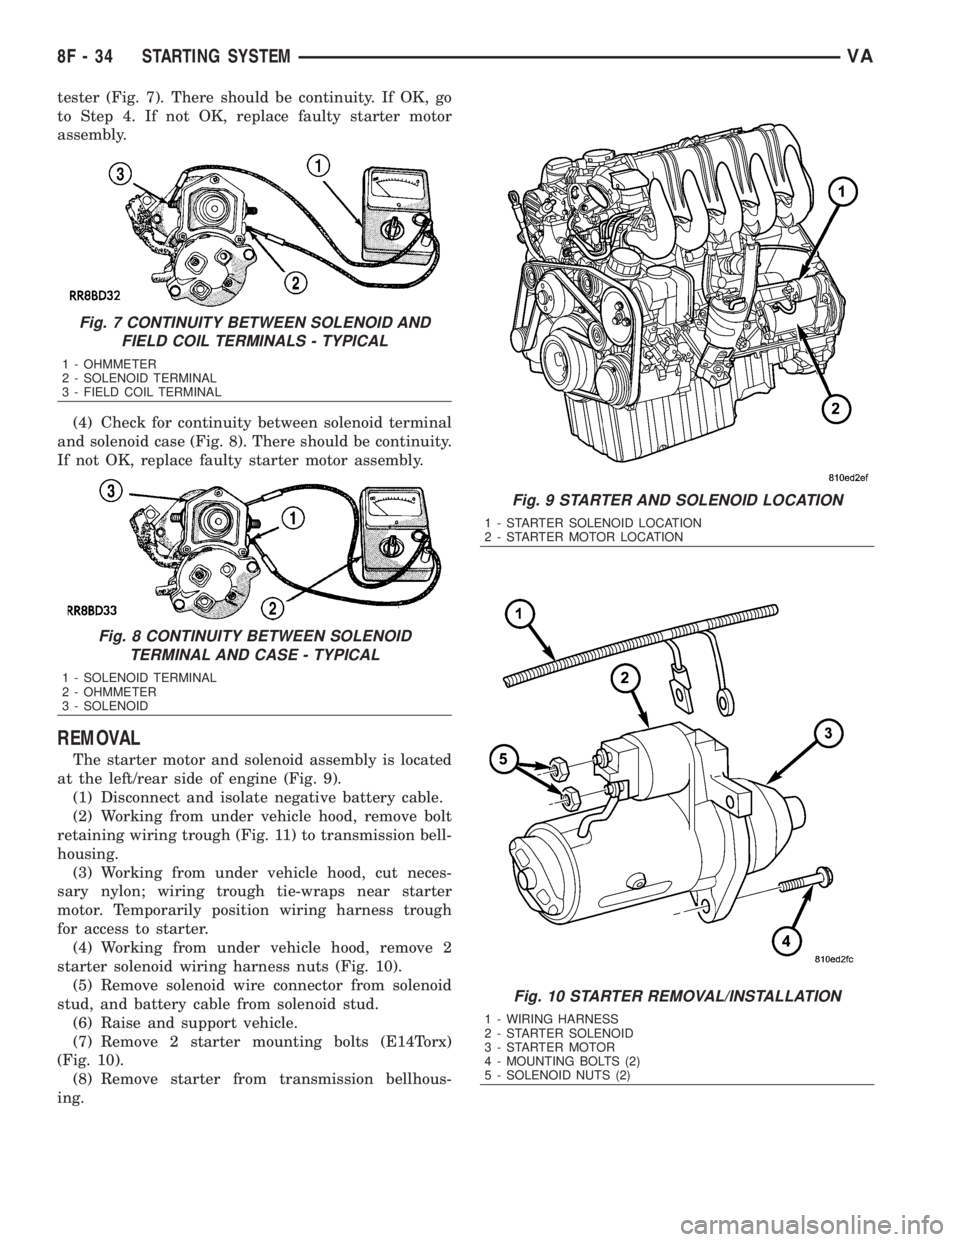
tester (Fig. 7). There should be continuity. If OK, go
to Step 4. If not OK, replace faulty starter motor
assembly.
(4) Check for continuity between solenoid terminal
and solenoid case (Fig. 8). There should be continuity.
If not OK, replace faulty starter motor assembly.
REMOVAL
The starter motor and solenoid assembly is located
at the left/rear side of engine (Fig. 9).
(1) Disconnect and isolate negative battery cable.
(2) Working from under vehicle hood, remove bolt
retaining wiring trough (Fig. 11) to transmission bell-
housing.
(3) Working from under vehicle hood, cut neces-
sary nylon; wiring trough tie-wraps near starter
motor. Temporarily position wiring harness trough
for access to starter.
(4) Working from under vehicle hood, remove 2
starter solenoid wiring harness nuts (Fig. 10).
(5) Remove solenoid wire connector from solenoid
stud, and battery cable from solenoid stud.
(6) Raise and support vehicle.
(7) Remove 2 starter mounting bolts (E14Torx)
(Fig. 10).
(8) Remove starter from transmission bellhous-
ing.
Fig. 7 CONTINUITY BETWEEN SOLENOID AND
FIELD COIL TERMINALS - TYPICAL
1 - OHMMETER
2 - SOLENOID TERMINAL
3 - FIELD COIL TERMINAL
Fig. 8 CONTINUITY BETWEEN SOLENOID
TERMINAL AND CASE - TYPICAL
1 - SOLENOID TERMINAL
2 - OHMMETER
3 - SOLENOID
Fig. 9 STARTER AND SOLENOID LOCATION
1 - STARTER SOLENOID LOCATION
2 - STARTER MOTOR LOCATION
Fig. 10 STARTER REMOVAL/INSTALLATION
1 - WIRING HARNESS
2 - STARTER SOLENOID
3 - STARTER MOTOR
4 - MOUNTING BOLTS (2)
5 - SOLENOID NUTS (2)
8F - 34 STARTING SYSTEMVA
Page 911 of 2305

HEATED SEATS
TABLE OF CONTENTS
page page
HEATED SEATS
DESCRIPTION.........................10
OPERATION...........................10
DIAGNOSIS AND TESTING - HEATED SEATS . 11
DRIVER HEATED SEAT SWITCH
DESCRIPTION.........................11
OPERATION...........................11
DIAGNOSIS AND TESTING - DRIVER HEATED
SEAT SWITCH........................11
REMOVAL.............................11
INSTALLATION.........................12
HEATED SEAT ELEMENT
DESCRIPTION.........................12
OPERATION...........................12
DIAGNOSIS AND TESTING - HEATED SEAT
ELEMENT...........................12
HEATED SEAT RELAY
DESCRIPTION.........................12OPERATION...........................13
DIAGNOSIS AND TESTING - HEATED SEAT
RELAY..............................13
REMOVAL.............................13
INSTALLATION.........................13
HEATED SEAT SENSOR
DESCRIPTION.........................13
DIAGNOSIS AND TESTING - HEATED SEAT
SENSOR............................13
PASSENGER HEATED SEAT SWITCH
DESCRIPTION.........................13
OPERATION...........................13
DIAGNOSIS AND TESTING - PASSENGER
HEATED SEAT SWITCH.................14
REMOVAL.............................14
INSTALLATION.........................14
HEATED SEATS
DESCRIPTION
Individually controlled, electrically heated front
seats are available factory-installed optional equip-
ment on this model. Vehicles with this option can be
visually identified by the two separate heated seat
switches mounted in the instrument panel. The
heated seat system allows the front seat driver and
passenger to select from two different levels of sup-
plemental electrical seat heating, or no seat heating
to suit their individual comfort requirements. The
heated seat system for this vehicle includes the fol-
lowing major components, which are described in fur-
ther detail later in this section:
²Heated Seat Elements- Four heated seat ele-
ments are used per vehicle, two for each front seat.
One heating element in the seat back and one in the
seat cushion. The heated seat sensor is integral to
the seat cushion heating element. The heated seat
elements are integral to the front seat and seat back
cushions. Refer to heated seat elements later in this
section for additional information.
²Heated Seat Relay- One heated seat relay is
used per vehicle. The relay is located in the fuse
block and is responsible for distributing the voltage
(B+) to the heated seat elements.
²Heated Seat Sensors- Two heated seat sen-
sors are used per vehicle, one for each front seat. The
heated seat sensors are integral to each of the heatedseat element assemblies. Refer to heated seat sensor
later in this section for additional information.
²Heated Seat Switches- Two heated seat
switches are used per vehicle, one for each front seat.
The switches are mounted in the instrument panel.
Refer to heated seat switches later in this section for
additional information.
Hard wired circuitry connects the heated seat sys-
tem components to each other through the electrical
system of the vehicle. Refer to Wiring for additional
information. The wiring information includes wiring
diagrams, proper wire and connector repair proce-
dures, further details on wire harness routing and
retention, as well as pin-out and location views for
the various wire harness connectors, splices and
grounds.
OPERATION
The heated seat system is designed to provide indi-
vidually controlled, supplemental heat to the seat
cushion and seat back surfaces of both front seats.
Because this system converts electrical current to
heat, the heated seat system can provide a measure
of warm comfort almost immediately upon entering a
cold vehicle, rather than having to wait for the
engine coolant to reach sufficient temperature to
deliver heat through the conventional heater system.
This system allows each front seat occupant to indi-
vidually select one of two comfort levels, Hi or Lo, or
to turn the heater for their seat off.
8G - 10 HEATED SEATSVA
Page 918 of 2305

IGNITION CONTROL
TABLE OF CONTENTS
page page
IGNITION CONTROL
OPERATION - GLOW PLUG................1
SPECIAL TOOLS........................1
GLOW PLUG
REMOVAL.............................1
INSTALLATION..........................1GLOW PLUG RELAY
DESCRIPTION..........................1
OPERATION............................2
DIAGNOSIS AND TESTING - GLOW PLUG
RELAYS..............................2
IGNITION CONTROL
OPERATION - GLOW PLUG
Pre - Glowing
With the key in the On position, the glow plug out-
put stage and the indicator lamp are actuated by the
ECM. The pre-heating time is calculated by the ECM
in line with the coolant temperature. The glow plug
output stage switches the current through the glow
plugs. The glow plug indicator lamp goes out after a
pre-glow period has elapsed. Component or cable fail-
ures in the pre-glow system are indicated by the glow
plug lamp and stored in the ECM.
Glow Output Stage
With the ignition key in the On position a signal is
transmitted from the ECM to the glow plug output
stager. If no data is exchanged with the ECM the
glow plug stage is terminated after two seconds. The
glow plug out put stage constantly signals the cur-
rent operating state (ON/OFF) and any system
faults. The following faults are recognized by the out
put stage and transmitted to the ECM:
²Open circuit in one or more of the glow plug
leads
²Short circuit in the glow plug circuit
²Out put stage fault or temperature related shut-
off
If a failure in the glow plug system occurs, the
glow plug indicator lamp will be illuminated only as
long as the fault is current. If the failure is no longer
present, the glow plug indicator lamp will be
switched off but a code will be stored in the ECM.
After Glow
Once the engine has started, the ECM determines
the after glow time depending on cooling tempera-
ture. During this time the glow plugs continue to be
actuated by the glow plug output stage. This results
in improved smooth running after a cold start and
improved warming up properties, elimination of blueexhaust after a cold start up and a more stable cold
starting speed.
If no signal is received from the coolant tempera-
ture sensor the signal from the oil sensor is used as a
substitute.
SPECIAL TOOLS
GLOW PLUG
REMOVAL
(1) Disconnect the negative battery cable.
(2) Remove the engine cover.
(3) Use special tool #9286 pliers to unplug the
glow plug wiring harness connector(s) at the glow
plug.
(4) Remove the glow plug(s) (Fig. 1).
INSTALLATION
(1) Screw glow plug(s) into cylinder head and
tighten to 12 N´m (115 lbs. in) (Fig. 1).
(2) Connect the glow plug wiring harness connec-
tor(s)
(3) Install the engine cover.
(4) Connect negative battery cable.
GLOW PLUG RELAY
DESCRIPTION
The glow plug relay supplies battery voltage to the
glow plug through a timed cycle that is related to
coolant temperature. The glow plug relay is located
under the battery. The purpose of a glow plug system
GLOW PLUG PLIERS
VAIGNITION CONTROL 8I - 1
Page 919 of 2305

is to improve combustion for low emissions and to
achieve easy starting at low temperatures.
OPERATION
When the ignition key is turned to the ON posi-
tion, the glow plug output stage and pre-glow indica-
tor lamp are actuated by the ECM. The duration of
the signal depends on the coolant temperature. The
glow plug relay has processing that communicates
with the ECM. If no data exchange occurs at the trig-
gering stage, the preheating is switched off after 2
seconds.
Start glowing is initiated when the key is in the
start position. The glow plugs (R13±R17) continue to
be supplied with voltage. This makes it possible to
stabilize the cold starting speed. (After glowing is ini-
tiated when the starter reject speed is reached).
After the engine starts, the ECM determines the
afterglow period in line with coolant temperature. If
no signal is received from the coolant temperature
sensor, afterglow is maintained for thirty seconds.
The following aims are reached by the afterglow :
²Improvement in warming-up properties
²Prevention of white exhaust smoke after cold
start
²Stabilizing of the cold starting speed
The glow plug output stage constantly signals the
current operating state and faults. The following are
faults detected and transmitted to the ECM :²Open circuit at one or several glow plugs
²Short circuit in the glow plug circuit
²Relay fault
If the Glow plug relay detects an open circuit at a
glow plug, it is stored and indicated only once the
engine is running by the preglow indicator lamp com-
ing on for about one minute and a fault is stored in
the ECM. If a short circuit, a glow plug output stage
faulty or a temperature related switching off of out-
put stages is detected, the fault is stored and indi-
cated immediately by the preglow indicator lamp
coming on. Once the fault is no longer current, the
indicator is immediately switched off, but the fault is
stored in the ECM. If the fault is constantly current,
the preglow indicator lamp remains on until the igni-
tion is switched off.
DIAGNOSIS AND TESTING - GLOW PLUG
RELAYS
Refer to the appropriate Diesel Powertrain Diagno-
sis Manual for information on diagnosing the glow
plug relays.
Fig. 1 GLOW PLUG (S)
1 - GLOW PLUG
2 - WIRING HARNESS CONNECTOR3 - INTAKE MANIFOLD
4 - ENGINE COVER
8I - 2 IGNITION CONTROLVA
Page 920 of 2305
INSTRUMENT CLUSTER
TABLE OF CONTENTS
page page
INSTRUMENT CLUSTER
DESCRIPTION..........................2
OPERATION............................5
DIAGNOSIS AND TESTING - INSTRUMENT
CLUSTER............................7
STANDARD PROCEDURE
CLUSTER PROGRAMMING...............7
REMOVAL.............................8
INSTALLATION..........................9
ABS INDICATOR
DESCRIPTION..........................9
OPERATION...........................10
ADR INDICATOR
DESCRIPTION.........................10
OPERATION...........................10
AIRBAG INDICATOR
DESCRIPTION.........................11
OPERATION...........................11
AMBIENT TEMPERATURE INDICATOR
DESCRIPTION.........................11
OPERATION...........................12
BRAKE INDICATOR
DESCRIPTION.........................12
OPERATION...........................12
BRAKE WEAR INDICATOR
DESCRIPTION.........................13
OPERATION...........................13
CHARGING INDICATOR
DESCRIPTION.........................14
OPERATION...........................14
CLOCK
DESCRIPTION.........................14
OPERATION...........................14
COOLANT LOW INDICATOR
DESCRIPTION.........................15
OPERATION...........................15
ENGINE TEMPERATURE GAUGE
DESCRIPTION.........................15
OPERATION...........................16
ESP INDICATOR
DESCRIPTION.........................16
OPERATION...........................16
FUEL FILTER CLOGGED INDICATOR
DESCRIPTION.........................17
OPERATION...........................17
FUEL GAUGE
DESCRIPTION.........................17
OPERATION...........................18
GEAR SELECTOR INDICATOR
DESCRIPTION.........................18
OPERATION...........................18HIGH BEAM INDICATOR
DESCRIPTION.........................19
OPERATION...........................19
LOW FUEL INDICATOR
DESCRIPTION.........................19
OPERATION...........................19
LOW OIL LEVEL INDICATOR
DESCRIPTION.........................20
OPERATION...........................20
MAINTENANCE INDICATOR
DESCRIPTION.........................20
OPERATION...........................21
MALFUNCTION INDICATOR LAMP (MIL)
DESCRIPTION.........................21
OPERATION...........................21
MULTI-FUNCTION INDICATOR
DESCRIPTION.........................22
OPERATION...........................22
ODOMETER
DESCRIPTION.........................22
OPERATION...........................23
PARK BRAKE INDICATOR
DESCRIPTION.........................23
OPERATION...........................24
SEATBELT INDICATOR
DESCRIPTION.........................24
OPERATION...........................24
SPEEDOMETER
DESCRIPTION.........................25
OPERATION...........................25
TACHOMETER
DESCRIPTION.........................25
OPERATION...........................25
TRACTION CONTROL INDICATOR
DESCRIPTION.........................26
OPERATION...........................26
TRACTION CONTROL MALFUNCTION
INDICATOR
DESCRIPTION.........................27
OPERATION...........................27
TURN SIGNAL INDICATOR
DESCRIPTION.........................27
OPERATION...........................27
WAIT-TO-START INDICATOR
DESCRIPTION.........................28
OPERATION...........................28
WASHER FLUID INDICATOR
DESCRIPTION.........................29
OPERATION...........................29
WATER-IN-FUEL INDICATOR
DESCRIPTION.........................29
OPERATION...........................29
VAINSTRUMENT CLUSTER 8J - 1
Page 921 of 2305
INSTRUMENT CLUSTER
DESCRIPTION
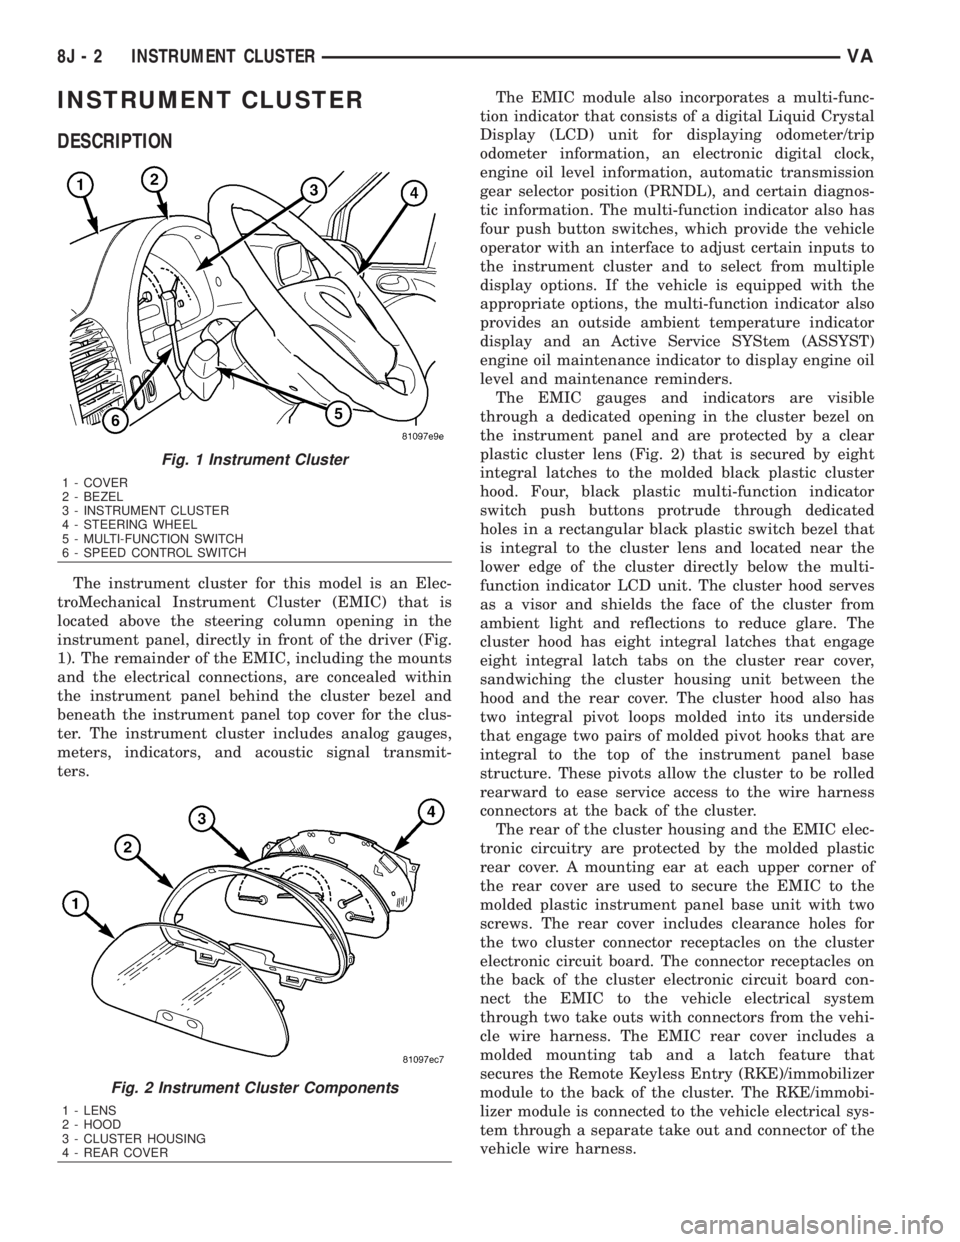
The instrument cluster for this model is an Elec-
troMechanical Instrument Cluster (EMIC) that is
located above the steering column opening in the
instrument panel, directly in front of the driver (Fig.
1). The remainder of the EMIC, including the mounts
and the electrical connections, are concealed within
the instrument panel behind the cluster bezel and
beneath the instrument panel top cover for the clus-
ter. The instrument cluster includes analog gauges,
meters, indicators, and acoustic signal transmit-
ters.The EMIC module also incorporates a multi-func-
tion indicator that consists of a digital Liquid Crystal
Display (LCD) unit for displaying odometer/trip
odometer information, an electronic digital clock,
engine oil level information, automatic transmission
gear selector position (PRNDL), and certain diagnos-
tic information. The multi-function indicator also has
four push button switches, which provide the vehicle
operator with an interface to adjust certain inputs to
the instrument cluster and to select from multiple
display options. If the vehicle is equipped with the
appropriate options, the multi-function indicator also
provides an outside ambient temperature indicator
display and an Active Service SYStem (ASSYST)
engine oil maintenance indicator to display engine oil
level and maintenance reminders.
The EMIC gauges and indicators are visible
through a dedicated opening in the cluster bezel on
the instrument panel and are protected by a clear
plastic cluster lens (Fig. 2) that is secured by eight
integral latches to the molded black plastic cluster
hood. Four, black plastic multi-function indicator
switch push buttons protrude through dedicated
holes in a rectangular black plastic switch bezel that
is integral to the cluster lens and located near the
lower edge of the cluster directly below the multi-
function indicator LCD unit. The cluster hood serves
as a visor and shields the face of the cluster from
ambient light and reflections to reduce glare. The
cluster hood has eight integral latches that engage
eight integral latch tabs on the cluster rear cover,
sandwiching the cluster housing unit between the
hood and the rear cover. The cluster hood also has
two integral pivot loops molded into its underside
that engage two pairs of molded pivot hooks that are
integral to the top of the instrument panel base
structure. These pivots allow the cluster to be rolled
rearward to ease service access to the wire harness
connectors at the back of the cluster.
The rear of the cluster housing and the EMIC elec-
tronic circuitry are protected by the molded plastic
rear cover. A mounting ear at each upper corner of
the rear cover are used to secure the EMIC to the
molded plastic instrument panel base unit with two
screws. The rear cover includes clearance holes for
the two cluster connector receptacles on the cluster
electronic circuit board. The connector receptacles on
the back of the cluster electronic circuit board con-
nect the EMIC to the vehicle electrical system
through two take outs with connectors from the vehi-
cle wire harness. The EMIC rear cover includes a
molded mounting tab and a latch feature that
secures the Remote Keyless Entry (RKE)/immobilizer
module to the back of the cluster. The RKE/immobi-
lizer module is connected to the vehicle electrical sys-
tem through a separate take out and connector of the
vehicle wire harness.
Fig. 1 Instrument Cluster
1 - COVER
2 - BEZEL
3 - INSTRUMENT CLUSTER
4 - STEERING WHEEL
5 - MULTI-FUNCTION SWITCH
6 - SPEED CONTROL SWITCH
Fig. 2 Instrument Cluster Components
1 - LENS
2 - HOOD
3 - CLUSTER HOUSING
4 - REAR COVER
8J - 2 INSTRUMENT CLUSTERVA