2006 MERCEDES-BENZ SPRINTER ignition
[x] Cancel search: ignitionPage 327 of 2305
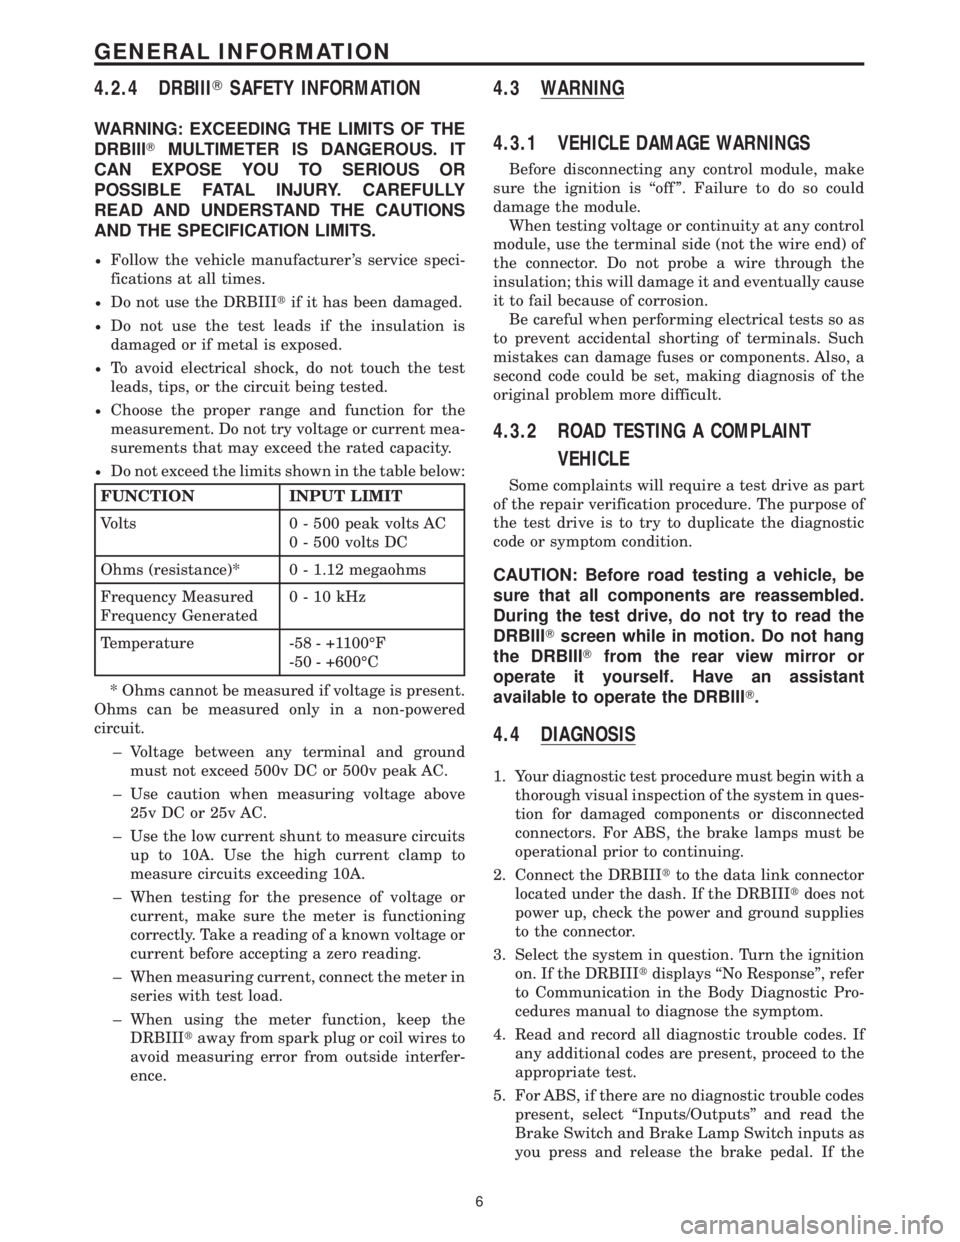
4.2.4 DRBIIITSAFETY INFORMATION
WARNING: EXCEEDING THE LIMITS OF THE
DRBIIITMULTIMETER IS DANGEROUS. IT
CAN EXPOSE YOU TO SERIOUS OR
POSSIBLE FATAL INJURY. CAREFULLY
READ AND UNDERSTAND THE CAUTIONS
AND THE SPECIFICATION LIMITS.
²Follow the vehicle manufacturer 's service speci-
fications at all times.
²Do not use the DRBIIItif it has been damaged.
²Do not use the test leads if the insulation is
damaged or if metal is exposed.
²To avoid electrical shock, do not touch the test
leads, tips, or the circuit being tested.
²Choose the proper range and function for the
measurement. Do not try voltage or current mea-
surements that may exceed the rated capacity.
²Do not exceed the limits shown in the table below:
FUNCTION INPUT LIMIT
Volts 0 - 500 peak volts AC
0 - 500 volts DC
Ohms (resistance)* 0 - 1.12 megaohms
Frequency Measured
Frequency Generated0-10kHz
Temperature -58 - +1100ÉF
-50 - +600ÉC
* Ohms cannot be measured if voltage is present.
Ohms can be measured only in a non-powered
circuit.
± Voltage between any terminal and ground
must not exceed 500v DC or 500v peak AC.
± Use caution when measuring voltage above
25v DC or 25v AC.
± Use the low current shunt to measure circuits
up to 10A. Use the high current clamp to
measure circuits exceeding 10A.
± When testing for the presence of voltage or
current, make sure the meter is functioning
correctly. Take a reading of a known voltage or
current before accepting a zero reading.
± When measuring current, connect the meter in
series with test load.
± When using the meter function, keep the
DRBIIItaway from spark plug or coil wires to
avoid measuring error from outside interfer-
ence.
4.3 WARNING
4.3.1 VEHICLE DAMAGE WARNINGS
Before disconnecting any control module, make
sure the ignition is ``off ''. Failure to do so could
damage the module.
When testing voltage or continuity at any control
module, use the terminal side (not the wire end) of
the connector. Do not probe a wire through the
insulation; this will damage it and eventually cause
it to fail because of corrosion.
Be careful when performing electrical tests so as
to prevent accidental shorting of terminals. Such
mistakes can damage fuses or components. Also, a
second code could be set, making diagnosis of the
original problem more difficult.
4.3.2 ROAD TESTING A COMPLAINT
VEHICLE
Some complaints will require a test drive as part
of the repair verification procedure. The purpose of
the test drive is to try to duplicate the diagnostic
code or symptom condition.
CAUTION: Before road testing a vehicle, be
sure that all components are reassembled.
During the test drive, do not try to read the
DRBIIITscreen while in motion. Do not hang
the DRBIIITfrom the rear view mirror or
operate it yourself. Have an assistant
available to operate the DRBIIIT.
4.4 DIAGNOSIS
1. Your diagnostic test procedure must begin with a
thorough visual inspection of the system in ques-
tion for damaged components or disconnected
connectors. For ABS, the brake lamps must be
operational prior to continuing.
2. Connect the DRBIIItto the data link connector
located under the dash. If the DRBIIItdoes not
power up, check the power and ground supplies
to the connector.
3. Select the system in question. Turn the ignition
on. If the DRBIIItdisplays ``No Responseº, refer
to Communication in the Body Diagnostic Pro-
cedures manual to diagnose the symptom.
4. Read and record all diagnostic trouble codes. If
any additional codes are present, proceed to the
appropriate test.
5. For ABS, if there are no diagnostic trouble codes
present, select ``Inputs/Outputs'' and read the
Brake Switch and Brake Lamp Switch inputs as
you press and release the brake pedal. If the
6
GENERAL INFORMATION
Page 328 of 2305

display does not match the state of the pedal,
perform the proper test. For a problem with the
ªABSº warning indicator, refer to the proper test.
6. If no other problems are found, it will be neces-
sary to road test the vehicle.THE DRBIIIt
MUST NOT BE CONNECTED TO THE
DATA LINK CONNECTOR WHEN ROAD
TESTING FOR PROPER ANTILOCK OP-
ERATION. THE SYSTEM IS DISABLED
WHILE IN DIAGNOSTIC MODE.Perform
several antilock stops from above 50 Km/h (30
mph) and then repeat steps 2, 3, and 4. If any
diagnostic trouble codes are present, proceed to
the appropriate test.
7. The following conditions should be considered
``NORMAL'' operation, and no repairs should be
attempted to correct them.
± Brake pedal feedback during an ABS stop
(clicking, vibrating)
± Clicking, groaning or buzzing at 12 Km/h (8
mph) (drive off self test)
± Groaning noise during an ABS stop
± Slight brake pedal drop and pop noise when
ignition is initially turned on
± Brake pedal ratcheting down at the end of an
ABS stop
8. If the complaint is ABS ``cycling'' at the end of a
stop at low speeds, it may be caused by a
marginal wheel speed sensor signal. The sensor
air gap, tone wheel condition, and/or brakes
hanging up are possible causes of this condition.
9. After a road test in which no problems were
found, refer to any Technical Service Bulletins
that may apply.
5.0 REQUIRED TOOLS AND
EQUIPMENT
DRBIIIt(diagnostic read-out box)
jumper wires
ohmmeter
voltmeter
test light
oscilloscope
6.0 GLOSSARY OF TERMS
ABSantilock brake system
ACalternating current
BCMbody control module
BSbrake switch
BLSbrake lamp switch
CABcontroller antilock brakeDCdirect current
DLCdata link connector
DRBIIItdiagnostic read-out box
DTCdiagnostic test code
EBDelectronic brake distribution
ECMelectronic control module
HCUhydraulic control unit
HZHertz
ICinstrument cluster
LFleft front
LRleft rear
PMpump motor
RFright front
RRright rear
SOLsolenoid
TCStraction control system
TCSStraction control system switch
VSSvehicle speed signal
WSSwheel speed sensor
7
GENERAL INFORMATION
Page 331 of 2305
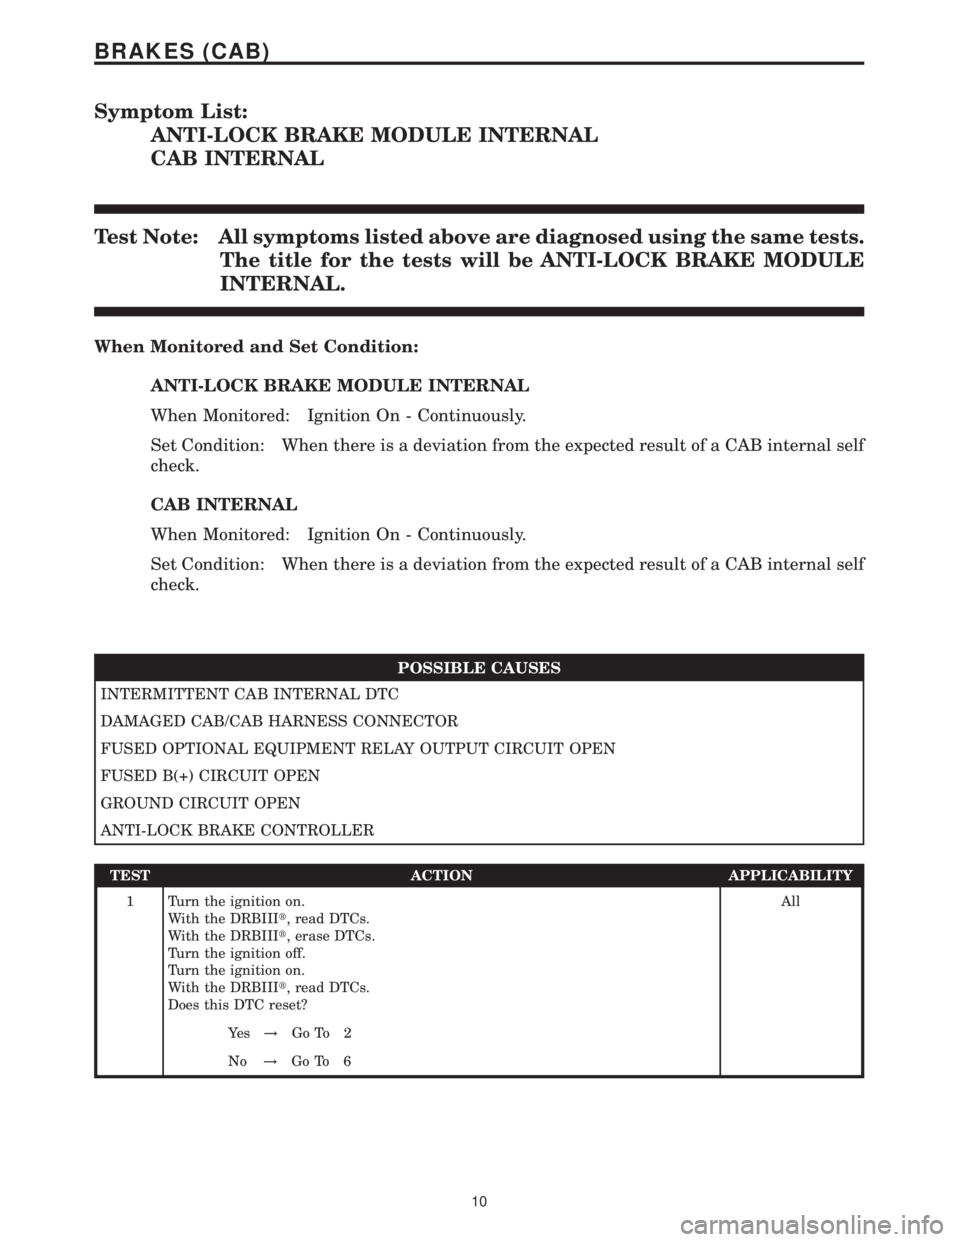
Symptom List:
ANTI-LOCK BRAKE MODULE INTERNAL
CAB INTERNAL
Test Note: All symptoms listed above are diagnosed using the same tests.
The title for the tests will be ANTI-LOCK BRAKE MODULE
INTERNAL.
When Monitored and Set Condition:
ANTI-LOCK BRAKE MODULE INTERNAL
When Monitored: Ignition On - Continuously.
Set Condition: When there is a deviation from the expected result of a CAB internal self
check.
CAB INTERNAL
When Monitored: Ignition On - Continuously.
Set Condition: When there is a deviation from the expected result of a CAB internal self
check.
POSSIBLE CAUSES
INTERMITTENT CAB INTERNAL DTC
DAMAGED CAB/CAB HARNESS CONNECTOR
FUSED OPTIONAL EQUIPMENT RELAY OUTPUT CIRCUIT OPEN
FUSED B(+) CIRCUIT OPEN
GROUND CIRCUIT OPEN
ANTI-LOCK BRAKE CONTROLLER
TEST ACTION APPLICABILITY
1 Turn the ignition on.
With the DRBIIIt, read DTCs.
With the DRBIIIt, erase DTCs.
Turn the ignition off.
Turn the ignition on.
With the DRBIIIt, read DTCs.
Does this DTC reset?All
Ye s!Go To 2
No!Go To 6
10
BRAKES (CAB)
Page 332 of 2305
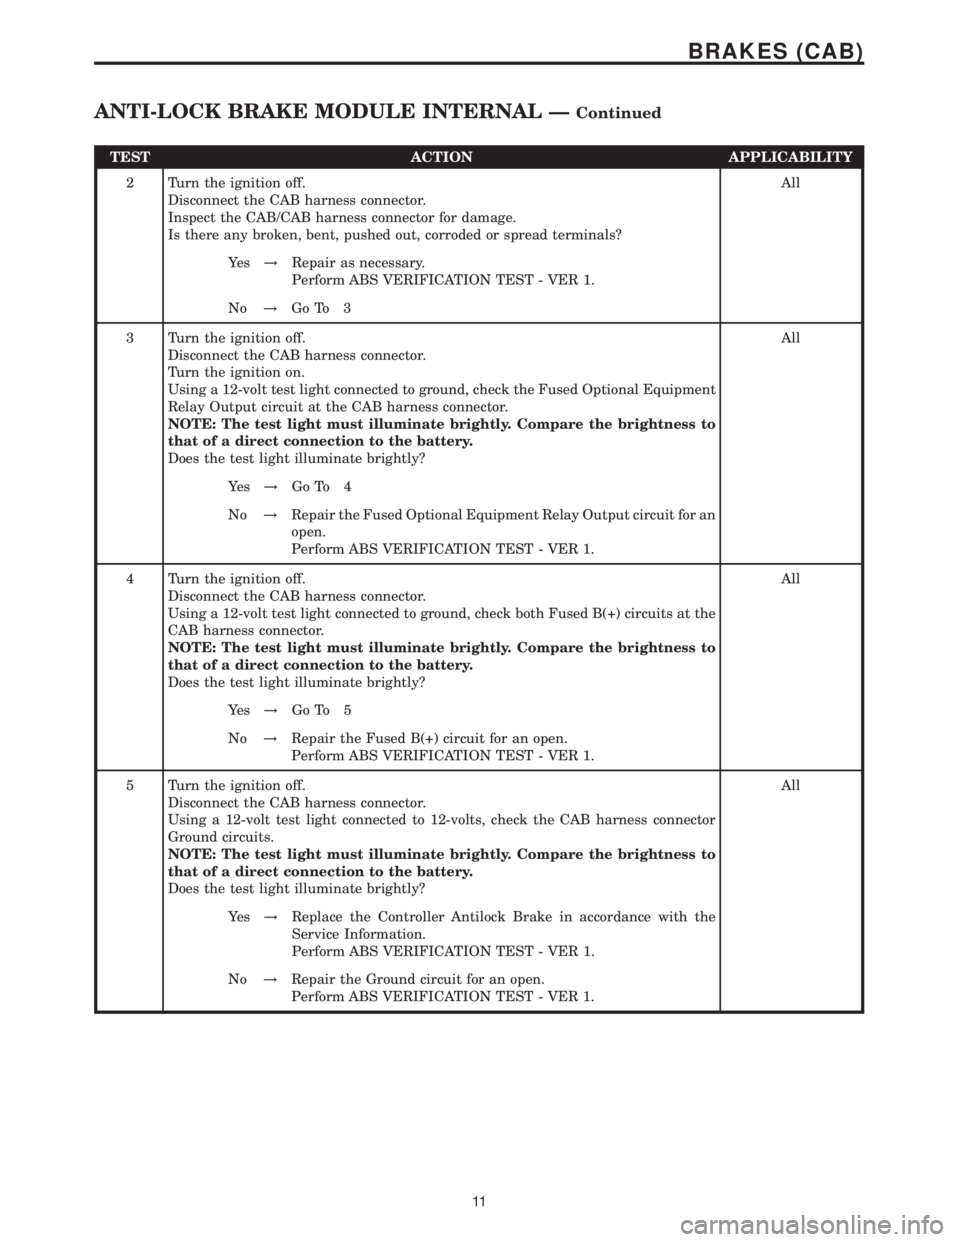
TEST ACTION APPLICABILITY
2 Turn the ignition off.
Disconnect the CAB harness connector.
Inspect the CAB/CAB harness connector for damage.
Is there any broken, bent, pushed out, corroded or spread terminals?All
Ye s!Repair as necessary.
Perform ABS VERIFICATION TEST - VER 1.
No!Go To 3
3 Turn the ignition off.
Disconnect the CAB harness connector.
Turn the ignition on.
Using a 12-volt test light connected to ground, check the Fused Optional Equipment
Relay Output circuit at the CAB harness connector.
NOTE: The test light must illuminate brightly. Compare the brightness to
that of a direct connection to the battery.
Does the test light illuminate brightly?All
Ye s!Go To 4
No!Repair the Fused Optional Equipment Relay Output circuit for an
open.
Perform ABS VERIFICATION TEST - VER 1.
4 Turn the ignition off.
Disconnect the CAB harness connector.
Using a 12-volt test light connected to ground, check both Fused B(+) circuits at the
CAB harness connector.
NOTE: The test light must illuminate brightly. Compare the brightness to
that of a direct connection to the battery.
Does the test light illuminate brightly?All
Ye s!Go To 5
No!Repair the Fused B(+) circuit for an open.
Perform ABS VERIFICATION TEST - VER 1.
5 Turn the ignition off.
Disconnect the CAB harness connector.
Using a 12-volt test light connected to 12-volts, check the CAB harness connector
Ground circuits.
NOTE: The test light must illuminate brightly. Compare the brightness to
that of a direct connection to the battery.
Does the test light illuminate brightly?All
Ye s!Replace the Controller Antilock Brake in accordance with the
Service Information.
Perform ABS VERIFICATION TEST - VER 1.
No!Repair the Ground circuit for an open.
Perform ABS VERIFICATION TEST - VER 1.
11
BRAKES (CAB)
ANTI-LOCK BRAKE MODULE INTERNAL ÐContinued
Page 333 of 2305
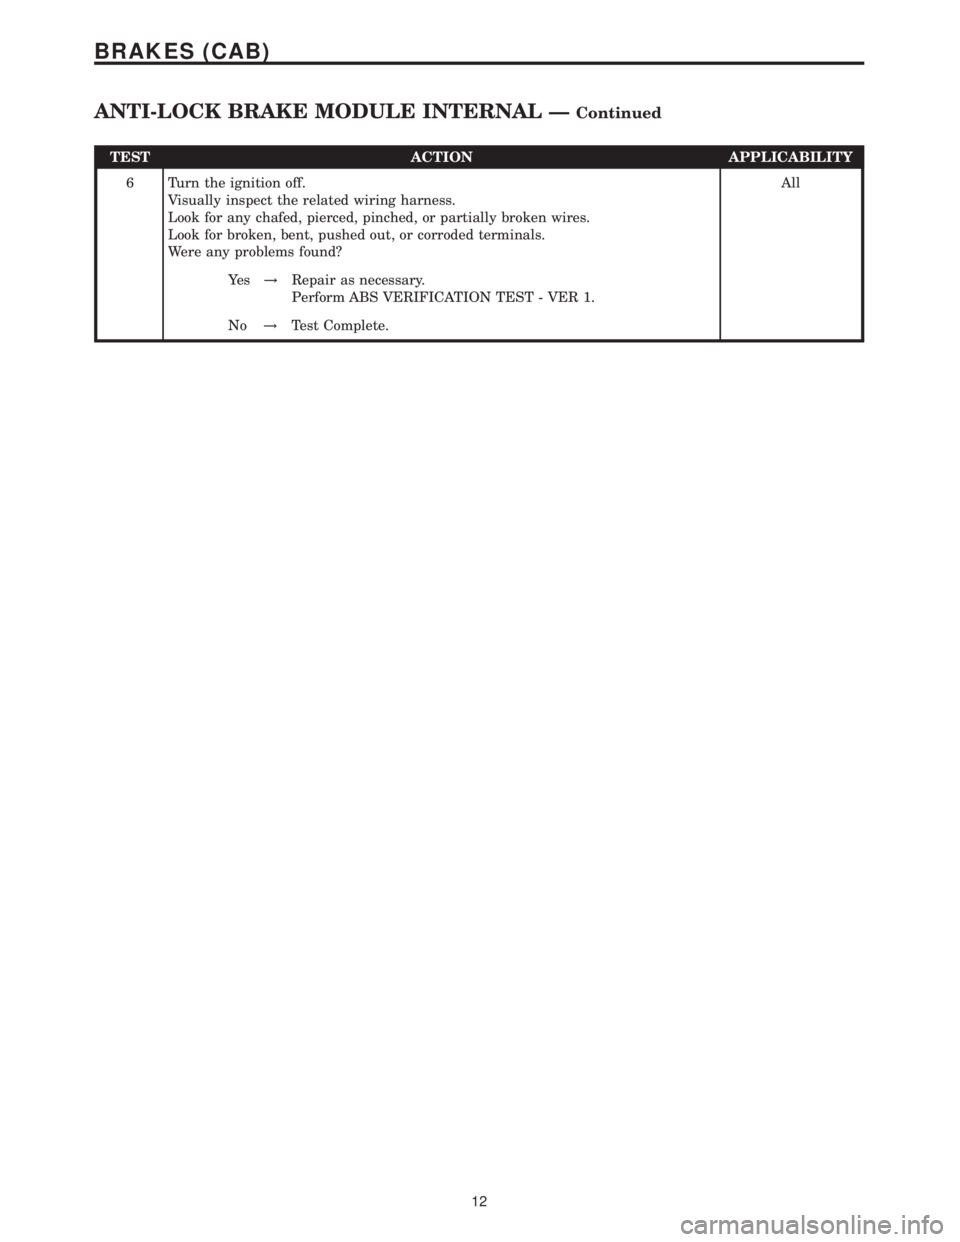
TEST ACTION APPLICABILITY
6 Turn the ignition off.
Visually inspect the related wiring harness.
Look for any chafed, pierced, pinched, or partially broken wires.
Look for broken, bent, pushed out, or corroded terminals.
Were any problems found?All
Ye s!Repair as necessary.
Perform ABS VERIFICATION TEST - VER 1.
No!Test Complete.
12
BRAKES (CAB)
ANTI-LOCK BRAKE MODULE INTERNAL ÐContinued
Page 334 of 2305
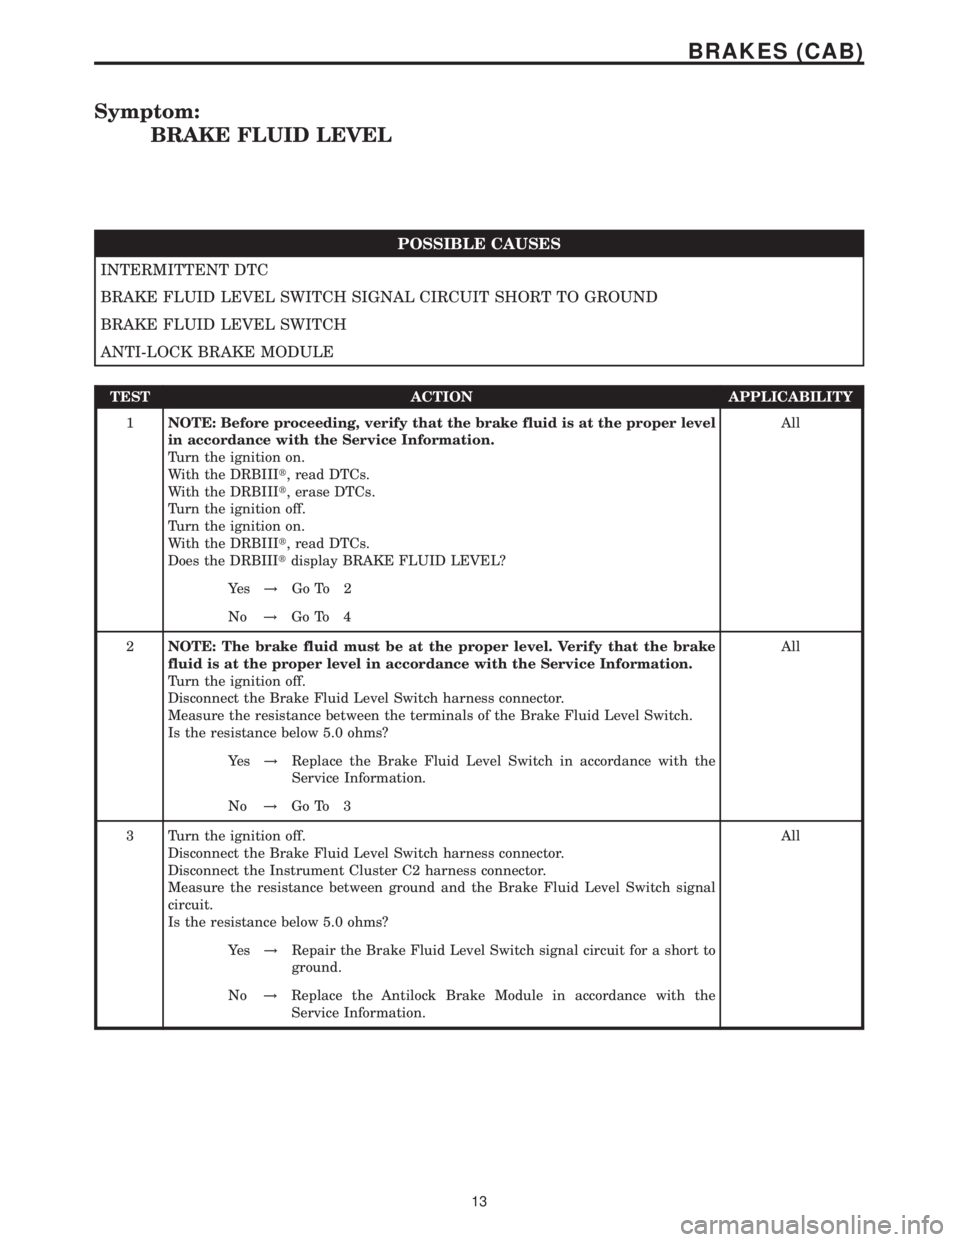
Symptom:
BRAKE FLUID LEVEL
POSSIBLE CAUSES
INTERMITTENT DTC
BRAKE FLUID LEVEL SWITCH SIGNAL CIRCUIT SHORT TO GROUND
BRAKE FLUID LEVEL SWITCH
ANTI-LOCK BRAKE MODULE
TEST ACTION APPLICABILITY
1NOTE: Before proceeding, verify that the brake fluid is at the proper level
in accordance with the Service Information.
Turn the ignition on.
With the DRBIIIt, read DTCs.
With the DRBIIIt, erase DTCs.
Turn the ignition off.
Turn the ignition on.
With the DRBIIIt, read DTCs.
Does the DRBIIItdisplay BRAKE FLUID LEVEL?All
Ye s!Go To 2
No!Go To 4
2NOTE: The brake fluid must be at the proper level. Verify that the brake
fluid is at the proper level in accordance with the Service Information.
Turn the ignition off.
Disconnect the Brake Fluid Level Switch harness connector.
Measure the resistance between the terminals of the Brake Fluid Level Switch.
Is the resistance below 5.0 ohms?All
Ye s!Replace the Brake Fluid Level Switch in accordance with the
Service Information.
No!Go To 3
3 Turn the ignition off.
Disconnect the Brake Fluid Level Switch harness connector.
Disconnect the Instrument Cluster C2 harness connector.
Measure the resistance between ground and the Brake Fluid Level Switch signal
circuit.
Is the resistance below 5.0 ohms?All
Ye s!Repair the Brake Fluid Level Switch signal circuit for a short to
ground.
No!Replace the Antilock Brake Module in accordance with the
Service Information.
13
BRAKES (CAB)
Page 335 of 2305
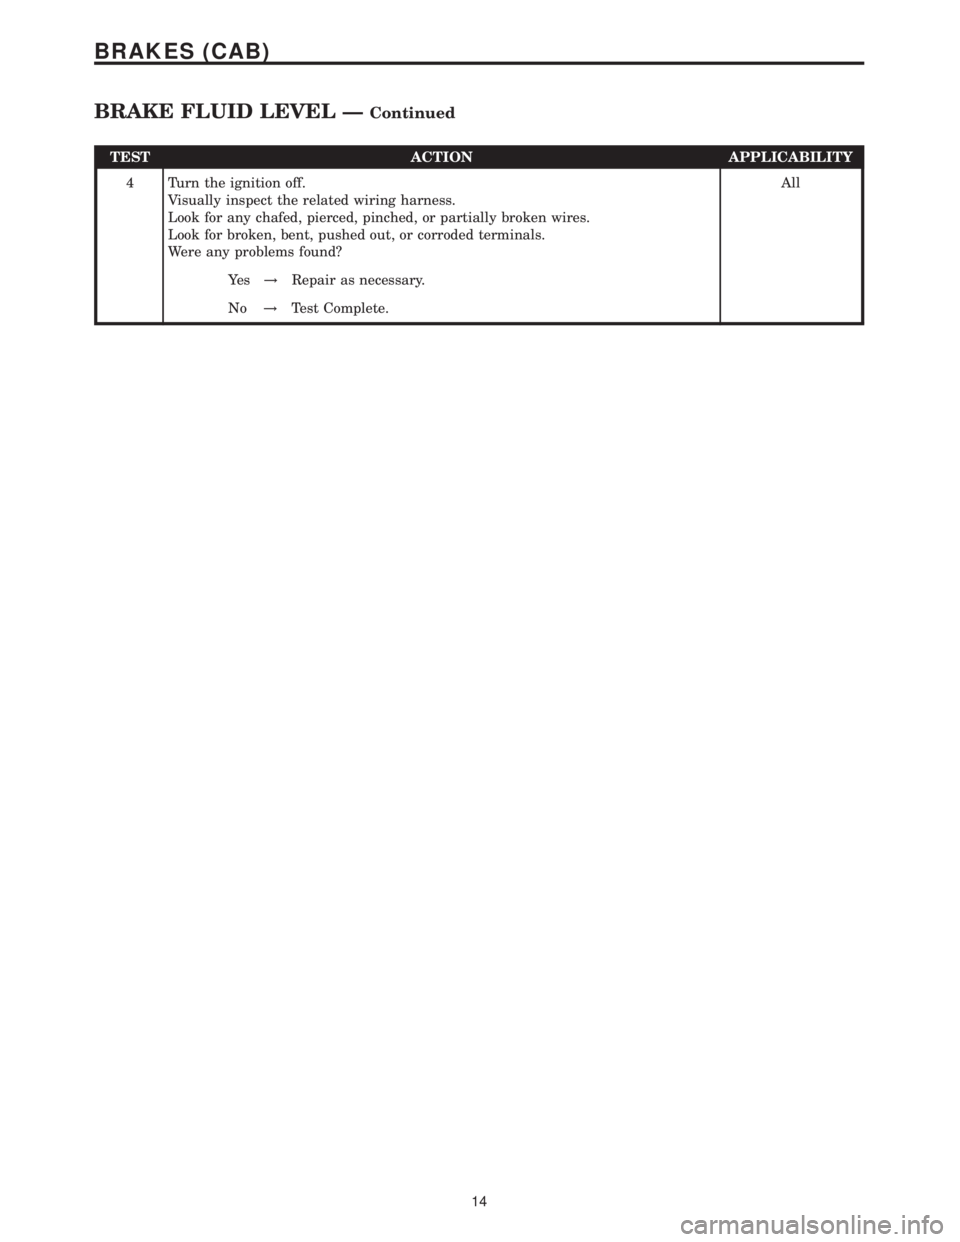
TEST ACTION APPLICABILITY
4 Turn the ignition off.
Visually inspect the related wiring harness.
Look for any chafed, pierced, pinched, or partially broken wires.
Look for broken, bent, pushed out, or corroded terminals.
Were any problems found?All
Ye s!Repair as necessary.
No!Test Complete.
14
BRAKES (CAB)
BRAKE FLUID LEVEL ÐContinued
Page 336 of 2305

Symptom:
BRAKE PRESSURE SENSOR CIRCUIT
POSSIBLE CAUSES
BRAKE PRESSURE SENSOR CIRCUIT INTERMITTENT DTC
BRAKE PRESSURE SENSOR CIRCUIT SHORT TO VOLTAGE
BRAKE PRESSURE SENSOR CIRCUIT SHORT TO GROUND
BRAKE PRESSURE SENSOR CIRCUIT OPEN
BRAKE PRESSURE SENSOR
ANTI-LOCK BRAKE CONTROLLER
TEST ACTION APPLICABILITY
1 Turn the ignition off.
Turn the ignition on.
With the DRBIIIt, read DTCs. Record DTC information.
NOTE: If a system undervoltage or overvoltage DTC is set along with this
DTC, diagnose the system voltage DTC first.
NOTE: Before continuing, make sure that the Brake Lamp switch is ad-
justed correctly and functioning properly. Adjust or replace the switch as
necessary in accordance with the Service Information.
With the DRBIIIt, erase DTCs.
Road test the vehicle and perform several braking maneuvers.
With the DRBIIIt, read DTCs.
Does this DTC reset?All
Ye s!Go To 2
No!Go To 6
2 Turn the ignition off.
Disconnect the Brake Pressure Sensor harness connector.
Disconnect the CAB harness connector.
Turn the ignition on.
Measure the voltage of the Brake Pressure Sensor signal circuit.
Measure the voltage of the Brake Pressure Sensor ground circuit.
Measure the voltage of the Brake Pressure Sensor 5 volt supply circuit.
Is there voltage present on any of the circuits?All
Ye s!Repair the Brake Pressure Sensor circuit(s) for a short to voltage.
No!Go To 3
3 Turn the ignition off.
Disconnect the Brake Pressure Sensor harness connector.
Disconnect the CAB harness connector.
Measure the resistance between ground and the Brake Pressure Sensor signal
circuit.
Measure the resistance between ground and the Brake Pressure Sensor 5 volt supply
circuit.
Is the resistance below 5.0 ohms for either circuit?All
Ye s!Repair the Brake Pressure Sensor circuit(s) for a short to ground.
No!Go To 4
15
BRAKES (CAB)