Page 1805 of 2305

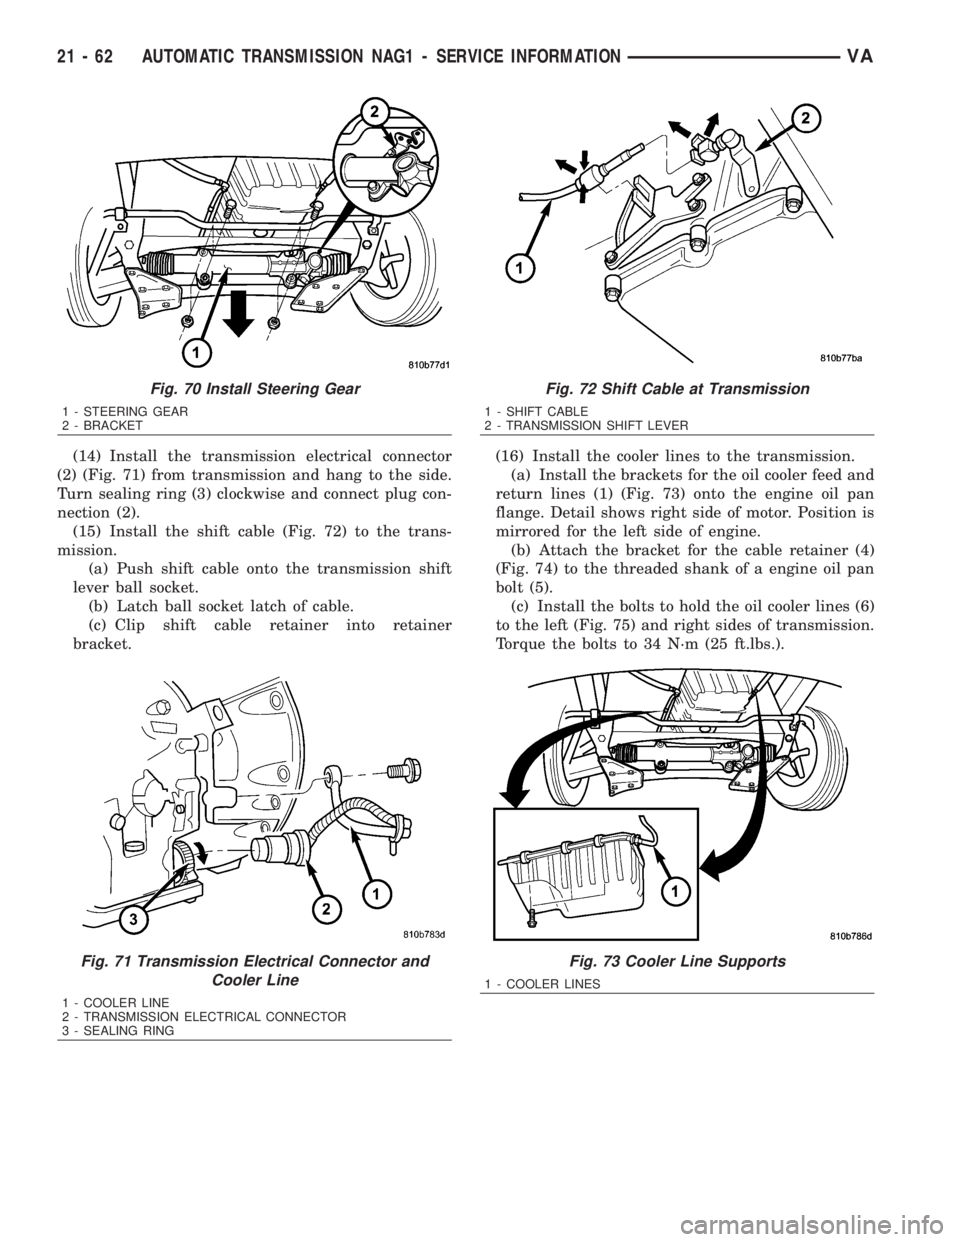
(14) Install the transmission electrical connector
(2) (Fig. 71) from transmission and hang to the side.
Turn sealing ring (3) clockwise and connect plug con-
nection (2).
(15) Install the shift cable (Fig. 72) to the trans-
mission.
(a) Push shift cable onto the transmission shift
lever ball socket.
(b) Latch ball socket latch of cable.
(c) Clip shift cable retainer into retainer
bracket.(16) Install the cooler lines to the transmission.
(a) Install the brackets for the oil cooler feed and
return lines (1) (Fig. 73) onto the engine oil pan
flange. Detail shows right side of motor. Position is
mirrored for the left side of engine.
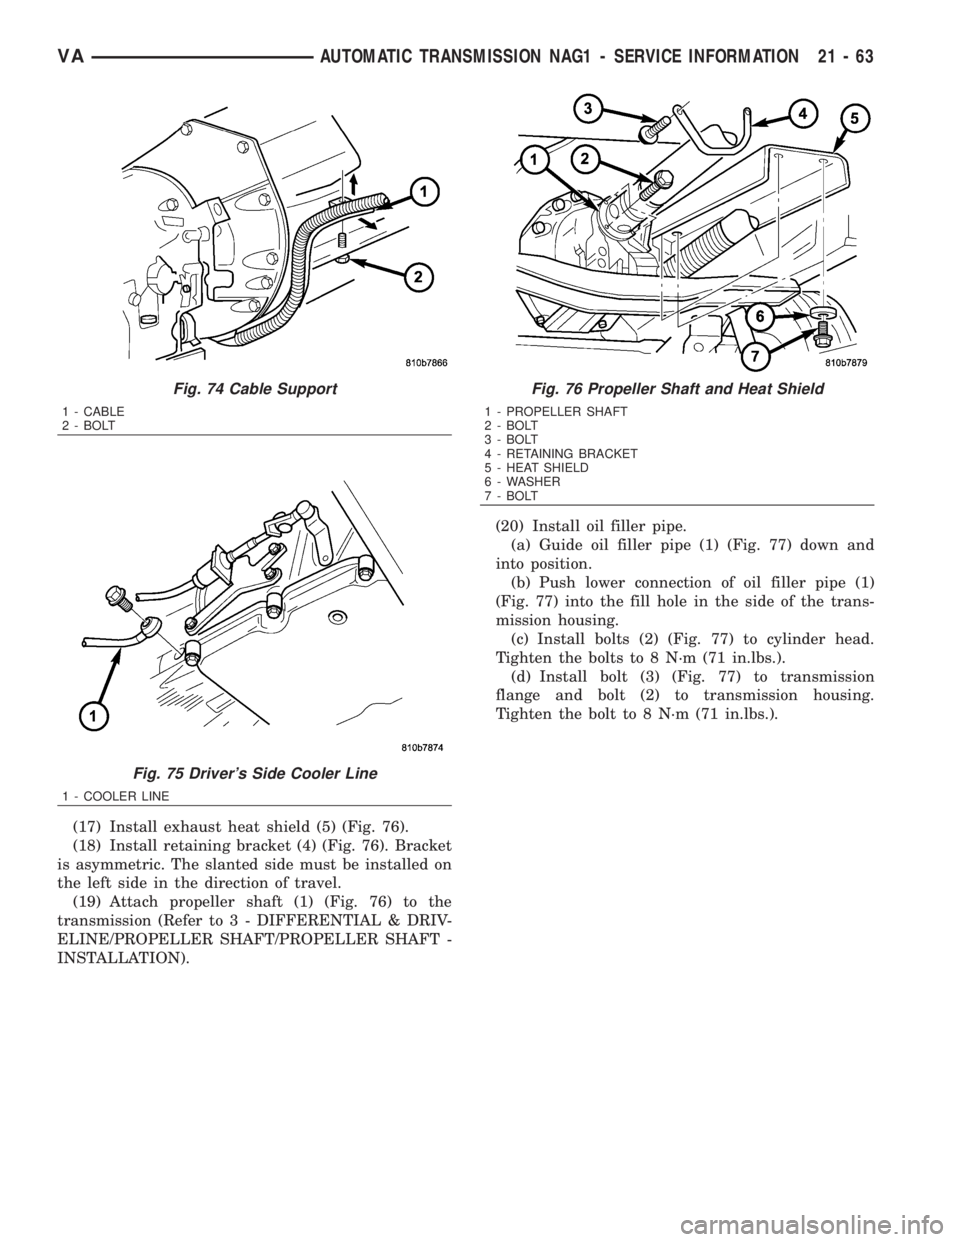
(b) Attach the bracket for the cable retainer (4)
(Fig. 74) to the threaded shank of a engine oil pan
bolt (5).
(c) Install the bolts to hold the oil cooler lines (6)
to the left (Fig. 75) and right sides of transmission.
Torque the bolts to 34 N´m (25 ft.lbs.).
Fig. 70 Install Steering Gear
1 - STEERING GEAR
2 - BRACKET
Fig. 71 Transmission Electrical Connector and
Cooler Line
1 - COOLER LINE
2 - TRANSMISSION ELECTRICAL CONNECTOR
3 - SEALING RING
Fig. 72 Shift Cable at Transmission
1 - SHIFT CABLE
2 - TRANSMISSION SHIFT LEVER
Fig. 73 Cooler Line Supports
1 - COOLER LINES
21 - 62 AUTOMATIC TRANSMISSION NAG1 - SERVICE INFORMATIONVA
Page 1806 of 2305

(17) Install exhaust heat shield (5) (Fig. 76).
(18) Install retaining bracket (4) (Fig. 76). Bracket
is asymmetric. The slanted side must be installed on
the left side in the direction of travel.
(19) Attach propeller shaft (1) (Fig. 76) to the
transmission (Refer to 3 - DIFFERENTIAL & DRIV-
ELINE/PROPELLER SHAFT/PROPELLER SHAFT -
INSTALLATION).(20) Install oil filler pipe.
(a) Guide oil filler pipe (1) (Fig. 77) down and
into position.
(b) Push lower connection of oil filler pipe (1)
(Fig. 77) into the fill hole in the side of the trans-
mission housing.
(c) Install bolts (2) (Fig. 77) to cylinder head.
Tighten the bolts to 8 N´m (71 in.lbs.).
(d) Install bolt (3) (Fig. 77) to transmission
flange and bolt (2) to transmission housing.
Tighten the bolt to 8 N´m (71 in.lbs.).
Fig. 74 Cable Support
1 - CABLE
2 - BOLT
Fig. 75 Driver's Side Cooler Line
1 - COOLER LINE
Fig. 76 Propeller Shaft and Heat Shield
1 - PROPELLER SHAFT
2 - BOLT
3 - BOLT
4 - RETAINING BRACKET
5 - HEAT SHIELD
6 - WASHER
7 - BOLT
VAAUTOMATIC TRANSMISSION NAG1 - SERVICE INFORMATION 21 - 63
Page 1807 of 2305
(21) Install the oil drain plug (2) (Fig. 78) with a
new seal into the transmission oil pan. Tighten the
drain plug to 20 N´m (14.5 ft.lbs.).
(22) Lower vehicle and fill transmission with cor-
rect automatic transmission fluid (Refer to 21 -
TRANSMISSION/AUTOMATIC - NAG1/FLUID AND
FILTER - STANDARD PROCEDURE).
(23) Road test the vehicle and verify the repair.
Fig. 77 Fill Tube
1 - FILL TUBE
2 - BOLTS TO CYLINDER HEAD AND TRANSMISSION HOUS-
ING
3 - BOLT TO TRANSMISSION FLANGE
Fig. 78 Oil Drain Plug
1 - SEAL
2 - DRAIN PLUG
21 - 64 AUTOMATIC TRANSMISSION NAG1 - SERVICE INFORMATIONVA
Page 1808 of 2305
SCHEMATICS AND DIAGRAMS
HYDRAULIC FLOW IN PARK
VAAUTOMATIC TRANSMISSION NAG1 - SERVICE INFORMATION 21 - 65
Page 1809 of 2305
HYDRAULIC FLOW IN REVERSE - FAILSAFE
21 - 66 AUTOMATIC TRANSMISSION NAG1 - SERVICE INFORMATIONVA
Page 1810 of 2305
HYDRAULIC FLOW IN REVERSE
VAAUTOMATIC TRANSMISSION NAG1 - SERVICE INFORMATION 21 - 67
Page 1811 of 2305
HYDRAULIC FLOW IN NEUTRAL - DEFAULT
21 - 68 AUTOMATIC TRANSMISSION NAG1 - SERVICE INFORMATIONVA
Page 1812 of 2305
HYDRAULIC FLOW IN NEUTRAL
VAAUTOMATIC TRANSMISSION NAG1 - SERVICE INFORMATION 21 - 69