Page 135 of 242

133 Telephone*
Telephone operation
TDMA or CDMA mobile phone
Entering the unlock code
�Use the number keys 1 through 0
to enter the four-digit unlock code.
Asterisks instead of digits will appear in
the input line.
�Press the OK soft key.
If entered code is correct and the pho-
ne is registered in a network, the phone
is ready for use and the Telephone
menu will appear.GSM mobile phone
Entering the PIN code
�Enter the four-digit PIN code on the
mobile phone or at the COMAND. Refer
to the mobile phone operator’s manual
on how to do this.
If no SIM card is in the telephone, the
message
Please insert SIM card
(Emergency Call 911 only pos-
sible with phone)
appears.
�Insert a SIM card. Refer to the mo-
bile phone operator’s manual.
Entering codesi
Your unlock code prevents unauthori-
zed persons from using your telephone.
B e s u re t o m em o ri z e t hi s c o d e , a f o u r d i -
git number, carefully.
If you enter an incorrect code, the sys-
tem returns to the menu for entering the
unlock code.
i
You must always enter the unlock code
when you switch on the telephone the
first time (if phone is in locked mode).
Page 136 of 242
134 Telephone*
Telephone operation
Entry incorrect:
You will hear a warning sound. The mes-
sage
PIN-Code incorrect will appear.
�You need to re-enter your PIN code.Entering the PUK
If you enter your PIN incorrectly three
times in a row, you need to enter the PUK
number.
The PUK can only be entered at the mobile
phone. Refer to the mobile phone
operator’s manual.When the COMAND is switched on, you
can switch to telephone operation from
any other system (e.g. radio):
�Press a.
The Telephone menu will appear.
Telephone menu
!
If the PIN is entered incorrectly three
times in a row, the SIM card will be
blocked. The message
SIM-card
blocked
is displayed briefly. After that
the message
PIN blocked. Please
enter PUK on cell phone
is
displayed.
i
The PUK number is provided by your
telephone service provider.
Switching to telephone operation
Page 139 of 242
137 Telephone*
Telephone operation
You can use the following functions to
make a phone call:
�Dialing a telephone number
(
�page 137)
�Redial (�page 138)
�Selecting an entry from the Received
calls list (
�page 139)
�Selecting an entry from the Dialed
numbers list (
�page 139)
�Use speed-dialing (�page 141)
�Use quick-dialing (�page 141)
�Selecting a phone book entry and
dialing the number (
�page 145)Dialing a telephone number
Entering a telephone number
�Open the Telephone menu
(
�page 134).
�Use the number keys 1 - 0 to enter
the telephone number.Deleting the last or several digits:
�Press the Delete soft key once or se-
veral times.
Deleting all digits:
�Press K.
or
�Press and hold Delete soft key for
more than 2 seconds.
Outgoing calls
Page 143 of 242

141 Telephone*
Telephone operation
Speed-dialing
For all memory locations
At the mobile phone you can save
telephone numbers in the speed-dialing
memory and use them. Refer to the mobile
phone operator’s manual.
You can also use speed-dialing at the
COMAND (only mobile phone memory
locations 1-99).
You can enter up to 2 digits.
�Open the Telephone menu
(
�page 134).
Memory locations with up to two digits:
�Use the number keys 1 to 9 to
enter the memory location number.
�Press E.
or
�Press k.
or
�Press the Send soft key.
The telephone dials the saved number.
Ending a call (
�page 138).
Quick-dialing
Quick dialing can be used on memory loca-
tions 1-9.
�Open the Telephone menu
(
�page 134).
�Press one of the number keys 1 - 9
longer than 2 seconds.
The telephone dials the saved number.
Ending a call (
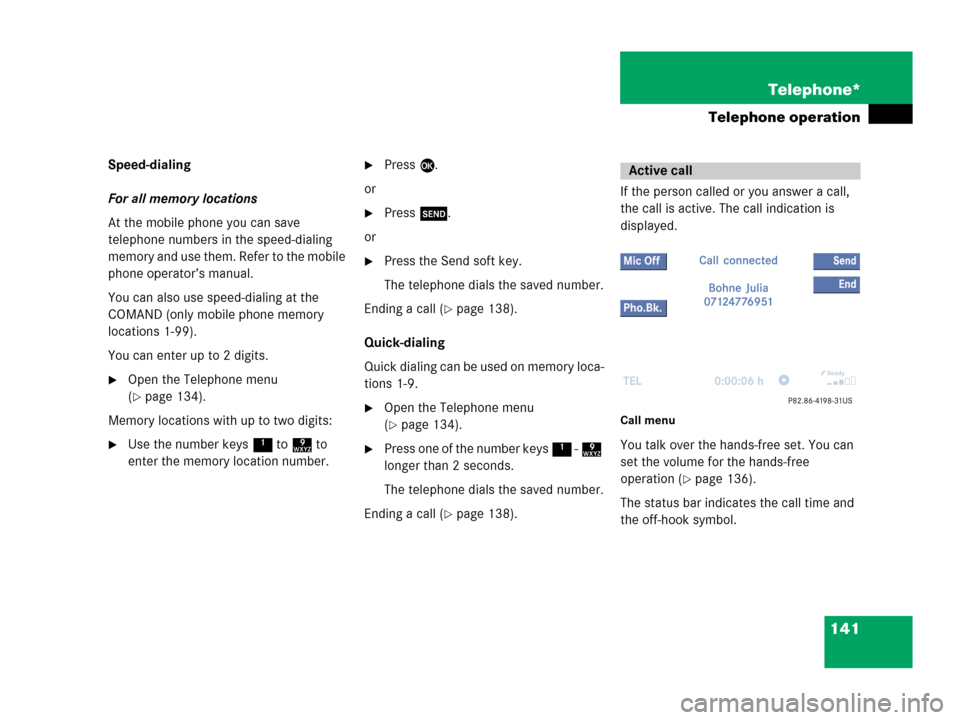
�page 138).If the person called or you answer a call,
the call is active. The call indication is
displayed.
Call menu
You talk over the hands-free set. You can
set the volume for the hands-free
operation (
�page 136).
The status bar indicates the call time and
the off-hook symbol.
Active call
Page 147 of 242

145 Telephone*
Telephone operation
You can select the following functions:
�Changing the phone book display at
the COMAND
�Selecting a phone book entry and
dialing the number (
�page 145)
Changing the phone book display
�Open the phone book (�page 144).
�Press the 123 soft key.
The display changes to numbers. The
status bar displays the name of the
marked entry.
or
�Press the ABC soft key.
The display changes to names. The
status bar displays the number of the
marked entry.Selecting a phone book entry and dia-
ling the number
�Open the phone book (�page 144).
The list of phone book entries with
names starting with a certain letter is
displayed.
Changing the initial letters
�Push the joystick to H or h one or
several times.
With every push of the button the
display changes to the next possible
letter. At the end of the letter list
follows the category
Others.Category
Others:
Here, all entries without names or with
names starting with a special character
(e.g. * or #) are put together.
Selecting an entry
�Change the initial letter if required.
�Push the joystick to G or g to
select a list entry.
�Press the Detail soft key to see all
information about the entry.
i
If you hold one of the buttons, scrolling
is accelerated.
Page 151 of 242

149 Navigation*
Important notes
COMAND calculates the route with the
help of data that is stored on the navigati-
on DVD.
Only use Mercedes-Benz navigation DVDs.
Using other navigation DVDs or CDs will
cause malfunctions and/or damage.
Because of changes in local traffic patterns
(e.g. road works) and/or incomplete data,
errors in calculation may occur.
As a result, the recommended route may
deviate from the ideal route. The data
stored on the DVD only reflects local con-
ditions at the time of DVD production. DVD
maps do not cover all areas nor all routes
within an area. Loading/ejecting a DVD
DVDs are loaded and ejected at the DVD
Navigation slot. The DVD Navigation slot is
located behind the display unit.
�Open the display unit to get access to
the DVD Navigation slot as described in
“Starting an update” (
�page 206).
Navigation DVD!
GPS (Global Positioning System) sig-
nals received make it possible to deter-
mine the current vehicle position.
Deviations from the actual position
may occur
�if the reception of GPS signals is
disturbed e.g. in parking garages
and tunnels
�if road conditions are bad
�depending on the vehicle’s conditi-
on
i
There are two l buttons. One is on
the display unit. The other is located
left of the DVD NAVIGATION slot
behind the display (
�page 205).
Page 152 of 242
150 Navigation*
Important notes
If your vehicle has been transported (e.g.
by a car, train or ferry) the system may
make navigation announcements which do
not correspond to the vehicle’s position.
The system needs to redetermine its
position.
Determining the location after the
vehicle has been transported
The system will need some time to
determine its location after the car has
been transported. The time required for
the system to do so varies from case to
case.
�Switch the COMAND on.
�Activate the Navigation main menu
(
�page 152).
The navigation DVD needs to be in the
DVD NAVIGATION slot (
�page 205).
�Drive and press c.
Drive until the position or the road
indicated correspond to the real
circumstances. The system is now
correctly adjusted.
Route guidance after the vehicle has
been transported
Page 170 of 242
168 Navigation*
Destination input
�Push the joystick to H, h, g, G
to move the cross-hairs.
�Push the joystick to F or f to move
the cross-hairs diagonally.This allows you to select your destination.
�Release the button.
If the system is able to assign a street
name to the selected location, it is
displayed on the status bar.
If a street name can not be assigned,
COMAND increases the zoom by one
increment each time E is pressed
until a street name can be selected.
�Press E.
The system uses the point at the center
of the cross-hairs as destination.
The Start route guidance menu will
appear (
�page 173).
i
If you press the Back soft key, your
selection will be discarded. The system
then uses the data of the previous
destination.
i
If a POI is close to the center of the
cross-hairs, a selection list will appear.
You can now select between a POI and
the address destination.