Page 102 of 242

100 Rear Audio/Video*
Rear Seat Entertainment (RSE) operation*
An MP3 CD is loaded in the RSE CD/DVD
player and it is switched on.
Loading a CD (
�page 94).
Switching on (
�page 93).
�Set the L/R monitor switch on the
remote to the side you wish to control.
�Press on the remote.
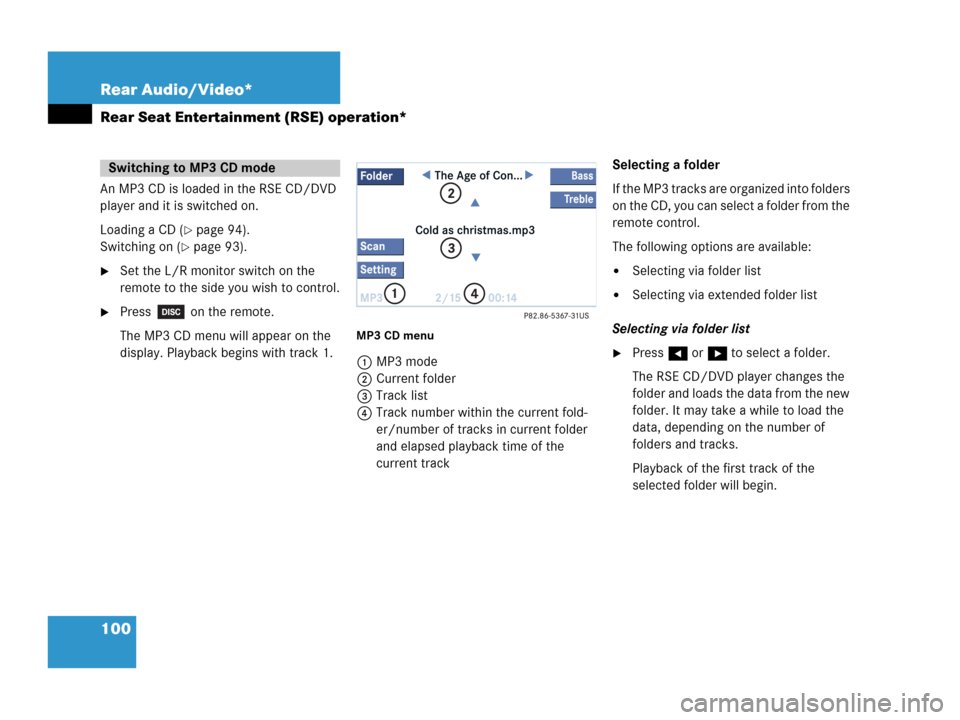
The MP3 CD menu will appear on the
display. Playback begins with track 1.
MP3 CD menu
1MP3 mode
2Current folder
3Track list
4Track number within the current fold-
er/number of tracks in current folder
and elapsed playback time of the
current trackSelecting a folder
If the MP3 tracks are organized into folders
on the CD, you can select a folder from the
remote control.
The following options are available:
�Selecting via folder list
�Selecting via extended folder list
Selecting via folder list
�Press H or h to select a folder.
The RSE CD/DVD player changes the
folder and loads the data from the new
folder. It may take a while to load the
data, depending on the number of
folders and tracks.
Playback of the first track of the
selected folder will begin.
Switching to MP3 CD mode
Page 105 of 242

103 Rear Audio/Video*
Rear Seat Entertainment (RSE) operation*
A DVD is loaded in the RSE CD/DVD player
and it is switched on.
Loading a CD (
�page 94).
Switching on (
�page 93).
�Set the L/R monitor switch on the
remote to the side you wish to control.
�Press on the remote.
Playback begins.
Displaying the soft keys during
playback
�Turn or press the thumb wheel.
The soft keys and the status bar are
displayed.1DVD mode
2T:1 - Track/film no.1 is played back
S:1 - Scene/chapter 1 is played back
0:00:26 - Elapsed playing time
To remove the soft key display
The soft keys and the status bar disappear
after approx. 10 seconds.
or
�Turn the thumb wheel to highlight the
Full scn. soft key and press to se-
lect.Soft key functions
�Pause or Play soft key:
Switches the Pause function on or off.
�Stop soft key:
Stops the DVD playback and displays a
menu (
�page 104).
�Full scn. soft key:
The soft key display disappears.
�Menu soft key:
Displays the menu on the DVD, if avai-
lable.
�Setting soft key:
Displays the Setting menu
(
�page 105).
Switching to DVD mode
i
Depending on the DVD, not all func-
tions are available at any time.
Page 112 of 242

110 Rear Audio/Video*
Rear Seat Entertainment (RSE) operation*
Soft key functions
�4:3, 16:9 or Zoom soft key:
You can change the aspect ratio.
�Full scn. soft key:
The soft key display disappears.
�Tone soft key:
Brings you to the tone menu, where you
can set Bass and Treble (
�page 108).
�Bright., Contr. and Color soft
key
s:
Allow you to adjust brightness, cont-
rast and color (
�page 108).
Changing the aspect ratio
You can manually change the aspect ratio
during playback. To do this, use the top left
soft key. The soft key changes each time
you press the thumb wheel. Possible aspect ratios are:
4:3, 16:9 and
Zoom.
The soft key indicates the aspect ratio to
which you will change when you press the
thumb wheel.
�Turn the thumb wheel to highlight the
top left soft key and press the thumb
wheel in succession until the desired
aspect ratio is set.
Displaying full screen
�Turn the thumb wheel to highlight the
Full scn. soft key and press to se-
lect.
The soft keys disappear. The full screen
will appear.You can set the settings for both monitors
separately. To switch between monitors
(
�page 90).
�Press on the remote.
The System menu will appear.
M class illustrated
System settings
Page 113 of 242

111 Rear Audio/Video*
Rear Seat Entertainment (RSE) operation*
You can use the following functions:
�Bright. soft key:
Adjusts the display brightness.
�Design soft key:
Sets the display dimming characteris-
tics.
�Pic off soft key:
Switches the monitor off and on. This is
also possible by pressing on the
remote (
�page 113).
�Lang. soft key:
Selects the language for the menu text
displays.
�Speaker soft key:
Selects the source of the speakers
(
�page 112).Adjusting the display brightness
�Turn the thumb wheel to highlight the
Bright. soft key and press to select.
�Press H or h direction to adjust the
brightness.
�Press E.
The setting is applied. The System
menu will appear.
Setting the display dimming characteri-
stics
�Turn the thumb wheel to highlight the
Design soft key and press to select.
�Press G or g to select an entry.
Day Mode
The display is continuously set to
daylight design.
Night Mode
The display is continuously set to night-
time design.
Automatic
The display changes depending on the
ambient light sensor in the vehicle.
�Press E.
The setting is applied. The System
menu will appear.
Switching the monitor on and off
�Turn the thumb wheel to highlight the
Pic off soft key and press to select.
The monitor is switched off.
�Press the thumb wheel again.
The monitor is switched on again.
Page 118 of 242

116 Satellite radio*
Important notes
� Important notes
In chapter “Satellite radio”, you will find
detailed information regarding
�selecting a station and a program cate-
gory
�memory functions
�sound adjustments
If you have not done so already, please fa-
miliarize yourself with these functions by
reading chapter “At a glance”.
i
Additional optional satellite radio equip-
ment and a subscription to satellite ra-
dio service provider are required for the
satellite radio operation described here.
Contact your authorized Mercedes-
Benz Center for details and availability
for your vehicle.
i
Note that categories and channels
shown in illustrations are dependent on
programming content delivered by the
service provider. Programming content
is subject to change. Therefore, channel
and categories shown in illustrations
and descriptions contained in this ma-
nual may differ from the channels and
categories delivered by the service pro-
vider.
Satellite radio service may be unavai-
lable or interrupted from time to time
for a variety of reasons, such as envi-
ronmental or topographic conditions
and other things we can’t control. Ser-
vice might also not be available in cer-
tain places (e.g., in tunnels, parking
garages, or within or next to buildings)
or near other technologies.
i
Sirius Satellite Radio provides approxi-
mately 100 channels, so called
streams, of digital-quality radio, among
others music, sports, news, and enter-
tainment commercial-free.
Sirius Satellite Radio uses a fleet of
high-power satellites to broadcast 24
hours per day, coast-to-coast, in the
contiguous U.S.
This diverse, satellite-delivered pro-
gramming is available for a monthly
subscription fee. For more information,
call the Sirius Service Center
(
�page 117) or contact
www.siriusradio.com.
Page 128 of 242

126 Telephone*
Important notes
� Important notes
In chapter “Telephone”, you will find de-
tailed information regarding the telepho-
ne*, including emergency call.
1 Observe all legal requirements
WarningG
Some jurisdictions prohibit the driver from
using a cellular telephone while driving a ve-
hicle. Whether or not prohibited by law, for
safety reasons, the driver should not use the
cellular telephone while the vehicle is in mo-
tion. Stop the vehicle in a safe location be-
fore answering or placing a call.
If you nonetheless choose to use the cellular
phone while driving, please use the hands-
free device and be sure to pay attention to
the traffic situation at all times. Use the cel-
lular phone
1 only when road, weather and
traffic conditions permit.
Never operate radio transmitters equipped
with a built-in or attached antenna (i.e.
without being connected to an external an-
tenna) from inside the vehicle while the en-
gine is running. Doing so could lead to
malfunction of the vehicle’s electronic sys-
tems, possibly resulting in an accident and
personal injury.
!
Radio transmitters, such as a portable
telephone or a citizens band unit
should only be used inside the vehicle
if they are connected to a separate ex-
terior antenna that has been approved
by Mercedes-Benz.
Page 129 of 242

127 Telephone*
Important notes
i
If you have a Mercedes-Benz specified
integrated mobile telephone (TDMA,
CDMA or GSM) and the telephone is
inserted in the cradle, the telephone
functions can be used as follows:
�at the COMAND
�at the multifunction steering wheel
This instruction manual describes the
operation at the COMAND. Unless
otherwise indicated, the descriptions
and illustrations refer to the COMAND.
Operation at the mobile phone is
described in separate operating guides.
Refer to the vehicle Operator’s Manual
for operation of the telephone using the
multifunction steering wheel.
i
In certain menus, the COMAND can
display date and time of the calls.
The COMAND can display phone
number and name of the other party
(e.g. if the COMAND detects an
incoming call, but also in other menus).
For the number to be displayed, the
number information must be
transmitted with the incoming call. The
same goes for the name display which
additionally requires that the caller’s
number and name are saved in the
phone book.
Page 132 of 242

130 Telephone*
Telephone operation
� Telephone operation
Automatically
The telephone* is automatically activated
when the COMAND is switched on. The
mobile phone must be inserted in the
mobile phone cradle* at the time
COMAND is switched on.
Manually
�Press a.
The menu to enter the unlock code
(
�page 133) will appear (only if phone
has been locked before).GSM mobile phone
�Enter the PIN on the mobile phone
or at the COMAND.
If no SIM card is in the telephone,
the message
Please insert SIM
card (Emergency Call 911
only possible with pho-
ne)
appears.
�Insert a SIM card. Refer to the mo-
bile phone operator’s manual.
�Switch the COMAND off (�page 34) or
turn off the engine.
The telephone* is switched off with a
time-lag of around 10 minutes. If you
make a call within that time, the
telephone will be switched off around
10 minutes after you end the call. or
�In the Telephone menu (�page 134),
press a longer than two seconds.
The message
Telephone being
deactivated, please wait
will
appear followed by
Phone off.
Switching telephone operation on
Switching telephone operation off