2006 LAND ROVER FRELANDER 2 fog light
[x] Cancel search: fog lightPage 1935 of 3229
Publi s hed: 11-May-2011
Exterior Lighting - Front Fog Lamp Adjustment
General Procedures
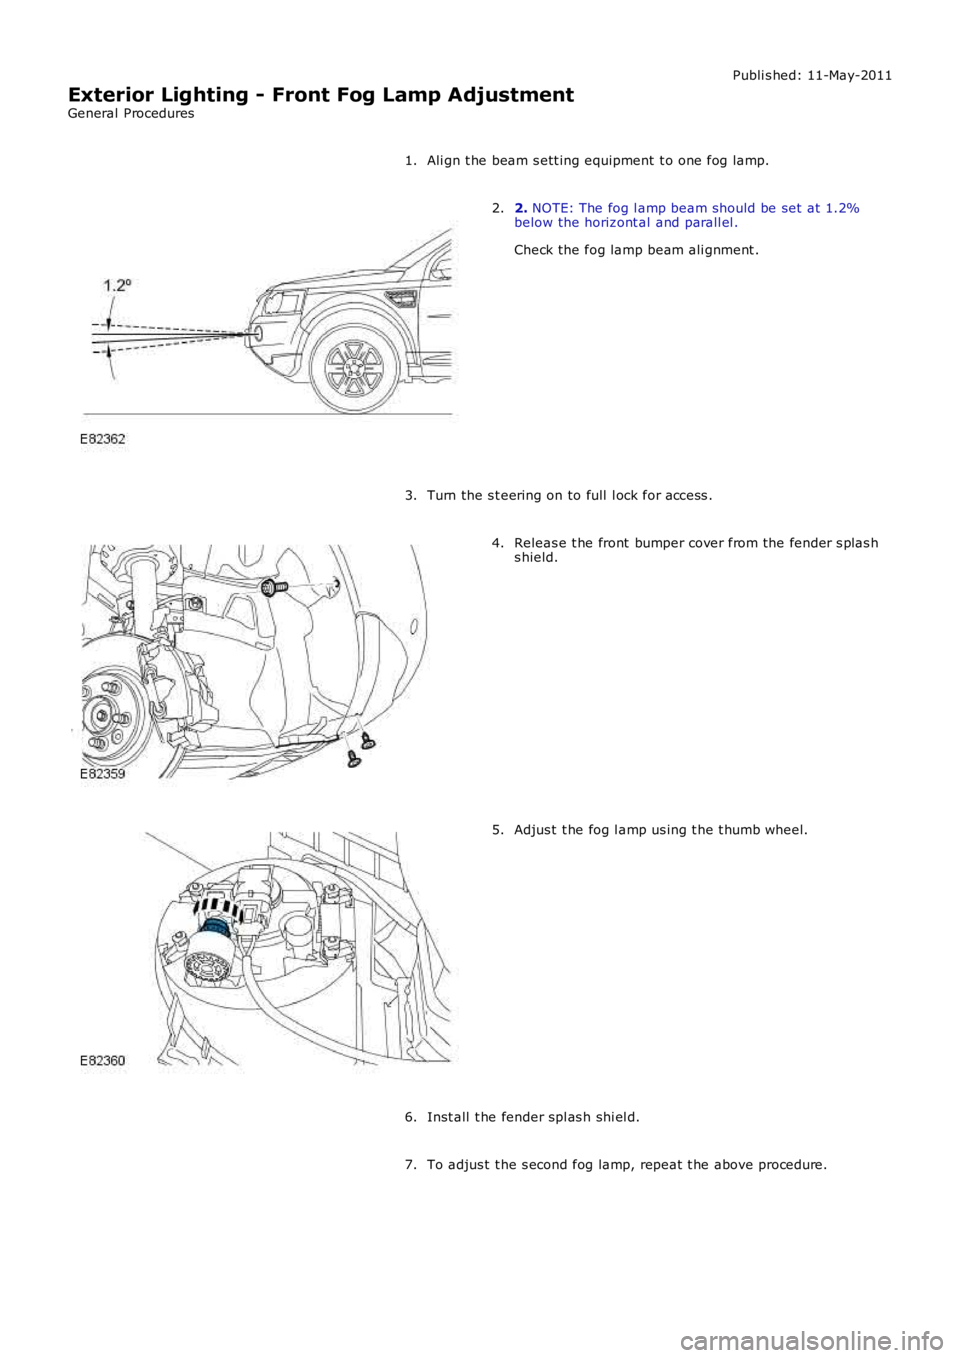
Ali gn t he beam s ett ing equipment t o one fog lamp.1.
2. NOTE: The fog l amp beam should be set at 1.2%below the horizont al and parall el .
Check the fog lamp beam ali gnment .
2.
Turn the s t eering on to full l ock for access .3.
Releas e t he front bumper cover from the fender s plas hs hield.4.
Adjus t t he fog l amp us ing t he t humb wheel.5.
Inst all t he fender spl as h shi el d.6.
To adjus t t he s econd fog lamp, repeat t he above procedure.7.
Page 1938 of 3229
Publi s hed: 11-May-2011
Exterior Lighting - Front Fog Lamp LH
Removal and Inst all ati on
Removal
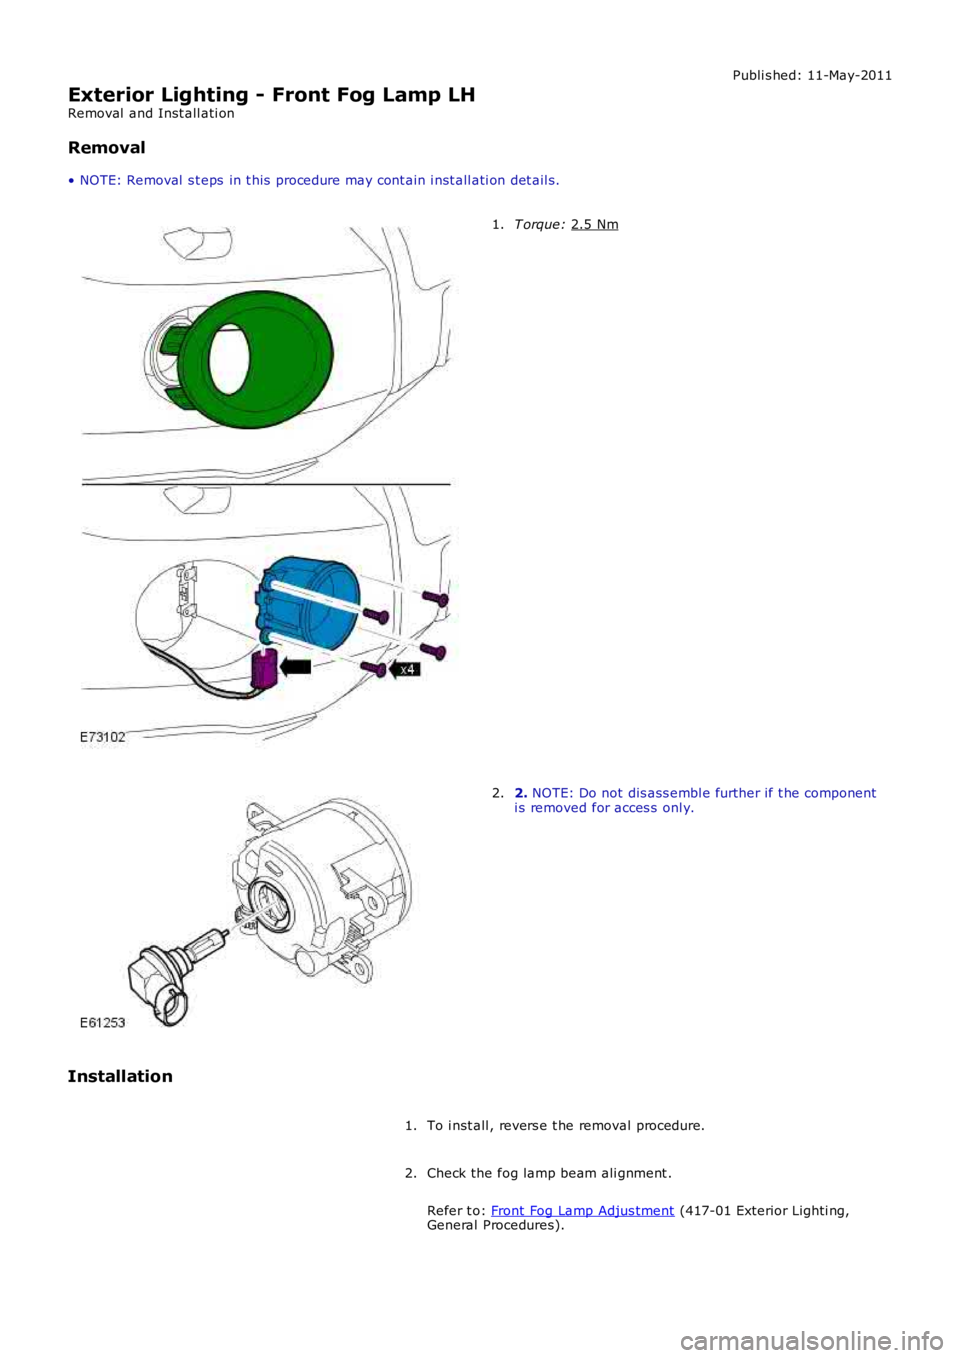
• NOTE: Removal s t eps in t his procedure may cont ain i nst all ati on det ail s. T orque:
2.5 Nm 1.
2.
NOTE: Do not dis ass embl e further if t he component
i s removed for acces s onl y.
2.
Installation To i nst all , revers e t he removal procedure.
1.
Check the fog lamp beam ali gnment .
Refer t o: Front Fog Lamp Adjus tment (417-01 Exterior Lighti ng,
General Procedures).
2.
Page 2723 of 3229

Contents
3
R
Quick start
QUICK START ................................................... 7
Filling station information
FILLING STATION INFORMATION................... 33
Introduction
SYMBOLS GLOSSARY .................................... 35
LABEL LOCATIONS ......................................... 35
HEALTH AND SAFETY ..................................... 36
DATA RECORDING.......................................... 37
DISABILITY MODIFICATIONS ......................... 37
PARTS AND ACCESSORIES ............................ 37
Keys and remote controls
USING THE KEY .............................................. 40
GENERAL INFORMATION ON RADIO
FREQUENCIES ................................................ 40
USING THE REMOTE CONTROL ..................... 41
Locks
LOCKING AND UNLOCKING ............................ 44
Alarm
ARMING THE ALARM ..................................... 45
DISARMING THE ALARM ............................... 46
Seats
SITTING IN THE CORRECT POSITION ............ 47
MANUAL SEATS ............................................. 48
ELECTRIC SEATS ............................................ 49
HEAD RESTRAINTS ........................................ 51
REAR SEATS................................................... 51
HEATED SEATS............................................... 53
Seat belts
PRINCIPLE OF OPERATION ............................ 54
SEAT BELT REMINDER ................................... 55
FASTENING THE SEAT BELTS ........................ 56
SEAT BELT HEIGHT ADJUSTMENT................. 56
USING SEAT BELTS DURI NG PREGNANCY .... 57
Supplementary restraints system
PRINCIPLE OF OPERATION ............................ 58
AIRBAG WARNING LAMP ............................... 61
DISABLING THE PASSENGER AIRBAG ........... 62
AIRBAG SERVICE INFORMATION ................... 63
Child safety
CHILD SEATS ................................................. 64
BOOSTER CUSHIONS ..................................... 66
ISOFIX ANCHOR POINTS................................ 67
CHILD SAFETY LOCKS ................................... 69
Steering wheel
ADJUSTING THE STEERING WHEEL .............. 70
AUDIO CONTROL ........................................... 70
Lighting
LIGHTING CONTROL ...................................... 72
FRONT FOG LAMPS........................................ 72
REAR FOG LAMPS.......................................... 73
ADJUSTING THE HEADLAMPS....................... 73
HEADLAMP LEVELLING ................................. 73
HAZARD WARNING FLASHERS...................... 74
ADAPTIVE FRONT LIGHTING SYSTEM (AFS) . 74
DIRECTION INDICATORS ............................... 75
INTERIOR LAMPS .......................................... 76
APPROACH LAMPS ........................................ 76
CHANGING A BULB ........................................ 77
BULB SPECIFICATION CHART ........................ 86
Wipers and washers
WINDSCREEN WIPERS .................................. 87
RAIN SENSOR ................................................ 87
WINDSCREEN WASHERS............................... 88
HEADLAMP WASHERS................................... 88
REAR WINDOW WIPER AND WASHERS ........ 89
ADJUSTING THE WINDSCREEN WASHER JETS .
89
CHECKING THE WIPER BLADES .................... 90
CHANGING THE WIPER BLADES.................... 90
Windows and mirrors
ELECTRIC WINDOWS ..................................... 93
EXTERIOR MIRRORS ..................................... 94
ELECTRIC EXTERIOR MIRRORS .................... 95
INTERIOR MIRROR ........................................ 96
Instruments
INSTRUMENT PANEL OVERVIEW .................. 97
Information displays
TRIP COMPUTER ........................................... 99
INFORMATION MESSAGES ............................ 99
Page 2741 of 3229
21
Quick start
R
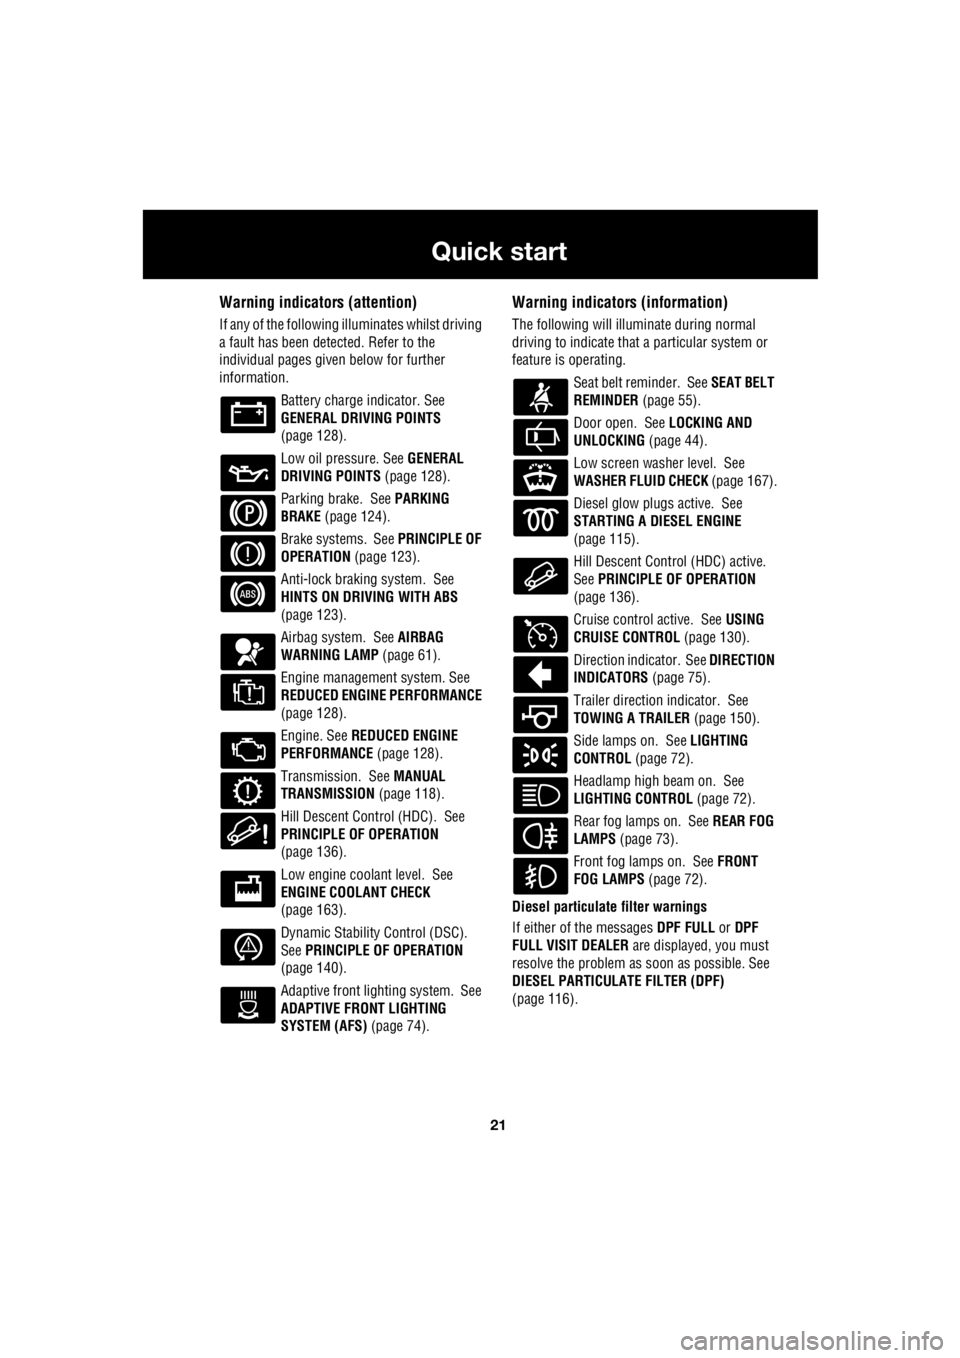
Warning indicators (attention)
If any of the following illuminates whilst driving
a fault has been detected. Refer to the
individual pages give n below for further
information.
Battery charge indicator. See
GENERAL DRIVING POINTS
(page 128).
Low oil pressure. See GENERAL
DRIVING POINTS (page 128).
Parking brake. See PARKING
BRAKE (page 124).
Brake systems. See PRINCIPLE OF
OPERATION (page 123).
Anti-lock braking system. See
HINTS ON DRIVING WITH ABS
(page 123).
Airbag system. See AIRBAG
WARNING LAMP (page 61).
Engine management system. See
REDUCED ENGINE PERFORMANCE
(page 128).
Engine. See REDUCED ENGINE
PERFORMANCE (page 128).
Transmission. See MANUAL
TRANSMISSION (page 118).
Hill Descent Control (HDC). See
PRINCIPLE OF OPERATION
(page 136).
Low engine coolant level. See
ENGINE COOLANT CHECK
(page 163).
Dynamic Stability Control (DSC).
See PRINCIPLE OF OPERATION
(page 140).
Adaptive front lighting system. See
ADAPTIVE FRONT LIGHTING
SYSTEM (AFS) (page 74).
Warning indicators (information)
The following will illuminate during normal
driving to indicate that a particular system or
feature is operating.
Seat belt reminder. See SEAT BELT
REMINDER (page 55).
Door open. See LOCKING AND
UNLOCKING (page 44).
Low screen washer level. See
WASHER FLUID CHECK (page 167).
Diesel glow plugs active. See
STARTING A DIESEL ENGINE
(page 115).
Hill Descent Control (HDC) active.
See PRINCIPLE OF OPERATION
(page 136).
Cruise control active. See USING
CRUISE CONTROL (page 130).
Direction indicator. See DIRECTION
INDICATORS (page 75).
Trailer direction indicator. See
TOWING A TRAILER (page 150).
Side lamps on. See LIGHTING
CONTROL (page 72).
Headlamp high beam on. See
LIGHTING CONTROL (page 72).
Rear fog lamps on. See REAR FOG
LAMPS (page 73).
Front fog lamps on. See FRONT
FOG LAMPS (page 72).
Diesel particulate filter warnings
If either of the messages DPF FULL or DPF
FULL VISIT DEALER are displayed, you must
resolve the problem as soon as possible. See
DIESEL PARTICULATE FILTER (DPF)
(page 116).
Page 2742 of 3229
22
Quick start
L
Wipers and washers
Windscreen wipers
1. Intermittent wipe/rain sensor
2. Low speed wipe
3. High speed wipe
4. Single wipe - pull down and release to
operate
5. Rotate control to adjust speed of
intermittent wipe or sensitivity of rain
sensor
Windscreen washer Push the button on the end of the
lever to operate the windscreen
washer.
Rear wiper and washer
Pull the lever to position 6 for intermittent
operation of the rear wiper. Pull and hold the
lever in position 7 to operate the rear washer
and wiper.
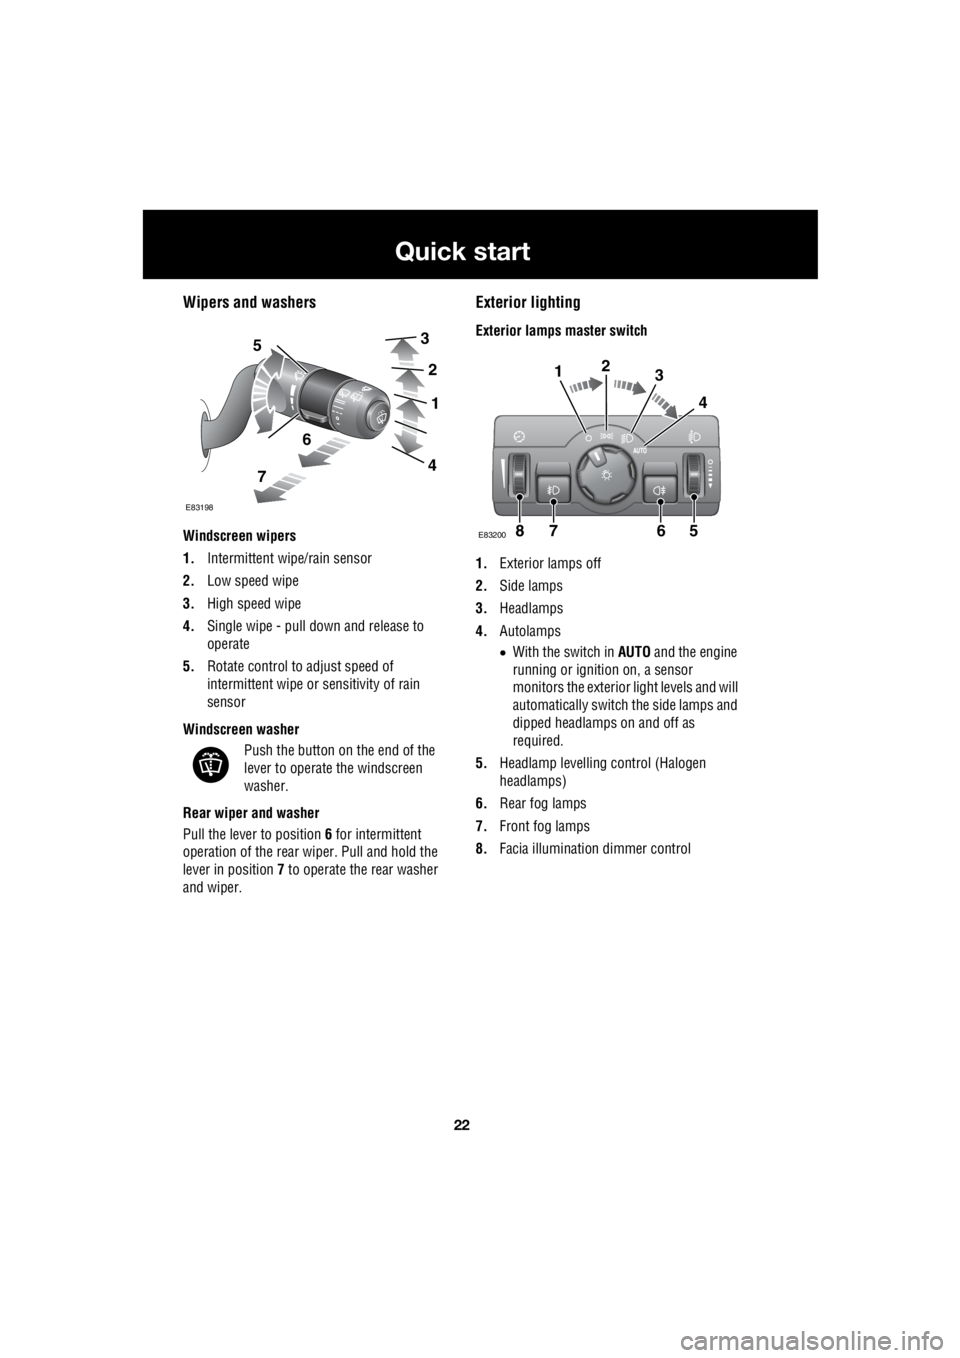
Exterior lighting
Exterior lamps master switch
1. Exterior lamps off
2. Side lamps
3. Headlamps
4. Autolamps
• With the switch in AUTO and the engine
running or ignition on, a sensor
monitors the exterior light levels and will
automatically switch the side lamps and
dipped headlamps on and off as
required.
5. Headlamp levelli ng control (Halogen
headlamps)
6. Rear fog lamps
7. Front fog lamps
8. Facia illumination dimmer control 5
6
7
3
2
1
4
E83198
7865
123
4
E83200
Page 2792 of 3229
Lighting
72
L
LightingLIGHTING CONTROL
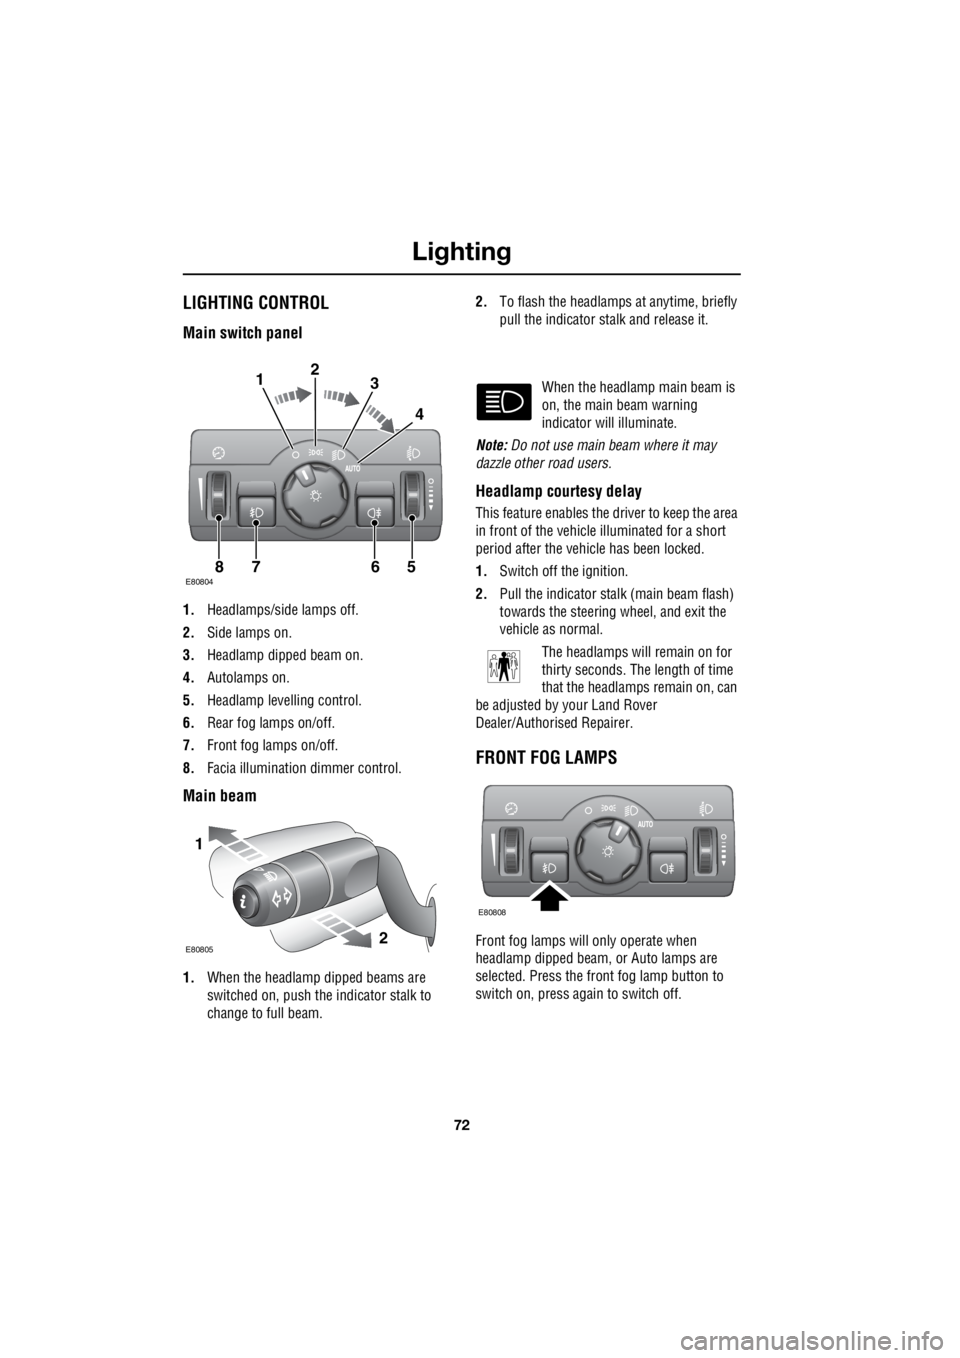
Main switch panel
1. Headlamps/side lamps off.
2. Side lamps on.
3. Headlamp dipped beam on.
4. Autolamps on.
5. Headlamp levelling control.
6. Rear fog lamps on/off.
7. Front fog lamps on/off.
8. Facia illumination dimmer control.
Main beam
1.When the headlamp dipped beams are
switched on, push the indicator stalk to
change to full beam. 2.
To flash the headlamps at anytime, briefly
pull the indicator stalk and release it.
When the headlamp main beam is
on, the main beam warning
indicator will illuminate.
Note: Do not use main beam where it may
dazzle other road users.
Headlamp courtesy delay
This feature enables the driver to keep the area
in front of the vehicle illuminated for a short
period after the vehicle has been locked.
1. Switch off the ignition.
2. Pull the indicator stalk (main beam flash)
towards the steering wheel, and exit the
vehicle as normal.
The headlamps will remain on for
thirty seconds. The length of time
that the headlamps remain on, can
be adjusted by your Land Rover
Dealer/Authorised Repairer.
FRONT FOG LAMPS
Front fog lamps will only operate when
headlamp dipped beam, or Auto lamps are
selected. Press the front fog lamp button to
switch on, press again to switch off.
E808047865
123
4
1
2E80805
E80808
Page 2793 of 3229
73
Lighting
R
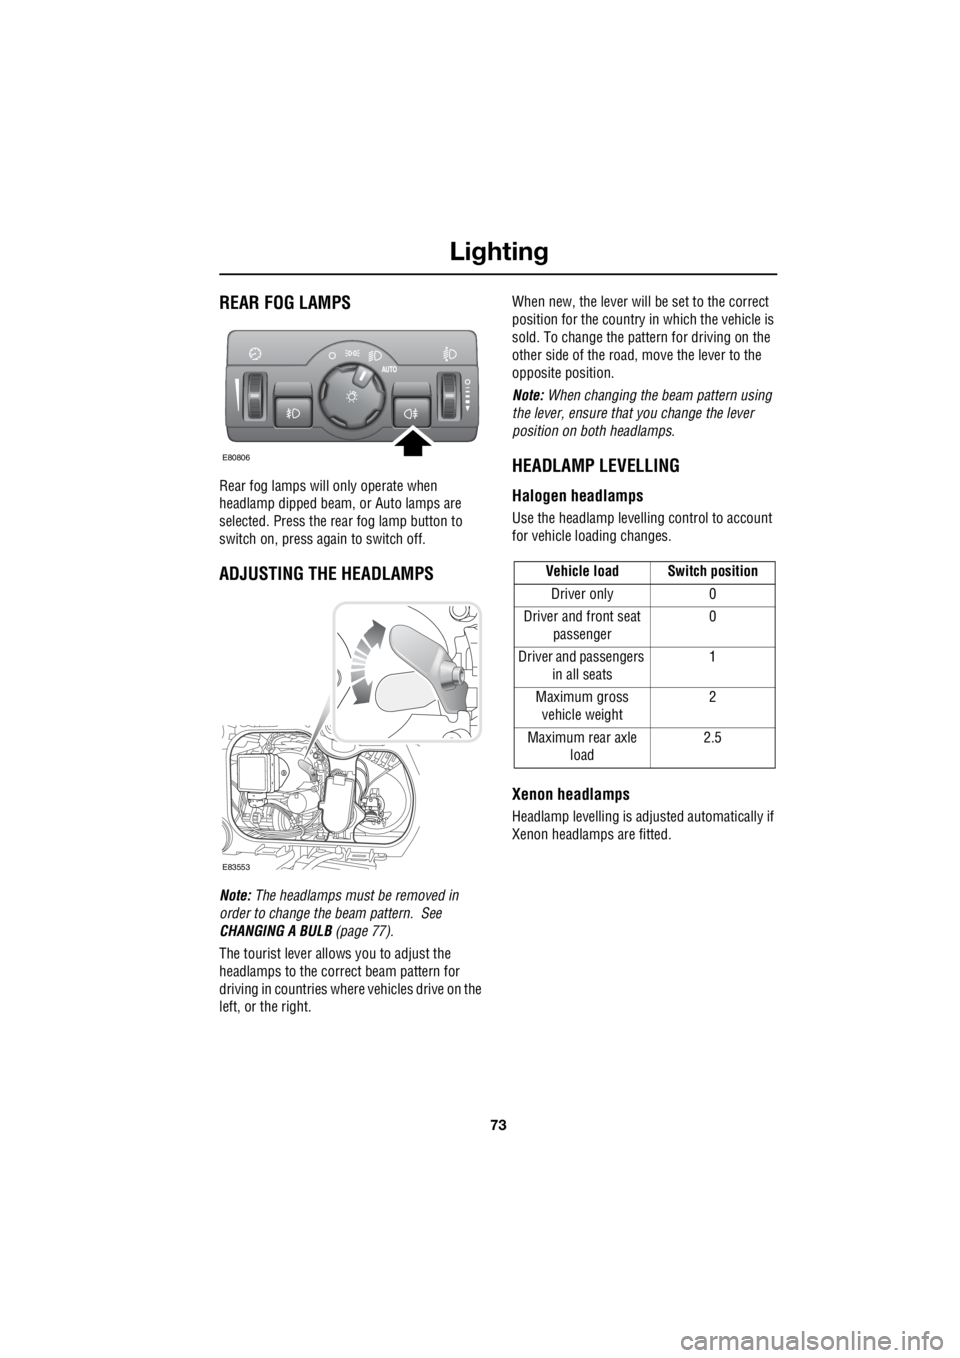
REAR FOG LAMPS
Rear fog lamps will only operate when
headlamp dipped beam, or Auto lamps are
selected. Press the rear fog lamp button to
switch on, press again to switch off.
ADJUSTING THE HEADLAMPS
Note: The headlamps must be removed in
order to change the beam pattern. See
CHANGING A BULB (page 77).
The tourist lever allows you to adjust the
headlamps to the correct beam pattern for
driving in countries where vehicles drive on the
left, or the right. When new, the lever will be set to the correct
position for the country in which the vehicle is
sold. To change the pattern for driving on the
other side of the road, move the lever to the
opposite position.
Note: When changing the beam pattern using
the lever, ensure that you change the lever
position on both headlamps.
HEADLAMP LEVELLING
Halogen headlamps
Use the headlamp levell ing control to account
for vehicle loading changes.
Xenon headlamps
Headlamp levelling is adju sted automatically if
Xenon headlamps are fitted.
E80806
E83553
Vehicle load Switch position
Driver only 0
Driver and front seat passenger 0
Driver and passengers in all seats 1
Maximum gross vehicle weight 2
Maximum rear axle load 2.5
Page 2797 of 3229
77
Lighting
R
CHANGING A BULB
General information
Note: In certain territori es it is a legal
requirement to carry spare bulbs. A
replacement bulb kit is available as an
approved accessory from your Land Rover
Dealer/Authorised Repairer.
Halogen bulbs
Halogen bulbs are used for main beam, dipped
beam, and front fog lamps. Take care not to
touch the glass part of the bulb with your
fingers; always use a cl oth to handle the bulb.
If necessary use methylated spirits to remove
finger prints. Xenon lamps
Seek advice a bout the correct
disposal of Bi-X enon lamp units
from a Land Rover
Dealer/Authorised Repairer, or your local
authority.
CAUTION
Alway replace bulbs with the correct
type and specification. If you are in any
doubt contact your Land Rover
Dealer/Authorised Repairer for advice.
WARNINGS
Replacement or maintenance of
Xenon lamps should only be carried
out by suitably qualified personnel.
High voltage is requi red to ignite the
gas and metal vapour which are used
to power Xenon lamps. Contact with
this voltage can cause serious injuries.
Bi-Xenon lamp units operate at a very
high temperature. Ensure that the
lamp units have cooled before
attempting to touch them.
Xenon lamp units contain Mercury
which is highly to xic, and can be
extremely harmful.