Page 2761 of 3229
41
Keys and remote controls
R
USING THE REMOTE CONTROL
Remote control
Note: The operational range of the remote
control will vary considerably depending on
atmospheric conditions and interference from
other transmitting devices.
The vehicle is supplied with two remote
controls, but up to six can be programmed to
the vehicle at any one time.
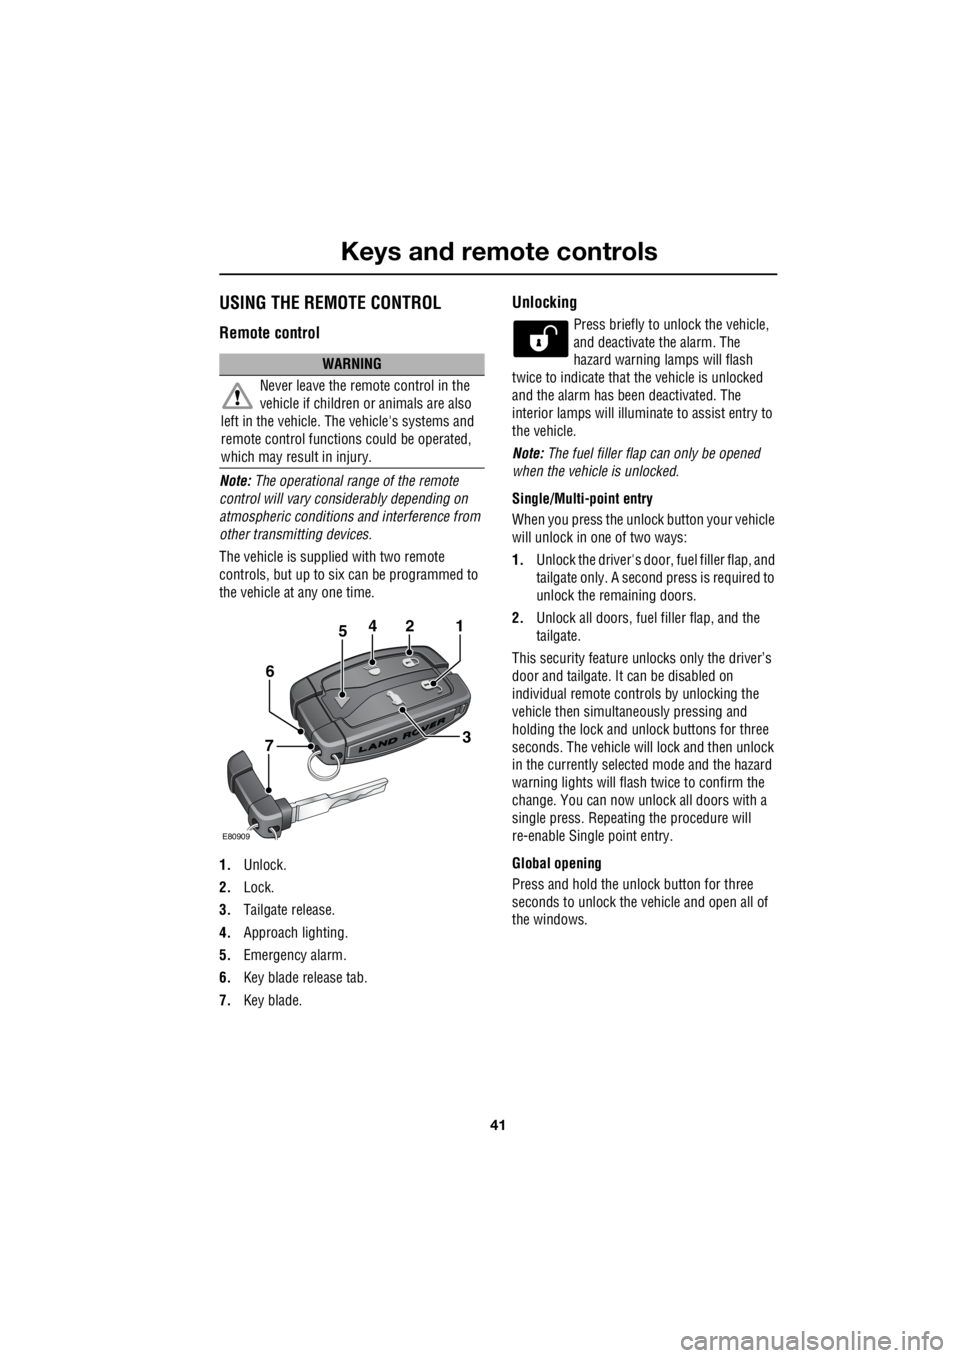
1. Unlock.
2. Lock.
3. Tailgate release.
4. Approach lighting.
5. Emergency alarm.
6. Key blade release tab.
7. Key blade.
Unlocking
Press briefly to unlock the vehicle,
and deactivate the alarm. The
hazard warning lamps will flash
twice to indicate that the vehicle is unlocked
and the alarm has been deactivated. The
interior lamps will illuminate to assist entry to
the vehicle.
Note: The fuel filler flap can only be opened
when the vehicle is unlocked.
Single/Multi- point entry
When you press the unlock button your vehicle
will unlock in one of two ways:
1. Unlock the driver's door, fuel filler flap, and
tailgate only. A second press is required to
unlock the remaining doors.
2. Unlock all doors, fuel filler flap, and the
tailgate.
This security feature unlocks only the driver’s
door and tailgate. It can be disabled on
individual remote controls by unlocking the
vehicle then simultaneously pressing and
holding the lock and unlock buttons for three
seconds. The vehicle will lock and then unlock
in the currently selected mode and the hazard
warning lights will flas h twice to confirm the
change. You can now unlock all doors with a
single press. Repeating the procedure will
re-enable Single point entry.
Global opening
Press and hold the unlock button for three
seconds to unlock the ve hicle and open all of
the windows.
WARNING
Never leave the remote control in the
vehicle if children or animals are also
left in the vehicle. The vehicle's systems and
remote control functions could be operated,
which may result in injury.
2
E80909
451
3
6
7
Page 2764 of 3229
Locks
44
L
LocksLOCKING AND UNLOCKING
Drive-away locking
The vehicle can be configured by a
Land Rover Dealer/Authorised
Repairer to lock automatically
when in motion. Contact your
Dealer/Authorised Re pairer for further
information.
Locking and unlocking from inside the
vehicle
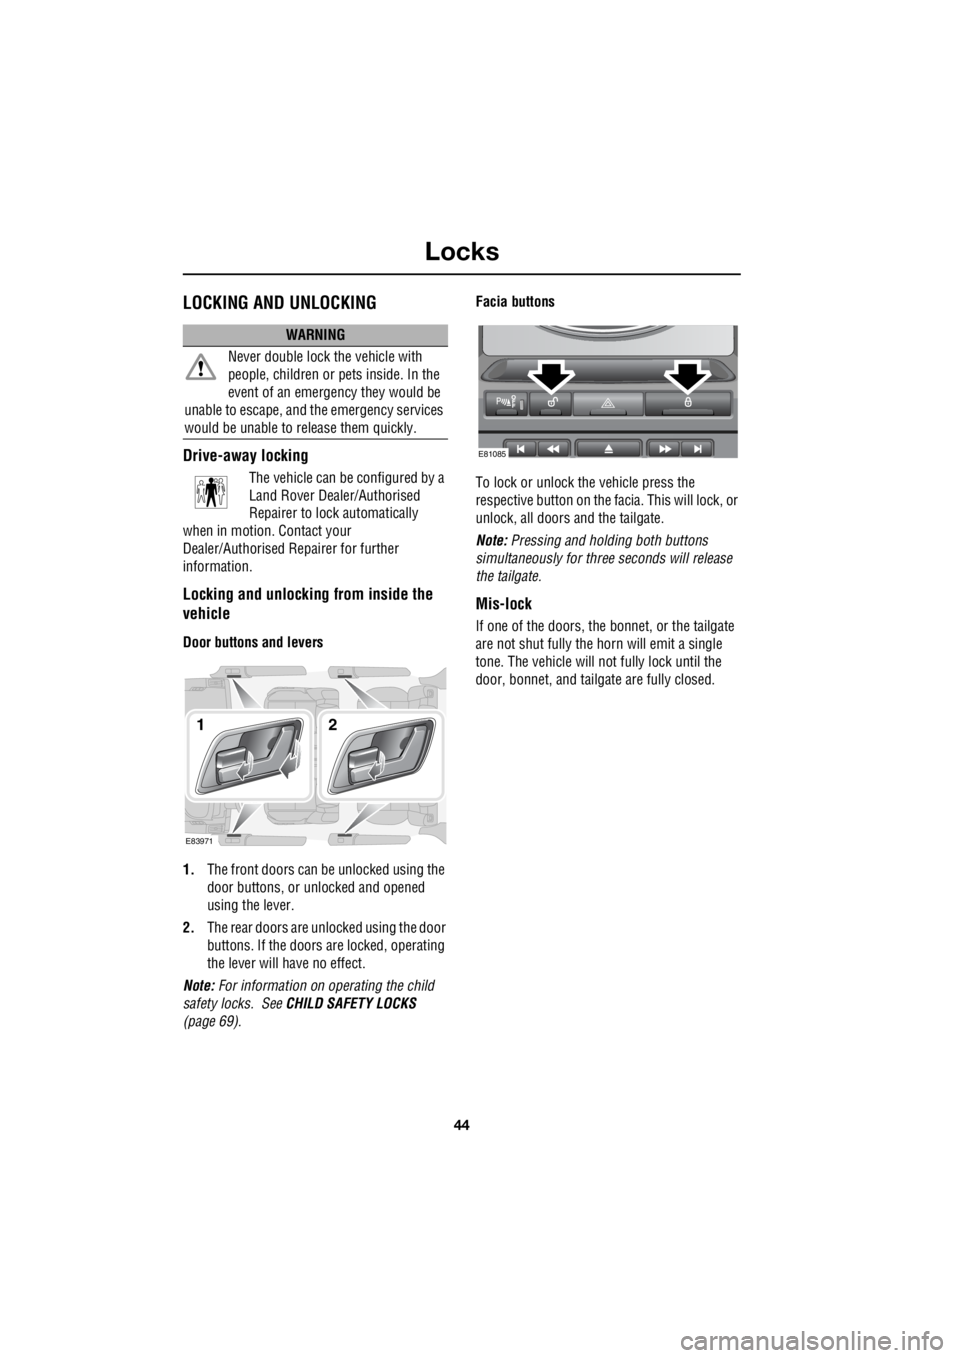
Door buttons and levers
1. The front doors can be unlocked using the
door buttons, or unlocked and opened
using the lever.
2. The rear doors are unlocked using the door
buttons. If the doors are locked, operating
the lever will have no effect.
Note: For information on operating the child
safety locks. See CHILD SAFETY LOCKS
(page 69). Facia buttons
To lock or unlock the vehicle press the
respective button on the fa cia. This will lock, or
unlock, all doors and the tailgate.
Note: Pressing and holding both buttons
simultaneously for thre e seconds will release
the tailgate.
Mis-lock
If one of the doors, the bon net, or the tailgate
are not shut fully the horn will emit a single
tone. The vehicle will not fully lock until the
door, bonnet, and tailga te are fully closed.
WARNING
Never double lock the vehicle with
people, children or pe ts inside. In the
event of an emergency they would be
unable to escape, and th e emergency services
would be unable to release them quickly.
E83971
12
E81085
Page 2770 of 3229
Seats
50
L
To adjust the seats, the remote control must be
inserted in the starter control unit and the
ignition on. On those ve hicles equipped with
the memory driver's seat, the seat has a 10
minute active peri od, initiated when the driver's
door is opened/closed or the remote control is
removed from the starter control unit.
Driving position memory
Once you have adjusted the power operated
driver's seat and exterior mirrors for your ideal
driving position, the vehicle can memorise
these settings for future use.
1. Press the memory stor e button to activate
the memory function.
2. Press one of the preset buttons within five
seconds to memorise the current settings.
MEMORY STORED will be displayed on the
message centre accompanied by an
audible chime to conf irm the settings have
been memorised.
A seat position will only be memorised during
the five second active period.
Any existing settings will be over-written when
programming a memory position.
E83189
12
Page 2791 of 3229
71
Steering wheel
R
Audio control using the telephone
buttons
When the telephone syst em is inoperative the
telephone controls on th e steering wheel can
be used to operate the audio system.
1. Operates as a menu control. Press to enter
or confirm menus selections.
2. Operates as an exit control. press to return
to the previous screen or menu.
3. Operates as forward motion of the rotary
control. Press to scroll forward through
menu items.
4. Operates as backward motion of the rotary
control. Press to scroll back through menu
items.
4
3
2
1
E83782
Page 2815 of 3229
95
Windows and mirrors
R
ELECTRIC EXTERIOR MIRRORS
Adjusting and folding
1. Left mirror adjustment.
2. Right mirror adjustment.
3. Powerfold. Adjusting
1. Press the left or right mirror button as
required. The green tell-tale light will
illuminate in the button to indicate that it
has been selected.
2. Move the toggle switch to adjust the mirror
as required.
Folding
To fold the mirrors back press both left and
right buttons at the sa me time. To unfold the
mirrors, press both le ft and right buttons
again.
12
3
E80504
Page 2823 of 3229
103
Climate control
R
AUTOMATIC CLIMATE CONTROL
Controls
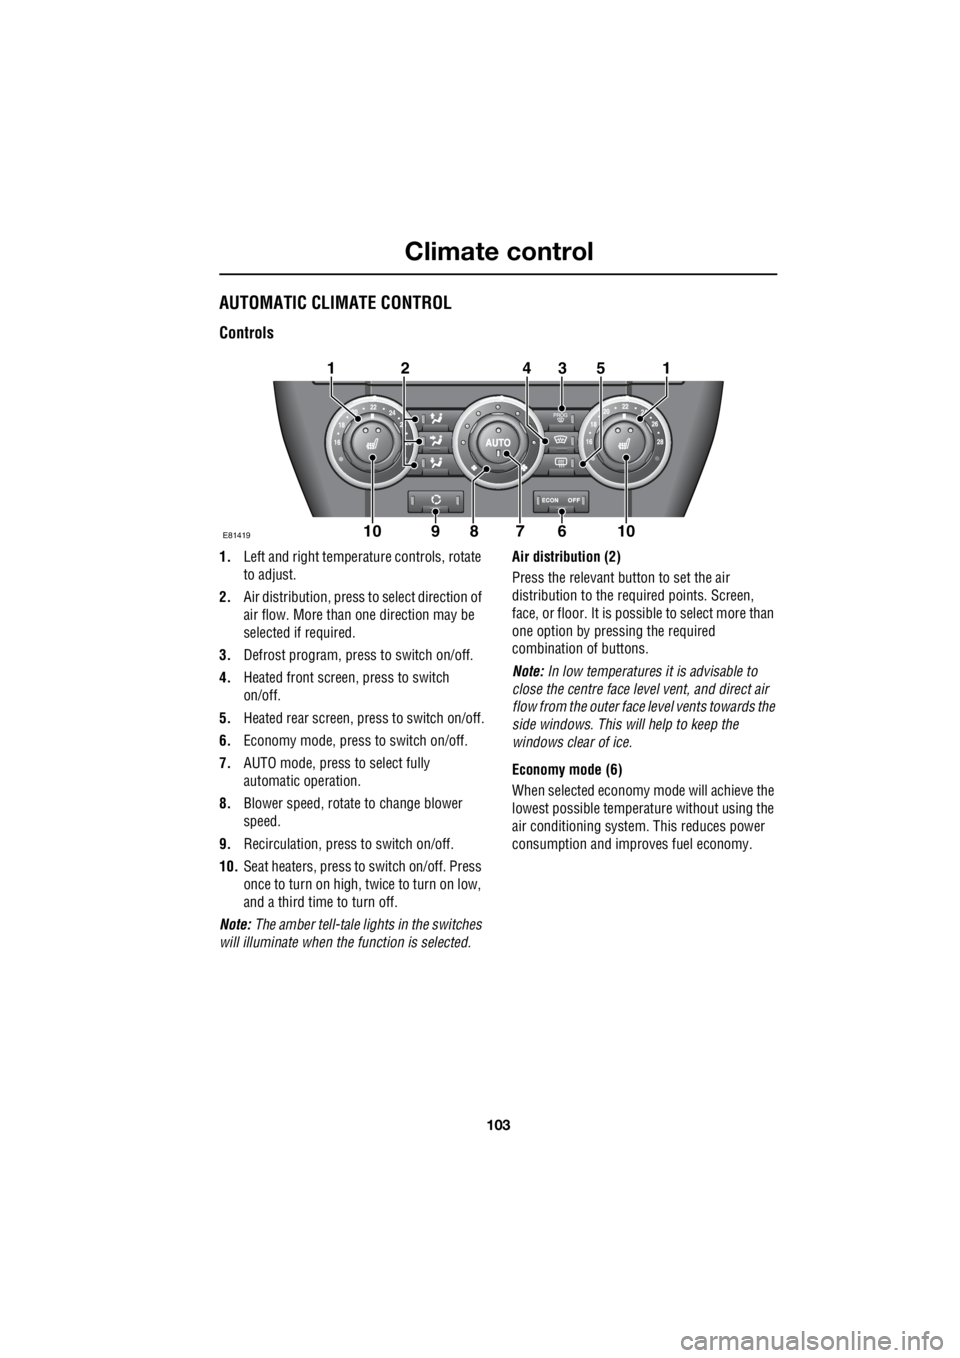
1. Left and right temperat ure controls, rotate
to adjust.
2. Air distribution, press to select direction of
air flow. More than one direction may be
selected if required.
3. Defrost program, press to switch on/off.
4. Heated front screen, press to switch
on/off.
5. Heated rear screen, press to switch on/off.
6. Economy mode, press to switch on/off.
7. AUTO mode, press to select fully
automatic operation.
8. Blower speed, rotate to change blower
speed.
9. Recirculation, press to switch on/off.
10. Seat heaters, press to switch on/off. Press
once to turn on high, twice to turn on low,
and a third time to turn off.
Note: The amber tell-tale lights in the switches
will illuminate when the function is selected. Air distribution (2)
Press the relevant button to set the air
distribution to the required points. Screen,
face, or floor. It is possible to select more than
one option by pressing the required
combination of buttons.
Note: In low temperatures it is advisable to
close the centre face leve l vent, and direct air
flow from the outer face level vents towards the
side windows. This will help to keep the
windows clear of ice.
Economy mode (6)
When selected economy mode will achieve the
lowest possible temperat ure without using the
air conditioning system . This reduces power
consumption and impr oves fuel economy.
E81419
131
6910
254
1078
Page 2946 of 3229
Audio unit operation
226
L
STATION PRESET BUTTONS
Premium audio
Standard audio
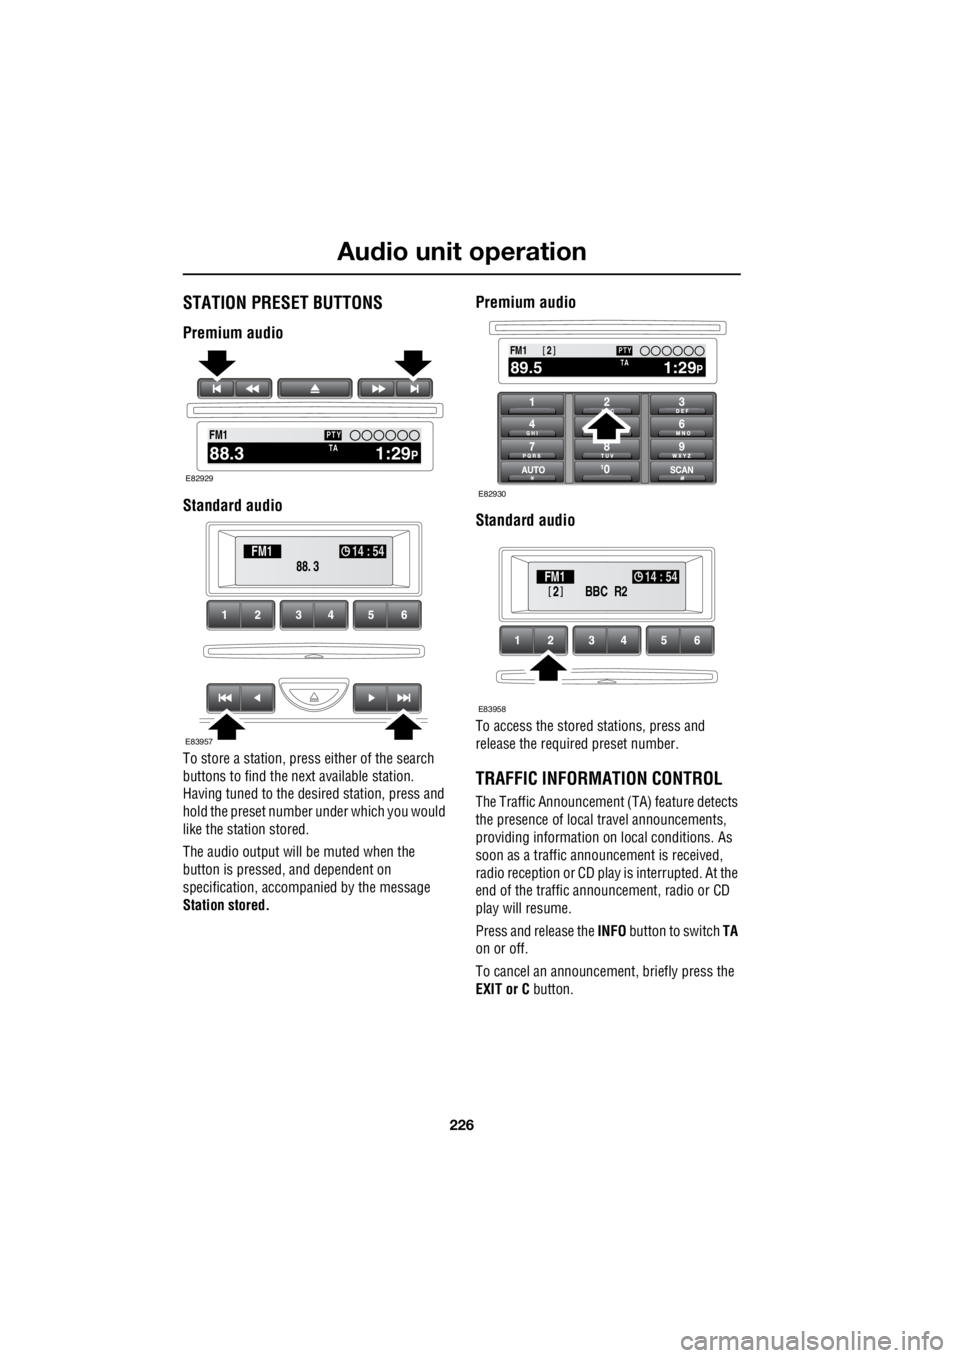
To store a station, press either of the search
buttons to find the next available station.
Having tuned to the desi red station, press and
hold the preset number under which you would
like the station stored.
The audio output will be muted when the
button is pressed, and dependent on
specification, accompanied by the message
Station stored.
Premium audio
Standard audio
To access the stored stations, press and
release the required preset number.
TRAFFIC INFORMATION CONTROL
The Traffic Announcement (TA) feature detects
the presence of local travel announcements,
providing information on local conditions. As
soon as a traffic announcement is received,
radio reception or CD play is interrupted. At the
end of the traffic announcement, radio or CD
play will resume.
Press and release the INFO button to switch TA
on or off.
To cancel an announcement, briefly press the
EXIT or C button.
2100.71234 6
NEWS
FM1
1:29PTA88.3
PTY
E82929
88. 3
FM1
14 : 54
E83957
100.71234 6
NEWS
FM1
1:29PTA89.5
PTY2
E82930
BBC R2
2FM1 14 : 54
E83958
Page 2953 of 3229
233
Audio unit menus
R
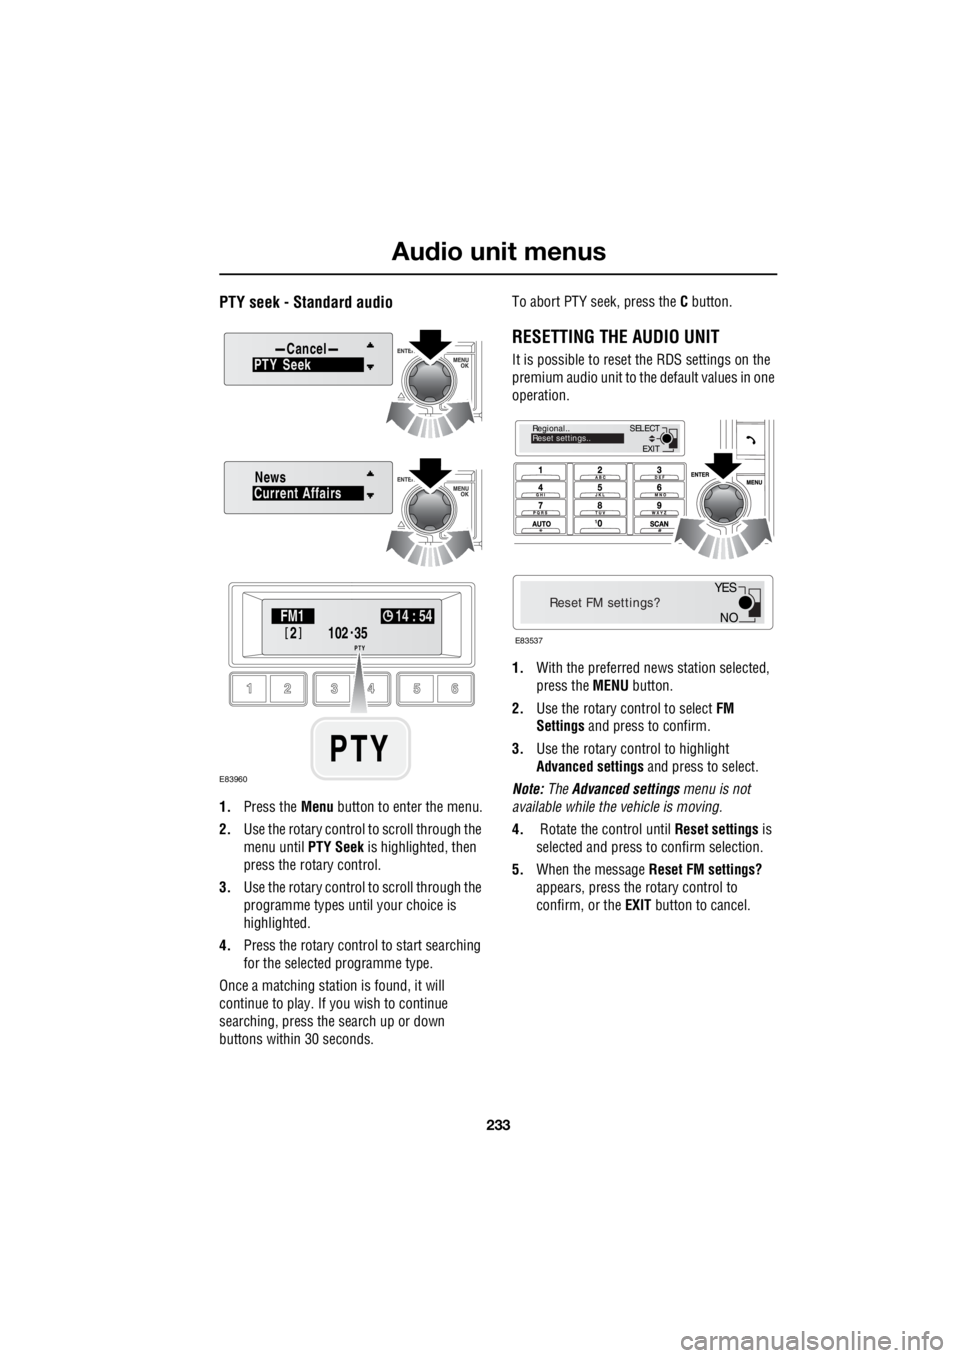
PTY seek - Standard audio
1. Press the Menu button to enter the menu.
2. Use the rotary control to scroll through the
menu until PTY Seek is highlighted, then
press the rotary control.
3. Use the rotary control to scroll through the
programme types until your choice is
highlighted.
4. Press the rotary control to start searching
for the selected programme type.
Once a matching station is found, it will
continue to play. If you wish to continue
searching, press the search up or down
buttons within 30 seconds. To abort PTY seek, press the
C button.
RESETTING THE AUDIO UNIT
It is possible to reset the RDS settings on the
premium audio unit to the default values in one
operation.
1. With the preferred news station selected,
press the MENU button.
2. Use the rotary control to select FM
Settings and press to confirm.
3. Use the rotary control to highlight
Advanced settings and press to select.
Note: The Advanced settings menu is not
available while the vehicle is moving.
4. Rotate the control until Reset settings is
selected and press to confirm selection.
5. When the message Reset FM settings?
appears, press the rotary control to
confirm, or the EXIT button to cancel.PTY CancelSeek
Current AffairsNews
102
.
2
FM1 14 : 54
PTY35
PTY
E83960
EXIT
SELECT
Regional..
Reset settings..
Reset FM settings?
E83537
NO
YES