Page 5028 of 5621

SUNROOF
RF-15
C
D
E
F
G
H
J
K
L
MA
B
RF
Revision: 2006 January2006 M35/M45
Terminals and Reference Value for BCMNIS0023T
Terminals and Reference Value for Sunroof Motor AssemblyNIS0023U
Te r m i -
nalWire
colorItem ConditionVoltage (V)
(Approx.)
12 P Front door switch (passenger side)OPEN (ON) 0
CLOSE (OFF) Battery voltage
38 W Power source (IGN) Ignition switch (ON or START) position Battery voltage
42 P Power source (Fuse) — Battery voltage
52 B Ground (power) — 0
53 BR RAP signalIgnition switch ON Battery voltage
Within 45 seconds after ignition switch is turned to
OFF positionBattery voltage
When driver side or passenger side door is opened
during retained power operation.0
54 O Power window power supply (BAT) — Battery voltage
55 W Power source (Fusible link) — Battery voltage
62 V Front door switch (driver side)OPEN (ON) 0
CLOSE (OFF) Battery voltage
Te r m i -
nalWire
colorItem ConditionVoltage (V)
(Approx.)
1 O BAT power supply (BCM) — Battery voltage
4LGSunroof (TILT DOWN/SLIDE
OPEN) switch signalIgnition switch ON and sunroof switch in
TILT DOWN / SLIDE OPEN position0
Other than above Battery voltage
6YRAP signalIgnition switch ON Battery voltage
Within 45 seconds after ignition switch is turned to
OFF positionBattery voltage
When driver side or passenger side door is opened
during retained power operation.0
8 B Ground — 0
9 Y Sunroof switch ground — 0
11 LSunroof (TILT UP/SLIDE CLOSE)
switch signalIgnition switch ON and sunroof switch in
TILT UP / SLIDE CLOSE position0
Other than above Battery voltage
Page 5029 of 5621
RF-16
SUNROOF
Revision: 2006 January2006 M35/M45
CONSULT-II Function (BCM)NIS0023V
CONSULT-II can display each diagnostic item using the diagnostic test modes shown following.
1. Turn ignition switch “ON”.
2. Connect “CONSULT-II and CONSULT-II CONVERTER” to the
data link connector (1).
3. Turn ignition switch “ON”.
4. Touch “START (NISSAN BASED VHCL)”.
5. Touch “BCM”.
If “BCM” is not indicated, go to GI-40, "
CONSULT-II Data Link
Connector (DLC) Circuit" .
6. Touch “RETAINED PWR”.
BCM diagnostic test item Check item diagnostic test mode Content
RETAINED PWRWork support Changes setting of each function.
Data monitor Displays the input data of BCM in real time.
Active test Gives a drive signal to a load to check the operation.
PBIB2712E
BCIA0029E
BCIA0030E
LIIA0163E
Page 5030 of 5621
SUNROOF
RF-17
C
D
E
F
G
H
J
K
L
MA
B
RF
Revision: 2006 January2006 M35/M45
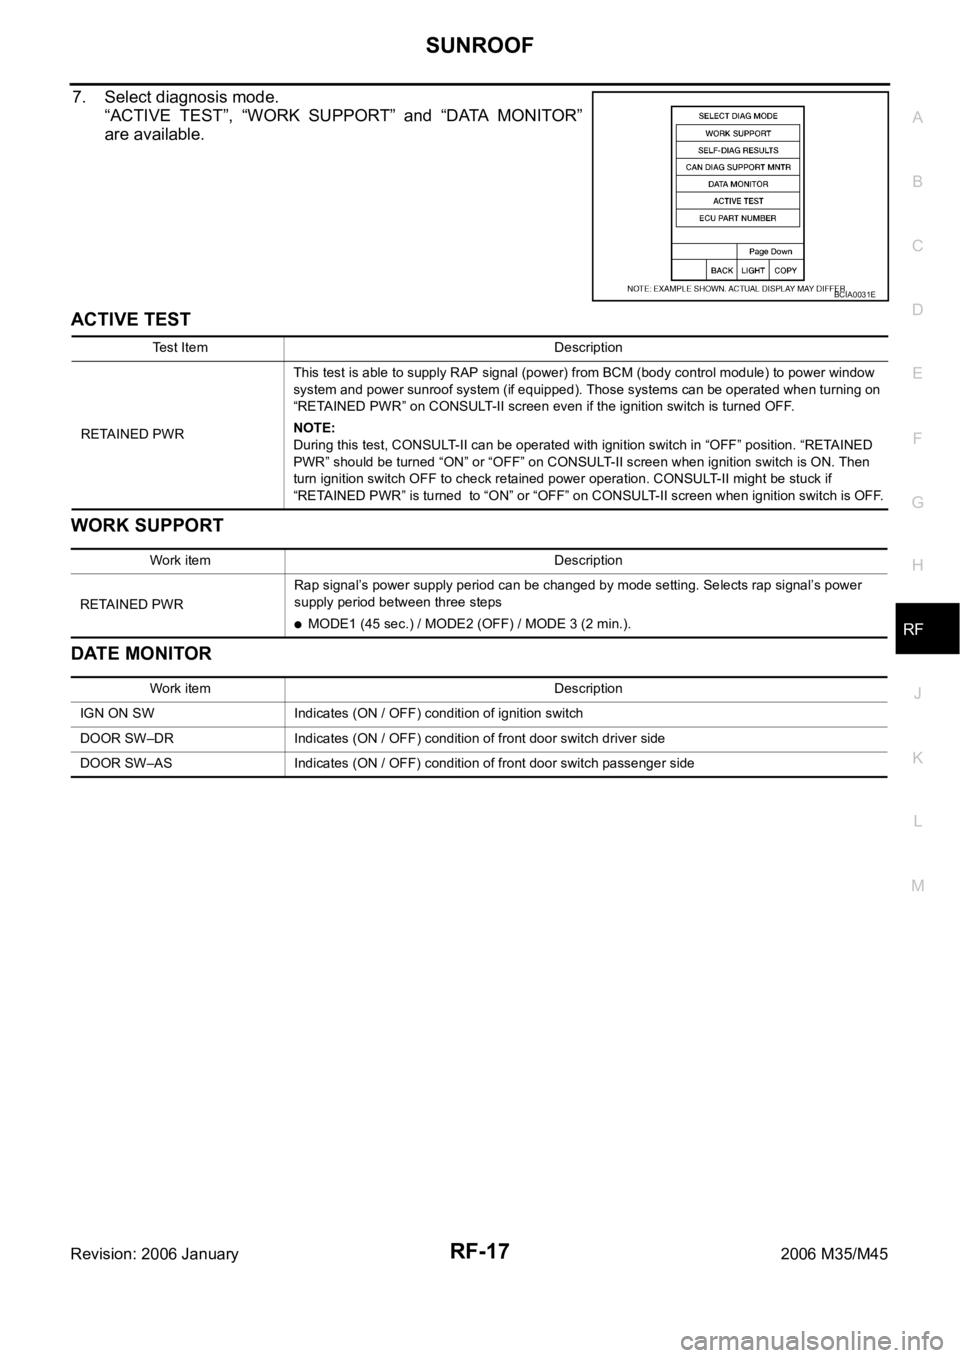
7. Select diagnosis mode.
“ACTIVE TEST”, “WORK SUPPORT” and “DATA MONITOR”
are available.
ACTIVE TEST
WORK SUPPORT
DATE MONITOR
BCIA0031E
Test Item Description
RETAINED PWRThis test is able to supply RAP signal (power) from BCM (body control module) to power window
system and power sunroof system (if equipped). Those systems can be operated when turning on
“RETAINED PWR” on CONSULT-II screen even if the ignition switch is turned OFF.
NOTE:
During this test, CONSULT-II can be operated with ignition switch in “OFF” position. “RETAINED
PWR” should be turned “ON” or “OFF” on CONSULT-II screen when ignition switch is ON. Then
turn ignition switch OFF to check retained power operation. CONSULT-II might be stuck if
“RETAINED PWR” is turned to “ON” or “OFF” on CONSULT-II screen when ignition switch is OFF.
Work item Description
RETAINED PWRRap signal’s power supply period can be changed by mode setting. Selects rap signal’s power
supply period between three steps
MODE1 (45 sec.) / MODE2 (OFF) / MODE 3 (2 min.).
Work item Description
IGN ON SW Indicates (ON / OFF) condition of ignition switch
DOOR SW–DR Indicates (ON / OFF) condition of front door switch driver side
DOOR SW–AS Indicates (ON / OFF) condition of front door switch passenger side
Page 5033 of 5621
RF-20
SUNROOF
Revision: 2006 January2006 M35/M45
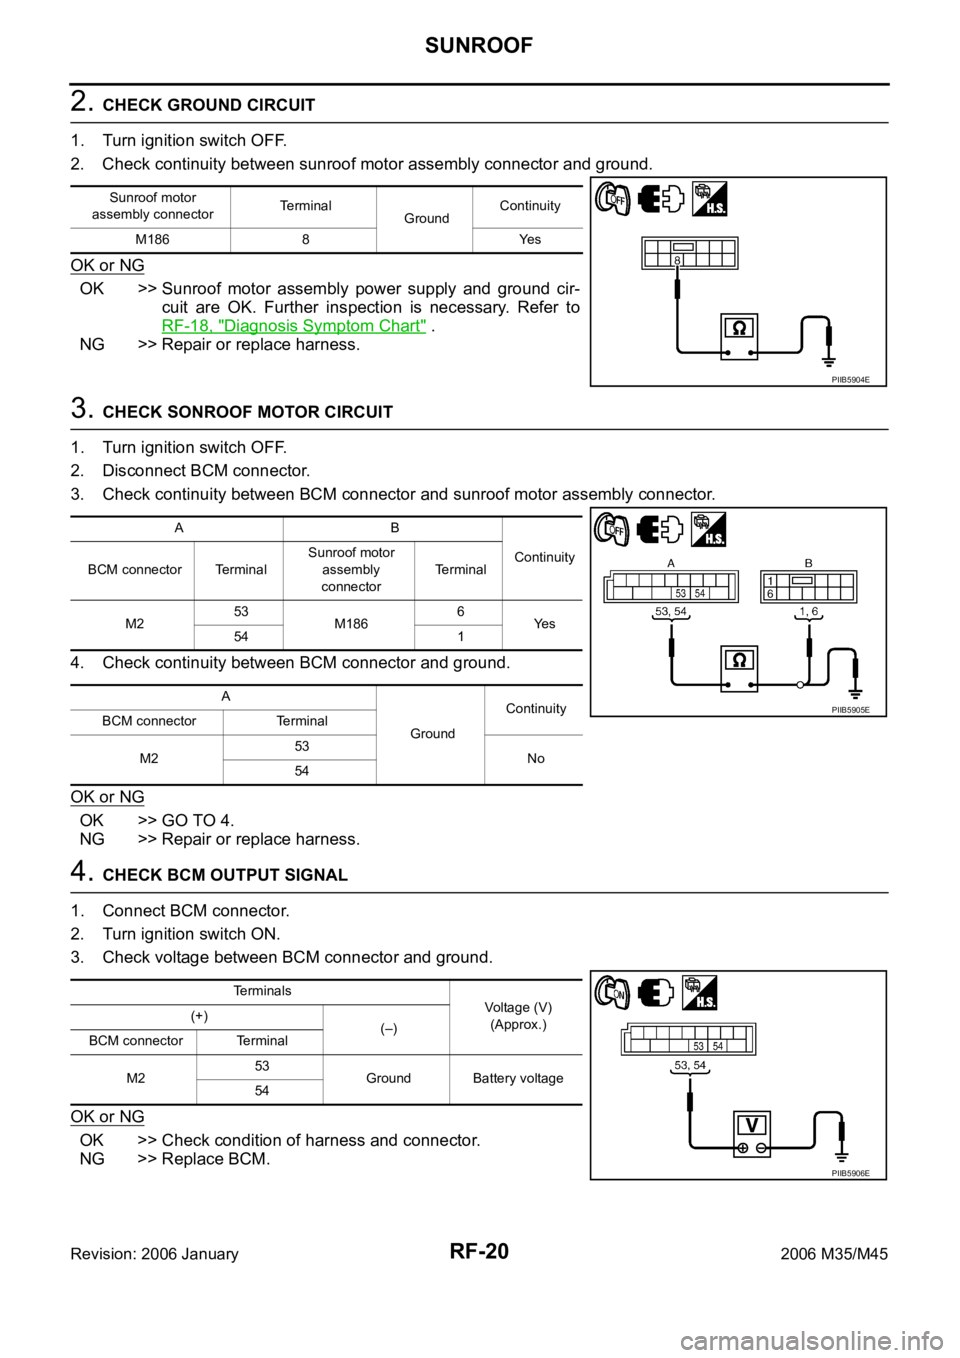
2. CHECK GROUND CIRCUIT
1. Turn ignition switch OFF.
2. Check continuity between sunroof motor assembly connector and ground.
OK or NG
OK >> Sunroof motor assembly power supply and ground cir-
cuit are OK. Further inspection is necessary. Refer to
RF-18, "
Diagnosis Symptom Chart" .
NG >> Repair or replace harness.
3. CHECK SONROOF MOTOR CIRCUIT
1. Turn ignition switch OFF.
2. Disconnect BCM connector.
3. Check continuity between BCM connector and sunroof motor assembly connector.
4. Check continuity between BCM connector and ground.
OK or NG
OK >> GO TO 4.
NG >> Repair or replace harness.
4. CHECK BCM OUTPUT SIGNAL
1. Connect BCM connector.
2. Turn ignition switch ON.
3. Check voltage between BCM connector and ground.
OK or NG
OK >> Check condition of harness and connector.
NG >> Replace BCM.
Sunroof motor
assembly connectorTerminal
GroundContinuity
M186 8 Yes
PIIB5904E
AB
Continuity
BCM connector TerminalSunroof motor
assembly
connectorTerminal
M253
M1866
Ye s
54 1
A
GroundContinuity
BCM connector Terminal
M253
No
54
PIIB5905E
Terminals
Voltage (V)
(Approx.) (+)
(–)
BCM connector Terminal
M253
Ground Battery voltage
54
PIIB5906E
Page 5034 of 5621
SUNROOF
RF-21
C
D
E
F
G
H
J
K
L
MA
B
RF
Revision: 2006 January2006 M35/M45
Sunroof Switch CheckNIS00240
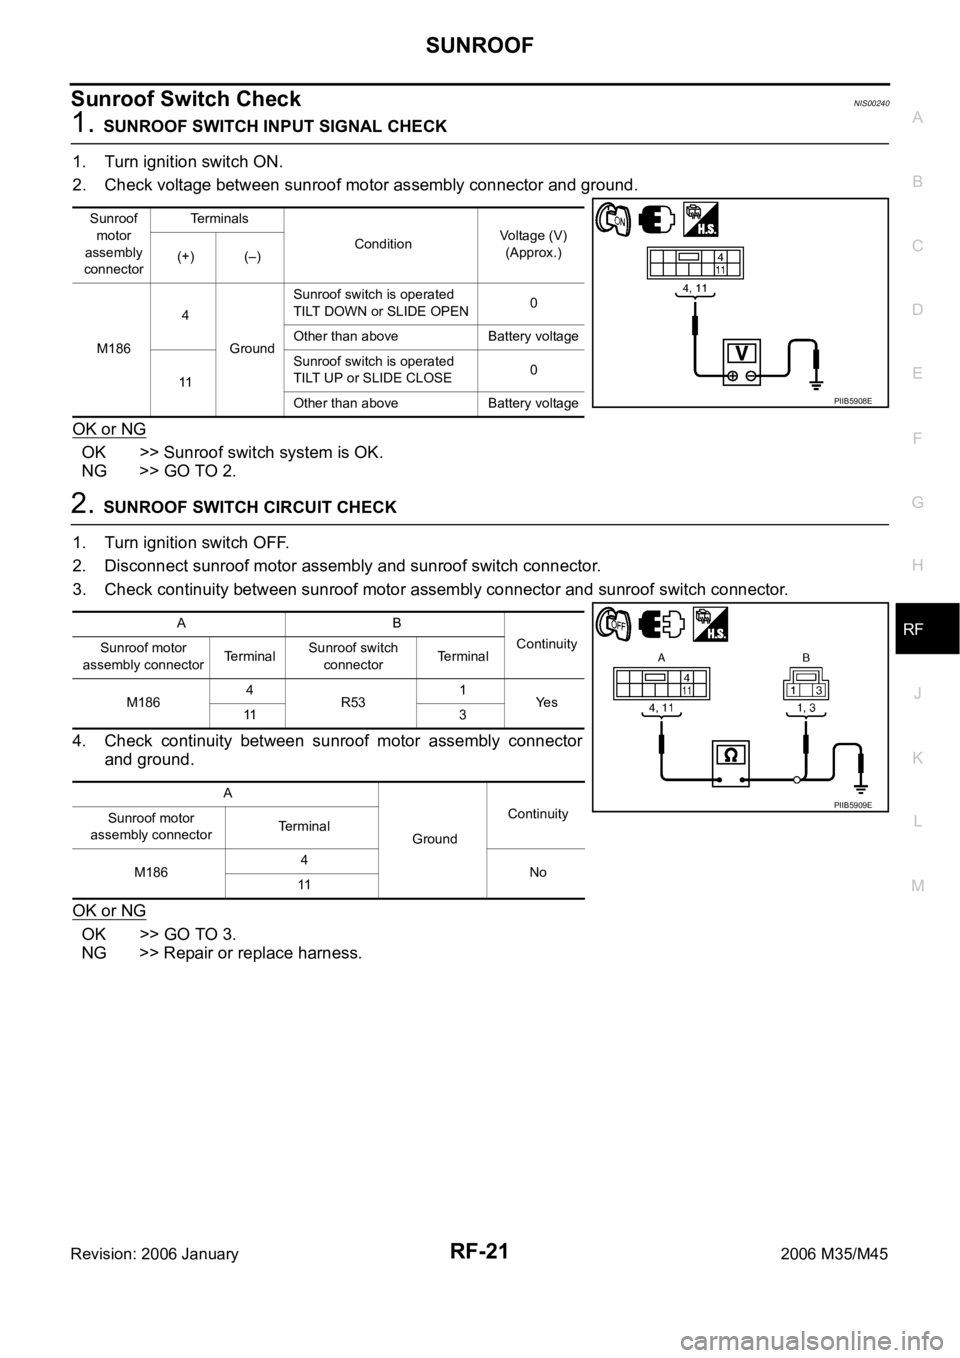
1. SUNROOF SWITCH INPUT SIGNAL CHECK
1. Turn ignition switch ON.
2. Check voltage between sunroof motor assembly connector and ground.
OK or NG
OK >> Sunroof switch system is OK.
NG >> GO TO 2.
2. SUNROOF SWITCH CIRCUIT CHECK
1. Turn ignition switch OFF.
2. Disconnect sunroof motor assembly and sunroof switch connector.
3. Check continuity between sunroof motor assembly connector and sunroof switch connector.
4. Check continuity between sunroof motor assembly connector
and ground.
OK or NG
OK >> GO TO 3.
NG >> Repair or replace harness.
Sunroof
motor
assembly
connectorTerminals
ConditionVoltage (V)
(Approx.)
(+) (–)
M1864
GroundSunroof switch is operated
TILT DOWN or SLIDE OPEN0
Other than above Battery voltage
11Sunroof switch is operated
TILT UP or SLIDE CLOSE0
Other than above Battery voltage
PIIB5908E
AB
Continuity
Sunroof motor
assembly connectorTerminalSunroof switch
connectorTerminal
M1864
R531
Ye s
11 3
A
GroundContinuity
Sunroof motor
assembly connectorTerminal
M1864
No
11
PIIB5909E
Page 5036 of 5621
SUNROOF
RF-23
C
D
E
F
G
H
J
K
L
MA
B
RF
Revision: 2006 January2006 M35/M45
Door Switch Check NIS00241
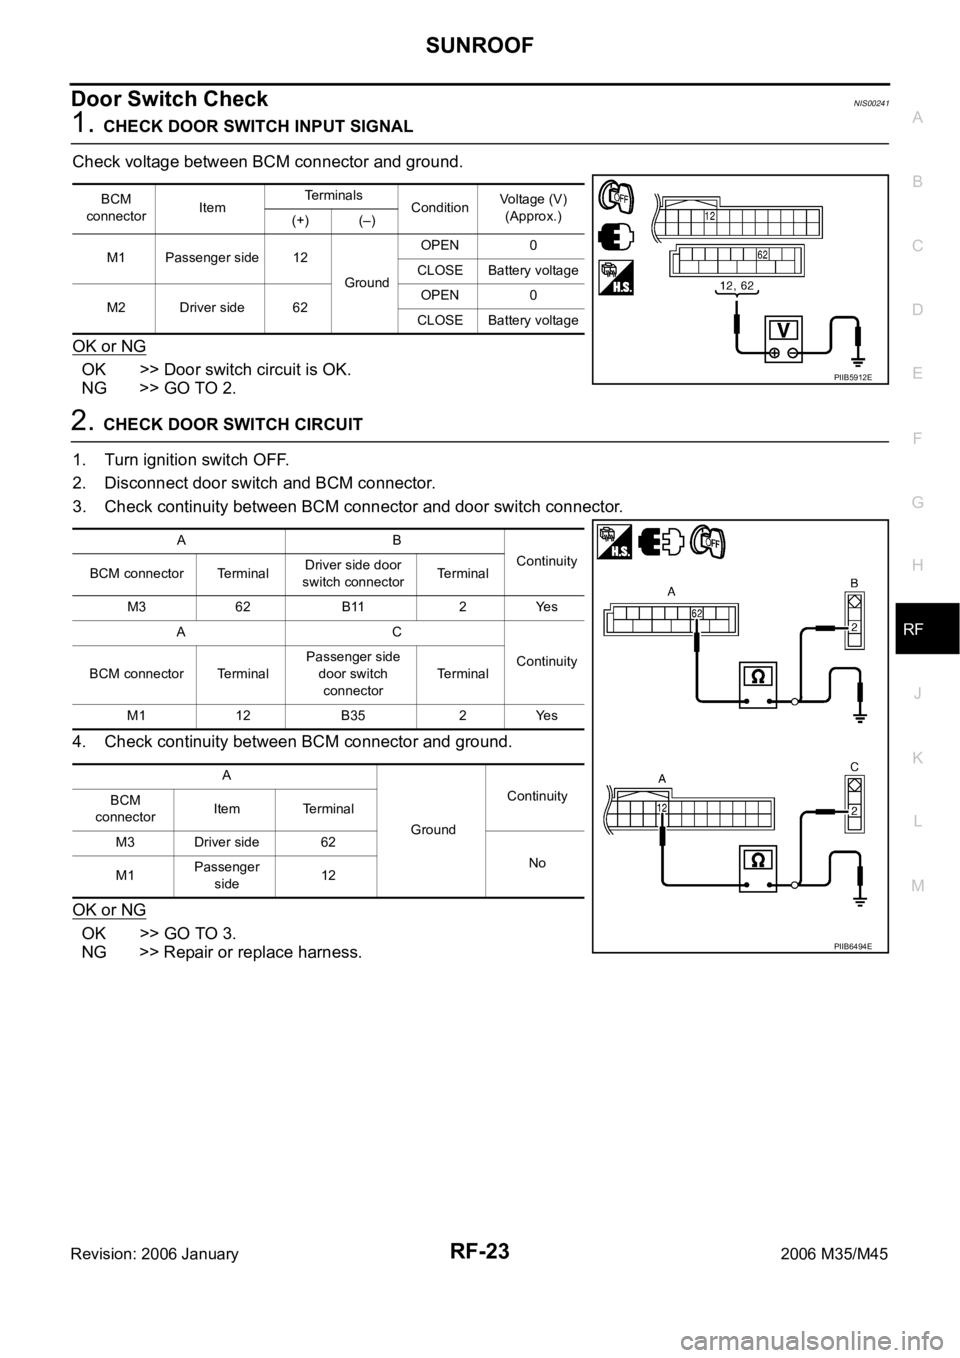
1. CHECK DOOR SWITCH INPUT SIGNAL
Check voltage between BCM connector and ground.
OK or NG
OK >> Door switch circuit is OK.
NG >> GO TO 2.
2. CHECK DOOR SWITCH CIRCUIT
1. Turn ignition switch OFF.
2. Disconnect door switch and BCM connector.
3. Check continuity between BCM connector and door switch connector.
4. Check continuity between BCM connector and ground.
OK or NG
OK >> GO TO 3.
NG >> Repair or replace harness.
BCM
connectorItemTe r m i n a l s
ConditionVoltage (V)
(Approx.)
(+) (–)
M1 Passenger side 12
GroundOPEN 0
CLOSE Battery voltage
M2 Driver side 62OPEN 0
CLOSE Battery voltage
PIIB5912E
AB
Continuity
BCM connector TerminalDriver side door
switch connectorTerminal
M3 62 B11 2 Yes
AC
Continuity
BCM connector TerminalPassenger side
door switch
connectorTerminal
M1 12 B35 2 Yes
A
GroundContinuity
BCM
connectorItem Terminal
M3 Driver side 62
No
M1Passenger
side12
PIIB6494E
Page 5118 of 5621
PRE-CRASH SEAT BELT
SB-19
C
D
E
F
G
I
J
K
L
MA
B
SB
Revision: 2006 January2006 M35/M45
Seat Belt Buckle Switch (Driver Side) Circuit CheckNHS0008B
1. CHECK PRE-CRASH SEAT BELT CONTROL UNIT INPUT SIGNAL
With CONSULT-II
Select “SB SW LH SIG” on DATA MONITOR screen, and then make sure that ON/OFF display changes syn-
chronized with the insertion operation to the seat belt buckle.
Without CONSULT-II
1. Turn the ignition switch ON.
2. Check voltage between seat belt buckle switch (driver side) har-
ness connector and ground.
OK or NG
OK >> Seat belt buckle switch (driver side) circuit is OK.
NG >> GO TO 2.SB SW LH SIG
When driver seat belt is not fastened : OFF
When driver seat belt is fastened : ON
PHIA0765E
Terminal
ConditionVoltage (V)
(Approx.) (+)
(–) Seat belt buckle
switch connector
(driver side)Te r m i n a l
B203 1 GroundWhen seat belt is
unfastened0
When seat belt is
fastenedBattery
voltage
PHIA1129E
Page 5120 of 5621
PRE-CRASH SEAT BELT
SB-21
C
D
E
F
G
I
J
K
L
MA
B
SB
Revision: 2006 January2006 M35/M45
Seat Belt Buckle Switch (Passenger Side) Circuit CheckNHS0008C
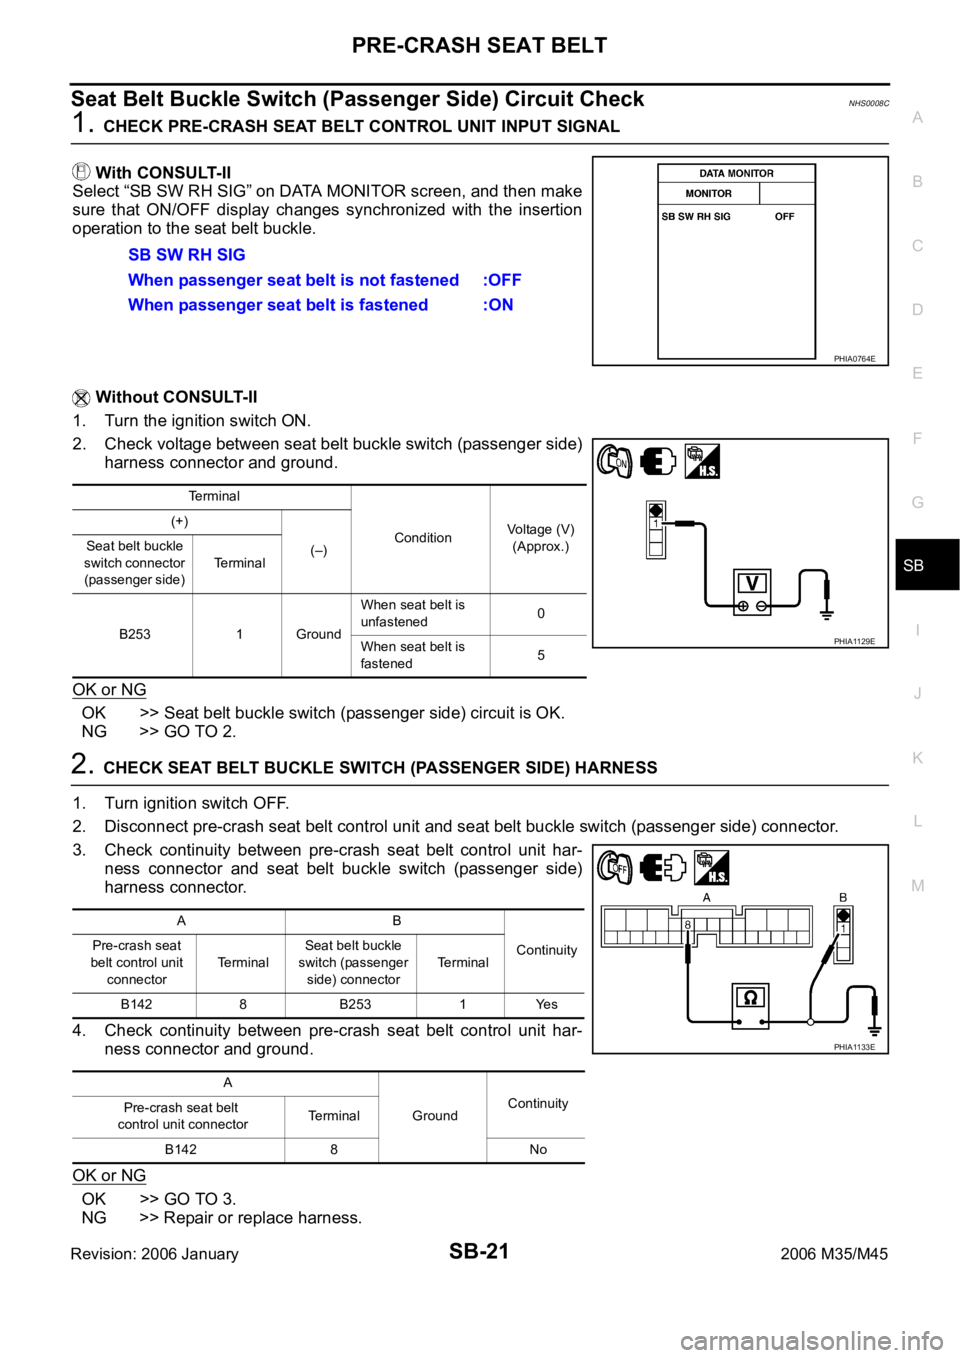
1. CHECK PRE-CRASH SEAT BELT CONTROL UNIT INPUT SIGNAL
With CONSULT-II
Select “SB SW RH SIG” on DATA MONITOR screen, and then make
sure that ON/OFF display changes synchronized with the insertion
operation to the seat belt buckle.
Without CONSULT-II
1. Turn the ignition switch ON.
2. Check voltage between seat belt buckle switch (passenger side)
harness connector and ground.
OK or NG
OK >> Seat belt buckle switch (passenger side) circuit is OK.
NG >> GO TO 2.
2. CHECK SEAT BELT BUCKLE SWITCH (PASSENGER SIDE) HARNESS
1. Turn ignition switch OFF.
2. Disconnect pre-crash seat belt control unit and seat belt buckle switch (passenger side) connector.
3. Check continuity between pre-crash seat belt control unit har-
ness connector and seat belt buckle switch (passenger side)
harness connector.
4. Check continuity between pre-crash seat belt control unit har-
ness connector and ground.
OK or NG
OK >> GO TO 3.
NG >> Repair or replace harness.SB SW RH SIG
When passenger seat belt is not fastened :OFF
When passenger seat belt is fastened :ON
PHIA0764E
Terminal
ConditionVoltage (V)
(Approx.) (+)
(–) Seat belt buckle
switch connector
(passenger side) Te r m i n a l
B253 1 GroundWhen seat belt is
unfastened0
When seat belt is
fastened5
PHIA1129E
AB
Continuity Pre-crash seat
belt control unit
connectorTerminalSeat belt buckle
switch (passenger
side) connectorTerminal
B142 8 B253 1 Yes
A
GroundContinuity
Pre-crash seat belt
control unit connectorTerminal
B142 8 No
PHIA1133E