2006 INFINITI M35 height adjustment
[x] Cancel search: height adjustmentPage 4430 of 5621

LT-3
C
D
E
F
G
H
I
J
L
MA
B
LT
Revision: 2006 January2006 M35/M45 OUTLINE ...........................................................136
AFS OPERATION .............................................137
HEADLAMP AUTO AIMING OPERATION ........139
CAN COMMUNICATION SYSTEM DESCRIP-
TION ..................................................................139
CAN COMMUNICATION UNIT .........................139
Component Parts Description ..............................140
AFS CONTROL UNIT .......................................140
SWIVEL ACTUATOR ........................................140
AIMING MOTOR ...............................................140
AFS SWITCH ....................................................141
HEIGHT SENSOR ............................................141
STEERING ANGLE SENSOR ..........................141
IPDM E/R ..........................................................141
ECM ..................................................................141
TCM ..................................................................141
UNIFIED METER AND A/C AMP. .....................141
COMBINATION METER ...................................141
Schematic ............................................................142
Wiring Diagram — AFS — ...................................143
Terminals and Reference Values for AFS Control
Unit .......................................................................149
How to Proceed with Trouble Diagnosis ..............151
Preliminary Check ................................................151
CONSULT-II Function (ADAPTIVE LIGHT) ..........152
CONSULT-II BASIC OPERATION .....................152
WORK SUPPORT (STEERING ANGLE SEN-
SOR ADJUSTMENT) ........................................153
WORK SUPPORT (LEVELIZER ADJUSTMENT)
.153
SELF-DIAG RESULTS ......................................154
DATA MONITOR ...............................................158
ACTIVE TEST ...................................................160
Symptom Chart ....................................................161
DTC B2503 SWIVEL ACTUATOR RH .................162
DTC B2504 SWIVEL ACTUATOR LH ..................168
DTC B2514 HI SEN UNUSUAL RR .....................174
DTC B2521 ECU CIRC ........................................178
AFS Operation Check (Function Test) .................181
Auto Aiming Operation Check (Function Test) .....183
AFS Switch Does Not Operate .............................185
Auto Aiming Does Not Operate (Check Aiming
Motor System Circuit) ..........................................
.187
AFS OFF Indicator Does Not Operate .................190
Removal and Installation of Steering Angle Sensor .190
Removal and Installation of Front Combination
Lamp ....................................................................190
Removal and Installation of AFS Control Unit ......191
REMOVAL ........................................................
.191
INSTALLATION .................................................191
Removal and Installation of AFS Switch ..............191
REMOVAL ........................................................
.191
INSTALLATION .................................................191
Removal and Installation of Height Sensor ..........192
REMOVAL ........................................................
.192
INSTALLATION .................................................192
FRONT FOG LAMP ................................................193
Component Parts and Harness Connector Location .193
System Description ..............................................193OUTLINE ...........................................................194
COMBINATION SWITCH READING FUNCTION .195
EXTERIOR LAMP BATTERY SAVER CONTROL .195
CAN Communication System Description ............195
CAN Communication Unit .....................................195
Schematic .............................................................196
Wiring Diagram — F/FOG — ................................197
Terminals and Reference Values for BCM ............201
Terminals and Reference Values for IPDM E/R ....202
How to Perform Trouble Diagnoses .....................202
Preliminary Check ................................................202
CHECK POWER SUPPLY AND GROUND CIR-
CUIT ..................................................................202
CONSULT-II Functions (BCM) ..............................203
CONSULT-II Functions (IPDM E/R) ......................203
Front Fog Lamps Do Not Illuminate (Both Sides) . 204
Front Fog Lamp Does Not Illuminate (One Side) . 207
Front Fog Lamps Do Not Turn OFF ......................208
Aiming Adjustment ................................................209
Bulb Replacement ................................................210
Removal and Installation ......................................210
REMOVAL ........................................................
.210
INSTALLATION .................................................210
TURN SIGNAL AND HAZARD WARNING LAMPS .211
Component Parts and Harness Connector Location .211
System Description ...............................................211
TURN SIGNAL OPERATION ............................211
HAZARD LAMP OPERATION ...........................212
COMBINATION SWITCH READING FUNCTION .213
CAN Communication System Description ............213
CAN Communication Unit .....................................213
Schematic .............................................................214
Wiring Diagram — TURN — .................................215
Terminals and Reference Values for BCM ............219
How to Perform Trouble Diagnoses .....................220
Preliminary Check ................................................221
CHECK POWER SUPPLY AND GROUND CIR-
CUIT ..................................................................221
CONSULT-II Functions (BCM) ..............................223
CONSULT-II BASIC OPERATION .....................223
DATA MONITOR ...............................................224
ACTIVE TEST ...................................................224
Turn Signal Lamp Does Not Operate ...................225
H a z a r d W a r n i n g L a m p D o e s N o t O p e r a t e B u t T u r n
Signal Lamp Operate ............................................227
Turn Signal Indicator Lamp Does Not Operate ....228
Bulb Replacement/Removal and Installation of Side
Turn Signal Lamp .................................................229
REMOVAL ........................................................
.229
INSTALLATION .................................................229
Bulb Replacement (Front Turn Signal Lamp) .......229
Bulb Replacement (Rear Turn Signal Lamp) ........229
Removal and Installation of Front Turn Signal Lamp .229
Removal and Installation of Rear Turn Signal Lamp .229
LIGHTING AND TURN SIGNAL SWITCH ..............230
Removal and Installation ......................................230
REMOVAL ........................................................
.230
INSTALLATION .................................................230
Switch Circuit Inspection ......................................230
Page 4580 of 5621

ACTIVE AFS
LT-153
C
D
E
F
G
H
I
J
L
MA
B
LT
Revision: 2006 January2006 M35/M45
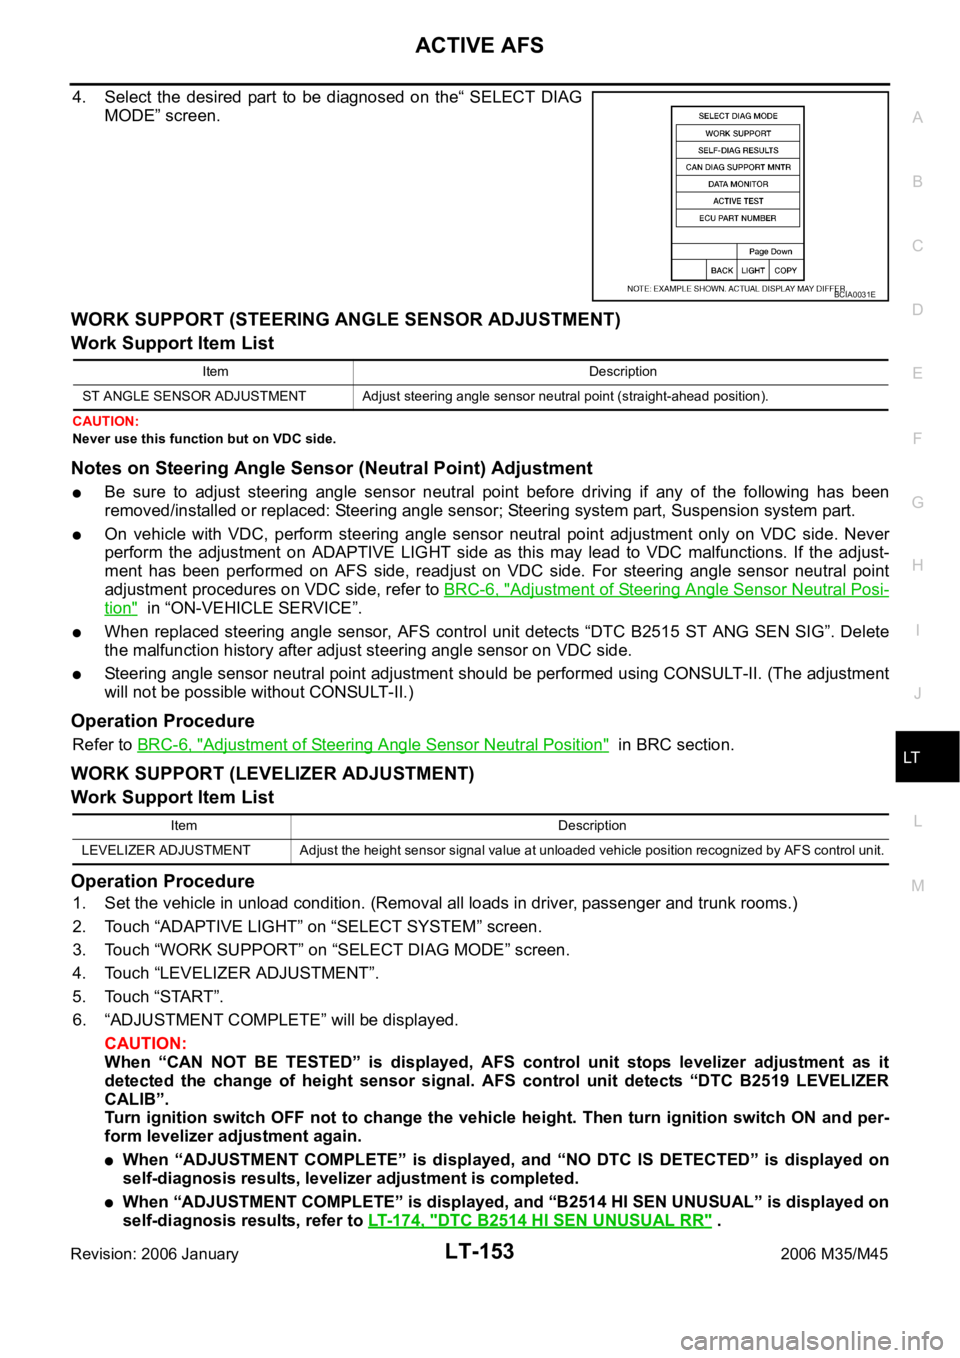
4. Select the desired part to be diagnosed on the“ SELECT DIAG
MODE” screen.
WORK SUPPORT (STEERING ANGLE SENSOR ADJUSTMENT)
Work Support Item List
CAUTION:
Never use this function but on VDC side.
Notes on Steering Angle Sensor (Neutral Point) Adjustment
Be sure to adjust steering angle sensor neutral point before driving if any of the following has been
removed/installed or replaced: Steering angle sensor; Steering system part, Suspension system part.
On vehicle with VDC, perform steering angle sensor neutral point adjustment only on VDC side. Never
perform the adjustment on ADAPTIVE LIGHT side as this may lead to VDC malfunctions. If the adjust-
ment has been performed on AFS side, readjust on VDC side. For steering angle sensor neutral point
adjustment procedures on VDC side, refer to BRC-6, "
Adjustment of Steering Angle Sensor Neutral Posi-
tion" in “ON-VEHICLE SERVICE”.
When replaced steering angle sensor, AFS control unit detects “DTC B2515 ST ANG SEN SIG”. Delete
the malfunction history after adjust steering angle sensor on VDC side.
Steering angle sensor neutral point adjustment should be performed using CONSULT-II. (The adjustment
will not be possible without CONSULT-II.)
Operation Procedure
Refer to BRC-6, "Adjustment of Steering Angle Sensor Neutral Position" in BRC section.
WORK SUPPORT (LEVELIZER ADJUSTMENT)
Work Support Item List
Operation Procedure
1. Set the vehicle in unload condition. (Removal all loads in driver, passenger and trunk rooms.)
2. Touch “ADAPTIVE LIGHT” on “SELECT SYSTEM” screen.
3. Touch “WORK SUPPORT” on “SELECT DIAG MODE” screen.
4. Touch “LEVELIZER ADJUSTMENT”.
5. Touch “START”.
6. “ADJUSTMENT COMPLETE” will be displayed.
CAUTION:
When “CAN NOT BE TESTED” is displayed, AFS control unit stops levelizer adjustment as it
detected the change of height sensor signal. AFS control unit detects “DTC B2519 LEVELIZER
CALIB”.
Turn ignition switch OFF not to change the vehicle height. Then turn ignition switch ON and per-
form levelizer adjustment again.
When “ADJUSTMENT COMPLETE” is displayed, and “NO DTC IS DETECTED” is displayed on
self-diagnosis results, levelizer adjustment is completed.
When “ADJUSTMENT COMPLETE” is displayed, and “B2514 HI SEN UNUSUAL” is displayed on
self-diagnosis results, refer to LT-174, "
DTC B2514 HI SEN UNUSUAL RR" .
BCIA0031E
Item Description
ST ANGLE SENSOR ADJUSTMENT Adjust steering angle sensor neutral point (straight-ahead position).
Item Description
LEVELIZER ADJUSTMENT Adjust the height sensor signal value at unloaded vehicle position recognized by AFS control unit.
Page 4583 of 5621
![INFINITI M35 2006 Factory Service Manual LT-156
ACTIVE AFS
Revision: 2006 January2006 M35/M45
ST ANG
SEN SIG
[B2515]Any of several statuses belowCannot receive steering angle sensor signal.
Receives steering angle sensor error.
Receives ste INFINITI M35 2006 Factory Service Manual LT-156
ACTIVE AFS
Revision: 2006 January2006 M35/M45
ST ANG
SEN SIG
[B2515]Any of several statuses belowCannot receive steering angle sensor signal.
Receives steering angle sensor error.
Receives ste](/manual-img/42/57023/w960_57023-4582.png)
LT-156
ACTIVE AFS
Revision: 2006 January2006 M35/M45
ST ANG
SEN SIG
[B2515]Any of several statuses belowCannot receive steering angle sensor signal.
Receives steering angle sensor error.
Receives steering angle sensor signal except 943 to +943.1. Back to the initial position.
2. Normal operation
3. Flash at intervals of approx. 1
second when keeping error state
for 2 seconds or longer.
4. Turn ignition switch OFF.BRC-23, "
Self-
Diagnosis" in
BRC section.
If above sys-
tem is normal,
replace AFS
control unit.
SHIFT SIG
[P, R]
[B2516]Cannot receive A/T position indicator signal.1. Back to the initial position.
2. Normal operation
3. Flash at intervals of approx. 1
second when keeping error state
for 2 seconds or longer.
4. Turn ignition switch OFF.AT- 9 2 , "
SELF-
DIAGNOSTIC
RESULT
MODE" in A/T
section.
If above sys-
tem is normal,
replace AFS
control unit.
VEHICLE
SPEED SIG
[B2517]Cannot receive vehicle speed signal.1. Back to the initial position.
2. Stop when the malfunction
occurred.
3. Flash at intervals of approx. 1
second when keeping error state
for 2 seconds or longer.
4. Turn ignition switch OFF.DI-32, "
SELF-
DIAG
RESULTS" in
DI section.
If above sys-
tem is normal,
replace AFS
control unit.
HEAD
LAMP SIG
[B2518]Cannot receive low beam status signal.1. Back to the initial position.
2. Stop aiming motors when the
malfunction occurred.
3. Flash at intervals of approx. 1
second when keeping error state
for 2 seconds or longer.
4. Turn ignition switch OFF.PG-21,
"SELF-DIAG
RESULTS" in
PG section.
If above sys-
tem is normal,
replace AFS
control unit.
LEVEL-
IZER CALIB
[B2519]Cannot recognize height sensor signal value at unloaded vehicle
position.1. Normal operation
2. Stop aiming motors when the
malfunction occurred.
3. Remains OFF.
4. When levelizer adjustment is
completedLT- 1 5 3 ,
"WORK SUP-
PORT (LEV-
ELIZER
ADJUST-
MENT)"
ST ANGLE
SEN CALIB
[B2520]Cannot recognize steering angle sensor neutral point (straight-
ahead position).1. Back to the initial position.
2. Normal operation
3. Flash at intervals of approx. 1
second when keeping error state
for 2 seconds or longer.
4. When steering angle sensor
adjustment is completedBRC-6,
"Adjustment of
Steering Angle
Sensor Neu-
tral Position"
in BRC sec-
tion. Details of
error
indication
detected by
CONSULT-
IIConditions of error detectionFail-safe
1. Swivel operation
2. Auto aiming operation
3. AFS OFF indicator operation
4. CancellationReference
Page 4610 of 5621

ACTIVE AFS
LT-183
C
D
E
F
G
H
I
J
L
MA
B
LT
Revision: 2006 January2006 M35/M45
Auto Aiming Operation Check (Function Test)NKS003QT
1. CHECK AIMING MOTOR
1. Start engine and turn lighting switch to 2ND position.
2. Select “ADAPTIVE LIGHT” on CONSULT-II. Select “ACTIVE
TEST” on “SELECT DIAG MODE” screen.
3. Select “LEVELIZER TEST” on “SELECT TEST ITEM” screen.
4. Touch “ORIGIN” and “PEAK” screen.
5. Make sure of auto aiming operation.
OK or NG
OK >> GO TO 2.
NG >>
When interference or poor fitment is found, perform aiming adjustment. Refer to LT- 7 4 , "Aiming
Adjustment" . If it is normal, replace headlamp. Refer to LT- 1 9 0 , "Removal and Installation of
Front Combination Lamp" .
When the operation range is irregular, perform aiming adjustment. Refer to LT- 7 4 , "Aiming
Adjustment" . If it is normal, GO TO 4.
2. PERFORM STATE LEVELIZER ADJUSTMENT 1
Check “LEV ACTR VLTG” in “Data Monitor” with unloaded vehicle
position. (Remove all loads in driver, passenger and trunk rooms.)
OK or NG
OK >> GO TO 3.
NG >> Perform LEVELIZER ADJUSTMENT. Refer to LT- 1 5 3 ,
"WORK SUPPORT (LEVELIZER ADJUSTMENT)" .
3. PERFORM STATE LEVELIZER ADJUSTMENT 2
Check if “LEV ACTR VLTG” changes approx. 3 seconds after lower-
ing vehicle height as low as approx.
0.5V from the value of “HI SEN
OTP RR” in “Data Monitor” at unloaded vehicle position. (Remove all
loads in driver, passenger and trunk rooms.)
OK or NG
OK >> GO TO 4.
NG >> Perform LEVELIZER ADJUSTMENT. Refer to LT- 1 5 3 ,
"WORK SUPPORT (LEVELIZER ADJUSTMENT)" .
SKIB4796E
TEST ITEM ORIGIN PEAK (Reference value)Light axis range at 10 m (394.7 in) off
(Reference value)
LEVELIZER TEST Light axis angle 0
Light axis angle approx. 2.5Approx. 450 mm (17.7 in)
TEST ITEM Unloaded vehicle position
LEV ACTR VLTG Approx. 70%
SKIB4793E
SKIB4793E
Page 4611 of 5621

LT-184
ACTIVE AFS
Revision: 2006 January2006 M35/M45
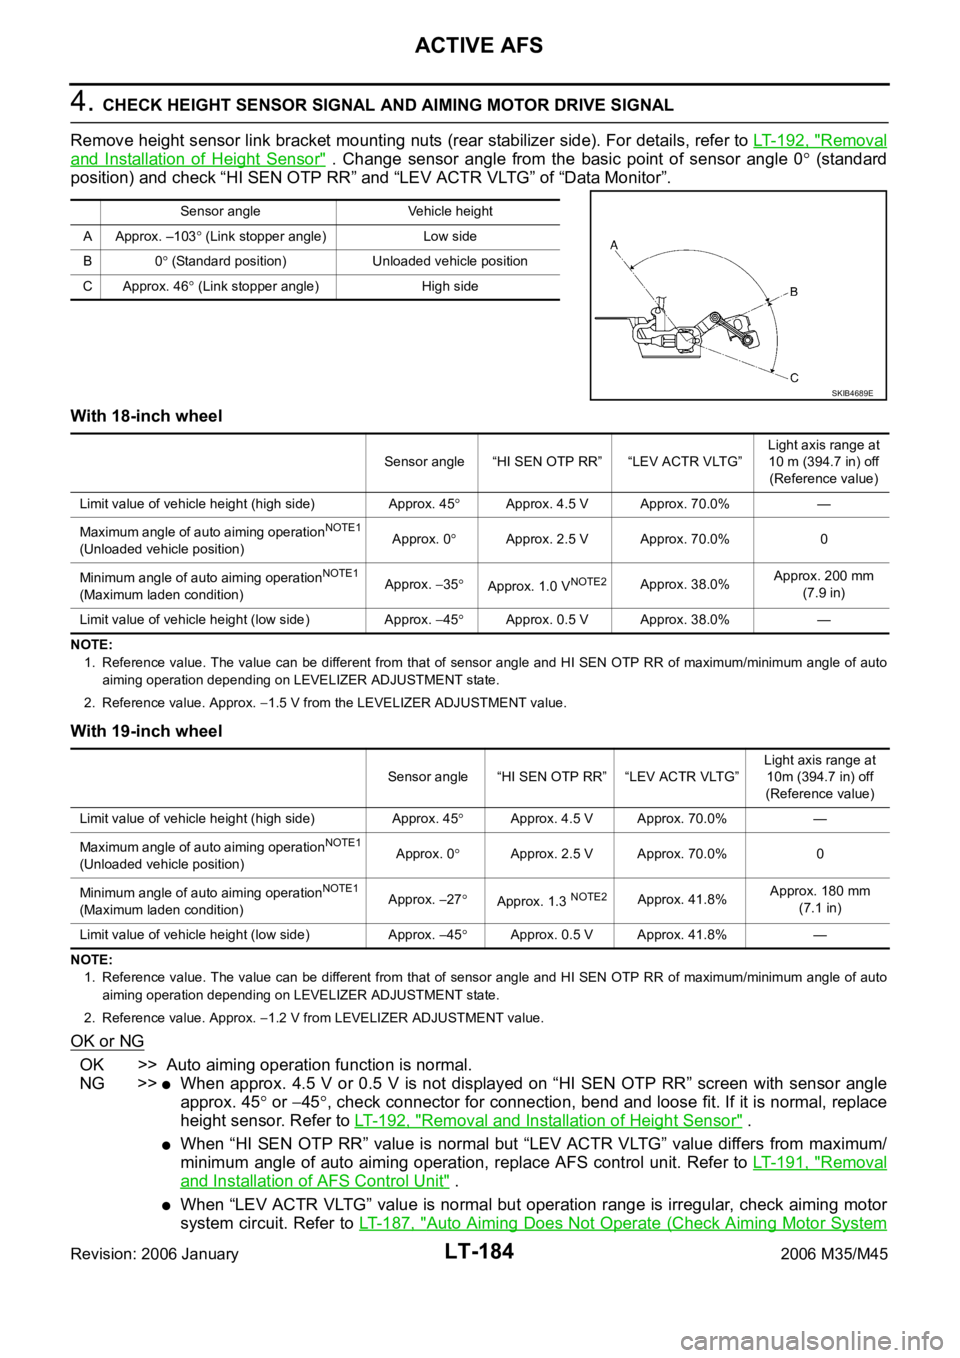
4. CHECK HEIGHT SENSOR SIGNAL AND AIMING MOTOR DRIVE SIGNAL
Remove height sensor link bracket mounting nuts (rear stabilizer side). For details, refer to LT- 1 9 2 , "
Removal
and Installation of Height Sensor" . Change sensor angle from the basic point of sensor angle 0 (standard
position) and check “HI SEN OTP RR” and “LEV ACTR VLTG” of “Data Monitor”.
With 18-inch wheel
NOTE:
1. Reference value. The value can be different from that of sensor angle and HI SEN OTP RR of maximum/minimum angle of auto
aiming operation depending on LEVELIZER ADJUSTMENT state.
2. Reference value. Approx.
1.5 V from the LEVELIZER ADJUSTMENT value.
With 19-inch wheel
NOTE:
1. Reference value. The value can be different from that of sensor angle and HI SEN OTP RR of maximum/minimum angle of auto
aiming operation depending on LEVELIZER ADJUSTMENT state.
2. Reference value. Approx.
1.2 V from LEVELIZER ADJUSTMENT value.
OK or NG
OK >> Auto aiming operation function is normal.
NG >>
When approx. 4.5 V or 0.5 V is not displayed on “HI SEN OTP RR” screen with sensor angle
approx. 45
or 45, check connector for connection, bend and loose fit. If it is normal, replace
height sensor. Refer to LT- 1 9 2 , "
Removal and Installation of Height Sensor" .
When “HI SEN OTP RR” value is normal but “LEV ACTR VLTG” value differs from maximum/
minimum angle of auto aiming operation, replace AFS control unit. Refer to LT- 1 9 1 , "
Removal
and Installation of AFS Control Unit" .
When “LEV ACTR VLTG” value is normal but operation range is irregular, check aiming motor
system circuit. Refer to LT- 1 8 7 , "
Auto Aiming Does Not Operate (Check Aiming Motor System
Sensor angle Vehicle height
A Approx. –103
(Link stopper angle) Low side
B0
(Standard position) Unloaded vehicle position
C Approx. 46
(Link stopper angle) High side
SKIB4689E
Sensor angle “HI SEN OTP RR” “LEV ACTR VLTG”Light axis range at
10 m (394.7 in) off
(Reference value)
Limit value of vehicle height (high side) Approx. 45
Approx. 4.5 V Approx. 70.0% —
Maximum angle of auto aiming operation
NOTE1
(Unloaded vehicle position)Approx. 0Approx. 2.5 V Approx. 70.0% 0
Minimum angle of auto aiming operation
NOTE1
(Maximum laden condition)Approx. 35Approx. 1.0 VNOTE2Approx. 38.0%Approx. 200 mm
(7.9 in)
Limit value of vehicle height (low side) Approx.
45Approx. 0.5 V Approx. 38.0% —
Sensor angle “HI SEN OTP RR” “LEV ACTR VLTG”Light axis range at
10m (394.7 in) off
(Reference value)
Limit value of vehicle height (high side) Approx. 45
Approx. 4.5 V Approx. 70.0% —
Maximum angle of auto aiming operation
NOTE1
(Unloaded vehicle position)Approx. 0Approx. 2.5 V Approx. 70.0% 0
Minimum angle of auto aiming operation
NOTE1
(Maximum laden condition)Approx. 27Approx. 1.3 NOTE2Approx. 41.8%Approx. 180 mm
(7.1 in)
Limit value of vehicle height (low side) Approx.
45Approx. 0.5 V Approx. 41.8% —
Page 4619 of 5621

LT-192
ACTIVE AFS
Revision: 2006 January2006 M35/M45
Removal and Installation of Height SensorNKS003R1
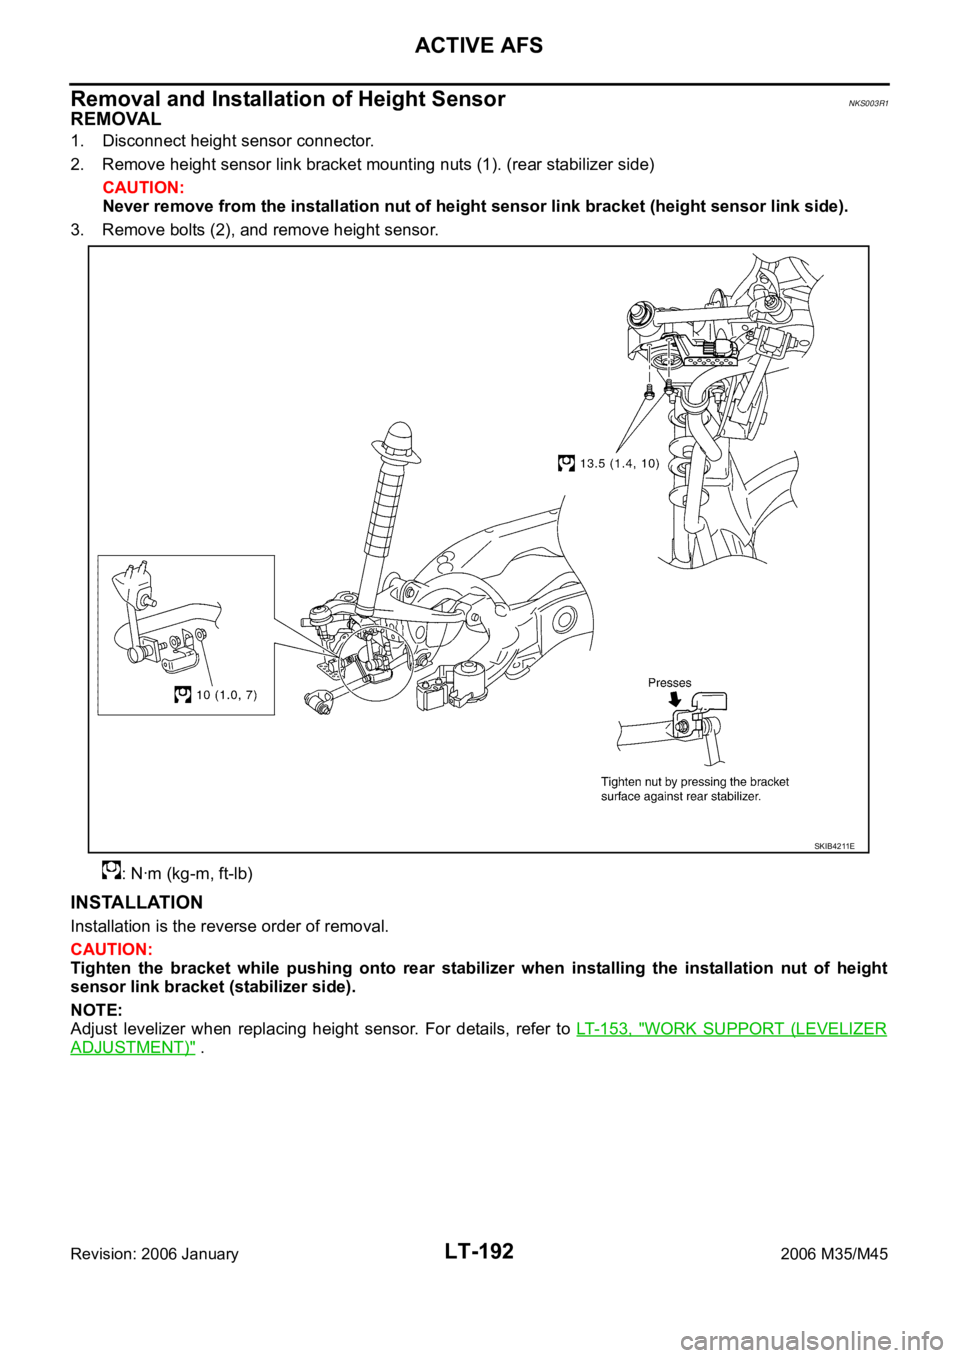
REMOVAL
1. Disconnect height sensor connector.
2. Remove height sensor link bracket mounting nuts (1). (rear stabilizer side)
CAUTION:
Never remove from the installation nut of height sensor link bracket (height sensor link side).
3. Remove bolts (2), and remove height sensor.
: Nꞏm (kg-m, ft-lb)
INSTALLATION
Installation is the reverse order of removal.
CAUTION:
Tighten the bracket while pushing onto rear stabilizer when installing the installation nut of height
sensor link bracket (stabilizer side).
NOTE:
Adjust levelizer when replacing height sensor. For details, refer to LT- 1 5 3 , "
WORK SUPPORT (LEVELIZER
ADJUSTMENT)" .
SKIB4211E
Page 5611 of 5621

WW-44
FRONT WIPER AND WASHER SYSTEM
Revision: 2006 January2006 M35/M45
DISASSEMBLY
1. Remove wiper linkage from wiper motor and motor frame.
2. Remove wiper motor mounting bolts (3), and remove wiper motor from wiper frame.
CAUTION:
Be careful not to bend linkage and not to damage the resin part of ball joint when removing wiper link-
age.
ASSEMBLY
1. Connect wiper motor connector. Turn wiper switch ON to operate wiper motor, and then turn wiper switch
OFF (auto stop).
2. Disconnect wiper motor connector.
3. Install wiper motor to wiper frame.
4. Install wiper linkage to wiper frame and wiper motor.
CAUTION:
Never drop the wiper motor or cause it to contact other parts.
Check grease conditions of the motor arm and wiper linkage joint (at retainer). Apply grease if
necessary.
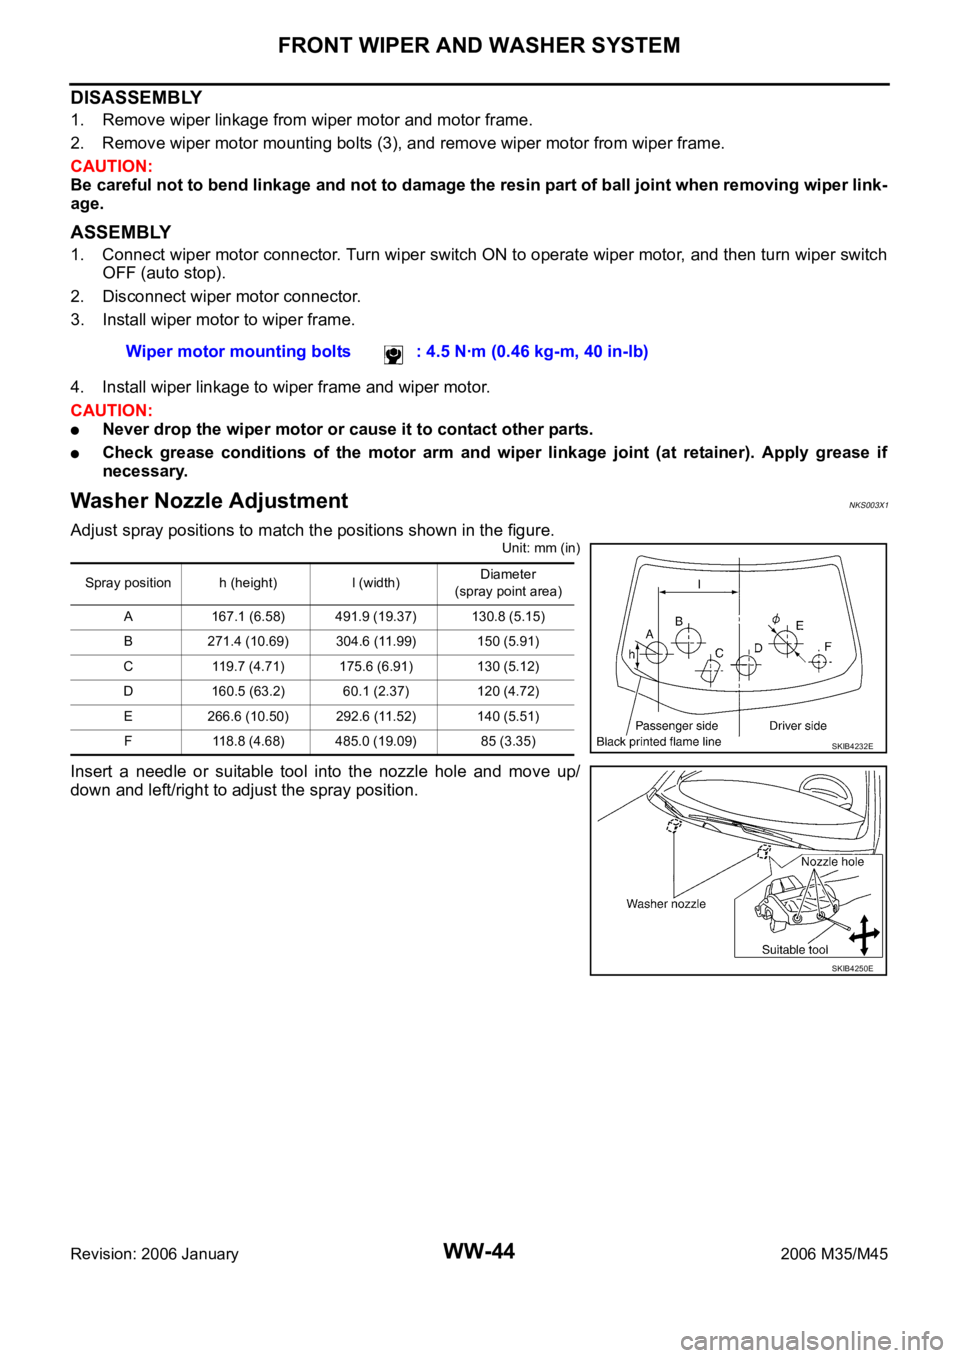
Washer Nozzle AdjustmentNKS003X1
Adjust spray positions to match the positions shown in the figure.
Unit: mm (in)
Insert a needle or suitable tool into the nozzle hole and move up/
down and left/right to adjust the spray position.Wiper motor mounting bolts : 4.5 Nꞏm (0.46 kg-m, 40 in-lb)
Spray position h (height) l (width)Diameter
(spray point area)
A 167.1 (6.58) 491.9 (19.37) 130.8 (5.15)
B 271.4 (10.69) 304.6 (11.99) 150 (5.91)
C 119.7 (4.71) 175.6 (6.91) 130 (5.12)
D 160.5 (63.2) 60.1 (2.37) 120 (4.72)
E 266.6 (10.50) 292.6 (11.52) 140 (5.51)
F 118.8 (4.68) 485.0 (19.09) 85 (3.35)
SKIB4232E
SKIB4250E